- GWT 教程
- GWT - 首頁
- GWT - 概述
- GWT - 環境設定
- GWT - 應用程式
- GWT - 建立應用程式
- GWT - 部署應用程式
- GWT - 使用 CSS 設定樣式
- GWT - 基本小部件
- GWT - 表單小部件
- GWT - 複雜小部件
- GWT - 佈局面板
- GWT - 事件處理
- GWT - 自定義小部件
- GWT - UIBinder
- GWT - RPC 通訊
- GWT - JUnit 整合
- GWT - 除錯應用程式
- GWT - 國際化
- GWT - History 類
- GWT - 書籤支援
- GWT - 日誌框架
- GWT 有用資源
- GWT - 常見問題解答
- GWT - 快速指南
- GWT - 有用資源
- GWT - 討論
GWT - DeckPanel 小部件
介紹
DeckPanel 小部件表示一個面板,該面板以“疊放”的方式顯示其所有子小部件,一次只有一個可見。它被 TabPanel 使用。
類宣告
以下是com.google.gwt.user.client.ui.DeckPanel類的宣告:
public class DeckPanel
   extends ComplexPanel
      implements HasAnimation, InsertPanel.ForIsWidget
類建構函式
| 序號 | 建構函式和說明 |
|---|---|
| 1 |
DeckPanel() DeckPanel 的建構函式。 |
類方法
| 序號 | 函式名稱和說明 |
|---|---|
| 1 |
void add(Widget w) 新增子小部件。 |
| 2 |
int getVisibleWidget() 獲取當前可見小部件的索引。 |
| 3 |
void insert(IsWidget w, int beforeIndex) |
| 4 |
void insert(Widget w, int beforeIndex) 在指定索引之前插入子小部件。 |
| 5 |
boolean isAnimationEnabled() 如果啟用了動畫,則返回 true;否則返回 false。 |
| 6 |
boolean remove(Widget w) 移除子小部件。 |
| 7 |
void setAnimationEnabled(boolean enable) 啟用或停用動畫。 |
| 8 |
void showWidget(int index) 顯示指定索引處的小部件。 |
繼承的方法
此類繼承自以下類的方法:
com.google.gwt.user.client.ui.UIObject
com.google.gwt.user.client.ui.Widget
com.google.gwt.user.client.ui.Panel
com.google.gwt.user.client.ui.ComplexPanel
java.lang.Object
DeckPanel 小部件示例
此示例將引導您完成簡單的步驟,以演示如何在 GWT 中使用 DeckPanel 小部件。按照以下步驟更新我們在GWT - 建立應用程式章節中建立的 GWT 應用程式:
| 步驟 | 說明 |
|---|---|
| 1 | 按照GWT - 建立應用程式章節中的說明,建立一個名為HelloWorld的專案,放在com.tutorialspoint包下。 |
| 2 | 修改HelloWorld.gwt.xml、HelloWorld.css、HelloWorld.html和HelloWorld.java,如下所述。其餘檔案保持不變。 |
| 3 | 編譯並執行應用程式以驗證已實現邏輯的結果。 |
以下是修改後的模組描述符src/com.tutorialspoint/HelloWorld.gwt.xml的內容。
<?xml version = "1.0" encoding = "UTF-8"?>
<module rename-to = 'helloworld'>
   <!-- Inherit the core Web Toolkit stuff.                        -->
   <inherits name = 'com.google.gwt.user.User'/>

   <!-- Inherit the default GWT style sheet.                       -->
   <inherits name = 'com.google.gwt.user.theme.clean.Clean'/>

   <!-- Specify the app entry point class.                         -->
   <entry-point class = 'com.tutorialspoint.client.HelloWorld'/>

   <!-- Specify the paths for translatable code                    -->
   <source path = 'client'/>
   <source path = 'shared'/>

</module>
以下是修改後的樣式表文件war/HelloWorld.css的內容。
body {
   text-align: center;
   font-family: verdana, sans-serif;
}

h1 {
   font-size: 2em;
   font-weight: bold;
   color: #777777;
   margin: 40px 0px 70px;
   text-align: center;
}
.deckpanel {
  border: 1px solid #BBBBBB;
  padding: 3px;
}
以下是修改後的 HTML 主機檔案war/HelloWorld.html的內容。
<html>
   <head>
      <title>Hello World</title>
      <link rel = "stylesheet" href = "HelloWorld.css"/>
      <script language = "javascript" src = "helloworld/helloworld.nocache.js">
      </script>
   </head>

   <body>
      <h1>DeckPanel Widget Demonstration</h1>
      <div id = "gwtContainer"></div>
   </body>
</html>
讓我們看一下 Java 檔案src/com.tutorialspoint/HelloWorld.java的內容,它將演示 DeckPanel 小部件的使用。
package com.tutorialspoint.client;


import com.google.gwt.core.client.EntryPoint;
import com.google.gwt.event.dom.client.ClickEvent;
import com.google.gwt.event.dom.client.ClickHandler;
import com.google.gwt.user.client.ui.Button;
import com.google.gwt.user.client.ui.DeckPanel;
import com.google.gwt.user.client.ui.HorizontalPanel;
import com.google.gwt.user.client.ui.Label;
import com.google.gwt.user.client.ui.RootPanel;
import com.google.gwt.user.client.ui.VerticalPanel;

public class HelloWorld implements EntryPoint {

   public void onModuleLoad() {
      // Create DeckPanel widget
      final DeckPanel deckPanel = new DeckPanel();
      deckPanel.setSize("300px", "120px");
      deckPanel.setStyleName("deckpanel");

      // Create lables to add to deckpanel
      Label label1 = new Label("This is first Page");
      Label label2 = new Label("This is second Page");
      Label label3 = new Label("This is third Page");

      // Add labels to deckpanel
      deckPanel.add(label1);
      deckPanel.add(label2);
      deckPanel.add(label3);

      //show first label
      deckPanel.showWidget(0);

      //create button bar
      HorizontalPanel buttonBar = new HorizontalPanel();
      buttonBar.setSpacing(5);

      // create button and add click handlers
      // show different labels on click of different buttons
      Button button1 = new Button("Page 1");
      button1.addClickHandler(new ClickHandler() {
         @Override
         public void onClick(ClickEvent event) {
            deckPanel.showWidget(0);
         }
      });

      Button button2 = new Button("Page 2");
      button2.addClickHandler(new ClickHandler() {
         @Override
         public void onClick(ClickEvent event) {
            deckPanel.showWidget(1);
         }
      });

      Button button3 = new Button("Page 3");
      button3.addClickHandler(new ClickHandler() {
         @Override
         public void onClick(ClickEvent event) {
            deckPanel.showWidget(2);
         }
      });

      buttonBar.add(button1);
      buttonBar.add(button2);
      buttonBar.add(button3);

      VerticalPanel vPanel = new VerticalPanel();
      vPanel.add(deckPanel);
      vPanel.add(buttonBar);

      // Add the widgets to the root panel.
      RootPanel.get().add(vPanel);
   }
}
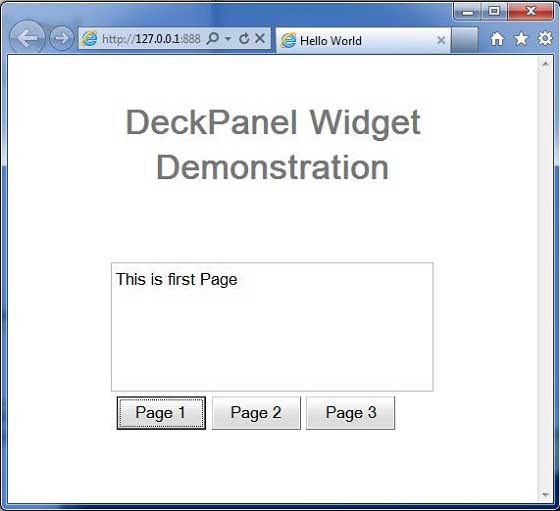
完成所有更改後,讓我們像在GWT - 建立應用程式章節中那樣,在開發模式下編譯並執行應用程式。如果應用程式一切正常,則會產生以下結果: