- DocumentDB 教程
- DocumentDB - 首頁
- DocumentDB - 簡介
- DocumentDB - 優勢
- DocumentDB - 環境設定
- DocumentDB - 建立賬戶
- DocumentDB - 連線賬戶
- DocumentDB - 建立資料庫
- DocumentDB - 列出資料庫
- DocumentDB - 刪除資料庫
- DocumentDB - 建立集合
- DocumentDB - 刪除集合
- DocumentDB - 插入文件
- DocumentDB - 查詢文件
- DocumentDB - 更新文件
- DocumentDB - 刪除文件
- DocumentDB - 資料建模
- DocumentDB - 資料型別
- DocumentDB - 限制記錄
- DocumentDB - 排序記錄
- DocumentDB - 索引記錄
- DocumentDB - 地理空間資料
- DocumentDB - 分割槽
- DocumentDB - 資料遷移
- DocumentDB - 訪問控制
- DocumentDB - 資料視覺化
- DocumentDB 有用資源
- DocumentDB - 快速指南
- DocumentDB - 有用資源
- DocumentDB - 討論
DocumentDB - 快速指南
DocumentDB - 簡介
在本章中,我們將簡要討論圍繞 NoSQL 和文件資料庫的主要概念。我們還將快速概述 DocumentDB。
NoSQL 文件資料庫
DocumentDB 是微軟最新的 NoSQL 文件資料庫,所以當你說 NoSQL 文件資料庫時,我們究竟指的是什麼?NoSQL 和文件資料庫分別是什麼?
SQL 代表結構化查詢語言,它是關係型資料庫的傳統查詢語言。SQL 通常與關係型資料庫等同。
將 NoSQL 資料庫視為非關係型資料庫更有幫助,因此 NoSQL 實際上表示非關係型。
NoSQL 資料庫有不同型別,包括:
- Azure 表儲存。
- 基於列的儲存,例如 Cassandra。
- 圖形資料庫,例如 NEO4。
- 文件資料庫,例如 MongoDB 和 Azure DocumentDB。
Azure DocumentDB
微軟於 2015 年 4 月 8 日正式釋出了 Azure DocumentDB,它當然可以被歸類為典型的 NoSQL 文件資料庫。它具有可擴充套件性,並使用無模式的 JSON 文件。
DocumentDB 是一種真正的無模式 NoSQL 文件資料庫服務,專為現代移動和 Web 應用程式而設計。
它還提供始終如一的快速讀寫、模式靈活性以及能夠根據需要輕鬆擴充套件資料庫的能力。
它不會為其索引的 JSON 文件假設或要求任何模式。
DocumentDB 會在文件新增到資料庫時自動索引文件中的每個屬性。
DocumentDB 使用 SQL 語言支援複雜的臨時查詢,並且每個文件在建立的那一刻即可立即查詢,並且您可以在文件層次結構中的任何位置搜尋任何屬性。
DocumentDB – 定價
DocumentDB 的計費基於資料庫帳戶中包含的集合數量。每個帳戶可以有一個或多個數據庫,每個資料庫可以有無限數量的集合,儘管初始預設配額為 100。可以透過聯絡 Azure 支援來取消此配額。
集合不僅是擴充套件單元,而且是成本單元,因此在 DocumentDB 中,您按集合付費,每個集合的儲存容量高達 10 GB。
至少,您需要一個 S1 集合來儲存資料庫中的文件,每月費用約為 25 美元,這將計入您的 Azure 訂閱。
隨著資料庫規模的增長並超過 10 GB,您需要購買另一個集合來容納額外的資料。
每個 S1 集合將為您提供每秒 250 個請求單位,如果這不夠,則可以將集合擴充套件到 S2 並獲得每秒 1000 個請求單位,每月約 50 美元。
您還可以將其完全擴充套件到 S3 並每月支付約 100 美元。
DocumentDB - 優勢
DocumentDB 憑藉一些非常獨特的功能脫穎而出。Azure DocumentDB 提供以下關鍵功能和優勢。
無模式
在關係型資料庫中,每個表都有一個模式,定義表中每一行必須符合的列和資料型別。
相反,文件資料庫沒有定義的模式,每個文件的結構都可以不同。
SQL 語法
DocumentDB 使用 SQL 語言支援複雜的臨時查詢,並且每個文件在建立的那一刻即可立即查詢。您可以在文件層次結構中的任何位置搜尋任何屬性。
可調一致性
它提供了一些粒度、明確定義的一致性級別,允許您在一致性、可用性和延遲之間進行合理的權衡。
您可以從四個明確定義的一致性級別中選擇,以實現一致性和效能之間的最佳權衡。對於查詢和讀取操作,DocumentDB 提供四個不同的協調級別:
- 強一致性
- 有界陳舊
- 會話一致性
- 最終一致性
彈性伸縮
可擴充套件性是 NoSQL 的核心,而 DocumentDB 則提供了這一點。DocumentDB 已經證明了其可擴充套件性。
像 Office OneNote 和 Xbox 這樣的主要服務已經由 DocumentDB 支援,資料庫包含數十 TB 的 JSON 文件,超過一百萬活躍使用者,並且始終如一地保持 99.95% 的可用性。
您可以透過建立更多單元來彈性擴充套件 DocumentDB,並獲得可預測的效能,以滿足應用程式增長的需求。
完全託管
DocumentDB 作為 Azure 上執行的完全託管的基於雲的平臺即服務提供。
您無需安裝或管理任何內容。
無需處理伺服器、電纜、作業系統或更新,也無需設定副本。
微軟會完成所有這些工作並保持服務的執行。
您只需使用瀏覽器和 Azure 訂閱,即可在幾分鐘內開始使用 DocumentDB。
DocumentDB - 環境設定
微軟提供 Visual Studio 的免費版本,其中還包含 SQL Server,您可以從 https://www.visualstudio.com 下載
安裝
步驟 1 − 下載完成後,執行安裝程式。將顯示以下對話方塊。
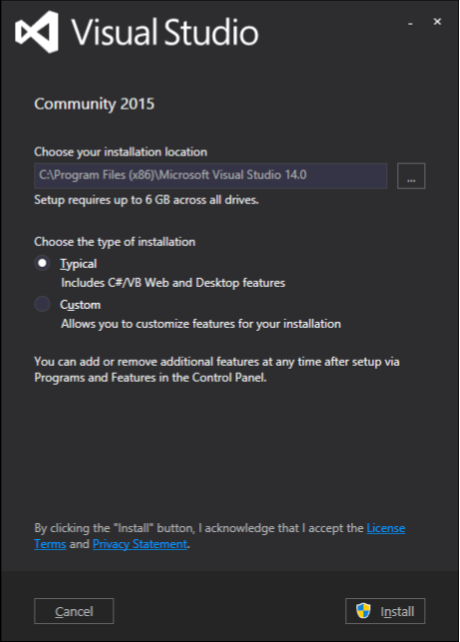
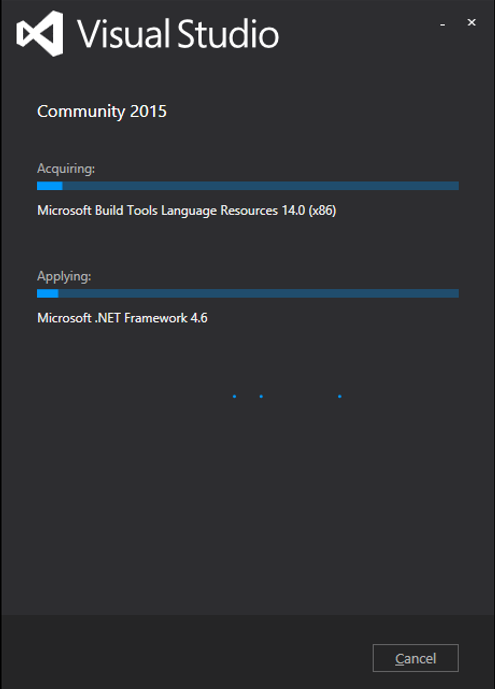
步驟 2 − 單擊“安裝”按鈕,它將啟動安裝過程。
步驟 3 − 安裝過程成功完成後,您將看到以下對話方塊。
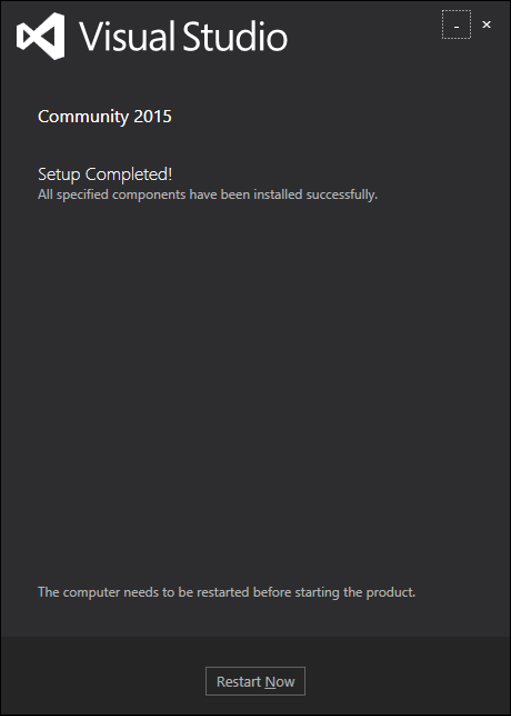
步驟 4 − 關閉此對話方塊,如果需要,重新啟動計算機。
步驟 5 − 現在從“開始”選單開啟 Visual Studio,這將開啟以下對話方塊。第一次僅需準備一段時間。
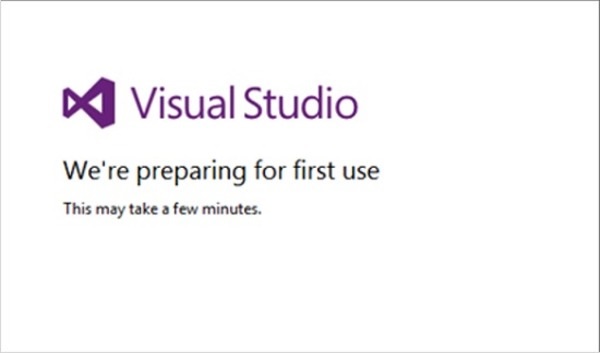
完成後,您將看到 Visual Studio 的主視窗。
步驟 6 − 讓我們從“檔案”→“新建”→“專案”建立新專案。
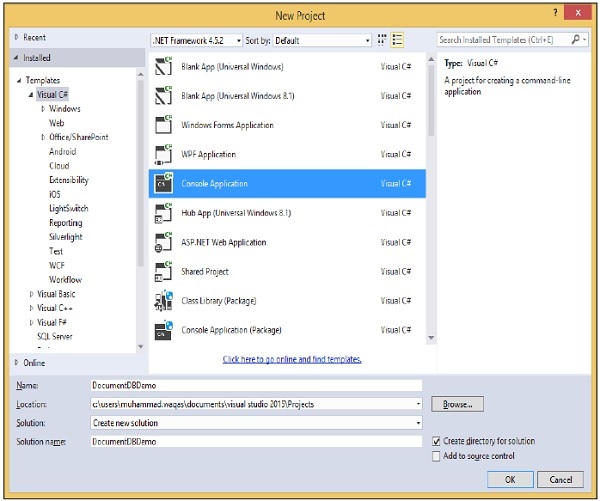
步驟 7 − 選擇“控制檯應用程式”,在“名稱”欄位中輸入 DocumentDBDemo,然後單擊“確定”按鈕。
步驟 8 − 在解決方案資源管理器中,右鍵單擊您的專案。
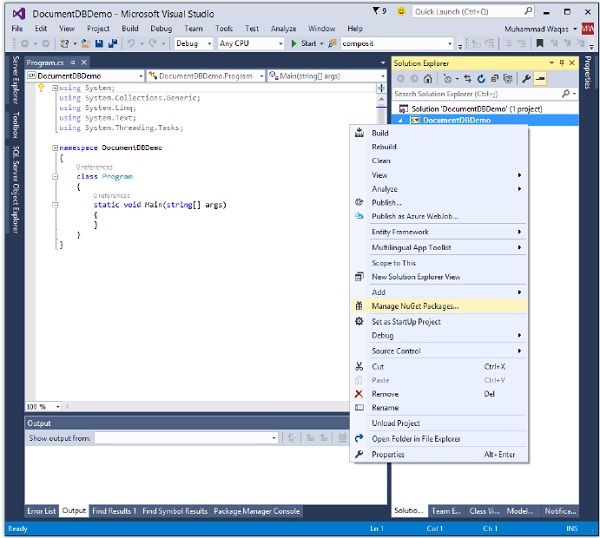
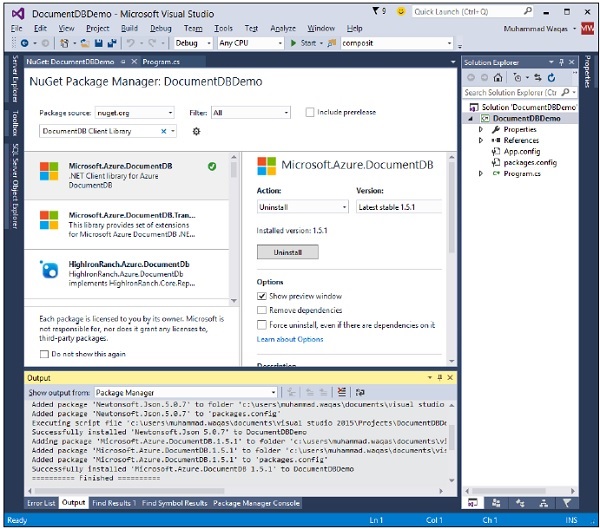
步驟 9 − 選擇“管理 NuGet 包”,這將在 Visual Studio 中開啟以下視窗,並在“搜尋聯機”輸入框中搜索 DocumentDB 客戶端庫。
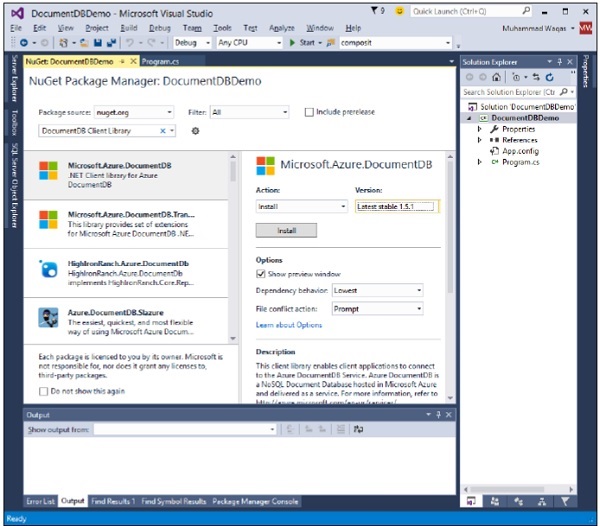
步驟 10 − 透過單擊“安裝”按鈕安裝最新版本。
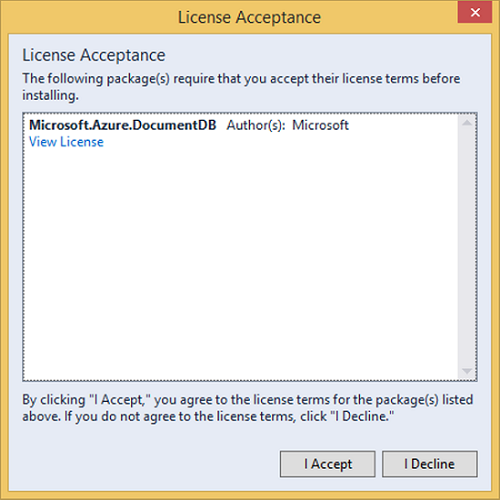
步驟 11 − 單擊“我接受”。安裝完成後,您將在輸出視窗中看到訊息。
您現在可以開始您的應用程式了。
DocumentDB - 建立賬戶
要使用 Microsoft Azure DocumentDB,您必須建立一個 DocumentDB 帳戶。在本章中,我們將使用 Azure 門戶建立一個 DocumentDB 帳戶。
步驟 1 − 如果您已有 Azure 訂閱,請登入到聯機 https://portal.azure.com,否則您需要先登入。
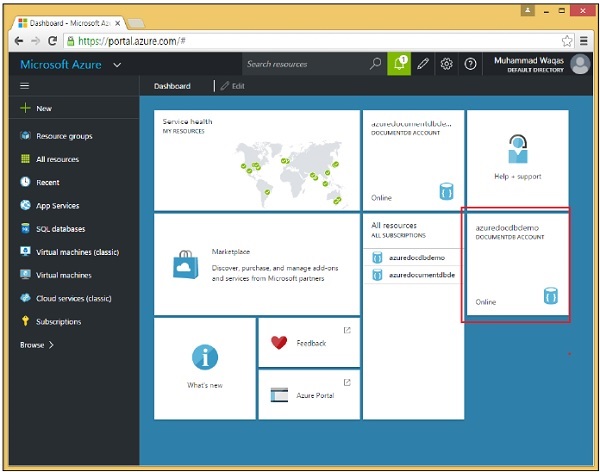
您將看到主儀表板。它是完全可自定義的,因此您可以根據需要排列這些磁貼,調整其大小,新增和刪除您經常使用或不再使用的磁貼。

步驟 2 − 選擇頁面左上側的“新建”選項。

步驟 3 − 現在選擇“資料 + 儲存”>“Azure DocumentDB”選項,您將看到以下“新建 DocumentDB 帳戶”部分。

我們需要想出一個全域性唯一的名稱(ID),它與 .documents.azure.com 組合後,就是我們 DocumentDB 帳戶的公共可訪問端點。我們在此帳戶下建立的所有資料庫都可以使用此端點透過網際網路訪問。
步驟 4 − 我們將其命名為 azuredocdbdemo,然後單擊“資源組”→“new_resource”。

步驟 5 − 選擇位置,即您希望此帳戶託管在哪個 Microsoft 資料中心。選擇位置並選擇您的區域。

步驟 6 − 選中“固定到儀表板”複選框,然後繼續單擊“建立”按鈕。

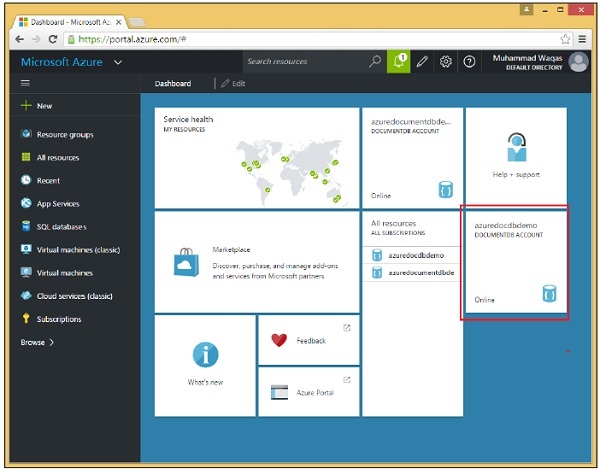
您可以看到磁貼已新增到儀表板中,並且它正在通知我們帳戶正在建立。在 DocumentDB 分配端點、預配副本並在後臺執行其他工作時,設定新帳戶實際上可能需要幾分鐘時間。
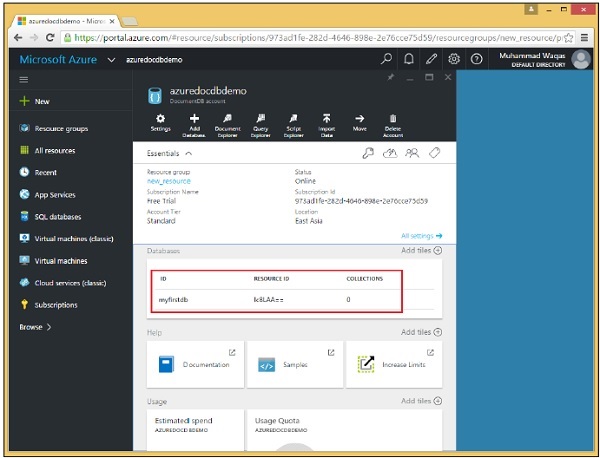
完成後,您將看到儀表板。

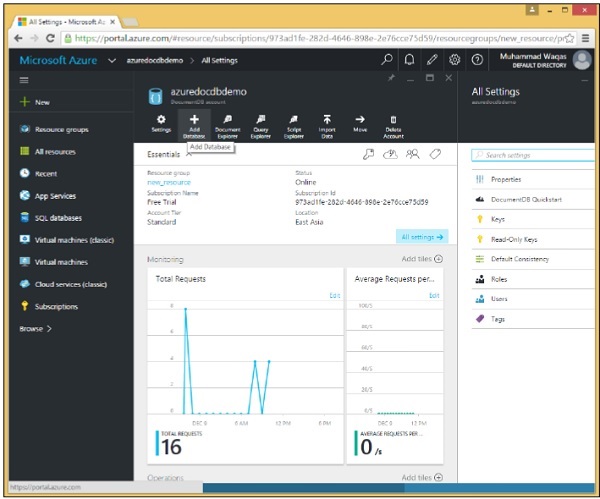
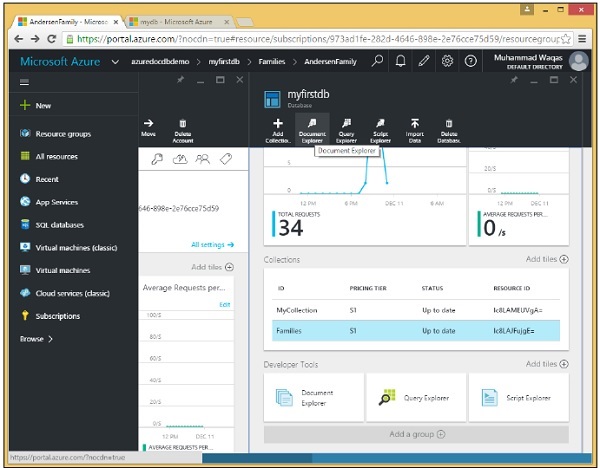
步驟 7 − 現在單擊建立的 DocumentDB 帳戶,您將看到一個詳細的螢幕,如下面的影像所示。

DocumentDB - 連線賬戶
當您開始針對 DocumentDB 進行程式設計時,第一步就是連線。因此,要連線到您的 DocumentDB 帳戶,您需要兩樣東西:
- 端點
- 授權金鑰
端點
端點是您 DocumentDB 帳戶的 URL,它透過將您的 DocumentDB 帳戶名稱與 .documents.azure.com 組合來構建。讓我們轉到儀表板。
現在,單擊建立的 DocumentDB 帳戶。您將看到如下面的影像所示的詳細資訊。
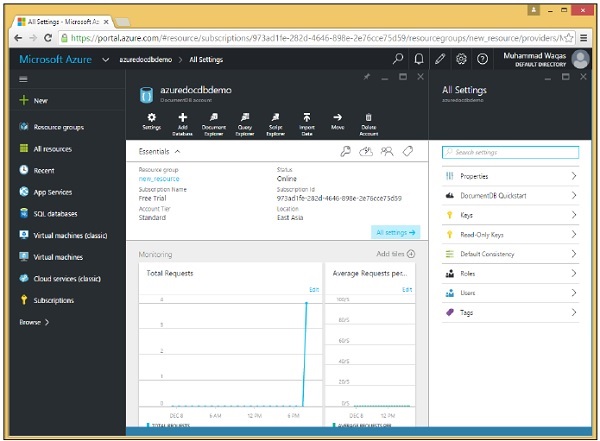
當您選擇“金鑰”選項時,它將顯示如下面的影像所示的其他資訊。您還將看到您 DocumentDB 帳戶的 URL,您可以將其用作您的端點。
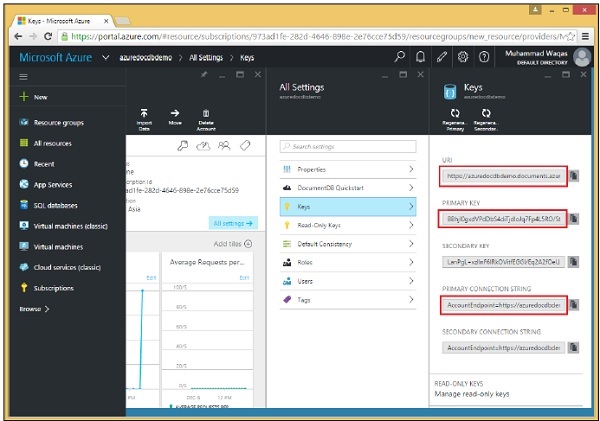
授權金鑰
授權金鑰包含您的憑據,並且有兩種型別的金鑰。主金鑰允許完全訪問帳戶中的所有資源,而資源令牌允許對特定資源進行受限訪問。
主金鑰
使用主金鑰,您幾乎可以做任何事情。如果您願意,可以使用主金鑰刪除整個資料庫。
因此,您絕對不希望共享主金鑰或將其分發到客戶端環境。作為額外的安全措施,最好經常更改它。
每個資料庫帳戶實際上有兩個主金鑰,即主金鑰和輔助金鑰,如上面的螢幕截圖中突出顯示的那樣。
資源令牌
您也可以使用資源令牌而不是主金鑰。
基於資源令牌的連線只能訪問令牌指定的資源,而不能訪問其他資源。
資源令牌基於使用者許可權,因此您首先建立一個或多個使用者,這些使用者是在資料庫級別定義的。
您根據要允許每個使用者訪問的資源,為每個使用者建立一個或多個許可權。
每個許可權都會生成一個資源令牌,該令牌允許對給定資源進行只讀或完全訪問,並且該令牌可以是資料庫中的任何使用者資源。
讓我們轉到第 3 章中建立的控制檯應用程式。
步驟 1 - 在 Program.cs 檔案中新增以下引用。
using Microsoft.Azure.Documents;
using Microsoft.Azure.Documents.Client;
using Microsoft.Azure.Documents.Linq;
using Newtonsoft.Json;
步驟 2 - 現在新增端點 URL 和授權金鑰。在本例中,我們將使用主鍵作為授權金鑰。
請注意,在您的情況下,端點 URL 和授權金鑰都應不同。
private const string EndpointUrl = "https://azuredocdbdemo.documents.azure.com:443/";
private const string AuthorizationKey =
   "BBhjI0gxdVPdDbS4diTjdloJq7Fp4L5RO/StTt6UtEufDM78qM2CtBZWbyVwFPSJIm8AcfDu2O+AfV T+TYUnBQ==";
步驟 3 - 在名為 CreateDocumentClient 的非同步任務中建立一個 DocumentClient 的新例項,並例項化新的 DocumentClient。
步驟 4 - 從您的 Main 方法呼叫您的非同步任務。
以下是迄今為止完整的 Program.cs 檔案。
using System;
using System.Collections.Generic;
using System.Linq;
using System.Text;
using System.Threading.Tasks;

using Microsoft.Azure.Documents;
using Microsoft.Azure.Documents.Client;
using Microsoft.Azure.Documents.Linq;
using Newtonsoft.Json;

namespace DocumentDBDemo {

   class Program {
      private const string EndpointUrl = "https://azuredocdbdemo.documents.azure.com:443/";

      private const string AuthorizationKey = "BBhjI0gxdVPdDbS4diTjdloJq7Fp4L5RO/
         StTt6UtEufDM78qM2CtBZWbyVwFPSJIm8AcfDu2O+AfV T+TYUnBQ==";

      static void Main(string[] args) {
         try {
            CreateDocumentClient().Wait();
         } catch (Exception e) {
            Exception baseException = e.GetBaseException();
            Console.WriteLine("Error: {0}, Message: {1}", e.Message, baseException.Message);
         }

         Console.ReadKey();
      }

      private static async Task CreateDocumentClient() {
         // Create a new instance of the DocumentClient
         var client = new DocumentClient(new Uri(EndpointUrl), AuthorizationKey);
      }

   }
}
在本節中,我們學習瞭如何連線到 DocumentDB 帳戶並建立 DocumentClient 類的例項。
DocumentDB - 建立資料庫
在本節中,我們將學習如何建立資料庫。要使用 Microsoft Azure DocumentDB,您必須擁有一個 DocumentDB 帳戶、一個數據庫、一個集合和文件。我們已經擁有一個 DocumentDB 帳戶,現在要建立資料庫,我們有兩個選項:
- Microsoft Azure 門戶或
- .Net SDK
使用 Microsoft Azure 門戶為 DocumentDB 建立資料庫
要使用門戶建立資料庫,請按照以下步驟操作。
步驟 1 - 登入到 Azure 門戶,您將看到儀表板。
步驟 2 - 現在單擊建立的 DocumentDB 帳戶,您將看到如下螢幕截圖所示的詳細資訊。
步驟 3 - 選擇“新增資料庫”選項併為您的資料庫提供 ID。
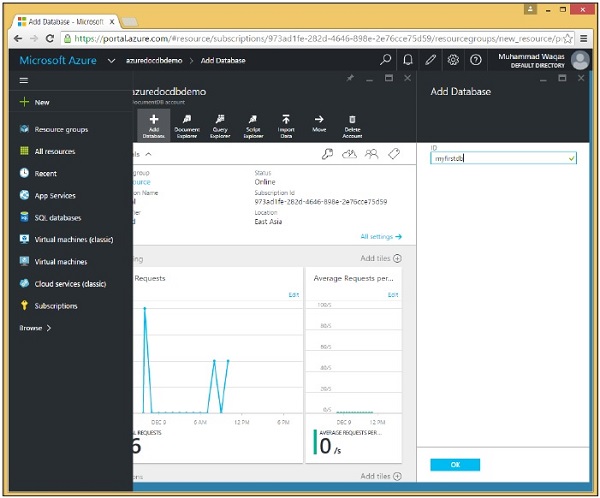
步驟 4 - 單擊“確定”。
您可以看到資料庫已新增。目前,它沒有任何集合,但我們稍後可以新增集合,這些集合是將儲存我們的 JSON 文件的容器。請注意,它同時具有 ID 和資源 ID。
使用 .Net SDK 為 DocumentDB 建立資料庫
要使用 .Net SDK 建立資料庫,請按照以下步驟操作。
步驟 1 - 從上一章開啟 Visual Studio 中的控制檯應用程式。
步驟 2 - 透過建立新的資料庫物件來建立新的資料庫。要建立新的資料庫,我們只需要分配 Id 屬性,我們將其設定為 CreateDatabase 任務中的“mynewdb”。
private async static Task CreateDatabase(DocumentClient client) {
   Console.WriteLine();
   Console.WriteLine("******** Create Database *******");

   var databaseDefinition = new Database { Id = "mynewdb" };
   var result = await client.CreateDatabaseAsync(databaseDefinition);
   var database = result.Resource;

   Console.WriteLine(" Database Id: {0}; Rid: {1}", database.Id, database.ResourceId);
   Console.WriteLine("******** Database Created *******");
}
步驟 3 - 現在將此 databaseDefinition 傳遞給 CreateDatabaseAsync,並獲取具有 Resource 屬性的結果。所有建立物件方法都返回一個 Resource 屬性,該屬性描述了建立的專案,在本例中為資料庫。
我們從 Resource 屬性獲取新的資料庫物件,並在控制檯中顯示它以及 DocumentDB 分配給它的資源 ID。
步驟 4 - 在例項化 DocumentClient 後,從 CreateDocumentClient 任務呼叫 CreateDatabase 任務。
using (var client = new DocumentClient(new Uri(EndpointUrl), AuthorizationKey)) {
   await CreateDatabase(client);
}
以下是迄今為止完整的 Program.cs 檔案。
using System;
using System.Collections.Generic;
using System.Linq;
using System.Text;
using System.Threading.Tasks;

using Microsoft.Azure.Documents;
using Microsoft.Azure.Documents.Client;
using Microsoft.Azure.Documents.Linq;
using Newtonsoft.Json;

namespace DocumentDBDemo {

   class Program {
      private const string EndpointUrl = "https://azuredocdbdemo.documents.azure.com:443/";

      private const string AuthorizationKey = "BBhjI0gxdVPdDbS4diTjdloJq7Fp4L5RO/
         StTt6UtEufDM78qM2CtBZWbyVwFPSJIm8AcfDu2O+AfV T+TYUnBQ==";

      static void Main(string[] args) {
         try {
            CreateDocumentClient().Wait();
         } catch (Exception e) {
            Exception baseException = e.GetBaseException();
            Console.WriteLine("Error: {0}, Message: {1}", e.Message, baseException.Message);
         }
         Console.ReadKey();
      }

      private static async Task CreateDocumentClient() {
         // Create a new instance of the DocumentClient
         using (var client = new DocumentClient(new Uri(EndpointUrl), AuthorizationKey)) {
            await CreateDatabase(client);
         }
      }

      private async static Task CreateDatabase(DocumentClient client) {
         Console.WriteLine();
         Console.WriteLine("******** Create Database *******");

         var databaseDefinition = new Database { Id = "mynewdb" };
         var result = await client.CreateDatabaseAsync(databaseDefinition);
         var database = result.Resource;

         Console.WriteLine(" Database Id: {0}; Rid: {1}", database.Id, database.ResourceId);
         Console.WriteLine("******** Database Created *******");
      }

   }
}
編譯並執行上述程式碼後,您將收到以下輸出,其中包含資料庫和資源 ID。
******** Create Database *******
 Database Id: mynewdb; Rid: ltpJAA==
******** Database Created *******
DocumentDB - 列出資料庫
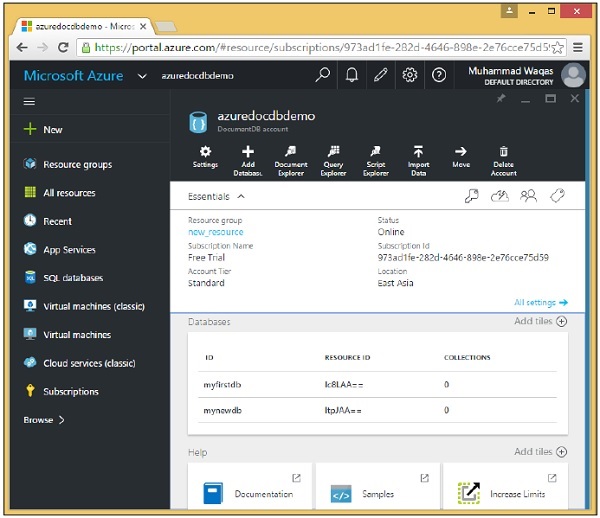
到目前為止,我們在 DocumentDB 帳戶中建立了兩個資料庫,第一個是使用 Azure 門戶建立的,第二個資料庫是使用 .Net SDK 建立的。現在要檢視這些資料庫,您可以使用 Azure 門戶。
轉到 Azure 門戶上的 DocumentDB 帳戶,您現在將看到兩個資料庫。
您還可以使用 .Net SDK 從程式碼中檢視或列出資料庫。以下為涉及的步驟。
步驟 1 - 發出沒有引數的資料庫查詢,它將返回完整列表,但您也可以傳遞查詢以查詢特定資料庫或特定資料庫。
private static void GetDatabases(DocumentClient client) {
   Console.WriteLine();
   Console.WriteLine();
   Console.WriteLine("******** Get Databases List ********");

   var databases = client.CreateDatabaseQuery().ToList();

   foreach (var database in databases) {
      Console.WriteLine(" Database Id: {0}; Rid: {1}", database.Id, database.ResourceId);
   }

   Console.WriteLine();
   Console.WriteLine("Total databases: {0}", databases.Count);
}
您將看到有一堆這些 CreateQuery 方法用於查詢集合、文件、使用者和其他資源。這些方法實際上並沒有執行查詢,它們只是定義查詢並返回可迭代物件。
實際上執行查詢、迭代結果並將其返回到列表中的是對 ToList() 的呼叫。
步驟 2 - 在例項化 DocumentClient 後,從 CreateDocumentClient 任務呼叫 GetDatabases 方法。
步驟 3 - 您還需要註釋 CreateDatabase 任務或更改資料庫 ID,否則您將收到資料庫已存在的錯誤訊息。
using (var client = new DocumentClient(new Uri(EndpointUrl), AuthorizationKey)) {
   //await CreateDatabase(client);
   GetDatabases(client);
}
以下是迄今為止完整的 Program.cs 檔案。
using System;
using System.Collections.Generic;
using System.Linq;
using System.Text;
using System.Threading.Tasks;

using Microsoft.Azure.Documents;
using Microsoft.Azure.Documents.Client;
using Microsoft.Azure.Documents.Linq;
using Newtonsoft.Json;

namespace DocumentDBDemo {

   class Program {
      private const string EndpointUrl = "https://azuredocdbdemo.documents.azure.com:443/";

      private const string AuthorizationKey = "BBhjI0gxdVPdDbS4diTjdloJq7Fp4L5RO/
         StTt6UtEufDM78qM2CtBZWbyVwFPSJIm8AcfDu2O+AfV T+TYUnBQ==";

      static void Main(string[] args) {
         try {
            CreateDocumentClient().Wait();
         } catch (Exception e) {
            Exception baseException = e.GetBaseException();
            Console.WriteLine("Error: {0}, Message: {1}", e.Message, baseException.Message);
         }
         Console.ReadKey();
      }

      private static async Task CreateDocumentClient() {
         // Create a new instance of the DocumentClient
         using (var client = new DocumentClient(new Uri(EndpointUrl), AuthorizationKey)) {
            await CreateDatabase(client);
            GetDatabases(client);
         }
      }

      private async static Task CreateDatabase(DocumentClient client) {
         Console.WriteLine();
         Console.WriteLine("******** Create Database *******");

         var databaseDefinition = new Database { Id = "mynewdb" };
         var result = await client.CreateDatabaseAsync(databaseDefinition);
         var database = result.Resource;

         Console.WriteLine(" Database Id: {0}; Rid: {1}", database.Id, database.ResourceId);
         Console.WriteLine("******** Database Created *******");
      }

      private static void GetDatabases(DocumentClient client) {
         Console.WriteLine();
         Console.WriteLine();
         Console.WriteLine("******** Get Databases List ********");

         var databases = client.CreateDatabaseQuery().ToList();

         foreach (var database in databases) {
            Console.WriteLine(" Database Id: {0}; Rid: {1}",
               database.Id, database.ResourceId);
         }

         Console.WriteLine();
         Console.WriteLine("Total databases: {0}", databases.Count);
      }

   }
}
編譯並執行上述程式碼後,您將收到以下輸出,其中包含兩個資料庫的資料庫和資源 ID。最後,您還將看到資料庫的總數。
******** Get Databases List ********
 Database Id: myfirstdb; Rid: Ic8LAA==
 Database Id: mynewdb; Rid: ltpJAA==
Total databases: 2
DocumentDB - 刪除資料庫
您可以從門戶以及使用 .Net SDK 從程式碼中刪除資料庫或資料庫。在這裡,我們將逐步討論如何在 DocumentDB 中刪除資料庫。
步驟 1 - 轉到 Azure 門戶上的 DocumentDB 帳戶。為了演示目的,我在以下螢幕截圖中添加了兩個資料庫。
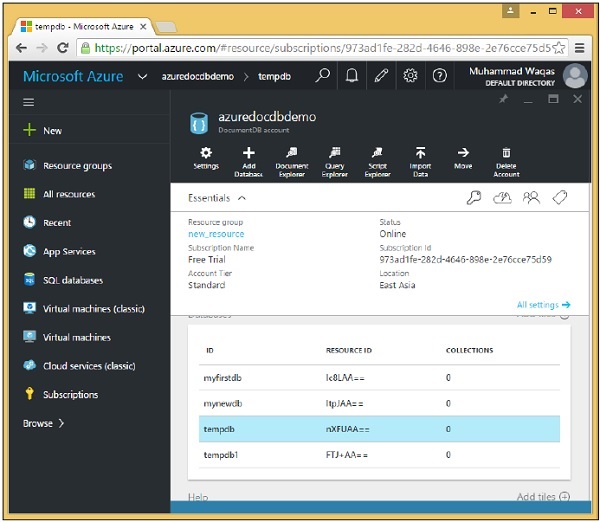
步驟 2 - 要刪除任何資料庫,您需要單擊該資料庫。讓我們選擇 tempdb,您將看到以下頁面,選擇“刪除資料庫”選項。

步驟 3 - 它將顯示確認訊息,現在單擊“是”按鈕。

您將看到 tempdb 不再在您的儀表板中可用。

您還可以使用 .Net SDK 從程式碼中刪除資料庫。要執行此操作,請按照以下步驟操作。
步驟 1 - 讓我們透過指定要刪除的資料庫的 ID 來刪除資料庫,但我們需要它的 SelfLink。
步驟 2 - 我們像以前一樣呼叫 CreateDatabaseQuery,但這次我們實際上提供了一個查詢以僅返回 ID 為 tempdb1 的一個數據庫。
private async static Task DeleteDatabase(DocumentClient client) {
   Console.WriteLine("******** Delete Database ********");
   Database database = client
      .CreateDatabaseQuery("SELECT * FROM c WHERE c.id = 'tempdb1'")
      .AsEnumerable()
      .First();
   await client.DeleteDatabaseAsync(database.SelfLink);
}
步驟 3 - 這次,我們可以呼叫 AsEnumerable 而不是 ToList(),因為我們實際上不需要列表物件。期望只有一個結果,呼叫 AsEnumerable 就足夠了,這樣我們就可以獲取查詢返回的第一個資料庫物件,並使用 First()。這是 tempdb1 的資料庫物件,它有一個 SelfLink,我們可以使用它來呼叫 DeleteDatabaseAsync,從而刪除資料庫。
步驟 4 - 您還需要在例項化 DocumentClient 後,從 CreateDocumentClient 任務呼叫 DeleteDatabase 任務。
步驟 5 - 要在刪除指定的資料庫後檢視資料庫列表,讓我們再次呼叫 GetDatabases 方法。
using (var client = new DocumentClient(new Uri(EndpointUrl), AuthorizationKey)) {
   //await CreateDatabase(client);

   GetDatabases(client);
   await DeleteDatabase(client);
   GetDatabases(client);
}
以下是迄今為止完整的 Program.cs 檔案。
using System;
using System.Collections.Generic;
using System.Linq;
using System.Text;
using System.Threading.Tasks;

using Microsoft.Azure.Documents;
using Microsoft.Azure.Documents.Client;
using Microsoft.Azure.Documents.Linq;
using Newtonsoft.Json;

namespace DocumentDBDemo {

   class Program {

      private const string EndpointUrl = "https://azuredocdbdemo.documents.azure.com:443/";

      private const string AuthorizationKey = "BBhjI0gxdVPdDbS4diTjdloJq7Fp4L5RO/
         StTt6UtEufDM78qM2CtBZWbyVwFPSJIm8AcfDu2O+AfV T+TYUnBQ==";

      static void Main(string[] args) {
         try {
            CreateDocumentClient().Wait();
         } catch (Exception e) {
            Exception baseException = e.GetBaseException();
            Console.WriteLine("Error: {0}, Message: {1}", e.Message, baseException.Message);
         }
         Console.ReadKey();
      }

      private static async Task CreateDocumentClient() {
         // Create a new instance of the DocumentClient
         using (var client = new DocumentClient(new Uri(EndpointUrl), AuthorizationKey)) {
            //await CreateDatabase(client);
            GetDatabases(client);
            await DeleteDatabase(client);
            GetDatabases(client);
         }
      }

      private async static Task CreateDatabase(DocumentClient client) {
         Console.WriteLine();
         Console.WriteLine("******** Create Database *******");

         var databaseDefinition = new Database { Id = "mynewdb" };
         var result = await client.CreateDatabaseAsync(databaseDefinition);
         var database = result.Resource;

         Console.WriteLine(" Database Id: {0}; Rid: {1}",
            database.Id, database.ResourceId);
         Console.WriteLine("******** Database Created *******");
      }

      private static void GetDatabases(DocumentClient client) {
         Console.WriteLine();
         Console.WriteLine();
         Console.WriteLine("******** Get Databases List ********");

         var databases = client.CreateDatabaseQuery().ToList();

         foreach (var database in databases) {
            Console.WriteLine(" Database Id: {0}; Rid: {1}", database.Id,
               database.ResourceId);
         }

         Console.WriteLine();
         Console.WriteLine("Total databases: {0}", databases.Count);
      }

      private async static Task DeleteDatabase(DocumentClient client) {
         Console.WriteLine();
         Console.WriteLine("******** Delete Database ********");

         Database database = client
            .CreateDatabaseQuery("SELECT * FROM c WHERE c.id = 'tempdb1'")
            .AsEnumerable()
            .First();
         await client.DeleteDatabaseAsync(database.SelfLink);
      }

   }
}
編譯並執行上述程式碼後,您將收到以下輸出,其中包含三個資料庫的資料庫和資源 ID 以及資料庫總數。
******** Get Databases List ********
 Database Id: myfirstdb; Rid: Ic8LAA==
 Database Id: mynewdb; Rid: ltpJAA==
 Database Id: tempdb1; Rid: 06JjAA==

Total databases: 3

******** Delete Database ********

******** Get Databases List ********
 Database Id: myfirstdb; Rid: Ic8LAA==
 Database Id: mynewdb; Rid: ltpJAA==

Total databases: 2
刪除資料庫後,您還將在最後看到 DocumentDB 帳戶中只剩下兩個資料庫。
DocumentDB - 建立集合
在本節中,我們將學習如何建立集合。它類似於建立資料庫。您可以從門戶或使用 .Net SDK 從程式碼中建立集合。
步驟 1 - 轉到 Azure 門戶上的主儀表板。
步驟 2 - 從資料庫列表中選擇 myfirstdb。
步驟 3 - 單擊“新增集合”選項併為集合指定 ID。為不同的選項選擇定價層。

步驟 4 - 讓我們選擇 S1 標準並單擊“選擇”→“確定”按鈕。
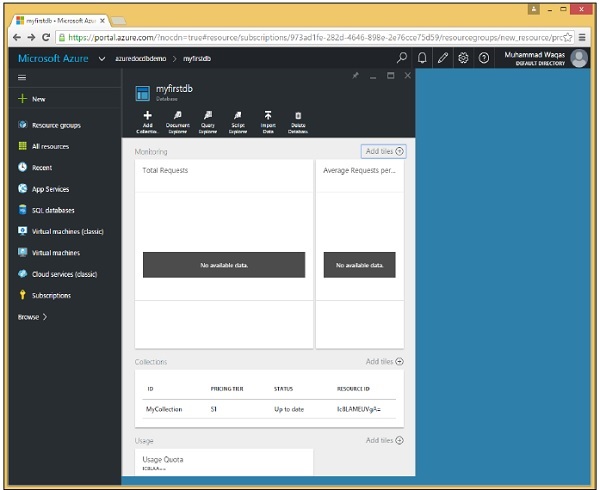
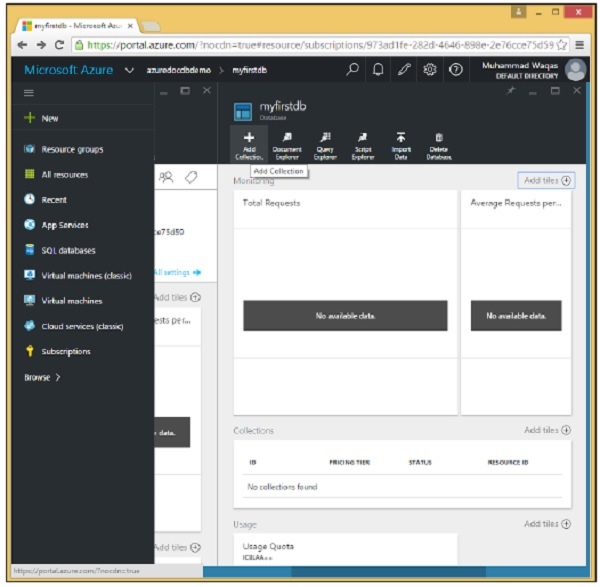
如您所見,MyCollection 已新增到 myfirstdb 中。
您還可以透過使用 .Net SDK 從程式碼中建立集合。讓我們看一下以下步驟以從程式碼中新增集合。
步驟 1 - 在 Visual Studio 中開啟控制檯應用程式。
步驟 2 - 要建立集合,首先透過其 ID 在 CreateDocumentClient 任務中檢索 myfirstdb 資料庫。
private static async Task CreateDocumentClient() {

   // Create a new instance of the DocumentClient
   using (var client = new DocumentClient(new Uri(EndpointUrl), AuthorizationKey)) {
      database = client.CreateDatabaseQuery("SELECT * FROM c WHERE c.id =
         'myfirstdb'").AsEnumerable().First();

      await CreateCollection(client, "MyCollection1");
      await CreateCollection(client, "MyCollection2", "S2");
   }
}
以下是 CreateCollection 任務的實現。
private async static Task CreateCollection(DocumentClient client, string collectionId,
   string offerType = "S1") {

   Console.WriteLine();
   Console.WriteLine("**** Create Collection {0} in {1} ****", collectionId, database.Id);

   var collectionDefinition = new DocumentCollection { Id = collectionId };
   var options = new RequestOptions { OfferType = offerType };
   var result = await client.CreateDocumentCollectionAsync(database.SelfLink,
      collectionDefinition, options);
   var collection = result.Resource;

   Console.WriteLine("Created new collection");
   ViewCollection(collection);
}
我們建立一個新的 DocumentCollection 物件,該物件使用 CreateDocumentCollectionAsync 方法為新集合定義所需的 Id,該方法還接受我們在此處用於設定新集合效能層的 options 引數,我們將其稱為 offerType。
這預設為 S1,因為我們沒有為 MyCollection1 傳遞 offerType,所以這將是 S1 集合,而對於 MyCollection2,我們傳遞了 S2,這使得它成為 S2,如上所示。
以下是 ViewCollection 方法的實現。
private static void ViewCollection(DocumentCollection collection) {
   Console.WriteLine("Collection ID: {0} ", collection.Id);
   Console.WriteLine("Resource ID: {0} ", collection.ResourceId);
   Console.WriteLine("Self Link: {0} ", collection.SelfLink);
   Console.WriteLine("Documents Link: {0} ", collection.DocumentsLink);
   Console.WriteLine("UDFs Link: {0} ", collection.UserDefinedFunctionsLink);
   Console.WriteLine(" StoredProcs Link: {0} ", collection.StoredProceduresLink);
   Console.WriteLine("Triggers Link: {0} ", collection.TriggersLink);
   Console.WriteLine("Timestamp: {0} ", collection.Timestamp);
}
以下是集合的 program.cs 檔案的完整實現。
using System;
using System.Collections.Generic;
using System.Linq;
using System.Text;
using System.Threading.Tasks;

using Microsoft.Azure.Documents;
using Microsoft.Azure.Documents.Client;
using Microsoft.Azure.Documents.Linq;

using Newtonsoft.Json;

namespace DocumentDBDemo {

   class Program {

      private const string EndpointUrl = "https://azuredocdbdemo.documents.azure.com:443/";

      private const string AuthorizationKey = "BBhjI0gxdVPdDbS4diTjdloJq7Fp4L5RO/
         StTt6UtEufDM78qM2CtBZWbyVwFPSJIm8AcfDu2O+AfV T+TYUnBQ==";

      private static Database database;

      static void Main(string[] args) {
         try {
            CreateDocumentClient().Wait();
         } catch (Exception e) {
            Exception baseException = e.GetBaseException();
            Console.WriteLine("Error: {0}, Message: {1}", e.Message, baseException.Message);
         }
         Console.ReadKey();
      }

      private static async Task CreateDocumentClient() {
         // Create a new instance of the DocumentClient
         using (var client = new DocumentClient(new Uri(EndpointUrl), AuthorizationKey)) {
            database = client.CreateDatabaseQuery("SELECT * FROM c WHERE c.id =
               'myfirstdb'").AsEnumerable().First();
            await CreateCollection(client, "MyCollection1");
            await CreateCollection(client, "MyCollection2", "S2");

            //await CreateDatabase(client);
            //GetDatabases(client);
            //await DeleteDatabase(client);
            //GetDatabases(client);
         }
      }

      private async static Task CreateCollection(DocumentClient client,
         string collectionId, string offerType = "S1") {

         Console.WriteLine();
         Console.WriteLine("**** Create Collection {0} in {1} ****", collectionId,
            database.Id);

         var collectionDefinition = new DocumentCollection { Id = collectionId };
         var options = new RequestOptions { OfferType = offerType };
         var result = await

			client.CreateDocumentCollectionAsync(database.SelfLink,
            collectionDefinition, options);
         var collection = result.Resource;

         Console.WriteLine("Created new collection");
         ViewCollection(collection);
      }

      private static void ViewCollection(DocumentCollection collection) {
         Console.WriteLine("Collection ID: {0} ", collection.Id);
         Console.WriteLine("Resource ID: {0} ", collection.ResourceId);
         Console.WriteLine("Self Link: {0} ", collection.SelfLink);
         Console.WriteLine("Documents Link: {0} ", collection.DocumentsLink);
         Console.WriteLine("UDFs Link: {0} ", collection.UserDefinedFunctionsLink);
         Console.WriteLine("StoredProcs Link: {0} ", collection.StoredProceduresLink);
         Console.WriteLine("Triggers Link: {0} ", collection.TriggersLink);
         Console.WriteLine("Timestamp: {0} ", collection.Timestamp);
      }

   }
}
編譯並執行上述程式碼後,您將收到以下輸出,其中包含與集合相關的所有資訊。
**** Create Collection MyCollection1 in myfirstdb ****
Created new collection
   Collection ID: MyCollection1
      Resource ID: Ic8LAPPvnAA=
         Self Link: dbs/Ic8LAA==/colls/Ic8LAPPvnAA=/
   Documents Link: dbs/Ic8LAA==/colls/Ic8LAPPvnAA=/docs/
         UDFs Link: dbs/Ic8LAA==/colls/Ic8LAPPvnAA=/udfs/
   StoredProcs Link: dbs/Ic8LAA==/colls/Ic8LAPPvnAA=/sprocs/
      Triggers Link: dbs/Ic8LAA==/colls/Ic8LAPPvnAA=/triggers/
         Timestamp: 12/10/2015 4:55:36 PM

**** Create Collection MyCollection2 in myfirstdb ****
Created new collection
   Collection ID: MyCollection2
      Resource ID: Ic8LAKGHDwE=
         Self Link: dbs/Ic8LAA==/colls/Ic8LAKGHDwE=/
   Documents Link: dbs/Ic8LAA==/colls/Ic8LAKGHDwE=/docs/
         UDFs Link: dbs/Ic8LAA==/colls/Ic8LAKGHDwE=/udfs/
   StoredProcs Link: dbs/Ic8LAA==/colls/Ic8LAKGHDwE=/sprocs/
      Triggers Link: dbs/Ic8LAA==/colls/Ic8LAKGHDwE=/triggers/
         Timestamp: 12/10/2015 4:55:38 PM
DocumentDB - 刪除集合
要刪除集合或集合,您可以從門戶以及使用 .Net SDK 從程式碼中執行相同的操作。
步驟 1 - 轉到 Azure 門戶上的 DocumentDB 帳戶。為了演示目的,我在以下螢幕截圖中添加了兩個集合。

步驟 2 - 要刪除任何集合,您需要單擊該集合。讓我們選擇 TempCollection1。您將看到以下頁面,選擇“刪除集合”選項。

步驟 3 - 它將顯示確認訊息。現在單擊“是”按鈕。
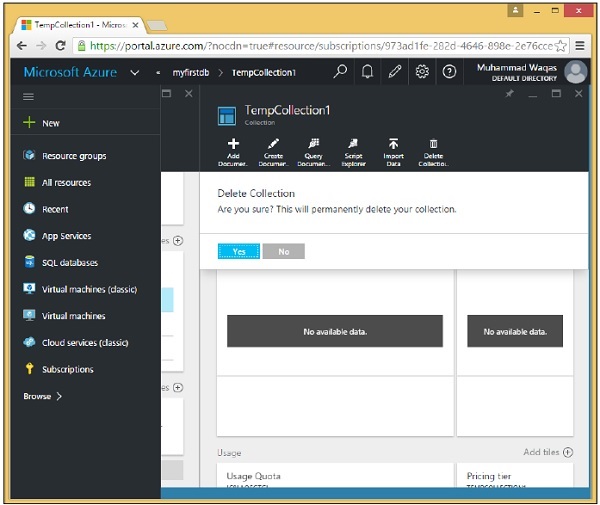
您將看到 TempCollection1 不再在您的儀表板中可用。

您還可以使用 .Net SDK 從程式碼中刪除集合。要執行此操作,請按照以下步驟操作。
步驟 1 - 讓我們透過指定要刪除的集合的 ID 來刪除集合。
這是透過 Id 查詢以獲取刪除資源所需的 selfLinks 的常用模式。
private async static Task DeleteCollection(DocumentClient client, string collectionId) {
   Console.WriteLine();
   Console.WriteLine("**** Delete Collection {0} in {1} ****", collectionId, database.Id);

   var query = new SqlQuerySpec {
      QueryText = "SELECT * FROM c WHERE c.id = @id",
         Parameters = new SqlParameterCollection {
         new SqlParameter {
            Name = "@id", Value = collectionId
         }
      }
   };

   DocumentCollection collection = client.CreateDocumentCollectionQuery(database.SelfLink,
      query).AsEnumerable().First();

   await client.DeleteDocumentCollectionAsync(collection.SelfLink);
   Console.WriteLine("Deleted collection {0} from database {1}", collectionId,
      database.Id);
}
在這裡,我們看到了構建引數化查詢的首選方法。我們沒有對 collectionId 進行硬編碼,因此此方法可用於刪除任何集合。我們正在透過 Id 查詢特定集合,其中 Id 引數在此分配給此 SqlQuerySpec 的引數屬性的 SqlParameterCollection 中定義。
然後,SDK 會完成構建 DocumentDB 的最終查詢字串的工作,並將 collectionId 嵌入其中。
步驟 2 - 執行查詢,然後使用其 SelfLink 從 CreateDocumentClient 任務中刪除集合。
private static async Task CreateDocumentClient() {
   // Create a new instance of the DocumentClient

   using (var client = new DocumentClient(new Uri(EndpointUrl), AuthorizationKey)) {
      database = client.CreateDatabaseQuery("SELECT * FROM c WHERE c.id =
         'myfirstdb'").AsEnumerable().First();
      await DeleteCollection(client, "TempCollection");
   }
}
以下是 Program.cs 檔案的完整實現。
using System;
using System.Collections.Generic;
using System.Linq;
using System.Text;
using System.Threading.Tasks;

using Microsoft.Azure.Documents;
using Microsoft.Azure.Documents.Client;
using Microsoft.Azure.Documents.Linq;

using Newtonsoft.Json;

namespace DocumentDBDemo {

   class Program {

      private const string EndpointUrl = "https://azuredocdbdemo.documents.azure.com:443/";

      private const string AuthorizationKey = "BBhjI0gxdVPdDbS4diTjdloJq7Fp4L5RO/
         StTt6UtEufDM78qM2CtBZWbyVwFPSJIm8AcfDu2O+AfV T+TYUnBQ==";

      private static Database database;

      static void Main(string[] args) {
         try {
            CreateDocumentClient().Wait();
         } catch (Exception e) {
            Exception baseException = e.GetBaseException();
            Console.WriteLine("Error: {0}, Message: {1}", e.Message, baseException.Message);
         }
         Console.ReadKey();
      }

      private static async Task CreateDocumentClient() {
         // Create a new instance of the DocumentClient
         using (var client = new DocumentClient(new Uri(EndpointUrl), AuthorizationKey)) {
            database = client.CreateDatabaseQuery("SELECT * FROM c WHERE c.id =
               'myfirstdb'").AsEnumerable().First();
            await DeleteCollection(client, "TempCollection");

            //await CreateCollection(client, "MyCollection1");
            //await CreateCollection(client, "MyCollection2", "S2");
            ////await CreateDatabase(client);
            //GetDatabases(client);
            //await DeleteDatabase(client);
            //GetDatabases(client);
         }
      }

      private async static Task CreateCollection(DocumentClient client,
         string collectionId, string offerType = "S1") {

         Console.WriteLine();
         Console.WriteLine("**** Create Collection {0} in {1} ****", collectionId,
            database.Id);

         var collectionDefinition = new DocumentCollection { Id = collectionId };
         var options = new RequestOptions { OfferType = offerType };
         var result = await client.CreateDocumentCollectionAsync(database.SelfLink,
            collectionDefinition, options);

         var collection = result.Resource;

         Console.WriteLine("Created new collection");
         ViewCollection(collection);
      }

      private static void ViewCollection(DocumentCollection collection) {
         Console.WriteLine("Collection ID: {0} ", collection.Id);
         Console.WriteLine("Resource ID: {0} ", collection.ResourceId);
         Console.WriteLine("Self Link: {0} ", collection.SelfLink);
         Console.WriteLine("Documents Link: {0} ", collection.DocumentsLink);
         Console.WriteLine("UDFs Link: {0} ", collection.UserDefinedFunctionsLink);
         Console.WriteLine("StoredProcs Link: {0} ", collection.StoredProceduresLink);
         Console.WriteLine("Triggers Link: {0} ", collection.TriggersLink);
         Console.WriteLine("Timestamp: {0} ", collection.Timestamp);
      }

      private async static Task DeleteCollection(DocumentClient client,
         string collectionId) {

         Console.WriteLine();
         Console.WriteLine("**** Delete Collection {0} in {1} ****", collectionId,
            database.Id);

         var query = new SqlQuerySpec {
            QueryText = "SELECT * FROM c WHERE c.id = @id", Parameters = new
               SqlParameterCollection {
               new SqlParameter {
                  Name = "@id", Value = collectionId
               }
            }
         };

         DocumentCollection collection = client.CreateDocumentCollectionQuery
            (database.SelfLink, query).AsEnumerable().First();

         await client.DeleteDocumentCollectionAsync(collection.SelfLink);
         Console.WriteLine("Deleted collection {0} from database {1}", collectionId,
            database.Id);
      }

   }
}
編譯並執行上述程式碼後,您將收到以下輸出。
**** Delete Collection TempCollection in myfirstdb ****
Deleted collection TempCollection from database myfirstdb
DocumentDB - 插入文件
在本節中,我們將開始使用集合中的實際文件。您可以使用 Azure 門戶或 .Net SDK 建立文件。
使用 Azure 門戶建立文件
讓我們看看以下步驟,將文件新增到您的集合中。
步驟 1 − 在 myfirstdb 中新增新的 S1 定價層 Families 集合。

步驟 2 − 選擇 Families 集合,然後單擊“建立文件”選項以開啟“新建文件”邊欄。

這只是一個簡單的文字編輯器,允許您為新文件鍵入任何 JSON。
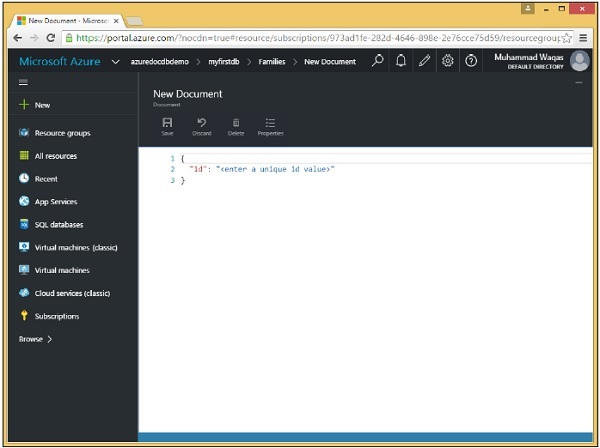
步驟 3 − 由於這是原始資料輸入,讓我們輸入我們的第一個文件。
{
   "id": "AndersenFamily",
   "lastName": "Andersen",

   "parents": [
      { "firstName": "Thomas", "relationship": "father" },
      { "firstName": "Mary Kay", "relationship": "mother" }
   ],

   "children": [
      {
         "firstName": "Henriette Thaulow",
         "gender": "female",
         "grade": 5,
         "pets": [ { "givenName": "Fluffy", "type": "Rabbit" } ]
      }
   ],

   "location": { "state": "WA", "county": "King", "city": "Seattle"},
   "isRegistered": true
}
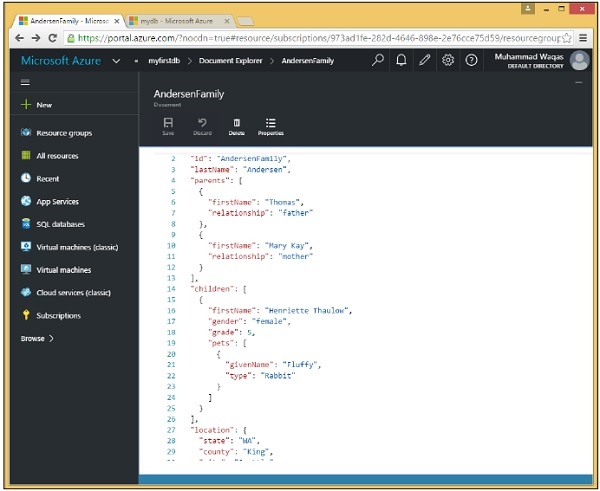
輸入上述文件後,您將看到以下螢幕。

請注意,我們已為文件提供了 ID。ID 值始終是必需的,並且在同一集合中的所有其他文件中都必須唯一。當您省略它時,DocumentDB 將使用 GUID 或全域性唯一識別符號為您自動生成一個。
ID 始終是字串,它不能是數字、日期、布林值或其他物件,並且長度不能超過 255 個字元。
還要注意文件的分層結構,它具有一些頂級屬性,例如必需的 id、lastName 和 isRegistered,但它也具有巢狀屬性。
例如,parents 屬性作為 JSON 陣列提供,如方括號所示。我們還有另一個用於 children 的陣列,即使在此示例中陣列中只有一個子項。
步驟 4 − 單擊“儲存”按鈕儲存文件,我們就建立了第一個文件。
如您所見,已對我們的 JSON 應用漂亮的格式設定,它將每個屬性都放在自己的行上,並使用空格縮排以傳達每個屬性的巢狀級別。

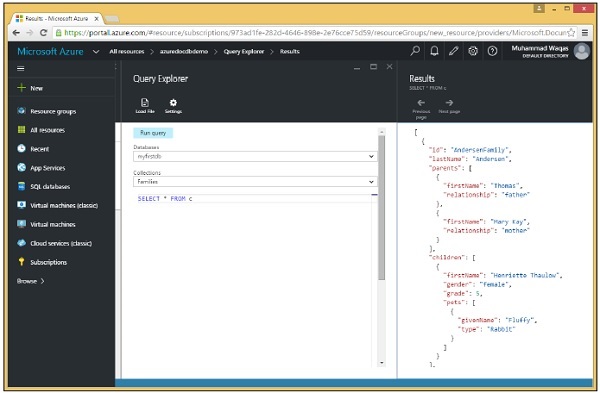
門戶包含一個文件瀏覽器,所以現在讓我們使用它來檢索我們剛剛建立的文件。
步驟 5 − 選擇資料庫和資料庫中的任何集合以檢視該集合中的文件。我們目前只有一個名為 myfirstdb 的資料庫和一個名為 Families 的集合,這兩個集合都已在此處的下拉列表中預先選擇。
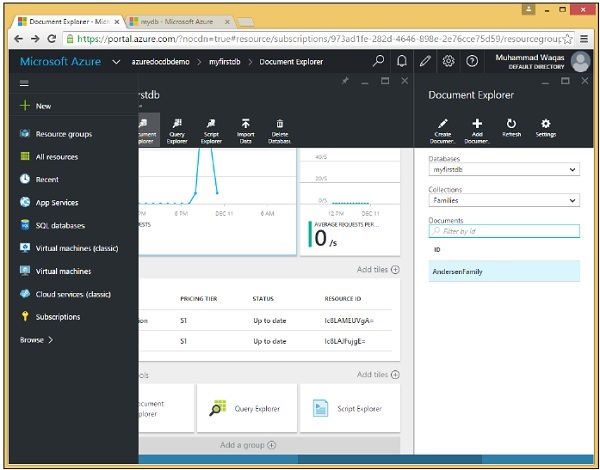
預設情況下,文件瀏覽器顯示集合中未過濾的文件列表,但您也可以按 ID 搜尋任何特定文件,或根據部分 ID 的萬用字元搜尋搜尋多個文件。
到目前為止,我們的集合中只有一個文件,我們在以下螢幕上看到它的 ID,AndersonFamily。
步驟 6 − 單擊 ID 以檢視文件。
使用 .NET SDK 建立文件
如您所知,文件只是另一種型別的資源,您已經熟悉瞭如何使用 SDK 處理資源。
文件與其他資源之間的一個主要區別是,當然,它們是無模式的。
因此有很多選擇。當然,您可以只使用 JSON 物件圖甚至 JSON 文字的原始字串,但您也可以使用動態物件,這些物件允許您在執行時繫結到屬性,而無需在編譯時定義類。
您還可以使用真實的 C# 物件或稱為實體的物件,這些物件可能是您的業務域類。
讓我們開始使用 .Net SDK 建立文件。以下是步驟。
步驟 1 − 例項化 DocumentClient,然後我們將查詢 myfirstdb 資料庫,然後查詢 MyCollection 集合,我們將該集合儲存在此私有變數 collection 中,以便在整個類中都可以訪問它。
private static async Task CreateDocumentClient() {
   // Create a new instance of the DocumentClient

   using (var client = new DocumentClient(new Uri(EndpointUrl), AuthorizationKey)) {
      database = client.CreateDatabaseQuery("SELECT * FROM c WHERE c.id =
         'myfirstdb'").AsEnumerable().First();

      collection = client.CreateDocumentCollectionQuery(database.CollectionsLink,
         "SELECT * FROM c WHERE c.id = 'MyCollection'").AsEnumerable().First();

      await CreateDocuments(client);
   }
}
步驟 2 − 在 CreateDocuments 任務中建立一些文件。
private async static Task CreateDocuments(DocumentClient client) {
   Console.WriteLine();
   Console.WriteLine("**** Create Documents ****");
   Console.WriteLine();

   dynamic document1Definition = new {
      name = "New Customer 1", address = new {
         addressType = "Main Office",
         addressLine1 = "123 Main Street",
         location = new {
            city = "Brooklyn", stateProvinceName = "New York"
         }, postalCode = "11229", countryRegionName = "United States"
      },
   };

   Document document1 = await CreateDocument(client, document1Definition);
   Console.WriteLine("Created document {0} from dynamic object", document1.Id);
   Console.WriteLine();
}
第一個文件將從此動態物件生成。這可能看起來像 JSON,但當然不是。這是 C# 程式碼,我們正在建立一個真正的 .NET 物件,但沒有類定義。相反,屬性是從物件初始化的方式推斷出來的。
請注意,我們沒有為此文件提供 Id 屬性。
現在讓我們看看 CreateDocument。它看起來與我們之前為建立資料庫和集合看到的模式相同。
private async static Task<Document> CreateDocument(DocumentClient client,
   object documentObject) {

   var result = await client.CreateDocumentAsync(collection.SelfLink, documentObject);
   var document = result.Resource;

   Console.WriteLine("Created new document: {0}\r\n{1}", document.Id, document);
   return result;
}
步驟 3 − 這次我們呼叫 CreateDocumentAsync,指定我們要將文件新增到其中的集合的 SelfLink。我們返回一個帶有 resource 屬性的響應,在這種情況下,它表示具有其系統生成屬性的新文件。
Document 物件是 SDK 中定義的類,它繼承自 resource,因此它具有所有常見的資源屬性,但它還包括定義無模式文件本身的動態屬性。
private async static Task CreateDocuments(DocumentClient client) {
   Console.WriteLine();
   Console.WriteLine("**** Create Documents ****");
   Console.WriteLine();

   dynamic document1Definition = new {
      name = "New Customer 1", address = new {
         addressType = "Main Office",
         addressLine1 = "123 Main Street",
         location = new {
            city = "Brooklyn", stateProvinceName = "New York"
         }, postalCode = "11229", countryRegionName = "United States"
      },
   };

   Document document1 = await CreateDocument(client, document1Definition);
   Console.WriteLine("Created document {0} from dynamic object", document1.Id);
   Console.WriteLine();
}
編譯並執行上述程式碼後,您將收到以下輸出。
**** Create Documents ****
Created new document: 34e9873a-94c8-4720-9146-d63fb7840fad {
   "name": "New Customer 1",

   "address": {
      "addressType": "Main Office",
      "addressLine1": "123 Main Street",
      "location": {
         "city": "Brooklyn", "stateProvinceName": "New York"
      },
      "postalCode": "11229", "countryRegionName": "United States"
   },

   "id": "34e9873a-94c8-4720-9146-d63fb7840fad",
   "_rid": "Ic8LAMEUVgACAAAAAAAAAA==",
   "_ts": 1449812756,
   "_self": "dbs/Ic8LAA==/colls/Ic8LAMEUVgA=/docs/Ic8LAMEUVgACAAAAAAAAAA==/",
   "_etag": "\"00001000-0000-0000-0000-566a63140000\"",
   "_attachments": "attachments/"
}
Created document 34e9873a-94c8-4720-9146-d63fb7840fad from dynamic object
如您所見,我們沒有提供 Id,但是 DocumentDB 為我們為新文件生成了此 Id。
DocumentDB - 查詢文件
在 DocumentDB 中,我們實際上使用 SQL 查詢文件,因此本章全部關於使用 DocumentDB 中的特殊 SQL 語法進行查詢。儘管如果您正在進行 .NET 開發,也可以使用 LINQ 提供程式,該提供程式可以從 LINQ 查詢生成相應的 SQL。
使用門戶查詢文件
Azure 門戶有一個查詢瀏覽器,允許您對 DocumentDB 資料庫執行任何 SQL 查詢。
我們將使用查詢瀏覽器演示查詢語言的許多不同功能和特性,從最簡單的查詢開始。
步驟 1 − 在資料庫邊欄中,單擊以開啟查詢瀏覽器邊欄。
請記住,查詢在集合的範圍內執行,因此查詢瀏覽器允許您在此下拉列表中選擇集合。
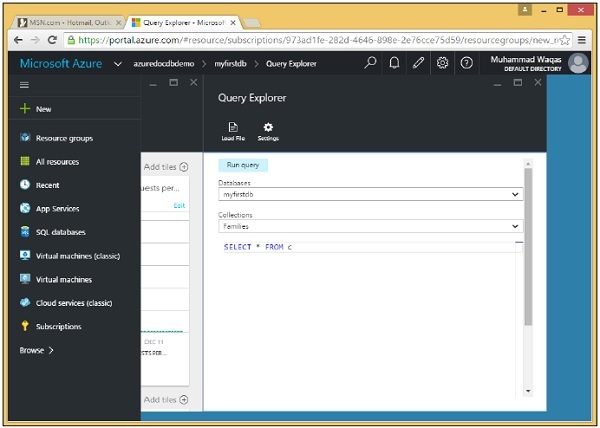
步驟 2 − 選擇 Families 集合,該集合是之前使用門戶建立的。
查詢瀏覽器將開啟此簡單的查詢 SELECT * FROM c,它只是從集合中檢索所有文件。
步驟 3 − 單擊“執行查詢”按鈕執行此查詢。然後您將看到完整的文件在結果邊欄中檢索。
使用 .Net SDK 查詢文件
以下是使用 .Net SDK 執行一些文件查詢的步驟。
在此示例中,我們希望查詢我們剛剛新增的新建立的文件。
步驟 1 − 呼叫 CreateDocumentQuery,透過其 SelfLink 和查詢文字傳入要對其執行查詢的集合。
private async static Task QueryDocumentsWithPaging(DocumentClient client) {
   Console.WriteLine();
   Console.WriteLine("**** Query Documents (paged results) ****");
   Console.WriteLine();
   Console.WriteLine("Quering for all documents");

   var sql = "SELECT * FROM c";
   var query = client.CreateDocumentQuery(collection.SelfLink, sql).AsDocumentQuery();

   while (query.HasMoreResults) {
      var documents = await query.ExecuteNextAsync();

      foreach (var document in documents) {
         Console.WriteLine(" Id: {0}; Name: {1};", document.id, document.name);
      }
   }

   Console.WriteLine();
}
此查詢也返回整個集合中的所有文件,但我們沒有像以前那樣在 CreateDocumentQuery 上呼叫 .ToList,這將在一行程式碼中發出必要的請求以拉取所有結果。
步驟 2 − 相反,呼叫 AsDocumentQuery,此方法返回一個具有 HasMoreResults 屬性的查詢物件。
步驟 3 − 如果 HasMoreResults 為 true,則呼叫 ExecuteNextAsync 獲取下一塊,然後轉儲該塊的所有內容。
步驟 4 − 如果您願意,也可以使用 LINQ 而不是 SQL 進行查詢。在這裡,我們在 q 中定義了一個 LINQ 查詢,但它直到我們在其上執行 .ToList 才會執行。
private static void QueryDocumentsWithLinq(DocumentClient client) {
   Console.WriteLine();
   Console.WriteLine("**** Query Documents (LINQ) ****");
   Console.WriteLine();
   Console.WriteLine("Quering for US customers (LINQ)");

   var q =
      from d in client.CreateDocumentQuery<Customer>(collection.DocumentsLink)
      where d.Address.CountryRegionName == " United States"
      select new {
         Id = d.Id,
         Name = d.Name,
         City = d.Address.Location.City
      };

   var documents = q.ToList();
   Console.WriteLine("Found {0} UK customers", documents.Count);

   foreach (var document in documents) {
      var d = document as dynamic;
      Console.WriteLine(" Id: {0}; Name: {1}; City: {2}", d.Id, d.Name, d.City);
   }

   Console.WriteLine();
}
SDK 將我們的 LINQ 查詢轉換為 DocumentDB 的 SQL 語法,根據我們的 LINQ 語法生成 SELECT 和 WHERE 子句
步驟 5 − 現在從 CreateDocumentClient 任務呼叫上述查詢。
private static async Task CreateDocumentClient() {
   // Create a new instance of the DocumentClient

   using (var client = new DocumentClient(new Uri(EndpointUrl), AuthorizationKey)) {
      database = client.CreateDatabaseQuery("SELECT * FROM c WHERE c.id =
         'myfirstdb'").AsEnumerable().First();

      collection = client.CreateDocumentCollectionQuery(database.CollectionsLink,
         "SELECT * FROM c WHERE c.id = 'MyCollection'").AsEnumerable().First();

      //await CreateDocuments(client);
      await QueryDocumentsWithPaging(client);
      QueryDocumentsWithLinq(client);
   }

}
執行上述程式碼後,您將收到以下輸出。
**** Query Documents (paged results) ****
Quering for all documents
 Id: 7e9ad4fa-c432-4d1a-b120-58fd7113609f; Name: New Customer 1;
 Id: 34e9873a-94c8-4720-9146-d63fb7840fad; Name: New Customer 1;

**** Query Documents (LINQ) ****
Quering for US customers (LINQ)
Found 2 UK customers
 Id: 7e9ad4fa-c432-4d1a-b120-58fd7113609f; Name: New Customer 1; City: Brooklyn
 Id: 34e9873a-94c8-4720-9146-d63fb7840fad; Name: New Customer 1; City: Brooklyn
DocumentDB - 更新文件
在本章中,我們將學習如何更新文件。使用 Azure 門戶,您可以透過在文件瀏覽器中開啟文件並在編輯器中將其更新為文字檔案來輕鬆更新文件。

單擊“儲存”按鈕。現在,當您需要使用 .Net SDK 更改文件時,您只需替換它即可。您無需刪除並重新建立它,除了繁瑣之外,這還會更改資源 ID,而您在修改文件時不希望這樣做。以下是如何使用 .Net SDK 更新文件的步驟。
讓我們看看以下 ReplaceDocuments 任務,我們將在其中查詢 isNew 屬性為 true 的文件,但我們將無法獲取任何文件,因為沒有任何文件。因此,讓我們修改我們之前新增的文件,即名稱以“新客戶”開頭的那些文件。
步驟 1 − 將 isNew 屬性新增到這些文件中,並將其值設定為 true。
private async static Task ReplaceDocuments(DocumentClient client) {

   Console.WriteLine();
   Console.WriteLine(">>> Replace Documents <<<");
   Console.WriteLine();
   Console.WriteLine("Quering for documents with 'isNew' flag");

   var sql = "SELECT * FROM c WHERE c.isNew = true";
   var documents = client.CreateDocumentQuery(collection.SelfLink, sql).ToList();

   Console.WriteLine("Documents with 'isNew' flag: {0} ", documents.Count);
   Console.WriteLine();
   Console.WriteLine("Quering for documents to be updated");

   sql = "SELECT * FROM c WHERE STARTSWITH(c.name, 'New Customer') = true";
   documents = client.CreateDocumentQuery(collection.SelfLink, sql).ToList();
   Console.WriteLine("Found {0} documents to be updated", documents.Count);

   foreach (var document in documents) {
      document.isNew = true;
      var result = await client.ReplaceDocumentAsync(document._self, document);
      var updatedDocument = result.Resource;
      Console.WriteLine("Updated document 'isNew' flag: {0}", updatedDocument.isNew);
   }

   Console.WriteLine();
   Console.WriteLine("Quering for documents with 'isNew' flag");

   sql = "SELECT * FROM c WHERE c.isNew = true";
   documents = client.CreateDocumentQuery(collection.SelfLink, sql).ToList();
   Console.WriteLine("Documents with 'isNew' flag: {0}: ", documents.Count);
   Console.WriteLine();
}
步驟 2 − 使用相同的 STARTSWITH 查詢獲取要更新的文件,這將為我們提供文件,我們在這裡將其作為動態物件獲取。
步驟 3 − 附加 isNew 屬性,並將其設定為每個文件的 true。
步驟 4 − 呼叫 ReplaceDocumentAsync,傳入文件的 SelfLink 以及更新後的文件。
現在,為了證明這有效,請查詢 isNew 等於 true 的文件。讓我們從 CreateDocumentClient 任務呼叫上述查詢。
private static async Task CreateDocumentClient() {
   // Create a new instance of the DocumentClient

   using (var client = new DocumentClient(new Uri(EndpointUrl), AuthorizationKey)) {
      database = client.CreateDatabaseQuery("SELECT * FROM c WHERE c.id =
         'myfirstdb'").AsEnumerable().First();

      collection = client.CreateDocumentCollectionQuery(database.CollectionsLink,
         "SELECT * FROM c WHERE c.id = 'MyCollection'").AsEnumerable().First();

      //await CreateDocuments(client);
      //QueryDocumentsWithSql(client);
      //await QueryDocumentsWithPaging(client);
      //QueryDocumentsWithLinq(client);
      await ReplaceDocuments(client);
   }

}
編譯並執行上述程式碼後,您將收到以下輸出。
**** Replace Documents ****
Quering for documents with 'isNew' flag
Documents with 'isNew' flag: 0
Quering for documents to be updated
Found 2 documents to be updated
Updated document ‘isNew’ flag: True
Updated document ‘isNew’ flag: True
Quering for documents with 'isNew' flag
Documents with 'isNew' flag: 2
DocumentDB - 刪除文件
在本章中,我們將學習如何從您的 DocumentDB 帳戶中刪除文件。使用 Azure 門戶,您可以透過在文件瀏覽器中開啟文件並單擊“刪除”選項來輕鬆刪除任何文件。


它將顯示確認訊息。現在按下“是”按鈕,您將看到該文件不再存在於您的 DocumentDB 帳戶中。
現在,當您想使用 .Net SDK 刪除文件時。
步驟 1 − 它與我們之前看到的模式相同,我們將在其中首先查詢以獲取每個新文件的 SelfLink。我們這裡不使用 SELECT *,這將返回文件的全部內容,而我們不需要。
步驟 2 − 相反,我們只是將 SelfLink 選擇到一個列表中,然後我們一次一個地為每個 SelfLink 呼叫 DeleteDocumentAsync,以從集合中刪除文件。
private async static Task DeleteDocuments(DocumentClient client) {
   Console.WriteLine();
   Console.WriteLine(">>> Delete Documents <<<");
   Console.WriteLine();
   Console.WriteLine("Quering for documents to be deleted");

   var sql =
      "SELECT VALUE c._self FROM c WHERE STARTSWITH(c.name, 'New Customer') = true";

   var documentLinks =
      client.CreateDocumentQuery<string>(collection.SelfLink, sql).ToList();

   Console.WriteLine("Found {0} documents to be deleted", documentLinks.Count);

   foreach (var documentLink in documentLinks) {
      await client.DeleteDocumentAsync(documentLink);
   }

   Console.WriteLine("Deleted {0} new customer documents", documentLinks.Count);
   Console.WriteLine();
}
步驟 3 − 現在讓我們從 CreateDocumentClient 任務呼叫上述 DeleteDocuments。
private static async Task CreateDocumentClient() {
   // Create a new instance of the DocumentClient
   using (var client = new DocumentClient(new Uri(EndpointUrl), AuthorizationKey)) {
      database = client.CreateDatabaseQuery("SELECT * FROM c WHERE c.id =
         'myfirstdb'").AsEnumerable().First();

      collection = client.CreateDocumentCollectionQuery(database.CollectionsLink,
         "SELECT * FROM c WHERE c.id = 'MyCollection'").AsEnumerable().First();

      await DeleteDocuments(client);
   }
}
執行上述程式碼後,您將收到以下輸出。
***** Delete Documents *****
Quering for documents to be deleted
Found 2 documents to be deleted
Deleted 2 new customer documents
DocumentDB - 資料建模
雖然像 DocumentDB 這樣的無模式資料庫使您能夠輕鬆地適應資料模型的更改,但您仍然應該花一些時間考慮您的資料。
您有很多選擇。當然,您可以只使用 JSON 物件圖甚至 JSON 文字的原始字串,但您也可以使用動態物件,這些物件允許您在執行時繫結到屬性,而無需在編譯時定義類。
您還可以使用真實的 C# 物件或稱為實體的物件,這些物件可能是您的業務域類。
關係
讓我們看看文件的分層結構。它具有一些頂級屬性,例如必需的 id、lastName 和 isRegistered,但它也具有巢狀屬性。
{
   "id": "AndersenFamily",
   "lastName": "Andersen",

   "parents": [
      { "firstName": "Thomas", "relationship": "father" },
      { "firstName": "Mary Kay", "relationship": "mother" }
   ],

   "children": [
      {
         "firstName": "Henriette Thaulow",
         "gender": "female",
         "grade": 5,
         "pets": [ { "givenName": "Fluffy", "type": "Rabbit" } ]
      }
   ],

   "location": { "state": "WA", "county": "King", "city": "Seattle"},
   "isRegistered": true
}
例如,parents 屬性以 JSON 陣列的形式提供,如方括號所示。
我們還有一個用於 children 的陣列,即使在本例中陣列中只有一個子項。因此,這就是您在文件中模擬一對多關係的方式。
您只需使用陣列,其中陣列中的每個元素可以是簡單值或另一個複雜物件,甚至另一個數組。
因此,一個家庭可以有多個父母和多個孩子,如果您檢視孩子物件,它們有一個寵物屬性,該屬性本身是用於孩子和寵物之間一對多關係的巢狀陣列。
對於 location 屬性,我們將三個相關屬性(州、縣和城市)組合到一個物件中。
以這種方式嵌入物件而不是嵌入物件陣列類似於在關係資料庫中兩個單獨表中的兩行之間具有一對一關係。
嵌入資料
當您開始在文件儲存(例如 DocumentDB)中建模資料時,請嘗試將您的實體視為以 JSON 表示的自包含文件。在使用關係資料庫時,我們總是對資料進行規範化。
規範化資料通常涉及獲取一個實體(例如客戶)並將其分解成離散的資料塊,例如聯絡方式和地址。
要讀取客戶及其所有聯絡方式和地址,您需要使用 JOIN 來有效地在執行時聚合您的資料。
現在讓我們看看如何在文件資料庫中將相同的資料建模為自包含實體。
{
   "id": "1",
   "firstName": "Mark",
   "lastName": "Upston",

   "addresses": [
      {
         "line1": "232 Main Street",
         "line2": "Unit 1",
         "city": "Brooklyn",
         "state": "NY",
         "zip": 11229
      }
   ],

   "contactDetails": [
      {"email": "mark.upston@xyz.com"},
      {"phone": "+1 356 545-86455", "extension": 5555}
   ]
}
如您所見,我們已對客戶記錄進行了反規範化,其中客戶的所有資訊都嵌入到單個 JSON 文件中。
在 NoSQL 中,我們有自由模式,因此您也可以以不同的格式新增聯絡方式和地址。在 NoSQL 中,您可以透過單個讀取操作從資料庫中檢索客戶記錄。類似地,更新記錄也是單個寫入操作。
以下是使用 .Net SDK 建立文件的步驟。
步驟 1 - 例項化 DocumentClient。然後,我們將查詢 myfirstdb 資料庫,並查詢 MyCollection 集合,我們將其儲存在此私有變數 collection 中,以便在整個類中都可以訪問它。
private static async Task CreateDocumentClient() {
   // Create a new instance of the DocumentClient

   using (var client = new DocumentClient(new Uri(EndpointUrl), AuthorizationKey)) {
      database = client.CreateDatabaseQuery("SELECT * FROM c WHERE c.id =
         'myfirstdb'").AsEnumerable().First();

      collection = client.CreateDocumentCollectionQuery(database.CollectionsLink,
         "SELECT * FROM c WHERE c.id = 'MyCollection'").AsEnumerable().First();

      await CreateDocuments(client);
   }

}
步驟 2 − 在 CreateDocuments 任務中建立一些文件。
private async static Task CreateDocuments(DocumentClient client) {
   Console.WriteLine();
   Console.WriteLine("**** Create Documents ****");
   Console.WriteLine();

   dynamic document1Definition = new {
      name = "New Customer 1", address = new {
         addressType = "Main Office",
         addressLine1 = "123 Main Street",
         location = new {
            city = "Brooklyn", stateProvinceName = "New York"
         },
         postalCode = "11229", countryRegionName = "United States"
      },
   };

   Document document1 = await CreateDocument(client, document1Definition);
   Console.WriteLine("Created document {0} from dynamic object", document1.Id);
   Console.WriteLine();
}
第一個文件將從此動態物件生成。這可能看起來像 JSON,但當然不是。這是 C# 程式碼,我們正在建立真正的 .NET 物件,但沒有類定義。相反,屬性是從物件初始化的方式推斷出來的。您還可以注意到,我們沒有為此文件提供 Id 屬性。
步驟 3 - 現在讓我們看看 CreateDocument,它看起來與我們為建立資料庫和集合看到的模式相同。
private async static Task<Document> CreateDocument(DocumentClient client,
   object documentObject) {
   var result = await client.CreateDocumentAsync(collection.SelfLink, documentObject);

   var document = result.Resource;
   Console.WriteLine("Created new document: {0}\r\n{1}", document.Id, document);

   return result;
}
步驟 4 - 這次我們呼叫 CreateDocumentAsync 並指定要向其中新增文件的集合的 SelfLink。我們得到一個包含 resource 屬性的響應,在這種情況下,該屬性表示具有其系統生成屬性的新文件。
在下面的 CreateDocuments 任務中,我們建立了三個文件。
在第一個文件中,Document 物件是 SDK 中定義的類,它繼承自 resource,因此它具有所有通用的資源屬性,但也包括定義無模式文件本身的動態屬性。
private async static Task CreateDocuments(DocumentClient client) {
   Console.WriteLine();
   Console.WriteLine("**** Create Documents ****");
   Console.WriteLine();

   dynamic document1Definition = new {
      name = "New Customer 1", address = new {
         addressType = "Main Office",
         addressLine1 = "123 Main Street",
         location = new {
            city = "Brooklyn", stateProvinceName = "New York"
         },
         postalCode = "11229",
         countryRegionName = "United States"
      },
   };

   Document document1 = await CreateDocument(client, document1Definition);
   Console.WriteLine("Created document {0} from dynamic object", document1.Id);
   Console.WriteLine();

   var document2Definition = @" {
      ""name"": ""New Customer 2"",

      ""address"": {
         ""addressType"": ""Main Office"",
         ""addressLine1"": ""123 Main Street"",
         ""location"": {
            ""city"": ""Brooklyn"", ""stateProvinceName"": ""New York""
         },
         ""postalCode"": ""11229"",
         ""countryRegionName"": ""United States""
      }
   }";

   Document document2 = await CreateDocument(client, document2Definition);
   Console.WriteLine("Created document {0} from JSON string", document2.Id);
   Console.WriteLine();

   var document3Definition = new Customer {
      Name = "New Customer 3",

      Address = new Address {
         AddressType = "Main Office",
         AddressLine1 = "123 Main Street",
         Location = new Location {
            City = "Brooklyn", StateProvinceName = "New York"
         },
         PostalCode = "11229",
         CountryRegionName = "United States"
      },
   };

   Document document3 = await CreateDocument(client, document3Definition);
   Console.WriteLine("Created document {0} from typed object", document3.Id);
   Console.WriteLine();
}
第二個文件僅使用原始 JSON 字串。現在,我們進入 CreateDocument 的過載,該過載使用 JavaScriptSerializer 將字串反序列化為物件,然後將其傳遞給用於建立第一個文件的相同 CreateDocument 方法。
在第三個文件中,我們使用了在我們的應用程式中定義的 C# 物件 Customer。
讓我們看看這個客戶,它有一個 Id 和 address 屬性,其中 address 是一個巢狀物件,它有自己的屬性,包括 location,location 又是另一個巢狀物件。
using Newtonsoft.Json;

using System;
using System.Collections.Generic;
using System.Linq;
using System.Text;
using System.Threading.Tasks;

namespace DocumentDBDemo {

   public class Customer {
      [JsonProperty(PropertyName = "id")]
      public string Id { get; set; }
      // Must be nullable, unless generating unique values for new customers on client
      [JsonProperty(PropertyName = "name")]
      public string Name { get; set; }
      [JsonProperty(PropertyName = "address")]
      public Address Address { get; set; }
   }

   public class Address {
      [JsonProperty(PropertyName = "addressType")]
      public string AddressType { get; set; }

      [JsonProperty(PropertyName = "addressLine1")]
      public string AddressLine1 { get; set; }

      [JsonProperty(PropertyName = "location")]
      public Location Location { get; set; }

      [JsonProperty(PropertyName = "postalCode")]
      public string PostalCode { get; set; }

      [JsonProperty(PropertyName = "countryRegionName")]
      public string CountryRegionName { get; set; }
   }

   public class Location {
      [JsonProperty(PropertyName = "city")]
      public string City { get; set; }

      [JsonProperty(PropertyName = "stateProvinceName")]
      public string StateProvinceName { get; set; }
   }
}
我們還設定了 JSON 屬性,因為我們希望在兩側都保持正確的約定。
因此,我只是建立我的 New Customer 物件及其巢狀的子物件,然後再次呼叫 CreateDocument。儘管我們的 customer 物件確實有一個 Id 屬性,但我們沒有為其提供值,因此 DocumentDB 根據 GUID 生成了一個,就像它對前兩個文件所做的那樣。
編譯並執行上述程式碼後,您將收到以下輸出。
**** Create Documents ****
Created new document: 575882f0-236c-4c3d-81b9-d27780206b2c
{
  "name": "New Customer 1",
  "address": {
    "addressType": "Main Office",
    "addressLine1": "123 Main Street",
    "location": {
      "city": "Brooklyn",
      "stateProvinceName": "New York"
    },
    "postalCode": "11229",
    "countryRegionName": "United States"
  },
  "id": "575882f0-236c-4c3d-81b9-d27780206b2c",
  "_rid": "kV5oANVXnwDGPgAAAAAAAA==",
  "_ts": 1450037545,
  "_self": "dbs/kV5oAA==/colls/kV5oANVXnwA=/docs/kV5oANVXnwDGPgAAAAAAAA==/",
  "_etag": "\"00006fce-0000-0000-0000-566dd1290000\"",
  "_attachments": "attachments/"
}
Created document 575882f0-236c-4c3d-81b9-d27780206b2c from dynamic object
Created new document: 8d7ad239-2148-4fab-901b-17a85d331056
{
  "name": "New Customer 2",
  "address": {
    "addressType": "Main Office",
    "addressLine1": "123 Main Street",
    "location": {
      "city": "Brooklyn",
      "stateProvinceName": "New York"
    },
    "postalCode": "11229",
    "countryRegionName": "United States"
  },
  "id": "8d7ad239-2148-4fab-901b-17a85d331056",
  "_rid": "kV5oANVXnwDHPgAAAAAAAA==",
  "_ts": 1450037545,
  "_self": "dbs/kV5oAA==/colls/kV5oANVXnwA=/docs/kV5oANVXnwDHPgAAAAAAAA==/",
  "_etag": "\"000070ce-0000-0000-0000-566dd1290000\"",
  "_attachments": "attachments/"
}
Created document 8d7ad239-2148-4fab-901b-17a85d331056 from JSON string
Created new document: 49f399a8-80c9-4844-ac28-cd1dee689968
{
  "id": "49f399a8-80c9-4844-ac28-cd1dee689968",
  "name": "New Customer 3",
  "address": {
    "addressType": "Main Office",
    "addressLine1": "123 Main Street",
    "location": {
      "city": "Brooklyn",
      "stateProvinceName": "New York"
    },
    "postalCode": "11229",
    "countryRegionName": "United States"
  },
  "_rid": "kV5oANVXnwDIPgAAAAAAAA==",
  "_ts": 1450037546,
  "_self": "dbs/kV5oAA==/colls/kV5oANVXnwA=/docs/kV5oANVXnwDIPgAAAAAAAA==/",
  "_etag": "\"000071ce-0000-0000-0000-566dd12a0000\"",
  "_attachments": "attachments/"
}
Created document 49f399a8-80c9-4844-ac28-cd1dee689968 from typed object
DocumentDB - 資料型別
JSON 或 JavaScript 物件表示法是一種輕量級的基於文字的開放標準,旨在用於人類可讀的資料交換,並且易於機器解析和生成。JSON 是 DocumentDB 的核心。我們透過網路傳輸 JSON,我們將 JSON 儲存為 JSON,並索引 JSON 樹,允許查詢完整的 JSON 文件。
JSON 格式支援以下資料型別 -
| 序號 | 型別和描述 |
|---|---|
| 1 | 數字 JavaScript 中的雙精度浮點格式 |
| 2 | 字串 帶有反斜槓轉義的雙引號 Unicode |
| 3 | 布林值 真或假 |
| 4 | 陣列 值的排序序列 |
| 5 | 值 它可以是字串、數字、真或假、空等。 |
| 6 | 物件 鍵值對的無序集合 |
| 7 | 空格 它可以在任何一對標記之間使用 |
| 8 | 空 空 |
讓我們看一個簡單的 DateTime 型別示例。將出生日期新增到客戶類中。
public class Customer {
   [JsonProperty(PropertyName = "id")]
   public string Id { get; set; }

   // Must be nullable, unless generating unique values for new customers on client
   [JsonProperty(PropertyName = "name")]
   public string Name { get; set; }

   [JsonProperty(PropertyName = "address")]
   public Address Address { get; set; }

   [JsonProperty(PropertyName = "birthDate")]
   public DateTime BirthDate { get; set; }
}
我們可以像以下程式碼所示那樣儲存、檢索和查詢 DateTime。
private async static Task CreateDocuments(DocumentClient client) {
   Console.WriteLine();
   Console.WriteLine("**** Create Documents ****");
   Console.WriteLine();

   var document3Definition = new Customer {
      Id = "1001",
      Name = "Luke Andrew",

      Address = new Address {
         AddressType = "Main Office",
         AddressLine1 = "123 Main Street",
         Location = new Location {
            City = "Brooklyn",
            StateProvinceName = "New York"
         },
         PostalCode = "11229",
         CountryRegionName = "United States"
      },

      BirthDate = DateTime.Parse(DateTime.Today.ToString()),
   };

   Document document3 = await CreateDocument(client, document3Definition);
   Console.WriteLine("Created document {0} from typed object", document3.Id);
   Console.WriteLine();
}
當上述程式碼編譯並執行,並且文件建立後,您將看到現在添加了出生日期。
**** Create Documents ****
Created new document: 1001
{
   "id": "1001",
   "name": "Luke Andrew",
   "address": {
      "addressType": "Main Office",
      "addressLine1": "123 Main Street",
      "location": {
         "city": "Brooklyn",
         "stateProvinceName": "New York"
      },
      "postalCode": "11229",
      "countryRegionName": "United States"
   },
   "birthDate": "2015-12-14T00:00:00",
   "_rid": "Ic8LAMEUVgAKAAAAAAAAAA==",
   "_ts": 1450113676,
   "_self": "dbs/Ic8LAA==/colls/Ic8LAMEUVgA=/docs/Ic8LAMEUVgAKAAAAAAAAAA==/",
   "_etag": "\"00002d00-0000-0000-0000-566efa8c0000\"",
   "_attachments": "attachments/"
}
Created document 1001 from typed object
DocumentDB - 限制記錄
Microsoft 最近在如何查詢 Azure DocumentDB 方面添加了許多改進,例如 SQL 語法的 TOP 關鍵字,這使得查詢執行速度更快並消耗更少的資源,提高了查詢運算子的限制,並在 .NET SDK 中添加了對其他 LINQ 運算子的支援。
讓我們看一個簡單的例子,在這個例子中我們將只檢索前兩條記錄。如果您有很多記錄,並且只想檢索其中的一些,那麼您可以使用 Top 關鍵字。在本例中,我們有很多地震記錄。
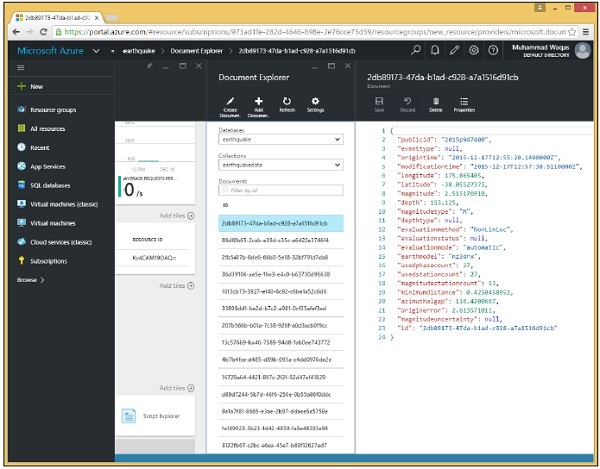
現在我們只想顯示前兩條記錄
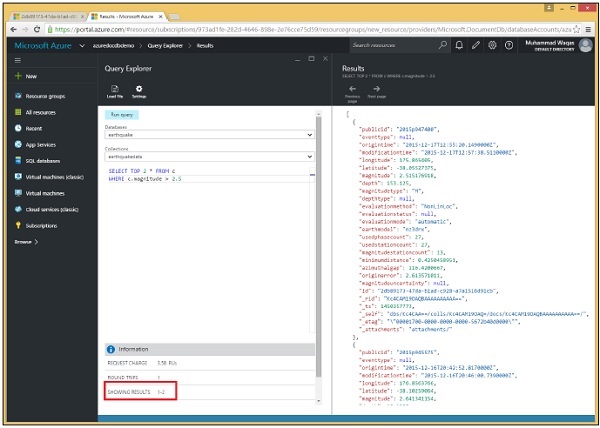
步驟 1 - 轉到查詢資源管理器並執行此查詢。
SELECT * FROM c
WHERE c.magnitude > 2.5
您將看到它檢索了四條記錄,因為我們尚未指定 TOP 關鍵字。
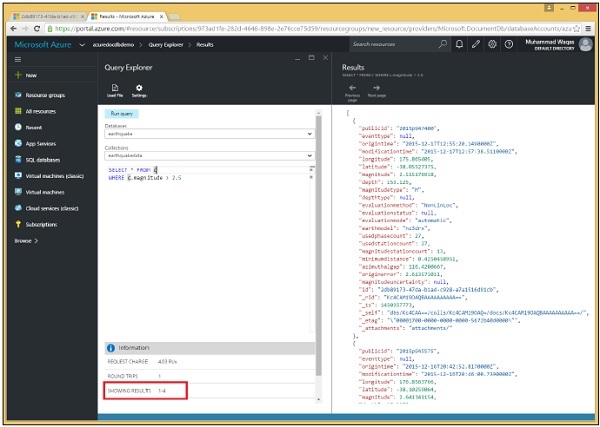
步驟 2 - 現在使用相同查詢的 TOP 關鍵字。這裡我們指定了 TOP 關鍵字,'2' 表示我們只需要兩條記錄。
SELECT TOP 2 * FROM c
WHERE c.magnitude > 2.5
步驟 3 - 現在執行此查詢,您將看到只檢索了兩條記錄。
類似地,您可以在使用 .Net SDK 的程式碼中使用 TOP 關鍵字。以下是實現。
private async static Task QueryDocumentsWithPaging(DocumentClient client) {
   Console.WriteLine();
   Console.WriteLine("**** Query Documents (paged results) ****");
   Console.WriteLine();
   Console.WriteLine("Quering for all documents");

   var sql = "SELECT TOP 3 * FROM c";
   var query = client
      .CreateDocumentQuery(collection.SelfLink, sql)
      .AsDocumentQuery();

   while (query.HasMoreResults) {
      var documents = await query.ExecuteNextAsync();

      foreach (var document in documents) {
         Console.WriteLine(" PublicId: {0}; Magnitude: {1};", document.publicid,
            document.magnitude);
      }
   }

   Console.WriteLine();
}
以下是 CreateDocumentClient 任務,其中例項化了 DocumentClient 和地震資料庫。
private static async Task CreateDocumentClient() {
   // Create a new instance of the DocumentClient
   using (var client = new DocumentClient(new Uri(EndpointUrl), AuthorizationKey)) {
      database = client.CreateDatabaseQuery("SELECT * FROM c WHERE c.id =
         'earthquake'").AsEnumerable().First();

      collection = client.CreateDocumentCollectionQuery(database.CollectionsLink,
         "SELECT * FROM c WHERE c.id = 'earthquakedata'").AsEnumerable().First();

      await QueryDocumentsWithPaging(client);
   }
}
當上述程式碼編譯並執行時,您將看到只檢索了三條記錄。
**** Query Documents (paged results) ****

Quering for all documents
PublicId: 2015p947400; Magnitude: 2.515176918;
PublicId: 2015p947373; Magnitude: 1.506774108;
PublicId: 2015p947329; Magnitude: 1.593394461;
DocumentDB - 排序記錄
Microsoft Azure DocumentDB 支援使用 JSON 文件上的 SQL 查詢文件。您可以使用查詢中的 ORDER BY 子句對集合中的數字和字串中的文件進行排序。該子句可以包含可選的 ASC/DESC 引數來指定必須檢索結果的順序。
讓我們看下面的例子,我們有一個 JSON 文件。
{
   "id": "Food Menu",
   "description": "Grapes, red or green (European type, such as Thompson seedless), raw",

   "tags": [
      {
         "name": "grapes"
      },

      {
         "name": "red or green (european type"
      },

      {
         "name": "such as thompson seedless)"
      },

      {
         "name": "raw"
      }
   ],

   "foodGroup": "Fruits and Fruit Juices",

   "servings": [
      {
         "amount": 1,
         "description": "cup",
         "weightInGrams": 151
      },

      {
         "amount": 10,
         "description": "grapes",
         "weightInGrams": 49
      },

      {
         "amount": 1,
         "description": "NLEA serving",
         "weightInGrams": 126
      }
   ]

}
以下是按降序排列結果的 SQL 查詢。
SELECT f.description, f.foodGroup,
   f.servings[2].description AS servingDescription,
   f.servings[2].weightInGrams AS servingWeight

FROM f
ORDER BY f.servings[2].weightInGrams DESC
當執行上述查詢時,您將收到以下輸出。
[
   {
      "description": "Grapes, red or green (European type, such as Thompson
         seedless), raw",
      "foodGroup": "Fruits and Fruit Juices",
      "servingDescription": "NLEA serving",
      "servingWeight": 126
   }
]
DocumentDB - 索引記錄
預設情況下,DocumentDB 會在文件新增到資料庫後立即自動索引文件中的每個屬性。但是,您可以控制並微調自己的索引策略,當存在從不需要索引的特定文件和/或屬性時,這可以減少儲存和處理開銷。
指示 DocumentDB 自動索引每個屬性的預設索引策略適用於許多常見場景。但您也可以實現自定義策略,對要索引的內容和不索引的內容以及與索引相關的其他功能進行精確控制。
DocumentDB 支援以下型別的索引 -
- 雜湊
- 範圍
雜湊
雜湊索引支援高效地查詢相等性,即,在搜尋給定屬性等於精確值的文件時,而不是匹配一系列值(如小於、大於或介於之間)。
您可以對雜湊索引執行範圍查詢,但 DocumentDB 將無法使用雜湊索引查詢匹配的文件,而需要依次掃描每個文件以確定是否應由範圍查詢選擇它。
您將無法使用 ORDER BY 子句對僅具有雜湊索引的屬性上的文件進行排序。
範圍
為屬性定義的範圍索引,DocumentDB 允許高效地查詢針對一系列值的文件。它還允許您使用 ORDER BY 對該屬性上的查詢結果進行排序。
DocumentDB 允許您在任何或所有屬性上同時定義雜湊索引和範圍索引,這支援高效的相等性和範圍查詢,以及 ORDER BY。
索引策略
每個集合都有一個索引策略,該策略決定在每個文件的每個屬性中的數字和字串中使用哪種型別的索引。
您還可以控制文件在新增到集合時是否自動索引。
預設情況下啟用自動索引,但在新增文件時可以覆蓋此行為,告訴 DocumentDB 不要索引該特定文件。
您可以停用自動索引,以便預設情況下,文件在新增到集合時不會被索引。類似地,您可以在文件級別覆蓋此設定,並在將文件新增到集合時指示 DocumentDB 索引特定文件。這稱為手動索引。
包含/排除索引
索引策略還可以定義應包含在索引中或排除在索引之外的路徑或路徑。如果您知道文件的某些部分永遠不會被查詢,而某些部分會被查詢,這將非常有用。
在這些情況下,您可以透過告訴 DocumentDB 只索引新增到集合的每個文件的這些特定部分來減少索引開銷。
自動索引
讓我們看一個自動索引的簡單例子。
步驟 1 - 首先,我們建立一個名為 autoindexing 的集合,並且在沒有顯式提供策略的情況下,此集合使用預設索引策略,這意味著在此集合上啟用了自動索引。
這裡我們使用基於 ID 的路由進行資料庫自連結,因此我們不需要知道它的資源 ID 或在建立集合之前查詢它。我們只需使用資料庫 ID,即 mydb。
步驟 2 - 現在讓我們建立兩個文件,這兩個文件的姓氏都是 Upston。
private async static Task AutomaticIndexing(DocumentClient client) {
   Console.WriteLine();
   Console.WriteLine("**** Override Automatic Indexing ****");

   // Create collection with automatic indexing

   var collectionDefinition = new DocumentCollection {
      Id = "autoindexing"
   };

   var collection = await client.CreateDocumentCollectionAsync("dbs/mydb",
      collectionDefinition);

   // Add a document (indexed)
   dynamic indexedDocumentDefinition = new {
      id = "MARK",
      firstName = "Mark",
      lastName = "Upston",
      addressLine = "123 Main Street",
      city = "Brooklyn",
      state = "New York",
      zip = "11229",
   };

   Document indexedDocument = await client
      .CreateDocumentAsync("dbs/mydb/colls/autoindexing", indexedDocumentDefinition);

   // Add another document (request no indexing)
   dynamic unindexedDocumentDefinition = new {
      id = "JANE",
      firstName = "Jane",
      lastName = "Upston",
      addressLine = "123 Main Street",
      city = "Brooklyn",
      state = "New York",
      zip = "11229",
   };

   Document unindexedDocument = await client
      .CreateDocumentAsync("dbs/mydb/colls/autoindexing", unindexedDocumentDefinition,
      new RequestOptions { IndexingDirective = IndexingDirective.Exclude });

   //Unindexed document won't get returned when querying on non-ID (or selflink) property

   var doeDocs = client.CreateDocumentQuery("dbs/mydb/colls/autoindexing", "SELECT *
      FROM c WHERE c.lastName = 'Doe'").ToList();

   Console.WriteLine("Documents WHERE lastName = 'Doe': {0}", doeDocs.Count);

   // Unindexed document will get returned when using no WHERE clause

   var allDocs = client.CreateDocumentQuery("dbs/mydb/colls/autoindexing",
      "SELECT * FROM c").ToList();
   Console.WriteLine("All documents: {0}", allDocs.Count);

   // Unindexed document will get returned when querying by ID (or self-link) property

   Document janeDoc = client.CreateDocumentQuery("dbs/mydb/colls/autoindexing",
      "SELECT * FROM c WHERE c.id = 'JANE'").AsEnumerable().FirstOrDefault();
   Console.WriteLine("Unindexed document self-link: {0}", janeDoc.SelfLink);

   // Delete the collection

   await client.DeleteDocumentCollectionAsync("dbs/mydb/colls/autoindexing");
}
第一個,Mark Upston,被新增到集合中,然後根據預設索引策略立即自動索引。
但是,當為 Mark Upston 新增第二個文件時,我們已將請求選項與 IndexingDirective.Exclude 一起傳遞,這明確指示 DocumentDB 不要索引此文件,儘管集合的索引策略如此。
最後,我們對這兩個文件都有不同型別的查詢。
步驟 3 - 讓我們從 CreateDocumentClient 呼叫 AutomaticIndexing 任務。
private static async Task CreateDocumentClient() {
   // Create a new instance of the DocumentClient
   using (var client = new DocumentClient(new Uri(EndpointUrl), AuthorizationKey)) {
      await AutomaticIndexing(client);
   }
}
編譯並執行上述程式碼後,您將收到以下輸出。
**** Override Automatic Indexing ****
Documents WHERE lastName = 'Upston': 1
All documents: 2
Unindexed document self-link: dbs/kV5oAA==/colls/kV5oAOEkfQA=/docs/kV5oAOEkfQACA
AAAAAAAAA==/
如您所見,我們有兩個這樣的文件,但查詢只返回 Mark 的一個,因為 Mark 的一個沒有被索引。如果我們再次查詢,沒有 WHERE 子句來檢索集合中的所有文件,那麼我們將獲得包含兩個文件的結果集,這是因為未索引的文件總是會被沒有 WHERE 子句的查詢返回。
我們還可以透過其 ID 或自連結檢索未索引的文件。因此,當我們按 ID MARK 查詢 Mark 的文件時,我們會看到 DocumentDB 返回了該文件,即使它沒有在集合中被索引。
手動索引
讓我們看一個透過覆蓋自動索引來手動索引的簡單示例。
步驟 1 - 首先,我們將建立一個名為 manualindexing 的集合,並透過顯式停用自動索引來覆蓋預設策略。這意味著,除非我們另有請求,否則新增到此集合的新文件將不會被索引。
private async static Task ManualIndexing(DocumentClient client) {
   Console.WriteLine();
   Console.WriteLine("**** Manual Indexing ****");
   // Create collection with manual indexing

   var collectionDefinition = new DocumentCollection {
      Id = "manualindexing",
      IndexingPolicy = new IndexingPolicy {
         Automatic = false,
      },
   };

   var collection = await client.CreateDocumentCollectionAsync("dbs/mydb",
      collectionDefinition);

   // Add a document (unindexed)
   dynamic unindexedDocumentDefinition = new {
      id = "MARK",
      firstName = "Mark",
      lastName = "Doe",
      addressLine = "123 Main Street",
      city = "Brooklyn",
      state = "New York",
      zip = "11229",
   };

   Document unindexedDocument = await client
      .CreateDocumentAsync("dbs/mydb/colls/manualindexing", unindexedDocumentDefinition);

   // Add another document (request indexing)
   dynamic indexedDocumentDefinition = new {
      id = "JANE",
      firstName = "Jane",
      lastName = "Doe",
      addressLine = "123 Main Street",
      city = "Brooklyn",
      state = "New York",
      zip = "11229",
   };

   Document indexedDocument = await client.CreateDocumentAsync
      ("dbs/mydb/colls/manualindexing", indexedDocumentDefinition, new RequestOptions {
      IndexingDirective = IndexingDirective.Include });

   //Unindexed document won't get returned when querying on non-ID (or selflink) property

   var doeDocs = client.CreateDocumentQuery("dbs/mydb/colls/manualindexing",
      "SELECT * FROM c WHERE c.lastName = 'Doe'").ToList();
   Console.WriteLine("Documents WHERE lastName = 'Doe': {0}", doeDocs.Count);

   // Unindexed document will get returned when using no WHERE clause

   var allDocs = client.CreateDocumentQuery("dbs/mydb/colls/manualindexing",
      "SELECT * FROM c").ToList();
   Console.WriteLine("All documents: {0}", allDocs.Count);

   // Unindexed document will get returned when querying by ID (or self-link) property

   Document markDoc = client
      .CreateDocumentQuery("dbs/mydb/colls/manualindexing",
      "SELECT * FROM c WHERE c.id = 'MARK'")
      .AsEnumerable().FirstOrDefault();
   Console.WriteLine("Unindexed document self-link: {0}", markDoc.SelfLink);
   await client.DeleteDocumentCollectionAsync("dbs/mydb/colls/manualindexing");
}
步驟 2 − 現在我們將再次建立與之前相同的兩個文件。這次我們不會為 Mark 的文件提供任何特殊請求選項,因為集合的索引策略,此文件將不會被索引。
步驟 3 − 現在當我們為 Mark 新增第二個文件時,我們使用帶有 IndexingDirective.Include 的 RequestOptions 來告訴 DocumentDB 它應該索引此文件,這將覆蓋集合中不應索引的索引策略。
最後,我們對這兩個文件都有不同型別的查詢。
步驟 4 − 讓我們從 CreateDocumentClient 呼叫 ManualIndexing 任務。
private static async Task CreateDocumentClient() {
   // Create a new instance of the DocumentClient
   using (var client = new DocumentClient(new Uri(EndpointUrl), AuthorizationKey)) {
      await ManualIndexing(client);
   }
}
編譯並執行上述程式碼後,您將收到以下輸出。
**** Manual Indexing ****
Documents WHERE lastName = 'Upston': 1
All documents: 2
Unindexed document self-link: dbs/kV5oAA==/colls/kV5oANHJPgE=/docs/kV5oANHJPgEBA
AAAAAAAAA==/
同樣,查詢僅返回兩個文件中的一個,但這次,它返回 Jane Doe,這是我們明確請求要索引的。但與之前一樣,在沒有 WHERE 子句的情況下進行查詢會檢索集合中的所有文件,包括 Mark 的未索引文件。我們也可以透過其 ID 查詢未索引的文件,即使它未被索引,DocumentDB 也會返回該文件。
DocumentDB - 地理空間資料
Microsoft 添加了地理空間支援,它允許您在文件中儲存位置資料,並對點和多邊形之間的距離和交集執行空間計算。
空間資料描述了物件在空間中的位置和形狀。
通常,它可以用來表示一個人的位置、一個感興趣的地方,或一個城市或一個湖泊的邊界。
常見的用例通常涉及鄰近查詢。例如,“查詢我當前位置附近的所有大學”。
一個點表示空間中的單個位置,表示確切的位置,例如特定大學的街道地址。點在 DocumentDB 中使用其座標對(經度和緯度)表示。以下是 JSON 點的示例。
{
   "type":"Point",
   "coordinates":[ 28.3, -10.7 ]
}
讓我們來看一個包含大學位置的簡單示例。
{
   "id":"case-university",
   "name":"CASE: Center For Advanced Studies In Engineering",
   "city":"Islamabad",

   "location": {
      "type":"Point",
      "coordinates":[ 33.7194136, -73.0964862 ]
   }
}
要根據位置檢索大學名稱,您可以使用以下查詢。
SELECT c.name FROM c

WHERE c.id = "case-university" AND ST_ISVALID({
      "type":"Point",
      "coordinates":[ 33.7194136, -73.0964862 ]})
執行上述查詢時,您將收到以下輸出。
[
   {
      "name": "CASE: Center For Advanced Studies In Engineering"
   }
]
在 .NET 中建立包含地理空間資料的文件
您可以建立一個包含地理空間資料的文件,讓我們來看一個建立大學文件的簡單示例。
private async static Task CreateDocuments(DocumentClient client) {
   Console.WriteLine();
   Console.WriteLine("**** Create Documents ****");
   Console.WriteLine();

   var uniDocument = new UniversityProfile {
      Id = "nust",
      Name = "National University of Sciences and Technology",
      City = "Islamabad",
      Loc = new Point(33.6455715, 72.9903447)
   };

   Document document = await CreateDocument(client, uniDocument);
   Console.WriteLine("Created document {0} from typed object", document.Id);
   Console.WriteLine();
}
以下是 UniversityProfile 類的實現。
public class UniversityProfile {
   [JsonProperty(PropertyName = "id")]
   public string Id { get; set; }

   [JsonProperty("name")]
   public string Name { get; set; }

   [JsonProperty("city")]
   public string City { get; set; }

   [JsonProperty("location")]
   public Point Loc { get; set; }
}
編譯並執行上述程式碼後,您將收到以下輸出。
**** Create Documents ****
Created new document: nust
{
   "id": "nust",
   "name": "National University of Sciences and Technology",
   "city": "Islamabad",
   "location": {
      "type": "Point",
      "coordinates": [
         33.6455715,
         72.9903447
      ]
   },
   "_rid": "Ic8LAMEUVgANAAAAAAAAAA==",
   "_ts": 1450200910,
   "_self": "dbs/Ic8LAA==/colls/Ic8LAMEUVgA=/docs/Ic8LAMEUVgANAAAAAAAAAA==/",
   "_etag": "\"00004100-0000-0000-0000-56704f4e0000\"",
   "_attachments": "attachments/"
}
Created document nust from typed object
DocumentDB - 分割槽
當您的資料庫規模超過 10GB 時,您可以透過建立新的集合,然後將資料分散或分割槽到越來越多的集合中來擴充套件。
遲早單個集合(容量為 10GB)將不足以容納您的資料庫。現在 10GB 可能聽起來不是一個很大的數字,但請記住,我們正在儲存 JSON 文件,這僅僅是純文字,即使考慮到索引的儲存開銷,您也可以在 10GB 中容納大量純文字文件。
在可擴充套件性方面,儲存並不是唯一需要考慮的問題。集合上可用的最大吞吐量是每秒 2500 個請求單元,這是使用 S3 集合獲得的。因此,如果您需要更高的吞吐量,那麼您還需要透過使用多個集合進行分割槽來擴充套件。擴充套件分割槽也稱為水平分割槽。
有多種方法可用於使用 Azure DocumentDB 對資料進行分割槽。以下是最常見的策略 -
- 溢位分割槽
- 範圍分割槽
- 查詢分割槽
- 雜湊分割槽
溢位分割槽
溢位分割槽是最簡單的策略,因為它沒有分割槽鍵。當您不確定很多事情時,它通常是一個不錯的選擇。您可能不知道是否需要擴充套件到單個集合之外,或者可能需要新增多少個集合,或者需要新增的速度有多快。
溢位分割槽從單個集合開始,並且沒有分割槽鍵。
集合開始增長,然後繼續增長,然後繼續增長,直到您開始接近 10GB 的限制。
當您達到 90% 的容量時,您會溢位到一個新的集合並開始使用它來儲存新文件。
一旦您的資料庫擴充套件到大量集合,您可能希望轉向基於分割槽鍵的策略。
當您這樣做時,您需要透過根據您遷移到的任何策略將文件移動到不同的集合來重新平衡您的資料。
範圍分割槽
最常見的策略之一是範圍分割槽。使用這種方法,您可以確定文件的分割槽鍵可能落入的值範圍,並將文件定向到與該範圍對應的集合。
日期通常與這種策略一起使用,您可以在其中建立一個集合來儲存落入定義日期範圍內的文件。當您定義足夠小的範圍時,您可以確信沒有任何集合會超過其 10GB 的限制。例如,可能有一種情況是,單個集合可以合理地處理整個月的文件。
也可能是大多數使用者都在查詢當前資料,這將是本月或上個月的資料,但使用者很少搜尋更舊的資料。因此,您從 6 月開始使用 S3 集合,這是您可以購買的最昂貴的集合,並且可以提供您可以獲得的最佳吞吐量。
在 7 月,您購買另一個 S3 集合來儲存 7 月的資料,並且您還將 6 月的資料縮減到價格較低的 S2 集合。然後在 8 月,您獲得另一個 S3 集合,並將 7 月縮減到 S2,並將 6 月一直縮減到 S1。它會持續下去,月復一月,您始終保持當前資料可用以獲得高吞吐量,而舊資料則以較低的吞吐量保持可用。
只要查詢提供了分割槽鍵,就只會查詢需要查詢的集合,而不是像溢位分割槽那樣查詢資料庫中的所有集合。
查詢分割槽
使用查詢分割槽,您可以定義一個分割槽對映,該對映根據其分割槽鍵將文件路由到特定的集合。例如,您可以按區域進行分割槽。
將所有美國文件儲存在一個集合中,將所有歐洲文件儲存在另一個集合中,並將來自任何其他區域的所有文件儲存在第三個集合中。
使用此分割槽對映和查詢分割槽解析器可以根據分割槽鍵(包含在每個文件中的區域屬性)確定要建立文件的集合和要查詢的集合。
雜湊分割槽
在雜湊分割槽中,分割槽是根據雜湊函式的值分配的,允許您在多個分割槽之間均勻地分配請求和資料。
這通常用於對來自大量不同客戶端生成或使用的資料進行分割槽,並且對於儲存使用者配置檔案、目錄項等很有用。
讓我們來看一個使用 .NET SDK 提供的 RangePartitionResolver 進行範圍分割槽的簡單示例。
步驟 1 − 建立一個新的 DocumentClient,我們將在 CreateCollections 任務中建立兩個集合。一個將包含使用者 ID 以 A 到 M 開頭的使用者的文件,另一個將包含使用者 ID 以 N 到 Z 開頭的使用者的文件。
private static async Task CreateCollections(DocumentClient client) {
   await client.CreateDocumentCollectionAsync(“dbs/myfirstdb”, new DocumentCollection {
      Id = “CollectionAM” });

   await client.CreateDocumentCollectionAsync(“dbs/myfirstdb”, new DocumentCollection {
      Id = “CollectionNZ” });
}
步驟 2 − 為資料庫註冊範圍解析器。
步驟 3 − 建立一個新的 RangePartitionResolver<string>,這是我們分割槽鍵的資料型別。建構函式採用兩個引數,分割槽鍵的屬性名稱和一個字典,即分片對映或分割槽對映,它只是我們為解析器預定義的範圍和相應集合的列表。
private static void RegisterRangeResolver(DocumentClient client) {

   //Note: \uffff is the largest UTF8 value, so M\ufff includes all strings that start with M.

   var resolver = new RangePartitionResolver<string>(
      "userId", new Dictionary<Range<string>, string>() {
      { new Range<string>("A", "M\uffff"), "dbs/myfirstdb/colls/CollectionAM" },
      { new Range<string>("N", "Z\uffff"), "dbs/myfirstdb/colls/CollectionNZ" },
   });

   client.PartitionResolvers["dbs/myfirstdb"] = resolver;
 }
這裡需要對最大可能的 UTF-8 值進行編碼。否則,第一個範圍將不會匹配任何 M,除了單個 M,並且第二個範圍中的 Z 也是如此。因此,您可以將此處的編碼值視為匹配分割槽鍵的萬用字元。
步驟 4 − 建立解析器後,使用當前 DocumentClient 為資料庫註冊它。為此,只需將其分配給 PartitionResolver 的 dictionary 屬性。
我們將針對資料庫建立和查詢文件,而不是像您通常那樣針對集合建立和查詢文件,解析器將使用此對映將請求路由到相應的集合。
現在讓我們建立一些文件。首先,我們將為 userId Kirk 建立一個,然後為 Spock 建立一個。
private static async Task CreateDocumentsAcrossPartitions(DocumentClient client) {
   Console.WriteLine();
   Console.WriteLine("**** Create Documents Across Partitions ****");

   var kirkDocument = await client.CreateDocumentAsync("dbs/myfirstdb", new { userId =
      "Kirk", title = "Captain" });
   Console.WriteLine("Document 1: {0}", kirkDocument.Resource.SelfLink);

   var spockDocument = await client.CreateDocumentAsync("dbs/myfirstdb", new { userId =
      "Spock", title = "Science Officer" });
   Console.WriteLine("Document 2: {0}", spockDocument.Resource.SelfLink);
}
此處的第一個引數是資料庫的自連結,而不是特定的集合。如果沒有分割槽解析器,這是不可能的,但有了分割槽解析器,它就可以無縫工作。
這兩個文件都儲存在資料庫 myfirstdb 中,但我們知道 Kirk 儲存在 A 到 M 的集合中,Spock 儲存在 N 到 Z 的集合中,如果我們的 RangePartitionResolver 工作正常的話。
讓我們從 CreateDocumentClient 任務中呼叫這些,如下面的程式碼所示。
private static async Task CreateDocumentClient() {
   // Create a new instance of the DocumentClient
   using (var client = new DocumentClient(new Uri(EndpointUrl), AuthorizationKey)) {
      await CreateCollections(client);
      RegisterRangeResolver(client);
      await CreateDocumentsAcrossPartitions(client);
   }
}
執行上述程式碼後,您將收到以下輸出。
**** Create Documents Across Partitions ****
Document 1: dbs/Ic8LAA==/colls/Ic8LAO2DxAA=/docs/Ic8LAO2DxAABAAAAAAAAAA==/
Document 2: dbs/Ic8LAA==/colls/Ic8LAP12QAE=/docs/Ic8LAP12QAEBAAAAAAAAAA==/
如所見,這兩個文件的自連結具有不同的資源 ID,因為它們存在於兩個單獨的集合中。
DocumentDB - 資料遷移
使用 DocumentDB 資料遷移工具,您可以輕鬆地將資料遷移到 DocumentDB。DocumentDB 資料遷移工具是一個免費的開源實用程式,您可以從 Microsoft 下載中心下載 https://www.microsoft.com/
遷移工具支援許多資料來源,其中一些列在下面 -
- SQL Server
- JSON 檔案
- 逗號分隔值 (CSV) 的平面檔案
- MongoDB
- Azure 表儲存
- Amazon DynamoDB
- HBase,甚至其他 DocumentDB 資料庫
下載 DocumentDB 資料遷移工具後,解壓縮 zip 檔案。
您可以在此資料夾中看到兩個可執行檔案,如下面的螢幕截圖所示。
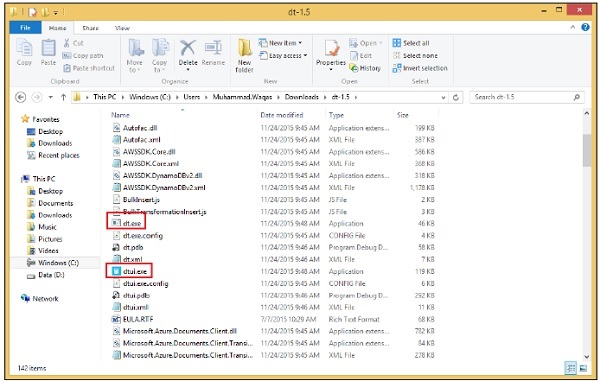
首先,有 dt.exe,它是帶命令列介面的控制檯版本,然後有 dtui.exe,它是帶圖形使用者介面的桌面版本。
讓我們啟動 GUI 版本。

您可以看到歡迎頁面。單擊“下一步”進入“源資訊”頁面。

在這裡,您可以配置您的資料來源,並且您可以從下拉選單中看到許多受支援的選擇。
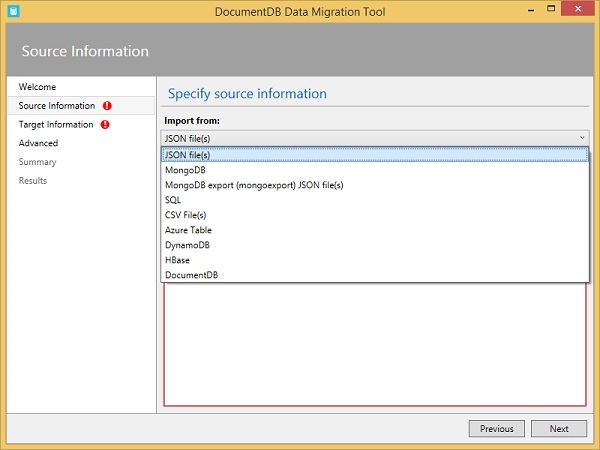
當您進行選擇時,“源資訊”頁面的其餘部分將相應地更改。
使用 DocumentDB 資料遷移工具將資料匯入 DocumentDB 非常容易。我們建議您練習上述示例並使用其他資料檔案。
DocumentDB - 訪問控制
DocumentDB 提供了控制對 DocumentDB 資源訪問的概念。對 DocumentDB 資源的訪問由主金鑰令牌或資源令牌控制。基於資源令牌的連線只能訪問令牌指定的資源,而不能訪問其他資源。資源令牌基於使用者許可權。
首先,您建立一個或多個使用者,這些使用者是在資料庫級別定義的。
然後,您為每個使用者建立一個或多個許可權,這些許可權基於您希望允許每個使用者訪問的資源。
每個許可權都會生成一個資源令牌,該令牌允許對給定資源進行只讀或完全訪問,並且該令牌可以是資料庫中的任何使用者資源。
使用者在資料庫級別定義,許可權為每個使用者定義。
使用者和許可權適用於資料庫中的所有集合。
讓我們來看一個簡單的示例,我們將學習如何定義使用者和許可權以在 DocumentDB 中實現細粒度安全性。
我們將從一個新的 DocumentClient 開始,並查詢 myfirstdb 資料庫。
private static async Task CreateDocumentClient() {
   // Create a new instance of the DocumentClient
   using (var client = new DocumentClient(new Uri(EndpointUrl), AuthorizationKey)) {
      database = client.CreateDatabaseQuery("SELECT * FROM c WHERE c.id =
         'myfirstdb'").AsEnumerable().First();

      collection = client.CreateDocumentCollectionQuery(database.CollectionsLink,
         "SELECT * FROM c WHERE c.id = 'MyCollection'").AsEnumerable().First();

      var alice = await CreateUser(client, "Alice");
      var tom = await CreateUser(client, "Tom");
   }
}
以下是 CreateUser 的實現。
private async static Task<User> CreateUser(DocumentClient client, string userId) {
   Console.WriteLine();
   Console.WriteLine("**** Create User {0} in {1} ****", userId, database.Id);

   var userDefinition = new User { Id = userId };
   var result = await client.CreateUserAsync(database.SelfLink, userDefinition);
   var user = result.Resource;

   Console.WriteLine("Created new user");
   ViewUser(user);

   return user;
}
步驟 1 − 建立兩個使用者,Alice 和 Tom,就像我們建立任何資源一樣,我們構建一個具有所需 ID 的定義物件並呼叫 create 方法,在本例中,我們呼叫 CreateUserAsync 方法,並傳入資料庫的 SelfLink 和 userDefinition。我們從其 resource 屬性獲取結果,並從中獲取新建立的使用者物件。
現在,讓我們在資料庫中檢視這兩個新使用者。
private static void ViewUsers(DocumentClient client) {
   Console.WriteLine();
   Console.WriteLine("**** View Users in {0} ****", database.Id);

   var users = client.CreateUserQuery(database.UsersLink).ToList();
   var i = 0;

   foreach (var user in users) {
      i++;
      Console.WriteLine();
      Console.WriteLine("User #{0}", i);
      ViewUser(user);
   }

   Console.WriteLine();
   Console.WriteLine("Total users in database {0}: {1}", database.Id, users.Count);
}

private static void ViewUser(User user) {
   Console.WriteLine("User ID: {0} ", user.Id);
   Console.WriteLine("Resource ID: {0} ", user.ResourceId);
   Console.WriteLine("Self Link: {0} ", user.SelfLink);
   Console.WriteLine("Permissions Link: {0} ", user.PermissionsLink);
   Console.WriteLine("Timestamp: {0} ", user.Timestamp);
}
步驟 2 − 對資料庫的 UsersLink 呼叫 CreateUserQuery 以檢索所有使用者的列表。然後迴圈遍歷它們並檢視它們的屬性。
現在我們必須先建立它們。假設我們想允許 Alice 對 MyCollection 集合擁有讀寫許可權,但 Tom 只能讀取集合中的文件。
await CreatePermission(client, alice, "Alice Collection Access", PermissionMode.All,
   collection);

await CreatePermission(client, tom, "Tom Collection Access", PermissionMode.Read,
   collection);
步驟 3 − 在 MyCollection 集合(即資源)上建立一個許可權,因此我們需要獲取該資源的 SelfLink。
步驟 4 − 然後為 Alice 建立一個針對此集合的 Permission.All 許可權,併為 Tom 建立一個針對此集合的 Permission.Read 許可權。
以下是 CreatePermission 的實現。
private async static Task CreatePermission(DocumentClient client, User user,
   string permId, PermissionMode permissionMode, string resourceLink) {
   Console.WriteLine();
   Console.WriteLine("**** Create Permission {0} for {1} ****", permId, user.Id);

   var permDefinition = new Permission {
      Id = permId,
      PermissionMode = permissionMode,
      ResourceLink = resourceLink
   };

   var result = await client.CreatePermissionAsync(user.SelfLink, permDefinition);
   var perm = result.Resource;
   Console.WriteLine("Created new permission");
   ViewPermission(perm);
}
正如您現在應該預期的那樣,我們透過為新許可權建立一個定義物件來實現此操作,該物件包括一個 Id 和一個 permissionMode(Permission.All 或 Permission.Read),以及受許可權保護的資源的 SelfLink。
步驟 5 − 呼叫 CreatePermissionAsync 並從結果的 resource 屬性中獲取建立的許可權。
要檢視建立的許可權,以下是 ViewPermissions 的實現。
private static void ViewPermissions(DocumentClient client, User user) {
   Console.WriteLine();
   Console.WriteLine("**** View Permissions for {0} ****", user.Id);

   var perms = client.CreatePermissionQuery(user.PermissionsLink).ToList();
   var i = 0;

   foreach (var perm in perms) {
      i++;
      Console.WriteLine();
      Console.WriteLine("Permission #{0}", i);
      ViewPermission(perm);
   }

   Console.WriteLine();
   Console.WriteLine("Total permissions for {0}: {1}", user.Id, perms.Count);
}

private static void ViewPermission(Permission perm) {
   Console.WriteLine("Permission ID: {0} ", perm.Id);
   Console.WriteLine("Resource ID: {0} ", perm.ResourceId);
   Console.WriteLine("Permission Mode: {0} ", perm.PermissionMode);
   Console.WriteLine("Token: {0} ", perm.Token);
   Console.WriteLine("Timestamp: {0} ", perm.Timestamp);
}
這次,它是針對使用者許可權連結的許可權查詢,我們只需列出返回的使用者的每個許可權。
讓我們刪除 Alice 和 Tom 的許可權。
await DeletePermission(client, alice, "Alice Collection Access");
await DeletePermission(client, tom, "Tom Collection Access");
以下是 DeletePermission 的實現。
private async static Task DeletePermission(DocumentClient client, User user,
   string permId) {
   Console.WriteLine();
   Console.WriteLine("**** Delete Permission {0} from {1} ****", permId, user.Id);

   var query = new SqlQuerySpec {
      QueryText = "SELECT * FROM c WHERE c.id = @id",
      Parameters = new SqlParameterCollection {
         new SqlParameter { Name = "@id", Value = permId }
      }
   };

   Permission perm = client.CreatePermissionQuery(user.PermissionsLink, query)
      .AsEnumerable().First();
   await client.DeletePermissionAsync(perm.SelfLink);
   Console.WriteLine("Deleted permission {0} from user {1}", permId, user.Id);
}
步驟 6 − 要刪除許可權,請按許可權 ID 查詢以獲取 SelfLink,然後使用 SelfLink 刪除許可權。
接下來,讓我們刪除使用者本身。讓我們刪除這兩個使用者。
await DeleteUser(client, "Alice");
await DeleteUser(client, "Tom");
以下是 DeleteUser 的實現。
private async static Task DeleteUser(DocumentClient client, string userId) {
   Console.WriteLine();
   Console.WriteLine("**** Delete User {0} in {1} ****", userId, database.Id);

   var query = new SqlQuerySpec {
      QueryText = "SELECT * FROM c WHERE c.id = @id",
      Parameters = new SqlParameterCollection {
         new SqlParameter { Name = "@id", Value = userId }
      }
   };

   User user = client.CreateUserQuery(database.SelfLink, query).AsEnumerable().First();
   await client.DeleteUserAsync(user.SelfLink);
   Console.WriteLine("Deleted user {0} from database {1}", userId, database.Id);
}
步驟 7 − 首先查詢以獲取她的 SelfLink,然後呼叫 DeleteUserAsync 刪除她的使用者物件。
以下是 CreateDocumentClient 任務的實現,在其中我們呼叫上述所有任務。
private static async Task CreateDocumentClient() {
   // Create a new instance of the DocumentClient
   using (var client = new DocumentClient(new Uri(EndpointUrl), AuthorizationKey)) {
      database = client.CreateDatabaseQuery("SELECT * FROM c WHERE c.id =
         'myfirstdb'").AsEnumerable().First();

      collection = client.CreateDocumentCollectionQuery(database.CollectionsLink,
         "SELECT * FROM c WHERE c.id = 'MyCollection'").AsEnumerable().First();

      ViewUsers(client);

      var alice = await CreateUser(client, "Alice");
      var tom = await CreateUser(client, "Tom");
      ViewUsers(client);

      ViewPermissions(client, alice);
      ViewPermissions(client, tom);

      string collectionLink = client.CreateDocumentCollectionQuery(database.SelfLink,
         "SELECT VALUE c._self FROM c WHERE c.id = 'MyCollection'")
         .AsEnumerable().First().Value;

      await CreatePermission(client, alice, "Alice Collection Access", PermissionMode.All,
         collectionLink);

      await CreatePermission(client, tom, "Tom Collection Access", PermissionMode.Read,
         collectionLink);

      ViewPermissions(client, alice);
      ViewPermissions(client, tom);

      await DeletePermission(client, alice, "Alice Collection Access");
      await DeletePermission(client, tom, "Tom Collection Access");

      await DeleteUser(client, "Alice");
      await DeleteUser(client, "Tom");
   }
}
編譯並執行上述程式碼後,您將收到以下輸出。
**** View Users in myfirstdb ****

Total users in database myfirstdb: 0

**** Create User Alice in myfirstdb ****
Created new user
          User ID: Alice
      Resource ID: kV5oAC56NwA=
        Self Link: dbs/kV5oAA==/users/kV5oAC56NwA=/
 Permissions Link: dbs/kV5oAA==/users/kV5oAC56NwA=/permissions/
        Timestamp: 12/17/2015 5:44:19 PM

**** Create User Tom in myfirstdb ****
Created new user
          User ID: Tom
      Resource ID: kV5oAALxKgA=
        Self Link: dbs/kV5oAA==/users/kV5oAALxKgA=/
 Permissions Link: dbs/kV5oAA==/users/kV5oAALxKgA=/permissions/
        Timestamp: 12/17/2015 5:44:21 PM

**** View Users in myfirstdb ****

User #1
          User ID: Tom
      Resource ID: kV5oAALxKgA=
        Self Link: dbs/kV5oAA==/users/kV5oAALxKgA=/
 Permissions Link: dbs/kV5oAA==/users/kV5oAALxKgA=/permissions/
        Timestamp: 12/17/2015 5:44:21 PM

User #2
          User ID: Alice
      Resource ID: kV5oAC56NwA=
        Self Link: dbs/kV5oAA==/users/kV5oAC56NwA=/
 Permissions Link: dbs/kV5oAA==/users/kV5oAC56NwA=/permissions/
        Timestamp: 12/17/2015 5:44:19 PM

Total users in database myfirstdb: 2

**** View Permissions for Alice ****

Total permissions for Alice: 0

**** View Permissions for Tom ****

Total permissions for Tom: 0

**** Create Permission Alice Collection Access for Alice ****
Created new permission
    Permission ID: Alice Collection Access
      Resource ID: kV5oAC56NwDON1RduEoCAA==
  Permission Mode: All
            Token: type=resource&ver=1&sig=zB6hfvvleC0oGGbq5cc67w==;Zt3Lx
Ol14h8pd6/tyF1h62zbZKk9VwEIATIldw4ZyipQGW951kirueAKdeb3MxzQ7eCvDfvp7Y/ZxFpnip/D G
JYcPyim5cf+dgLvos6fUuiKSFSul7uEKqp5JmJqUCyAvD7w+qt1Qr1PmrJDyAIgbZDBFWGe2VT9FaBH o
PYwrLjRlnH0AxfbrR+T/UpWMSSHtLB8JvNFZNSH8hRjmQupuTSxCTYEC89bZ/pS6fNmNg8=;
        Timestamp: 12/17/2015 5:44:28 PM

**** Create Permission Tom Collection Access for Tom ****
Created new permission
    Permission ID: Tom Collection Access
      Resource ID: kV5oAALxKgCMai3JKWdfAA==
  Permission Mode: Read
            Token: type=resource&ver=1&sig=ieBHKeyi6EY9ZOovDpe76w==;92gwq
V4AxKaCJ2dLS02VnJiig/5AEbPcfo1xvOjR10uK3a3FUMFULgsaK8nzxdz6hLVCIKUj6hvMOTOSN8Lt 7
i30mVqzpzCfe7JO3TYSJEI9D0/5HbMIEgaNJiCu0JPPwsjVecTytiLN56FHPguoQZ7WmUAhVTA0IMP6 p
jQpLDgJ43ZaG4Zv3qWJiO689balD+egwiU2b7RICH4j6R66UVye+GPxq/gjzqbHwx79t54=;
        Timestamp: 12/17/2015 5:44:30 PM

**** View Permissions for Alice ****

Permission #1
    Permission ID: Alice Collection Access
      Resource ID: kV5oAC56NwDON1RduEoCAA==
  Permission Mode: All
            Token: type=resource&ver=1&sig=BSzz/VNe9j4IPJ9M31Mf4Q==;Tcq/B
X50njB1vmANZ/4aHj/3xNkghaqh1OfV95JMi6j4v7fkU+gyWe3mJasO3MJcoop9ixmVnB+RKOhFaSxE l
P37SaGuIIik7GAWS+dcEBWglMefc95L2YkeNuZsjmmW5b+a8ELCUg7N45MKbpzkp5BrmmGVJ7h4Z4pf D
rdmehYLuxSPLkr9ndbOOrD8E3bux6TgXCsgYQscpIlJHSKCKHUHfXWBP2Y1LV2zpJmRjis=;
        Timestamp: 12/17/2015 5:44:28 PM

Total permissions for Alice: 1

**** View Permissions for Tom ****
Permission #1
    Permission ID: Tom Collection Access
      Resource ID: kV5oAALxKgCMai3JKWdfAA==
  Permission Mode: Read
            Token: type=resource&ver=1&sig=NPkWNJp1mAkCASE8KdR6PA==;ur/G2
V+fDamBmzECux000VnF5i28f8WRbPwEPxD1DMpFPqYcu45wlDyzT5A5gBr3/R3qqYkEVn8bU+een6Gl j
L6vXzIwsZfL12u/1hW4mJT2as2PWH3eadry6Q/zRXHAxV8m+YuxSzlZPjBFyJ4Oi30mrTXbBAEafZhA 5
yvbHkpLmQkLCERy40FbIFOzG87ypljREpwWTKC/z8RSrsjITjAlfD/hVDoOyNJwX3HRaz4=;
        Timestamp: 12/17/2015 5:44:30 PM

Total permissions for Tom: 1

**** Delete Permission Alice Collection Access from Alice ****
Deleted permission Alice Collection Access from user Alice

**** Delete Permission Tom Collection Access from Tom ****
Deleted permission Tom Collection Access from user Tom

**** Delete User Alice in myfirstdb ****
Deleted user Alice from database myfirstdb

**** Delete User Tom in myfirstdb ****
Deleted user Tom from database myfirstdb
DocumentDB - 資料視覺化
在本章中,我們將學習如何視覺化儲存在 DocumentDB 中的資料。Microsoft 提供了 Power BI Desktop 工具,該工具可將您的資料轉換為豐富的視覺效果。它還使您能夠從各種資料來源檢索資料、合併和轉換資料、建立強大的報表和視覺化效果,以及將報表釋出到 Power BI。
在最新版本的 Power BI Desktop 中,Microsoft 也添加了對 DocumentDB 的支援,您現在可以連線到您的 DocumentDB 帳戶。您可以從此連結下載此工具:https://powerbi.microsoft.com
讓我們來看一個示例,我們將視覺化上一章匯入的地震資料。
步驟 1 − 下載工具後,啟動 Power BI Desktop。

步驟 2 − 點選“獲取資料”選項,該選項位於“主頁”選項卡下的“外部資料”組中,它將顯示“獲取資料”頁面。

步驟 3 − 選擇“Microsoft Azure DocumentDB (Beta)”選項,然後點選“連線”按鈕。

步驟 4 − 輸入您要從中視覺化資料的 Azure DocumentDB 帳戶、資料庫和集合的 URL,然後按“確定”。
如果您第一次連線到此端點,系統會提示您輸入帳戶金鑰。

步驟 5 − 輸入帳戶金鑰(主金鑰),該金鑰對於 Azure 門戶上可用的每個 DocumentDB 帳戶都是唯一的,然後點選“連線”。
當帳戶成功連線後,它將從指定的資料庫檢索資料。預覽窗格顯示記錄項列表,文件在 Power BI 中表示為記錄型別。
步驟 6 − 點選“編輯”按鈕,這將啟動查詢編輯器。

步驟 7 − 在 Power BI 查詢編輯器中,您應該在中間窗格中看到一個“文件”列,點選“文件”列標題右側的展開器,然後選擇您要顯示的列。

您可以看到我們已將緯度和經度作為單獨的列,但我們希望以緯度、經度座標的形式視覺化資料。
步驟 8 − 為此,點選“新增列”選項卡。

步驟 9 − 選擇“新增自定義列”,這將顯示以下頁面。

步驟 10 − 指定新列名,例如 LatLong,以及將緯度和經度組合到一個以逗號分隔的列中的公式。以下為公式。
Text.From([latitude])&", "&Text.From([longitude])
步驟 11 − 點選“確定”繼續,您將看到已新增新列。

步驟 12 − 轉到“主頁”選項卡,然後點選“關閉並應用”選項。

步驟 13 − 您可以透過將欄位拖放到報表畫布中來建立報表。您可以在右側看到兩個窗格:一個“視覺化效果”窗格,另一個是“欄位”窗格。

讓我們建立一個顯示每個地震位置的地圖檢視。
步驟 14 − 從“視覺化效果”窗格中拖動地圖視覺型別。
步驟 15 − 現在,將“LatLong”欄位從“欄位”窗格拖放到“視覺化效果”窗格中的“位置”屬性。然後,將“強度”欄位拖放到“值”屬性。
步驟 16 − 將“深度”欄位拖放到“顏色飽和度”屬性。

您現在將看到地圖視覺效果,顯示一組氣泡,指示每個地震的位置。