- DocumentDB 教程
- DocumentDB - 首頁
- DocumentDB - 簡介
- DocumentDB - 優勢
- DocumentDB - 環境設定
- DocumentDB - 建立賬戶
- DocumentDB - 連線賬戶
- DocumentDB - 建立資料庫
- DocumentDB - 列出資料庫
- DocumentDB - 刪除資料庫
- DocumentDB - 建立集合
- DocumentDB - 刪除集合
- DocumentDB - 插入文件
- DocumentDB - 查詢文件
- DocumentDB - 更新文件
- DocumentDB - 刪除文件
- DocumentDB - 資料建模
- DocumentDB - 資料型別
- DocumentDB - 限制記錄
- DocumentDB - 排序記錄
- DocumentDB - 索引記錄
- DocumentDB - 地理空間資料
- DocumentDB - 分割槽
- DocumentDB - 資料遷移
- DocumentDB - 訪問控制
- DocumentDB - 資料視覺化
- DocumentDB 有用資源
- DocumentDB - 快速指南
- DocumentDB - 有用資源
- DocumentDB - 討論
DocumentDB - 建立賬戶
要使用 Microsoft Azure DocumentDB,您必須建立一個 DocumentDB 帳戶。在本節中,我們將使用 Azure 門戶建立一個 DocumentDB 帳戶。
步驟 1 − 如果您已經有 Azure 訂閱,請登入線上 https://portal.azure.com,否則您需要先登入。
您將看到主儀表板。它是完全可自定義的,因此您可以根據自己的喜好排列這些磁貼,調整它們的大小,新增和刪除您經常使用或不再使用的磁貼。

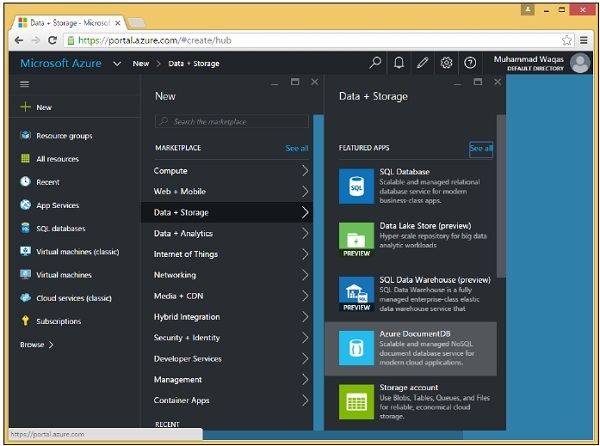
步驟 2 − 選擇頁面左上角的“新建”選項。

步驟 3 − 現在選擇“資料 + 儲存”>“Azure DocumentDB”選項,您將看到以下“新建 DocumentDB 帳戶”部分。

我們需要想出一個全域性唯一的名稱 (ID),它與 .documents.azure.com 組合後,就是我們 DocumentDB 帳戶的公共可訪問端點。我們在此帳戶下建立的所有資料庫都可以使用此端點透過網際網路訪問。
步驟 4 − 我們將其命名為 azuredocdbdemo,然後單擊“資源組”→“new_resource”。

步驟 5 − 選擇位置,即您希望託管此帳戶的 Microsoft 資料中心。選擇位置並選擇您的區域。

步驟 6 − 選中“固定到儀表板”複選框,然後單擊“建立”按鈕。

您可以看到該磁貼已新增到儀表板,並且它正在告知我們帳戶正在建立中。在 DocumentDB 分配端點、預配副本並在後臺執行其他工作時,設定新帳戶實際上可能需要幾分鐘時間。
完成後,您將看到儀表板。

步驟 7 − 現在單擊已建立的 DocumentDB 帳戶,您將看到如下所示的詳細螢幕。

廣告