- Angular 8 教程
- Angular 8 - 首頁
- Angular 8 - 簡介
- Angular 8 - 安裝
- 建立第一個應用程式
- Angular 8 - 架構
- Angular 元件和模板
- Angular 8 - 資料繫結
- Angular 8 - 指令
- Angular 8 - 管道
- Angular 8 - 響應式程式設計
- 服務和依賴注入
- Angular 8 - Http 客戶端程式設計
- Angular 8 - Angular Material
- 路由和導航
- Angular 8 - 動畫
- Angular 8 - 表單
- Angular 8 - 表單驗證
- 身份驗證和授權
- Angular 8 - Web Workers
- Service Workers 和 PWA
- Angular 8 - 伺服器端渲染
- Angular 8 - 國際化 (i18n)
- Angular 8 - 可訪問性
- Angular 8 - CLI 命令
- Angular 8 - 測試
- Angular 8 - Ivy 編譯器
- Angular 8 - 使用 Bazel 構建
- Angular 8 - 向後相容性
- Angular 8 - 實用示例
- Angular 9 - 新特性?
- Angular 8 有用資源
- Angular 8 - 快速指南
- Angular 8 - 有用資源
- Angular 8 - 討論
Angular 8 - 實用示例
在這裡,我們將學習有關 Angular 8 的完整分步實用示例。
讓我們建立一個 Angular 應用程式來檢查我們日常的支出。讓我們將我們的新應用程式命名為 ExpenseManager。
建立應用程式
使用以下命令建立新應用程式。
cd /path/to/workspace
ng new expense-manager
這裡:
new 是 ng CLI 應用程式的一個命令。它將用於建立新的應用程式。它會提出一些基本問題以便建立新的應用程式。讓應用程式選擇預設選項就足夠了。關於如下提到的路由問題,請指定 否。
Would you like to add Angular routing? No
回答完基本問題後,ng CLI 應用程式會在 expense-manager 資料夾下建立一個新的 Angular 應用程式。
讓我們進入我們新建立的應用程式資料夾。
cd expense-manager
讓我們使用以下命令啟動應用程式。
ng serve
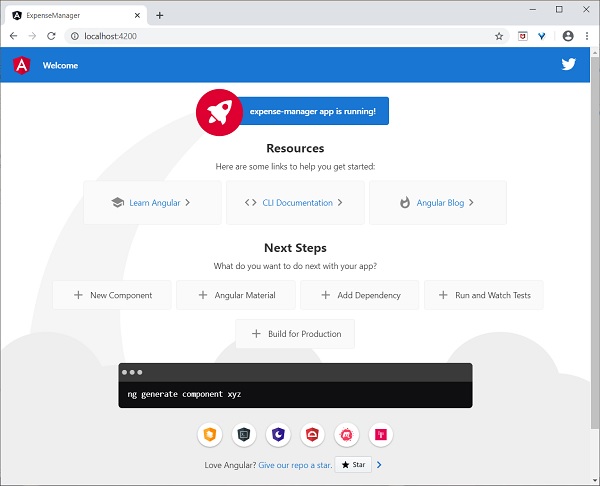
讓我們啟動瀏覽器並開啟 https://:4200。瀏覽器將顯示如下所示的應用程式:
讓我們更改應用程式的標題以更好地反映我們的應用程式。開啟 src/app/app.component.ts 並更改程式碼如下:
export class AppComponent {
   title = 'Expense Manager';
}
我們的最終應用程式將在瀏覽器中呈現,如下所示:
新增元件
使用 ng generate component 命令建立一個新元件,如下所示:
ng generate component expense-entry
輸出
輸出如下:
CREATE src/app/expense-entry/expense-entry.component.html (28 bytes)
CREATE src/app/expense-entry/expense-entry.component.spec.ts (671 bytes)
CREATE src/app/expense-entry/expense-entry.component.ts (296 bytes)
CREATE src/app/expense-entry/expense-entry.component.css (0 bytes)
UPDATE src/app/app.module.ts (431 bytes)
這裡:
- ExpenseEntryComponent 建立在 src/app/expense-entry 資料夾下。
- 元件類、模板和樣式表已建立。
- AppModule 已更新為包含新元件。
向 ExpenseEntryComponent (src/app/expense-entry/expense-entry.component.ts) 元件新增 title 屬性。
import { Component, OnInit } from '@angular/core';

@Component({
   selector: 'app-expense-entry',
   templateUrl: './expense-entry.component.html',
   styleUrls: ['./expense-entry.component.css']
})
export class ExpenseEntryComponent implements OnInit {
   title: string;
   constructor() { }

   ngOnInit() {
      this.title = "Expense Entry"
   }
}
使用以下內容更新模板 src/app/expense-entry/expense-entry.component.html。
<p>{{ title }}</p>
開啟
src/app/app.component.html
幷包含新建立的元件。<h1>{{ title }}</h1>
<app-expense-entry></app-expense-entry>
這裡:
app-expense-entry 是選擇器值,可以用作常規 HTML 標籤。
應用程式的輸出如下所示:

包含 Bootstrap
讓我們使用 styles 選項將 Bootstrap 包含到我們的 ExpenseManager 應用程式中,並將預設模板更改為使用 Bootstrap 元件。
開啟命令提示符並轉到 ExpenseManager 應用程式。
cd /go/to/expense-manager
使用以下命令安裝 bootstrap 和 JQuery 庫
npm install --save bootstrap@4.5.0 jquery@3.5.1
這裡:
我們安裝了 JQuery,因為 Bootstrap 大量使用 jquery 來實現高階元件。
選項 angular.json 並設定 bootstrap 和 jquery 庫路徑。
{
   "projects": {
      "expense-manager": {
         "architect": {
            "build": {
               "builder":"@angular-devkit/build-angular:browser", "options": {
                  "outputPath": "dist/expense-manager",
                  "index": "src/index.html",
                  "main": "src/main.ts",
                  "polyfills": "src/polyfills.ts",
                  "tsConfig": "tsconfig.app.json",
                  "aot": false,
                  "assets": [
                     "src/favicon.ico",
                     "src/assets"
                  ],
                  "styles": [
                     "./node_modules/bootstrap/dist/css/bootstrap.css", "src/styles.css"
                  ],
                  "scripts": [
                     "./node_modules/jquery/dist/jquery.js", "./node_modules/bootstrap/dist/js/bootstrap.js"
                  ]
               },
            },
         }
   }},
   "defaultProject": "expense-manager"
}
這裡:
scripts 選項用於包含 JavaScript 庫。透過 scripts 註冊的 JavaScript 將可用於應用程式中的所有 Angular 元件。
開啟 app.component.html 並更改內容如下
<!-- Navigation -->
<nav class="navbar navbar-expand-lg navbar-dark bg-dark static-top">
   <div class="container">
      <a class="navbar-brand" href="#">{{ title }}</a> <button class="navbar-toggler" type="button" data-toggle="collapse" data-target="#navbarResponsive" aria-controls="navbarResponsive" aria-expanded="false" aria-label="Toggle navigation">
         <span class="navbar-toggler-icon">
         </span>
      </button>
      <div class="collapse navbar-collapse" id="navbarResponsive">
         <ul class="navbar-nav ml-auto">
            <li class="nav-item active">
            <a class="nav-link" href="#">Home
               <span class="sr-only">(current)
               </span>
            </a>
            </li>
            <li class="nav-item">
            <a class="nav-link" href="#">Report</a>
            </li>
            <li class="nav-item">
            <a class="nav-link" href="#">Add Expense</a>
            </li>
            <li class="nav-item">
            <a class="nav-link" href="#">About</a>
            </li>
         </ul>
      </div>
   </div>
</nav>
<app-expense-entry></app-expense-entry>
這裡:
使用了 Bootstrap 導航和容器。
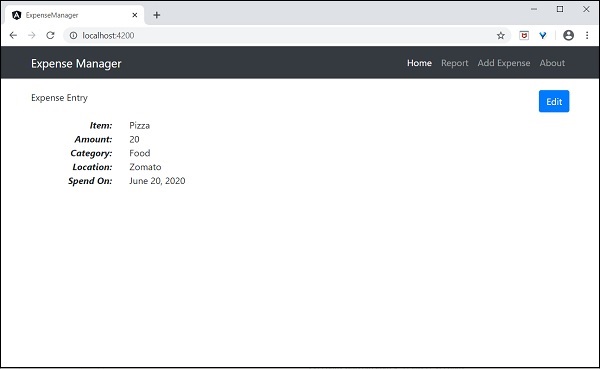
開啟 src/app/expense-entry/expense-entry.component.html 並放置以下內容。
<!-- Page Content -->
<div class="container">
   <div class="row">
      <div class="col-lg-12 text-center" style="padding-top: 20px;">
         <div class="container" style="padding-left: 0px; padding-right: 0px;">
            <div class="row">
            <div class="col-sm" style="text-align: left;"> {{ title }}
            </div>
            <div class="col-sm" style="text-align: right;">
               <button type="button" class="btn btn-primary">Edit</button>
            </div>
            </div>
         </div>
         <div class="container box" style="margin-top: 10px;">
         <div class="row">
         <div class="col-2" style="text-align: right;">
            <strong><em>Item:</em></strong>
         </div>
         <div class="col" style="text-align: left;">
            Pizza
         </div>
         </div>
         <div class="row">
         <div class="col-2" style="text-align: right;">
            <strong><em>Amount:</em></strong>
         </div>
         <div class="col" style="text-align: left;">
            20
         </div>
         </div>
         <div class="row">
         <div class="col-2" style="text-align: right;">
            <strong><em>Category:</em></strong>
         </div>
         <div class="col" style="text-align: left;">
            Food
         </div>
         </div>
         <div class="row">
         <div class="col-2" style="text-align: right;">
            <strong><em>Location:</em></strong>
         </div>
         <div class="col" style="text-align: left;">
            Zomato
         </div>
         </div>
         <div class="row">
         <div class="col-2" style="text-align: right;">
            <strong><em>Spend On:</em></strong>
         </div>
         <div class="col" style="text-align: left;">
            June 20, 2020
         </div>
         </div>
      </div>
   </div>
</div>
</div>
重新啟動應用程式。
應用程式的輸出如下所示:
我們將在下一章中改進應用程式以處理動態支出條目。
新增介面
建立 ExpenseEntry 介面 (src/app/expense-entry.ts) 並新增 id、amount、category、Location、spendOn 和 createdOn。
export interface ExpenseEntry {
   id: number;
   item: string;
   amount: number;
   category: string;
   location: string;
   spendOn: Date;
   createdOn: Date;
}
將 ExpenseEntry 匯入到 ExpenseEntryComponent 中。
import { ExpenseEntry } from '../expense-entry';
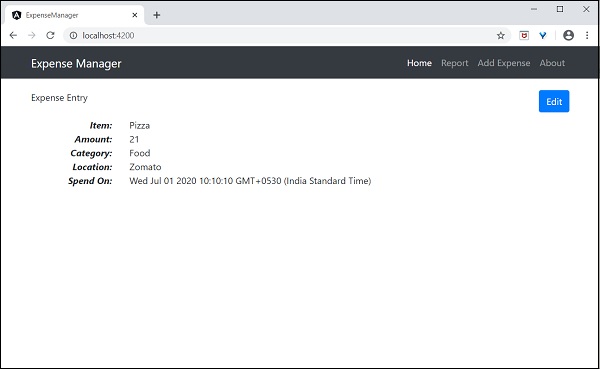
建立一個 ExpenseEntry 物件,expenseEntry 如下所示:
export class ExpenseEntryComponent implements OnInit {
   title: string;
   expenseEntry: ExpenseEntry;
   constructor() { }

   ngOnInit() {
      this.title = "Expense Entry";

      this.expenseEntry = {

         id: 1,
         item: "Pizza",
         amount: 21,
         category: "Food",
         location: "Zomato",
         spendOn: new Date(2020, 6, 1, 10, 10, 10),
         createdOn: new Date(2020, 6, 1, 10, 10, 10),
      };
   }
}
使用 expenseEntry 物件,src/app/expense-entry/expense-entry.component.html 更新元件模板,如下所示:
<!-- Page Content -->
<div class="container">
   <div class="row">
      <div class="col-lg-12 text-center" style="padding-top: 20px;">
         <div class="container" style="padding-left: 0px; padding-right: 0px;">
            <div class="row">
               <div class="col-sm" style="text-align: left;">
                  {{ title }}
               </div>
               <div class="col-sm" style="text-align: right;">
                  <button type="button" class="btn btn-primary">Edit</button>
               </div>
            </div>
         </div>
         <div class="container box" style="margin-top: 10px;">
            <div class="row">
               <div class="col-2" style="text-align: right;">
                  <strong><em>Item:</em></strong>
               </div>
               <div class="col" style="text-align: left;">
                  {{ expenseEntry.item }}
               </div>
            </div>
            <div class="row">
               <div class="col-2" style="text-align: right;">
                  <strong><em>Amount:</em></strong>
               </div>
               <div class="col" style="text-align: left;">
                  {{ expenseEntry.amount }}
               </div>
            </div>
            <div class="row">
               <div class="col-2" style="text-align: right;">
                  <strong><em>Category:</em></strong>
               </div>
               <div class="col" style="text-align: left;">

                  {{ expenseEntry.category }}
               </div>
            </div>
            <div class="row">
               <div class="col-2" style="text-align: right;">
                  <strong><em>Location:</em></strong>
               </div>
               <div class="col" style="text-align: left;">
                  {{ expenseEntry.location }}
               </div>
            </div>
            <div class="row">
               <div class="col-2" style="text-align: right;">
                  <strong><em>Spend On:</em></strong>
               </div>
               <div class="col" style="text-align: left;">
                  {{ expenseEntry.spendOn }}
               </div>
            </div>
         </div>
      </div>
   </div>
</div>
應用程式的輸出如下所示:
使用指令
讓我們在我們的 ExpenseManager 應用程式中新增一個新元件來列出支出條目。
開啟命令提示符並轉到專案根資料夾。
cd /go/to/expense-manager
啟動應用程式。
ng serve
使用以下命令建立一個新元件,ExpenseEntryListComponent:
ng generate component ExpenseEntryList
輸出
輸出如下:
CREATE src/app/expense-entry-list/expense-entry-list.component.html (33 bytes)
CREATE src/app/expense-entry-list/expense-entry-list.component.spec.ts (700 bytes)
CREATE src/app/expense-entry-list/expense-entry-list.component.ts (315 bytes)
CREATE src/app/expense-entry-list/expense-entry-list.component.css (0 bytes)
UPDATE src/app/app.module.ts (548 bytes)
在這裡,該命令建立了 ExpenseEntryList 元件並在 AppModule 中更新了必要的程式碼。
將 ExpenseEntry 匯入到 ExpenseEntryListComponent 元件 (src/app/expense-entry-list/expense-entry-list.component)
import { ExpenseEntry } from '../expense-entry';
新增一個方法 getExpenseEntries() 來返回支出條目的列表(模擬項)在 ExpenseEntryListComponent (src/app/expense-entry-list/expense-entry-list.component)
getExpenseEntries() : ExpenseEntry[] {
   let mockExpenseEntries : ExpenseEntry[] = [
      { id: 1,
         item: "Pizza",
         amount: Math.floor((Math.random() * 10) + 1),
         category: "Food",
         location: "Mcdonald",
         spendOn: new Date(2020, 4, Math.floor((Math.random() * 30) + 1), 10, 10, 10),
         createdOn: new Date(2020, 4, Math.floor((Math.random() * 30) + 1), 10, 10, 10) },
      { id: 1,
         item: "Pizza",
         amount: Math.floor((Math.random() * 10) + 1),
         category: "Food",
         location: "KFC",
         spendOn: new Date(2020, 4, Math.floor((Math.random() * 30) + 1), 10, 10, 10),
         createdOn: new Date(2020, 4, Math.floor((Math.random() * 30) + 1), 10, 10, 10) },
      { id: 1,
         item: "Pizza",
         amount: Math.floor((Math.random() * 10) + 1),
         category: "Food",
         location: "KFC",
         spendOn: new Date(2020, 4, Math.floor((Math.random() * 30) + 1), 10, 10, 10),
         createdOn: new Date(2020, 4, Math.floor((Math.random() * 30) + 1), 10, 10, 10)
      },
   ];
   return mockExpenseEntries;
}
宣告一個區域性變數 expenseEntries 並載入如下所示的模擬支出條目列表:
title: string;
expenseEntries: ExpenseEntry[];
constructor() { }
ngOnInit() {
   this.title = "Expense Entry List";
   this.expenseEntries = this.getExpenseEntries();
}
開啟模板檔案 (src/app/expense-entry-list/expense-entry-list.component.html) 並在一個表中顯示模擬條目。
<!-- Page Content -->
<div class="container">
   <div class="row">
      <div class="col-lg-12 text-center" style="padding-top: 20px;">
         <div class="container" style="padding-left: 0px; padding-right: 0px;">
            <div class="row">
               <div class="col-sm" style="text-align: left;">
                  {{ title }}
               </div>
               <div class="col-sm" style="text-align: right;">
                  <button type="button" class="btn btn-primary">Edit</button>
               </div>
            </div>
         </div>
         <div class="container box" style="margin-top: 10px;">
            <table class="table table-striped">
               <thead>
                  <tr>
                     <th>Item</th>
                     <th>Amount</th>
                     <th>Category</th>
                     <th>Location</th>
                     <th>Spent On</th>
                  </tr>
               </thead>
               <tbody>
                  <tr *ngFor="let entry of expenseEntries">
                     <th scope="row">{{ entry.item }}</th>
                     <th>{{ entry.amount }}</th>
                     <td>{{ entry.category }}</td>
                     <td>{{ entry.location }}</td>
                     <td>{{ entry.spendOn | date: 'short' }}</td>
                  </tr>
               </tbody>
            </table>
         </div>
      </div>
   </div>
</div>
這裡:
使用了 Bootstrap 表格。table 和 table-striped 將根據 Bootstrap 樣式標準設定表格樣式。
使用 ngFor 遍歷 expenseEntries 並生成表格行。
開啟 AppComponent 模板 src/app/app.component.html 幷包含 ExpenseEntryListComponent 並刪除 ExpenseEntryComponent,如下所示:
...
<app-expense-entry-list></app-expense-entry-list>
最後,應用程式的輸出如下所示。
使用管道
讓我們在我們的 ExpenseManager 應用程式中使用管道
開啟 ExpenseEntryListComponent 的模板 src/app/expense-entry-list/expense-entry-list.component.html 並按照如下所示在 entry.spendOn 中包含管道:
<td>{{ entry.spendOn | date: 'short' }}</td>
在這裡,我們使用了日期管道以簡短格式顯示支出日期。
最後,應用程式的輸出如下所示:
新增除錯服務
執行以下命令以生成 Angular 服務 DebugService。
ng g service debug
這將建立兩個 TypeScript 檔案(除錯服務及其測試),如下所示:
CREATE src/app/debug.service.spec.ts (328 bytes)
CREATE src/app/debug.service.ts (134 bytes)
讓我們分析 DebugService 服務的內容。
import { Injectable } from '@angular/core'; @Injectable({
   providedIn: 'root'
})
export class DebugService {
   constructor() { }
}
這裡:
@Injectable 裝飾器附加到 DebugService 類,這使得 DebugService 可以在應用程式的 Angular 元件中使用。
providedIn 選項及其值 root 使 DebugService 可以在應用程式的所有元件中使用。
讓我們新增一個方法 Info,它將訊息列印到瀏覽器控制檯。
info(message : String) : void {
   console.log(message);
}
讓我們在 ExpenseEntryListComponent 中初始化服務並使用它來列印訊息。
import { Component, OnInit } from '@angular/core'; import { ExpenseEntry } from '../expense-entry'; import { DebugService } from '../debug.service'; @Component({
   selector: 'app-expense-entry-list',
   templateUrl: './expense-entry-list.component.html', styleUrls: ['./expense-entry-list.component.css']
})
export class ExpenseEntryListComponent implements OnInit {
   title: string;
   expenseEntries: ExpenseEntry[];
   constructor(private debugService: DebugService) { }
   ngOnInit() {
      this.debugService.info("Expense Entry List
      component initialized");
      this.title = "Expense Entry List";
      this.expenseEntries = this.getExpenseEntries();
   }
   // other coding
}
這裡:
DebugService 使用建構函式引數初始化。設定型別為 DebugService 的引數 (debugService) 將觸發依賴注入以建立一個新的 DebugService 物件並將其設定到 ExpenseEntryListComponent 元件中。
在 ngOnInit 方法中呼叫 DebugService 的 info 方法會在瀏覽器控制檯中列印訊息。
可以使用開發者工具檢視結果,它看起來類似於以下所示:
讓我們擴充套件應用程式以瞭解服務的範圍。
讓我們使用以下命令建立一個 DebugComponent。
ng generate component debug
CREATE src/app/debug/debug.component.html (20 bytes) CREATE src/app/debug/debug.component.spec.ts (621 bytes)
CREATE src/app/debug/debug.component.ts (265 bytes) CREATE src/app/debug/debug.component.css (0 bytes) UPDATE src/app/app.module.ts (392 bytes)
讓我們刪除根模組中的 DebugService。
// src/app/debug.service.ts
import { Injectable } from '@angular/core'; @Injectable()
export class DebugService {
   constructor() {
   }
   info(message : String) : void {
      console.log(message);
   }
}
在 ExpenseEntryListComponent 元件下注冊 DebugService。
// src/app/expense-entry-list/expense-entry-list.component.ts @Component({
   selector: 'app-expense-entry-list',
   templateUrl: './expense-entry-list.component.html',
   styleUrls: ['./expense-entry-list.component.css']
   providers: [DebugService]
})
在這裡,我們使用了 providers 元資料 (ElementInjector) 來註冊服務。
開啟 DebugComponent (src/app/debug/debug.component.ts) 並匯入 DebugService,並在元件的建構函式中設定一個例項。
import { Component, OnInit } from '@angular/core'; import { DebugService } from '../debug.service';
@Component({
   selector: 'app-debug',
   templateUrl: './debug.component.html',
   styleUrls: ['./debug.component.css']
})
export class DebugComponent implements OnInit {
   constructor(private debugService: DebugService) { }
   ngOnInit() {
      this.debugService.info("Debug component gets service from Parent");
   }
}
在這裡,我們沒有註冊 DebugService。因此,如果用作父元件,則 DebugService 將不可用。如果父元件可以使用該服務,則在父元件內使用時,該服務可能可從父元件獲取。
開啟 ExpenseEntryListComponent 模板 (src/app/expense-entry-list/expense-entry-list.component.html) 幷包含如下所示的內容部分
// existing content
<app-debug></app-debug>
<ng-content></ng-content>
在這裡,我們包含了一個內容部分和 DebugComponent 部分。
讓我們在 AppComponent 模板中將 debug 元件作為內容包含在 ExpenseEntryListComponent 元件中。開啟 AppComponent 模板並將 app-expense-entry-list 更改如下:
// navigation code
<app-expense-entry-list>
<app-debug></app-debug>
</app-expense-entry-list>
在這裡,我們包含了 DebugComponent 作為內容。
讓我們檢查應用程式,它將在頁面末尾顯示 DebugService 模板,如下所示:
此外,我們還可以在控制檯中看到來自 debug 元件的兩個除錯資訊。這表明 debug 元件從其父元件獲取服務。
讓我們更改在 ExpenseEntryListComponent 中注入服務的方式以及它如何影響服務的範圍。將 providers 注入器更改為 viewProviders 注入。viewProviders 不會將服務注入到內容子元素中,因此它應該會失敗。
viewProviders: [DebugService]
檢查應用程式,您將看到一個 debug 元件(用作內容子元素)會丟擲錯誤,如下所示:

讓我們刪除模板中的 debug 元件並恢復應用程式。
開啟 ExpenseEntryListComponent 模板 (src/app/expense-entry-list/expense-entry-list.component.html) 並刪除以下內容
<app-debug></app-debug>
<ng-content></ng-content>
開啟 AppComponent 模板並將 app-expense-entry-list 更改如下:
// navigation code
<app-expense-entry-list>
</app-expense-entry-list>
將 ExpenseEntryListComponent 中的 viewProviders 設定更改為 providers。
providers: [DebugService]
重新執行應用程式並檢查結果。
建立支出服務
讓我們在我們的 ExpenseManager 應用程式中建立一個新的服務 ExpenseEntryService 來與 Expense REST API 進行互動。ExpenseEntryService 將獲取最新的支出條目、插入新的支出條目、修改現有的支出條目並刪除不需要的支出條目。
開啟命令提示符並轉到專案根資料夾。
cd /go/to/expense-manager
啟動應用程式。
ng serve
執行以下命令以生成 Angular 服務 ExpenseService。
ng generate service ExpenseEntry
這將建立兩個 TypeScript 檔案(支出條目服務及其測試),如下所示:
CREATE src/app/expense-entry.service.spec.ts (364 bytes)
CREATE src/app/expense-entry.service.ts (141 bytes)
開啟 ExpenseEntryService (src/app/expense-entry.service.ts) 並從 rxjs 庫匯入 ExpenseEntry、throwError 和 catchError,並從 @angular/common/http 包匯入 HttpClient、HttpHeaders 和 HttpErrorResponse。
import { Injectable } from '@angular/core';
import { ExpenseEntry } from './expense-entry'; import { throwError } from 'rxjs';
import { catchError } from 'rxjs/operators';
import { HttpClient, HttpHeaders, HttpErrorResponse } from
'@angular/common/http';
將 HttpClient 服務注入到我們的服務中。
constructor(private httpClient : HttpClient) { }
建立一個變數 expenseRestUrl 來指定 Expense Rest API 端點。
private expenseRestUrl = 'https://:8000/api/expense';
建立一個變數 httpOptions 來設定 Http Header 選項。這將在 Angular HttpClient 服務呼叫 Http Rest API 時使用。
private httpOptions = {
   headers: new HttpHeaders( { 'Content-Type': 'application/json' })
};
完整程式碼如下:
import { Injectable } from '@angular/core';
import { ExpenseEntry } from './expense-entry';
import { Observable, throwError } from 'rxjs';
import { catchError, retry } from 'rxjs/operators';
import { HttpClient, HttpHeaders, HttpErrorResponse } from '@angular/common/http';

@Injectable({
   providedIn: 'root'
})
export class ExpenseEntryService {
      private expenseRestUrl = 'api/expense';
      private httpOptions = {
         headers: new HttpHeaders( { 'Content-Type': 'application/json' })
      };

   constructor(
      private httpClient : HttpClient) { }
}
使用 HttpClient 服務進行 Http 程式設計
啟動 Expense REST API 應用程式,如下所示:
cd /go/to/expense-rest-api
node .\server.js
在 ExpenseEntryService (src/app/expense-entry.service.ts) 服務中新增 getExpenseEntries() 和 httpErrorHandler() 方法。
getExpenseEntries() : Observable<ExpenseEntry[]> {
   return this.httpClient.get<ExpenseEntry[]>(this.expenseRestUrl, this.httpOptions)
   .pipe(retry(3),catchError(this.httpErrorHandler));
}

getExpenseEntry(id: number) : Observable<ExpenseEntry> {
   return this.httpClient.get<ExpenseEntry>(this.expenseRestUrl + "/" + id, this.httpOptions)
   .pipe(
      retry(3),
      catchError(this.httpErrorHandler)
   );
}

private httpErrorHandler (error: HttpErrorResponse) {
      if (error.error instanceof ErrorEvent) {
      console.error("A client side error occurs. The error message is " + error.message);
      } else {
      console.error(
            "An error happened in server. The HTTP status code is "  + error.status + " and the error returned is " + error.message);
      }

      return throwError("Error occurred. Pleas try again");
}
這裡:
getExpenseEntries() 使用支出端點呼叫 get() 方法,並配置錯誤處理程式。此外,它還配置 httpClient 以在失敗的情況下最多嘗試 3 次。最後,它將伺服器響應作為型別化 (ExpenseEntry[]) Observable 物件返回。
getExpenseEntry 與 getExpenseEntries() 類似,只是它傳遞 ExpenseEntry 物件的 id 並獲取 ExpenseEntry Observable 物件。
ExpenseEntryService 的完整程式碼如下:
import { Injectable } from '@angular/core';
import { ExpenseEntry } from './expense-entry';

import { Observable, throwError } from 'rxjs';
import { catchError, retry } from 'rxjs/operators';
import { HttpClient, HttpHeaders, HttpErrorResponse } from '@angular/common/http';

@Injectable({

   providedIn: 'root'
})
export class ExpenseEntryService {
   private expenseRestUrl = 'https://:8000/api/expense';
   private httpOptions = {
      headers: new HttpHeaders( { 'Content-Type': 'application/json' })
   };

   constructor(private httpClient : HttpClient) { }

   getExpenseEntries() : Observable {
      return this.httpClient.get(this.expenseRestUrl, this.httpOptions)
      .pipe(
         retry(3),
         catchError(this.httpErrorHandler)
      );
   }

   getExpenseEntry(id: number) : Observable {
      return this.httpClient.get(this.expenseRestUrl + "/" + id, this.httpOptions)
      .pipe(
         retry(3),
         catchError(this.httpErrorHandler)
      );
   }

   private httpErrorHandler (error: HttpErrorResponse) {
      if (error.error instanceof ErrorEvent) {
         console.error("A client side error occurs. The error message is " + error.message);
      } else {
         console.error(
            "An error happened in server. The HTTP status code is "  + error.status + " and the error returned is " + error.message);
      }

      return throwError("Error occurred. Pleas try again");
   }
}
開啟 ExpenseEntryListComponent (src-entry-list-entry-list.component.ts) 並透過建構函式注入 ExpenseEntryService,如下所示
constructor(private debugService: DebugService, private restService :
ExpenseEntryService ) { }
更改 getExpenseEntries() 函式。呼叫 ExpenseEntryService 中的 getExpenseEntries() 方法,而不是返回模擬項。
getExpenseItems() {
   this.restService.getExpenseEntries()
      .subscribe( data =− this.expenseEntries = data );
}
ExpenseEntryListComponent 的完整程式碼如下:
import { Component, OnInit } from '@angular/core';
import { ExpenseEntry } from '../expense-entry';
import { DebugService } from '../debug.service';
import { ExpenseEntryService } from '../expense-entry.service';

@Component({
   selector: 'app-expense-entry-list',
   templateUrl: './expense-entry-list.component.html',
   styleUrls: ['./expense-entry-list.component.css'],
   providers: [DebugService]
})
export class ExpenseEntryListComponent implements OnInit {
   title: string;
   expenseEntries: ExpenseEntry[];
   constructor(private debugService: DebugService, private restService : ExpenseEntryService ) { }

   ngOnInit() {
      this.debugService.info("Expense Entry List component initialized");
      this.title = "Expense Entry List";

      this.getExpenseItems();
   }

   getExpenseItems() {
      this.restService.getExpenseEntries()
      .subscribe( data => this.expenseEntries = data );
   }
}
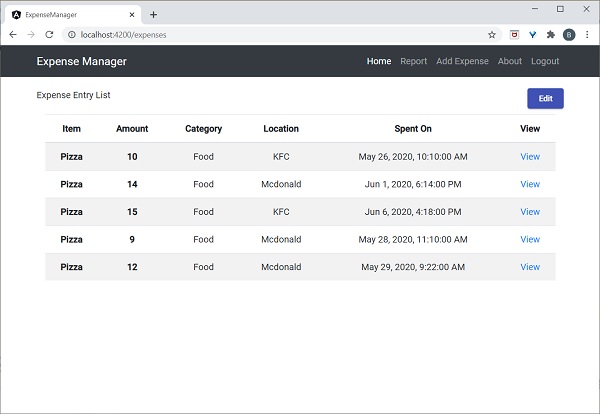
最後,檢查應用程式,您將看到以下響應。
新增支出功能
讓我們在我們的 ExpenseEntryService 中新增一個新方法 addExpenseEntry() 來新增新的支出條目,如下所示:
addExpenseEntry(expenseEntry: ExpenseEntry): Observable<ExpenseEntry> {
   return this.httpClient.post<ExpenseEntry>(this.expenseRestUrl, expenseEntry, this.httpOptions)
   .pipe(
      retry(3),
      catchError(this.httpErrorHandler)
   );
}
更新支出條目功能
讓我們在ExpenseEntryService中新增一個新的方法updateExpenseEntry(),用於更新現有的支出條目,如下所示
updateExpenseEntry(expenseEntry: ExpenseEntry): Observable<ExpenseEntry> {
   return this.httpClient.put<ExpenseEntry>(this.expenseRestUrl + "/" + expenseEntry.id, expenseEntry, this.httpOptions)
   .pipe(
      retry(3),
      catchError(this.httpErrorHandler)
   );
}
刪除支出條目功能
讓我們在ExpenseEntryService中新增一個新的方法deleteExpenseEntry(),用於刪除現有的支出條目,如下所示:
deleteExpenseEntry(expenseEntry: ExpenseEntry | number) : Observable<ExpenseEntry> {
   const id = typeof expenseEntry == 'number' ? expenseEntry : expenseEntry.id
   const url = `${this.expenseRestUrl}/${id}`;

   return this.httpClient.delete<ExpenseEntry>(url, this.httpOptions)
   .pipe(
      retry(3),
      catchError(this.httpErrorHandler)
   );
}
新增路由
如果之前沒有完成,請使用以下命令生成路由模組。
ng generate module app-routing --module app --flat
輸出
輸出如下所示:
CREATE src/app/app-routing.module.ts (196 bytes)
UPDATE src/app/app.module.ts (785 bytes)
這裡:
CLI生成AppRoutingModule,然後在AppModule中配置它。
更新AppRoutingModule (src/app/app.module.ts),如下所示:
import { NgModule } from '@angular/core';
import { Routes, RouterModule } from '@angular/router'; import { ExpenseEntryComponent } from './expense-entry/expense-entry.component';
import { ExpenseEntryListComponent } from './expense-entry-list/expense-entry-list.component';
const routes: Routes = [
   { path: 'expenses', component: ExpenseEntryListComponent },
   { path: 'expenses/detail/:id', component: ExpenseEntryComponent },
   { path: '', redirectTo: 'expenses', pathMatch: 'full' }];
@NgModule({
   imports: [RouterModule.forRoot(routes)],
   exports: [RouterModule] })
export class AppRoutingModule { }
在這裡,我們為支出列表和支出詳情元件添加了路由。
更新AppComponent模板(src/app/app.component.html)以包含router-outlet和routerLink。
<!-- Navigation -->
<nav class="navbar navbar-expand-lg navbar-dark bg-dark static-top">
<div class="container">
   <a class="navbar-brand" href="#">{{ title }}</a> <button class="navbar-toggler" type="button" data-toggle="collapse" data-target="#navbarResponsive" aria-controls="navbarResponsive" aria-expanded="false" aria-label="Toggle navigation">
      <span class="navbar-toggler-icon"></span>
   </button>
   <div class="collapse navbar-collapse" id="navbarResponsive">
      <ul class="navbar-nav ml-auto">
         <li class="nav-item active">
            <a class="nav-link" href="#">Home
               <span class="sr-only" routerLink="/">(current)</span>
            </a>
         </li>
         <li class="nav-item">
            <a class="nav-link" routerLink="/expenses">Report</a>
         </li>
         <li class="nav-item">
            <a class="nav-link" href="#">Add Expense</a>
         </li>
         <li class="nav-item">
            <a class="nav-link" href="#">About</a>
         </li>
      </ul>
   </div>
</div>
</nav>
<router-outlet></router-outlet>
開啟ExpenseEntryListComponent模板(src/app/expense-entry-list/expense-entry-list.component.html)併為每個支出條目包含檢視選項。
<table class="table table-striped">
   <thead>
      <tr>
         <th>Item</th>
         <th>Amount</th>
         <th>Category</th>
         <th>Location</th>
         <th>Spent On</th>
         <th>View</th>
      </tr>
   </thead>
   <tbody>
      <tr *ngFor="let entry of expenseEntries">
         <th scope="row">{{ entry.item }}</th>
         <th>{{ entry.amount }}</th>
         <td>{{ entry.category }}</td>
         <td>{{ entry.location }}</td>
         <td>{{ entry.spendOn | date: 'medium' }}</td>
         <td><a routerLink="../expenses/detail/{{ entry.id }}">View</a></td>
      </tr>
   </tbody>
</table>
在這裡,我們更新了支出列表表格,並添加了一列來顯示檢視選項。
開啟ExpenseEntryComponent (src/app/expense-entry/expense-entry.component.ts)並新增功能以獲取當前選定的支出條目。這可以透過首先透過paramMap獲取ID,然後使用ExpenseEntryService中的getExpenseEntry()方法來完成。
this.expenseEntry$ = this.route.paramMap.pipe(
   switchMap(params => {
      this.selectedId = Number(params.get('id'));
      return
this.restService.getExpenseEntry(this.selectedId); }));
   this.expenseEntry$.subscribe( (data) => this.expenseEntry = data );
更新ExpenseEntryComponent並新增轉到支出列表的選項。
goToList() {
   this.router.navigate(['/expenses']);
}
ExpenseEntryComponent的完整程式碼如下:
import { Component, OnInit } from '@angular/core'; import { ExpenseEntry } from '../expense-entry'; import { ExpenseEntryService } from '../expense-entry.service';
import { Router, ActivatedRoute } from '@angular/router';
import { Observable } from 'rxjs';
import { switchMap } from 'rxjs/operators';
@Component({
   selector: 'app-expense-entry',
   templateUrl: './expense-entry.component.html',
   styleUrls: ['./expense-entry.component.css']
})
export class ExpenseEntryComponent implements OnInit {
   title: string;
   expenseEntry$ : Observable<ExpenseEntry>;
   expenseEntry: ExpenseEntry = {} as ExpenseEntry;
   selectedId: number;
   constructor(private restService : ExpenseEntryService, private router : Router, private route :
ActivatedRoute ) { }
   ngOnInit() {
      this.title = "Expense Entry";
   this.expenseEntry$ = this.route.paramMap.pipe(
      switchMap(params => {
         this.selectedId = Number(params.get('id'));
         return
this.restService.getExpenseEntry(this.selectedId); }));
   this.expenseEntry$.subscribe( (data) => this.expenseEntry = data );
   }
   goToList() {
      this.router.navigate(['/expenses']);
   }
}
開啟ExpenseEntryComponent (src/app/expense-entry/expense-entry.component.html)模板並新增一個新按鈕以導航回支出列表頁面。
<div class="col-sm" style="text-align: right;">
   <button type="button" class="btn btn-primary" (click)="goToList()">Go to List</button>
   <button type="button" class="btn btn-primary">Edit</button>
</div>
在這裡,我們在編輯按鈕之前添加了轉到列表按鈕。
使用以下命令執行應用程式:
ng serve
應用程式的最終輸出如下所示:

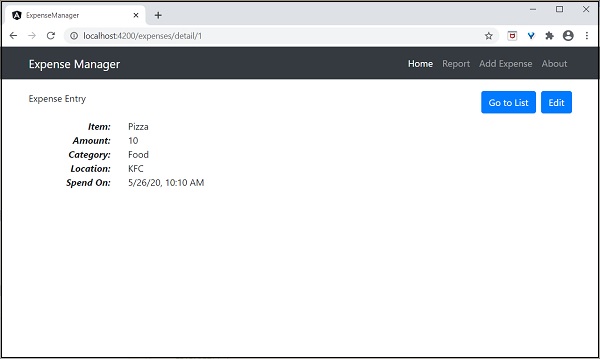
單擊第一個條目的檢視選項將導航到詳細資訊頁面並顯示所選的支出條目,如下所示:
啟用登入和登出功能
建立一個新的服務AuthService來驗證使用者。
ng generate service auth
CREATE src/app/auth.service.spec.ts (323 bytes)
CREATE src/app/auth.service.ts (133 bytes)
開啟AuthService幷包含以下程式碼。
import { Injectable } from '@angular/core';

import { Observable, of } from 'rxjs';
import { tap, delay } from 'rxjs/operators';

@Injectable({
   providedIn: 'root'
})
export class AuthService {

   isUserLoggedIn: boolean = false;

   login(userName: string, password: string): Observable {
      console.log(userName);
      console.log(password);
      this.isUserLoggedIn = userName == 'admin' && password == 'admin';
      localStorage.setItem('isUserLoggedIn', this.isUserLoggedIn ? "true" : "false");

   return of(this.isUserLoggedIn).pipe(
      delay(1000),
      tap(val => {
         console.log("Is User Authentication is successful: " + val);
      })
   );
   }

   logout(): void {
   this.isUserLoggedIn = false;
      localStorage.removeItem('isUserLoggedIn');
   }

   constructor() { }
}
這裡:
我們編寫了兩個方法,login和logout。
login方法的目的是驗證使用者,如果使用者成功驗證,則將資訊儲存在localStorage中,然後返回true。
身份驗證驗證是使用者名稱和密碼應為admin。
我們沒有使用任何後端。相反,我們使用Observables模擬了1秒的延遲。
logout方法的目的是使使用者無效並刪除儲存在localStorage中的資訊。
使用以下命令建立一個login元件:
ng generate component login
CREATE src/app/login/login.component.html (20 bytes)
CREATE src/app/login/login.component.spec.ts (621 bytes)
CREATE src/app/login/login.component.ts (265 bytes)
CREATE src/app/login/login.component.css (0 bytes)
UPDATE src/app/app.module.ts (1207 bytes)
開啟LoginComponent幷包含以下程式碼:
import { Component, OnInit } from '@angular/core';

import { FormGroup, FormControl } from '@angular/forms';
import { AuthService } from '../auth.service';
import { Router } from '@angular/router';

@Component({
   selector: 'app-login',
   templateUrl: './login.component.html',
   styleUrls: ['./login.component.css']
})
export class LoginComponent implements OnInit {

   userName: string;
   password: string;
   formData: FormGroup;

   constructor(private authService : AuthService, private router : Router) { }

   ngOnInit() {
      this.formData = new FormGroup({
         userName: new FormControl("admin"),
         password: new FormControl("admin"),
      });
   }

   onClickSubmit(data: any) {
      this.userName = data.userName;
      this.password = data.password;

      console.log("Login page: " + this.userName);
      console.log("Login page: " + this.password);

      this.authService.login(this.userName, this.password)
         .subscribe( data => {
            console.log("Is Login Success: " + data);

           if(data) this.router.navigate(['/expenses']);
      });
   }
}
這裡:
使用了響應式表單。
匯入了AuthService和Router並在建構函式中對其進行了配置。
建立了FormGroup的一個例項,幷包含了FormControl的兩個例項,一個用於使用者名稱,另一個用於密碼。
建立了一個onClickSubmit來使用authService驗證使用者,如果成功,則導航到支出列表。
開啟LoginComponent模板幷包含以下模板程式碼。
<!-- Page Content -->
<div class="container">
   <div class="row">
      <div class="col-lg-12 text-center" style="padding-top: 20px;">
         <div class="container box" style="margin-top: 10px; padding-left: 0px; padding-right: 0px;">
            <div class="row">
               <div class="col-12" style="text-align: center;">
                                    <form [formGroup]="formData" (ngSubmit)="onClickSubmit(formData.value)"
                                          class="form-signin">
                                    <h2 class="form-signin-heading">Please sign in</h2>
                                    <label for="inputEmail" class="sr-only">Email address</label>
                                    <input type="text" id="username" class="form-control"
                                          formControlName="userName" placeholder="Username" required autofocus>
                                    <label for="inputPassword" class="sr-only">Password</label>
                                    <input type="password" id="inputPassword" class="form-control"
                                          formControlName="password" placeholder="Password" required>
                                    <button class="btn btn-lg btn-primary btn-block" type="submit">Sign in</button>
                                    </form>
               </div>
            </div>
         </div>
      </div>
   </div>
</div>
這裡:
建立了一個響應式表單並設計了一個登入表單。
將onClickSubmit方法附加到表單提交操作。
開啟LoginComponent樣式幷包含以下CSS程式碼。
.form-signin {
   max-width: 330px;

   padding: 15px;
   margin: 0 auto;
}

input {
   margin-bottom: 20px;
}
在這裡,添加了一些樣式來設計登入表單。
使用以下命令建立一個登出元件:
ng generate component logout
CREATE src/app/logout/logout.component.html (21 bytes)
CREATE src/app/logout/logout.component.spec.ts (628 bytes)
CREATE src/app/logout/logout.component.ts (269 bytes)
CREATE src/app/logout/logout.component.css (0 bytes)
UPDATE src/app/app.module.ts (1368 bytes)
開啟LogoutComponent幷包含以下程式碼。
import { Component, OnInit } from '@angular/core';

import { AuthService } from '../auth.service';
import { Router } from '@angular/router';

@Component({
   selector: 'app-logout',
   templateUrl: './logout.component.html',
   styleUrls: ['./logout.component.css']
})
export class LogoutComponent implements OnInit {

   constructor(private authService : AuthService, private router: Router) { }

   ngOnInit() {
      this.authService.logout();
      this.router.navigate(['/']);
   }

}
這裡:
- 使用了AuthService的登出方法。
- 登出使用者後,頁面將重定向到主頁(/)。
使用以下命令建立一個守衛:
ng generate guard expense
CREATE src/app/expense.guard.spec.ts (364 bytes)
CREATE src/app/expense.guard.ts (459 bytes)
開啟ExpenseGuard幷包含以下程式碼:
import { Injectable } from '@angular/core';
import { CanActivate, ActivatedRouteSnapshot, RouterStateSnapshot, Router, UrlTree } from '@angular/router';
import { Observable } from 'rxjs';

import { AuthService } from './auth.service';

@Injectable({
   providedIn: 'root'
})
export class ExpenseGuard implements CanActivate {

   constructor(private authService: AuthService, private router: Router) {}

   canActivate(
   next: ActivatedRouteSnapshot,
   state: RouterStateSnapshot): boolean | UrlTree {
      let url: string = state.url;

          return this.checkLogin(url);
      }

      checkLogin(url: string): true | UrlTree {
         console.log("Url: " + url)
         let val: string = localStorage.getItem('isUserLoggedIn');

         if(val != null && val == "true"){
            if(url == "/login")
               this.router.parseUrl('/expenses');
            else
               return true;
         } else {
            return this.router.parseUrl('/login');
         }
      }
}
這裡:
- checkLogin將檢查localStorage是否包含使用者資訊,如果可用,則返回true。
- 如果使用者已登入並轉到登入頁面,它將把使用者重定向到支出頁面。
- 如果使用者未登入,則使用者將被重定向到登入頁面。
開啟AppRoutingModule (src/app/app-routing.module.ts)並更新以下程式碼:
import { NgModule } from '@angular/core';
import { Routes, RouterModule } from '@angular/router';
import { ExpenseEntryComponent } from './expense-entry/expense-entry.component';
import { ExpenseEntryListComponent } from './expense-entry-list/expense-entry-list.component';
import { LoginComponent } from './login/login.component';
import { LogoutComponent } from './logout/logout.component';

import { ExpenseGuard } from './expense.guard';

const routes: Routes = [
   { path: 'login', component: LoginComponent },
   { path: 'logout', component: LogoutComponent },
   { path: 'expenses', component: ExpenseEntryListComponent, canActivate: [ExpenseGuard]},
   { path: 'expenses/detail/:id', component: ExpenseEntryComponent, canActivate: [ExpenseGuard]},
   { path: '', redirectTo: 'expenses', pathMatch: 'full' }
];

@NgModule({
  imports: [RouterModule.forRoot(routes)],
  exports: [RouterModule]
})
export class AppRoutingModule { }
這裡:
- 匯入了LoginComponent和LogoutComponent。
- 匯入了ExpenseGuard。
- 建立了兩個新路由,login和logout,分別用於訪問LoginComponent和LogoutComponent。
- 為ExpenseEntryComponent和ExpenseEntryListComponent新增新的選項canActivate。
開啟AppComponent模板並新增兩個登入和登出連結。
<div class="collapse navbar-collapse" id="navbarResponsive">
   <ul class="navbar-nav ml-auto">
      <li class="nav-item active">
         <a class="nav-link" href="#">Home
            <span class="sr-only" routerLink="/">(current)</span>

         </a>
      </li>
      <li class="nav-item">
         <a class="nav-link" routerLink="/expenses">Report</a>
      </li>
      <li class="nav-item">
         <a class="nav-link" href="#">Add Expense</a>
      </li>
      <li class="nav-item">

         <a class="nav-link" href="#">About</a>
      </li>
      <li class="nav-item">
                  <div *ngIf="isUserLoggedIn; else isLogOut">
                        <a class="nav-link" routerLink="/logout">Logout</a>
                  </div>

                  <ng-template #isLogOut>
                              <a class="nav-link" routerLink="/login">Login</a>
                  </ng-template>
      </li>
   </ul>
</div>
開啟AppComponent並更新以下程式碼:
import { Component } from '@angular/core';

import { AuthService } from './auth.service';

@Component({
   selector: 'app-root',
   templateUrl: './app.component.html',
   styleUrls: ['./app.component.css']
})
export class AppComponent {

   title = 'Expense Manager';
   isUserLoggedIn = false;

   constructor(private authService: AuthService) {}

   ngOnInit() {
      let storeData = localStorage.getItem("isUserLoggedIn");
      console.log("StoreData: " + storeData);

      if( storeData != null && storeData == "true")
         this.isUserLoggedIn = true;
      else


         this.isUserLoggedIn = false;
   }
}
在這裡,我們添加了識別使用者狀態的邏輯,以便我們可以顯示登入/登出功能。
開啟AppModule (src/app/app.module.ts)並配置ReactiveFormsModule
import { ReactiveFormsModule } from '@angular/forms';
imports: [
   ReactiveFormsModule
]
現在,執行應用程式,應用程式將開啟登入頁面。
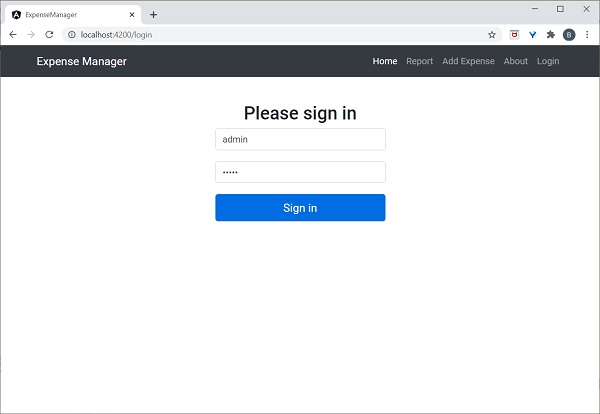
輸入admin和admin作為使用者名稱和密碼,然後單擊提交。應用程式處理登入並將使用者重定向到支出列表頁面,如下所示:
最後,您可以單擊登出並退出應用程式。
新增/編輯/刪除支出
新增一個新元件EditEntryComponent,使用以下命令新增新的支出條目並編輯現有的支出條目:
ng generate component EditEntry
CREATE src/app/edit-entry/edit-entry.component.html (25 bytes)
CREATE src/app/edit-entry/edit-entry.component.spec.ts (650 bytes)
CREATE src/app/edit-entry/edit-entry.component.ts (284 bytes)
CREATE src/app/edit-entry/edit-entry.component.css (0 bytes)
UPDATE src/app/app.module.ts (1146 bytes)
使用以下程式碼更新EditEntryComponent:
import { Component, OnInit } from '@angular/core';

import { FormGroup, FormControl, Validators } from '@angular/forms';

import { ExpenseEntry } from '../expense-entry';
import { ExpenseEntryService } from '../expense-entry.service';

import { Router, ActivatedRoute } from '@angular/router';


@Component({
   selector: 'app-edit-entry',
   templateUrl: './edit-entry.component.html',
   styleUrls: ['./edit-entry.component.css']
})
export class EditEntryComponent implements OnInit {
   id: number;
   item: string;
   amount: number;
   category: string;
   location: string;
   spendOn: Date;

   formData: FormGroup;
   selectedId: number;
   expenseEntry: ExpenseEntry;

   constructor(private expenseEntryService : ExpenseEntryService, private router: Router, private route: ActivatedRoute) { }

   ngOnInit() {
      this.formData = new FormGroup({
         id: new FormControl(),
         item: new FormControl('', [Validators.required]),
         amount: new FormControl('', [Validators.required]),
         category: new FormControl(),
         location: new FormControl(),
         spendOn: new FormControl()
      });

      this.selectedId = Number(this.route.snapshot.paramMap.get('id'));

      if(this.selectedId != null && this.selectedId != 0) {
         this.expenseEntryService.getExpenseEntry(this.selectedId)
            .subscribe( (data) =>
               {
                  this.expenseEntry = data;
                  this.formData.controls['id'].setValue(this.expenseEntry.id);
                  this.formData.controls['item'].setValue(this.expenseEntry.item);
                  this.formData.controls['amount'].setValue(this.expenseEntry.amount);
                  this.formData.controls['category'].setValue(this.expenseEntry.category);
                  this.formData.controls['location'].setValue(this.expenseEntry.location);


                  this.formData.controls['spendOn'].setValue(this.expenseEntry.spendOn);
               })
      }


   }

   get itemValue() {
   return this.formData.get('item');
   }

   get amountValue() {
   return this.formData.get('amount');
   }

    onClickSubmit(data: any) {
   console.log('onClickSubmit fired');
   this.id = data.id;
   this.item = data.item;
   this.amount = data.amount;
   this.category = data.category;
   this.location = data.location;
   this.spendOn = data.spendOn;

   let expenseEntry : ExpenseEntry = {
      id: this.id,
       item: this.item,
       amount: this.amount,
       category: this.category,
       location: this.location,
       spendOn: this.spendOn,
       createdOn: new Date(2020, 5, 20)
   }
   console.log(expenseEntry);

      if(expenseEntry.id == null || expenseEntry.id == 0) {
         console.log('add fn fired');
      this.expenseEntryService.addExpenseEntry(expenseEntry)
         .subscribe( data => { console.log(data); this.router.navigate(['/expenses']); });
   } else {
         console.log('edit fn fired');
      this.expenseEntryService.updateExpenseEntry(expenseEntry)
         .subscribe( data => { console.log(data); this.router.navigate(['/expenses']); });
   }
    }
}
這裡:
在ngOnInit方法中使用FormControl和FormGroup類以及適當的驗證規則建立了一個表單formData。
在ngOnInit方法中載入要編輯的支出條目。
建立了兩個方法itemValue和amountValue,分別用於獲取使用者為驗證目的輸入的專案和金額值。
建立了方法onClickSubmit來儲存(新增/更新)支出條目。
使用支出服務新增和更新支出條目。
使用支出表單更新EditEntryComponent模板,如下所示:
<!-- Page Content -->
<div class="container">
   <div class="row">
   <div class="col-lg-12 text-center" style="padding-top: 20px;">
       <div class="container" style="padding-left: 0px; padding-right: 0px;">
       </div>
       <div class="container box" style="margin-top: 10px;">
<form [formGroup]="formData" (ngSubmit)="onClickSubmit(formData.value)" class="form" novalidate>
  <div class="form-group">
    <label for="item">Item</label>
    <input type="hidden" class="form-control" id="id" formControlName="id">
    <input type="text" class="form-control" id="item" formControlName="item">
    <div
   *ngIf="!itemValue?.valid && (itemValue?.dirty ||itemValue?.touched)">
   <div [hidden]="!itemValue.errors.required">
      Item is required
   </div>
   </div>
  </div>
  <div class="form-group">
    <label for="amount">Amount</label>
    <input type="text" class="form-control" id="amount" formControlName="amount">
    <div
   *ngIf="!amountValue?.valid && (amountValue?.dirty ||amountValue?.touched)">
   <div [hidden]="!amountValue.errors.required">
      Amount is required
   </div>
   </div>
  </div>
  <div class="form-group">
    <label for="category">Category</label>
    <select class="form-control" id="category" formControlName="category">
      <option>Food</option>
      <option>Vegetables</option>
      <option>Fruit</option>
      <option>Electronic Item</option>

      <option>Bill</option>
    </select>
  </div>
  <div class="form-group">
    <label for="location">location</label>
    <input type="text" class="form-control" id="location" formControlName="location">
  </div>
  <div class="form-group">
    <label for="spendOn">spendOn</label>
    <input type="text" class="form-control" id="spendOn" formControlName="spendOn">
  </div>
<button class="btn btn-lg btn-primary btn-block" type="submit" [disabled]="!formData.valid">Submit</button>
</form>
       </div>
   </div>
    </div>
</div>
這裡:
建立了一個表單並將其繫結到在類中建立的表單formData。
將item和amount驗證為必需值。
驗證成功後呼叫onClickSubmit函式。
開啟EditEntryComponent樣式表並更新以下程式碼:
.form {
   max-width: 330px;
   padding: 15px;
   margin: 0 auto;
}

.form label {
   text-align: left;
   width: 100%;
}

input {
   margin-bottom: 20px;
}
在這裡,我們設計了支出條目表單的樣式。
使用以下命令新增AboutComponent
ng generate component About
CREATE src/app/about/about.component.html (20 bytes)

CREATE src/app/about/about.component.spec.ts (621 bytes)
CREATE src/app/about/about.component.ts (265 bytes)
CREATE src/app/about/about.component.css (0 bytes)
UPDATE src/app/app.module.ts (1120 bytes)
開啟AboutComponent並新增如下所示的標題:
import { Component, OnInit } from '@angular/core';

@Component({
   selector: 'app-about',
   templateUrl: './about.component.html',
   styleUrls: ['./about.component.css']
})
export class AboutComponent implements OnInit {
   title = "About";
   constructor() { }

   ngOnInit() {
   }

}
開啟AboutComponent模板並更新如下所示的內容:
<!-- Page Content -->
<div class="container">
   <div class="row">
   <div class="col-lg-12 text-center" style="padding-top: 20px;">
       <div class="container" style="padding-left: 0px; padding-right: 0px;">
      <div class="row">
          <div class="col-sm" style="text-align: left;">
         <h1>{{ title }}</h1>
          </div>
      </div>
       </div>
       <div class="container box" style="margin-top: 10px;">
      <div class="row">
          <div class="col" style="text-align: left;">
         <p>Expense management Application</p>
          </div>
      </div>
       </div>
   </div>
    </div>
</div>
新增新增和編輯支出條目的路由,如下所示
import { NgModule } from '@angular/core';

import { Routes, RouterModule } from '@angular/router';
import { ExpenseEntryComponent } from './expense-entry/expense-entry.component';
import { ExpenseEntryListComponent } from './expense-entry-list/expense-entry-list.component';
import { LoginComponent } from './login/login.component';
import { LogoutComponent } from './logout/logout.component';
import { EditEntryComponent } from './edit-entry/edit-entry.component';
import { AboutComponent } from './about/about.component';

import { ExpenseGuard } from './expense.guard';

const routes: Routes = [
   { path: 'about', component: AboutComponent },
   { path: 'login', component: LoginComponent },
   { path: 'logout', component: LogoutComponent },
   { path: 'expenses', component: ExpenseEntryListComponent, canActivate: [ExpenseGuard]},
   { path: 'expenses/detail/:id', component: ExpenseEntryComponent, canActivate: [ExpenseGuard]},
   { path: 'expenses/add', component: EditEntryComponent, canActivate: [ExpenseGuard]},
   { path: 'expenses/edit/:id', component: EditEntryComponent, canActivate: [ExpenseGuard]},
   { path: '', redirectTo: 'expenses', pathMatch: 'full' }
];

@NgModule({
      imports: [RouterModule.forRoot(routes)],
      exports: [RouterModule]
})
export class AppRoutingModule { }
在這裡,我們添加了關於、新增支出和編輯支出路由。
在ExpenseEntryListComponent模板中新增編輯和刪除連結。
<table class="table table-striped">
   <thead>
         <tr>
         <th>Item</th>
         <th>Amount</th>
         <th>Category</th>
         <th>Location</th>
         <th>Spent On</th>
         <th>View</th>
               <th>Edit</th>
               <th>Delete</th>
         </tr>
   </thead>
   <tbody>
      <tr *ngFor="let entry of expenseEntries">

      <th scope="row">{{ entry.item }}</th>
      <th>{{ entry.amount }}</th>
      <td>{{ entry.category }}</td>
      <td>{{ entry.location }}</td>
      <td>{{ entry.spendOn | date: 'medium' }}</td>
      <td><a routerLink="../expenses/detail/{{ entry.id }}">View</a></td>
      <td><a routerLink="../expenses/edit/{{ entry.id }}">Edit</a></td>
      <td><a href="#" (click)="deleteExpenseEntry($event, entry.id)">Delete</a></td>
      </tr>
   </tbody>
</table>
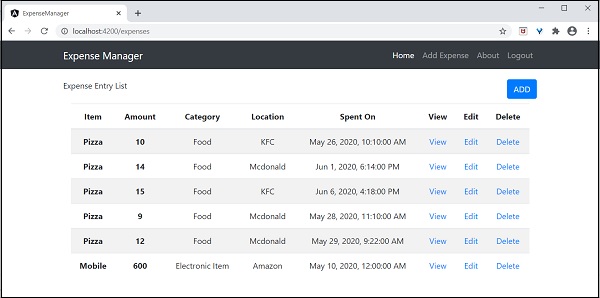
在這裡,我們包含了另外兩列。一列用於顯示編輯連結,另一列用於顯示刪除連結。
更新ExpenseEntryListComponent中的deleteExpenseEntry方法,如下所示
deleteExpenseEntry(evt, id) {
   evt.preventDefault();
   if(confirm("Are you sure to delete the entry?")) {
      this.restService.deleteExpenseEntry(id)
         .subscribe( data => console.log(data) );

      this.getExpenseItems();
   }
}
在這裡,我們要求確認刪除,如果使用者確認,則呼叫支出服務中的deleteExpenseEntry方法來刪除所選支出專案。
將ExpenseEntryListComponent模板頂部的編輯連結更改為新增連結,如下所示:
<div class="col-sm" style="text-align: right;">
   <button class="btn btn-primary" routerLink="/expenses/add">ADD</button>
   <!-- <button type="button" class="btn btn-primary">Edit</button> -->
</div>
在ExpenseEntryComponent模板中新增編輯連結。
<div class="col-sm" style="text-align: right;">
   <button type="button" class="btn btn-primary" (click)="goToList()">Go to List</button>
    <button type="button" class="btn btn-primary" (click)="goToEdit()">Edit</button>
</div>
開啟ExpenseEntryComponent並新增goToEdit()方法,如下所示:
goToEdit() {
   this.router.navigate(['/expenses/edit', this.selectedId]);
}
更新AppComponent模板中的導航連結。
<!-- Navigation -->
<nav class="navbar navbar-expand-lg navbar-dark bg-dark static-top">
   <div class="container">
      <a class="navbar-brand" href="#">{{ title }}</a>
      <button class="navbar-toggler" type="button" data-toggle="collapse" data-target="#navbarResponsive" aria-controls="navbarResponsive" aria-expanded="false" aria-label="Toggle navigation">
         <span class="navbar-toggler-icon"></span>
      </button>
      <div class="collapse navbar-collapse" id="navbarResponsive">
         <ul class="navbar-nav ml-auto">
            <li class="nav-item active">
               <a class="nav-link" href="#">Home
                  <span class="sr-only" routerLink="/">(current)</span>
               </a>
            </li>
            <li class="nav-item">
               <a class="nav-link" routerLink="/expenses/add">Add Expense</a>
            </li>
            <li class="nav-item">
               <a class="nav-link" routerLink="/about">About</a>
            </li>
            <li class="nav-item">
                        <div *ngIf="isUserLoggedIn; else isLogOut">
                              <a class="nav-link" routerLink="/logout">Logout</a>
                        </div>

                        <ng-template #isLogOut>
                                    <a class="nav-link" routerLink="/login">Login</a>
                        </ng-template>
            </li>
         </ul>
      </div>
   </div>
</nav>

<router-outlet></router-outlet>
在這裡,我們更新了新增支出連結和關於連結。
執行應用程式,輸出將類似於如下所示:
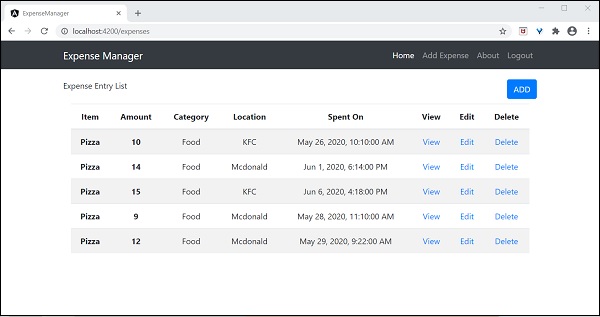
嘗試使用支出列表頁面中的新增連結新增新的支出。輸出將類似於如下所示
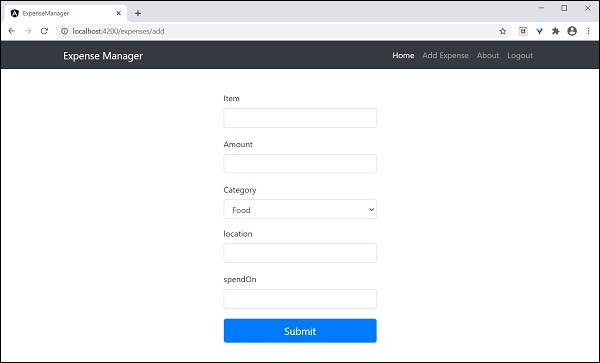
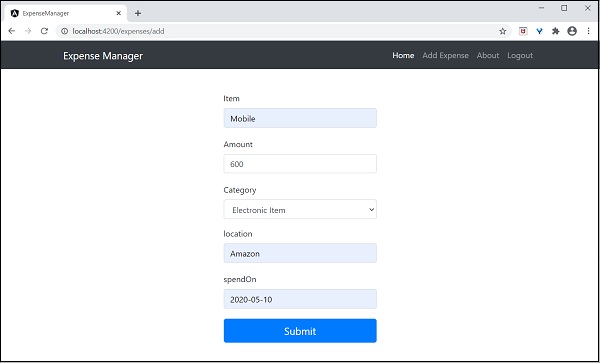
填寫如下所示的表單:
如果資料填寫不正確,驗證程式碼將發出如下所示的警告:

單擊提交。它將觸發提交事件,資料將儲存到後端並重定向到列表頁面,如下所示:
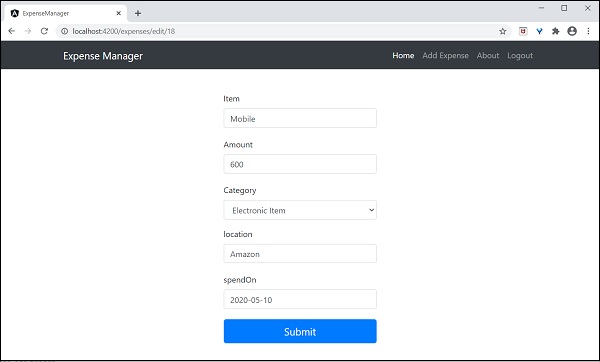
嘗試使用支出列表頁面中的編輯連結編輯現有支出。輸出將類似於如下所示:
單擊提交。它將觸發提交事件,資料將儲存到後端並重定向到列表頁面。
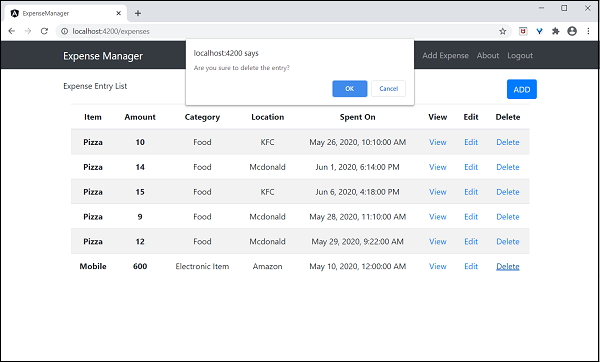
要刪除專案,請單擊刪除連結。它將確認刪除,如下所示:
最後,我們實現了應用程式中管理支出所需的所有功能。