- Angular 8 教程
- Angular 8 - 首頁
- Angular 8 - 簡介
- Angular 8 - 安裝
- 建立第一個應用程式
- Angular 8 - 架構
- Angular 元件和模板
- Angular 8 - 資料繫結
- Angular 8 - 指令
- Angular 8 - 管道
- Angular 8 - 響應式程式設計
- 服務和依賴注入
- Angular 8 - Http 客戶端程式設計
- Angular 8 - Angular Material
- 路由和導航
- Angular 8 - 動畫
- Angular 8 - 表單
- Angular 8 - 表單驗證
- 身份驗證和授權
- Angular 8 - Web Workers
- Service Workers 和 PWA
- Angular 8 - 伺服器端渲染
- Angular 8 - 國際化 (i18n)
- Angular 8 - 可訪問性
- Angular 8 - CLI 命令
- Angular 8 - 測試
- Angular 8 - Ivy 編譯器
- Angular 8 - 使用 Bazel 構建
- Angular 8 - 向後相容性
- Angular 8 - 工作示例
- Angular 9 - 新增功能?
- Angular 8 有用資源
- Angular 8 - 快速指南
- Angular 8 - 有用資源
- Angular 8 - 討論
Angular 8 - 路由和導航
導航是 web 應用程式中一個重要的方面。即使單頁面應用程式 (SPA) 沒有多頁面的概念,它也會從一個檢視(例如支出列表)移動到另一個檢視(例如支出詳情)。提供清晰易懂的導航元素決定了應用程式的成功。
Angular 提供了廣泛的導航功能,可以適應從簡單場景到複雜場景的需求。定義導航元素和相應檢視的過程稱為路由。Angular 提供了一個單獨的模組,RouterModule,用於在 Angular 應用程式中設定導航。本章我們將學習如何在 Angular 應用程式中進行路由。
配置路由
Angular CLI 完全支援在應用程式建立過程中以及在應用程式執行過程中設定路由。讓我們使用以下命令建立一個啟用路由的新應用程式:
ng new routing-app --routing
Angular CLI 生成一個新的模組,AppRoutingModule,用於路由目的。生成的程式碼如下:
import { NgModule } from '@angular/core';
import { Routes, RouterModule } from '@angular/router';


const routes: Routes = [];

@NgModule({
  imports: [RouterModule.forRoot(routes)],
  exports: [RouterModule]
})
export class AppRoutingModule { }
這裡:
從 @angular/router 包中匯入 RouterModule 和 Routes。
RouterModule 提供了在應用程式中配置和執行路由的功能。
Routes 是用於設定導航規則的型別。
routes 是用於配置應用程式實際導航規則的區域性變數(Routes 型別)。
RouterModule.forRoot() 方法將設定在 routes 變數中配置的導航規則。
Angular CLI 將生成的 AppRoutingModule 包含在 AppComponent 中,如下所示:
import { BrowserModule } from '@angular/platform-browser';
import { NgModule } from '@angular/core';

import { AppRoutingModule } from './app-routing.module';
import { AppComponent } from './app.component';

@NgModule({
  declarations: [
    AppComponent
  ],
  imports: [
    BrowserModule,
    AppRoutingModule
  ],
  providers: [],
  bootstrap: [AppComponent]
})
export class AppModule { }
這裡:
AppComponent 使用 imports 元資料匯入AppRoutingModule 模組。
Angular CLI 也提供在現有應用程式中設定路由的選項。在現有應用程式中包含路由的通用命令如下:
ng generate module my-module --routing
這將生成一個啟用了路由功能的新模組。要在現有模組 (AppModule) 中啟用路由功能,我們需要包含如下指定的額外選項:
ng generate module app-routing --module app --flat
這裡:
–module app 將新建立的路由模組AppRoutingModule 配置到 AppModule 模組中。
讓我們在ExpenseManager 應用程式中配置路由模組。
開啟命令提示符並轉到專案根資料夾。
cd /go/to/expense-manager
使用以下命令生成路由模組:
ng generate module app-routing --module app --flat
輸出
輸出如下:
CREATE src/app/app-routing.module.ts (196 bytes)
UPDATE src/app/app.module.ts (785 bytes)
這裡:
CLI 生成AppRoutingModule,然後將其配置到AppModule 中。
建立路由
建立路由簡單易行。建立路由的基本資訊如下:
- 要呼叫的目標元件。
- 訪問目標元件的路徑。
建立簡單路由的程式碼如下:
const routes: Routes = [
  { path: 'about', component: AboutComponent },
];
這裡:
Routes 是 AppRoutingModule 中的變數。
about 是路徑,AboutComponent 是目標/目標元件。當用戶請求 https://:4200/about url 時,路徑與 about 規則匹配,然後將呼叫 AboutComponent。
訪問路由
讓我們學習如何在應用程式中使用已配置的路由。
訪問路由是一個兩步過程。
在根元件模板中包含router-outlet 標籤。
<router-outlet></router-outlet>
在需要的地方使用routerLink 和routerLinkActive 屬性。
<a routerLink="/about" routerLinkActive="active">First Component</a>
這裡:
routerLink 使用路徑設定要呼叫的路由。
routerLinkActive 設定在路由啟用時使用的 CSS 類。
有時,我們需要在元件內部而不是模板中訪問路由。然後,我們需要遵循以下步驟:
在相應的元件中注入Router 和ActivatedRoute 的例項。
import { Router, ActivatedRoute } from '@angular/router';
constructor(private router: Router, private route: ActivatedRoute)
這裡:
Router 提供執行路由操作的功能。
Route 指的是當前啟用的路由。
使用路由器的 navigate 函式。
this.router.navigate(['about']);
這裡:
navigate 函式需要一個包含必要路徑資訊的陣列。
使用相對路徑
路由路徑類似於網頁 URL,它也支援相對路徑。要從另一個元件(例如HomePageComponent)訪問AboutComponent,只需像在 web url 或資料夾路徑中一樣使用 .. 符號。
<a routerLink="../about">Relative Route to about component</a>
要在元件中訪問相對路徑:
import { NavigationExtras } from '@angular/router';
this.router.navigate(['about'], { relativeTo: this.route });
這裡:
relativeTo 可在NavigationExtras 類中找到。
路由排序
路由排序在路由配置中非常重要。如果同一路徑多次配置,則將呼叫第一次匹配的路徑。如果由於某種原因第一次匹配失敗,則將呼叫第二次匹配。
重定向路由
Angular 路由允許將一個路徑重定向到另一個路徑。redirectTo 是設定重定向路徑的選項。示例路由如下:
const routes: Routes = [
   { path: '', redirectTo: '/about' },
];
這裡:
- 如果實際路徑與空字串匹配,則redirectTo 將 about 設定為重定向路徑。
萬用字元路由
萬用字元路由將匹配任何路徑。它是使用 ** 建立的,將用於處理應用程式中不存在的路徑。將萬用字元路由放在配置的末尾,使其在其他路徑不匹配時被呼叫。
示例程式碼如下:
const routes: Routes = [
  { path: 'about', component: AboutComponent },
  { path: '',   redirectTo: '/about', pathMatch: 'full' },
  { path: '**', component: PageNotFoundComponent },  // Wildcard route for a 404 page
];
這裡:
如果呼叫了不存在的頁面,則前兩個路由將失敗。但是,最終的萬用字元路由將成功,並呼叫PageNotFoundComponent。
訪問路由引數
在 Angular 中,我們可以使用引數在路徑中附加額外資訊。可以使用 paramMap 介面在元件中訪問引數。在路由中建立新引數的語法如下:
const routes: Routes = [
  { path: 'about', component: AboutComponent },
  { path: 'item/:id', component: ItemComponent },
  { path: '',   redirectTo: '/about', pathMatch: 'full' },
  { path: '**', component: PageNotFoundComponent },  // Wildcard route for a 404 page
];
在這裡,我們在路徑中添加了id。可以使用兩種技術在ItemComponent 中訪問id。
- 使用 Observable。
- 使用 snapshot(非 Observable 選項)。
使用 Observable
Angular 提供了一個特殊的介面 paramMap 來訪問路徑的引數。paramMap 具有以下方法:
has(name) - 如果路徑(引數列表)中存在指定的名稱,則返回 true。
get(name) - 返回路徑(引數列表)中指定名稱的值。
getAll(name) - 返回路徑中指定名稱的多個值。當有多個值可用時,get() 方法只返回第一個值。
keys - 返回路徑中所有可用的引數。
使用paramMap 訪問引數的步驟如下:
匯入paramMap,它位於@angular/router 包中。
在ngOnInit() 中使用paramMap 訪問引數並將其設定為區域性變數。
ngOnInit() {
    this.route.paramMap.subscribe(params => {
        this.id = params.get('id);
    });
}
我們可以使用pipe 方法直接在其餘服務中使用它。
this.item$ = this.route.paramMap.pipe(
    switchMap(params => {
      this.selectedId = Number(params.get('id'));
      return this.service.getItem(this.selectedId);
    })
);
使用 snapshot
snapshot 與Observable 類似,只是它不支援 Observable 並立即獲取引數值。
let id = this.route.snapshot.paramMap.get('id');
巢狀路由
通常,router-outlet 將放置在應用程式的根元件(AppComponent) 中。但是,router-outlet 可以用於任何元件。當 router-outlet 用於根元件以外的元件時,特定元件的路由必須配置為父元件的子元件。這稱為巢狀路由。
讓我們考慮一個元件,例如ItemComponent 配置了router-outlet 並具有兩個routerLink,如下所示:
<h2>Item Component</h2>
<nav>
   <ul>
      <li><a routerLink="view">View</a></li>
      <li><a routerLink="edit">Edit</a></li>
   </ul>
</nav>
<router-outlet></router-outlet>
ItemComponent 的路由必須配置為巢狀路由,如下所示:
const routes: Routes = [
{
   path: 'item',

   component: ItemComponent,
   children: [
   {
      path: 'view',
      component: ItemViewComponent
   },
   {
   path: 'edit',
   component: ItemEditComponent
   }
   ]
}]
工作示例
讓我們將本章中學到的路由概念應用到我們的ExpenseManager 應用程式中。
開啟命令提示符並轉到專案根資料夾。
cd /go/to/expense-manager
如果之前沒有完成,請使用以下命令生成路由模組。
ng generate module app-routing --module app --flat
輸出
輸出如下:
CREATE src/app/app-routing.module.ts (196 bytes) UPDATE src/app/app.module.ts (785 bytes)
這裡:
CLI 生成AppRoutingModule,然後將其配置到AppModule 中。
更新AppRoutingModule (src/app/app.module.ts),如下所示:
import { NgModule } from '@angular/core';
import { Routes, RouterModule } from '@angular/router'; import { ExpenseEntryComponent } from './expense-entry/expense-entry.component';
import { ExpenseEntryListComponent } from './expense-entry-list/expense-entry-list.component';
const routes: Routes = [
   { path: 'expenses', component: ExpenseEntryListComponent },
   { path: 'expenses/detail/:id', component: ExpenseEntryComponent },
   { path: '', redirectTo: 'expenses', pathMatch: 'full' }];
@NgModule({
   imports: [RouterModule.forRoot(routes)],
   exports: [RouterModule] })
export class AppRoutingModule { }
在這裡,我們為我們的支出列表和支出詳情元件添加了路由。
更新AppComponent 模板(src/app/app.component.html) 以包含router-outlet 和routerLink。
<!-- Navigation -->
<nav class="navbar navbar-expand-lg navbar-dark bg-dark static-top">
<div class="container">
   <a class="navbar-brand" href="#">{{ title }}</a> <button class="navbar-toggler" type="button" data-toggle="collapse" data-target="#navbarResponsive" aria-controls="navbarResponsive" aria-expanded="false" aria-label="Toggle navigation">
      <span class="navbar-toggler-icon"></span>
   </button>
   <div class="collapse navbar-collapse" id="navbarResponsive">
      <ul class="navbar-nav ml-auto">
         <li class="nav-item active">
            <a class="nav-link" href="#">Home
               <span class="sr-only" routerLink="/">(current)</span>
            </a>
         </li>
         <li class="nav-item">
            <a class="nav-link" routerLink="/expenses">Report</a>
         </li>
         <li class="nav-item">
            <a class="nav-link" href="#">Add Expense</a>
         </li>
         <li class="nav-item">
            <a class="nav-link" href="#">About</a>
         </li>
      </ul>
   </div>
</div>
</nav>
<router-outlet></router-outlet>
開啟ExpenseEntryListComponent 模板 (src/app/expense-entry-list/expense-entry-list.component.html) 併為每個支出條目包含檢視選項。
<table class="table table-striped">
   <thead>
      <tr>
         <th>Item</th>
         <th>Amount</th>
         <th>Category</th>
         <th>Location</th>
         <th>Spent On</th>
         <th>View</th>
      </tr>
   </thead>
   <tbody>
      <tr *ngFor="let entry of expenseEntries">
         <th scope="row">{{ entry.item }}</th>
         <th>{{ entry.amount }}</th>
         <td>{{ entry.category }}</td>
         <td>{{ entry.location }}</td>
         <td>{{ entry.spendOn | date: 'medium' }}</td>
         <td><a routerLink="../expenses/detail/{{ entry.id }}">View</a></td>
      </tr>
   </tbody>
</table>
在這裡,我們更新了支出列表表並添加了一列來顯示檢視選項。
開啟ExpenseEntryComponent (src/app/expense-entry/expense-entry.component.ts) 並新增功能以獲取當前選擇的支出條目。這可以透過首先透過paramMap 獲取 id,然後使用ExpenseEntryService 的getExpenseEntry() 方法來完成。
this.expenseEntry$ = this.route.paramMap.pipe(
   switchMap(params => {
      this.selectedId = Number(params.get('id'));
      return
this.restService.getExpenseEntry(this.selectedId); }));
   this.expenseEntry$.subscribe( (data) => this.expenseEntry = data );
更新 ExpenseEntryComponent 並新增轉到支出列表的選項。
goToList() {
   this.router.navigate(['/expenses']);
}
ExpenseEntryComponent 的完整程式碼如下:
import { Component, OnInit } from '@angular/core'; import { ExpenseEntry } from '../expense-entry'; import { ExpenseEntryService } from '../expense-entry.service';
import { Router, ActivatedRoute } from '@angular/router';
import { Observable } from 'rxjs';
import { switchMap } from 'rxjs/operators';
@Component({
   selector: 'app-expense-entry',
   templateUrl: './expense-entry.component.html',
   styleUrls: ['./expense-entry.component.css']
})
export class ExpenseEntryComponent implements OnInit {
   title: string;
   expenseEntry$ : Observable<ExpenseEntry>;
   expenseEntry: ExpenseEntry = {} as ExpenseEntry;
   selectedId: number;
   constructor(private restService : ExpenseEntryService, private router : Router, private route :
ActivatedRoute ) { }
   ngOnInit() {
      this.title = "Expense Entry";
   this.expenseEntry$ = this.route.paramMap.pipe(
      switchMap(params => {
         this.selectedId = Number(params.get('id'));
         return
this.restService.getExpenseEntry(this.selectedId); }));
   this.expenseEntry$.subscribe( (data) => this.expenseEntry = data );
   }
   goToList() {
      this.router.navigate(['/expenses']);
   }
}
開啟ExpenseEntryComponent (src/app/expense-entry/expense-entry.component.html) 模板並新增一個新按鈕以導航回支出列表頁面。
<div class="col-sm" style="text-align: right;">
   <button type="button" class="btn btn-primary" (click)="goToList()">Go to List</button>
   <button type="button" class="btn btn-primary">Edit</button>
</div>
在這裡,我們在編輯按鈕之前添加了轉到列表按鈕。
使用以下命令執行應用程式:
ng serve
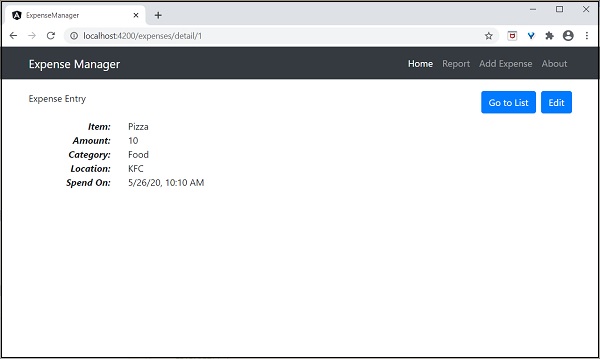
應用程式的最終輸出如下:

單擊第一個條目的檢視選項將導航到詳細資訊頁面並顯示所選的支出條目,如下所示: