- Angular 8 教程
- Angular 8 - 首頁
- Angular 8 - 簡介
- Angular 8 - 安裝
- 建立第一個應用程式
- Angular 8 - 架構
- Angular 元件和模板
- Angular 8 - 資料繫結
- Angular 8 - 指令
- Angular 8 - 管道
- Angular 8 - 響應式程式設計
- 服務和依賴注入
- Angular 8 - Http 客戶端程式設計
- Angular 8 - Angular Material
- 路由和導航
- Angular 8 - 動畫
- Angular 8 - 表單
- Angular 8 - 表單驗證
- 身份驗證和授權
- Angular 8 - Web Workers
- Service Workers 和 PWA
- Angular 8 - 伺服器端渲染
- Angular 8 - 國際化 (i18n)
- Angular 8 - 可訪問性
- Angular 8 - CLI 命令
- Angular 8 - 測試
- Angular 8 - Ivy 編譯器
- Angular 8 - 使用 Bazel 構建
- Angular 8 - 向後相容性
- Angular 8 - 例項
- Angular 9 - 新特性?
- Angular 8 有用資源
- Angular 8 快速指南
- Angular 8 - 有用資源
- Angular 8 - 討論
Angular 8 快速指南
Angular 8 - 簡介
Angular 8 是一個基於 TypeScript 的全棧 Web 框架,用於構建 Web 和移動應用程式。其主要優勢之一是 Angular 8 支援適應任何螢幕解析度的 Web 應用程式。Angular 應用程式與手機、平板電腦、筆記型電腦或桌上型電腦完全相容。Angular 8 為 Web 開發人員提供了一個優秀的使用者介面庫,其中包含可重用的 UI 元件。
此功能幫助我們建立單頁面應用程式 (SPA)。SPA 是響應迅速且快速的應用程式。例如,如果您在單頁面中有一個按鈕,並且單擊該按鈕,則操作會在當前頁面中動態執行,而無需從伺服器載入新頁面。Angular 8 基於 TypeScript 的面向物件程式設計,並支援伺服器端程式設計功能。
Angular 各版本的比較
眾所周知,Google 釋出了Angular 的各個版本,以改進移動和 Web 開發功能。所有已釋出的版本都向後相容,並且可以輕鬆更新到較新版本。讓我們來看一下已釋出版本的比較。
AngularJS
AngularJS 是一個非常強大的 JavaScript 框架。它於 2010 年 10 月釋出。AngularJS 基於模型-檢視-控制器 (MVC) 架構,並自動處理適合每個瀏覽器的 JavaScript 程式碼。
Angular 2.0
Angular 2.0 於 2016 年 9 月釋出。它是 AngularJS 的重新設計和重寫版本。AngularJS 側重於控制器,但版本 2 將重點轉移到元件上。元件是應用程式的主要構建塊。它支援渲染速度、更新頁面和為 Google Android 和 iOS 構建跨平臺原生移動應用程式的功能。
Angular 4.0
Angular 4.0 於 2017 年 3 月釋出。它更新到 TypeScript 2.2,支援 ng if-else 條件,而 Angular 2 僅支援 if 條件。Angular 4.0 引入了動畫包、Http 搜尋引數,最後 Angular 4 應用程式更小更快。
Angular 5.0
Angular 5.0 於 2017 年 11 月釋出。它支援一些重要功能,例如 HTTPClient API、Lambda 支援、改進的編譯器和構建最佳化器。
Angular 6.0
Angular 6.0 於 2018 年 5 月釋出。此版本新增的功能包括更新的 Angular CLI、更新的 CDK、更新的 Angular Material、多個驗證器和 Reactive JS 庫的使用。
Angular 7.0
Angular 7.0 於 2018 年 10 月釋出。一些重要功能包括 Google 支援的社群、基於 POJO 的開發、模組化結構、宣告式使用者介面和模組化結構。
Angular 8 新特性
Angular 8 帶來了以下新的吸引人的特性:
Bazel 支援 - 如果您的應用程式使用多個模組和庫,Bazel 併發構建有助於加快應用程式載入速度。
延遲載入 - Angular 8 將AppRoutingModule 分割成更小的包並在 DOM 中載入資料。
差異載入 - 建立應用程式時,Angular CLI 會生成模組,這些模組將自動載入,然後瀏覽器將呈現資料。
Web worker - 它在後臺執行,不會影響頁面的效能。
改進的 CLI 工作流程 - Angular 8 CLI 命令 ng-build、ng-test 和 ng-run 擴充套件到第三方庫。
路由器向後相容性 - Angular 路由器向後相容性功能有助於為大型專案建立路徑,以便使用者可以輕鬆地藉助懶載入新增程式碼。
選擇加入的使用情況共享 - 使用者可以選擇加入共享 Angular CLI 使用資料。
應用案例
下面列出了一些使用 Angular 框架的流行網站:
Weather.com - 它是領先的天氣預報網站之一。
Youtube - 它是Google 託管的影片共享網站。
Netflix - 它是一家技術和媒體服務提供商。
PayPal - 它是一個線上支付系統。
Angular 8 - 安裝
本章介紹如何在您的機器上安裝Angular 8。在進行安裝之前,讓我們先驗證先決條件。
先決條件
眾所周知,Angular 是用TypeScript 編寫的。我們需要Node 和npm 將檔案編譯成JavaScript,然後才能部署我們的應用程式。為此,必須在您的系統中安裝Node.js。希望您已經在您的機器上安裝了Node.js。
我們可以使用以下命令檢查它:
node --version
您將看到 node 的版本,如下所示:
v14.2.0
如果未安裝Node,您可以訪問以下連結下載並安裝:
https://nodejs.com.tw/en/download/。Angular 8 安裝
Angular 8 CLI 安裝基於非常簡單的步驟。安裝時間不超過五分鐘。
npm 用於安裝Angular 8 CLI。安裝Node.js 後,npm 也已安裝。如果要驗證它,請鍵入以下命令
npm -v
您將看到以下版本:
6.14.4
讓我們使用npm 安裝Angular 8 CLI,如下所示:
npm install -g @angular/cli@^8.0.0
要驗證Angular 8 是否已正確安裝在您的機器上,請鍵入以下命令:
ng version
您將看到以下響應:
Angular CLI: 8.3.26
Node: 14.2.0
OS: win32 x64
Angular: ...
Package                    Version
------------------------------------------------------
@angular-devkit/architect  0.803.26
@angular-devkit/core       8.3.26
@angular-devkit/schematics 8.3.26
@schematics/angular        8.3.26
@schematics/update         0.803.26
rxjs                       6.4.0
Angular 8 - 建立第一個應用程式
讓我們建立一個簡單的 Angular 應用程式並分析基本 Angular 應用程式的結構。
讓我們使用以下命令檢查 Angular 框架是否已安裝在我們的系統中以及已安裝的 Angular 版本的版本:
ng --version
這裡:
ng 是用於建立、管理和執行 Angular 應用程式的 CLI 應用程式。它用 JavaScript 編寫,在 NodeJS 環境中執行。
結果將顯示如下所示的 Angular 版本詳細資訊:
Angular CLI: 8.3.26
Node: 14.2.0
OS: win32 x64
Angular: ...
Package                    Version
------------------------------------------------------
@angular-devkit/architect  0.803.26
@angular-devkit/core       8.3.26
@angular-devkit/schematics 8.3.26
@schematics/angular        8.3.26
@schematics/update         0.803.26
rxjs                       6.4.0
因此,Angular 已安裝在我們的系統中,版本為8.3.26。
讓我們建立一個 Angular 應用程式來檢查我們日常的支出。讓我們將ExpenseManager 作為我們新應用程式的選擇。使用以下命令建立新應用程式。
cd /path/to/workspace
ng new expense-manager
這裡:
new 是ng CLI 應用程式的命令之一。它將用於建立新應用程式。為了建立新應用程式,它會提出一些基本問題。讓應用程式選擇預設選項就足夠了。關於如下所述的路由問題,請指定否。我們將在路由章節中學習如何建立路由。
Would you like to add Angular routing? No
回答基本問題後,ng CLI 應用程式會在expense-manager 資料夾下建立一個新的 Angular 應用程式。
讓我們進入我們新建立的應用程式資料夾。
cd expense-manager
讓我們檢查應用程式的部分結構。應用程式的結構如下:
| favicon.ico
| index.html
| main.ts
| polyfills.ts
| styles.css
|
+---app
|  app.component.css
|  app.component.html
|  app.component.spec.ts
|  app.component.ts
|  app.module.ts
|
+---assets
|  .gitkeep
|
+---environments
   environment.prod.ts
   environment.ts
這裡:
我們只顯示了應用程式中最重要的檔案和資料夾。
favicon.ico 和assets 是應用程式的圖示和應用程式的根資產資料夾。
polyfills.ts 包含對瀏覽器相容性有用的標準程式碼。
environments 資料夾將包含應用程式的設定。它包括生產和開發設定。
main.ts 檔案包含啟動程式碼。
index.html 是應用程式的基本 HTML 程式碼。
styles.css 是基本 CSS 程式碼。
app 資料夾包含 Angular 應用程式程式碼,我們將在接下來的章節中詳細學習。
讓我們使用以下命令啟動應用程式:
ng serve
10% building 3/3 modules 0 activei wds: Project is running at https://:4200/webpack-dev-server/
i wds: webpack output is served from /

i wds: 404s will fallback to //index.html
chunk {main} main.js, main.js.map (main) 49.2 kB [initial] [rendered]
chunk {polyfills} polyfills.js, polyfills.js.map (polyfills) 269 kB [initial] [rendered]
chunk {runtime} runtime.js, runtime.js.map (runtime) 6.15 kB [entry] [rendered]
chunk {styles} styles.js, styles.js.map (styles) 9.75 kB [initial] [rendered]
chunk {vendor} vendor.js, vendor.js.map (vendor) 3.81 MB [initial] [rendered]
Date: 2020-05-26T05:02:14.134Z - Hash: 0dec2ff62a4247d58fe2 - Time: 12330ms
** Angular Live Development Server is listening on localhost:4200, open your
browser on https://:4200/ **
i wdm: Compiled successfully.
這裡,serve 是用於使用本地開發 Web 伺服器編譯和執行 Angular 應用程式的子命令。ng server 將啟動一個開發 Web 伺服器,並在埠 4200 下提供服務。
讓我們啟動瀏覽器並開啟 https://:4200。瀏覽器將顯示如下所示的應用程式:

讓我們更改應用程式的標題以更好地反映我們的應用程式。開啟src/app/app.component.ts 並按如下所示更改程式碼:
export class AppComponent {
   title = 'Expense Manager';
}
我們的最終應用程式將在瀏覽器中呈現,如下所示:
我們將在接下來的章節中更改應用程式並學習如何編寫 Angular 應用程式。
Angular 8 - 架構
讓我們在本節中瞭解 Angular 框架的架構。
Angular 框架基於四個核心概念,它們是:
- 元件。
- 帶有資料繫結和指令的模板。
- 模組。
- 服務和依賴注入。
元件
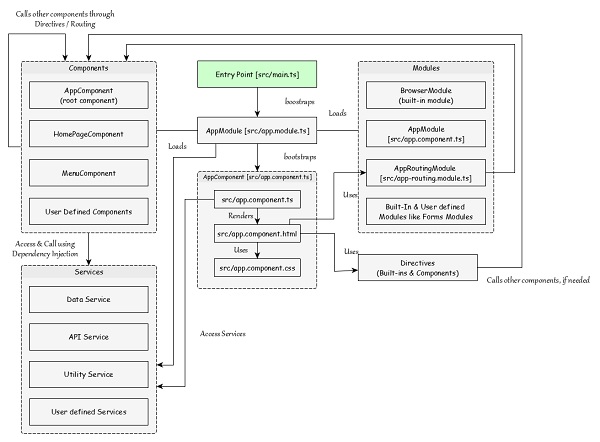
Angular 框架架構的核心是Angular 元件。Angular 元件是每個 Angular 應用程式的構建塊。每個 Angular 應用程式都由一個或多個Angular 元件組成。它基本上是一個普通的 JavaScript/TypeScript 類,以及一個 HTML 模板和一個關聯的名稱。
HTML 模板可以訪問其對應的 JavaScript/TypeScript 類中的資料。元件的 HTML 模板可以使用其選擇器值(名稱)包含其他元件。Angular 元件可能具有與其關聯的可選 CSS 樣式,並且 HTML 模板也可以訪問 CSS 樣式。
讓我們分析一下我們的ExpenseManager 應用程式中的AppComponent 元件。AppComponent 程式碼如下:
// src/app/app.component.ts
import { Component } from '@angular/core'; @Component({
   selector: 'app-root',
   templateUrl: './app.component.html',
   styleUrls: ['./app.component.css']
})
export class AppComponent {
   title = 'Expense Manager';
}
@Component 是一個裝飾器,用於將普通的 TypeScript 類轉換為Angular 元件。
app-root 是元件的選擇器/名稱,它使用元件裝飾器的selector 元資料指定。app-root 可由應用程式根文件src/index.html 使用,如下所示
<!doctype html>
<html lang="en">
   <head>
      <meta charset="utf-8">
      <title>ExpenseManager</title>
      <base href="/">
      <meta name="viewport" content="width=device-width, initial-scale=1">
      <link rel="icon" type="image/x-icon" href="favicon.ico">
   </head>
   <body>
      <app-root></app-root>
   </body>
</html>
app.component.html 是與元件關聯的 HTML 模板文件。元件模板使用@Component 裝飾器的templateUrl 元資料指定。
app.component.css 是與元件關聯的 CSS 樣式文件。元件樣式使用@Component 裝飾器的styleUrls 元資料指定。
AppComponent 的屬性 (title) 可在 HTML 模板中使用,如下所示:
{{ title }}
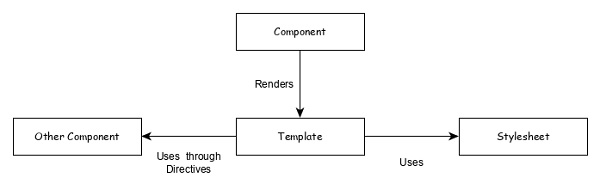
模板
模板基本上是 HTML 的超集。模板包含 HTML 的所有特性,並提供附加功能,用於將元件資料繫結到 HTML 並動態生成 HTML DOM 元素。
模板的核心概念可以分為兩項,如下所示:
資料繫結
用於將資料從元件繫結到模板。
{{ title }}
這裡,title 是 AppComponent 中的一個屬性,它使用插值繫結到模板。
指令
用於包含邏輯以及啟用複雜 HTML DOM 元素的建立。
<p *ngIf="canShow">
   This sectiom will be shown only when the *canShow* propery's value in the corresponding component is *true* </p>
<p [showToolTip]='tips' />
這裡,ngIf 和 showToolTip(只是一個例子)是指令。只有當 canShow 為 true 時,ngIf 才建立段落 DOM 元素。類似地,showToolTip 是屬性指令,它向段落元素新增工具提示功能。
當用戶滑鼠懸停在段落上時,將顯示一個工具提示。工具提示的內容來自其對應元件的 tips 屬性。
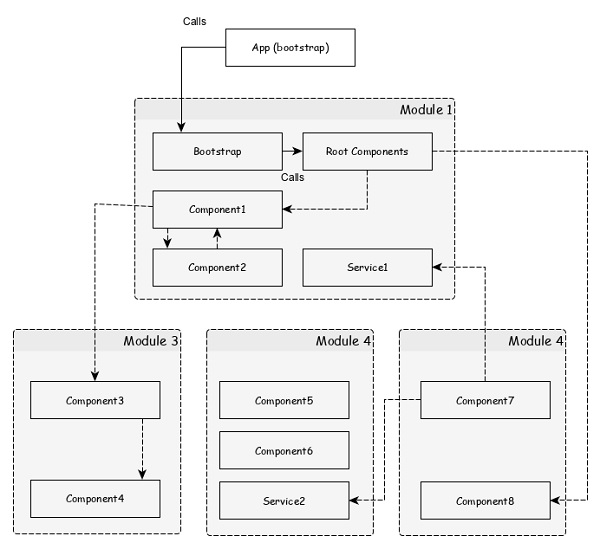
模組
Angular 模組基本上是相關特性/功能的集合。Angular 模組將多個元件和服務分組在一個上下文中。
例如,動畫相關功能可以分組到單個模組中,Angular 已經為動畫相關功能提供了一個模組,即 BrowserAnimationModule 模組。
一個 Angular 應用程式可以包含任意數量的模組,但只有一個模組可以設定為根模組,它將引導應用程式,然後根據需要呼叫其他模組。一個模組也可以配置為訪問其他模組的功能。簡而言之,任何模組中的元件都可以訪問任何其他模組中的元件和服務。
下圖描述了模組及其元件之間的互動。
讓我們檢查一下我們的Expense Manager應用程式的根模組。
import { BrowserModule } from '@angular/platform-browser';
import { NgModule } from '@angular/core';
import { AppComponent } from './app.component'; @NgModule({
   declarations: [
      AppComponent
   ],
   imports: [
      BrowserModule
   ],
   providers: [],
   bootstrap: [AppComponent]
})
export class AppModule { }
這裡:
NgModule 裝飾器用於將普通的 TypeScript/JavaScript 類轉換為Angular 模組。
declarations 選項用於將元件包含到AppModule 模組中。
bootstrap 選項用於設定AppModule 模組的根元件。
providers 選項用於包含AppModule 模組的服務。
imports 選項用於將其他模組匯入到AppModule 模組中。
下圖描述了模組、元件和服務之間的關係。
服務
服務是提供非常特定功能的普通 TypeScript/JavaScript 類。服務將執行單個任務並使其最佳化。服務的首要目的是可重用性。與其在元件內編寫功能,不如將其分離到服務中,這也可以在其他元件中使用。
此外,服務使開發人員能夠組織應用程式的業務邏輯。基本上,元件使用服務來完成自己的工作。依賴注入用於在元件中正確初始化服務,以便元件可以在需要時訪問服務,而無需任何設定。
Angular 應用程式的工作流程
我們已經學習了 Angular 應用程式的核心概念。讓我們看看典型 Angular 應用程式的完整流程。
src/main.ts 是 Angular 應用程式的入口點。
src/main.ts 引導 AppModule (src/app.module.ts),它是每個 Angular 應用程式的根模組。
platformBrowserDynamic().bootstrapModule(AppModule) .catch(err => console.error(err));
AppModule 引導 AppComponent (src/app.component.ts),它是每個 Angular 應用程式的根元件。
@NgModule({
   declarations: [
      AppComponent
   ],
      imports: [
   BrowserModule
   ],
   providers: [],
   bootstrap: [AppComponent]
})
export class AppModule { }
這裡:
AppModule 透過imports選項載入模組。
AppModule 還使用依賴注入 (DI)框架載入所有已註冊的服務。
AppComponent 渲染其模板(src/app.component.html)並使用相應的樣式(src/app.component.css)。AppComponent 的名稱,app-root 用於將其放置在src/index.html中。
<!doctype html>
<html lang="en">
   <head>
      <meta charset="utf-8">
      <title>ExpenseManager</title>
      <base href="/">
      <meta name="viewport" content="width=device-width, initial-scale=1">
      <link rel="icon" type="image/x-icon" href="favicon.ico">
   </head>
   <body>
      <app-root></app-root>
   </body>
</html>
AppComponent 可以使用在應用程式中註冊的任何其他元件。
@NgModule({
   declarations: [
      AppComponent
      AnyOtherComponent
   ],
   imports: [
      BrowserModule
   ],
   providers: [],
   bootstrap: [AppComponent]
})
export class AppModule { }
元件透過其模板中使用目標元件的選擇器名稱的指令來使用其他元件。
<component-selector-name></component-selector-name>
此外,所有註冊的服務都可以透過依賴注入 (DI)框架訪問所有 Angular 元件。
Angular 8 - Angular 元件和模板
正如我們前面所學,元件是 Angular 應用程式的構建塊。Angular 元件的主要工作是生成名為檢視的網頁部分。每個元件都將有一個關聯的模板,它將用於生成檢視。
讓我們在本節中學習元件和模板的基本概念。
新增元件
讓我們在我們的ExpenseManager應用程式中建立一個新元件。
開啟命令提示符並轉到ExpenseManager應用程式。
cd /go/to/expense-manager
使用下面指定的ng generate component命令建立一個新元件:
ng generate component expense-entry
輸出
輸出如下所示:
CREATE src/app/expense-entry/expense-entry.component.html (28 bytes)
CREATE src/app/expense-entry/expense-entry.component.spec.ts (671 bytes)
CREATE src/app/expense-entry/expense-entry.component.ts (296 bytes)
CREATE src/app/expense-entry/expense-entry.component.css (0 bytes)
UPDATE src/app/app.module.ts (431 bytes)
這裡:
- ExpenseEntryComponent 建立在 src/app/expense-entry 資料夾下。
- 建立了元件類、模板和樣式表。
- AppModule 已使用新元件更新。
向ExpenseEntryComponent (src/app/expense-entry/expense-entry.component.ts) 元件新增 title 屬性。
import { Component, OnInit } from '@angular/core'; @Component({
   selector: 'app-expense-entry',
   templateUrl: './expense-entry.component.html', styleUrls: ['./expense-entry.component.css']
})
export class ExpenseEntryComponent implements OnInit {
   title: string;
   constructor() { }
   ngOnInit() {
      this.title = "Expense Entry"
   }
}
使用以下內容更新模板src/app/expense-entry/expense-entry.component.html。
<p>{{ title }}</p>
開啟src/app/app.component.html幷包含新建立的元件。
<h1>{{ title }}</h1>
<app-expense-entry></app-expense-entry>
這裡:
app-expense-entry 是選擇器值,它可以用作常規 HTML 標籤。
最後,應用程式的輸出如下所示:

在學習更多關於模板的過程中,我們將更新元件的內容。
模板
Angular 元件的組成部分是模板。它用於生成 HTML 內容。模板是具有附加功能的普通 HTML。
附加模板
模板可以使用@component裝飾器的元資料附加到 Angular 元件。Angular 提供兩種元資料將模板附加到元件。
templateUrl
我們已經知道如何使用 templateUrl。它期望模板檔案的相對路徑。例如,AppComponent 將其模板設定為 app.component.html。
templateUrl: './app.component.html',
template
template 允許將 HTML 字串放在元件本身中。如果模板內容最少,則將其放在元件類本身中以便於跟蹤和維護。
@Component({
   selector: 'app-root',
   templateUrl: `<h1>{{ title }}</h1>`,
   styleUrls: ['./app.component.css']
})
export class AppComponent implements OnInit {
   title = 'Expense Manager';
   constructor(private debugService : DebugService) {} ngOnInit() {
      this.debugService.info("Angular Application starts");
   }
}
附加樣式表
Angular 模板可以使用與 HTML 類似的 CSS 樣式。模板從兩個來源獲取其樣式資訊:a) 來自其元件 b) 來自應用程式配置。
元件配置
Component 裝飾器提供兩個選項,styles 和 styleUrls,用於向其模板提供 CSS 樣式資訊。
- Styles − styles 選項用於將 CSS 放置在元件本身中。
styles: ['h1 { color: '#ff0000'; }']
- styleUrls − styleUrls 用於引用外部 CSS 樣式表。我們也可以使用多個樣式表。
styleUrls: ['./app.component.css', './custom_style.css']
應用程式配置
Angular 在專案配置(angular.json)中提供了一個選項來指定 CSS 樣式表。在angular.json中指定的樣式將適用於所有模板。讓我們檢查我們的angular.json,如下所示:
{
"projects": {
   "expense-manager": {
      "architect": {
         "build": {
            "builder": "@angular-devkit/build-angular:browser", "options": {
               "outputPath": "dist/expense-manager",
               "index": "src/index.html",
               "main": "src/main.ts",
               "polyfills": "src/polyfills.ts",
               "tsConfig": "tsconfig.app.json",
               "aot": false,
               "assets": [
                  "src/favicon.ico",
                  "src/assets"
               ],
               "styles": [
                  "src/styles.css"
               ],
               "scripts": []
            },
         },
      }
   }},
   "defaultProject": "expense-manager"
}
這裡:
styles 選項將src/styles.css設定為全域性 CSS 樣式表。我們可以包含任意數量的 CSS 樣式表,因為它支援多個值。
包含 Bootstrap
讓我們使用styles選項將 Bootstrap 包含到我們的ExpenseManager應用程式中,並更改預設模板以使用 Bootstrap 元件。
開啟命令提示符並轉到 ExpenseManager 應用程式。
cd /go/to/expense-manager
使用以下命令安裝bootstrap和JQuery庫:
npm install --save bootstrap@4.5.0 jquery@3.5.1
這裡:
我們安裝了 JQuery,因為 Bootstrap 大量使用 jquery 來實現高階元件。
選項angular.json 並設定 bootstrap 和 jquery 庫路徑。
{
   "projects": {
      "expense-manager": {
         "architect": {
            "build": {
               "builder":"@angular-devkit/build-angular:browser", "options": {
                  "outputPath": "dist/expense-manager",
                  "index": "src/index.html",
                  "main": "src/main.ts",
                  "polyfills": "src/polyfills.ts",
                  "tsConfig": "tsconfig.app.json",
                  "aot": false,
                  "assets": [
                     "src/favicon.ico",
                     "src/assets"
                  ],
                  "styles": [
                     "./node_modules/bootstrap/dist/css/bootstrap.css", "src/styles.css"
                  ],
                  "scripts": [
                     "./node_modules/jquery/dist/jquery.js", "./node_modules/bootstrap/dist/js/bootstrap.js"
                  ]
               },
            },
         }
   }},
   "defaultProject": "expense-manager"
}
這裡:
scripts 選項用於包含 JavaScript 庫。透過scripts註冊的JavaScript將在應用程式中的所有 Angular 元件中可用。
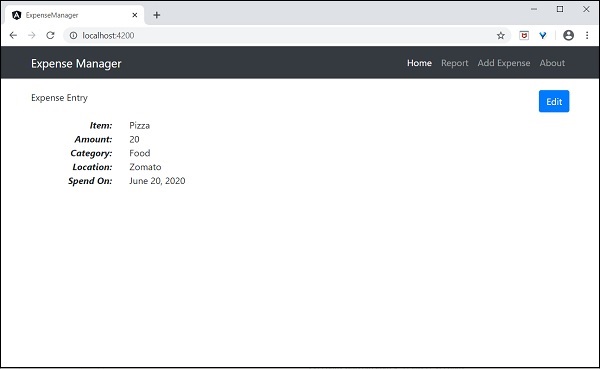
開啟app.component.html並將內容更改為如下所示:
<!-- Navigation -->
<nav class="navbar navbar-expand-lg navbar-dark bg-dark static-top">
   <div class="container">
      <a class="navbar-brand" href="#">{{ title }}</a> <button class="navbar-toggler" type="button" data-toggle="collapse" data-target="#navbarResponsive" aria-controls="navbarResponsive" aria-expanded="false" aria-label="Toggle navigation">
         <span class="navbar-toggler-icon">
         </span>
      </button>
      <div class="collapse navbar-collapse" id="navbarResponsive">
         <ul class="navbar-nav ml-auto">
            <li class="nav-item active">
            <a class="nav-link" href="#">Home
               <span class="sr-only">(current)
               </span>
            </a>
            </li>
            <li class="nav-item">
            <a class="nav-link" href="#">Report</a>
            </li>
            <li class="nav-item">
            <a class="nav-link" href="#">Add Expense</a>
            </li>
            <li class="nav-item">
            <a class="nav-link" href="#">About</a>
            </li>
         </ul>
      </div>
   </div>
</nav>
<app-expense-entry></app-expense-entry>
這裡:
使用了 Bootstrap 導航和容器。
開啟src/app/expense-entry/expense-entry.component.html並放置以下內容。
<!-- Page Content -->
<div class="container">
   <div class="row">
      <div class="col-lg-12 text-center" style="padding-top: 20px;">
         <div class="container" style="padding-left: 0px; padding-right: 0px;">
            <div class="row">
            <div class="col-sm" style="text-align: left;"> {{ title }}
            </div>
            <div class="col-sm" style="text-align: right;">
               <button type="button" class="btn btn-primary">Edit</button>
            </div>
            </div>
         </div>
         <div class="container box" style="margin-top: 10px;">
         <div class="row">
         <div class="col-2" style="text-align: right;">
            <strong><em>Item:</em></strong>
         </div>
         <div class="col" style="text-align: left;">
            Pizza
         </div>
         </div>
         <div class="row">
         <div class="col-2" style="text-align: right;">
            <strong><em>Amount:</em></strong>
         </div>
         <div class="col" style="text-align: left;">
            20
         </div>
         </div>
         <div class="row">
         <div class="col-2" style="text-align: right;">
            <strong><em>Category:</em></strong>
         </div>
         <div class="col" style="text-align: left;">
            Food
         </div>
         </div>
         <div class="row">
         <div class="col-2" style="text-align: right;">
            <strong><em>Location:</em></strong>
         </div>
         <div class="col" style="text-align: left;">
            Zomato
         </div>
         </div>
         <div class="row">
         <div class="col-2" style="text-align: right;">
            <strong><em>Spend On:</em></strong>
         </div>
         <div class="col" style="text-align: left;">
            June 20, 2020
         </div>
         </div>
      </div>
   </div>
</div>
</div>
重啟應用程式。
應用程式的輸出如下:
我們將在下一章中改進應用程式以處理動態費用條目。
Angular 8 - 資料繫結
資料繫結處理如何將資料從元件繫結到 HTML DOM 元素(模板)。我們可以輕鬆地與應用程式互動,而無需擔心如何插入資料。我們可以透過單向和雙向繫結兩種不同的方式建立連線。
在進入本主題之前,讓我們在 Angular 8 中建立一個元件。
開啟命令提示符並使用以下命令建立新的 Angular 應用程式:
cd /go/to/workspace
ng new databind-app
cd databind-app
使用 Angular CLI 建立一個test元件,如下所示:
ng generate component test
上述操作建立了一個新元件,輸出如下:
CREATE src/app/test/test.component.scss (0 bytes) CREATE src/app/test/test.component.html (19 bytes) CREATE src/app/test/test.component.spec.ts (614 bytes)
CREATE src/app/test/test.component.ts (262 bytes) UPDATE src/app/app.module.ts (545 bytes)
使用以下命令執行應用程式:
ng serve
單向資料繫結
單向資料繫結是元件及其模板之間的一種單向互動。如果對元件進行任何更改,則它將反映在 HTML 元素中。它支援以下型別:
字串插值
一般來說,字串插值是格式化或操作字串的過程。在 Angular 中,插值用於將資料從元件顯示到檢視 (DOM)。它由 {{ }} 表示式表示,也稱為鬍子語法。
讓我們在元件中建立一個簡單的字串屬性並將資料繫結到檢視。
在test.component.ts檔案中新增以下程式碼:
export class TestComponent implements OnInit {
   appName = "My first app in Angular 8";
}
轉到 test.component.html 檔案並新增以下程式碼:
<h1>{{appName}}</h1>
透過替換現有內容,將 test 元件新增到app.component.html檔案中,如下所示:
<app-test></app-test>
最後,使用以下命令啟動應用程式(如果尚未啟動):
ng serve
您可以在螢幕上看到以下輸出:

事件繫結
事件是諸如滑鼠單擊、雙擊、懸停或任何鍵盤和滑鼠操作之類的操作。如果使用者與應用程式互動並執行某些操作,則會引發事件。它由括號()或on-表示。我們有不同的方法將事件繫結到 DOM 元素。讓我們簡要了解一下。
元件到檢視繫結
讓我們瞭解簡單的按鈕單擊事件處理是如何工作的。
在test.component.ts檔案中新增以下程式碼:
export class TestComponent {
   showData($event: any){
      console.log("button is clicked!"); if($event) {
         console.log($event.target);
         console.log($event.target.value);
      }
   }
}
$event 指的是觸發的事件。在這個場景中,click 是事件。$event 包含關於事件和目標元素的所有資訊。這裡,目標是按鈕。$event.target 屬性將包含目標資訊。
我們有兩種方法可以將元件方法呼叫到檢視(test.component.html)。第一種方法定義如下:
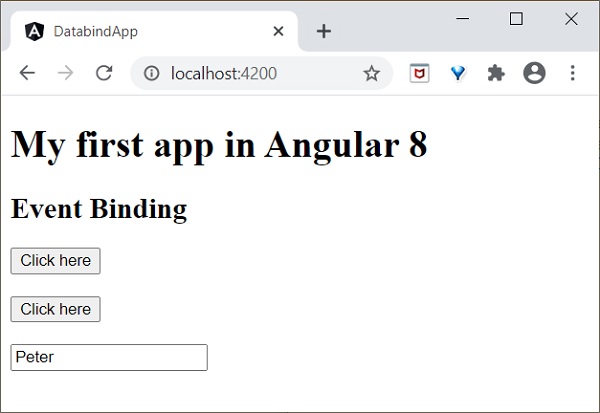
<h2>Event Binding</h2>
<button (click)="showData($event)">Click here</button>
或者,您可以使用字首 - on使用規範形式,如下所示:
<button on-click = "showData()">Click here</button>
這裡,我們沒有使用$event,因為它是可選的。
最後,使用以下命令啟動應用程式(如果尚未啟動):
ng serve
現在,執行您的應用程式,您將看到以下響應:

在這裡,當用戶單擊按鈕時,事件繫結會理解按鈕單擊操作並呼叫元件 showData() 方法,因此我們可以得出結論,它是單向繫結。
屬性繫結
屬性繫結用於將資料從元件的屬性繫結到 DOM 元素。它由[]表示。
讓我們透過一個簡單的例子來理解。
在 **test.component.ts** 檔案中新增以下程式碼。
export class TestComponent {
   userName:string = "Peter";
}
在檢視 test.component.html 中新增以下更改。
<input type="text" [value]="userName">
這裡:
**userName** 屬性繫結到 DOM 元素 **<input>** 標籤的一個屬性。
最後,使用以下命令啟動應用程式(如果尚未啟動):
ng serve
屬性繫結
**屬性繫結** 用於將元件中的資料繫結到 HTML 屬性。語法如下:
<HTMLTag [attr.ATTR]="Component data">
例如:
<td [attr.colspan]="columnSpan"> ... </td>
讓我們透過一個簡單的例子來理解。
在 **test.component.ts** 檔案中新增以下程式碼。
export class TestComponent {
   userName:string = "Peter";
}
在檢視 **test.component.html** 中新增以下更改。
<input type="text" [value]="userName">
這裡:
userName 屬性繫結到 DOM 元素 <input> 標籤的一個屬性。
最後,使用以下命令啟動應用程式(如果尚未啟動):
ng serve

類繫結
**類繫結** 用於將元件中的資料繫結到 HTML 類屬性。語法如下:
<HTMLTag [class]="component variable holding class name">
**類繫結** 提供額外的功能。如果元件資料是布林值,則只有在值為 true 時才會繫結類。可以透過字串(“foo bar”)和字串陣列來提供多個類。還有許多其他選項可用。
例如:
<p [class]="myClasses">
讓我們透過一個簡單的例子來理解。
在 test.component.ts 檔案中新增以下程式碼。
export class TestComponent {
   myCSSClass = "red";
   applyCSSClass = false;
}
在檢視 **test.component.html** 中新增以下更改。
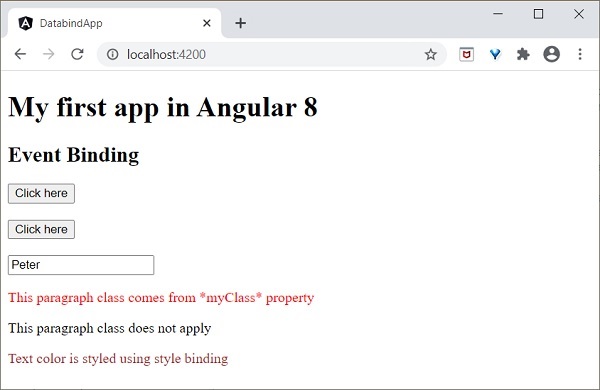
<p [class]="myCSSClass">This paragraph class comes from *myClass* property </p>
<p [class.blue]="applyCSSClass">This paragraph class does not apply</p>
在 test.component.css 中新增以下內容。
.red {
   color: red;
}
.blue {
   color: blue;
}
最後,使用以下命令啟動應用程式(如果尚未啟動):
ng serve
最終輸出將如下所示:

樣式繫結
**樣式繫結** 用於將元件中的資料繫結到 HTML style 屬性。語法如下:
<HTMLTag [style.STYLE]="component data">
例如:
<p [style.color]="myParaColor"> ... </p>
讓我們透過一個簡單的例子來理解。
在 **test.component.ts** 檔案中新增以下程式碼。
myColor = 'brown';
在檢視 **test.component.html** 中新增以下更改。
<p [style.color]="myColor">Text color is styled using style binding</p>
最後,使用以下命令啟動應用程式(如果尚未啟動):
ng serve
最終輸出將如下所示:
雙向資料繫結
**雙向資料繫結** 是一種雙向互動,資料雙向流動(從元件到檢視,以及從檢視到元件)。簡單的例子是 **ngModel**。如果您對屬性(或模型)進行任何更改,它都會反映在您的檢視中,反之亦然。它是屬性繫結和事件繫結的組合。
NgModel
**NgModel** 是一個獨立指令。**ngModel** 指令將表單控制元件繫結到屬性,並將屬性繫結到表單控制元件。**ngModel** 的語法如下:
<HTML [(ngModel)]="model.name" />
例如:
<input type="text" [(ngModel)]="model.name" />
讓我們嘗試在測試應用程式中使用 **ngModel**。
在 **AppModule** (src/app/app.module.ts) 中配置 **FormsModule**。
import { FormsModule } from '@angular/forms'; @NgModule({
   imports: [
      BrowserModule,
      FormsModule
   ]
})
export class AppModule { }
**FormModule** 完成必要的設定以啟用雙向資料繫結。
更新 **TestComponent** 檢視 **(test.component.html)**,如下所示:
<input type="text" [(ngModel)]="userName" />
<p>Two way binding! Hello {{ userName }}!</p>
這裡:
屬性繫結到表單控制元件 **ngModel** 指令,如果您在文字框中輸入任何文字,它將繫結到該屬性。執行應用程式後,您可以看到以下更改:
最後,使用以下命令啟動應用程式(如果尚未啟動):
ng serve
現在,執行您的應用程式,您將看到以下響應:
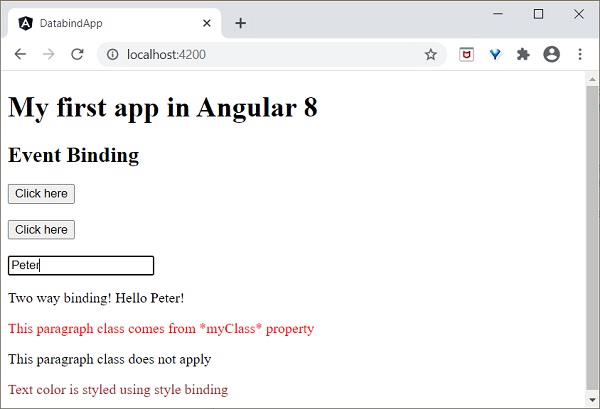
現在,嘗試將輸入值更改為 **Jack**。當您鍵入時,輸入框下方的文字會發生更改,最終輸出將如下所示:

我們將在接下來的章節中學習更多關於表單控制元件的內容。
工作示例
讓我們在 **ExpenseManager** 應用程式中實現本章學習的所有概念。
開啟命令提示符並轉到專案根資料夾。
cd /go/to/expense-manager
建立 ExpenseEntry 介面 (src/app/expense-entry.ts) 並新增 id、amount、category、Location、spendOn 和 createdOn。
export interface ExpenseEntry {
   id: number;
   item: string;
   amount: number;
   category: string;
   location: string;
   spendOn: Date;
   createdOn: Date;
}
將 **ExpenseEntry** 匯入到 **ExpenseEntryComponent** 中。
import { ExpenseEntry } from '../expense-entry';
建立一個 **ExpenseEntry** 物件,**expenseEntry**,如下所示:
export class ExpenseEntryComponent implements OnInit {
   title: string;
   expenseEntry: ExpenseEntry;
   constructor() { }
   ngOnInit() {
      this.title = "Expense Entry";
      this.expenseEntry = {
         id: 1,
         item: "Pizza",
         amount: 21,
         category: "Food",
         location: "Zomato",
         spendOn: new Date(2020, 6, 1, 10, 10, 10), createdOn: new Date(2020, 6, 1, 10, 10, 10),
      };
   }
}
使用 **expenseEntry** 物件更新元件模板,**src/app/expense-entry/expense-entry.component.html**,如下所示:
<!-- Page Content -->
<div class="container">
   <div class="row">
      <div class="col-lg-12 text-center" style="padding-top: 20px;">
         <div class="container" style="padding-left: 0px; padding-right: 0px;">
            <div class="row">
               <div class="col-sm" style="text-align: left;">
                  {{ title }}
               </div>
               <div class="col-sm" style="text-align: right;">
                  <button type="button" class="btn btn-primary">Edit</button>
               </div>
            </div>
         </div>
         <div class="container box" style="margin-top: 10px;">
            <div class="row">
               <div class="col-2" style="text-align: right;">
                  <strong><em>Item:</em></strong>
               </div>
               <div class="col" style="text-align: left;">
                  {{ expenseEntry.item }}
               </div>
            </div>
            <div class="row">
               <div class="col-2" style="text-align: right;">
                  <strong><em>Amount:</em></strong>
               </div>
               <div class="col" style="text-align: left;">
                  {{ expenseEntry.amount }}
               </div>
            </div>
            <div class="row">
               <div class="col-2" style="text-align: right;">
                  <strong><em>Category:</em></strong>
               </div>
               <div class="col" style="text-align: left;">
                  {{ expenseEntry.category }}
               </div>
            </div>
            <div class="row">
               <div class="col-2" style="text-align: right;">
                  <strong><em>Location:</em></strong>
               </div>
               <div class="col" style="text-align: left;">
                  {{ expenseEntry.location }}
               </div>
            </div>
            <div class="row">
               <div class="col-2" style="text-align: right;">
                  <strong><em>Spend On:</em></strong>
               </div>
               <div class="col" style="text-align: left;">
                  {{ expenseEntry.spendOn }}
               </div>
            </div>
         </div>
      </div>
   </div>
</div>

Angular 8 - 指令
Angular 8 指令是與您的應用程式互動的 DOM 元素。通常,指令是一個 **TypeScript** 函式。當此函式執行時,**Angular** 編譯器會在 DOM 元素內檢查它。Angular 指令以 **ng-** 開頭,其中 **ng** 代表 Angular,並使用 **@directive** 裝飾器擴充套件 HTML 標籤。
指令使邏輯能夠包含在 Angular 模板中。Angular 指令可以分為三類,如下所示:
屬性指令
用於為現有 HTML 元素新增新屬性以更改其外觀和行為。
<HTMLTag [attrDirective]='value' />
例如:
<p [showToolTip]='Tips' />
這裡,**showToolTip** 指的是一個示例指令,當它用於 HTML 元素時,會在使用者懸停 HTML 元素時顯示提示。
結構指令
用於在當前 HTML 文件中新增或刪除 DOM 元素。
<HTMLTag [structuralDirective]='value' />
例如:
<div *ngIf="isNeeded">
   Only render if the *isNeeded* value has true value.
</div>
這裡,**ngIf** 是一個內建指令,用於在當前 HTML 文件中新增或刪除 HTML 元素。Angular 提供許多內建指令,我們將在後面的章節中學習。
基於元件的指令
元件可以用作指令。每個元件都有 **Input** 和 **Output** 選項,用於在元件及其父 HTML 元素之間傳遞資料。
<component-selector-name [input-reference]="input-value"> ... </component-selector-name>
例如:
<list-item [items]="fruits"> ... </list-item>
這裡,**list-item** 是一個元件,**items** 是輸入選項。我們將在後面的章節中學習如何建立元件以及高階用法。
在進入本主題之前,讓我們在 Angular 8 中建立一個示例應用程式 **(directive-app)** 來實踐學習內容。
開啟命令提示符並使用以下命令建立新的 Angular 應用程式:
cd /go/to/workspace
ng new directive-app
cd directive-app
使用 Angular CLI 建立一個test元件,如下所示:
ng generate component test
上述操作建立了一個新元件,輸出如下:
CREATE src/app/test/test.component.scss (0 bytes) CREATE src/app/test/test.component.html (19 bytes) CREATE src/app/test/test.component.spec.ts (614 bytes)
CREATE src/app/test/test.component.ts (262 bytes) UPDATE src/app/app.module.ts (545 bytes)
使用以下命令執行應用程式:
ng serve
DOM 概述
讓我們簡要了解一下 DOM 模型。DOM 用於定義訪問文件的標準。通常,HTML DOM 模型被構建為物件的樹。它是一個訪問 html 元素的標準物件模型。
出於以下原因,我們可以在 Angular 8 中使用 DOM 模型:
- 我們可以輕鬆地使用 DOM 元素導航文件結構。
- 我們可以輕鬆地新增 html 元素。
- 我們可以輕鬆地更新元素及其內容。
結構指令
結構指令透過新增或刪除元素來更改 **DOM** 的結構。它用 * 符號表示,並具有三個預定義指令 **NgIf、NgFor** 和 **NgSwitch**。讓我們簡要了解一下。
NgIf 指令
**NgIf** 指令用於根據條件為真或假來顯示或隱藏應用程式中的資料。我們可以將其新增到模板中的任何標籤。
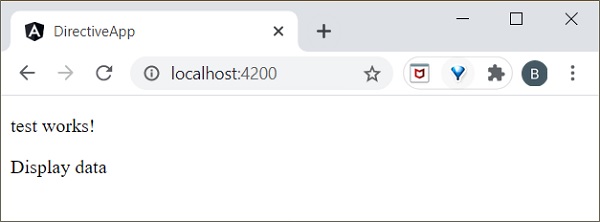
讓我們在 **directive-app** 應用程式中嘗試使用 **ngIf** 指令。
在 **test.component.html** 中新增以下標籤。
<p>test works!</p>
<div *ngIf="true">Display data</div>
在您的 **app.component.html** 檔案中新增測試元件,如下所示:
<app-test></app-test>
使用以下命令啟動您的伺服器(如果尚未啟動):
ng serve
現在,執行您的應用程式,您將看到以下響應:
如果您將條件設定為 **ngIf=“false”**,則內容將被隱藏。
ngIfElse 指令
**ngIfElse** 與 **ngIf** 類似,只是它提供了在失敗情況下呈現內容的選項。
讓我們透過一個示例瞭解 **ngIfElse** 的工作原理。
在 **test.component.ts** 檔案中新增以下程式碼。
export class TestComponent implements OnInit {
   isLogIn : boolean = false;
   isLogOut : boolean = true;
}
在 **test.component.html** 檔案中新增以下程式碼:
<p>ngIfElse example!</p>
<div *ngIf="isLogIn; else isLogOut">
   Hello you are logged in
</div>
<ng-template #isLogOut>
   You're logged out..
</ng-template>
最後,使用以下命令啟動應用程式(如果尚未啟動):
ng serve
現在,執行您的應用程式,您將看到以下響應:
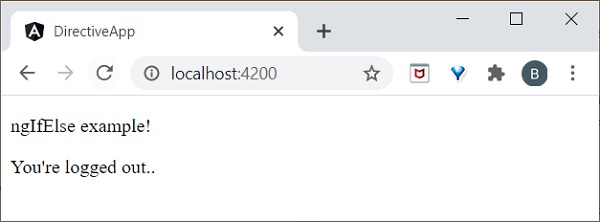
這裡:
isLogOut
值為 **true**,因此它進入 **else** 塊並呈現 **ng-template**。我們將在本章後面學習 **ng-template**。ngFor 指令
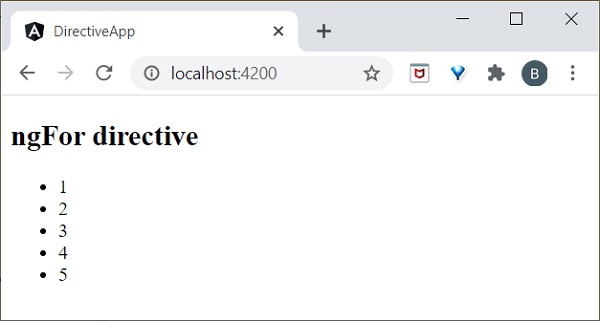
ngFor 用於重複專案列表中的部分元素。
讓我們透過一個示例瞭解 ngFor 的工作原理。
在 test.component.ts 檔案中新增列表,如下所示:
list = [1,2,3,4,5];
在 **test.component.html** 中新增 **ngFor** 指令,如下所示:
<h2>ngFor directive</h2>
<ul>
   <li *ngFor="let l of list">
      {{l}}
   </li>
</ul>
這裡,let 關鍵字建立一個區域性變數,可以在模板中的任何位置引用它。let l 建立一個模板區域性變數來獲取列表元素。
最後,使用以下命令啟動應用程式(如果尚未啟動):
ng serve
現在,執行您的應用程式,您將看到以下響應:
trackBy
有時,對於大型列表,**ngFor** 的效能較低。例如,當向列表中新增新專案或刪除任何專案時,可能會觸發多個 DOM 操作。要迭代大型物件集合,我們使用 **trackBy**。
它用於跟蹤新增或刪除元素的時間。它由 trackBy 方法執行。它有兩個引數:index 和 element。Index 用於唯一標識每個元素。下面定義了一個簡單的示例。
讓我們透過一個示例瞭解 trackBy 與 **ngFor** 的工作原理。
在 **test.component.ts** 檔案中新增以下程式碼。
export class TestComponent {
   studentArr: any[] = [ {
      "id": 1,
      "name": "student1"
   },
   {
      "id": 2,
      "name": "student2"
   },
   {
      "id": 3, "name": "student3"
   },
   {
      "id": 4,
      "name": "student4"
   }
   ];
   trackByData(index:number, studentArr:any): number {
      return studentArr.id;
   }
這裡:
我們建立了:
trackByData()
方法以基於 id 的唯一方式訪問每個學生元素。在 **test.component.html** 檔案中新增以下程式碼,以在 ngFor 內定義 trackBy 方法。
<ul>
   <li *ngFor="let std of studentArr; trackBy: trackByData">
      {{std.name}}
   </li>
</ul>
最後,使用以下命令啟動應用程式(如果尚未啟動):
ng serve
現在,執行您的應用程式,您將看到以下響應:
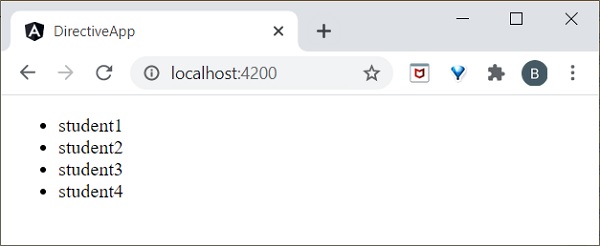
這裡,應用程式將列印學生姓名。現在,應用程式使用學生 ID 而不是物件引用來跟蹤學生物件。因此,DOM 元素不會受到影響。
NgSwitch 指令
**NgSWitch** 用於檢查多個條件,並使 DOM 結構保持簡單易懂。
讓我們在 **directive-app** 應用程式中嘗試使用 **ngSwitch** 指令。
在 **test.component.ts** 檔案中新增以下程式碼。
export class TestComponent implements OnInit {
   logInName = 'admin';
}
在 test.component.html 檔案中新增以下程式碼:
<h2>ngSwitch directive</h2>
<ul [ngSwitch]="logInName">
   <li *ngSwitchCase="'user'">
      <p>User is logged in..</p>
   </li>
   <li *ngSwitchCase="'admin'">
      <p>admin is logged in</p>
   </li>
   <li *ngSwitchDefault>
      <p>Please choose login name</p>
   </li>
</ul>
最後,使用以下命令啟動應用程式(如果尚未啟動):
ng serve
現在,執行您的應用程式,您將看到以下響應:
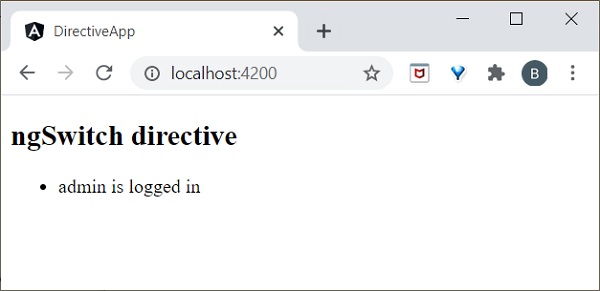
這裡,我們將 **logInName** 定義為 **admin**。因此,它匹配第二個 SwitchCase 並列印上面與 admin 相關的訊息。
屬性指令
屬性指令執行 DOM 元素或元件的外觀或行為。一些示例包括 NgStyle、NgClass 和 NgModel。而 NgModel 是前一章中解釋的雙向屬性資料繫結。
ngStyle
**ngStyle** 指令用於新增動態樣式。以下示例用於將藍色應用於段落。
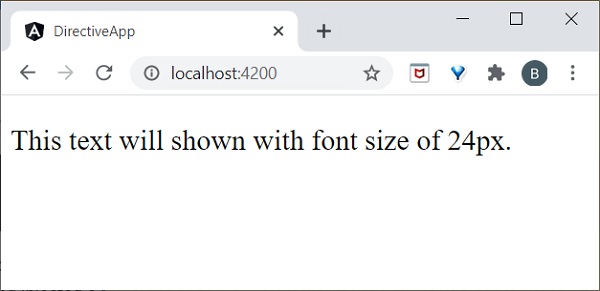
讓我們在 **directive-app** 應用程式中嘗試使用 **ngStyle** 指令。
在 **test.component.html** 檔案中新增以下內容。
<p [ngStyle]="{'color': 'blue', 'font-size': '14px'}">
   paragraph style is applied using ngStyle
</p>
使用以下命令啟動您的應用程式(如果尚未啟動):
ng serve
現在,執行您的應用程式,您將看到以下響應:

ngClass
**ngClass** 用於在 HTML 元素中新增或刪除 CSS 類。
讓我們在 **directive-app** 應用程式中嘗試使用 **ngClass** 指令。
使用以下命令建立一個類 **User**
ng g class User
您將看到以下響應:
CREATE src/app/user.spec.ts (146 bytes)
CREATE src/app/user.ts (22 bytes)
轉到 **src/app/user.ts** 檔案並新增以下程式碼:
export class User {
   userId : number; userName : string;
}
這裡,我們在 **User** 類中建立了兩個屬性 **userId** 和 **userName**。
開啟 **test.component.ts** 檔案並新增以下更改:
import { User } from '../user';
export class TestComponent implements OnInit {
   users: User[] = [
      {
         "userId": 1,
         "userName": 'User1'
      },
      {
         "userId": 2,
         "userName": 'User2'
      },
   ];
}
這裡,我們聲明瞭一個區域性變數 users 並用 2 個使用者物件初始化它。
開啟 **test.component.css** 檔案並新增以下程式碼
.highlight {
   color: red;
}
開啟您的 **test.component.html** 檔案並新增以下程式碼:
<div class="container">
<br/>
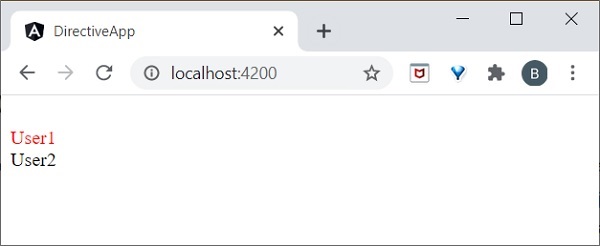
<div *ngFor="let user of users" [ngClass]="{
'highlight':user.userName === 'User1'
}">
{{ user.userName }}
</div>
</div>
這裡:
我們為 **User1** 應用了 **ngClass**,因此它將突出顯示 **User1**。
最後,使用以下命令啟動應用程式(如果尚未啟動):
ng serve
現在,執行您的應用程式,您將看到以下響應:
自定義指令
Angular 提供了使用使用者定義的指令擴充套件 Angular 指令的選項,這稱為 **自定義指令**。讓我們在本節中學習如何在本章中建立自定義指令。
讓我們嘗試在 **directive-app** 應用程式中建立自定義指令。
Angular CLI 提供以下命令來建立自定義指令。
ng generate directive customstyle
執行此命令後,您將看到以下響應:
CREATE src/app/customstyle.directive.spec.ts (244 bytes)
CREATE src/app/customstyle.directive.ts (151 bytes) UPDATE src/app/app.module.ts (1115 bytes)
開啟 **app.module.ts**。指令將透過 **declarations** 元資料在 **AppModule** 中配置。
import { CustomstyleDirective } from './customstyle.directive';
@NgModule({
   declarations: [
      AppComponent,
      TestComponent,
      CustomstyleDirective
   ]
})
開啟 **customstyle.directive.ts** 檔案並新增以下程式碼:
import { Directive, ElementRef } from '@angular/core';
@Directive({
   selector: '[appCustomstyle]'
})
export class CustomstyleDirective {
   constructor(el: ElementRef) {
      el.nativeElement.style.fontSize = '24px';
   }
}
這裡,**constructor** 方法使用 **CustomStyleDirective** 獲取元素作為 **el**。然後,它訪問 el 的樣式並使用 CSS 屬性將其字型大小設定為 **24px**。
最後,使用以下命令啟動應用程式(如果尚未啟動):
ng serve
現在,執行您的應用程式,您將看到以下響應:
ng-template
**ng-template** 用於建立動態且可重用的模板。它是一個虛擬元素。如果您使用 **ng-template** 編譯程式碼,則它會在 DOM 中轉換為註釋。
例如:
讓我們在 **test.component.html** 頁面中新增以下程式碼。
<h3>ng-template</h3>
<ng-template>ng-template tag is a virtual element</ng-template>
如果您執行該應用程式,它只會列印 **h3** 元素。檢查您的頁面原始碼,模板顯示在註釋部分,因為它是一個虛擬元素,所以它不會呈現任何內容。我們需要將 **ng-template** 與 Angular 指令一起使用。
通常,指令會發出與其關聯的 HTML 標籤。有時,我們不需要標籤,只需要內容。例如,在下面的示例中,將發出 li。
<li *ngFor="let item in list">{{ item }}</li>
我們可以使用 **ng-template** 安全地跳過 **li** 標籤。
ng-template 與結構指令
**ng-template** 應始終用於 **ngIf、ngFor** 或 **ngSwitch** 指令內以呈現結果。
讓我們假設一個簡單的程式碼。
<ng-template [ngIf]=true>
   <div><h2>ng-template works!</h2></div>
</ng-template>
這裡,如果 **ngIf** 條件為真,它將列印 div 元素內的資訊。同樣,您也可以使用 **ngFor** 和 **ngSwitch** 指令。
NgForOf 指令
**ngForOf** 也是一個結構指令,用於呈現集合中的專案。以下示例用於顯示 **ngForOf** 指令在 **ng-template** 內。
import { Component, OnInit } from '@angular/core';
@Component({
   selector: 'app-test',
   template: `
   <div>
   <ng-template ngFor let-item [ngForOf]="Fruits" let-i="index">
   <p>{{i}}</p>
   </ng-template>
   </div>`
   ,
   styleUrls: ['./test.component.css']
})
export class TestComponent implements OnInit {
   Fruits = ["mango","apple","orange","grapes"];
   ngOnInit()
   {
   }
}
如果您執行該應用程式,它將顯示每個元素的索引,如下所示:
0
1
2
3
元件指令
元件指令基於元件。實際上,每個元件都可以用作指令。元件提供 @Input 和 @Output 裝飾器,用於在父元件和子元件之間傳送和接收資訊。
讓我們嘗試在 **directive-app** 應用程式中將元件用作指令。
使用以下命令建立一個新的 **ChildComponent**:
ng generate component child
CREATE src/app/child/child.component.html (20 bytes) CREATE src/app/child/child.component.spec.ts (621 bytes)
CREATE src/app/child/child.component.ts (265 bytes) CREATE src/app/child/child.component.css (0 bytes) UPDATE src/app/app.module.ts (466 bytes)
開啟child.component.ts檔案並新增以下程式碼:
@Input() userName: string;
在這裡,我們為ChildComponent設定一個輸入屬性。
開啟child.component.html檔案並新增以下程式碼:
<p>child works!</p>
<p>Hi {{ userName }}</p>
在這裡,我們使用userName的值來歡迎使用者。
開啟test.component.ts檔案並新增以下程式碼:
name: string = 'Peter';
開啟test.component.html檔案並新增以下程式碼:
<h1>Test component</h1>
<app-child [userName]="name"><app-child>
在這裡,我們將AppComponent作為指令,並使用輸入屬性,在TestComponent中使用。
最後,使用以下命令啟動應用程式(如果尚未啟動):
ng serve
現在,執行您的應用程式,您將看到以下響應:
[](images/directive-app/component_as_directive.PNG)
工作示例
讓我們在ExpenseManager應用程式中新增一個新的元件來列出支出條目。
開啟命令提示符並轉到專案根資料夾。
cd /go/to/expense-manager
啟動應用程式。
ng serve
使用以下命令建立一個新的元件,ExpenseEntryListComponent:
ng generate component ExpenseEntryList
輸出
輸出如下:
CREATE src/app/expense-entry-list/expense-entry-list.component.html (33 bytes)
CREATE src/app/expense-entry-list/expense-entry-list.component.spec.ts (700 bytes)
CREATE src/app/expense-entry-list/expense-entry-list.component.ts (315 bytes)
CREATE src/app/expense-entry-list/expense-entry-list.component.css (0 bytes)
UPDATE src/app/app.module.ts (548 bytes)
此命令建立ExpenseEntryList元件,並在AppModule中更新必要的程式碼。
將ExpenseEntry匯入到ExpenseEntryListComponent元件(src/app/expense-entry-list/expense-entry-list.component)中
import { ExpenseEntry } from '../expense-entry';
新增一個方法getExpenseEntries(),在ExpenseEntryListComponent (src/app/expense-entry-list/expense-entry-list.component)中返回支出條目的列表(模擬項)。
getExpenseEntries() : ExpenseEntry[] {
   let mockExpenseEntries : ExpenseEntry[] = [
      { id: 1,
         item: "Pizza",
         amount: Math.floor((Math.random() * 10) + 1),
         category: "Food",
         location: "Mcdonald",
         spendOn: new Date(2020, 4, Math.floor((Math.random() * 30) + 1), 10, 10, 10),
         createdOn: new Date(2020, 4, Math.floor((Math.random() * 30) + 1), 10, 10, 10) },
      { id: 1,
         item: "Pizza",
         amount: Math.floor((Math.random() * 10) + 1),
         category: "Food",
         location: "KFC",
         spendOn: new Date(2020, 4, Math.floor((Math.random() * 30) + 1), 10, 10, 10),
         createdOn: new Date(2020, 4, Math.floor((Math.random() * 30) + 1), 10, 10, 10) },
      { id: 1,
         item: "Pizza",
         amount: Math.floor((Math.random() * 10) + 1),
         category: "Food",
         location: "KFC",
         spendOn: new Date(2020, 4, Math.floor((Math.random() * 30) + 1), 10, 10, 10),
         createdOn: new Date(2020, 4, Math.floor((Math.random() * 30) + 1), 10, 10, 10)
      },
   ];
   return mockExpenseEntries;
}
宣告一個區域性變數expenseEntries,並載入如下所示的模擬支出條目列表:
title: string;
expenseEntries: ExpenseEntry[];
constructor() { }
ngOnInit() {
   this.title = "Expense Entry List";
   this.expenseEntries = this.getExpenseEntries();
}
開啟模板檔案(src/app/expense-entry-list/expense-entry-list.component.html),並在表格中顯示模擬條目。
<!-- Page Content -->
<div class="container">
   <div class="row">
      <div class="col-lg-12 text-center" style="padding-top: 20px;">
         <div class="container" style="padding-left: 0px; padding-right: 0px;">
            <div class="row">
               <div class="col-sm" style="text-align: left;">
                  {{ title }}
               </div>
               <div class="col-sm" style="text-align: right;">
                  <button type="button" class="btn btn-primary">Edit</button>
               </div>
            </div>
         </div>
         <div class="container box" style="margin-top: 10px;">
            <table class="table table-striped">
               <thead>
                  <tr>
                     <th>Item</th>
                     <th>Amount</th>
                     <th>Category</th>
                     <th>Location</th>
                     <th>Spent On</th>
                  </tr>
               </thead>
               <tbody>
                  <tr *ngFor="let entry of expenseEntries">
                     <th scope="row">{{ entry.item }}</th>
                     <th>{{ entry.amount }}</th>
                     <td>{{ entry.category }}</td>
                     <td>{{ entry.location }}</td>
                     <td>{{ entry.spendOn | date: 'short' }}</td>
                  </tr>
               </tbody>
            </table>
         </div>
      </div>
   </div>
</div>
這裡:
使用了Bootstrap表格。table和table-striped將根據Bootstrap樣式標準對錶格進行樣式設定。
使用ngFor迴圈遍歷expenseEntries並生成表格行。
開啟AppComponent模板src/app/app.component.html,包含ExpenseEntryListComponent並移除ExpenseEntryComponent,如下所示:
...
<app-expense-entry-list></app-expense-entry-list>
最後,應用程式的輸出如下所示。
Angular 8 - 管道
管道被稱為過濾器。它有助於轉換資料並在插值中管理資料,由{{ | }}表示。它接受資料、陣列、整數和字串作為輸入,這些輸入由'|'符號分隔。本章詳細解釋了管道。
新增引數
在你的test.component.ts檔案中建立一個日期方法。
export class TestComponent {
   presentDate = new Date();
}
現在,在你的test.component.html檔案中新增以下程式碼。
<div>
   Today's date :- {{presentDate}}
</div>
現在,執行應用程式,它將顯示以下輸出:
Today's date :- Mon Jun 15 2020 10:25:05 GMT+0530 (IST)
這裡:
日期物件被轉換為易於閱讀的格式。
新增日期管道
讓我們在上面的html檔案中新增日期管道。
<div>
   Today's date :- {{presentDate | date }}
</div>
你會看到以下輸出:
Today's date :- Jun 15, 2020
日期中的引數
我們可以使用:字元在管道中新增引數。我們可以使用此引數顯示短日期、全日期或格式化日期。在test.component.html檔案中新增以下程式碼。
<div>
   short date :- {{presentDate | date:'shortDate' }} <br/>
   Full date :- {{presentDate | date:'fullDate' }} <br/>
   Formatted date:- {{presentDate | date:'M/dd/yyyy'}} <br/>
   Hours and minutes:- {{presentDate | date:'h:mm'}}
</div>
你可以在螢幕上看到以下響應:
short date :- 6/15/20
Full date :- Monday, June 15, 2020
Formatted date:- 6/15/2020
Hours and minutes:- 12:00
鏈式管道
我們可以將多個管道組合在一起。當一個場景與多個必須應用於資料轉換的管道相關聯時,這將非常有用。
在上面的示例中,如果要以大寫字母顯示日期,則可以同時應用Date和Uppercase管道。
<div>
   Date with uppercase :- {{presentDate | date:'fullDate' | uppercase}} <br/>
   Date with lowercase :- {{presentDate | date:'medium' | lowercase}} <br/>
</div>
你可以在螢幕上看到以下響應:
Date with uppercase :- MONDAY, JUNE 15, 2020 Date with lowercase :- jun 15, 2020, 12:00:00 am
這裡:
Date、Uppercase和Lowercase是預定義的管道。讓我們在下節中瞭解其他型別的內建管道。
內建管道
Angular 8支援以下內建管道。我們將逐一簡要討論。
AsyncPipe
如果資料以可觀察物件的形式出現,則Async管道訂閱可觀察物件並返回傳輸的值。
import { Observable, Observer } from 'rxjs';
export class TestComponent implements OnInit {
   timeChange = new Observable<string>((observer: Observer>string>) => {
      setInterval(() => observer.next(new
      Date().toString()), 1000);
   });
}
這裡:
Async管道每秒執行一次訂閱以進行時間變化,並在每次傳遞給它時返回結果。主要優點是,我們不需要在timeChange上呼叫subscribe,也不需要擔心取消訂閱,如果元件被移除。
在你的test.component.html中新增以下程式碼。
<div>
   Seconds changing in Time: {{ timeChange | async }}
</div>
現在,執行應用程式,你可以在螢幕上看到秒數的變化。
CurrencyPipe
它用於將給定的數字轉換為不同國家的貨幣格式。請考慮test.component.ts檔案中的以下程式碼。
import { Component, OnInit } from '@angular/core'; @Component({
   selector: 'app-test',
   template: `
   <div style="text-align:center">
      <h3> Currency Pipe</h3>
      <p>{{ price | currency:'EUR':true}}</p>
      <p>{{ price | currency:'INR' }}</p>
   </div>
   `,
   styleUrls: ['./test.component.scss']
})
export class TestComponent implements OnInit {
   price : number = 20000; ngOnInit() {

   }
}
您可以在螢幕上看到以下輸出:
Currency Pipe

€20,000.00
₹20,000.00
SlicePipe
Slice管道用於返回陣列的切片。它將索引作為引數。如果你只指定起始索引,這意味著它將列印到值的末尾。如果你想列印特定範圍的值,那麼我們可以指定起始和結束索引。
我們還可以使用負索引來訪問元素。簡單的例子如下:
test.component.ts
import { Component, OnInit } from '@angular/core'; @Component({
   selector: 'app-test',
   template: `
   <div>
      <h3>Start index:- {{Fruits | slice:2}}</h3>
      <h4>Start and end index:- {{Fruits | slice:1:4}}</h4>
      <h5>Negative index:- {{Fruits | slice:-2}}</h5>
      <h6>Negative start and end index:- {{Fruits | slice:-4:-2}}</h6>
   </div>
   `,
   styleUrls: ['./test.component.scss']
})
export class TestComponent implements OnInit {
   Fruits = ["Apple","Orange","Grapes","Mango","Kiwi","Pomegranate"];
   ngOnInit() {

   }
}
現在執行你的應用程式,你可以在螢幕上看到以下輸出:
Start index:- Grapes,Mango,Kiwi,Pomegranate
Start and end index:- Orange,Grapes,Mango
Negative index:- Kiwi,Pomegranate
Negative start and end index:- Grapes,Mango
這裡:
{{Fruits | slice:2}}表示它從第二個索引值Grapes開始,直到值的末尾。
{{Fruits | slice:1:4}}表示從1到end-1,所以結果是一到三個索引值。
{{Fruits | slice:-2}}表示從-2到末尾,因為沒有指定結束值。因此,結果是Kiwi、Pomegranate。
{{Fruits | slice:-4:-2}}表示從負索引-4(Grapes)到end-1(-3),所以索引[-4,-3]的結果是Grapes、Mango。
DecimalPipe
它用於格式化十進位制值。它也被認為是CommonModule。讓我們在test.component.ts檔案中瞭解一個簡單的程式碼:
import { Component, OnInit } from '@angular/core'; @Component({
   selector: 'app-test',
   template: `
   <div style="text-align:center">
      <h3>Decimal Pipe</h3>
      <p> {{decimalNum1 | number}} </p>
      <p> {{decimalNum2 | number}} </p>
   </div>
   `,
   styleUrls: ['./test.component.scss']
})
export class TestComponent implements OnInit {
   decimalNum1: number = 8.7589623;
   decimalNum2: number = 5.43;
   ngOnInit() {

   }
}
你可以在螢幕上看到以下輸出:
Decimal Pipe
8.759
5.43
格式化值
我們可以在數字模式內應用字串格式。它基於以下格式:
number:"{minimumIntegerDigits}.{minimumFractionDigits} - {maximumFractionDigits}"
讓我們在我們的程式碼中應用上述格式:
@Component({
   template: `
   <div style="text-align:center">
      <p> Apply formatting:- {{decimalNum1 | number:'3.1'}} </p>
      <p> Apply formatting:- {{decimalNum1 | number:'2.1-4'}} </p>
   </div>
   `,
})
這裡:
{{decimalNum1 | number:’3.1’}}表示三位小數位,至少一位小數,但對最大小數位數沒有限制。它返回以下輸出:
Apply formatting:- 008.759
{{decimalNum1 | number:’2.1-4’}}表示兩位小數位,最小一位,最多四位小數位,因此它返回以下輸出:
Apply formatting:- 08.759
PercentPipe
它用於將數字格式化為百分比。格式化字串與DecimalPipe的概念相同。簡單的例子如下:
import { Component, OnInit } from '@angular/core';
@Component({
   selector: 'app-test',
   template: `
   <div style="text-align:center">
      <h3>Decimal Pipe</h3>
      <p> {{decimalNum1 | percent:'2.2'}} </p>
   </div>
   `,
   styleUrls: ['./test.component.scss']
})
export class TestComponent {
   decimalNum1: number = 0.8178;
}
你可以在螢幕上看到以下輸出:
Decimal Pipe
81.78%
JsonPipe
它用於將JavaScript物件轉換為JSON字串。在test.component.ts檔案中新增以下程式碼:
import { Component, OnInit } from '@angular/core';
@Component({
   selector: 'app-test',
   template: `
   <div style="text-align:center">
      <p ngNonBindable>{{ jsonData }}</p> (1)
      <p>{{ jsonData }}</p>
      <p ngNonBindable>{{ jsonData | json }}</p>
      <p>{{ jsonData | json }}</p>
   </div>
   `,
   styleUrls: ['./test.component.scss']
})
export class TestComponent {
   jsonData = { id: 'one', name: { username: 'user1' }}
}
現在,執行應用程式,你可以在螢幕上看到以下輸出:
{{ jsonData }}
(1)
[object Object]
{{ jsonData | json }}
{ "id": "one", "name": { "username": "user1" } }
建立自定義管道
正如我們已經看到的那樣,Angular 8中有很多預定義的管道可用,但有時我們可能希望以自定義格式轉換值。本節解釋了建立自定義管道。
使用以下命令建立一個自定義管道:
ng g pipe digitcount
執行上述命令後,你會看到以下響應:
CREATE src/app/digitcount.pipe.spec.ts (203 bytes) CREATE src/app/digitcount.pipe.ts (213 bytes)
UPDATE src/app/app.module.ts (744 bytes)
讓我們建立一個使用管道計算數字中位數的邏輯。開啟digitcount.pipe.ts檔案並新增以下程式碼:
import { Pipe, PipeTransform } from '@angular/core'; @Pipe({
   name: 'digitcount'
})
export class DigitcountPipe implements PipeTransform {
   transform(val : number) : number {
      return val.toString().length;
   }
}
現在,我們已經添加了計算數字中位數的邏輯。讓我們在test.component.ts檔案中新增最終程式碼,如下所示:
import { Component, OnInit } from '@angular/core'; @Component({
   selector: 'app-test',
   template: `
   <div>
      <p> DigitCount Pipe </p>
      <h1>{{ digits | digitcount }}</h1>
   </div>
   `,
   styleUrls: ['./test.component.scss']
})
export class TestComponent implements OnInit {
   digits : number = 100;
   ngOnInit() {
   }
}
現在,執行應用程式,你會看到以下響應:
DigitCount Pipe
3
工作示例
讓我們在ExpenseManager應用程式中使用該管道。
開啟命令提示符並轉到專案根資料夾。
cd /go/to/expense-manager
啟動應用程式。
ng serve
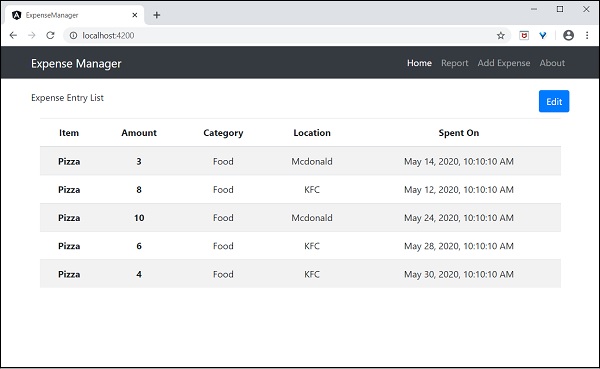
開啟ExpenseEntryListComponent的模板src/app/expense-entry-list/expense-entry-list.component.html,並在entry.spendOn中包含管道,如下所示:
<td>{{ entry.spendOn | date: 'short' }}</td>
在這裡,我們使用了日期管道以短格式顯示支出日期。
最後,應用程式的輸出如下所示:
Angular 8 - 響應式程式設計
響應式程式設計是一種處理資料流和變化傳播的程式設計正規化。資料流可以是靜態的或動態的。靜態資料流的一個例子是陣列或資料集合。它將具有初始數量,並且不會改變。動態資料流的一個例子是事件發射器。事件發射器在事件發生時發出資料。最初可能沒有事件,但隨著時間的推移,事件發生,它將被髮出。
響應式程式設計使資料流能夠從稱為Observable的一個源發出,並透過稱為訂閱的過程由稱為Observer的其他源捕獲發出的資料流。這種Observable/Observer模式或簡單的Observer模式極大地簡化了程式設計環境中複雜的更改檢測和必要的更新。
JavaScript沒有內建的響應式程式設計支援。RxJs是一個JavaScript庫,它在JavaScript中實現了響應式程式設計。Angular廣泛使用RxJs庫來實現以下高階概念:
- 元件之間的資料傳輸。
- HTTP客戶端。
- 路由器。
- 響應式表單。
讓我們在本節中使用RxJs庫學習響應式程式設計。
Observable
正如前面所瞭解的,Observable是資料來源,它們可能是靜態的或動態的。Rxjs提供了許多方法來從常見的JavaScript物件建立Observable。讓我們看看一些常見的方法。
of - 按順序發出任意數量的值,最後發出完成通知。
const numbers$ = of(1, 2, 3, 4, 5, 6, 7, 8, 9, 10);
這裡:
numbers$是一個Observable物件,當訂閱時,它將按順序發出1到10。
變數末尾的美元符號 ($)用於標識該變數是Observable。
range - 按順序發出一個數字範圍。
const numbers$ = range(1,10)
from - 發出陣列、promise或可迭代物件。
const numbers$ = from([1,2,3,4,5,6,7,8,9,10]);
ajax - 透過AJAX獲取URL,然後發出響應。
const api$ = ajax({ url: 'https://httpbin.org/delay/1', method: 'POST', headers: { 'Content-Type': 'application/text' }, body: "Hello" });
這裡:
https://httpbin.org是一個免費的REST API服務,它將以JSON格式返回提供的正文內容,如下所示:
{
   "args": {},
   "data": "Hello",
   "files": {},
   "form": {},
   "headers": {
      "Accept": "text/html,application/xhtml+xml,application/xml;q=0.9,image/webp,image/apng,*/*;q=0.8,application/signed-exchange;v=b3;q=0.9",
      "Accept-Encoding": "gzip, deflate, br",
      "Accept-Language": "en-US,en;q=0.9",
      "Host": "httpbin.org", "Sec-Fetch-Dest": "document",
      "Sec-Fetch-Mode": "navigate",
      "Sec-Fetch-Site": "none",
      "Upgrade-Insecure-Requests": "1",
      "User-Agent": "Mozilla/5.0 (Windows NT 10.0; Win64; x64) AppleWebKit/537.36 (KHTML, like Gecko) Chrome/83.0.4103.106 Safari/537.36",
      "X-Amzn-Trace-Id": "Root=1-5eeef468-015d8f0c228367109234953c"
   },
   "origin": "ip address",
   "url": "https://httpbin.org/delay/1"
}
fromEvent - 監聽HTML元素的事件,然後在監聽的事件觸發時發出事件及其屬性。
const clickEvent$ = fromEvent(document.getElementById('counter'), 'click');
Angular在內部廣泛使用此概念來提供元件之間的資料傳輸和響應式表單。
訂閱過程
訂閱Observable非常容易。每個Observable物件都有一個方法subscribe用於訂閱過程。Observer需要實現三個回撥函式來訂閱Observable物件。它們如下:
next - 接收和處理從Observable發出的值
error - 錯誤處理回撥
complete - 當Observable的所有資料都發出時呼叫的回撥函式。
一旦定義了三個回撥函式,就必須呼叫Observable的subscribe方法,如下所示:
const numbers$ = from([1,2,3,4,5,6,7,8,9,10]);
// observer
const observer = {
   next: (num: number) => {      this.numbers.push(num); this.val1 += num },
      error: (err: any) => console.log(err),
      complete: () => console.log("Observation completed")
};
numbers$.subscribe(observer);
這裡:
next - 方法獲取發出的數字,然後將其推入區域性變數this.numbers中。
next - 方法還將數字新增到區域性變數this.val1中。
error - 方法只是將錯誤訊息寫入控制檯。
complete - 方法也向控制檯寫入完成訊息。
我們可以跳過error和complete方法,只編寫next方法,如下所示:
number$.subscribe((num: number) => { this.numbers.push(num); this.val1 += num; });
操作
Rxjs庫提供了一些運算子來處理資料流。一些重要的運算子如下:
filter - 使用回撥函式過濾資料流。
const filterFn = filter( (num : number) => num > 5 );
const filteredNumbers$ = filterFn(numbers$);
filteredNumbers$.subscribe( (num : number) => {
this.filteredNumbers.push(num); this.val2 += num } );
map - 使用回撥函式對映資料流並更改資料流本身。
const mapFn = map( (num : number) => num + num ); const mappedNumbers$ = mappedFn(numbers$);
pipe - 使得可以組合兩個或多個運算子。
const filterFn = filter( (num : number) => num > 5 );
const mapFn = map( (num : number) => num + num ); const processedNumbers$ = numbers$.pipe(filterFn, mapFn);
processedNumbers$.subscribe( (num : number) => { this.processedNumbers.push(num); this.val3 += num } );
讓我們建立一個示例應用程式來嘗試本章中學習的反應式程式設計概念。
使用以下命令建立一個新的應用程式,reactive:
ng new reactive
將目錄更改為我們新建立的應用程式。
cd reactive
執行應用程式。
ng serve
更改AppComponent元件程式碼(src/app/app.component.ts),如下所示:
import { Component, OnInit } from '@angular/core'; import { Observable, of, range, from, fromEvent } from 'rxjs';
import { ajax } from 'rxjs/ajax';
import { filter, map, catchError } from 'rxjs/operators';
@Component({
   selector: 'app-root',
   templateUrl: './app.component.html',
   styleUrls: ['./app.component.css']
})
export class AppComponent implements OnInit {
   title = 'Reactive programming concept';
   numbers : number[] = [];
   val1 : number = 0;
   filteredNumbers : number[] = [];
   val2 : number = 0;
   processedNumbers : number[] = [];
   val3 : number = 0;
   apiMessage : string;
   counter : number = 0;
   ngOnInit() {
      // Observable stream of data Observable<number>
      // const numbers$ = of(1, 2, 3, 4, 5, 6, 7, 8, 9, 10);
      // const numbers$ = range(1,10);
      const numbers$ = from([1,2,3,4,5,6,7,8,9,10]);
      // observer
      const observer = {
         next: (num: number) => {this.numbers.push(num); this.val1 += num },
         error: (err: any) => console.log(err),
         complete: () => console.log("Observation completed")
      };
      numbers$.subscribe(observer);
      const filterFn = filter( (num : number) => num > 5 );
      const filteredNumbers = filterFn(numbers$);
      filteredNumbers.subscribe( (num : number) => {this.filteredNumbers.push(num); this.val2 += num } );
      const mapFn = map( (num : number) => num + num );
      const processedNumbers$ = numbers$.pipe(filterFn, mapFn);
      processedNumbers$.subscribe( (num : number) => {this.processedNumbers.push(num); this.val3 += num } );
      const api$ = ajax({
         url: 'https://httpbin.org/delay/1',
         method: 'POST',
         headers: {'Content-Type': 'application/text' },
         body: "Hello"
      });
      api$.subscribe(res => this.apiMessage = res.response.data );
      const clickEvent$ = fromEvent(document.getElementById('counter'), 'click');
      clickEvent$.subscribe( () => this.counter++ );
   }
}
這裡:
- 使用of、range、from、ajax和fromEvent方法建立Observable。
- 使用 filter、map 和 pipe 運算子方法處理資料流。
- 回撥函式捕獲發射的資料,處理它,然後將其儲存在元件的區域性變數中。
按如下所示更改 **AppComponent** 模板 **(src/app/app.component.html)**:
<h1>{{ title }}</h1>
<div>
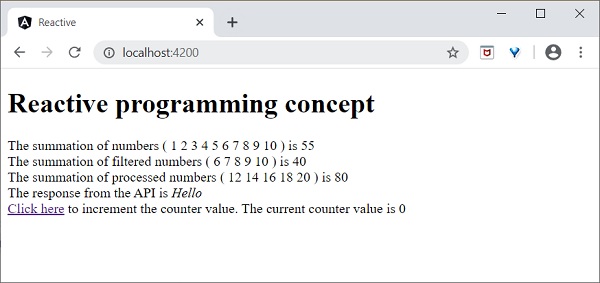
The summation of numbers ( <span *ngFor="let num of numbers"> {{ num }} </span> ) is {{ val1 }}
</div>
<div>
The summation of filtered numbers ( <span *ngFor="let num of filteredNumbers"> {{ num }} </span> ) is {{ val2 }}
</div>
<div>
The summation of processed numbers ( <span *ngFor="let num of processedNumbers"> {{ num }} </span> ) is {{ val3 }}
</div>
<div>
The response from the API is <em>{{ apiMessage }}</em> </div>
<div>
<a id="counter" href="#">Click here</a> to increment the counter value. The current counter value is {{ counter }}
<div>
這裡:
顯示了由 **Observer** 回撥函式處理的所有區域性變數。
開啟瀏覽器,https://:4200。
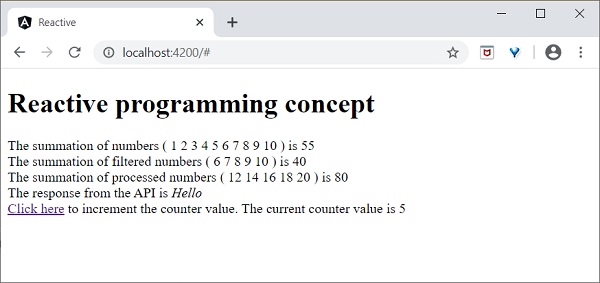
點選“點選此處”連結五次。對於每次事件,事件將被髮射並轉發到 **Observer**。Observer 回撥函式將被呼叫。回撥函式為每次點選遞增計數器,最終結果如下所示:
Angular 8 - 服務和依賴注入
如前所述,**服務**在 Angular 應用程式中提供特定功能。在一個給定的 Angular 應用程式中,可以使用一個或多個服務。同樣,Angular 元件可能依賴於一個或多個服務。
此外,Angular 服務可能依賴於其他服務才能正常工作。依賴項解析是開發任何應用程式中複雜且耗時的活動之一。為了降低複雜性,Angular 提供了 **依賴注入**模式作為核心概念之一。
讓我們在本節中學習如何在 Angular 應用程式中使用依賴注入。
建立 Angular 服務
Angular 服務是一個普通的 TypeScript 類,它具有一個或多個方法(功能)以及 **@Injectable** 裝飾器。它使普通的 TypeScript 類能夠在 Angular 應用程式中用作服務。
import { Injectable } from '@angular/core'; @Injectable()
export class DebugService {
   constructor() { }
}
這裡,**@Injectable** 裝飾器將普通的 TypeScript 類轉換為 Angular 服務。
註冊 Angular 服務
要使用 **依賴注入**,每個服務都需要註冊到系統中。Angular 提供了多種註冊服務的方法,如下所示:
- ModuleInjector @ 根級別
- ModuleInjector @ 平臺級別
- 使用 providers 元資料的 ElementInjector
- 使用 viewProviders 元資料的 ElementInjector
- NullInjector
ModuleInjector @ 根級別
**ModuleInjector** 僅強制在特定模組內使用服務。**@Injectable** 中可用的 **providedIn** 元資料用於指定可以使用該服務的模組。
該值應引用已註冊的 Angular 模組之一(用 **@NgModule** 裝飾)。**root** 是一個特殊選項,它指的是應用程式的根模組。示例程式碼如下:
import { Injectable } from '@angular/core'; @Injectable({
   providedIn: 'root',
})
export class DebugService {
   constructor() { }
}
ModuleInjector @ 平臺級別
**Platform Injector** 比 **ModuleInjector** 高一級,僅在高階和罕見情況下使用。每個 Angular 應用程式都透過執行 **platformBrowserDynamic().bootstrap** 方法(參見 **main.js**)啟動,該方法負責引導 Angular 應用程式的根模組。
**platformBrowserDynamic()** 方法建立一個由 **PlatformModule** 配置的注入器。我們可以使用 **PlatformModule** 提供的 **platformBrowser()** 方法配置平臺級服務。
NullInjector
**NullInjector** 比平臺級 **ModuleInjector** 高一級,位於層次結構的頂層。我們無法在 **NullInjector** 中註冊任何服務。當在層次結構中任何地方都找不到所需的服務時,它會解析並簡單地丟擲錯誤。
使用 providers 的 ElementInjector
**ElementInjector** 強制僅在某些特定元件內使用服務。**@Component** 裝飾器中可用的 providers 和 **viewProviders** 元資料用於指定特定元件可見的服務列表。使用 providers 的示例程式碼如下:
ExpenseEntryListComponent
// import statement
import { DebugService } from '../debug.service';
// component decorator
@Component({
   selector: 'app-expense-entry-list',
   templateUrl: './expense-entry-list.component.html',
   styleUrls: ['./expense-entry-list.component.css'],
   providers: [DebugService] })
這裡,**DebugService** 僅在其檢視內和 **ExpenseEntryListComponent** 內可用。要在其他元件中使用 DebugService,只需在必要的元件中使用 **providers** 裝飾器。
使用 viewProviders 的 ElementInjector
**viewProviders** 與 **providers** 類似,不同之處在於它不允許在使用 **ng-content** 指令建立的元件內容內使用服務。
ExpenseEntryListComponent
// import statement
import { DebugService } from '../debug.service';
// component decorator
@Component({
   selector: 'app-expense-entry-list',
   templateUrl: './expense-entry-list.component.html',
   styleUrls: ['./expense-entry-list.component.css'], viewProviders: [DebugService]
})
父元件可以透過其檢視或內容使用子元件。父元件與子元件和內容檢視的示例如下:
父元件檢視/模板
<div>
   child template in view
   <child></child>
</div>
<ng-content></ng-content>
子元件檢視/模板
<div>
   child template in view
</div>
父元件在模板中的用法(另一個元件)
<parent>
   <!-- child template in content -->
   <child></child>
</parent>
這裡:
- **child** 元件在兩個地方使用。一個在父元件的檢視內,另一個在父元件的內容內。
- 服務可在放置在父元件檢視內的子元件中使用。
- 服務不可用於放置在父元件內容內的子元件。
解析 Angular 服務
讓我們看看元件如何使用下面的流程圖解析服務。
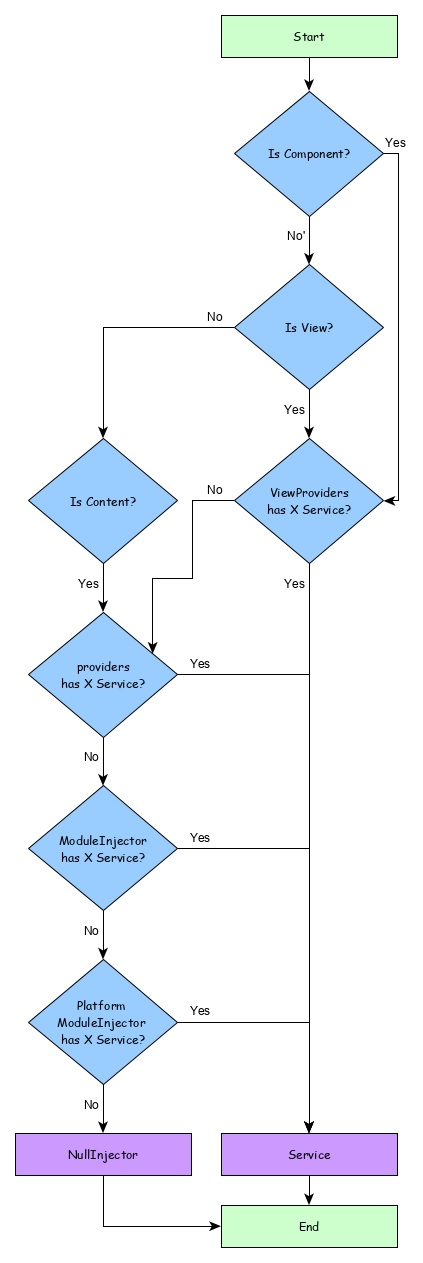
這裡:
- 首先,元件嘗試查詢使用 **viewProviders** 元資料註冊的服務。
- 如果未找到,元件嘗試查詢使用 **providers** 元資料註冊的服務。
- 如果未找到,元件嘗試查詢使用 **ModuleInjector** 註冊的服務。
- 如果未找到,元件嘗試查詢使用 **PlatformInjector** 註冊的服務。
- 如果未找到,元件嘗試查詢使用 **NullInjector** 註冊的服務,這始終會丟擲錯誤。
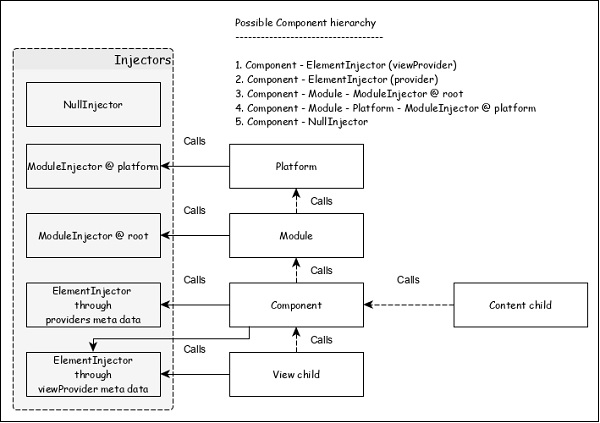
注入器的層次結構以及服務解析的工作流程如下:
解析修飾符
正如我們在上一節中瞭解到的,服務的解析從元件開始,並在找到服務或到達 **NullInjector** 時停止。這是預設解析,可以使用 **解析修飾符**更改它。它們如下所示:
Self()
**Self()** 在其當前 **ElementInjector** 本身啟動和停止對服務的搜尋。
import { Self } from '@angular/core';
constructor(@Self() public debugService: DebugService) {}
SkipSelf()
**SkipSelf()** 與 Self() 正好相反。它跳過當前 ElementInjector,並從其父 **ElementInjector** 開始搜尋服務。
import { SkipSelf } from '@angular/core';
constructor(@SkipSelf() public debugService: DebugService) {}
Host()
**Host()** 在其宿主 **ElementInjector** 中停止對服務的搜尋。即使服務在更高級別可用,它也會在宿主級別停止。
import { Host } from '@angular/core';
constructor(@Host() public debugService: DebugService) {}
Optional()
**Optional()** 在服務搜尋失敗時不會丟擲錯誤。
import { Optional } from '@angular/core';
constructor(@Optional() private debugService?: DebugService) {
   if (this.debugService) {
      this.debugService.info("Debugger initialized");
   }
}
依賴注入提供程式
依賴注入提供程式有兩個用途。首先,它有助於為要註冊的服務設定令牌。該令牌將用於引用和呼叫服務。其次,它有助於根據給定的配置建立服務。
如前所述,最簡單的提供程式如下:
providers: [ DebugService ]
這裡,**DebugService** 既是令牌,也是必須用其建立服務物件的類。提供程式的實際形式如下:
providers: [ { provides: DebugService, useClass: DebugService }]
這裡,**provides** 是令牌,**useClass** 是用於建立服務物件的類引用。
Angular 提供了一些其他的提供程式,如下所示:
別名類提供程式
提供程式的目的是重用現有服務。
providers: [ DebugService,
   { provides: AnotherDebugService, userClass: DebugService }]
這裡,只建立一個 **DebugService** 服務的例項。
值提供程式
值提供程式的目的是提供值本身,而不是要求 DI 建立服務物件的例項。它也可以使用現有物件。唯一的限制是物件必須符合引用的服務的形狀。
export class MyCustomService {
   name = "My Custom Service"
}
[{ provide: MyService, useValue: { name: 'instance of MyCustomService' }]
這裡,DI 提供程式只是返回在 **useValue** 選項中設定的例項,而不是建立新的服務物件。
非類依賴提供程式
它允許在 Angular DI 中使用字串、函式或物件。
讓我們看一個簡單的例子。
// Create the injectable token
import { InjectionToken } from '@angular/core';
export const APP_CONFIG = new InjectionToken<AppConfig>('app.config');
// Create value
export const MY_CONFIG: AppConfig = {
   title: 'Dependency Injection'
};
// congfigure providers
providers: [{ provide: APP_CONFIG, useValue: HERO_DI_CONFIG }]
// inject the service
constructor(@Inject(APP_CONFIG) config: AppConfig) {
工廠提供程式
工廠提供程式允許複雜的的建立。它將物件的建立委託給外部函式。工廠提供程式還可以選擇為工廠物件設定依賴項。
{ provide: MyService, useFactory: myServiceFactory, deps: [DebugService] };
這裡,**myServiceFactory** 返回 **MyService** 的例項。
Angular 服務用法
現在,我們知道如何建立和註冊 Angular 服務。讓我們看看如何在元件內部使用 Angular 服務。使用 Angular 服務就像將建構函式的引數型別設定為服務提供程式的令牌一樣簡單。
export class ExpenseEntryListComponent implements OnInit {
   title = 'Expense List';
   constructor(private debugService : DebugService) {}
   ngOnInit() {
      this.debugService.info("Angular Application starts");
   }
}
這裡:
**ExpenseEntryListComponent** 建構函式設定了一個型別為 DebugService 的引數。
**Angular 依賴注入器** (DI) 將嘗試查詢應用程式中已註冊的任何型別為 DebugService 的服務。如果找到,它會將 DebugService 的例項設定為 ExpenseEntryListComponent 元件。如果沒有找到,它將丟擲錯誤。
新增除錯服務
讓我們新增一個簡單的 **Debug** 服務,它將幫助我們在應用程式開發過程中列印除錯資訊。
開啟命令提示符並轉到專案根資料夾。
cd /go/to/expense-manager
啟動應用程式。
ng serve
執行以下命令生成 Angular 服務 **DebugService**。
ng g service debug
這將建立兩個 TypeScript 檔案(除錯服務及其測試),如下所示:
CREATE src/app/debug.service.spec.ts (328 bytes)
CREATE src/app/debug.service.ts (134 bytes)
讓我們分析 **DebugService** 服務的內容。
import { Injectable } from '@angular/core'; @Injectable({
   providedIn: 'root'
})
export class DebugService {
   constructor() { }
}
這裡:
**@Injectable** 裝飾器附加到 DebugService 類,這使得 DebugService 能夠在應用程式的 Angular 元件中使用。
**providedIn** 選項及其值 root 使 DebugService 能夠在應用程式的所有元件中使用。
讓我們新增一個方法 Info,它將訊息列印到瀏覽器控制檯。
info(message : String) : void {
   console.log(message);
}
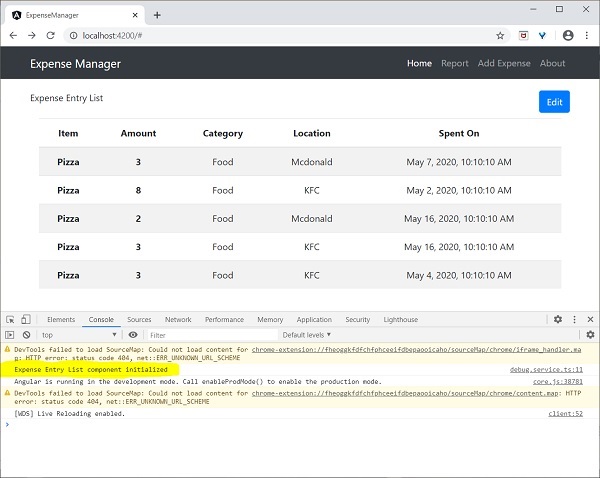
讓我們在 **ExpenseEntryListComponent** 中初始化服務並使用它來列印訊息。
import { Component, OnInit } from '@angular/core'; import { ExpenseEntry } from '../expense-entry'; import { DebugService } from '../debug.service'; @Component({
   selector: 'app-expense-entry-list',
   templateUrl: './expense-entry-list.component.html', styleUrls: ['./expense-entry-list.component.css']
})
export class ExpenseEntryListComponent implements OnInit {
   title: string;
   expenseEntries: ExpenseEntry[];
   constructor(private debugService: DebugService) { }
   ngOnInit() {
      this.debugService.info("Expense Entry List
      component initialized");
      this.title = "Expense Entry List";
      this.expenseEntries = this.getExpenseEntries();
   }
   // other coding
}
這裡:
使用建構函式引數初始化 DebugService。設定型別為 DebugService 的引數 (debugService) 將觸發依賴注入以建立新的 DebugService 物件並將其設定為 ExpenseEntryListComponent 元件。
在 ngOnInit 方法中呼叫 DebugService 的 info 方法會在瀏覽器控制檯中列印訊息。
可以使用開發者工具檢視結果,它看起來類似於以下所示:
讓我們擴充套件應用程式以瞭解服務的範圍。
讓我們使用下面提到的命令建立一個 **DebugComponent**。
ng generate component debug
CREATE src/app/debug/debug.component.html (20 bytes) CREATE src/app/debug/debug.component.spec.ts (621 bytes)
CREATE src/app/debug/debug.component.ts (265 bytes) CREATE src/app/debug/debug.component.css (0 bytes) UPDATE src/app/app.module.ts (392 bytes)
讓我們刪除根模組中的 DebugService。
// src/app/debug.service.ts
import { Injectable } from '@angular/core'; @Injectable()
export class DebugService {
   constructor() {
   }
   info(message : String) : void {
      console.log(message);
   }
}
在 ExpenseEntryListComponent 元件下注冊 DebugService。
// src/app/expense-entry-list/expense-entry-list.component.ts @Component({
   selector: 'app-expense-entry-list',
   templateUrl: './expense-entry-list.component.html',
   styleUrls: ['./expense-entry-list.component.css']
   providers: [DebugService]
})
這裡,我們使用了 providers 元資料 **(ElementInjector)** 來註冊服務。
開啟 **DebugComponent** (src/app/debug/debug.component.ts) 並匯入 **DebugService**,並在元件的建構函式中設定一個例項。
import { Component, OnInit } from '@angular/core'; import { DebugService } from '../debug.service';
@Component({
   selector: 'app-debug',
   templateUrl: './debug.component.html',
   styleUrls: ['./debug.component.css']
})
export class DebugComponent implements OnInit {
   constructor(private debugService: DebugService) { }
   ngOnInit() {
      this.debugService.info("Debug component gets service from Parent");
   }
}
這裡,我們沒有註冊 **DebugService**。因此,如果用作父元件,則 DebugService 將不可用。如果在父元件內使用,如果父元件可以訪問該服務,則該服務可能可從父元件訪問。
開啟**ExpenseEntryListComponent** 模板檔案 (src/app/expense-entry-list/expense-entry-list.component.html),並新增如下所示的內容部分。
// existing content
<app-debug></app-debug>
<ng-content></ng-content>
這裡,我們添加了一個內容部分和一個DebugComponent部分。
讓我們在AppComponent模板中將debug元件作為內容包含在**ExpenseEntryListComponent**元件內。開啟**AppComponent**模板,並將**app-expense-entry-list**修改如下:
// navigation code
<app-expense-entry-list>
<app-debug></app-debug>
</app-expense-entry-list>
這裡,我們添加了**DebugComponent**作為內容。
讓我們檢查一下應用程式,它會在頁面末尾顯示**DebugService**模板,如下所示:
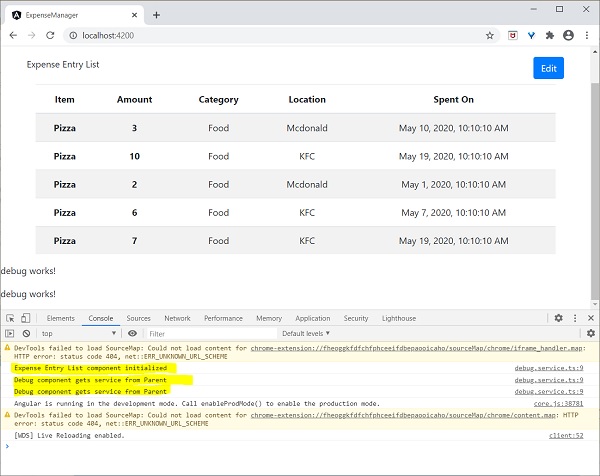
此外,我們還可以在控制檯中看到來自debug元件的兩個除錯資訊。這表明debug元件從其父元件獲取服務。
讓我們更改在**ExpenseEntryListComponent**中注入服務的方式以及它如何影響服務的範圍。將providers注入器更改為viewProviders注入。**viewProviders**不會將服務注入到內容子級,因此它應該會失敗。
viewProviders: [DebugService]
檢查應用程式,您會看到一個debug元件(用作內容子級)丟擲錯誤,如下所示:

讓我們從模板中刪除debug元件並恢復應用程式。
開啟**ExpenseEntryListComponent**模板 (src/app/expense-entry-list/expense-entry-list.component.html) 並刪除以下內容
<app-debug></app-debug>
<ng-content></ng-content>
開啟**AppComponent**模板,並將**app-expense-entry-list**修改如下:
// navigation code
<app-expense-entry-list>
</app-expense-entry-list>
將**ExpenseEntryListComponent**中的**viewProviders**設定更改為**providers**。
providers: [DebugService]
重新執行應用程式並檢查結果。
Angular 8 - Http 客戶端程式設計
Http客戶端程式設計是每個現代Web應用程式中必不可少的功能。如今,許多應用程式透過REST API(基於HTTP協議的功能)公開其功能。考慮到這一點,Angular團隊提供了廣泛的支援來訪問HTTP伺服器。Angular提供了一個單獨的模組**HttpClientModule**和一個服務**HttpClient**來進行HTTP程式設計。
讓我們在本節中學習如何使用**HttpClient**服務。開發人員應該具備HTTP程式設計的基礎知識才能理解本章內容。
費用REST API
進行Http程式設計的先決條件是對Http協議和REST API技術的瞭解。Http程式設計涉及兩部分:伺服器端和客戶端。Angular提供支援來建立客戶端應用程式。**Express**是一個流行的Web框架,它支援建立伺服器端應用程式。
讓我們使用express框架建立一個**費用REST API**,然後使用Angular HttpClient服務從我們的**ExpenseManager**應用程式訪問它。
開啟命令提示符並建立一個新資料夾**express-rest-api**。
cd /go/to/workspace
mkdir express-rest-api
cd expense-rest-api
使用以下命令初始化一個新的Node應用程式:
npm init
**npm init**會詢問一些基本問題,例如專案名稱(express-rest-api)、入口點(server.js)等,如下所示:
This utility will walk you through creating a package.json file.
It only covers the most common items, and tries to guess sensible defaults.
See `npm help json` for definitive documentation on these fields and exactly what they do.
Use `npm install <pkg>` afterwards to install a package and save it as a dependency in the package.json file.
Press ^C at any time to quit.
package name: (expense-rest-api)
version: (1.0.0)
description: Rest api for Expense Application
entry point: (index.js) server.js
test command:
git repository:
keywords:
author:
license: (ISC)
About to write to \path\to\workspace\expense-rest-api\package.json: {
   "name": "expense-rest-api",
   "version": "1.0.0",
   "description": "Rest api for Expense Application",
   "main": "server.js",
   "scripts": {
      "test": "echo \"Error: no test specified\" && exit 1"
   },
   "author": "",
   "license": "ISC"
}
Is this OK? (yes) yes
使用以下命令安裝**express, sqlite**和**cors**模組:
npm install express sqlite3 cors
建立一個新檔案**sqlitedb.js**並將以下程式碼放入其中:
var sqlite3 = require('sqlite3').verbose()
const DBSOURCE = "expensedb.sqlite"

let db = new sqlite3.Database(DBSOURCE, (err) => {
   if (err) {
      console.error(err.message)
      throw err
   }else{
      console.log('Connected to the SQLite database.')
      db.run(`CREATE TABLE expense (
         id INTEGER PRIMARY KEY AUTOINCREMENT,
         item text,
         amount real,
         category text,
         location text,
         spendOn text,
         createdOn text
         )`,
            (err) => {
               if (err) {
                  console.log(err);
               }else{
                  var insert = 'INSERT INTO expense (item, amount, category, location, spendOn, createdOn) VALUES (?,?,?,?,?,?)'

                  db.run(insert, ['Pizza', 10, 'Food', 'KFC', '2020-05-26 10:10', '2020-05-26 10:10'])
                  db.run(insert, ['Pizza', 9, 'Food', 'Mcdonald', '2020-05-28 11:10', '2020-05-28 11:10'])
                  db.run(insert, ['Pizza', 12, 'Food', 'Mcdonald', '2020-05-29 09:22', '2020-05-29 09:22'])
                  db.run(insert, ['Pizza', 15, 'Food', 'KFC', '2020-06-06 16:18', '2020-06-06 16:18'])
                  db.run(insert, ['Pizza', 14, 'Food', 'Mcdonald', '2020-06-01 18:14', '2020-05-01 18:14'])
               }
            }
      );
   }
});

module.exports = db
在這裡,我們建立一個新的sqlite資料庫並載入一些示例資料。
開啟server.js並將以下程式碼放入其中:
var express = require("express")
var cors = require('cors')
var db = require("./sqlitedb.js")

var app = express()
app.use(cors());

var bodyParser = require("body-parser");
app.use(bodyParser.urlencoded({ extended: false }));
app.use(bodyParser.json());

var HTTP_PORT = 8000
app.listen(HTTP_PORT, () => {
   console.log("Server running on port %PORT%".replace("%PORT%",HTTP_PORT))
});

app.get("/", (req, res, next) => {
    res.json({"message":"Ok"})
});

app.get("/api/expense", (req, res, next) => {
   var sql = "select * from expense"
   var params = []
   db.all(sql, params, (err, rows) => {
      if (err) {
        res.status(400).json({"error":err.message});
        return;
      }
      res.json(rows)
     });

});

app.get("/api/expense/:id", (req, res, next) => {
   var sql = "select * from expense where id = ?"
   var params = [req.params.id]
   db.get(sql, params, (err, row) => {
      if (err) {
         res.status(400).json({"error":err.message});
         return;
      }
      res.json(row)
   });
});

app.post("/api/expense/", (req, res, next) => {
   var errors=[]
   if (!req.body.item){
      errors.push("No item specified");
   }
   var data = {
      item : req.body.item,
      amount: req.body.amount,
      category: req.body.category,
      location : req.body.location,
      spendOn: req.body.spendOn,
      createdOn: req.body.createdOn,
   }
   var sql = 'INSERT INTO expense (item, amount, category, location, spendOn, createdOn) VALUES (?,?,?,?,?,?)'
   var params =[data.item, data.amount, data.category, data.location, data.spendOn, data.createdOn]
   db.run(sql, params, function (err, result) {
      if (err){
         res.status(400).json({"error": err.message})
         return;
      }
      data.id = this.lastID;
      res.json(data);
   });
})

app.put("/api/expense/:id", (req, res, next) => {
   var data = {
      item : req.body.item,
      amount: req.body.amount,
      category: req.body.category,
      location : req.body.location,
      spendOn: req.body.spendOn
   }
   db.run(
      `UPDATE expense SET
         item = ?,

         amount = ?,
         category = ?,
         location = ?,

         spendOn = ?
         WHERE id = ?`,
            [data.item, data.amount, data.category, data.location,data.spendOn, req.params.id],
      function (err, result) {
         if (err){
            console.log(err);
            res.status(400).json({"error": res.message})
            return;
         }
         res.json(data)
   });
})

app.delete("/api/expense/:id", (req, res, next) => {
   db.run(
      'DELETE FROM expense WHERE id = ?',
      req.params.id,
      function (err, result) {
         if (err){
            res.status(400).json({"error": res.message})
            return;
         }
         res.json({"message":"deleted", changes: this.changes})
   });
})

app.use(function(req, res){
   res.status(404);
});
在這裡,我們建立了一個基本的CURD rest api來選擇、插入、更新和刪除費用條目。
使用以下命令執行應用程式:
npm run start
開啟瀏覽器,輸入**https://:8000/**並按回車鍵。您將看到以下響應:
{
   "message": "Ok"
}
這證實了我們的應用程式執行良好。
將url更改為**https://:8000/api/expense**,您將看到所有費用條目以JSON格式顯示。
[
   {
      "id": 1,

      "item": "Pizza",
      "amount": 10,
      "category": "Food",
      "location": "KFC",
      "spendOn": "2020-05-26 10:10",
      "createdOn": "2020-05-26 10:10"
   },
   {
      "id": 2,
      "item": "Pizza",
      "amount": 14,
      "category": "Food",
      "location": "Mcdonald",
      "spendOn": "2020-06-01 18:14",
      "createdOn": "2020-05-01 18:14"
   },
   {
      "id": 3,
      "item": "Pizza",
      "amount": 15,
      "category": "Food",
      "location": "KFC",
      "spendOn": "2020-06-06 16:18",
      "createdOn": "2020-06-06 16:18"
   },
   {
      "id": 4,
      "item": "Pizza",
      "amount": 9,
      "category": "Food",
      "location": "Mcdonald",
      "spendOn": "2020-05-28 11:10",
      "createdOn": "2020-05-28 11:10"
   },
   {
      "id": 5,
      "item": "Pizza",
      "amount": 12,
      "category": "Food",
      "location": "Mcdonald",
      "spendOn": "2020-05-29 09:22",
      "createdOn": "2020-05-29 09:22"
   }
]
最後,我們為費用條目建立了一個簡單的CURD REST API,我們可以從我們的Angular應用程式訪問REST API來學習HttpClient模組。
配置Http客戶端
讓我們在本節中學習如何配置**HttpClient**服務。
**HttpClient**服務位於**HttpClientModule**模組內,該模組位於@angular/common/http包內。
註冊**HttpClientModule**模組:
在**AppComponent**中匯入HttpClientModule
import { HttpClientModule } from '@angular/common/http';
在AppComponent的imports元資料中包含HttpClientModule。
@NgModule({
   imports: [
      BrowserModule,
      // import HttpClientModule after BrowserModule.
      HttpClientModule,
   ]
})
export class AppModule {}
建立費用服務
讓我們在我們的**ExpenseManager**應用程式中建立一個新的服務**ExpenseEntryService**來與**費用REST API**互動。ExpenseEntryService將獲取最新的費用條目,插入新的費用條目,修改現有的費用條目並刪除不需要的費用條目。
開啟命令提示符並轉到專案根資料夾。
cd /go/to/expense-manager
啟動應用程式。
ng serve
執行以下命令以生成一個Angular服務**ExpenseService**。
ng generate service ExpenseEntry
這將建立兩個TypeScript檔案(費用條目服務及其測試),如下所示:
CREATE src/app/expense-entry.service.spec.ts (364 bytes)
CREATE src/app/expense-entry.service.ts (141 bytes)
開啟**ExpenseEntryService** (src/app/expense-entry.service.ts) 並從rxjs庫匯入**ExpenseEntry, throwError**和**catchError**,並從@angular/common/http包匯入**HttpClient, HttpHeaders**和**HttpErrorResponse**。
import { Injectable } from '@angular/core';
import { ExpenseEntry } from './expense-entry'; import { throwError } from 'rxjs';
import { catchError } from 'rxjs/operators';
import { HttpClient, HttpHeaders, HttpErrorResponse } from
'@angular/common/http';
將HttpClient服務注入到我們的服務中。
constructor(private httpClient : HttpClient) { }
建立一個變數**expenseRestUrl**來指定**費用Rest API**端點。
private expenseRestUrl = 'https://:8000/api/expense';
建立一個變數**httpOptions**來設定Http Header選項。這將由Angular **HttpClient**服務在Http Rest API呼叫期間使用。
private httpOptions = {
   headers: new HttpHeaders( { 'Content-Type': 'application/json' })
};
完整的程式碼如下:
import { Injectable } from '@angular/core';
import { ExpenseEntry } from './expense-entry';
import { Observable, throwError } from 'rxjs';
import { catchError, retry } from 'rxjs/operators';
import { HttpClient, HttpHeaders, HttpErrorResponse } from '@angular/common/http';

@Injectable({
   providedIn: 'root'
})
export class ExpenseEntryService {
   private expenseRestUrl = 'api/expense';
   private httpOptions = {
      headers: new HttpHeaders( { 'Content-Type': 'application/json' })
   };

   constructor(
      private httpClient : HttpClient) { }
}
HTTP GET
HttpClient提供get()方法從網頁獲取資料。主要引數是目標網路url。另一個可選引數是具有以下格式的選項物件:
{
   headers?: HttpHeaders | {[header: string]: string | string[]},
   observe?: 'body' | 'events' | 'response',

   params?: HttpParams|{[param: string]: string | string[]},
   reportProgress?: boolean,
   responseType?: 'arraybuffer'|'blob'|'json'|'text',
   withCredentials?: boolean,
}
這裡:
**headers** - 請求的HTTP標頭,可以是字串、字串陣列或HttpHeaders陣列。
**observe** - 處理響應並返回響應的特定內容。可能的值為body、response和events。observer的預設選項是body。
**params** - 請求的HTTP引數,可以是字串、字串陣列或HttpParams陣列。
**reportProgress** - 是否報告程序的進度(true或false)。
**responseType** - 指的是響應的格式。可能的值為**arraybuffer, blob, json**和**text**。
**withCredentials** - 請求是否具有憑據(true或false)。
所有選項都是可選的。
**get()**方法將請求的響應作為**Observable**返回。當從伺服器接收到響應時,返回的Observable會發出資料。
使用**get()**方法的示例程式碼如下:
httpClient.get(url, options)
.subscribe( (data) => console.log(data) );
型別化響應
**get()**方法有一個選項可以返回可觀察物件,它也會發出型別化響應。獲取型別化響應(ExpenseEntry)的示例程式碼如下
httpClient.get<T>(url, options) .subscribe( (data: T) => console.log(data) );
處理錯誤
錯誤處理是HTTP程式設計的一個重要方面。在HTTP程式設計中遇到錯誤是一種常見的情況。
HTTP程式設計中的錯誤可以分為兩類:
客戶端問題可能是由於網路故障、錯誤配置等造成的。如果發生客戶端錯誤,則**get()**方法會丟擲**ErrorEvent**物件。
伺服器端問題可能是由於URL錯誤、伺服器不可用、伺服器程式設計錯誤等造成的。
讓我們為我們的**ExpenseEntryService**服務編寫一個簡單的錯誤處理程式。
private httpErrorHandler (error: HttpErrorResponse) {
   if (error.error instanceof ErrorEvent) {
      console.error("A client side error occurs. The error message is " + error.message);
      } else {
         console.error(
            "An error happened in server. The HTTP status code is "  + error.status + " and the error returned is " + error.message);
      }

   return throwError("Error occurred. Pleas try again");
}
錯誤函式可以在**get()**中呼叫,如下所示:
httpClient.get(url, options)
   .pipe(catchError(this.httpErrorHandler)
   .subscribe( (data) => console.log(data) )
處理失敗的請求
正如我們前面提到的,可能會發生錯誤,一種方法是處理它。另一種選擇是嘗試一定次數。如果請求由於網路問題或HTTP伺服器暫時離線而失敗,則下一個請求可能會成功。
在這種情況下,我們可以使用**rxjs**庫的**retry**運算子,如下所示
httpClient.get(url, options)
   .pipe(
      retry(5),
      catchError(this.httpErrorHandler))
   .subscribe( (data) => console.log(data) )
獲取費用條目
讓我們在ExpenseManager應用程式中編寫實際程式碼以從**費用Rest API**獲取費用。
開啟命令提示符並轉到專案根資料夾。
cd /go/to/expense-manager
啟動應用程式。
ng serve
在**ExpenseEntryService** (src/app/expense-entry.service.ts) 服務中新增**getExpenseEntries()**和**httpErrorHandler()**方法。
getExpenseEntries() : Observable<ExpenseEntry[]> {
   return this.httpClient.get<ExpenseEntry[]>(this.expenseRestUrl, this.httpOptions)
   .pipe(retry(3),catchError(this.httpErrorHandler));
}

getExpenseEntry(id: number) : Observable<ExpenseEntry> {
   return this.httpClient.get<ExpenseEntry>(this.expenseRestUrl + "/" + id, this.httpOptions)
   .pipe(
      retry(3),
      catchError(this.httpErrorHandler)
   );
}

private httpErrorHandler (error: HttpErrorResponse) {
   if (error.error instanceof ErrorEvent) {
      console.error("A client side error occurs. The error message is " + error.message);
   } else {
      console.error(
         "An error happened in server. The HTTP status code is "  + error.status + " and the error returned is " + error.message);
   }

   return throwError("Error occurred. Pleas try again");
}
這裡:
**getExpenseEntries()**使用費用端點呼叫**get()**方法,並配置錯誤處理程式。此外,它還將**httpClient**配置為在失敗的情況下最多嘗試3次。最後,它將伺服器的響應作為型別化**(ExpenseEntry[])** Observable物件返回。
**getExpenseEntry**類似於getExpenseEntries(),只是它傳遞ExpenseEntry物件的id並獲取ExpenseEntry Observable物件。
**ExpenseEntryService**的完整程式碼如下:
import { Injectable } from '@angular/core';
import { ExpenseEntry } from './expense-entry';

import { Observable, throwError } from 'rxjs';
import { catchError, retry } from 'rxjs/operators';
import { HttpClient, HttpHeaders, HttpErrorResponse } from '@angular/common/http';

@Injectable({

   providedIn: 'root'
})
export class ExpenseEntryService {
   private expenseRestUrl = 'https://:8000/api/expense';
   private httpOptions = {
      headers: new HttpHeaders( { 'Content-Type': 'application/json' })
   };

   constructor(private httpClient : HttpClient) { }

   getExpenseEntries() : Observable {
      return this.httpClient.get(this.expenseRestUrl, this.httpOptions)
      .pipe(
         retry(3),
         catchError(this.httpErrorHandler)
      );
   }

   getExpenseEntry(id: number) : Observable {
      return this.httpClient.get(this.expenseRestUrl + "/" + id, this.httpOptions)
      .pipe(
         retry(3),
         catchError(this.httpErrorHandler)
      );
   }

   private httpErrorHandler (error: HttpErrorResponse) {
      if (error.error instanceof ErrorEvent) {
         console.error("A client side error occurs. The error message is " + error.message);
      } else {
         console.error(
            "An error happened in server. The HTTP status code is "  + error.status + " and the error returned is " + error.message);
      }

      return throwError("Error occurred. Pleas try again");
   }
}
開啟**ExpenseEntryListComponent** (src-entry-list-entry-list.component.ts) 並透過建構函式注入**ExpenseEntryService**,如下所示
constructor(private debugService: DebugService, private restService :
ExpenseEntryService ) { }
更改**getExpenseEntries()**函式。呼叫**ExpenseEntryService**中的getExpenseEntries()方法,而不是返回模擬項。
getExpenseItems() {
   this.restService.getExpenseEntries()
      .subscribe( data =− this.expenseEntries = data );
}
**ExpenseEntryListComponent**的完整程式碼如下:
import { Component, OnInit } from '@angular/core';
import { ExpenseEntry } from '../expense-entry';
import { DebugService } from '../debug.service';
import { ExpenseEntryService } from '../expense-entry.service';

@Component({
   selector: 'app-expense-entry-list',
   templateUrl: './expense-entry-list.component.html',
   styleUrls: ['./expense-entry-list.component.css'],
   providers: [DebugService]
})
export class ExpenseEntryListComponent implements OnInit {
   title: string;
   expenseEntries: ExpenseEntry[];
   constructor(private debugService: DebugService, private restService : ExpenseEntryService ) { }

   ngOnInit() {
      this.debugService.info("Expense Entry List component initialized");
      this.title = "Expense Entry List";

      this.getExpenseItems();
   }

   getExpenseItems() {
      this.restService.getExpenseEntries()
      .subscribe( data => this.expenseEntries = data );
   }
}
最後,檢查應用程式,您將看到以下響應。
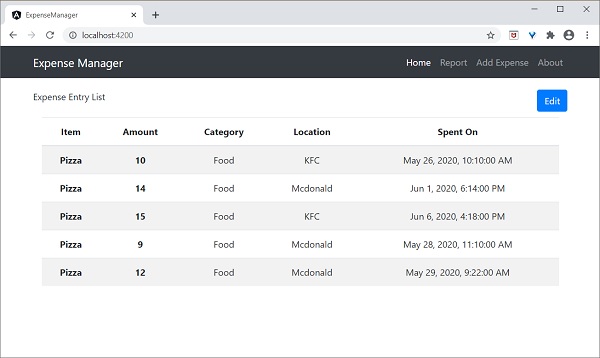
HTTP POST
HTTP POST類似於HTTP GET,只是post請求會將必要的資料作為釋出內容與請求一起傳送。HTTP POST用於將新記錄插入系統。
**HttpClient**提供**post()**方法,它類似於**get()**,只是它支援額外的引數來將資料傳送到伺服器。
讓我們在我們的**ExpenseEntryService**中新增一個新方法**addExpenseEntry()**來新增新的費用條目,如下所示:
addExpenseEntry(expenseEntry: ExpenseEntry): Observable<ExpenseEntry> {
   return this.httpClient.post<ExpenseEntry>(this.expenseRestUrl, expenseEntry, this.httpOptions)
   .pipe(
      retry(3),
      catchError(this.httpErrorHandler)
   );
}
HTTP PUT
HTTP PUT類似於HTTP POST請求。HTTP PUT用於更新系統中現有的記錄。
**httpClient**提供**put()**方法,它類似於**post()**。
更新費用條目
讓我們在我們的**ExpenseEntryService**中新增一個新方法**updateExpenseEntry()**來更新現有的費用條目,如下所示
updateExpenseEntry(expenseEntry: ExpenseEntry): Observable<ExpenseEntry> {
   return this.httpClient.put<ExpenseEntry>(this.expenseRestUrl + "/" + expenseEntry.id, expenseEntry, this.httpOptions)
   .pipe(
      retry(3),
      catchError(this.httpErrorHandler)
   );
}
HTTP DELETE
HTTP DELETE類似於http GET請求。HTTP DELETE用於刪除系統中的條目。
**httpclient**提供**delete()**方法,它類似於**get()**。
刪除費用條目
讓我們在我們的**ExpenseEntryService**中新增一個新方法**deleteExpenseEntry()**來刪除現有的費用條目,如下所示:
deleteExpenseEntry(expenseEntry: ExpenseEntry | number) : Observable<ExpenseEntry> {
   const id = typeof expenseEntry == 'number' ? expenseEntry : expenseEntry.id
   const url = `${this.expenseRestUrl}/${id}`;

   return this.httpClient.delete<ExpenseEntry>(url, this.httpOptions)
   .pipe(
      retry(3),
      catchError(this.httpErrorHandler)
   );
}
Angular 8 - Angular Material
Angular Material提供大量基於Material Design的高質量、現成的Angular元件。讓我們學習如何在Angular應用程式中包含Angular Material並使用其元件。
配置Angular Material
讓我們看看如何在Angular應用程式中配置Angular Material。
開啟命令提示符並轉到專案根資料夾。
cd /go/to/expense-manager
使用以下命令新增Angular Material包:
ng add @angular/material
Angular CLI會詢問一些關於主題、手勢識別和瀏覽器動畫的問題。選擇您選擇的任何主題,然後對動效和手勢識別回答肯定。
Installing packages for tooling via npm.
Installed packages for tooling via npm.
Choose a prebuilt theme name, or "custom" for a custom theme: Indigo/Pink        [ Preview: https://material.angular.i
o?theme=indigo-pink ]
Set up HammerJS for gesture recognition? Yes
Set up browser animations for Angular Material? Yes
Angular Material將每個UI元件打包在一個單獨的模組中。透過根模組**(src/app/app.module.ts)**將所有必要的模組匯入應用程式。
import { MatTableModule } from '@angular/material/table';
import { MatButtonModule } from '@angular/material/button';
import { MatIconModule } from '@angular/material/icon';

@NgModule({
  imports: [
    MatTableModule,
    MatButtonModule,
    MatIconModule
  ]
})
使用ExpenseEntryListComponent模板(src/app/expense-entry-list/expense-entry-list.component.html)更改編輯按鈕,如下所示:
<div class="col-sm" style="text-align: right;">
    <!-- <button type="button" class="btn btn-primary">Edit</button> -->
    <button mat-raised-button color="primary">Edit</button>
</div>
執行應用程式並測試頁面。
ng serve
應用程式的輸出如下:
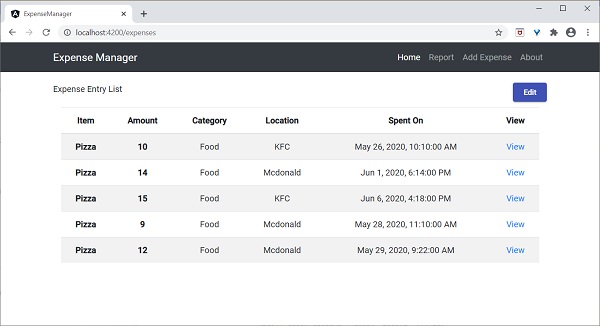
在這裡,應用程式清楚地顯示了Angular Material按鈕。
工作示例
Angular Material包提供的一些重要的UI元素。
- 表單欄位
- 輸入框
- 複選框
- 單選按鈕
- 選擇框
- 按鈕
- 日期選擇器
- 列表
- 卡片
- 網格列表
- 表格
- 分頁器
- 標籤頁
- 工具欄
- 選單
- 對話方塊
- Snackbar(小吃欄)
- 進度條
- 圖示
- 分隔線
使用 Material 元件非常簡單,我們將透過一個示例專案學習其中一個常用的 Material 元件:Material 表格。
開啟命令提示符並轉到專案根資料夾。
ng add @angular/material
讓我們修改ExpenseEntryListComponent (src/app/expense-entry-list/expense-entry-list.component.ts) 並使用 Material 表格元件。
宣告一個變數 `displayedColumns` 並賦值為要顯示的列列表。
displayedColumns: string[] = ['item', 'amount', 'category', 'location', 'spendOn' ];
在ExpenseEntryListComponent 模板(src/app/expense-entry-list/expense-entry-list.component.html)中新增 Material 表格,如下所示,並刪除現有的列表。
<div class="mat-elevation-z8">
   <table mat-table [dataSource]="expenseEntries">
      <ng-container matColumnDef="item">
         <th mat-header-cell *matHeaderCellDef> Item </th>
         <td mat-cell *matCellDef="let element" style="text-align: left"> {{element.item}} </td>
      </ng-container>

      <ng-container matColumnDef="amount">
         <th mat-header-cell *matHeaderCellDef > Amount </th>
         <td mat-cell *matCellDef="let element" style="text-align: left"> {{element.amount}} </td>
      </ng-container>

      <ng-container matColumnDef="category">
         <th mat-header-cell *matHeaderCellDef> Category </th>
         <td mat-cell *matCellDef="let element" style="text-align: left"> {{element.category}} </td>
      </ng-container>

      <ng-container matColumnDef="location">
         <th mat-header-cell *matHeaderCellDef> Location </th>
         <td mat-cell *matCellDef="let element" style="text-align:left"> {{element.location}} </td>
      </ng-container>

      <ng-container matColumnDef="spendOn">
         <th mat-header-cell *matHeaderCellDef> Spend On </th>
         <td mat-cell *matCellDef="let element" style="text-align: left"> {{element.spendOn}} </td>
      </ng-container>

      <tr mat-header-row *matHeaderRowDef="displayedColumns"></tr>
      <tr mat-row *matRowDef="let row; columns: displayedColumns;"></tr>
   </table>
</div>
這裡:
mat-table 屬性用於將普通表格轉換為 Material 表格。
[dataSource] 屬性用於指定表格的資料來源。
Material 表格是基於模板的,每一列可以使用單獨的模板進行設計。ng-container 用於建立模板。
matColumnDef 用於指定應用於特定 ng-container 的資料來源列。
mat-header-cell 用於指定每一列的標題文字。
mat-cell 用於指定每一列的內容。
mat-header-row 和 mat-row 用於指定行中列的順序。
我們只使用了 Material 表格的基本功能。Material 表格還有許多其他功能,例如排序、分頁等。
執行應用程式。
ng serve
應用程式的輸出如下:
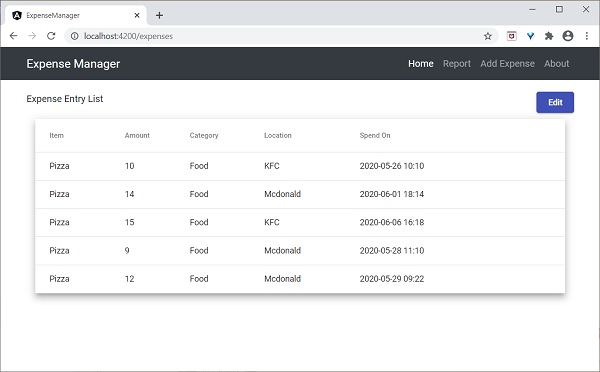
Angular 8 - 路由和導航
導航是 Web 應用中的一個重要方面。即使單頁應用 (SPA) 沒有多個頁面的概念,它也會從一個檢視(例如支出列表)移動到另一個檢視(例如支出詳情)。提供清晰易懂的導航元素決定了應用的成功。
Angular 提供了廣泛的導航功能集,以適應從簡單場景到複雜場景的需求。定義導航元素和對應檢視的過程稱為路由。Angular 提供了一個單獨的模組RouterModule來設定 Angular 應用中的導航。本章我們將學習如何在 Angular 應用中進行路由。
配置路由
Angular CLI 完全支援在應用建立過程中以及在應用執行過程中設定路由。讓我們使用以下命令建立一個啟用路由的新應用:
ng new routing-app --routing
Angular CLI 生成一個新的模組 AppRoutingModule 用於路由目的。生成的程式碼如下:
import { NgModule } from '@angular/core';
import { Routes, RouterModule } from '@angular/router';


const routes: Routes = [];

@NgModule({
  imports: [RouterModule.forRoot(routes)],
  exports: [RouterModule]
})
export class AppRoutingModule { }
這裡:
從 `@angular/router` 包中匯入 RouterModule 和 Routes。
RouterModule 提供了在應用中配置和執行路由的功能。
Routes 是用於設定導航規則的型別。
Routes 是用於配置應用實際導航規則的區域性變數(Routes 型別)。
RouterModule.forRoot() 方法將設定 routes 變數中配置的導航規則。
Angular CLI 將生成的 AppRoutingModule 包含在 AppComponent 中,如下所示:
import { BrowserModule } from '@angular/platform-browser';
import { NgModule } from '@angular/core';

import { AppRoutingModule } from './app-routing.module';
import { AppComponent } from './app.component';

@NgModule({
  declarations: [
    AppComponent
  ],
  imports: [
    BrowserModule,
    AppRoutingModule
  ],
  providers: [],
  bootstrap: [AppComponent]
})
export class AppModule { }
這裡:
AppComponent 使用 `imports` 元資料匯入AppRoutingModule 模組。
Angular CLI 還提供在現有應用中設定路由的選項。在現有應用中包含路由的通用命令如下:
ng generate module my-module --routing
這將生成一個啟用了路由功能的新模組。要在現有模組 (AppModule) 中啟用路由功能,我們需要包含如下所示的額外選項:
ng generate module app-routing --module app --flat
這裡:
–module app 將新建立的路由模組AppRoutingModule配置到 AppModule 模組中。
讓我們在ExpenseManager應用中配置路由模組。
開啟命令提示符並轉到專案根資料夾。
cd /go/to/expense-manager
使用以下命令生成路由模組:
ng generate module app-routing --module app --flat
輸出
輸出如下所示:
CREATE src/app/app-routing.module.ts (196 bytes)
UPDATE src/app/app.module.ts (785 bytes)
這裡:
CLI 生成AppRoutingModule,然後將其配置到AppModule中。
建立路由
建立路由簡單易行。建立路由的基本資訊如下:
- 要呼叫的目標元件。
- 訪問目標元件的路徑。
建立簡單路由的程式碼如下:
const routes: Routes = [
  { path: 'about', component: AboutComponent },
];
這裡:
Routes 是 AppRoutingModule 中的變數。
about 是路徑,AboutComponent 是目標/目的地元件。當用戶請求 `https://:4200/about` URL 時,路徑與 `about` 規則匹配,然後將呼叫 AboutComponent。
訪問路由
讓我們學習如何在應用中使用已配置的路由。
訪問路由是一個兩步過程。
在根元件模板中包含router-outlet標籤。
<router-outlet></router-outlet>
在需要的地方使用routerLink和routerLinkActive屬性。
<a routerLink="/about" routerLinkActive="active">First Component</a>
這裡:
routerLink 使用路徑設定要呼叫的路由。
routerLinkActive 設定在啟用路由時要使用的 CSS 類。
有時,我們需要在元件內部而不是模板中訪問路由。然後,我們需要遵循以下步驟:
在相應的元件中注入Router和ActivatedRoute的例項。
import { Router, ActivatedRoute } from '@angular/router';
constructor(private router: Router, private route: ActivatedRoute)
這裡:
Router 提供執行路由操作的功能。
Route 指的是當前啟用的路由。
使用路由器的 `navigate` 函式。
this.router.navigate(['about']);
這裡:
navigate 函式需要一個包含必要路徑資訊的陣列。
使用相對路徑
路由路徑類似於網頁 URL,它也支援相對路徑。要從另一個元件(例如HomePageComponent)訪問AboutComponent,只需像在 Web URL 或資料夾路徑中一樣使用 `..` 符號。
<a routerLink="../about">Relative Route to about component</a>
要在元件中訪問相對路徑:
import { NavigationExtras } from '@angular/router';
this.router.navigate(['about'], { relativeTo: this.route });
這裡:
relativeTo 可在NavigationExtras類中使用。
路由順序
路由順序在路由配置中非常重要。如果多次配置相同的路徑,則將呼叫第一個匹配的路徑。如果由於某種原因第一個匹配失敗,則將呼叫第二個匹配。
重定向路由
Angular 路由允許將一個路徑重定向到另一個路徑。redirectTo 是設定重定向路徑的選項。示例路由如下:
const routes: Routes = [
   { path: '', redirectTo: '/about' },
];
這裡:
- 如果實際路徑與空字串匹配,則redirectTo 將 `about` 設定為重定向路徑。
萬用字元路由
萬用字元路由將匹配任何路徑。它是使用 `**` 建立的,並將用於處理應用中不存在的路徑。將萬用字元路由放在配置的末尾,使其在其他路徑不匹配時被呼叫。
示例程式碼如下:
const routes: Routes = [
  { path: 'about', component: AboutComponent },
  { path: '',   redirectTo: '/about', pathMatch: 'full' },
  { path: '**', component: PageNotFoundComponent },  // Wildcard route for a 404 page
];
這裡:
如果呼叫了不存在的頁面,則前兩個路由將失敗。但是,最終的萬用字元路由將成功,並且將呼叫PageNotFoundComponent。
訪問路由引數
在 Angular 中,我們可以使用引數在路徑中附加額外資訊。可以使用 `paramMap` 介面在元件中訪問引數。在路由中建立新引數的語法如下:
const routes: Routes = [
  { path: 'about', component: AboutComponent },
  { path: 'item/:id', component: ItemComponent },
  { path: '',   redirectTo: '/about', pathMatch: 'full' },
  { path: '**', component: PageNotFoundComponent },  // Wildcard route for a 404 page
];
在這裡,我們在路徑中添加了id。可以使用兩種技術在ItemComponent中訪問id。
- 使用 Observable。
- 使用快照(非 Observable 選項)。
使用 Observable
Angular 提供了一個特殊的介面 `paramMap` 來訪問路徑的引數。`paramMap` 具有以下方法:
has(name) - 如果路徑(引數列表)中存在指定的名稱,則返回 true。
get(name) - 返回路徑(引數列表)中指定名稱的值。
getAll(name) - 返回路徑中指定名稱的多個值。當有多個值可用時,`get()` 方法只返回第一個值。
keys - 返回路徑中所有可用的引數。
使用paramMap訪問引數的步驟如下:
匯入paramMap,它位於@angular/router包中。
在ngOnInit()中使用paramMap訪問引數並將其設定為區域性變數。
ngOnInit() {
    this.route.paramMap.subscribe(params => {
        this.id = params.get('id);
    });
}
我們可以使用pipe方法直接在 rest 服務中使用它。
this.item$ = this.route.paramMap.pipe(
    switchMap(params => {
      this.selectedId = Number(params.get('id'));
      return this.service.getItem(this.selectedId);
    })
);
使用快照
snapshot 與Observable類似,不同之處在於它不支援 Observable 並立即獲取引數值。
let id = this.route.snapshot.paramMap.get('id');
巢狀路由
通常,router-outlet 將放置在應用的根元件(AppComponent)中。但是,可以在任何元件中使用 `router-outlet`。當在根元件以外的元件中使用 `router-outlet` 時,必須將該元件的路由配置為父元件的子路由。這稱為巢狀路由。
讓我們考慮一個元件,例如ItemComponent配置了router-outlet,並具有兩個routerLink,如下所示:
<h2>Item Component</h2>
<nav>
   <ul>
      <li><a routerLink="view">View</a></li>
      <li><a routerLink="edit">Edit</a></li>
   </ul>
</nav>
<router-outlet></router-outlet>
ItemComponent 的路由必須配置為巢狀路由,如下所示:
const routes: Routes = [
{
   path: 'item',

   component: ItemComponent,
   children: [
   {
      path: 'view',
      component: ItemViewComponent
   },
   {
   path: 'edit',
   component: ItemEditComponent
   }
   ]
}]
工作示例
讓我們將本章學習的路由概念應用到我們的ExpenseManager應用中。
開啟命令提示符並轉到專案根資料夾。
cd /go/to/expense-manager
如果之前沒有生成,請使用以下命令生成路由模組。
ng generate module app-routing --module app --flat
輸出
輸出如下:
CREATE src/app/app-routing.module.ts (196 bytes) UPDATE src/app/app.module.ts (785 bytes)
這裡:
CLI 生成AppRoutingModule,然後將其配置到AppModule中。
更新AppRoutingModule (src/app/app.module.ts),如下所示:
import { NgModule } from '@angular/core';
import { Routes, RouterModule } from '@angular/router'; import { ExpenseEntryComponent } from './expense-entry/expense-entry.component';
import { ExpenseEntryListComponent } from './expense-entry-list/expense-entry-list.component';
const routes: Routes = [
   { path: 'expenses', component: ExpenseEntryListComponent },
   { path: 'expenses/detail/:id', component: ExpenseEntryComponent },
   { path: '', redirectTo: 'expenses', pathMatch: 'full' }];
@NgModule({
   imports: [RouterModule.forRoot(routes)],
   exports: [RouterModule] })
export class AppRoutingModule { }
在這裡,我們為支出列表和支出詳情元件添加了路由。
更新AppComponent模板(src/app/app.component.html)以包含router-outlet和routerLink。
<!-- Navigation -->
<nav class="navbar navbar-expand-lg navbar-dark bg-dark static-top">
<div class="container">
   <a class="navbar-brand" href="#">{{ title }}</a> <button class="navbar-toggler" type="button" data-toggle="collapse" data-target="#navbarResponsive" aria-controls="navbarResponsive" aria-expanded="false" aria-label="Toggle navigation">
      <span class="navbar-toggler-icon"></span>
   </button>
   <div class="collapse navbar-collapse" id="navbarResponsive">
      <ul class="navbar-nav ml-auto">
         <li class="nav-item active">
            <a class="nav-link" href="#">Home
               <span class="sr-only" routerLink="/">(current)</span>
            </a>
         </li>
         <li class="nav-item">
            <a class="nav-link" routerLink="/expenses">Report</a>
         </li>
         <li class="nav-item">
            <a class="nav-link" href="#">Add Expense</a>
         </li>
         <li class="nav-item">
            <a class="nav-link" href="#">About</a>
         </li>
      </ul>
   </div>
</div>
</nav>
<router-outlet></router-outlet>
開啟ExpenseEntryListComponent模板(src/app/expense-entry-list/expense-entry-list.component.html)併為每個支出條目包含檢視選項。
<table class="table table-striped">
   <thead>
      <tr>
         <th>Item</th>
         <th>Amount</th>
         <th>Category</th>
         <th>Location</th>
         <th>Spent On</th>
         <th>View</th>
      </tr>
   </thead>
   <tbody>
      <tr *ngFor="let entry of expenseEntries">
         <th scope="row">{{ entry.item }}</th>
         <th>{{ entry.amount }}</th>
         <td>{{ entry.category }}</td>
         <td>{{ entry.location }}</td>
         <td>{{ entry.spendOn | date: 'medium' }}</td>
         <td><a routerLink="../expenses/detail/{{ entry.id }}">View</a></td>
      </tr>
   </tbody>
</table>
在這裡,我們更新了支出列表表格,並添加了一列來顯示檢視選項。
開啟ExpenseEntryComponent (src/app/expense-entry/expense-entry.component.ts)並新增功能以獲取當前選定的支出條目。這可以透過首先透過paramMap獲取 id,然後使用ExpenseEntryService中的getExpenseEntry()方法來完成。
this.expenseEntry$ = this.route.paramMap.pipe(
   switchMap(params => {
      this.selectedId = Number(params.get('id'));
      return
this.restService.getExpenseEntry(this.selectedId); }));
   this.expenseEntry$.subscribe( (data) => this.expenseEntry = data );
更新 ExpenseEntryComponent 並新增轉到支出列表的選項。
goToList() {
   this.router.navigate(['/expenses']);
}
ExpenseEntryComponent 的完整程式碼如下:
import { Component, OnInit } from '@angular/core'; import { ExpenseEntry } from '../expense-entry'; import { ExpenseEntryService } from '../expense-entry.service';
import { Router, ActivatedRoute } from '@angular/router';
import { Observable } from 'rxjs';
import { switchMap } from 'rxjs/operators';
@Component({
   selector: 'app-expense-entry',
   templateUrl: './expense-entry.component.html',
   styleUrls: ['./expense-entry.component.css']
})
export class ExpenseEntryComponent implements OnInit {
   title: string;
   expenseEntry$ : Observable<ExpenseEntry>;
   expenseEntry: ExpenseEntry = {} as ExpenseEntry;
   selectedId: number;
   constructor(private restService : ExpenseEntryService, private router : Router, private route :
ActivatedRoute ) { }
   ngOnInit() {
      this.title = "Expense Entry";
   this.expenseEntry$ = this.route.paramMap.pipe(
      switchMap(params => {
         this.selectedId = Number(params.get('id'));
         return
this.restService.getExpenseEntry(this.selectedId); }));
   this.expenseEntry$.subscribe( (data) => this.expenseEntry = data );
   }
   goToList() {
      this.router.navigate(['/expenses']);
   }
}
開啟ExpenseEntryComponent (src/app/expense-entry/expense-entry.component.html)模板並新增一個新按鈕以導航回支出列表頁面。
<div class="col-sm" style="text-align: right;">
   <button type="button" class="btn btn-primary" (click)="goToList()">Go to List</button>
   <button type="button" class="btn btn-primary">Edit</button>
</div>
在這裡,我們在編輯按鈕之前添加了轉到列表按鈕。
使用以下命令執行應用程式:
ng serve
應用的最終輸出如下所示:

單擊第一個條目的檢視選項將導航到詳細資訊頁面並顯示所選支出條目,如下所示:
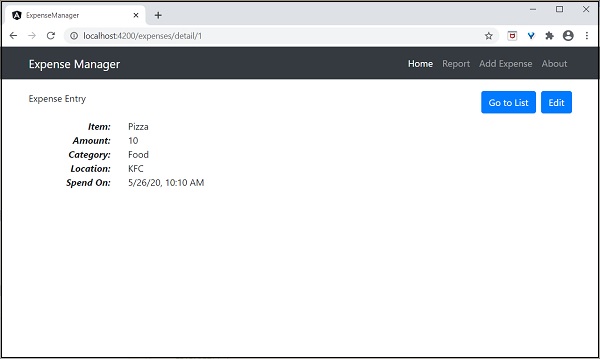
Angular 8 - 動畫
動畫使 Web 應用煥然一新,並提供了豐富的使用者互動。在 HTML 中,動畫基本上是在特定時間段內將 HTML 元素從一種 CSS 樣式轉換為另一種 CSS 樣式。例如,可以更改影像元素的寬度和高度來放大它。
如果在一段時間內(例如 10 秒)分步驟將影像的寬度和高度從初始值更改為最終值,則會產生動畫效果。因此,動畫的範圍取決於 CSS 提供的用於設定 HTML 元素樣式的功能/屬性。
Angular 提供了一個單獨的模組BrowserAnimationModule來執行動畫。BrowserAnimationModule 提供了一種簡單明瞭的方法來執行動畫。
配置動畫模組
讓我們學習如何在本章中配置動畫模組。
按照以下步驟在應用中配置動畫模組BrowserAnimationModule。
在 AppModule 中匯入BrowserAnimationModule。
import { BrowserAnimationsModule } from '@angular/platform-browser/animations';
@NgModule({
   imports: [
      BrowserModule,
      BrowserAnimationsModule
   ],
   declarations: [ ],
   bootstrap: [ ]
})
export class AppModule { }
在相關元件中匯入動畫函式。
import { state, style, transition, animate, trigger } from '@angular/animations'
在相關元件中新增animations元資料屬性。
@Component({
   animations: [
      // animation functionality goes here
   ]
})
export class MyAnimationComponent
概念
在 Angular 中,我們需要理解五個核心概念及其與動畫的關係。
狀態
狀態指的是元件的特定狀態。一個元件可以有多個定義的狀態。狀態是使用 `state()` 方法建立的。`state()` 方法有兩個引數。
name - 狀態的唯一名稱。
style - 使用 `style()` 方法定義的狀態樣式。
animations: [
   ...
   state('start', style( { width: 200px; } ))
   ...
]
這裡,start 是狀態的名稱。
樣式
樣式指的是在特定狀態下應用的CSS樣式。style() 方法用於設定元件特定狀態的樣式。它使用CSS屬性,可以包含多個專案。
animations: [
   ...
   state('start', style( { width: 200px; opacity: 1 } ))
   ...
]
這裡,start 狀態定義了兩個CSS屬性,width 值為 200px,opacity 值為 1。
過渡
過渡指的是從一個狀態到另一個狀態的轉變。動畫可以有多個過渡。每個過渡都使用 transition() 函式定義。transition() 函式接受兩個引數。
指定兩個過渡狀態之間的方向。例如,start => end 表示初始狀態為start,最終狀態為end。實際上,這是一個功能豐富的表示式。
使用animate() 函式指定動畫細節。
animations: [
   ...
   transition('start => end', [
      animate('1s')
   ])
   ...
]
這裡,transition() 函式定義了從 start 狀態到 end 狀態的過渡,動畫細節在 animate() 方法中定義。
動畫
動畫定義了從一個狀態到另一個狀態的過渡方式。animation() 函式用於設定動畫細節。animate() 接受一個如下所示的表示式作為引數:
duration delay easing
duration – 指的是過渡的持續時間。表示方式為 1s、100ms 等。
delay – 指的是過渡開始之前的延遲時間。表示方式與duration類似。
easing – 指的是在給定的持續時間內如何加速/減速過渡。
觸發器
每個動畫都需要一個觸發器來啟動。trigger() 方法用於在一個地方設定所有動畫資訊,例如狀態、樣式、過渡和動畫,併為其賦予一個唯一的名稱。此唯一名稱隨後用於觸發動畫。
animations: [
   trigger('enlarge', [
      state('start', style({
         height: '200px',
      })),
      state('end', style({
         height: '500px',
      })),
      transition('start => end', [
         animate('1s')
      ]),
      transition('end => start', [
         animate('0.5s')
   ]) ]),
]
這裡,enlarge 是賦予特定動畫的唯一名稱。它有兩個狀態和相關的樣式。它有兩個過渡,一個是從 start 到 end,另一個是從 end 到 start。end 到 start 狀態執行動畫的反向操作。
觸發器可以附加到元素上,如下所示:
<div [@triggerName]="expression">...</div>;
例如:
<img [@enlarge]="isEnlarge ? 'end' : 'start'">...</img>;
這裡:
@enlarge – 觸發器設定為 image 標籤並附加到一個表示式。
如果isEnlarge 值更改為 true,則將設定end 狀態,並觸發start => end 過渡。
如果isEnlarge 值更改為 false,則將設定start 狀態,並觸發end => start 過渡。
簡單的動畫示例
讓我們編寫一個新的 Angular 應用,透過放大帶有動畫效果的影像來更好地理解動畫概念。
開啟命令提示符並建立一個新的 Angular 應用。
cd /go/to/workspace
ng new animation-app
cd animation-app
在AppModule (src/app/app.module.ts) 中配置BrowserAnimationModule。
import { BrowserModule } from '@angular/platform-browser';
import { NgModule } from '@angular/core'
import { BrowserAnimationsModule } from '@angular/platform-browser/animations';
import { AppComponent } from './app.component'; @NgModule({
   declarations: [
      AppComponent
   ],
   imports: [
      BrowserModule,
      BrowserAnimationsModule
   ],
   providers: [],
   bootstrap: [AppComponent]
})
export class AppModule { }
開啟AppComponent (src/app/app.component.ts) 並匯入必要的動畫函式。
import { state, style, transition, animate, trigger } from '@angular/animations';
新增動畫功能,這將在影像放大/縮小期間為影像新增動畫。
@Component({
   selector: 'app-root',
   templateUrl: './app.component.html',
   styleUrls: ['./app.component.css'],
   animations: [
      trigger('enlarge', [
         state('start', style({
            height: '150px'
         })),
         state('end', style({
            height: '250px'
         })),
         transition('start => end', [
            animate('1s 2s')
         ]),
         transition('end => start', [
            animate('1s 2s')
         ])
      ])
   ]
})
開啟AppComponent 模板src/app/app.component.html 並刪除示例程式碼。然後,包含一個帶有應用程式標題、影像和一個放大/縮小影像按鈕的標題。
<h1>{{ title }}</h1>
<img src="assets/puppy.jpeg" style="height: 200px" /> <br />
<button>{{ this.buttonText }}</button>
編寫一個函式來更改動畫表達式。
export class AppComponent {
   title = 'Animation Application';
   isEnlarge: boolean = false;
   buttonText: string = "Enlarge";
   triggerAnimation() {
      this.isEnlarge = !this.isEnlarge;
      if(this.isEnlarge)
         this.buttonText = "Shrink";
      else
         this.buttonText = "Enlarge";
   }
}
將動畫附加到 image 標籤。此外,還為按鈕附加點選事件。
<h1>{{ title }}</h1>
<img [@enlarge]="isEnlarge ? 'end' : 'start'" src="assets/puppy.jpeg" style="height: 200px" />
<br />
<button (click)='triggerAnimation()'>{{ this.buttonText }}</button>
完整的AppComponent 程式碼如下:
import { Component } from '@angular/core';
import { state, style, transition, animate, trigger } from '@angular/animations';

@Component({
   selector: 'app-root',
   templateUrl: './app.component.html',
   styleUrls: ['./app.component.css'],
   animations: [
      trigger('enlarge', [
         state('start', style({
            height: '150px'
         })),
         state('end', style({
            height: '250px'
         })),
         transition('start => end', [
            animate('1s 2s')
         ]),
         transition('end => start', [
            animate('1s 2s')
         ])
      ])
   ]
})
export class AppComponent {
   title = 'Animation Application';
   isEnlarge: boolean = false;
   buttonText: string = "Enlarge";


   triggerAnimation() {
      this.isEnlarge = !this.isEnlarge;

      if(this.isEnlarge)
         this.buttonText = "Shrink";
      else
         this.buttonText = "Enlarge";
   }
}
完整的 AppComponent 模板程式碼如下:
<h1>{{ title }}</h1>
<img [@enlarge]="isEnlarge ? 'end' : 'start'" src="assets/puppy.jpeg" style="height: 200px" />
<br />
<button (click)='triggerAnimation()'>{{ this.buttonText }}</button>
使用以下命令執行應用程式:
ng serve
點選放大按鈕,它將以動畫效果放大影像。結果將如下所示:
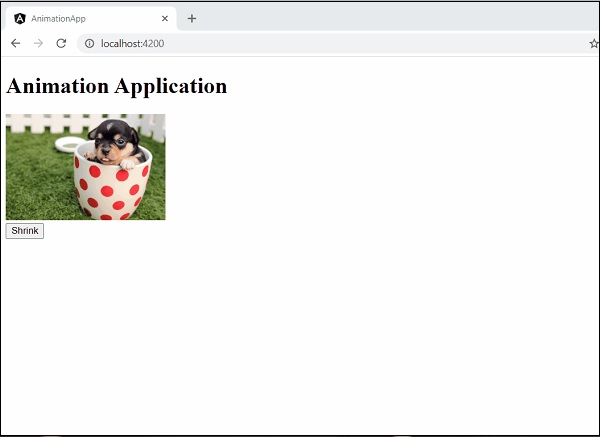
再次點選按鈕將其縮小。結果將如下所示:
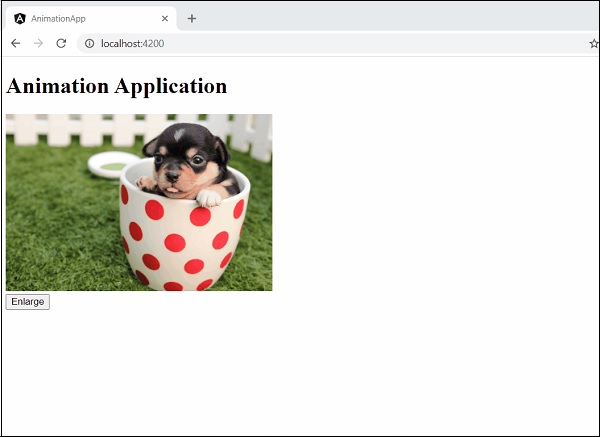
Angular 8 - 表單
表單用於處理使用者輸入資料。Angular 8 支援兩種型別的表單。它們是模板驅動表單和響應式表單。本節詳細解釋了 Angular 8 表單。
模板驅動表單
模板驅動表單是使用模板中的指令建立的。它主要用於建立簡單的表單應用程式。讓我們簡要了解如何建立模板驅動表單。
配置表單
在瞭解表單之前,讓我們學習如何在應用程式中配置表單。要啟用模板驅動表單,首先需要在app.module.ts中匯入FormsModule。如下所示:
import { BrowserModule } from '@angular/platform-browser';
import { NgModule } from '@angular/core';
import { AppRoutingModule } from './app-routing.module';
import { AppComponent } from './app.component';

//import FormsModule here
import { FormsModule } from '@angular/forms';

imports: [
   BrowserModule,
   AppRoutingModule,
   FormsModule   //Assign FormsModule
],
一旦匯入了FormsModule,應用程式就準備好進行表單程式設計了。
建立簡單的表單
讓我們在 Angular 8 中建立一個示例應用程式(template-form-app) 來學習模板驅動表單。
開啟命令提示符並使用以下命令建立新的 Angular 應用程式:
cd /go/to/workspace
ng new template-form-app
cd template-form-app
在AppComponent中配置FormsModule,如下所示:
...

import { FormsModule } from '@angular/forms';

@NgModule({
   declarations: [
      AppComponent,
      TestComponent
   ],
   imports: [
      BrowserModule,
      FormsModule
   ],
   providers: [],
   bootstrap: [AppComponent]
})
export class AppModule { }
使用 Angular CLI 建立測試元件,如下所示:
ng generate component test
上述操作建立了一個新元件,輸出如下:
CREATE src/app/test/test.component.scss (0 bytes)
CREATE src/app/test/test.component.html (19 bytes)
CREATE src/app/test/test.component.spec.ts (614 bytes)
CREATE src/app/test/test.component.ts (262 bytes)
UPDATE src/app/app.module.ts (545 bytes)
讓我們建立一個簡單的表單來顯示使用者輸入的文字。
在test.component.html檔案中新增以下程式碼:
<form #userName="ngForm" (ngSubmit)="onClickSubmit(userName.value)">
   <input type="text" name="username" placeholder="username" ngModel>
   <br/>
   <br/>
   <input type="submit" value="submit">
</form>
這裡,我們在input文字欄位中使用了ngModel屬性。
在test.component.ts檔案中建立onClickSubmit()方法,如下所示
import { Component, OnInit } from '@angular/core';

@Component({
   selector: 'app-test',
   templateUrl: './test.component.html',
   styleUrls: ['./test.component.scss']
})

export class TestComponent implements OnInit {

   ngOnInit() {
   }
   onClickSubmit(result) {
      console.log("You have entered : " + result.username);
   }
}
開啟 app.component.html 並更改內容,如下所示:
<app-test></app-test>
最後,使用以下命令啟動應用程式(如果尚未啟動):
ng serve
現在,執行您的應用程式,您將看到以下響應:
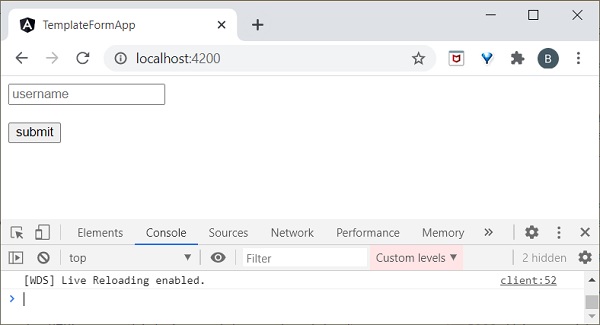
在輸入文字欄位中輸入Peter 並提交。onClickSubmit 函式將被呼叫,使用者輸入的文字Peter 將作為引數傳送。onClickSubmit 將在控制檯中列印使用者名稱,輸出如下:
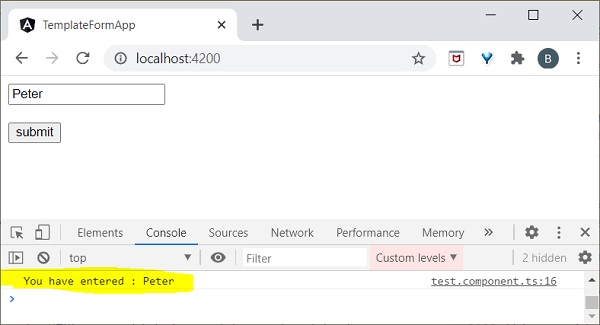
響應式表單
響應式表單是在元件類中建立的,因此也稱為模型驅動表單。每個表單控制元件都將在元件中擁有一個物件,這在表單程式設計中提供了更大的控制和靈活性。響應式表單基於結構化資料模型。讓我們瞭解如何在 Angular 中使用響應式表單。
配置響應式表單
要啟用響應式表單,首先需要在app.module.ts中匯入ReactiveFormsModule。定義如下:
import { BrowserModule } from '@angular/platform-browser';
import { NgModule } from '@angular/core';

import { AppRoutingModule } from './app-routing.module';
import { AppComponent } from './app.component';
import { TestComponent } from './test/test.component';
import { FormsModule } from '@angular/forms';

//import ReactiveFormsModule here
import { ReactiveFormsModule } from '@angular/forms';

  imports: [
    BrowserModule,
    AppRoutingModule,
    FormsModule,
    ReactiveFormsModule   //Assign here
  ]
建立響應式表單
在建立響應式表單之前,我們需要了解以下概念:
FormControl – 定義單個表單控制元件的基本功能
FormGroup – 用於聚合集合表單控制元件的值
FormArray – 用於將表單控制元件的值聚合到陣列中
ControlValueAccessor – 充當表單 API 與 HTML DOM 元素之間的介面。
讓我們在 Angular 8 中建立一個示例應用程式(reactive-form-app) 來學習模板驅動表單。
開啟命令提示符並使用以下命令建立新的 Angular 應用程式:
cd /go/to/workspace
ng new reactive-form-app
cd reactive-form-app
在AppComponent中配置ReactiveFormsModule,如下所示:
...
import { ReactiveFormsModule } from '@angular/forms';

@NgModule({
   declarations: [
      AppComponent,
      TestComponent
   ],
   imports: [
      BrowserModule,
      ReactiveFormsModule
   ],
   providers: [],
   bootstrap: [AppComponent]
})
export class AppModule { }
使用 Angular CLI 建立一個test元件,如下所示:
ng generate component test
上述操作建立了一個新元件,輸出如下:
CREATE src/app/test/test.component.scss (0 bytes)
CREATE src/app/test/test.component.html (19 bytes)
CREATE src/app/test/test.component.spec.ts (614 bytes)
CREATE src/app/test/test.component.ts (262 bytes)
UPDATE src/app/app.module.ts (545 bytes)
讓我們建立一個簡單的表單來顯示使用者輸入的文字。
我們需要在TestComponent中匯入FormGroup、FormControl類。
import { FormGroup, FormControl } from '@angular/forms';
在test.component.ts檔案中建立onClickSubmit()方法,如下所示:
import { Component, OnInit } from '@angular/core';
import { FormGroup, FormControl } from '@angular/forms';

@Component({
   selector: 'app-test',
   templateUrl: './test.component.html',
   styleUrls: ['./test.component.css']
})
export class TestComponent implements OnInit {
   userName;
   formdata;
   ngOnInit() {
      this.formdata = new FormGroup({
         userName: new FormControl("Tutorialspoint")
      });
   }
   onClickSubmit(data) {this.userName = data.userName;}
}
這裡:
建立了formGroup的例項並將其設定為區域性變數 formdata。
建立了FormControl的例項並將其設定為 formdata 中的一個條目。
建立了一個onClickSubmit()方法,該方法使用其引數設定區域性變數userName。
在test.component.html檔案中新增以下程式碼。
<div>
   <form [formGroup]="formdata" (ngSubmit)="onClickSubmit(formdata.value)" >
      <input type= text"  name="userName" placeholder="userName"
         formControlName = "userName">
      <br/>
      <br/>
      <input type="submit"  value="Click here">
   </form>
</div>
<p> Textbox result is: {{userName}} </p>
這裡:
建立了一個新表單並將其formGroup屬性設定為 formdata。
建立了一個新的輸入文字欄位,並將其formControlName設定為 username。
ngSubmit事件屬性用於表單,並將其值設定為 onClickSubmit() 方法。
onClickSubmit()方法獲取 formdata 值作為其引數。
開啟app.component.html 並更改內容,如下所示:
<app-test></app-test>
最後,使用以下命令啟動應用程式(如果尚未啟動):
ng serve
現在,執行您的應用程式,您將看到以下響應:
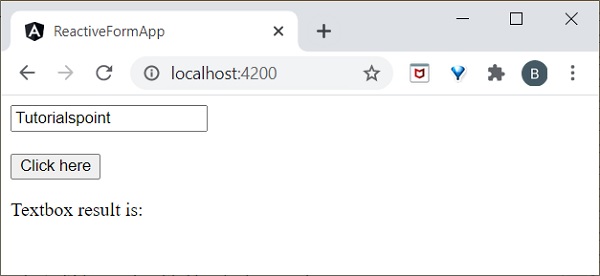
在輸入文字欄位中輸入Tutorialspoint 並提交。onClickSubmit 函式將被呼叫,使用者輸入的文字Peter 將作為引數傳送。
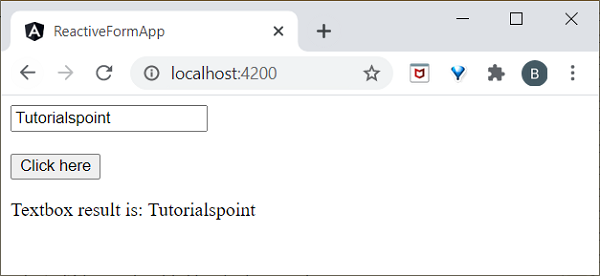
我們將在下一章中執行表單驗證。
Angular 8 - 表單驗證
表單驗證是 Web 應用程式的重要組成部分。它用於驗證使用者輸入是否正確。
RequiredValidator
讓我們在 Angular 中執行簡單的必填欄位驗證。
開啟命令提示符並轉到reactive-form-app。
cd /go/to/reactive-form-app
在test.component.ts檔案中替換以下程式碼。
import { Component, OnInit } from '@angular/core';

//import validator and FormBuilder
import { FormGroup, FormControl, Validators, FormBuilder } from '@angular/forms';

@Component({
   selector: 'app-test',
   templateUrl: './test.component.html',
   styleUrls: ['./test.component.css']
})

export class TestComponent implements OnInit {
   //Create FormGroup
   requiredForm: FormGroup;
   constructor(private fb: FormBuilder) {
      this.myForm();
   }

   //Create required field validator for name
   myForm() {
      this.requiredForm = this.fb.group({
      name: ['', Validators.required ]
      });
   }
   ngOnInit()
   {

   }
}
這裡:
我們使用表單構建器來處理所有驗證。建構函式用於建立帶有驗證規則的表單。
在test.component.html檔案中新增以下程式碼。
<div>
   <h2>
     Required Field validation
   </h2>
   <form [formGroup]="requiredForm" novalidate>
         <div class="form-group">
           <label class="center-block">Name:
             <input class="form-control" formControlName="name">
           </label>
         </div>
         <div *ngIf="requiredForm.controls['name'].invalid && requiredForm.controls['name'].touched" class="alert alert-danger">
             <div *ngIf="requiredForm.controls['name'].errors.required">
             Name is required.
           </div>
         </div>
   </form>
 <p>Form value: {{ requiredForm.value | json }}</p>
 <p>Form status: {{ requiredForm.status | json }}</p>
 </div>
這裡:
requiredForm 被稱為全域性表單組物件。它是一個父元素。表單控制元件是 requiredForm 的子元素。
條件語句用於檢查,如果使用者觸碰了輸入欄位但沒有輸入值,則顯示錯誤訊息。
最後,使用以下命令啟動應用程式(如果尚未啟動):
ng serve
現在執行您的應用程式並將焦點放在文字框上。然後,它將顯示“Name is required”,如下所示:
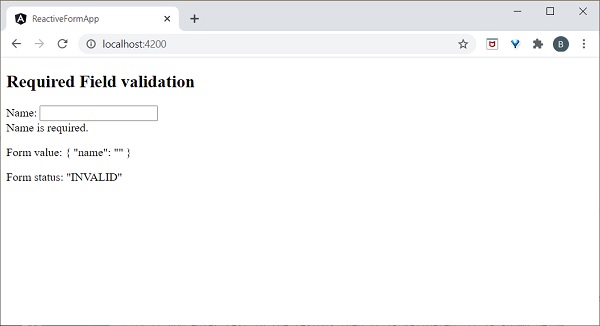
如果您在文字框中輸入文字,則它將被驗證,並顯示以下輸出:
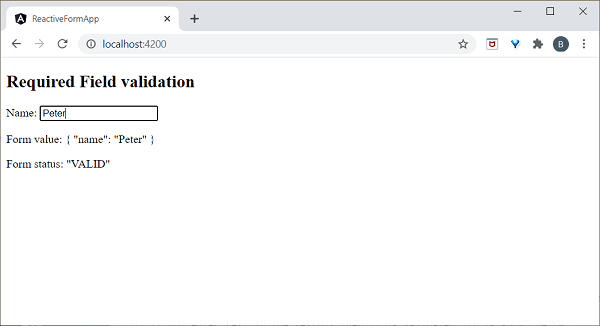
PatternValidator
PatternValidator 用於驗證正則表示式模式。讓我們執行簡單的電子郵件驗證。
開啟命令提示符並轉到reactive-form-app。
cd /go/to/reactive-form-app
在 test.component.ts 檔案中替換以下程式碼:
import { Component, OnInit } from '@angular/core';
import { FormGroup, FormControl, Validators, FormBuilder } from
'@angular/forms';
@Component({
selector: 'app-test',
templateUrl: './test.component.html',
styleUrls: ['./test.component.css']
})
export class TestComponent implements OnInit {
requiredForm: FormGroup;
constructor(private fb: FormBuilder) {
this.myForm();
}
myForm() {
this.requiredForm = this.fb.group({
email: ['', [Validators.required,
Validators.pattern("^[a-z0-9._%+-]+@[a-z0-9.-]+\.[a-z]{2,4}$")] ]
});
}
ngOnInit()
{
}
}
這裡:
在 Validator 中添加了電子郵件模式驗證器。
在 test.component.html 檔案中更新以下程式碼:
<div>
<h2>
Pattern validation
</h2>
<form [formGroup]="requiredForm" novalidate>
<div class="form-group">
<label class="center-block">Email:
<input class="form-control" formControlName="email">
</label>
</div>
<div *ngIf="requiredForm.controls['email'].invalid && requiredForm.controls['email'].touched" class="alert alert-danger">
<div *ngIf="requiredForm.controls['email'].errors.required">
Email is required.
</div>
</div>
</form>
<p>Form value: {{ requiredForm.value | json }}</p>
<p>Form status: {{ requiredForm.status | json }}</p>
</div>
在這裡,我們建立了電子郵件控制元件並呼叫了電子郵件驗證器。
執行您的應用程式,您將看到以下結果:
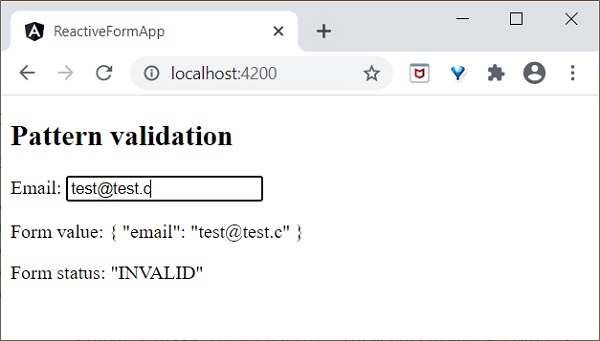
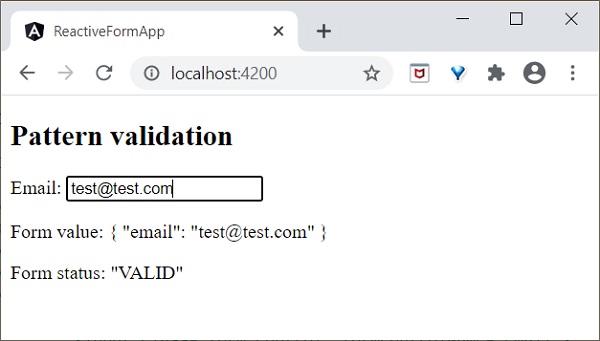
同樣,您可以自己嘗試執行其他型別的驗證器。
Angular 8 - 身份驗證和授權
身份驗證是將 Web 應用程式的訪問者與系統中預定義的使用者身份集進行匹配的過程。換句話說,它是識別使用者身份的過程。在安全性方面,身份驗證對於系統來說是一個非常重要的過程。
授權是授予使用者訪問系統中某些資源的許可權的過程。只有經過身份驗證的使用者才能被授權訪問資源。
讓我們在本節學習如何在 Angular 應用程式中進行身份驗證和授權。
路由中的守衛
在 Web 應用程式中,資源由 URL 引用。系統中的每個使用者都將被允許訪問一組 URL。例如,管理員可能會被分配所有屬於管理部分的 URL。
眾所周知,URL 由路由處理。Angular 路由允許根據程式設計邏輯保護和限制 URL。因此,普通使用者可能會被拒絕訪問某個 URL,而管理員則可以訪問。
Angular 提供了一個名為路由守衛的概念,可用於透過路由阻止對應用程式某些部分的未授權訪問。Angular 提供多個守衛,它們如下所示:
CanActivate – 用於阻止訪問路由。
CanActivateChild – 用於阻止訪問子路由。
CanDeactivate – 用於阻止正在進行的過程中從使用者那裡獲得反饋。例如,如果使用者回覆否定,則可以停止刪除過程。
Resolve – 用於在導航到路由之前預取資料。
CanLoad – 用於載入資產。
工作示例
讓我們嘗試向我們的應用程式新增登入功能,並使用 CanActivate 守衛對其進行保護。
開啟命令提示符並轉到專案根資料夾。
cd /go/to/expense-manager
啟動應用程式。
ng serve
建立一個新的服務 AuthService 來驗證使用者。
ng generate service auth CREATE src/app/auth.service.spec.ts (323 bytes) CREATE src/app/auth.service.ts (133 bytes)
開啟AuthService幷包含以下程式碼。
import { Injectable } from '@angular/core';
import { Observable, of } from 'rxjs';
import { tap, delay } from 'rxjs/operators';
@Injectable({
providedIn: 'root'
})
export class AuthService {
isUserLoggedIn: boolean = false;
login(userName: string, password: string): Observable {
console.log(userName);
console.log(password);
this.isUserLoggedIn = userName == 'admin' && password == 'admin';
localStorage.setItem('isUserLoggedIn', this.isUserLoggedIn ? "true" : "false");
return of(this.isUserLoggedIn).pipe(
delay(1000),
tap(val => {
console.log("Is User Authentication is successful: " + val);
})
);
}
logout(): void {
this.isUserLoggedIn = false;
localStorage.removeItem('isUserLoggedIn');
}
constructor() { }
}
這裡:
我們編寫了兩個方法,login 和logout。
login 方法的目的是驗證使用者,如果使用者成功驗證,它會將資訊儲存在localStorage中,然後返回 true。
身份驗證驗證是使用者名稱和密碼應該是admin。
我們沒有使用任何後端。相反,我們使用 Observables 模擬了 1 秒的延遲。
logout 方法的目的是使使用者無效並刪除儲存在 localStorage 中的資訊。
使用以下命令建立一個 login 元件:
ng generate component login CREATE src/app/login/login.component.html (20 bytes) CREATE src/app/login/login.component.spec.ts (621 bytes) CREATE src/app/login/login.component.ts (265 bytes) CREATE src/app/login/login.component.css (0 bytes) UPDATE src/app/app.module.ts (1207 bytes)
開啟 LoginComponent 幷包含以下程式碼:
import { Component, OnInit } from '@angular/core';
import { FormGroup, FormControl } from '@angular/forms';
import { AuthService } from '../auth.service';
import { Router } from '@angular/router';
@Component({
selector: 'app-login',
templateUrl: './login.component.html',
styleUrls: ['./login.component.css']
})
export class LoginComponent implements OnInit {
userName: string;
password: string;
formData: FormGroup;
constructor(private authService : AuthService, private router : Router) { }
ngOnInit() {
this.formData = new FormGroup({
userName: new FormControl("admin"),
password: new FormControl("admin"),
});
}
onClickSubmit(data: any) {
this.userName = data.userName;
this.password = data.password;
console.log("Login page: " + this.userName);
console.log("Login page: " + this.password);
this.authService.login(this.userName, this.password)
.subscribe( data => {
console.log("Is Login Success: " + data);
if(data) this.router.navigate(['/expenses']);
});
}
}
這裡:
使用了響應式表單。
匯入了 AuthService 和 Router,並在建構函式中進行了配置。
建立了一個 FormGroup 例項,幷包含了兩個 FormControl 例項,一個用於使用者名稱,另一個用於密碼。
建立了一個 onClickSubmit 方法,用於使用 authService 驗證使用者,如果成功,則導航到支出列表。
開啟 LoginComponent 模板幷包含以下模板程式碼。
<!-- Page Content -->
<div class="container">
<div class="row">
<div class="col-lg-12 text-center" style="padding-top: 20px;">
<div class="container box" style="margin-top: 10px; padding-left: 0px; padding-right: 0px;">
<div class="row">
<div class="col-12" style="text-align: center;">
<form [formGroup]="formData" (ngSubmit)="onClickSubmit(formData.value)"
class="form-signin">
<h2 class="form-signin-heading">Please sign in</h2>
<label for="inputEmail" class="sr-only">Email address</label>
<input type="text" id="username" class="form-control"
formControlName="userName" placeholder="Username" required autofocus>
<label for="inputPassword" class="sr-only">Password</label>
<input type="password" id="inputPassword" class="form-control"
formControlName="password" placeholder="Password" required>
<button class="btn btn-lg btn-primary btn-block" type="submit">Sign in</button>
</form>
</div>
</div>
</div>
</div>
</div>
</div>
這裡:
建立了一個響應式表單並設計了一個登入表單。
將 onClickSubmit 方法附加到表單提交操作。
開啟 LoginComponent 樣式幷包含以下 CSS 程式碼。
.form-signin {
max-width: 330px;
padding: 15px;
margin: 0 auto;
}
input {
margin-bottom: 20px;
}
這裡,添加了一些樣式來設計登入表單。
使用以下命令建立一個登出元件:
ng generate component logout CREATE src/app/logout/logout.component.html (21 bytes) CREATE src/app/logout/logout.component.spec.ts (628 bytes) CREATE src/app/logout/logout.component.ts (269 bytes) CREATE src/app/logout/logout.component.css (0 bytes) UPDATE src/app/app.module.ts (1368 bytes)
開啟 LogoutComponent 幷包含以下程式碼。
import { Component, OnInit } from '@angular/core';
import { AuthService } from '../auth.service';
import { Router } from '@angular/router';
@Component({
selector: 'app-logout',
templateUrl: './logout.component.html',
styleUrls: ['./logout.component.css']
})
export class LogoutComponent implements OnInit {
constructor(private authService : AuthService, private router: Router) { }
ngOnInit() {
this.authService.logout();
this.router.navigate(['/']);
}
}
這裡:
- 使用了 AuthService 的 logout 方法。
- 使用者登出後,頁面將重定向到主頁 (/)。
使用以下命令建立一個守衛:
ng generate guard expense CREATE src/app/expense.guard.spec.ts (364 bytes) CREATE src/app/expense.guard.ts (459 bytes)
開啟 ExpenseGuard 幷包含以下程式碼:
import { Injectable } from '@angular/core';
import { CanActivate, ActivatedRouteSnapshot, RouterStateSnapshot, Router, UrlTree } from '@angular/router';
import { Observable } from 'rxjs';
import { AuthService } from './auth.service';
@Injectable({
providedIn: 'root'
})
export class ExpenseGuard implements CanActivate {
constructor(private authService: AuthService, private router: Router) {}
canActivate(
next: ActivatedRouteSnapshot,
state: RouterStateSnapshot): boolean | UrlTree {
let url: string = state.url;
return this.checkLogin(url);
}
checkLogin(url: string): true | UrlTree {
console.log("Url: " + url)
let val: string = localStorage.getItem('isUserLoggedIn');
if(val != null && val == "true"){
if(url == "/login")
this.router.parseUrl('/expenses');
else
return true;
} else {
return this.router.parseUrl('/login');
}
}
}
這裡:
- checkLogin 將檢查 localStorage 是否包含使用者資訊,如果可用,則返回 true。
- 如果使用者已登入並轉到登入頁面,它將把使用者重定向到支出頁面。
- 如果使用者未登入,則使用者將被重定向到登入頁面。
開啟 AppRoutingModule (src/app/app-routing.module.ts) 並更新以下程式碼:
import { NgModule } from '@angular/core';
import { Routes, RouterModule } from '@angular/router';
import { ExpenseEntryComponent } from './expense-entry/expense-entry.component';
import { ExpenseEntryListComponent } from './expense-entry-list/expense-entry-list.component';
import { LoginComponent } from './login/login.component';
import { LogoutComponent } from './logout/logout.component';
import { ExpenseGuard } from './expense.guard';
const routes: Routes = [
{ path: 'login', component: LoginComponent },
{ path: 'logout', component: LogoutComponent },
{ path: 'expenses', component: ExpenseEntryListComponent, canActivate: [ExpenseGuard]},
{ path: 'expenses/detail/:id', component: ExpenseEntryComponent, canActivate: [ExpenseGuard]},
{ path: '', redirectTo: 'expenses', pathMatch: 'full' }
];
@NgModule({
imports: [RouterModule.forRoot(routes)],
exports: [RouterModule]
})
export class AppRoutingModule { }
這裡:
- 匯入了 LoginComponent 和 LogoutComponent。
- 匯入了 ExpenseGuard。
- 建立了兩個新路由,login 和 logout,分別用於訪問 LoginComponent 和 LogoutComponent。
- 為 ExpenseEntryComponent 和 ExpenseEntryListComponent 新增新的 canActivate 選項。
開啟 AppComponent 模板並新增兩個登入和登出連結。
<div class="collapse navbar-collapse" id="navbarResponsive">
<ul class="navbar-nav ml-auto">
<li class="nav-item active">
<a class="nav-link" href="#">Home
<span class="sr-only" routerLink="/">(current)</span>
</a>
</li>
<li class="nav-item">
<a class="nav-link" routerLink="/expenses">Report</a>
</li>
<li class="nav-item">
<a class="nav-link" href="#">Add Expense</a>
</li>
<li class="nav-item">
<a class="nav-link" href="#">About</a>
</li>
<li class="nav-item">
<div *ngIf="isUserLoggedIn; else isLogOut">
<a class="nav-link" routerLink="/logout">Logout</a>
</div>
<ng-template #isLogOut>
<a class="nav-link" routerLink="/login">Login</a>
</ng-template>
</li>
</ul>
</div>
開啟 AppComponent 並更新以下程式碼:
import { Component } from '@angular/core';
import { AuthService } from './auth.service';
@Component({
selector: 'app-root',
templateUrl: './app.component.html',
styleUrls: ['./app.component.css']
})
export class AppComponent {
title = 'Expense Manager';
isUserLoggedIn = false;
constructor(private authService: AuthService) {}
ngOnInit() {
let storeData = localStorage.getItem("isUserLoggedIn");
console.log("StoreData: " + storeData);
if( storeData != null && storeData == "true")
this.isUserLoggedIn = true;
else
this.isUserLoggedIn = false;
}
}
在這裡,我們添加了識別使用者狀態的邏輯,以便我們可以顯示登入/登出功能。
開啟 AppModule (src/app/app.module.ts) 並配置 ReactiveFormsModule
import { ReactiveFormsModule } from '@angular/forms';
imports: [
ReactiveFormsModule
]
現在,執行應用程式,應用程式將開啟登入頁面。
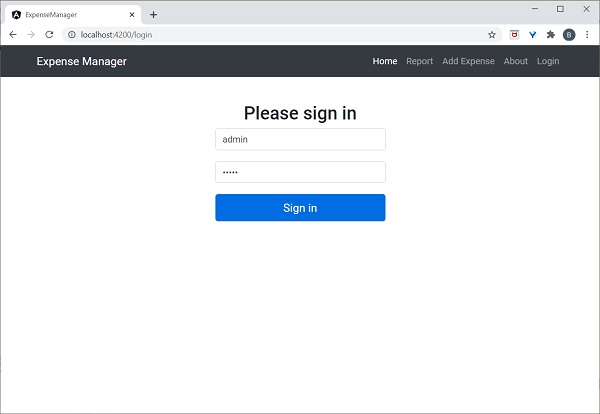
輸入 admin 和 admin 作為使用者名稱和密碼,然後單擊提交。應用程式處理登入並如以下所示將使用者重定向到支出列表頁面:
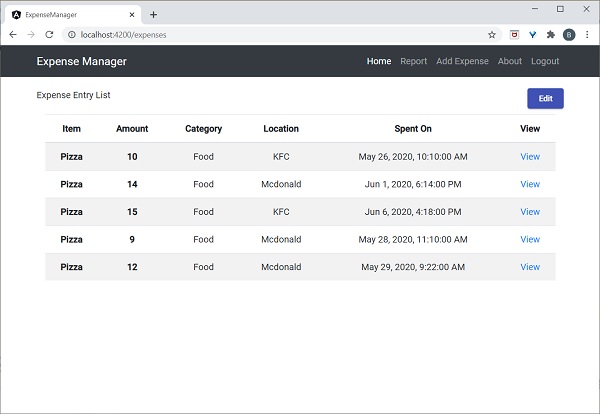
最後,您可以單擊登出並退出應用程式。
Angular 8 - Web Workers
Web Workers 使 JavaScript 應用程式能夠在後臺執行 CPU 密集型任務,以便應用程式主執行緒專注於 UI 的平滑執行。Angular 支援在應用程式中包含 Web Workers。讓我們編寫一個簡單的 Angular 應用程式並嘗試使用 Web Workers。
使用以下命令建立一個新的 Angular 應用程式:
cd /go/to/workspace ng new web-worker-sample
使用以下命令執行應用程式:
cd web-worker-sample npm run start
使用以下命令新增新的 Web Worker:
ng generate web-worker app
上述命令的輸出如下:
CREATE tsconfig.worker.json (212 bytes) CREATE src/app/app.worker.ts (157 bytes) UPDATE tsconfig.app.json (296 bytes) UPDATE angular.json (3776 bytes) UPDATE src/app/app.component.ts (605 bytes)
這裡:
- app 指的是要建立的 Web Worker 的位置。
- Angular CLI 將生成兩個新檔案,tsconfig.worker.json 和 src/app/app.worker.ts,並更新三個檔案,tsconfig.app.json、angular.json 和 src/app/app.component.ts 檔案。
讓我們檢查一下更改:
// tsconfig.worker.json
{
"extends": "./tsconfig.json",
"compilerOptions": {
"outDir": "./out-tsc/worker",
"lib": [
"es2018",
"webworker"
],
"types": []
},
"include": [
"src/**/*.worker.ts"
]
}
這裡:
tsconfig.worker.json 擴充套件了 tsconfig.json 幷包含編譯 Web Workers 的選項。
// tsconfig.app.json [only a snippet] "exclude": [ "src/test.ts", "src/**/*.spec.ts", "src/**/*.worker.ts" ]
這裡:
基本上,它排除了所有要編譯的 worker,因為它有單獨的配置。
// angular.json (only a snippet) "webWorkerTsConfig": "tsconfig.worker.json"
這裡:
angular.json 包含 Web Worker 配置檔案 tsconfig.worker.json。
// src/app/app.worker.ts
addEventListener('message', ({ data }) => {
const response = `worker response to ${data}`;
postMessage(response);
});
這裡:
建立了一個 Web Worker。Web Worker 基本上是一個函式,當觸發 message 事件時將呼叫該函式。Web Worker 將接收呼叫者傳送的資料,對其進行處理,然後將響應傳送回撥用者。
// src/app/app.component.ts [only a snippet]
if (typeof Worker !== 'undefined') {
// Create a new
const worker = new Worker('./app.worker', { type: 'module' });
worker.onmessage = ({ data }) => {
console.log(`page got message: ${data}`);
};
worker.postMessage('hello');
} else {
// Web Workers are not supported in this environment.
// You should add a fallback so that your program still executes correctly.
}
這裡:
- AppComponent 建立一個新的 worker 例項,建立一個回撥函式來接收響應,然後向 worker 傳送訊息。
重新啟動應用程式。由於 angular.json 檔案已更改,而 Angular 執行程式未監視該檔案,因此必須重新啟動應用程式。否則,Angular 將無法識別新的 Web Worker 並且不會編譯它。
讓我們建立一個 Typescript 類 src/app/app.prime.ts 來查詢第 n 個素數。
export class PrimeCalculator
{
static isPrimeNumber(num : number) : boolean {
if(num == 1) return true;
let idx : number = 2;
for(idx = 2; idx < num / 2; idx++)
{
if(num % idx == 0)
return false;
}
return true;
}
static findNthPrimeNumber(num : number) : number {
let idx : number = 1;
let count = 0;
while(count < num) {
if(this.isPrimeNumber(idx))
count++;
idx++;
console.log(idx);
}
return idx - 1;
}
}
這裡:
- isPrimeNumber 檢查給定數字是否為素數。
- findNthPrimeNumber 查詢第 n 個素數。
將新建立的素數類匯入到 src/app/app.worker.ts 中,並將 Web Worker 的邏輯更改為查詢第 n 個素數。
/// <reference lib="webworker" />
import { PrimeCalculator } from './app.prime';
addEventListener('message', ({ data }) => {
// const response = `worker response to ${data}`;
const response = PrimeCalculator.findNthPrimeNumber(parseInt(data));
postMessage(response);
});
更改 AppComponent 幷包含兩個函式 find10thPrimeNumber 和 find10000thPrimeNumber。
import { Component } from '@angular/core';
import { PrimeCalculator } from './app.prime';
@Component({
selector: 'app-root',
templateUrl: './app.component.html',
styleUrls: ['./app.component.css']
})
export class AppComponent {
title = 'Web worker sample';
prime10 : number = 0;
prime10000 : number = 0;
find10thPrimeNumber() {
this.prime10 = PrimeCalculator.findNthPrimeNumber(10);
}
find10000thPrimeNumber() {
if (typeof Worker !== 'undefined') {
// Create a new
const worker = new Worker('./app.worker', { type: 'module' });
worker.onmessage = ({ data }) => {
this.prime10000 = data;
};
worker.postMessage(10000);
} else {
// Web Workers are not supported in this environment.
// You should add a fallback so that your program still executes correctly.
}
}
}
這裡:
find10thPrimeNumber 直接使用 PrimeCalculator。但是,find10000thPrimeNumber 將計算委託給 Web Worker,後者又使用 PrimeCalculator。
更改 AppComponent 模板 src/app/app.commands.html 幷包含兩個選項,一個用於查詢第 10 個素數,另一個用於查詢第 10000 個素數。
<h1>{{ title }}</h1>
<div>
<a href="#" (click)="find10thPrimeNumber()">Click here</a> to find 10th prime number
<div>The 10<sup>th</sup> prime number is {{ prime10 }}</div> <br/>
<a href="#" (click)="find10000thPrimeNumber()">Click here</a> to find 10000th prime number
<div>The 10000<sup>th</sup> prime number is {{ prime10000 }}</div>
</div>
這裡:
查詢第 10000 個素數需要幾秒鐘,但它不會影響其他程序,因為它使用了 Web Workers。先嚐試查詢第 10000 個素數,然後再查詢第 10 個素數。
由於 Web Worker 正在計算第 10000 個素數,因此 UI 不會凍結。與此同時,我們可以檢查第 10 個素數。如果我們沒有使用 Web Worker,我們無法在瀏覽器中執行任何操作,因為它正在積極處理第 10000 個素數。
應用程式的結果如下:
應用程式的初始狀態。

單擊並嘗試查詢第 10000 個素數,然後嘗試查詢第 10 個素數。應用程式很快找到第 10 個素數並顯示它。應用程式仍在後臺處理以查詢第 10000 個素數。
兩個程序都已完成。
Web Worker 透過在後臺執行復雜操作來增強 Web 應用程式的使用者體驗,並且在 Angular 應用程式中也很容易實現。
Angular 8 - Service Workers 和 PWA
漸進式 Web 應用 (PWA) 是具有少量增強的普通 Web 應用程式,其行為類似於原生應用程式。PWA 應用不依賴網路即可工作。PWA 快取應用程式並從本地快取中呈現它。它定期檢查應用程式的即時版本,然後在後臺快取最新版本。
PWA 可以像原生應用程式一樣安裝在系統中,並且可以在桌面上顯示快捷方式。單擊快捷方式將在瀏覽器中開啟應用程式,即使系統中沒有任何可用的網路,它也會使用本地快取。
Angular 應用程式可以轉換為 PWA 應用程式。要轉換 Angular 應用程式,我們需要使用 Service Worker API。Service Worker 實際上是一個代理伺服器,位於瀏覽器、應用程式和網路之間。
Service Workers 與網頁是分開的。它無法訪問 DOM 物件。相反,Service Workers 透過 PostMessage 介面與網頁互動。
PWA 應用程式有兩個先決條件,如下所示:
瀏覽器支援 - 儘管許多瀏覽器都支援 PWA 應用,但 IE、Opera mini 和其他一些瀏覽器並不提供 PWA 支援。
HTTPS 傳輸 - 應用程式需要透過 HTTPS 協議傳輸。https 支援的一個例外是開發目的的 localhost。
讓我們建立一個新應用程式並將其轉換為 PWA 應用程式。
使用以下命令建立一個新的 Angular 應用程式:
cd /go/to/workspace ng new pwa-sample
使用以下命令新增 PWA 支援:
cd pwa-sample ng add @angular/pwa --project pwa-sample
構建應用程式的生產版本:
ng build --prod
PWA 應用程式不會在 Angular 開發伺服器下執行。使用以下命令安裝一個簡單的 Web 伺服器:
npm install -g http-server
執行 Web 伺服器並將應用程式的生產構建設定為根資料夾。
f the application as root folder. http-server -p 8080 -c-1 dist/pwa-sample
開啟瀏覽器並輸入 https://:8080。
現在,轉到 開發者工具 -> 網路 並選擇 離線 選項。
如果網路設定為離線,則普通應用程式將停止工作,但 PWA 應用程式可以正常工作,如下所示: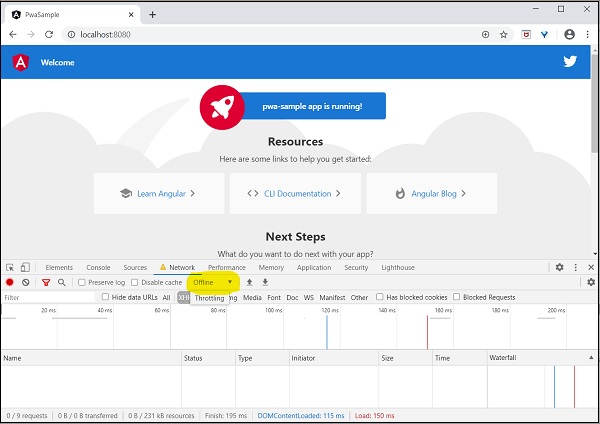
Angular 8 - 伺服器端渲染
伺服器端渲染 (SSR) 是一種現代技術,用於將執行在瀏覽器中的單頁應用程式 (SPA) 轉換為基於伺服器的應用程式。通常,在 SPA 中,伺服器返回一個簡單的 index.html 檔案,其中包含對基於 JavaScript 的 SPA 應用的引用。SPA 應用從此處接管,配置整個應用程式,處理請求,然後傳送最終響應。
但在支援 SSR 的應用程式中,伺服器也會執行所有必要的配置,然後將最終響應傳送到瀏覽器。瀏覽器呈現響應並啟動 SPA 應用。SPA 應用從此處接管,進一步的請求將被導向到 SPA 應用。SPA 和 SSR 的流程如下圖所示。
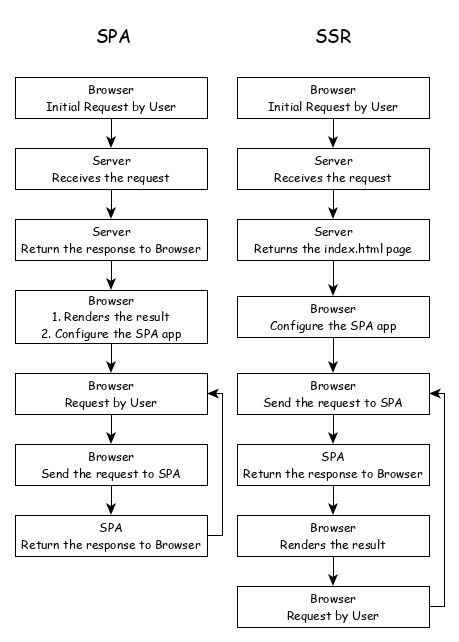
將 SPA 應用程式轉換為 SSR 提供了一些優勢,如下所示:
速度 - 第一個請求相對較快。SPA 的主要缺點之一是初始渲染速度慢。一旦應用程式呈現完畢,SPA 應用的速度就相當快。SSR 解決了初始渲染問題。
SEO 友好 - 使站點更利於 SEO。SPA 的另一個主要缺點是 Web 抓取工具無法為了 SEO 的目的而對其進行抓取。SSR 解決了這個問題。
Angular Universal
要在 Angular 中啟用 SSR,Angular 應該能夠在伺服器中呈現。為此,Angular 提供了一種名為 Angular Universal 的特殊技術。這是一項相當新的技術,並且仍在不斷發展。Angular Universal 知道如何在伺服器中呈現 Angular 應用程式。我們可以將我們的應用程序升級到 Angular Universal 以支援 SSR。
Angular 8 - 國際化 (i18n)
國際化 (i18n) 是任何現代 Web 應用程式都必須具備的功能。國際化使應用程式能夠針對世界上的任何語言。本地化是國際化的一部分,它使應用程式能夠以目標本地語言呈現。Angular 完全支援國際化和本地化功能。
讓我們學習如何在不同的語言中建立一個簡單的 hello world 應用程式。
使用以下命令建立一個新的 Angular 應用程式:
cd /go/to/workspace ng new i18n-sample
使用以下命令執行應用程式:
cd i18n-sample npm run start
按如下所述更改 AppComponent 的模板:
<h1>{{ title }}</h1>
<div>Hello</div>
<div>The Current time is {{ currentDate | date : 'medium' }}</div>
使用以下命令新增本地化模組:
ng add @angular/localize
重啟應用程式。
LOCALE_ID 是 Angular 變數,用於引用當前區域設定。預設情況下,它設定為 en_US。讓我們使用 AppModule 中的提供程式來更改區域設定。
import { BrowserModule } from '@angular/platform-browser';
import { LOCALE_ID, NgModule } from '@angular/core';
import { AppComponent } from './app.component';
@NgModule({
declarations: [
AppComponent
],
imports: [
BrowserModule
],
providers: [ { provide: LOCALE_ID, useValue: 'hi' } ],
bootstrap: [AppComponent]
})
export class AppModule { }
這裡:
- LOCALE_ID 從 @angular/core 匯入。
- LOCALE_ID 透過提供程式設定為 hi,以便 LOCALE_ID 可在應用程式中的任何地方使用。
從 @angular/common/locales/hi 匯入區域設定資料,然後使用 registerLocaleData 方法註冊它,如下所示
import { Component } from '@angular/core';
import { registerLocaleData } from '@angular/common';
import localeHi from '@angular/common/locales/hi';
registerLocaleData(localeHi);
@Component({
selector: 'app-root',
templateUrl: './app.component.html',
styleUrls: ['./app.component.css'],
})
export class AppComponent {
title = 'Internationzation Sample';
}
建立一個區域性變數 CurrentDate 並使用 Date.now() 設定當前時間。
export class AppComponent {
title = 'Internationzation Sample';
currentDate: number = Date.now();
}
更改 AppComponent 的模板內容幷包含 currentDate,如下所示:
<h1>{{ title }}</h1>
<div>Hello</div>
<div>The Current time is {{ currentDate | date : 'medium' }}</div>
檢查結果,您將看到日期使用 hi 區域設定指定。
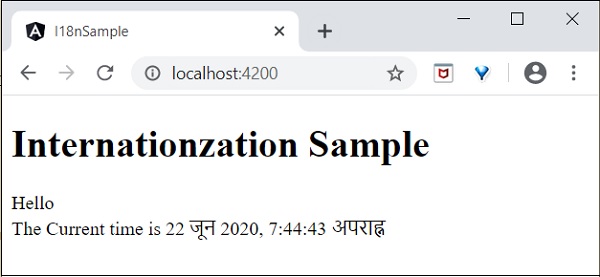
我們已將日期更改為當前區域設定。讓我們也更改其他內容。為此,請在相關標籤中包含 i18n 屬性,格式為 title|description@@id。
<h1>{{ title }}</h1>
<h1 i18n="greeting|Greeting a person@@greeting">Hello</h1>
<div>
<span i18n="time|Specifiy the current time@@currentTime">
The Current time is {{ currentDate | date : 'medium' }}
</span>
</div>
這裡:
- hello 是簡單的翻譯格式,因為它包含要翻譯的完整文字。
- Time 有點複雜,因為它也包含動態內容。文字的格式應遵循 ICU 訊息格式進行翻譯。
我們可以使用以下命令提取要翻譯的資料:
ng xi18n --output-path src/locale
命令生成包含以下內容的 messages.xlf 檔案:
<?xml version="1.0" encoding="UTF-8" ?>
<xliff version="1.2" xmlns="urn:oasis:names:tc:xliff:document:1.2">
<file source-language="en" datatype="plaintext" original="ng2.template">
<body>
<trans-unit id="greeting" datatype="html">
<source>Hello</source>
<context-group purpose="location">
<context context-type="sourcefile">src/app/app.component.html</context>
<context context-type="linenumber">3</context>
</context-group>
<note priority="1" from="description">Greeting a person</note>
<note priority="1" from="meaning">greeting</note>
</trans-unit>
<trans-unit id="currentTime" datatype="html">
<source>
The Current time is <x id="INTERPOLATION" equiv-text="{{ currentDate | date : 'medium' }}"/>
</source>
<context-group purpose="location">
<context context-type="sourcefile">src/app/app.component.html</context>
<context context-type="linenumber">5</context>
</context-group>
<note priority="1" from="description">Specifiy the current time</note>
<note priority="1" from="meaning">time</note>
</trans-unit>
</body>
</file>
</xliff>
複製該檔案並將其重新命名為 messages.hi.xlf
使用支援 Unicode 的文字編輯器開啟檔案。找到source標籤並將其複製為target標籤,然後將內容更改為hi語言環境。使用谷歌翻譯查詢匹配的文字。更改後的內容如下:


開啟angular.json檔案,並在build -> configuration下新增以下配置
"hi": {
"aot": true,
"outputPath": "dist/hi/",
"i18nFile": "src/locale/messages.hi.xlf",
"i18nFormat": "xlf",
"i18nLocale": "hi",
"i18nMissingTranslation": "error",
"baseHref": "/hi/"
},
"en": {
"aot": true,
"outputPath": "dist/en/",
"i18nFile": "src/locale/messages.xlf",
"i18nFormat": "xlf",
"i18nLocale": "en",
"i18nMissingTranslation": "error",
"baseHref": "/en/"
}
這裡:
我們為hi和en語言環境使用了單獨的設定。
在serve -> configuration下設定以下內容。
"hi": {
"browserTarget": "i18n-sample:build:hi"
},
"en": {
"browserTarget": "i18n-sample:build:en"
}
我們添加了必要的配置。停止應用程式並執行以下命令:
npm run start -- --configuration=hi
這裡:
我們指定了要使用 hi 配置。
導航到 https://:4200/hi,您將看到印地語本地化內容。

最後,我們建立了一個 Angular 本地化應用程式。
Angular 8 - 可訪問性
輔助功能支援是每個基於 UI 的應用程式的重要功能之一。輔助功能是一種應用程式設計方式,使其也能被某些殘疾人士訪問。讓我們學習 Angular 提供的支援,以開發具有良好輔助功能的應用程式。
使用屬性繫結時,對 ARIA 屬性使用attr.字首。
使用 Angular Material 元件實現輔助功能。一些有用的元件包括LiveAnnouncer和cdkTrapFocus。
儘可能使用原生 HTML 元素,因為原生 HTML 元素提供了最大的輔助功能。建立元件時,選擇與您的用例匹配的原生 html 元素,而不是重新開發原生功能。
使用NavigationEnd來跟蹤和控制應用程式的焦點,因為它對輔助功能有很大幫助。
Angular 8 - CLI 命令
Angular CLI 幫助開發人員輕鬆快速地建立專案。正如我們已經知道的那樣,Angular CLI 工具用於開發,並且構建在 Node.js 之上,從 NPM 安裝。本章將詳細解釋 Angular 8 CLI 命令。
驗證 CLI
在繼續使用 Angular CLI 命令之前,我們必須確保 Angular CLI 已安裝在您的機器上。如果已安裝,您可以使用以下命令進行驗證:
ng version
您將看到以下響應:
如果未安裝 CLI,請使用以下命令安裝它。
npm install -g @angular/cli@^8.0.0
讓我們簡要了解一下這些命令。
新建命令
要在 Angular 中建立一個應用程式,請使用以下語法:
ng new <project-name>
示例
如果您想建立 CustomerApp,請使用以下程式碼:
ng new CustomerApp
生成命令
它用於根據架構生成或修改檔案。在您的 Angular 專案中輸入以下命令:
ng generate
或者,您可以簡單地將 generate 輸入為 g。您也可以使用以下語法:
ng g
它將列出可用的架構:
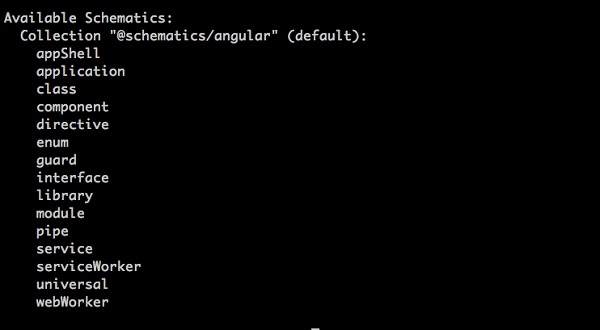
讓我們在下一節中瞭解一些重複使用的 ng generate 架構。
建立元件
元件是 Angular 的構建塊。要在 Angular 中建立元件,請使用以下語法:
ng g c <component-name>
例如,如果使用者想建立一個Details元件,請使用以下程式碼:
ng g c Details
使用此命令後,您將看到以下響應:
CREATE src/app/details/details.component.scss (0 bytes) CREATE src/app/details/details.component.html (22 bytes) CREATE src/app/details/details.component.spec.ts (635 bytes) CREATE src/app/details/details.component.ts (274 bytes) UPDATE src/app/app.module.ts (1201 bytes)
建立類
它用於在 Angular 中建立一個新類。定義如下:
ng g class <class-name>
如果您想建立一個 customer 類,請鍵入以下命令:
ng g class Customer
使用此命令後,您將看到以下響應:
CREATE src/app/customer.spec.ts (162 bytes) CREATE src/app/customer.ts (26 bytes)
建立管道
管道用於過濾資料。它用於在 Angular 中建立自定義管道。定義如下:
ng g pipe <pipe-name>
如果您想在一個管道中建立一個自定義數字計數,請鍵入以下命令:
ng g pipe DigitCount
使用此命令後,您將看到以下響應:
CREATE src/app/digit-count.pipe.spec.ts (204 bytes) CREATE src/app/digit-count.pipe.ts (213 bytes) UPDATE src/app/app.module.ts (1274 bytes)
建立指令
它用於在 Angular 中建立一個新的指令。定義如下:
ng g directive <directive-name>
如果您想建立一個 UnderlineText 指令,請鍵入以下命令:
ng g directive UnderlineText
使用此命令後,您將看到以下響應:
CREATE src/app/underline-text.directive.spec.ts (253 bytes) CREATE src/app/underline-text.directive.ts (155 bytes) UPDATE src/app/app.module.ts (1371 bytes)
建立模組
它用於在 Angular 中建立一個新的模組。定義如下:
ng g module <module-name>
如果您想建立一個使用者資訊模組,請鍵入以下命令:
ng g module Userinfo
使用此命令後,您將看到以下響應:
CREATE src/app/userinfo/userinfo.module.ts (194 bytes)
建立介面
它用於在 Angular 中建立一個介面。如下所示:
ng g interface <interface-name>
如果您想建立一個 customer 類,請鍵入以下命令:
ng g interface CustomerData
使用此命令後,您將看到以下響應:
CREATE src/app/customer-data.ts (34 bytes)
建立 Web Worker
它用於在 Angular 中建立一個新的 Web Worker。如下所示:
ng g webWorker <webWorker-name>
如果您想建立一個 customer 類,請鍵入以下命令:
ng g webWorker CustomerWebWorker
使用此命令後,您將看到以下響應:
CREATE tsconfig.worker.json (212 bytes) CREATE src/app/customer-web-worker.worker.ts (157 bytes) UPDATE tsconfig.app.json (296 bytes) UPDATE angular.json (3863 bytes)
建立服務
它用於在 Angular 中建立一個服務。如下所示:
ng g service <service-name>
如果您想建立一個 customer 類,請鍵入以下命令:
ng g service CustomerService
使用此命令後,您將看到以下響應:
CREATE src/app/customer-service.service.spec.ts (379 bytes) CREATE src/app/customer-service.service.ts (144 bytes)
建立列舉
它用於在 Angular 中建立一個列舉。如下所示:
ng g enum <enum-name>
如果您想建立一個 customer 類,請鍵入以下命令:
ng g enum CustomerRecords
使用此命令後,您將看到以下響應:
CREATE src/app/customer-records.enum.ts (32 bytes)
新增命令
它用於向您的專案新增對外部庫的支援。由以下命令指定:
ng add [name]
構建命令
它用於編譯或構建您的 Angular 應用程式。定義如下:
ng build
使用此命令後,您將看到以下響應:
Generating ES5 bundles for differential loading... ES5 bundle generation complete.
配置命令
它用於檢索或設定工作區 angular.json 檔案中的 Angular 配置值。定義如下:
ng config
使用此命令後,您將看到以下響應:
{
"$schema": "./node_modules/@angular/cli/lib/config/schema.json",
"version": 1,
"newProjectRoot": "projects",
"projects": {
"MyApp": {
"projectType": "application",
"schematics": {
"@schematics/angular:component": {
"style": "scss"
}
},
.............................
.............................
文件命令
它用於在瀏覽器中開啟官方 Angular 文件 (angular.io),並搜尋給定的關鍵字。
ng doc <keyword>
例如,如果您使用 component 作為 ng g component 進行搜尋,它將開啟文件。
端到端 (e2e) 命令
它用於構建和服務 Angular 應用程式,然後使用 Protractor 執行端到端測試。如下所示:
ng e2e <project> [options]
幫助命令
它列出可用的命令及其簡短說明。如下所示:
ng help
服務命令
它用於構建和服務您的應用程式,並在檔案更改時重新構建。如下所示:
ng serve
測試命令
執行專案中的單元測試。如下所示:
ng test
更新命令
更新您的應用程式及其依賴項。如下所示:
ng update
版本命令
顯示 Angular CLI 版本。如下所示:
ng version
Angular 8 - 測試
測試是應用程式開發生命週期中非常重要的一個階段。它確保應用程式的質量。它需要仔細的計劃和執行。
單元測試
單元測試是測試應用程式最簡單的方法。它基於確保一段程式碼或類的某個方法的正確性。但是,它並不反映真實的執行環境,因此它是查詢錯誤的最低效選項。
通常,Angular 8 使用 Jasmine 和 Karma 配置。要執行此操作,首先需要使用以下命令在您的專案中進行配置:
ng test
現在,您將看到以下響應:
現在,Chrome 瀏覽器也會開啟並在“Jasmine HTML Reporter”中顯示測試輸出。它看起來類似於:
端到端 (E2E) 測試
單元測試是一個小型、簡單且快速的流程,而 E2E 測試階段則涉及多個元件協同工作,涵蓋應用程式中的流程。要執行 e2e 測試,請鍵入以下命令:
ng e2e
您將看到以下響應:

Angular 8 - Ivy 編譯器
Ivy 編譯器是 Angular 團隊釋出的 Angular 應用程式的最新編譯器。目前,Angular 使用View Engine編譯器來編譯 Angular 應用程式。
一般來說,Angular 編譯器有兩種編譯應用程式的選項。
即時 (JIT) 編譯器
在即時 (JIT)編譯中,編譯器將與應用程式捆綁在一起併發送到瀏覽器。Angular 應用程式將在瀏覽器中編譯並在應用程式執行之前執行。
即使JIT提供了一些高階功能,JIT也會減慢編譯速度,並且應用程式包的大小將是AOT編譯器生成的兩倍,因為它也包含編譯器。
提前 (AOT) 編譯器
在AOT編譯中,編譯器將發出最佳化的程式碼,準備在瀏覽器中執行而無需任何額外步驟。它將減小包的大小,並減少應用程式的編譯時間和啟動時間。
Ivy 編譯器的優點
Ivy 編譯器是 Angular 的最佳化和高階編譯器。截至 Angular 8,它雖然可用,但尚未完全完成。Angular 團隊建議開發人員在 Angular 8 中使用它。
Ivy 編譯器的主要優點如下:
- 最佳化的程式碼。
- 更快的構建時間。
- 減小的包大小。
- 更好的效能。
如何使用 Ivy?
透過更改如下指定的專案設定,可以在 Angular 8 應用程式中使用Ivy 編譯器:
開啟 angular.json 並將專案的 aot 選項(projects -> -> architect -> build -> configurations -> production)設定為 true。
{
"projects": {
"my-existing-project": {
"architect": {
"build": {
"options": {
...
"aot": true,
}
}
}
}
}
}
開啟tsconfig.app.json並在angularCompilerOptions下將enableIvy設定為 true。
{
...
"angularCompilerOptions": {
"enableIvy": true
}
編譯並執行應用程式,即可受益於Ivy 編譯器。
Angular 8 - 使用 Bazel 構建
Bazel是一個高階構建和測試工具。它支援許多適合大型專案的功能。
Bazel的一些功能如下:
- 支援多種語言。
- 支援多個平臺。
- 支援多個儲存庫。
- 支援高階構建語言。
- 快速可靠。
Angular 支援使用 bazel 構建應用程式。讓我們看看如何使用 bazel 編譯 Angular 應用程式。
首先,安裝@angular/bazel包。
npm install -g @angular/bazel
對於現有應用程式,請按如下所示新增@angular/bazel
ng add @angular/bazel
對於新應用程式,請使用以下命令
ng new --collection=@angular/bazel
要使用 bazel 構建應用程式,請使用以下命令
ng build --leaveBazelFilesOnDisk
這裡:
leaveBazelFilesOnDisk選項將保留構建過程中建立的 bazel 檔案,我們可以使用這些檔案直接使用 bazel 構建應用程式。
要直接使用 bazel 構建應用程式,請安裝@bazel/bazelisk,然後使用bazelisk build 命令。
npm install -g @bazel/bazelisk bazelisk build
Angular 8 - 向後相容性
Angular 框架提供了與先前版本的最大相容性。如果 Angular 團隊在一個版本中棄用某個功能,它將等待另外三個版本才能完全刪除該功能。Angular 團隊每六個月釋出一個主要版本。每個版本都將有六個月的主動維護期,然後是一年的長期支援 (LTS) 期。在這些 18 個月中,Angular 不會引入重大更改。如果 Angular 版本在版本 5 中棄用某個功能,那麼它可能會在版本 8 或後續版本中刪除它。
Angular 保留所有版本的文件和指南。例如,可以在 @ https://v7.angular.io 檢視 Angular 版本 7 的文件。Angular 還透過 https://update.angular.io/ 網站提供詳細的升級路徑。
要更新從先前版本編寫的 Angular 應用程式,請在專案目錄中使用以下命令
ng update @angular/cli@8 @angular/core@8
讓我們看看 Angular 8 中引入的一些重要更改。
HttpModule模組及其關聯的Http服務已被刪除。使用HttpClientModule模組中的HttpClient服務。
/deep/、>>>和:ng-deep元件選擇器已被刪除。
Angular 的 TypeScript 預設版本為 3.4。
Angular 支援的 Node 版本為 v10 及更高版本。
@ViewChild()和ContentChild()裝飾器的行為已從動態更改為靜態。
路由器模組中的延遲載入字串語法已被刪除,僅支援基於函式的語法。
loadChildren: './lazy/lazy.module#LazyModule'
loadChildren: () => import('./lazy/lazy.module'
Angular 8 - 例項
在這裡,我們將學習關於 Angular 8 的完整分步工作示例。
讓我們建立一個Angular應用程式來檢查我們日常的開支。讓我們將ExpenseManager作為我們新應用程式的名稱。
建立應用程式
使用以下命令建立新的應用程式。
cd /path/to/workspace ng new expense-manager
這裡:
ng new 是ng CLI應用程式的一個命令。它將用於建立新的應用程式。它會提出一些基本問題以便建立新的應用程式。讓應用程式選擇預設選項即可。關於如下提到的路由問題,請指定否。
Would you like to add Angular routing? No
回答完基本問題後,ng CLI應用程式將在expense-manager資料夾下建立一個新的Angular應用程式。
讓我們進入我們新建立的應用程式資料夾。
cd expense-manager
讓我們使用以下命令啟動應用程式。
ng serve
讓我們啟動瀏覽器並開啟 https://:4200。瀏覽器將顯示如下所示的應用程式:
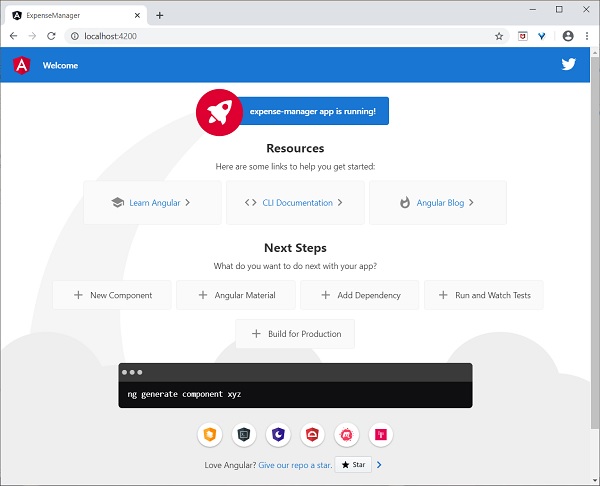
讓我們更改應用程式的標題以更好地反映我們的應用程式。開啟src/app/app.component.ts 並按如下所示更改程式碼:
export class AppComponent {
title = 'Expense Manager';
}
我們的最終應用程式將在瀏覽器中呈現,如下所示:
新增元件
使用如下所示的ng generate component命令建立一個新的元件:
ng generate component expense-entry
輸出
輸出如下:
CREATE src/app/expense-entry/expense-entry.component.html (28 bytes) CREATE src/app/expense-entry/expense-entry.component.spec.ts (671 bytes) CREATE src/app/expense-entry/expense-entry.component.ts (296 bytes) CREATE src/app/expense-entry/expense-entry.component.css (0 bytes) UPDATE src/app/app.module.ts (431 bytes)
這裡:
- ExpenseEntryComponent 建立在 src/app/expense-entry 資料夾下。
- 建立了元件類、模板和樣式表。
- AppModule 已使用新元件更新。
向ExpenseEntryComponent (src/app/expense-entry/expense-entry.component.ts)元件新增title屬性。
import { Component, OnInit } from '@angular/core';
@Component({
selector: 'app-expense-entry',
templateUrl: './expense-entry.component.html',
styleUrls: ['./expense-entry.component.css']
})
export class ExpenseEntryComponent implements OnInit {
title: string;
constructor() { }
ngOnInit() {
this.title = "Expense Entry"
}
}
使用以下內容更新模板,src/app/expense-entry/expense-entry.component.html:
<p>{{ title }}</p>
開啟
src/app/app.component.html
幷包含新建立的元件。<h1>{{ title }}</h1>
<app-expense-entry></app-expense-entry>
這裡:
app-expense-entry是選擇器值,可以用作常規HTML標籤。
應用程式的輸出如下所示:
包含 Bootstrap
讓我們使用styles選項將 Bootstrap 包含到我們的ExpenseManager應用程式中,並更改預設模板以使用 Bootstrap 元件。
開啟命令提示符並轉到 ExpenseManager 應用程式。
cd /go/to/expense-manager
使用以下命令安裝bootstrap和JQuery庫:
npm install --save bootstrap@4.5.0 jquery@3.5.1
這裡:
我們安裝了 JQuery,因為 Bootstrap 大量使用 jquery 來實現高階元件。
選項angular.json 並設定 bootstrap 和 jquery 庫路徑。
{
"projects": {
"expense-manager": {
"architect": {
"build": {
"builder":"@angular-devkit/build-angular:browser", "options": {
"outputPath": "dist/expense-manager",
"index": "src/index.html",
"main": "src/main.ts",
"polyfills": "src/polyfills.ts",
"tsConfig": "tsconfig.app.json",
"aot": false,
"assets": [
"src/favicon.ico",
"src/assets"
],
"styles": [
"./node_modules/bootstrap/dist/css/bootstrap.css", "src/styles.css"
],
"scripts": [
"./node_modules/jquery/dist/jquery.js", "./node_modules/bootstrap/dist/js/bootstrap.js"
]
},
},
}
}},
"defaultProject": "expense-manager"
}
這裡:
scripts 選項用於包含 JavaScript 庫。透過scripts註冊的JavaScript將在應用程式中的所有 Angular 元件中可用。
開啟app.component.html並將內容更改為如下所示:
<!-- Navigation -->
<nav class="navbar navbar-expand-lg navbar-dark bg-dark static-top">
<div class="container">
<a class="navbar-brand" href="#">{{ title }}</a> <button class="navbar-toggler" type="button" data-toggle="collapse" data-target="#navbarResponsive" aria-controls="navbarResponsive" aria-expanded="false" aria-label="Toggle navigation">
<span class="navbar-toggler-icon">
</span>
</button>
<div class="collapse navbar-collapse" id="navbarResponsive">
<ul class="navbar-nav ml-auto">
<li class="nav-item active">
<a class="nav-link" href="#">Home
<span class="sr-only">(current)
</span>
</a>
</li>
<li class="nav-item">
<a class="nav-link" href="#">Report</a>
</li>
<li class="nav-item">
<a class="nav-link" href="#">Add Expense</a>
</li>
<li class="nav-item">
<a class="nav-link" href="#">About</a>
</li>
</ul>
</div>
</div>
</nav>
<app-expense-entry></app-expense-entry>
這裡:
使用了 Bootstrap 導航和容器。
開啟src/app/expense-entry/expense-entry.component.html並放置以下內容。
<!-- Page Content -->
<div class="container">
<div class="row">
<div class="col-lg-12 text-center" style="padding-top: 20px;">
<div class="container" style="padding-left: 0px; padding-right: 0px;">
<div class="row">
<div class="col-sm" style="text-align: left;"> {{ title }}
</div>
<div class="col-sm" style="text-align: right;">
<button type="button" class="btn btn-primary">Edit</button>
</div>
</div>
</div>
<div class="container box" style="margin-top: 10px;">
<div class="row">
<div class="col-2" style="text-align: right;">
<strong><em>Item:</em></strong>
</div>
<div class="col" style="text-align: left;">
Pizza
</div>
</div>
<div class="row">
<div class="col-2" style="text-align: right;">
<strong><em>Amount:</em></strong>
</div>
<div class="col" style="text-align: left;">
20
</div>
</div>
<div class="row">
<div class="col-2" style="text-align: right;">
<strong><em>Category:</em></strong>
</div>
<div class="col" style="text-align: left;">
Food
</div>
</div>
<div class="row">
<div class="col-2" style="text-align: right;">
<strong><em>Location:</em></strong>
</div>
<div class="col" style="text-align: left;">
Zomato
</div>
</div>
<div class="row">
<div class="col-2" style="text-align: right;">
<strong><em>Spend On:</em></strong>
</div>
<div class="col" style="text-align: left;">
June 20, 2020
</div>
</div>
</div>
</div>
</div>
</div>
重啟應用程式。
應用程式的輸出如下:
我們將在下一章中改進應用程式以處理動態費用條目。
新增介面
建立ExpenseEntry介面(src/app/expense-entry.ts)並新增id、amount、category、Location、spendOn和createdOn。
export interface ExpenseEntry {
id: number;
item: string;
amount: number;
category: string;
location: string;
spendOn: Date;
createdOn: Date;
}
將 **ExpenseEntry** 匯入到 **ExpenseEntryComponent** 中。
import { ExpenseEntry } from '../expense-entry';
建立一個ExpenseEntry物件,expenseEntry,如下所示:
export class ExpenseEntryComponent implements OnInit {
title: string;
expenseEntry: ExpenseEntry;
constructor() { }
ngOnInit() {
this.title = "Expense Entry";
this.expenseEntry = {
id: 1,
item: "Pizza",
amount: 21,
category: "Food",
location: "Zomato",
spendOn: new Date(2020, 6, 1, 10, 10, 10),
createdOn: new Date(2020, 6, 1, 10, 10, 10),
};
}
}
使用expenseEntry物件更新元件模板,src/app/expense-entry/expense-entry.component.html,如下所示:
<!-- Page Content -->
<div class="container">
<div class="row">
<div class="col-lg-12 text-center" style="padding-top: 20px;">
<div class="container" style="padding-left: 0px; padding-right: 0px;">
<div class="row">
<div class="col-sm" style="text-align: left;">
{{ title }}
</div>
<div class="col-sm" style="text-align: right;">
<button type="button" class="btn btn-primary">Edit</button>
</div>
</div>
</div>
<div class="container box" style="margin-top: 10px;">
<div class="row">
<div class="col-2" style="text-align: right;">
<strong><em>Item:</em></strong>
</div>
<div class="col" style="text-align: left;">
{{ expenseEntry.item }}
</div>
</div>
<div class="row">
<div class="col-2" style="text-align: right;">
<strong><em>Amount:</em></strong>
</div>
<div class="col" style="text-align: left;">
{{ expenseEntry.amount }}
</div>
</div>
<div class="row">
<div class="col-2" style="text-align: right;">
<strong><em>Category:</em></strong>
</div>
<div class="col" style="text-align: left;">
{{ expenseEntry.category }}
</div>
</div>
<div class="row">
<div class="col-2" style="text-align: right;">
<strong><em>Location:</em></strong>
</div>
<div class="col" style="text-align: left;">
{{ expenseEntry.location }}
</div>
</div>
<div class="row">
<div class="col-2" style="text-align: right;">
<strong><em>Spend On:</em></strong>
</div>
<div class="col" style="text-align: left;">
{{ expenseEntry.spendOn }}
</div>
</div>
</div>
</div>
</div>
</div>
應用程式的輸出如下:
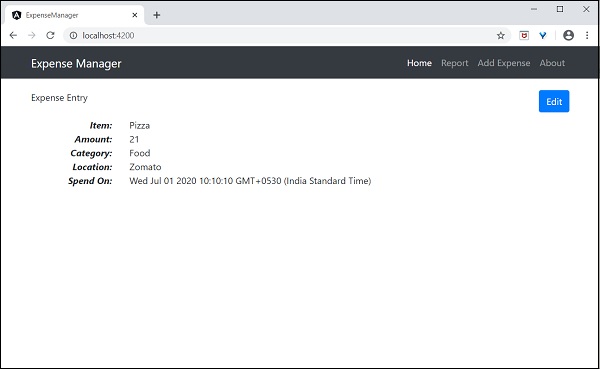
使用指令
讓我們在ExpenseManager應用程式中新增一個新的元件來列出支出條目。
開啟命令提示符並轉到專案根資料夾。
cd /go/to/expense-manager
啟動應用程式。
ng serve
使用以下命令建立一個新的元件,ExpenseEntryListComponent:
ng generate component ExpenseEntryList
輸出
輸出如下:
CREATE src/app/expense-entry-list/expense-entry-list.component.html (33 bytes) CREATE src/app/expense-entry-list/expense-entry-list.component.spec.ts (700 bytes) CREATE src/app/expense-entry-list/expense-entry-list.component.ts (315 bytes) CREATE src/app/expense-entry-list/expense-entry-list.component.css (0 bytes) UPDATE src/app/app.module.ts (548 bytes)
此命令建立ExpenseEntryList元件,並在AppModule中更新必要的程式碼。
將ExpenseEntry匯入到ExpenseEntryListComponent元件(src/app/expense-entry-list/expense-entry-list.component)中
import { ExpenseEntry } from '../expense-entry';
新增一個方法getExpenseEntries(),在ExpenseEntryListComponent (src/app/expense-entry-list/expense-entry-list.component)中返回支出條目的列表(模擬項)。
getExpenseEntries() : ExpenseEntry[] {
let mockExpenseEntries : ExpenseEntry[] = [
{ id: 1,
item: "Pizza",
amount: Math.floor((Math.random() * 10) + 1),
category: "Food",
location: "Mcdonald",
spendOn: new Date(2020, 4, Math.floor((Math.random() * 30) + 1), 10, 10, 10),
createdOn: new Date(2020, 4, Math.floor((Math.random() * 30) + 1), 10, 10, 10) },
{ id: 1,
item: "Pizza",
amount: Math.floor((Math.random() * 10) + 1),
category: "Food",
location: "KFC",
spendOn: new Date(2020, 4, Math.floor((Math.random() * 30) + 1), 10, 10, 10),
createdOn: new Date(2020, 4, Math.floor((Math.random() * 30) + 1), 10, 10, 10) },
{ id: 1,
item: "Pizza",
amount: Math.floor((Math.random() * 10) + 1),
category: "Food",
location: "KFC",
spendOn: new Date(2020, 4, Math.floor((Math.random() * 30) + 1), 10, 10, 10),
createdOn: new Date(2020, 4, Math.floor((Math.random() * 30) + 1), 10, 10, 10)
},
];
return mockExpenseEntries;
}
宣告一個區域性變數expenseEntries,並載入如下所示的模擬支出條目列表:
title: string;
expenseEntries: ExpenseEntry[];
constructor() { }
ngOnInit() {
this.title = "Expense Entry List";
this.expenseEntries = this.getExpenseEntries();
}
開啟模板檔案(src/app/expense-entry-list/expense-entry-list.component.html),並在表格中顯示模擬條目。
<!-- Page Content -->
<div class="container">
<div class="row">
<div class="col-lg-12 text-center" style="padding-top: 20px;">
<div class="container" style="padding-left: 0px; padding-right: 0px;">
<div class="row">
<div class="col-sm" style="text-align: left;">
{{ title }}
</div>
<div class="col-sm" style="text-align: right;">
<button type="button" class="btn btn-primary">Edit</button>
</div>
</div>
</div>
<div class="container box" style="margin-top: 10px;">
<table class="table table-striped">
<thead>
<tr>
<th>Item</th>
<th>Amount</th>
<th>Category</th>
<th>Location</th>
<th>Spent On</th>
</tr>
</thead>
<tbody>
<tr *ngFor="let entry of expenseEntries">
<th scope="row">{{ entry.item }}</th>
<th>{{ entry.amount }}</th>
<td>{{ entry.category }}</td>
<td>{{ entry.location }}</td>
<td>{{ entry.spendOn | date: 'short' }}</td>
</tr>
</tbody>
</table>
</div>
</div>
</div>
</div>
這裡:
使用了Bootstrap表格。table和table-striped將根據Bootstrap樣式標準對錶格進行樣式設定。
使用ngFor迴圈遍歷expenseEntries並生成表格行。
開啟AppComponent模板src/app/app.component.html,包含ExpenseEntryListComponent並移除ExpenseEntryComponent,如下所示:
... <app-expense-entry-list></app-expense-entry-list>
最後,應用程式的輸出如下所示。
使用管道
讓我們在我們的ExpenseManager應用程式中使用管道
開啟ExpenseEntryListComponent的模板src/app/expense-entry-list/expense-entry-list.component.html,並在entry.spendOn中包含管道,如下所示:
<td>{{ entry.spendOn | date: 'short' }}</td>
在這裡,我們使用了日期管道以短格式顯示支出日期。
最後,應用程式的輸出如下所示:
新增除錯服務
執行以下命令生成 Angular 服務 **DebugService**。
ng g service debug
這將建立兩個 TypeScript 檔案(除錯服務及其測試),如下所示:
CREATE src/app/debug.service.spec.ts (328 bytes) CREATE src/app/debug.service.ts (134 bytes)
讓我們分析 **DebugService** 服務的內容。
import { Injectable } from '@angular/core'; @Injectable({
providedIn: 'root'
})
export class DebugService {
constructor() { }
}
這裡:
**@Injectable** 裝飾器附加到 DebugService 類,這使得 DebugService 能夠在應用程式的 Angular 元件中使用。
**providedIn** 選項及其值 root 使 DebugService 能夠在應用程式的所有元件中使用。
讓我們新增一個方法 Info,它將訊息列印到瀏覽器控制檯。
info(message : String) : void {
console.log(message);
}
讓我們在 **ExpenseEntryListComponent** 中初始化服務並使用它來列印訊息。
import { Component, OnInit } from '@angular/core'; import { ExpenseEntry } from '../expense-entry'; import { DebugService } from '../debug.service'; @Component({
selector: 'app-expense-entry-list',
templateUrl: './expense-entry-list.component.html', styleUrls: ['./expense-entry-list.component.css']
})
export class ExpenseEntryListComponent implements OnInit {
title: string;
expenseEntries: ExpenseEntry[];
constructor(private debugService: DebugService) { }
ngOnInit() {
this.debugService.info("Expense Entry List
component initialized");
this.title = "Expense Entry List";
this.expenseEntries = this.getExpenseEntries();
}
// other coding
}
這裡:
使用建構函式引數初始化 DebugService。設定型別為 DebugService 的引數 (debugService) 將觸發依賴注入以建立新的 DebugService 物件並將其設定為 ExpenseEntryListComponent 元件。
在 ngOnInit 方法中呼叫 DebugService 的 info 方法會在瀏覽器控制檯中列印訊息。
可以使用開發者工具檢視結果,它看起來類似於以下所示:
讓我們擴充套件應用程式以瞭解服務的範圍。
讓我們使用下面提到的命令建立一個 **DebugComponent**。
ng generate component debug CREATE src/app/debug/debug.component.html (20 bytes) CREATE src/app/debug/debug.component.spec.ts (621 bytes) CREATE src/app/debug/debug.component.ts (265 bytes) CREATE src/app/debug/debug.component.css (0 bytes) UPDATE src/app/app.module.ts (392 bytes)
讓我們刪除根模組中的 DebugService。
// src/app/debug.service.ts
import { Injectable } from '@angular/core'; @Injectable()
export class DebugService {
constructor() {
}
info(message : String) : void {
console.log(message);
}
}
在 ExpenseEntryListComponent 元件下注冊 DebugService。
// src/app/expense-entry-list/expense-entry-list.component.ts @Component({
selector: 'app-expense-entry-list',
templateUrl: './expense-entry-list.component.html',
styleUrls: ['./expense-entry-list.component.css']
providers: [DebugService]
})
這裡,我們使用了 providers 元資料 **(ElementInjector)** 來註冊服務。
開啟 **DebugComponent** (src/app/debug/debug.component.ts) 並匯入 **DebugService**,並在元件的建構函式中設定一個例項。
import { Component, OnInit } from '@angular/core'; import { DebugService } from '../debug.service';
@Component({
selector: 'app-debug',
templateUrl: './debug.component.html',
styleUrls: ['./debug.component.css']
})
export class DebugComponent implements OnInit {
constructor(private debugService: DebugService) { }
ngOnInit() {
this.debugService.info("Debug component gets service from Parent");
}
}
這裡,我們沒有註冊 **DebugService**。因此,如果用作父元件,則 DebugService 將不可用。如果在父元件內使用,如果父元件可以訪問該服務,則該服務可能可從父元件訪問。
開啟**ExpenseEntryListComponent** 模板檔案 (src/app/expense-entry-list/expense-entry-list.component.html),並新增如下所示的內容部分。
// existing content <app-debug></app-debug> <ng-content></ng-content>
這裡,我們添加了一個內容部分和一個DebugComponent部分。
讓我們在AppComponent模板中將debug元件作為內容包含在**ExpenseEntryListComponent**元件內。開啟**AppComponent**模板,並將**app-expense-entry-list**修改如下:
// navigation code <app-expense-entry-list> <app-debug></app-debug> </app-expense-entry-list>
這裡,我們添加了**DebugComponent**作為內容。
讓我們檢查一下應用程式,它會在頁面末尾顯示**DebugService**模板,如下所示:
此外,我們還可以在控制檯中看到來自debug元件的兩個除錯資訊。這表明debug元件從其父元件獲取服務。
讓我們更改在**ExpenseEntryListComponent**中注入服務的方式以及它如何影響服務的範圍。將providers注入器更改為viewProviders注入。**viewProviders**不會將服務注入到內容子級,因此它應該會失敗。
viewProviders: [DebugService]
檢查應用程式,您會看到一個debug元件(用作內容子級)丟擲錯誤,如下所示:
讓我們從模板中刪除debug元件並恢復應用程式。
開啟**ExpenseEntryListComponent**模板 (src/app/expense-entry-list/expense-entry-list.component.html) 並刪除以下內容
<app-debug></app-debug> <ng-content></ng-content>
開啟**AppComponent**模板,並將**app-expense-entry-list**修改如下:
// navigation code <app-expense-entry-list> </app-expense-entry-list>
將**ExpenseEntryListComponent**中的**viewProviders**設定更改為**providers**。
providers: [DebugService]
重新執行應用程式並檢查結果。
建立費用服務
讓我們在我們的**ExpenseManager**應用程式中建立一個新的服務**ExpenseEntryService**來與**費用REST API**互動。ExpenseEntryService將獲取最新的費用條目,插入新的費用條目,修改現有的費用條目並刪除不需要的費用條目。
開啟命令提示符並轉到專案根資料夾。
cd /go/to/expense-manager
啟動應用程式。
ng serve
執行以下命令以生成一個Angular服務**ExpenseService**。
ng generate service ExpenseEntry
這將建立兩個TypeScript檔案(費用條目服務及其測試),如下所示:
CREATE src/app/expense-entry.service.spec.ts (364 bytes) CREATE src/app/expense-entry.service.ts (141 bytes)
開啟**ExpenseEntryService** (src/app/expense-entry.service.ts) 並從rxjs庫匯入**ExpenseEntry, throwError**和**catchError**,並從@angular/common/http包匯入**HttpClient, HttpHeaders**和**HttpErrorResponse**。
import { Injectable } from '@angular/core';
import { ExpenseEntry } from './expense-entry'; import { throwError } from 'rxjs';
import { catchError } from 'rxjs/operators';
import { HttpClient, HttpHeaders, HttpErrorResponse } from
'@angular/common/http';
將HttpClient服務注入到我們的服務中。
constructor(private httpClient : HttpClient) { }
建立一個變數**expenseRestUrl**來指定**費用Rest API**端點。
private expenseRestUrl = 'https://:8000/api/expense';
建立一個變數**httpOptions**來設定Http Header選項。這將由Angular **HttpClient**服務在Http Rest API呼叫期間使用。
private httpOptions = {
headers: new HttpHeaders( { 'Content-Type': 'application/json' })
};
完整的程式碼如下:
import { Injectable } from '@angular/core';
import { ExpenseEntry } from './expense-entry';
import { Observable, throwError } from 'rxjs';
import { catchError, retry } from 'rxjs/operators';
import { HttpClient, HttpHeaders, HttpErrorResponse } from '@angular/common/http';
@Injectable({
providedIn: 'root'
})
export class ExpenseEntryService {
private expenseRestUrl = 'api/expense';
private httpOptions = {
headers: new HttpHeaders( { 'Content-Type': 'application/json' })
};
constructor(
private httpClient : HttpClient) { }
}
使用HttpClient服務進行Http程式設計
啟動Expense REST API應用程式,如下所示:
cd /go/to/expense-rest-api node .\server.js
在**ExpenseEntryService** (src/app/expense-entry.service.ts) 服務中新增**getExpenseEntries()**和**httpErrorHandler()**方法。
getExpenseEntries() : Observable<ExpenseEntry[]> {
return this.httpClient.get<ExpenseEntry[]>(this.expenseRestUrl, this.httpOptions)
.pipe(retry(3),catchError(this.httpErrorHandler));
}
getExpenseEntry(id: number) : Observable<ExpenseEntry> {
return this.httpClient.get<ExpenseEntry>(this.expenseRestUrl + "/" + id, this.httpOptions)
.pipe(
retry(3),
catchError(this.httpErrorHandler)
);
}
private httpErrorHandler (error: HttpErrorResponse) {
if (error.error instanceof ErrorEvent) {
console.error("A client side error occurs. The error message is " + error.message);
} else {
console.error(
"An error happened in server. The HTTP status code is " + error.status + " and the error returned is " + error.message);
}
return throwError("Error occurred. Pleas try again");
}
這裡:
**getExpenseEntries()**使用費用端點呼叫**get()**方法,並配置錯誤處理程式。此外,它還將**httpClient**配置為在失敗的情況下最多嘗試3次。最後,它將伺服器的響應作為型別化**(ExpenseEntry[])** Observable物件返回。
**getExpenseEntry**類似於getExpenseEntries(),只是它傳遞ExpenseEntry物件的id並獲取ExpenseEntry Observable物件。
**ExpenseEntryService**的完整程式碼如下:
import { Injectable } from '@angular/core';
import { ExpenseEntry } from './expense-entry';
import { Observable, throwError } from 'rxjs';
import { catchError, retry } from 'rxjs/operators';
import { HttpClient, HttpHeaders, HttpErrorResponse } from '@angular/common/http';
@Injectable({
providedIn: 'root'
})
export class ExpenseEntryService {
private expenseRestUrl = 'https://:8000/api/expense';
private httpOptions = {
headers: new HttpHeaders( { 'Content-Type': 'application/json' })
};
constructor(private httpClient : HttpClient) { }
getExpenseEntries() : Observable {
return this.httpClient.get(this.expenseRestUrl, this.httpOptions)
.pipe(
retry(3),
catchError(this.httpErrorHandler)
);
}
getExpenseEntry(id: number) : Observable {
return this.httpClient.get(this.expenseRestUrl + "/" + id, this.httpOptions)
.pipe(
retry(3),
catchError(this.httpErrorHandler)
);
}
private httpErrorHandler (error: HttpErrorResponse) {
if (error.error instanceof ErrorEvent) {
console.error("A client side error occurs. The error message is " + error.message);
} else {
console.error(
"An error happened in server. The HTTP status code is " + error.status + " and the error returned is " + error.message);
}
return throwError("Error occurred. Pleas try again");
}
}
開啟**ExpenseEntryListComponent** (src-entry-list-entry-list.component.ts) 並透過建構函式注入**ExpenseEntryService**,如下所示
constructor(private debugService: DebugService, private restService :
ExpenseEntryService ) { }
更改**getExpenseEntries()**函式。呼叫**ExpenseEntryService**中的getExpenseEntries()方法,而不是返回模擬項。
getExpenseItems() {
this.restService.getExpenseEntries()
.subscribe( data =− this.expenseEntries = data );
}
**ExpenseEntryListComponent**的完整程式碼如下:
import { Component, OnInit } from '@angular/core';
import { ExpenseEntry } from '../expense-entry';
import { DebugService } from '../debug.service';
import { ExpenseEntryService } from '../expense-entry.service';
@Component({
selector: 'app-expense-entry-list',
templateUrl: './expense-entry-list.component.html',
styleUrls: ['./expense-entry-list.component.css'],
providers: [DebugService]
})
export class ExpenseEntryListComponent implements OnInit {
title: string;
expenseEntries: ExpenseEntry[];
constructor(private debugService: DebugService, private restService : ExpenseEntryService ) { }
ngOnInit() {
this.debugService.info("Expense Entry List component initialized");
this.title = "Expense Entry List";
this.getExpenseItems();
}
getExpenseItems() {
this.restService.getExpenseEntries()
.subscribe( data => this.expenseEntries = data );
}
}
最後,檢查應用程式,您將看到以下響應。
新增開支功能
讓我們在我們的**ExpenseEntryService**中新增一個新方法**addExpenseEntry()**來新增新的費用條目,如下所示:
addExpenseEntry(expenseEntry: ExpenseEntry): Observable<ExpenseEntry> {
return this.httpClient.post<ExpenseEntry>(this.expenseRestUrl, expenseEntry, this.httpOptions)
.pipe(
retry(3),
catchError(this.httpErrorHandler)
);
}
更新開支條目功能
讓我們在我們的**ExpenseEntryService**中新增一個新方法**updateExpenseEntry()**來更新現有的費用條目,如下所示
updateExpenseEntry(expenseEntry: ExpenseEntry): Observable<ExpenseEntry> {
return this.httpClient.put<ExpenseEntry>(this.expenseRestUrl + "/" + expenseEntry.id, expenseEntry, this.httpOptions)
.pipe(
retry(3),
catchError(this.httpErrorHandler)
);
}
刪除開支條目功能
讓我們在我們的**ExpenseEntryService**中新增一個新方法**deleteExpenseEntry()**來刪除現有的費用條目,如下所示:
deleteExpenseEntry(expenseEntry: ExpenseEntry | number) : Observable<ExpenseEntry> {
const id = typeof expenseEntry == 'number' ? expenseEntry : expenseEntry.id
const url = `${this.expenseRestUrl}/${id}`;
return this.httpClient.delete<ExpenseEntry>(url, this.httpOptions)
.pipe(
retry(3),
catchError(this.httpErrorHandler)
);
}
新增路由
如果之前沒有生成,請使用以下命令生成路由模組。
ng generate module app-routing --module app --flat
輸出
輸出如下所示:
CREATE src/app/app-routing.module.ts (196 bytes) UPDATE src/app/app.module.ts (785 bytes)
這裡:
CLI 生成AppRoutingModule,然後將其配置到AppModule中。
更新AppRoutingModule (src/app/app.module.ts),如下所示:
import { NgModule } from '@angular/core';
import { Routes, RouterModule } from '@angular/router'; import { ExpenseEntryComponent } from './expense-entry/expense-entry.component';
import { ExpenseEntryListComponent } from './expense-entry-list/expense-entry-list.component';
const routes: Routes = [
{ path: 'expenses', component: ExpenseEntryListComponent },
{ path: 'expenses/detail/:id', component: ExpenseEntryComponent },
{ path: '', redirectTo: 'expenses', pathMatch: 'full' }];
@NgModule({
imports: [RouterModule.forRoot(routes)],
exports: [RouterModule] })
export class AppRoutingModule { }
在這裡,我們為支出列表和支出詳情元件添加了路由。
更新AppComponent模板(src/app/app.component.html)以包含router-outlet和routerLink。
<!-- Navigation -->
<nav class="navbar navbar-expand-lg navbar-dark bg-dark static-top">
<div class="container">
<a class="navbar-brand" href="#">{{ title }}</a> <button class="navbar-toggler" type="button" data-toggle="collapse" data-target="#navbarResponsive" aria-controls="navbarResponsive" aria-expanded="false" aria-label="Toggle navigation">
<span class="navbar-toggler-icon"></span>
</button>
<div class="collapse navbar-collapse" id="navbarResponsive">
<ul class="navbar-nav ml-auto">
<li class="nav-item active">
<a class="nav-link" href="#">Home
<span class="sr-only" routerLink="/">(current)</span>
</a>
</li>
<li class="nav-item">
<a class="nav-link" routerLink="/expenses">Report</a>
</li>
<li class="nav-item">
<a class="nav-link" href="#">Add Expense</a>
</li>
<li class="nav-item">
<a class="nav-link" href="#">About</a>
</li>
</ul>
</div>
</div>
</nav>
<router-outlet></router-outlet>
開啟ExpenseEntryListComponent模板(src/app/expense-entry-list/expense-entry-list.component.html)併為每個支出條目包含檢視選項。
<table class="table table-striped">
<thead>
<tr>
<th>Item</th>
<th>Amount</th>
<th>Category</th>
<th>Location</th>
<th>Spent On</th>
<th>View</th>
</tr>
</thead>
<tbody>
<tr *ngFor="let entry of expenseEntries">
<th scope="row">{{ entry.item }}</th>
<th>{{ entry.amount }}</th>
<td>{{ entry.category }}</td>
<td>{{ entry.location }}</td>
<td>{{ entry.spendOn | date: 'medium' }}</td>
<td><a routerLink="../expenses/detail/{{ entry.id }}">View</a></td>
</tr>
</tbody>
</table>
在這裡,我們更新了支出列表表格,並添加了一列來顯示檢視選項。
開啟ExpenseEntryComponent (src/app/expense-entry/expense-entry.component.ts)並新增功能以獲取當前選定的支出條目。這可以透過首先透過paramMap獲取 id,然後使用ExpenseEntryService中的getExpenseEntry()方法來完成。
this.expenseEntry$ = this.route.paramMap.pipe(
switchMap(params => {
this.selectedId = Number(params.get('id'));
return
this.restService.getExpenseEntry(this.selectedId); }));
this.expenseEntry$.subscribe( (data) => this.expenseEntry = data );
更新 ExpenseEntryComponent 並新增轉到支出列表的選項。
goToList() {
this.router.navigate(['/expenses']);
}
ExpenseEntryComponent 的完整程式碼如下:
import { Component, OnInit } from '@angular/core'; import { ExpenseEntry } from '../expense-entry'; import { ExpenseEntryService } from '../expense-entry.service';
import { Router, ActivatedRoute } from '@angular/router';
import { Observable } from 'rxjs';
import { switchMap } from 'rxjs/operators';
@Component({
selector: 'app-expense-entry',
templateUrl: './expense-entry.component.html',
styleUrls: ['./expense-entry.component.css']
})
export class ExpenseEntryComponent implements OnInit {
title: string;
expenseEntry$ : Observable<ExpenseEntry>;
expenseEntry: ExpenseEntry = {} as ExpenseEntry;
selectedId: number;
constructor(private restService : ExpenseEntryService, private router : Router, private route :
ActivatedRoute ) { }
ngOnInit() {
this.title = "Expense Entry";
this.expenseEntry$ = this.route.paramMap.pipe(
switchMap(params => {
this.selectedId = Number(params.get('id'));
return
this.restService.getExpenseEntry(this.selectedId); }));
this.expenseEntry$.subscribe( (data) => this.expenseEntry = data );
}
goToList() {
this.router.navigate(['/expenses']);
}
}
開啟ExpenseEntryComponent (src/app/expense-entry/expense-entry.component.html)模板並新增一個新按鈕以導航回支出列表頁面。
<div class="col-sm" style="text-align: right;"> <button type="button" class="btn btn-primary" (click)="goToList()">Go to List</button> <button type="button" class="btn btn-primary">Edit</button> </div>
在這裡,我們在編輯按鈕之前添加了轉到列表按鈕。
使用以下命令執行應用程式:
ng serve
應用的最終輸出如下所示:
單擊第一個條目的檢視選項將導航到詳細資訊頁面並顯示所選支出條目,如下所示:
啟用登入和登出功能
建立一個新的服務 AuthService 來驗證使用者。
ng generate service auth CREATE src/app/auth.service.spec.ts (323 bytes) CREATE src/app/auth.service.ts (133 bytes)
開啟AuthService幷包含以下程式碼。
import { Injectable } from '@angular/core';
import { Observable, of } from 'rxjs';
import { tap, delay } from 'rxjs/operators';
@Injectable({
providedIn: 'root'
})
export class AuthService {
isUserLoggedIn: boolean = false;
login(userName: string, password: string): Observable {
console.log(userName);
console.log(password);
this.isUserLoggedIn = userName == 'admin' && password == 'admin';
localStorage.setItem('isUserLoggedIn', this.isUserLoggedIn ? "true" : "false");
return of(this.isUserLoggedIn).pipe(
delay(1000),
tap(val => {
console.log("Is User Authentication is successful: " + val);
})
);
}
logout(): void {
this.isUserLoggedIn = false;
localStorage.removeItem('isUserLoggedIn');
}
constructor() { }
}
這裡:
我們編寫了兩個方法,login 和logout。
login 方法的目的是驗證使用者,如果使用者成功驗證,它會將資訊儲存在localStorage中,然後返回 true。
身份驗證驗證是使用者名稱和密碼應該是admin。
我們沒有使用任何後端。相反,我們使用 Observables 模擬了 1 秒的延遲。
logout 方法的目的是使使用者無效並刪除儲存在 localStorage 中的資訊。
使用以下命令建立一個 login 元件:
ng generate component login CREATE src/app/login/login.component.html (20 bytes) CREATE src/app/login/login.component.spec.ts (621 bytes) CREATE src/app/login/login.component.ts (265 bytes) CREATE src/app/login/login.component.css (0 bytes) UPDATE src/app/app.module.ts (1207 bytes)
開啟 LoginComponent 幷包含以下程式碼:
import { Component, OnInit } from '@angular/core';
import { FormGroup, FormControl } from '@angular/forms';
import { AuthService } from '../auth.service';
import { Router } from '@angular/router';
@Component({
selector: 'app-login',
templateUrl: './login.component.html',
styleUrls: ['./login.component.css']
})
export class LoginComponent implements OnInit {
userName: string;
password: string;
formData: FormGroup;
constructor(private authService : AuthService, private router : Router) { }
ngOnInit() {
this.formData = new FormGroup({
userName: new FormControl("admin"),
password: new FormControl("admin"),
});
}
onClickSubmit(data: any) {
this.userName = data.userName;
this.password = data.password;
console.log("Login page: " + this.userName);
console.log("Login page: " + this.password);
this.authService.login(this.userName, this.password)
.subscribe( data => {
console.log("Is Login Success: " + data);
if(data) this.router.navigate(['/expenses']);
});
}
}
這裡:
使用了響應式表單。
匯入了 AuthService 和 Router,並在建構函式中進行了配置。
建立了一個 FormGroup 例項,幷包含了兩個 FormControl 例項,一個用於使用者名稱,另一個用於密碼。
建立了一個 onClickSubmit 方法,用於使用 authService 驗證使用者,如果成功,則導航到支出列表。
開啟 LoginComponent 模板幷包含以下模板程式碼。
<!-- Page Content -->
<div class="container">
<div class="row">
<div class="col-lg-12 text-center" style="padding-top: 20px;">
<div class="container box" style="margin-top: 10px; padding-left: 0px; padding-right: 0px;">
<div class="row">
<div class="col-12" style="text-align: center;">
<form [formGroup]="formData" (ngSubmit)="onClickSubmit(formData.value)"
class="form-signin">
<h2 class="form-signin-heading">Please sign in</h2>
<label for="inputEmail" class="sr-only">Email address</label>
<input type="text" id="username" class="form-control"
formControlName="userName" placeholder="Username" required autofocus>
<label for="inputPassword" class="sr-only">Password</label>
<input type="password" id="inputPassword" class="form-control"
formControlName="password" placeholder="Password" required>
<button class="btn btn-lg btn-primary btn-block" type="submit">Sign in</button>
</form>
</div>
</div>
</div>
</div>
</div>
</div>
這裡:
建立了一個響應式表單並設計了一個登入表單。
將 onClickSubmit 方法附加到表單提交操作。
開啟 LoginComponent 樣式幷包含以下 CSS 程式碼。
.form-signin {
max-width: 330px;
padding: 15px;
margin: 0 auto;
}
input {
margin-bottom: 20px;
}
這裡,添加了一些樣式來設計登入表單。
使用以下命令建立一個登出元件:
ng generate component logout CREATE src/app/logout/logout.component.html (21 bytes) CREATE src/app/logout/logout.component.spec.ts (628 bytes) CREATE src/app/logout/logout.component.ts (269 bytes) CREATE src/app/logout/logout.component.css (0 bytes) UPDATE src/app/app.module.ts (1368 bytes)
開啟 LogoutComponent 幷包含以下程式碼。
import { Component, OnInit } from '@angular/core';
import { AuthService } from '../auth.service';
import { Router } from '@angular/router';
@Component({
selector: 'app-logout',
templateUrl: './logout.component.html',
styleUrls: ['./logout.component.css']
})
export class LogoutComponent implements OnInit {
constructor(private authService : AuthService, private router: Router) { }
ngOnInit() {
this.authService.logout();
this.router.navigate(['/']);
}
}
這裡:
- 使用了 AuthService 的 logout 方法。
- 使用者登出後,頁面將重定向到主頁 (/)。
使用以下命令建立一個守衛:
ng generate guard expense CREATE src/app/expense.guard.spec.ts (364 bytes) CREATE src/app/expense.guard.ts (459 bytes)
開啟 ExpenseGuard 幷包含以下程式碼:
import { Injectable } from '@angular/core';
import { CanActivate, ActivatedRouteSnapshot, RouterStateSnapshot, Router, UrlTree } from '@angular/router';
import { Observable } from 'rxjs';
import { AuthService } from './auth.service';
@Injectable({
providedIn: 'root'
})
export class ExpenseGuard implements CanActivate {
constructor(private authService: AuthService, private router: Router) {}
canActivate(
next: ActivatedRouteSnapshot,
state: RouterStateSnapshot): boolean | UrlTree {
let url: string = state.url;
return this.checkLogin(url);
}
checkLogin(url: string): true | UrlTree {
console.log("Url: " + url)
let val: string = localStorage.getItem('isUserLoggedIn');
if(val != null && val == "true"){
if(url == "/login")
this.router.parseUrl('/expenses');
else
return true;
} else {
return this.router.parseUrl('/login');
}
}
}
這裡:
- checkLogin 將檢查 localStorage 是否包含使用者資訊,如果可用,則返回 true。
- 如果使用者已登入並轉到登入頁面,它將把使用者重定向到支出頁面。
- 如果使用者未登入,則使用者將被重定向到登入頁面。
開啟 AppRoutingModule (src/app/app-routing.module.ts) 並更新以下程式碼:
import { NgModule } from '@angular/core';
import { Routes, RouterModule } from '@angular/router';
import { ExpenseEntryComponent } from './expense-entry/expense-entry.component';
import { ExpenseEntryListComponent } from './expense-entry-list/expense-entry-list.component';
import { LoginComponent } from './login/login.component';
import { LogoutComponent } from './logout/logout.component';
import { ExpenseGuard } from './expense.guard';
const routes: Routes = [
{ path: 'login', component: LoginComponent },
{ path: 'logout', component: LogoutComponent },
{ path: 'expenses', component: ExpenseEntryListComponent, canActivate: [ExpenseGuard]},
{ path: 'expenses/detail/:id', component: ExpenseEntryComponent, canActivate: [ExpenseGuard]},
{ path: '', redirectTo: 'expenses', pathMatch: 'full' }
];
@NgModule({
imports: [RouterModule.forRoot(routes)],
exports: [RouterModule]
})
export class AppRoutingModule { }
這裡:
- 匯入了 LoginComponent 和 LogoutComponent。
- 匯入了 ExpenseGuard。
- 建立了兩個新路由,login 和 logout,分別用於訪問 LoginComponent 和 LogoutComponent。
- 為 ExpenseEntryComponent 和 ExpenseEntryListComponent 新增新的 canActivate 選項。
開啟 AppComponent 模板並新增兩個登入和登出連結。
<div class="collapse navbar-collapse" id="navbarResponsive">
<ul class="navbar-nav ml-auto">
<li class="nav-item active">
<a class="nav-link" href="#">Home
<span class="sr-only" routerLink="/">(current)</span>
</a>
</li>
<li class="nav-item">
<a class="nav-link" routerLink="/expenses">Report</a>
</li>
<li class="nav-item">
<a class="nav-link" href="#">Add Expense</a>
</li>
<li class="nav-item">
<a class="nav-link" href="#">About</a>
</li>
<li class="nav-item">
<div *ngIf="isUserLoggedIn; else isLogOut">
<a class="nav-link" routerLink="/logout">Logout</a>
</div>
<ng-template #isLogOut>
<a class="nav-link" routerLink="/login">Login</a>
</ng-template>
</li>
</ul>
</div>
開啟 AppComponent 並更新以下程式碼:
import { Component } from '@angular/core';
import { AuthService } from './auth.service';
@Component({
selector: 'app-root',
templateUrl: './app.component.html',
styleUrls: ['./app.component.css']
})
export class AppComponent {
title = 'Expense Manager';
isUserLoggedIn = false;
constructor(private authService: AuthService) {}
ngOnInit() {
let storeData = localStorage.getItem("isUserLoggedIn");
console.log("StoreData: " + storeData);
if( storeData != null && storeData == "true")
this.isUserLoggedIn = true;
else
this.isUserLoggedIn = false;
}
}
在這裡,我們添加了識別使用者狀態的邏輯,以便我們可以顯示登入/登出功能。
開啟 AppModule (src/app/app.module.ts) 並配置 ReactiveFormsModule
import { ReactiveFormsModule } from '@angular/forms';
imports: [
ReactiveFormsModule
]
現在,執行應用程式,應用程式將開啟登入頁面。
輸入 admin 和 admin 作為使用者名稱和密碼,然後單擊提交。應用程式處理登入並如以下所示將使用者重定向到支出列表頁面:
最後,您可以單擊登出並退出應用程式。
新增/編輯/刪除開支
使用以下命令新增新元件EditEntryComponent來新增新的開支條目並編輯現有的開支條目:
ng generate component EditEntry CREATE src/app/edit-entry/edit-entry.component.html (25 bytes) CREATE src/app/edit-entry/edit-entry.component.spec.ts (650 bytes) CREATE src/app/edit-entry/edit-entry.component.ts (284 bytes) CREATE src/app/edit-entry/edit-entry.component.css (0 bytes) UPDATE src/app/app.module.ts (1146 bytes)
使用以下程式碼更新EditEntryComponent:
import { Component, OnInit } from '@angular/core';
import { FormGroup, FormControl, Validators } from '@angular/forms';
import { ExpenseEntry } from '../expense-entry';
import { ExpenseEntryService } from '../expense-entry.service';
import { Router, ActivatedRoute } from '@angular/router';
@Component({
selector: 'app-edit-entry',
templateUrl: './edit-entry.component.html',
styleUrls: ['./edit-entry.component.css']
})
export class EditEntryComponent implements OnInit {
id: number;
item: string;
amount: number;
category: string;
location: string;
spendOn: Date;
formData: FormGroup;
selectedId: number;
expenseEntry: ExpenseEntry;
constructor(private expenseEntryService : ExpenseEntryService, private router: Router, private route: ActivatedRoute) { }
ngOnInit() {
this.formData = new FormGroup({
id: new FormControl(),
item: new FormControl('', [Validators.required]),
amount: new FormControl('', [Validators.required]),
category: new FormControl(),
location: new FormControl(),
spendOn: new FormControl()
});
this.selectedId = Number(this.route.snapshot.paramMap.get('id'));
if(this.selectedId != null && this.selectedId != 0) {
this.expenseEntryService.getExpenseEntry(this.selectedId)
.subscribe( (data) =>
{
this.expenseEntry = data;
this.formData.controls['id'].setValue(this.expenseEntry.id);
this.formData.controls['item'].setValue(this.expenseEntry.item);
this.formData.controls['amount'].setValue(this.expenseEntry.amount);
this.formData.controls['category'].setValue(this.expenseEntry.category);
this.formData.controls['location'].setValue(this.expenseEntry.location);
this.formData.controls['spendOn'].setValue(this.expenseEntry.spendOn);
})
}
}
get itemValue() {
return this.formData.get('item');
}
get amountValue() {
return this.formData.get('amount');
}
onClickSubmit(data: any) {
console.log('onClickSubmit fired');
this.id = data.id;
this.item = data.item;
this.amount = data.amount;
this.category = data.category;
this.location = data.location;
this.spendOn = data.spendOn;
let expenseEntry : ExpenseEntry = {
id: this.id,
item: this.item,
amount: this.amount,
category: this.category,
location: this.location,
spendOn: this.spendOn,
createdOn: new Date(2020, 5, 20)
}
console.log(expenseEntry);
if(expenseEntry.id == null || expenseEntry.id == 0) {
console.log('add fn fired');
this.expenseEntryService.addExpenseEntry(expenseEntry)
.subscribe( data => { console.log(data); this.router.navigate(['/expenses']); });
} else {
console.log('edit fn fired');
this.expenseEntryService.updateExpenseEntry(expenseEntry)
.subscribe( data => { console.log(data); this.router.navigate(['/expenses']); });
}
}
}
這裡:
在ngOnInit方法中使用FormControl和FormGroup類以及適當的驗證規則建立了一個表單formData。
在ngOnInit方法中載入要編輯的開支條目。
建立了兩個方法itemValue和amountValue,分別用於獲取使用者輸入的專案和金額值,以進行驗證。
建立了方法onClickSubmit來儲存(新增/更新)開支條目。
使用Expense服務新增和更新開支條目。
使用以下所示的開支表單更新EditEntryComponent模板:
<!-- Page Content -->
<div class="container">
<div class="row">
<div class="col-lg-12 text-center" style="padding-top: 20px;">
<div class="container" style="padding-left: 0px; padding-right: 0px;">
</div>
<div class="container box" style="margin-top: 10px;">
<form [formGroup]="formData" (ngSubmit)="onClickSubmit(formData.value)" class="form" novalidate>
<div class="form-group">
<label for="item">Item</label>
<input type="hidden" class="form-control" id="id" formControlName="id">
<input type="text" class="form-control" id="item" formControlName="item">
<div
*ngIf="!itemValue?.valid && (itemValue?.dirty ||itemValue?.touched)">
<div [hidden]="!itemValue.errors.required">
Item is required
</div>
</div>
</div>
<div class="form-group">
<label for="amount">Amount</label>
<input type="text" class="form-control" id="amount" formControlName="amount">
<div
*ngIf="!amountValue?.valid && (amountValue?.dirty ||amountValue?.touched)">
<div [hidden]="!amountValue.errors.required">
Amount is required
</div>
</div>
</div>
<div class="form-group">
<label for="category">Category</label>
<select class="form-control" id="category" formControlName="category">
<option>Food</option>
<option>Vegetables</option>
<option>Fruit</option>
<option>Electronic Item</option>
<option>Bill</option>
</select>
</div>
<div class="form-group">
<label for="location">location</label>
<input type="text" class="form-control" id="location" formControlName="location">
</div>
<div class="form-group">
<label for="spendOn">spendOn</label>
<input type="text" class="form-control" id="spendOn" formControlName="spendOn">
</div>
<button class="btn btn-lg btn-primary btn-block" type="submit" [disabled]="!formData.valid">Submit</button>
</form>
</div>
</div>
</div>
</div>
這裡:
建立了一個表單並將其繫結到在類中建立的表單formData。
驗證item和amount為必填值。
驗證成功後呼叫onClickSubmit函式。
開啟EditEntryComponent樣式表並更新以下程式碼:
.form {
max-width: 330px;
padding: 15px;
margin: 0 auto;
}
.form label {
text-align: left;
width: 100%;
}
input {
margin-bottom: 20px;
}
在這裡,我們對開支條目表單進行了樣式設定。
使用以下命令新增AboutComponent:
ng generate component About CREATE src/app/about/about.component.html (20 bytes) CREATE src/app/about/about.component.spec.ts (621 bytes) CREATE src/app/about/about.component.ts (265 bytes) CREATE src/app/about/about.component.css (0 bytes) UPDATE src/app/app.module.ts (1120 bytes)
開啟AboutComponent並新增如下所示的標題:
import { Component, OnInit } from '@angular/core';
@Component({
selector: 'app-about',
templateUrl: './about.component.html',
styleUrls: ['./about.component.css']
})
export class AboutComponent implements OnInit {
title = "About";
constructor() { }
ngOnInit() {
}
}
開啟AboutComponent模板並更新如下所示的內容:
<!-- Page Content -->
<div class="container">
<div class="row">
<div class="col-lg-12 text-center" style="padding-top: 20px;">
<div class="container" style="padding-left: 0px; padding-right: 0px;">
<div class="row">
<div class="col-sm" style="text-align: left;">
<h1>{{ title }}</h1>
</div>
</div>
</div>
<div class="container box" style="margin-top: 10px;">
<div class="row">
<div class="col" style="text-align: left;">
<p>Expense management Application</p>
</div>
</div>
</div>
</div>
</div>
</div>
新增新增和編輯開支條目的路由,如下所示:
import { NgModule } from '@angular/core';
import { Routes, RouterModule } from '@angular/router';
import { ExpenseEntryComponent } from './expense-entry/expense-entry.component';
import { ExpenseEntryListComponent } from './expense-entry-list/expense-entry-list.component';
import { LoginComponent } from './login/login.component';
import { LogoutComponent } from './logout/logout.component';
import { EditEntryComponent } from './edit-entry/edit-entry.component';
import { AboutComponent } from './about/about.component';
import { ExpenseGuard } from './expense.guard';
const routes: Routes = [
{ path: 'about', component: AboutComponent },
{ path: 'login', component: LoginComponent },
{ path: 'logout', component: LogoutComponent },
{ path: 'expenses', component: ExpenseEntryListComponent, canActivate: [ExpenseGuard]},
{ path: 'expenses/detail/:id', component: ExpenseEntryComponent, canActivate: [ExpenseGuard]},
{ path: 'expenses/add', component: EditEntryComponent, canActivate: [ExpenseGuard]},
{ path: 'expenses/edit/:id', component: EditEntryComponent, canActivate: [ExpenseGuard]},
{ path: '', redirectTo: 'expenses', pathMatch: 'full' }
];
@NgModule({
imports: [RouterModule.forRoot(routes)],
exports: [RouterModule]
})
export class AppRoutingModule { }
在這裡,我們添加了關於、新增開支和編輯開支路由。
在ExpenseEntryListComponent模板中新增編輯和刪除連結。
<table class="table table-striped">
<thead>
<tr>
<th>Item</th>
<th>Amount</th>
<th>Category</th>
<th>Location</th>
<th>Spent On</th>
<th>View</th>
<th>Edit</th>
<th>Delete</th>
</tr>
</thead>
<tbody>
<tr *ngFor="let entry of expenseEntries">
<th scope="row">{{ entry.item }}</th>
<th>{{ entry.amount }}</th>
<td>{{ entry.category }}</td>
<td>{{ entry.location }}</td>
<td>{{ entry.spendOn | date: 'medium' }}</td>
<td><a routerLink="../expenses/detail/{{ entry.id }}">View</a></td>
<td><a routerLink="../expenses/edit/{{ entry.id }}">Edit</a></td>
<td><a href="#" (click)="deleteExpenseEntry($event, entry.id)">Delete</a></td>
</tr>
</tbody>
</table>
在這裡,我們添加了兩列。一列用於顯示編輯連結,另一列用於顯示刪除連結。
如下所示更新ExpenseEntryListComponent中的deleteExpenseEntry方法:
deleteExpenseEntry(evt, id) {
evt.preventDefault();
if(confirm("Are you sure to delete the entry?")) {
this.restService.deleteExpenseEntry(id)
.subscribe( data => console.log(data) );
this.getExpenseItems();
}
}
在這裡,我們要求確認刪除,如果使用者確認,則呼叫開支服務中的deleteExpenseEntry方法來刪除選定的開支項。
將ExpenseEntryListComponent模板頂部的編輯連結更改為新增連結,如下所示:
<div class="col-sm" style="text-align: right;"> <button class="btn btn-primary" routerLink="/expenses/add">ADD</button> <!-- <button type="button" class="btn btn-primary">Edit</button> --> </div>
在ExpenseEntryComponent模板中新增編輯連結。
<div class="col-sm" style="text-align: right;"> <button type="button" class="btn btn-primary" (click)="goToList()">Go to List</button> <button type="button" class="btn btn-primary" (click)="goToEdit()">Edit</button> </div>
開啟ExpenseEntryComponent並新增如下所示的goToEdit()方法:
goToEdit() {
this.router.navigate(['/expenses/edit', this.selectedId]);
}
更新AppComponent模板中的導航連結。
<!-- Navigation -->
<nav class="navbar navbar-expand-lg navbar-dark bg-dark static-top">
<div class="container">
<a class="navbar-brand" href="#">{{ title }}</a>
<button class="navbar-toggler" type="button" data-toggle="collapse" data-target="#navbarResponsive" aria-controls="navbarResponsive" aria-expanded="false" aria-label="Toggle navigation">
<span class="navbar-toggler-icon"></span>
</button>
<div class="collapse navbar-collapse" id="navbarResponsive">
<ul class="navbar-nav ml-auto">
<li class="nav-item active">
<a class="nav-link" href="#">Home
<span class="sr-only" routerLink="/">(current)</span>
</a>
</li>
<li class="nav-item">
<a class="nav-link" routerLink="/expenses/add">Add Expense</a>
</li>
<li class="nav-item">
<a class="nav-link" routerLink="/about">About</a>
</li>
<li class="nav-item">
<div *ngIf="isUserLoggedIn; else isLogOut">
<a class="nav-link" routerLink="/logout">Logout</a>
</div>
<ng-template #isLogOut>
<a class="nav-link" routerLink="/login">Login</a>
</ng-template>
</li>
</ul>
</div>
</div>
</nav>
<router-outlet></router-outlet>
在這裡,我們更新了新增開支連結和關於連結。
執行應用程式,輸出將類似於以下所示:
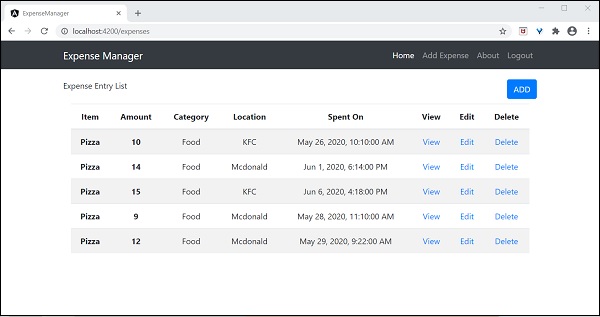
嘗試使用開支列表頁面中的新增連結新增新的開支。輸出將類似於以下所示:
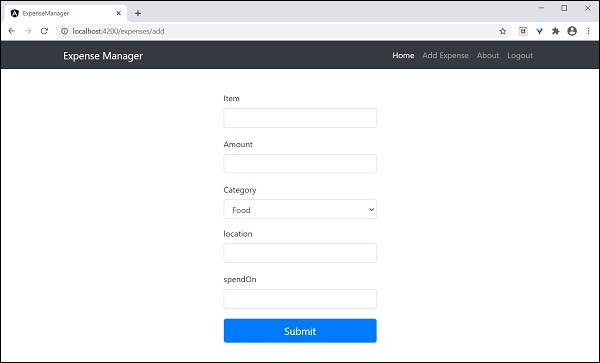
填寫表單,如下所示:
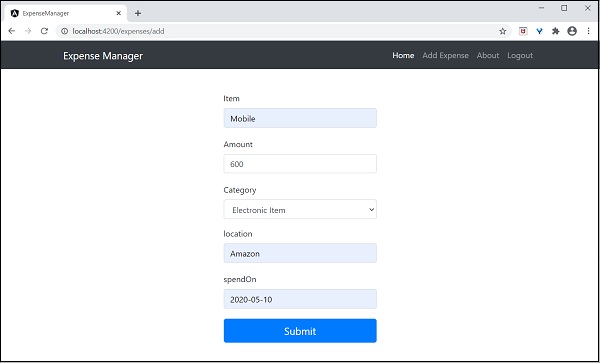
如果資料填寫不正確,驗證程式碼將發出如下所示的警報:

點選提交。它將觸發提交事件,資料將儲存到後端並重定向到列表頁面,如下所示:
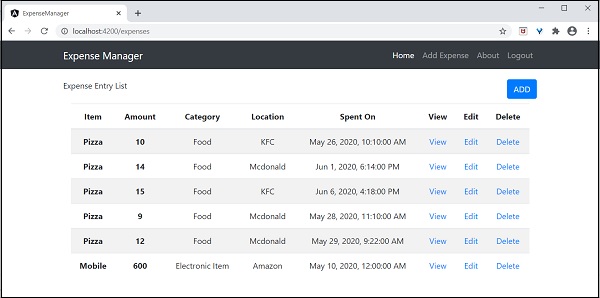
嘗試使用開支列表頁面中的編輯連結編輯現有開支。輸出將類似於以下所示:
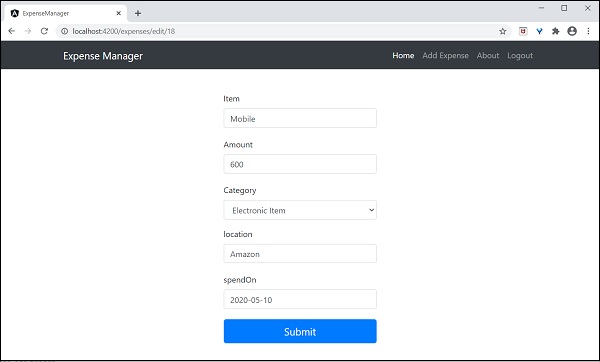
點選提交。它將觸發提交事件,資料將儲存到後端並重定向到列表頁面。
要刪除專案,請單擊刪除連結。它將確認刪除,如下所示:
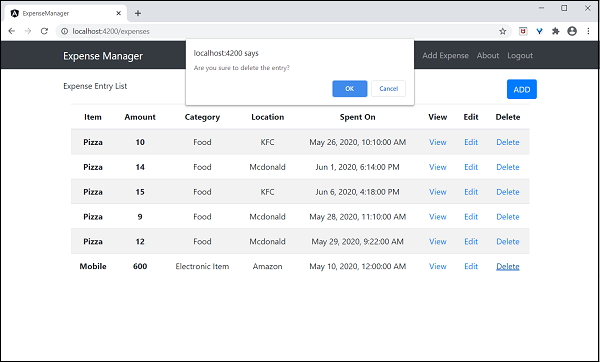
最後,我們實現了應用程式中管理開支所需的所有功能。
Angular 8 - 新功能?
Angular社群不斷更新其版本。本章解釋了Angular 9版本的更新。
安裝Angular 9
如果您想使用Angular 9,首先需要使用以下命令設定Angular 9 CLI:
npm install -g @angular/cli@^9.0.0
執行此命令後,您可以使用以下命令檢查版本:
ng version
Angular 9 更新
讓我們簡要了解Angular 9的更新。
Ivy編譯器
Ivy編譯器成為Angular 9中的預設編譯器。這使得應用程式執行速度更快,效率更高。而Angular 8中Ivy是可選的。我們必須在tsconfig.json檔案中啟用它。
Ivy編譯器支援以下功能:
執行更快的測試 - TestBed實現有助於更有效地進行測試。
改進的CSS類和樣式 - Ivy樣式易於合併和設計,並且可預測。
改進的型別檢查 - 此功能有助於在開發過程的早期發現錯誤。
增強的除錯 - Ivy附帶更多工具以啟用更好的除錯功能。這將有助於顯示有用的堆疊跟蹤,以便我們可以輕鬆跳轉到指令。
提前編譯器(Ahead-of-Time compiler) - 這是編譯器效能的重要改進之一。AOT構建速度非常快。改進的國際化 - i18n替換有助於比以前的版本快十倍以上地構建。
可靠的ng update
ng update非常可靠。它包含清晰的進度更新並執行所有遷移。這可以使用以下命令完成:
ng update --create-commits
這裡:
–create-commits標誌用於在每次遷移後提交程式碼。
改進的依賴注入
@Injectable服務有助於在應用程式中添加註入器。providedIn元資料提供了一個新的選項platform,以確保物件可以被所有應用程式使用和共享。其定義如下:
@Injectable({
providedIn: 'platform'
})
class MyService {...}
TypeScript 3.8
Angular 9設計為支援3.8版本。TypeScript 3.8帶來了對以下功能的支援:
- 僅型別匯入和匯出。
- ECMAScript私有欄位。
- 頂級等待。
- JSDoc屬性修飾符。
- export * as ns語法。
Angular 9.0.0-next.5
Angular 9.0.0-next.5構建的main.js檔案大小較小,與之前的Angular 8版本相比,效能更好。
IDE增強
Angular 9提供了改進的IDE支援。TextMate語法支援內聯和外部模板中的語法高亮顯示。
結論
Angular是一個靈活的、不斷改進的、持續更新的可靠框架。Angular極大地簡化了SPA開發的過程。透過在每個版本中提供新功能,例如Angular Universal、漸進式Web應用程式、Web工作執行緒、Bazel構建、Ivy編譯器等,Angular將擁有長久的生命週期並獲得前端開發人員的全面支援。