- Angular 8 教程
- Angular 8 - 首頁
- Angular 8 - 簡介
- Angular 8 - 安裝
- 建立第一個應用
- Angular 8 - 架構
- Angular 元件和模板
- Angular 8 - 資料繫結
- Angular 8 - 指令
- Angular 8 - 管道
- Angular 8 - 響應式程式設計
- 服務和依賴注入
- Angular 8 - Http 客戶端程式設計
- Angular 8 - Angular Material
- 路由和導航
- Angular 8 - 動畫
- Angular 8 - 表單
- Angular 8 - 表單驗證
- 身份驗證和授權
- Angular 8 - Web Workers
- Service Workers 和 PWA
- Angular 8 - 伺服器端渲染
- Angular 8 - 國際化 (i18n)
- Angular 8 - 可訪問性
- Angular 8 - CLI 命令
- Angular 8 - 測試
- Angular 8 - Ivy 編譯器
- Angular 8 - 使用 Bazel 構建
- Angular 8 - 向後相容性
- Angular 8 - 工作示例
- Angular 9 - 有什麼新功能?
- Angular 8 有用資源
- Angular 8 - 快速指南
- Angular 8 - 有用資源
- Angular 8 - 討論
Angular 8 - 表單
表單用於處理使用者輸入資料。Angular 8 支援兩種型別的表單。它們是**模板驅動表單**和**響應式表單**。本節詳細介紹了 Angular 8 表單。
模板驅動表單
模板驅動表單是使用模板中的指令建立的。它主要用於建立簡單的表單應用程式。讓我們簡要了解如何建立模板驅動表單。
配置表單
在瞭解表單之前,讓我們學習如何在應用程式中配置表單。要啟用模板驅動表單,首先需要在**app.module.ts**中匯入**FormsModule**。如下所示:
import { BrowserModule } from '@angular/platform-browser';
import { NgModule } from '@angular/core';
import { AppRoutingModule } from './app-routing.module';
import { AppComponent } from './app.component';

//import FormsModule here
import { FormsModule } from '@angular/forms';

imports: [
   BrowserModule,
   AppRoutingModule,
   FormsModule   //Assign FormsModule
],
一旦匯入**FormsModule**,應用程式就準備好進行表單程式設計了。
建立簡單的表單
讓我們在 Angular 8 中建立一個示例應用程式**(template-form-app)**來學習模板驅動表單。
開啟命令提示符並使用以下命令建立新的 Angular 應用程式:
cd /go/to/workspace
ng new template-form-app
cd template-form-app
在**AppComponent**中配置**FormsModule**,如下所示:
...

import { FormsModule } from '@angular/forms';

@NgModule({
   declarations: [
      AppComponent,
      TestComponent
   ],
   imports: [
      BrowserModule,
      FormsModule
   ],
   providers: [],
   bootstrap: [AppComponent]
})
export class AppModule { }
使用 Angular CLI 建立測試元件,如下所示:
ng generate component test
以上建立了一個新的元件,輸出如下:
CREATE src/app/test/test.component.scss (0 bytes)
CREATE src/app/test/test.component.html (19 bytes)
CREATE src/app/test/test.component.spec.ts (614 bytes)
CREATE src/app/test/test.component.ts (262 bytes)
UPDATE src/app/app.module.ts (545 bytes)
讓我們建立一個簡單的表單來顯示使用者輸入的文字。
在**test.component.html**檔案中新增以下程式碼:
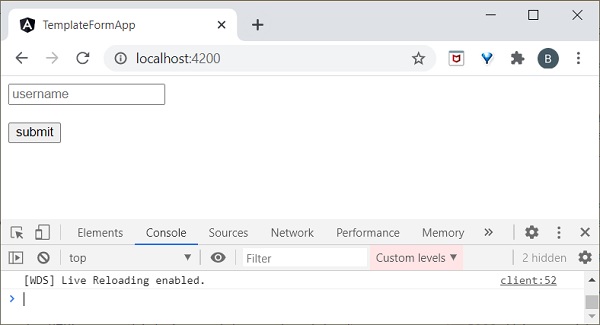
<form #userName="ngForm" (ngSubmit)="onClickSubmit(userName.value)">
   <input type="text" name="username" placeholder="username" ngModel>
   <br/>
   <br/>
   <input type="submit" value="submit">
</form>
這裡,我們在**input**文字欄位中使用了**ngModel**屬性。
在**test.component.ts**檔案中建立**onClickSubmit()**方法,如下所示
import { Component, OnInit } from '@angular/core';

@Component({
   selector: 'app-test',
   templateUrl: './test.component.html',
   styleUrls: ['./test.component.scss']
})

export class TestComponent implements OnInit {

   ngOnInit() {
   }
   onClickSubmit(result) {
      console.log("You have entered : " + result.username);
   }
}
開啟 app.component.html 並更改內容,如下所示:
<app-test></app-test>
最後,使用以下命令啟動您的應用程式(如果尚未啟動):
ng serve
現在,執行您的應用程式,您將看到以下響應:
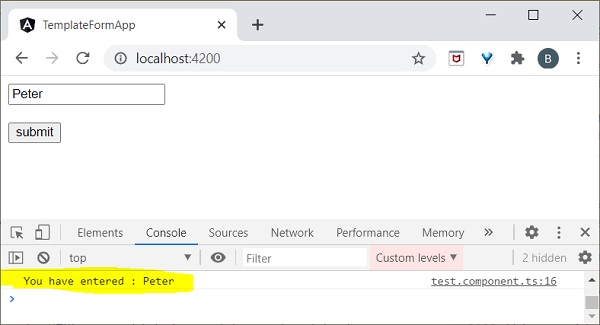
在輸入文字欄位中輸入**Peter**並點選提交。**onClickSubmit**函式將被呼叫,使用者輸入的文字**Peter**將作為引數傳送。**onClickSubmit**將在控制檯中列印使用者名稱,輸出如下:
響應式表單
**響應式表單**是在元件類內部建立的,因此也稱為模型驅動表單。每個表單控制元件在元件中都有一個物件,這提供了對錶單程式設計的更大控制和靈活性。**響應式表單**基於結構化資料模型。讓我們瞭解如何在 Angular 中使用響應式表單。
配置響應式表單
要啟用響應式表單,首先需要在**app.module.ts**中匯入**ReactiveFormsModule**。定義如下
import { BrowserModule } from '@angular/platform-browser';
import { NgModule } from '@angular/core';

import { AppRoutingModule } from './app-routing.module';
import { AppComponent } from './app.component';
import { TestComponent } from './test/test.component';
import { FormsModule } from '@angular/forms';

//import ReactiveFormsModule here
import { ReactiveFormsModule } from '@angular/forms';

  imports: [
    BrowserModule,
    AppRoutingModule,
    FormsModule,
    ReactiveFormsModule   //Assign here
  ]
建立響應式表單
在開始建立響應式表單之前,我們需要了解以下概念:
**FormControl** - 定義單個表單控制元件的基本功能
**FormGroup** - 用於聚合表單控制元件集合的值
**FormArray** - 用於將表單控制元件的值聚合到陣列中
**ControlValueAccessor** - 充當 Forms API 與 HTML DOM 元素之間的介面。
讓我們在 Angular 8 中建立一個示例應用程式**(reactive-form-app)**來學習模板驅動表單。
開啟命令提示符並使用以下命令建立新的 Angular 應用程式:
cd /go/to/workspace
ng new reactive-form-app
cd reactive-form-app
在**AppComponent**中配置**ReactiveFormsModule**,如下所示:
...
import { ReactiveFormsModule } from '@angular/forms';

@NgModule({
   declarations: [
      AppComponent,
      TestComponent
   ],
   imports: [
      BrowserModule,
      ReactiveFormsModule
   ],
   providers: [],
   bootstrap: [AppComponent]
})
export class AppModule { }
使用 Angular CLI 建立**test**元件,如下所示:
ng generate component test
以上建立了一個新的元件,輸出如下:
CREATE src/app/test/test.component.scss (0 bytes)
CREATE src/app/test/test.component.html (19 bytes)
CREATE src/app/test/test.component.spec.ts (614 bytes)
CREATE src/app/test/test.component.ts (262 bytes)
UPDATE src/app/app.module.ts (545 bytes)
讓我們建立一個簡單的表單來顯示使用者輸入的文字。
我們需要在**TestComponent**中匯入**FormGroup、FormControl**類。
import { FormGroup, FormControl } from '@angular/forms';
在**test.component.ts**檔案中建立**onClickSubmit()**方法,如下所示:
import { Component, OnInit } from '@angular/core';
import { FormGroup, FormControl } from '@angular/forms';

@Component({
   selector: 'app-test',
   templateUrl: './test.component.html',
   styleUrls: ['./test.component.css']
})
export class TestComponent implements OnInit {
   userName;
   formdata;
   ngOnInit() {
      this.formdata = new FormGroup({
         userName: new FormControl("Tutorialspoint")
      });
   }
   onClickSubmit(data) {this.userName = data.userName;}
}
這裡:
建立了**formGroup**的例項並將其設定為區域性變數formdata。
建立**FormControl**的例項並將其設定為formdata中的一個條目。
建立了一個**onClickSubmit()**方法,該方法使用其引數設定區域性變數**userName**。
在**test.component.html**檔案中新增以下程式碼。
<div>
   <form [formGroup]="formdata" (ngSubmit)="onClickSubmit(formdata.value)" >
      <input type= text"  name="userName" placeholder="userName"
         formControlName = "userName">
      <br/>
      <br/>
      <input type="submit"  value="Click here">
   </form>
</div>
<p> Textbox result is: {{userName}} </p>
這裡:
建立了新的表單並將其**formGroup**屬性設定為formdata。
建立了新的輸入文字欄位並將其**formControlName**設定為username。
**ngSubmit**事件屬性用於表單並將onClickSubmit()方法設定為其值。
**onClickSubmit()**方法獲取formdata值作為其引數。
開啟**app.component.html**並更改內容,如下所示:
<app-test></app-test>
最後,使用以下命令啟動您的應用程式(如果尚未啟動):
ng serve
現在,執行您的應用程式,您將看到以下響應:
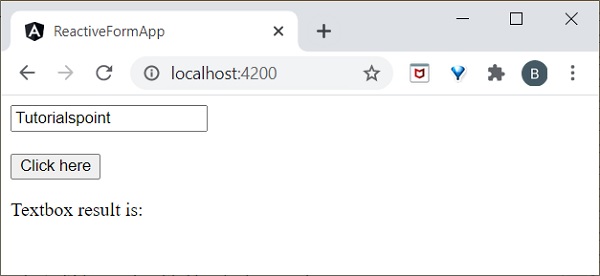
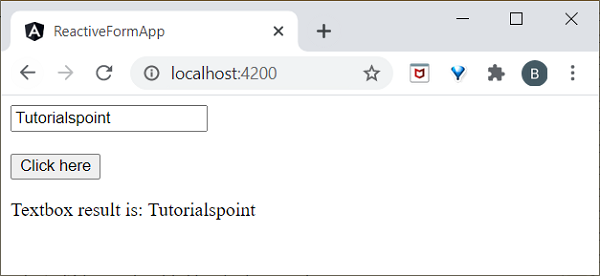
在輸入文字欄位中輸入**Tutorialspoint**並點選提交。**onClickSubmit**函式將被呼叫,使用者輸入的文字**Tutorialspoint**將作為引數傳送。
我們將在下一章中執行表單驗證。