- JSF 教程
- JSF - 首頁
- JSF - 概述
- JSF - 環境搭建
- JSF - 架構
- JSF - 生命週期
- JSF - 第一個應用程式
- JSF - 託管 Bean
- JSF - 頁面導航
- JSF - 基本標籤
- JSF - Facelet 標籤
- JSF - 轉換器標籤
- JSF - 驗證器標籤
- JSF - DataTable
- JSF - 複合元件
- JSF - Ajax
- JSF - 事件處理
- JSF - JDBC 整合
- JSF - Spring 整合
- JSF - 表示式語言
- JSF - 國際化
- JSF 有用資源
- JSF 快速指南
- JSF - 有用資源
- JSF - 討論
JSF 快速指南
JSF - 概述
什麼是 JSF?
JavaServer Faces (JSF) 是一種 MVC Web 框架,它使用頁面中可重用的 UI 元件簡化了基於伺服器的應用程式的使用者介面 (UI) 的構建。JSF 提供了一種將 UI 小部件連線到資料來源和伺服器端事件處理程式的功能。JSF 規範定義了一組標準的 UI 元件,併為開發元件提供了應用程式程式設計介面 (API)。JSF 支援對現有標準 UI 元件的重用和擴充套件。
優點
JSF 減少了建立和維護應用程式的工作量,這些應用程式將在 Java 應用程式伺服器上執行,並將應用程式 UI 呈現到目標客戶端。JSF 透過以下方式促進 Web 應用程式開發:-
- 提供可重用的 UI 元件
- 簡化 UI 元件之間的資料傳輸
- 管理跨多個伺服器請求的 UI 狀態
- 支援自定義元件的實現
- 將客戶端事件連線到伺服器端應用程式程式碼
JSF UI 元件模型
JSF 使開發人員能夠從 UI 元件集合中建立 Web 應用程式,這些元件可以針對多種客戶端型別以不同的方式呈現自身(例如 - HTML 瀏覽器、無線或 WAP 裝置)。
JSF 提供了 -
核心庫
一組基本 UI 元件 - 標準 HTML 輸入元素
擴充套件基本 UI 元件以建立其他 UI 元件庫或擴充套件現有元件
多種渲染功能,使 JSF UI 元件能夠根據客戶端型別以不同的方式呈現自身
JSF - 環境搭建
本章將指導您如何準備開發環境以開始使用 JSF 框架。在設定 JSF 框架之前,您將學習如何在您的機器上設定 JDK、Eclipse、Maven 和 Tomcat。
系統要求
JSF 需要 JDK 1.5 或更高版本,因此第一個要求是在您的機器上安裝 JDK。
| JDK | 1.5 或以上 |
| 記憶體 | 無最低要求 |
| 磁碟空間 | 無最低要求 |
| 作業系統 | 無最低要求 |
JSF 應用程式開發的環境搭建
按照以下步驟設定您的環境,開始進行 JSF 應用程式開發。
步驟 1:驗證您的機器上是否已安裝 Java
開啟控制檯並執行以下 Java 命令。
| 作業系統 | 任務 | 命令 |
|---|---|---|
| Windows | 開啟命令控制檯 | c:\> java -version |
| Linux | 開啟命令終端 | $ java -version |
| Mac | 開啟終端 | machine:~ joseph$ java -version |
讓我們驗證所有作業系統的輸出 -
| 作業系統 | 生成輸出 |
|---|---|
| Windows | java version "1.6.0_21" Java(TM) SE Runtime Environment (build 1.6.0_21-b07) Java HotSpot(TM) Client VM (build 17.0-b17, mixed mode, sharing) |
| Linux | java version "1.6.0_21" Java(TM) SE Runtime Environment (build 1.6.0_21-b07) Java HotSpot(TM) Client VM (build 17.0-b17, mixed mode, sharing) |
| Mac | java version "1.6.0_21" Java(TM) SE Runtime Environment (build 1.6.0_21-b07) Java HotSpot(TM)64-Bit Server VM (build 17.0-b17, mixed mode, sharing) |
步驟 2:設定 Java 開發工具包 (JDK)
如果您尚未安裝 Java,則可以從 Oracle 的 Java 網站安裝 Java 軟體開發工具包 (SDK) - Java SE 下載。您將在下載的檔案中找到安裝 JDK 的說明,請按照給定的說明安裝和配置設定。最後,設定 PATH 和 JAVA_HOME 環境變數以引用包含 java 和 javac 的目錄,通常分別為 java_install_dir/bin 和 java_install_dir。
設定 JAVA_HOME 環境變數以指向 Java 安裝在您機器上的基本目錄位置。
例如 -
| 作業系統 | 輸出 |
|---|---|
| Windows | 將環境變數 JAVA_HOME 設定為 C:\Program Files\Java\jdk1.6.0_21 |
| Linux | Export JAVA_HOME=/usr/local/java-current |
| Mac | Export JAVA_HOME=/Library/Java/Home |
將 Java 編譯器位置追加到系統路徑。
| 作業系統 | 輸出 |
|---|---|
| Windows | 將字串 ;%JAVA_HOME%\bin 追加到系統變數 Path 的末尾。 |
| Linux | Export PATH=$PATH:$JAVA_HOME/bin/ |
| Mac | 無需操作 |
或者,如果您使用整合開發環境 (IDE)(如 Borland JBuilder、Eclipse、IntelliJ IDEA 或 Sun ONE Studio),請編譯並執行一個簡單的程式以確認 IDE 知道您安裝 Java 的位置。否則,請根據 IDE 的給定文件進行正確的設定。
步驟 3:設定 Eclipse IDE
本教程中的所有示例均使用 Eclipse IDE 編寫。因此,我們建議您在您的機器上安裝最新版本的 Eclipse,具體取決於您的作業系統。
要安裝 Eclipse IDE,請從 https://www.eclipse.org/downloads/ 下載帶有 WTP 支援的最新 Eclipse 二進位制檔案。下載安裝程式後,將其解壓縮到方便的位置。例如,在 Windows 上的 C:\eclipse 中,或在 Linux/Unix 上的 /usr/local/eclipse 中,最後適當地設定 PATH 變數。
可以透過在 Windows 機器上執行以下命令啟動 Eclipse,或者您可以簡單地雙擊 eclipse.exe
%C:\eclipse\eclipse.exe
可以透過在 Unix(Solaris、Linux 等)機器上執行以下命令啟動 Eclipse -
$/usr/local/eclipse/eclipse
啟動成功後,如果一切正常,它將顯示以下結果。
*注意 - 使用以下 Eclipse 軟體更新站點將 m2eclipse 外掛安裝到 Eclipse 中
m2eclipse 外掛 - https://m2eclipse.sonatype.org/update/。
此外掛使開發人員能夠在 Eclipse 中使用嵌入式/外部 Maven 安裝執行 Maven 命令。
步驟 4:下載 Maven 歸檔檔案
從 https://maven.apache.org/download.html 下載 Maven 2.2.1
| 作業系統 | 歸檔檔名 |
|---|---|
| Windows | apache-maven-2.0.11-bin.zip |
| Linux | apache-maven-2.0.11-bin.tar.gz |
| Mac | apache-maven-2.0.11-bin.tar.gz |
步驟 5:解壓縮 Maven 歸檔檔案
將歸檔檔案解壓縮到您希望安裝 Maven 2.2.1 的目錄中。子目錄 apache-maven-2.2.1 將從歸檔檔案中建立。
| 作業系統 | 位置(根據您的安裝情況可能有所不同) |
|---|---|
| Windows | C:\Program Files\Apache Software Foundation\apache-maven-2.2.1 |
| Linux | /usr/local/apache-maven |
| Mac | /usr/local/apache-maven |
步驟 6:設定 Maven 環境變數
將 M2_HOME、M2、MAVEN_OPTS 新增到環境變數中。
| 作業系統 | 輸出 |
|---|---|
| Windows | 使用系統屬性設定環境變數。 M2_HOME=C:\Program Files\Apache Software Foundation\apachemaven-2.2.1 M2=%M2_HOME%\bin MAVEN_OPTS=-Xms256m -Xmx512m |
| Linux | 開啟命令終端並設定環境變數。 export M2_HOME=/usr/local/apache-maven/apache-maven-2.2.1 export M2=%M2_HOME%\bin export MAVEN_OPTS=-Xms256m -Xmx512m |
| Mac | 開啟命令終端並設定環境變數。 export M2_HOME=/usr/local/apache-maven/apache-maven-2.2.1 export M2=%M2_HOME%\bin export MAVEN_OPTS=-Xms256m -Xmx512m |
步驟 7:將 Maven bin 目錄位置新增到系統路徑
現在將 M2 變數追加到系統路徑。
| 作業系統 | 輸出 |
|---|---|
| Windows | 將字串 ;%M2% 追加到系統變數 Path 的末尾。 |
| Linux | export PATH=$M2:$PATH |
| Mac | export PATH=$M2:$PATH |
步驟 8:驗證 Maven 安裝。
開啟控制檯,執行以下 mvn 命令。
| 作業系統 | 任務 | 命令 |
|---|---|---|
| Windows | 開啟命令控制檯 | c:\> mvn --version |
| Linux | 開啟命令終端 | $ mvn --version |
| Mac | 開啟終端 | machine:~ joseph$ mvn --version |
最後,驗證上述命令的輸出,它應如以下表格所示。
| 作業系統 | 輸出 |
|---|---|
| Windows | Apache Maven 2.2.1 (r801777; 2009-08-07 00:46:01+0530) Java version: 1.6.0_21 Java home: C:\Program Files\Java\jdk1.6.0_21\jre |
| Linux | Apache Maven 2.2.1 (r801777; 2009-08-07 00:46:01+0530) Java version: 1.6.0_21 Java home: C:\Program Files\Java\jdk1.6.0_21\jre |
| Mac | Apache Maven 2.2.1 (r801777; 2009-08-07 00:46:01+0530) Java version: 1.6.0_21 Java home: C:\Program Files\Java\jdk1.6.0_21\jre |
步驟 9:設定 Apache Tomcat
您可以從 https://tomcat.apache.org/ 下載最新版本的 Tomcat。下載安裝程式後,將其解壓縮到方便的位置。例如,在 Windows 上的 C:\apache-tomcat-6.0.33 中,或在 Linux/Unix 上的 /usr/local/apache-tomcat-6.0.33 中,並設定指向安裝位置的 CATALINA_HOME 環境變數。
可以透過在 Windows 機器上執行以下命令啟動 Tomcat,或者您可以簡單地雙擊 startup.bat
%CATALINA_HOME%\bin\startup.bat
or
C:\apache-tomcat-6.0.33\bin\startup.bat
可以透過在 Unix(Solaris、Linux 等)機器上執行以下命令啟動 Tomcat。
$CATALINA_HOME/bin/startup.sh
or
/usr/local/apache-tomcat-6.0.33/bin/startup.sh
啟動成功後,可以透過訪問 https://:8080/ 來使用 Tomcat 附帶的預設 Web 應用程式。如果一切正常,它將顯示以下結果。
有關配置和執行 Tomcat 的更多資訊,請參閱此處包含的文件以及 Tomcat 網站 - http://tomcat.apache.org
可以透過在 Windows 機器上執行以下命令停止 Tomcat。
%CATALINA_HOME%\bin\shutdown
or
C:\apache-tomcat-5.5.29\bin\shutdown
可以透過在 Unix(Solaris、Linux 等)機器上執行以下命令停止 Tomcat。
$CATALINA_HOME/bin/shutdown.sh
or
/usr/local/apache-tomcat-5.5.29/bin/shutdown.sh
JSF - 架構
JSF 技術是一個用於開發、構建伺服器端使用者介面元件並在 Web 應用程式中使用它們的框架。JSF 技術基於模型檢視控制器 (MVC) 架構來分離邏輯和表示。
什麼是 MVC 設計模式?
MVC 設計模式使用三個獨立的模組設計應用程式 -
| 序號 | 模組及描述 |
|---|---|
| 1 | 模型 承載資料和邏輯 |
| 2 | 檢視 顯示使用者介面 |
| 3 | 控制器 處理應用程式。 |
MVC 設計模式的目的是分離模型和表示,使開發人員能夠專注於其核心技能並更清晰地協作。
Web 設計師只需專注於檢視層,而不是模型層和控制器層。開發人員可以更改模型的程式碼,通常不需要更改檢視層。控制器用於處理使用者操作。在此過程中,模型層和檢視層可能會發生變化。
JSF 架構
JSF 應用程式類似於任何其他基於 Java 技術的 Web 應用程式;它在 Java servlet 容器中執行,並且包含 -
作為模型的 JavaBeans 元件,包含特定於應用程式的功能和資料
用於表示事件處理程式和驗證器的自定義標籤庫
用於渲染 UI 元件的自定義標籤庫
表示為伺服器上狀態物件的使用者介面元件
伺服器端輔助類
驗證器、事件處理程式和導航處理程式
用於配置應用程式資源的應用程式配置資原始檔
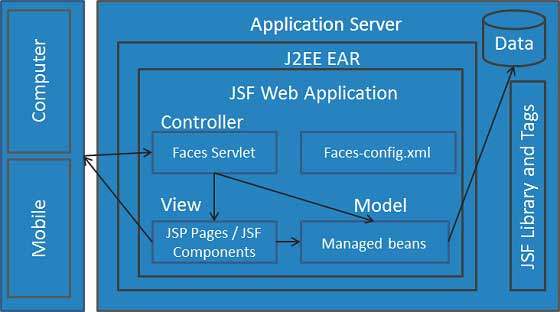
可以使用控制器執行使用者操作。使用者介面可以由網頁作者建立,業務邏輯可以由託管 Bean 利用。
JSF 提供了幾種渲染單個元件的機制。由網頁設計師選擇所需的表示形式,應用程式開發人員無需知道使用哪種機制來渲染 JSF UI 元件。
JSF - 生命週期
JSF 應用程式生命週期包含六個階段,如下所示 -
- 還原檢視階段
- 應用請求值階段;處理事件
- 處理驗證階段;處理事件
- 更新模型值階段;處理事件
- 呼叫應用程式階段;處理事件
- 渲染響應階段

這六個階段顯示了 JSF 處理表單的順序。列表按其可能的執行順序顯示階段,每個階段都進行事件處理。
階段 1:還原檢視
一旦單擊連結或按鈕並且 JSF 接收到請求,JSF 就會開始還原檢視階段。
在此階段,JSF 構建檢視,將事件處理程式和驗證器連線到 UI 元件,並將檢視儲存在 FacesContext 例項中。FacesContext 例項現在將包含處理請求所需的所有資訊。
階段 2:應用請求值
建立/還原元件樹後,元件樹中的每個元件都使用 decode 方法從請求引數中提取其新值。元件儲存此值。如果轉換失敗,則會生成錯誤訊息並將其排隊到 FacesContext 中。此訊息將在渲染響應階段與任何驗證錯誤一起顯示。
如果任何解碼方法事件監聽器在當前 FacesContext 例項上呼叫 renderResponse,則 JSF 將進入渲染響應階段。
階段 3:處理驗證
在此階段,JSF 處理元件樹上註冊的所有驗證器。它檢查元件屬性規則以進行驗證,並將這些規則與為元件儲存的本地值進行比較。
如果本地值無效,則 JSF 會將錯誤訊息新增到 FacesContext 例項中,生命週期將前進到渲染響應階段,並再次顯示包含錯誤訊息的同一頁面。
階段 4:更新模型值
在 JSF 檢查資料有效後,它會遍歷元件樹並將相應的伺服器端物件屬性設定為元件的本地值。JSF 將更新與輸入元件的值屬性相對應的 Bean 屬性。
如果任何 updateModels 方法在當前 FacesContext 例項上呼叫 renderResponse,則 JSF 將進入渲染響應階段。
階段 5:呼叫應用程式
在此階段,JSF 處理任何應用程式級事件,例如提交表單/連結到另一個頁面。
階段 6:渲染響應
在此階段,如果應用程式使用 JSP 頁面,JSF 會要求容器/應用程式伺服器渲染頁面。對於初始請求,頁面上表示的元件將作為 JSP 容器執行頁面時新增到元件樹中。如果不是初始請求,則元件樹已構建,因此無需再次新增元件。無論哪種情況,元件都將在 JSP 容器/應用程式伺服器遍歷頁面中的標籤時自行渲染。
渲染檢視內容後,將儲存響應狀態,以便後續請求可以訪問它,並且它可用於恢復檢視階段。
JSF - 第一個應用程式
要建立簡單的 JSF 應用程式,我們將使用 maven-archetype-webapp 外掛。在以下示例中,我們將在 C:\JSF 資料夾中建立一個基於 Maven 的 Web 應用程式專案。
建立專案
讓我們開啟命令控制檯,轉到C:\ > JSF目錄並執行以下mvn命令。
C:\JSF>mvn archetype:create
-DgroupId = com.tutorialspoint.test
-DartifactId = helloworld
-DarchetypeArtifactId = maven-archetype-webapp
Maven 將開始處理,並將建立完整的 Java Web 應用程式專案結構。
[INFO] Scanning for projects...
[INFO] Searching repository for plugin with prefix: 'archetype'.
[INFO] -------------------------------------------------------------
[INFO] Building Maven Default Project
[INFO]    task-segment: [archetype:create] (aggregator-style)
[INFO] -------------------------------------------------------------
[INFO] [archetype:create {execution: default-cli}]
[INFO] Defaulting package to group ID: com.tutorialspoint.test
[INFO] artifact org.apache.maven.archetypes:maven-archetype-webapp:
checking for updates from central
[INFO] -------------------------------------------------------------
[INFO] Using following parameters for creating project
from Old (1.x) Archetype: maven-archetype-webapp:RELEASE
[INFO] -------------------------------------------------------------
[INFO] Parameter: groupId, Value: com.tutorialspoint.test
[INFO] Parameter: packageName, Value: com.tutorialspoint.test
[INFO] Parameter: package, Value: com.tutorialspoint.test
[INFO] Parameter: artifactId, Value: helloworld
[INFO] Parameter: basedir, Value: C:\JSF
[INFO] Parameter: version, Value: 1.0-SNAPSHOT
[INFO] project created from Old (1.x) Archetype in dir:
C:\JSF\helloworld
[INFO] -------------------------------------------------------------
[INFO] BUILD SUCCESSFUL
[INFO] -------------------------------------------------------------
[INFO] Total time: 7 seconds
[INFO] Finished at: Mon Nov 05 16:05:04 IST 2012
[INFO] Final Memory: 12M/84M
[INFO] -------------------------------------------------------------
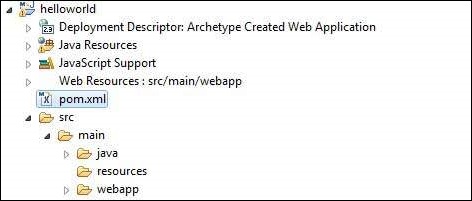
現在轉到 C:/JSF 目錄。您將看到一個建立的 Java Web 應用程式專案,名為 helloworld(如 artifactId 中指定)。Maven 使用以下螢幕截圖所示的標準目錄佈局。

使用以上示例,我們可以理解以下關鍵概念。
| 序號 | 資料夾結構和描述 |
|---|---|
| 1 | helloworld 包含 src 資料夾和 pom.xml |
| 2 | src/main/wepapp 包含 WEB-INF 資料夾和 index.jsp 頁面 |
| 3 | src/main/resources 它包含影像/屬性檔案(在以上示例中,我們需要手動建立此結構) |
向專案新增 JSF 功能
新增以下 JSF 依賴項。
<dependencies>
   <dependency>
      <groupId>com.sun.faces</groupId>
      <artifactId>jsf-api</artifactId>
      <version>2.1.7</version>
   </dependency>

   <dependency>
      <groupId>com.sun.faces</groupId>
      <artifactId>jsf-impl</artifactId>
      <version>2.1.7</version>
   </dependency>

</dependencies>
完整的 POM.xml
<project xmlns = "http://maven.apache.org/POM/4.0.0"
   xmlns:xsi = "http://www.w3.org/2001/XMLSchema-instance"
   xsi:schemaLocation = "http://maven.apache.org/POM/4.0.0
   http://maven.apache.org/maven-v4_0_0.xsd">

   <modelVersion>4.0.0</modelVersion>
   <groupId>com.tutorialspoint.test</groupId>
   <artifactId>helloworld</artifactId>
   <packaging>war</packaging>
   <version>1.0-SNAPSHOT</version>
   <name>helloworld Maven Webapp</name>
   <url>http://maven.apache.org</url>

   <dependencies>
      <dependency>
         <groupId>junit</groupId>
         <artifactId>junit</artifactId>
         <version>3.8.1</version>
         <scope>test</scope>
      </dependency>

      <dependency>
         <groupId>com.sun.faces</groupId>
         <artifactId>jsf-api</artifactId>
         <version>2.1.7</version>
      </dependency>

      <dependency>
         <groupId>com.sun.faces</groupId>
         <artifactId>jsf-impl</artifactId>
         <version>2.1.7</version>
      </dependency>

   </dependencies>

   <build>
      <finalName>helloworld</finalName>
      <plugins>
         <plugin>
            <groupId>org.apache.maven.plugins</groupId>
            <artifactId>maven-compiler-plugin</artifactId>
            <version>2.3.1</version>

            <configuration>
               <source>1.6</source>
               <target>1.6</target>
            </configuration>
         </plugin>
      </plugins>

   </build>
</project>
準備 Eclipse 專案
讓我們開啟命令控制檯。轉到C:\ > JSF > helloworld目錄並執行以下mvn命令。
C:\JSF\helloworld>mvn eclipse:eclipse -Dwtpversion = 2.0
Maven 將開始處理,建立 Eclipse 準備就緒的專案,並將新增 wtp 功能。
Downloading: http://repo.maven.apache.org/org/apache/maven/plugins/
maven-compiler-plugin/2.3.1/maven-compiler-plugin-2.3.1.pom
5K downloaded  (maven-compiler-plugin-2.3.1.pom)
Downloading: http://repo.maven.apache.org/org/apache/maven/plugins/
maven-compiler-plugin/2.3.1/maven-compiler-plugin-2.3.1.jar
29K downloaded  (maven-compiler-plugin-2.3.1.jar)
[INFO] Searching repository for plugin with prefix: 'eclipse'.
[INFO] ------------------------------------------------------------
[INFO] Building helloworld Maven Webapp
[INFO]    task-segment: [eclipse:eclipse]
[INFO] ------------------------------------------------------------
[INFO] Preparing eclipse:eclipse
[INFO] No goals needed for project - skipping
[INFO] [eclipse:eclipse {execution: default-cli}]
[INFO] Adding support for WTP version 2.0.
[INFO] Using Eclipse Workspace: null
[INFO] Adding default classpath container: org.eclipse.jdt.
launching.JRE_CONTAINER
Downloading: http://repo.maven.apache.org/
com/sun/faces/jsf-api/2.1.7/jsf-api-2.1.7.pom
12K downloaded  (jsf-api-2.1.7.pom)
Downloading: http://repo.maven.apache.org/
com/sun/faces/jsf-impl/2.1.7/jsf-impl-2.1.7.pom
10K downloaded  (jsf-impl-2.1.7.pom)
Downloading: http://repo.maven.apache.org/
com/sun/faces/jsf-api/2.1.7/jsf-api-2.1.7.jar
619K downloaded  (jsf-api-2.1.7.jar)
Downloading: http://repo.maven.apache.org/
com/sun/faces/jsf-impl/2.1.7/jsf-impl-2.1.7.jar
1916K downloaded  (jsf-impl-2.1.7.jar)
[INFO] Wrote settings to C:\JSF\helloworld\.settings\
org.eclipse.jdt.core.prefs
[INFO] Wrote Eclipse project for "helloworld" to C:\JSF\helloworld.
[INFO]
[INFO] -----------------------------------------------------------
[INFO] BUILD SUCCESSFUL
[INFO] -----------------------------------------------------------
[INFO] Total time: 6 minutes 7 seconds
[INFO] Finished at: Mon Nov 05 16:16:25 IST 2012
[INFO] Final Memory: 10M/89M
[INFO] -----------------------------------------------------------
在 Eclipse 中匯入專案
以下是步驟 -
使用匯入嚮導在 Eclipse 中匯入專案。
轉到檔案→匯入...→將現有專案匯入工作區。
選擇 helloworld 的根目錄。
保持將專案複製到工作區處於選中狀態。
單擊“完成”按鈕。
Eclipse 將匯入並將專案複製到其工作區C:\→專案→資料→工作區。
在 web.xml 中配置 Faces Servlet
在webapp→WEB-INF資料夾中找到 web.xml 並按如下所示更新它。
<?xml version = "1.0" encoding = "UTF-8"?>
<web-app xmlns:xsi = "http://www.w3.org/2001/XMLSchema-instance"
   xmlns = "http://java.sun.com/xml/ns/javaee"
   xmlns:web = "http://java.sun.com/xml/ns/javaee/web-app_2_5.xsd"
   xsi:schemaLocation = "http://java.sun.com/xml/ns/javaee
   http://java.sun.com/xml/ns/javaee/web-app_2_5.xsd"
   id = "WebApp_ID" version="2.5">

   <welcome-file-list>
      <welcome-file>faces/home.xhtml</welcome-file>
   </welcome-file-list>

   <!--
      FacesServlet is main servlet responsible to handle all request.
      It acts as central controller.
      This servlet initializes the JSF components before the JSP is displayed.
   -->

   <servlet>
      <servlet-name>Faces Servlet</servlet-name>
      <servlet-class>javax.faces.webapp.FacesServlet</servlet-class>
      <load-on-startup>1</load-on-startup>
   </servlet>

   <servlet-mapping>
      <servlet-name>Faces Servlet</servlet-name>
      <url-pattern>/faces/*</url-pattern>
   </servlet-mapping>

   <servlet-mapping>
      <servlet-name>Faces Servlet</servlet-name>
      <url-pattern>*.jsf</url-pattern>
   </servlet-mapping>

   <servlet-mapping>
      <servlet-name>Faces Servlet</servlet-name>
      <url-pattern>*.faces</url-pattern>
   </servlet-mapping>

   <servlet-mapping>
      <servlet-name>Faces Servlet</servlet-name>
      <url-pattern>*.xhtml</url-pattern>
   </servlet-mapping>

</web-app>
建立一個託管 Bean
在src→main→java 作為 com→tutorialspoint→test下建立一個包結構。在此包中建立 HelloWorld.java 類。按如下所示更新HelloWorld.java的程式碼。
package com.tutorialspoint.test;

import javax.faces.bean.ManagedBean;

@ManagedBean(name = "helloWorld", eager = true)
public class HelloWorld {

   public HelloWorld() {
      System.out.println("HelloWorld started!");
   }

   public String getMessage() {
      return "Hello World!";
   }
}
建立一個 JSF 頁面
在webapp資料夾下建立一個頁面 home.xhtml。按如下所示更新home.xhtml的程式碼。
<!DOCTYPE html PUBLIC "-//W3C//DTD XHTML 1.0 Transitional//EN"
   "http://www.w3.org/TR/xhtml1/DTD/xhtml1-transitional.dtd">

<html xmlns = "http://www.w3.org/1999/xhtml">
   <head>
      <title>JSF Tutorial!</title>
   </head>

   <body>
      #{helloWorld.getMessage()}
   </body>
</html>
構建專案
以下是步驟。
在 Eclipse 中選擇 helloworld 專案
使用“執行方式”嚮導
選擇執行方式→Maven package
Maven 將開始構建專案,並在C:\→專案→資料→工作區→helloworld→target資料夾下建立 helloworld.war。
[INFO] Scanning for projects...
[INFO] -----------------------------------------------------
[INFO] Building helloworld Maven Webapp
[INFO]
[INFO] Id: com.tutorialspoint.test:helloworld:war:1.0-SNAPSHOT
[INFO] task-segment: [package]
[INFO] -----------------------------------------------------
[INFO] [resources:resources]
[INFO] Using default encoding to copy filtered resources.
[INFO] [compiler:compile]
[INFO] Nothing to compile - all classes are up to date
[INFO] [resources:testResources]
[INFO] Using default encoding to copy filtered resources.
[INFO] [compiler:testCompile]
[INFO] No sources to compile
[INFO] [surefire:test]
[INFO] Surefire report directory:
C:\Projects\Data\WorkSpace\helloworld\target\surefire-reports

-------------------------------------------------------
 T E S T S
-------------------------------------------------------
There are no tests to run.

Results :

Tests run: 0, Failures: 0, Errors: 0, Skipped: 0

[INFO] [war:war]
[INFO] Packaging webapp
[INFO] Assembling webapp[helloworld] in
[C:\Projects\Data\WorkSpace\helloworld\target\helloworld]
[INFO] Processing war project
[INFO] Webapp assembled in[150 msecs]
[INFO] Building war:
C:\Projects\Data\WorkSpace\helloworld\target\helloworld.war
[INFO] ------------------------------------------------
[INFO] BUILD SUCCESSFUL
[INFO] ------------------------------------------------
[INFO] Total time: 3 seconds
[INFO] Finished at: Mon Nov 05 16:34:46 IST 2012
[INFO] Final Memory: 2M/15M
[INFO] ------------------------------------------------
部署 WAR 檔案
以下是步驟。
停止 Tomcat 伺服器。
將 helloworld.war 檔案複製到Tomcat 安裝目錄→webapps 資料夾。
啟動 Tomcat 伺服器。
檢視 webapps 目錄內部,應該建立了一個名為 helloworld 的資料夾。
現在 helloworld.war 已成功部署在 Tomcat Webserver 根目錄中。
執行應用程式
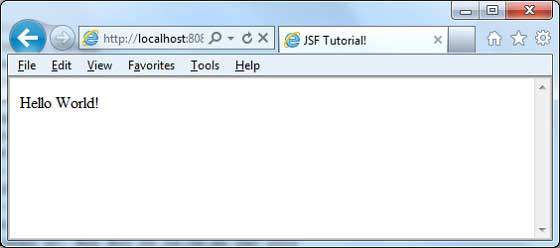
在 Web 瀏覽器中輸入 URL:https://:8080/helloworld/home.jsf以啟動應用程式。
伺服器名稱 (localhost) 和埠 (8080) 可能因您的 Tomcat 配置而異。
JSF - 託管 Bean
託管 Bean 是一個使用 JSF 註冊的常規 Java Bean 類。換句話說,託管 Bean 是由 JSF 框架管理的 Java Bean。託管 Bean 包含 getter 和 setter 方法、業務邏輯,甚至是一個支援 Bean(一個包含所有 HTML 表單值的 Bean)。
託管 Bean 充當 UI 元件的模型。可以從 JSF 頁面訪問託管 Bean。
在JSF 1.2中,託管 Bean 必須在 JSF 配置檔案(如 facesconfig.xml)中註冊它。從JSF 2.0開始,可以使用註釋輕鬆註冊託管 Bean。這種方法將 Bean 及其註冊保留在一個位置,因此易於管理。
使用 XML 配置
<managed-bean>
   <managed-bean-name>helloWorld</managed-bean-name>
   <managed-bean-class>com.tutorialspoint.test.HelloWorld</managed-bean-class>
   <managed-bean-scope>request</managed-bean-scope>
</managed-bean>

<managed-bean>
   <managed-bean-name>message</managed-bean-name>
   <managed-bean-class>com.tutorialspoint.test.Message</managed-bean-class>
   <managed-bean-scope>request</managed-bean-scope>
</managed-bean>
使用註釋
@ManagedBean(name = "helloWorld", eager = true)
@RequestScoped
public class HelloWorld {
   @ManagedProperty(value = "#{message}")
   private Message message;
   ...
}
@ManagedBean 註釋
@ManagedBean將 Bean 標記為託管 Bean,其名稱在 name 屬性中指定。如果未指定 name 屬性,則託管 Bean 名稱將預設為完整限定類名的類名部分。在我們的例子中,它將是 helloWorld。
另一個重要的屬性是eager。如果 eager = "true",則在首次請求託管 Bean 之前建立它,否則使用“延遲”初始化,其中僅在請求 Bean 時建立它。
作用域註釋
作用域註釋設定託管 Bean 將放置其中的作用域。如果未指定作用域,則 Bean 將預設為請求作用域。下表簡要討論了每個作用域。
| 序號 | 作用域和描述 |
|---|---|
| 1 | @RequestScoped Bean 的生命週期與 HTTP 請求-響應的生命週期相同。它在 HTTP 請求時建立,並在與 HTTP 請求關聯的 HTTP 響應完成時銷燬。 |
| 2 | @NoneScoped Bean 的生命週期與單個 EL 評估相同。它在 EL 評估時建立,並在 EL 評估後立即銷燬。 |
| 3 | @ViewScoped Bean 的生命週期與使用者在瀏覽器視窗/選項卡中與同一 JSF 檢視互動的時間相同。它在 HTTP 請求時建立,並在使用者回發到不同檢視時銷燬。 |
| 4 | @SessionScoped Bean 的生命週期與 HTTP 會話的生命週期相同。它在會話中涉及此 Bean 的第一個 HTTP 請求時建立,並在 HTTP 會話失效時銷燬。 |
| 5 | @ApplicationScoped Bean 的生命週期與 Web 應用程式的生命週期相同。它在應用程式中涉及此 Bean 的第一個 HTTP 請求時建立(或在 Web 應用程式啟動並且在 @ManagedBean 中設定了 eager=true 屬性時),並在 Web 應用程式關閉時銷燬。 |
| 6 | @CustomScoped Bean 的生命週期與為該作用域建立的自定義 Map 中的 Bean 條目相同。 |
@ManagedProperty 註釋
JSF 是一個簡單的靜態依賴注入 (DI) 框架。使用@ManagedProperty註釋,可以在另一個託管 Bean 中注入託管 Bean 的屬性。
示例應用程式
讓我們建立一個測試 JSF 應用程式來測試託管 Bean 的上述註釋。
| 步驟 | 描述 |
|---|---|
| 1 | 在JSF - 建立應用程式章節中說明的包com.tutorialspoint.test下建立一個名為helloworld的專案。 |
| 2 | 修改HelloWorld.java,如下所述。保持其餘檔案不變。 |
| 3 | 在包com.tutorialspoint.test下建立Message.java,如下所述。 |
| 4 | 編譯並執行應用程式以確保業務邏輯按要求工作。 |
| 5 | 最後,以 war 檔案的形式構建應用程式,並將其部署到 Apache Tomcat Webserver 中。 |
| 6 | 使用下面最後一步中說明的適當 URL 啟動您的 Web 應用程式。 |
HelloWorld.java
package com.tutorialspoint.test;

import javax.faces.bean.ManagedBean;
import javax.faces.bean.ManagedProperty;
import javax.faces.bean.RequestScoped;

@ManagedBean(name = "helloWorld", eager = true)
@RequestScoped
public class HelloWorld {
   @ManagedProperty(value = "#{message}")
   private Message messageBean;
   private String message;

   public HelloWorld() {
      System.out.println("HelloWorld started!");
   }

   public String getMessage() {

      if(messageBean != null) {
         message = messageBean.getMessage();
      }
      return message;
   }

   public void setMessageBean(Message message) {
      this.messageBean = message;
   }
}
Message.java
package com.tutorialspoint.test;

import javax.faces.bean.ManagedBean;
import javax.faces.bean.RequestScoped;

@ManagedBean(name = "message", eager = true)
@RequestScoped
public class Message {
   private String message = "Hello World!";

   public String getMessage() {
      return message;
   }
   public void setMessage(String message) {
      this.message = message;
   }
}
home.xhtml
<!DOCTYPE html PUBLIC "-//W3C//DTD XHTML 1.0 Transitional//EN"
   "http://www.w3.org/TR/xhtml1/DTD/xhtml1-transitional.dtd">

<html xmlns = "http://www.w3.org/1999/xhtml">
   <head>
      <title>JSF Tutorial!</title>
   </head>

   <body>
      #{helloWorld.message}
   </body>
</html>
準備好所有更改後,讓我們像在 JSF - 建立應用程式章節中那樣編譯和執行應用程式。如果您的應用程式一切正常,這將產生以下結果。
JSF - 頁面導航
導航規則是由 JSF 框架提供的那些規則,描述了單擊按鈕或連結時要顯示哪個檢視。
導航規則可以在名為 faces-config.xml 的 JSF 配置檔案中定義。它們可以在託管 Bean 中定義。
導航規則可以包含基於其顯示結果檢視的條件。JSF 2.0 還提供隱式導航,在這種情況下,不需要像這樣定義導航規則。
隱式導航
JSF 2.0 提供名為隱式導航的自動檢視頁面解析器機制。在這種情況下,您只需要在 action 屬性中放置檢視名稱,JSF 將自動在已部署的應用程式中搜索正確的檢視頁面。

JSF 頁面中的自動導航
在任何 JSF UI 元件的 action 屬性中設定檢視名稱。
<h:form>
   <h3>Using JSF outcome</h3>
   <h:commandButton action = "page2" value = "Page2" />
</h:form>
在這裡,當單擊Page2按鈕時,JSF 將解析檢視名稱page2作為 page2.xhtml 副檔名,並在當前目錄中找到相應的檢視檔案page2.xhtml。
託管 Bean 中的自動導航
在託管 Bean 中定義一個方法以返回檢視名稱。
@ManagedBean(name = "navigationController", eager = true)
@RequestScoped

public class NavigationController implements Serializable {
   public String moveToPage1() {
      return "page1";
   }
}
使用託管 Bean 在任何 JSF UI 元件的 action 屬性中獲取檢視名稱。
<h:form>
   <h3> Using Managed Bean</h3>
   <h:commandButton action = "#{navigationController.moveToPage1}"
   value = "Page1" /glt;
</h:form>
在這裡,當單擊Page1按鈕時,JSF 將解析檢視名稱page1作為 page1.xhtml 副檔名,並在當前目錄中找到相應的檢視檔案page1.xhtml。

條件導航
使用託管 Bean,我們可以非常輕鬆地控制導航。檢視託管 Bean 中的以下程式碼。
@ManagedBean(name = "navigationController", eager = true)
@RequestScoped

public class NavigationController implements Serializable {
   //this managed property will read value from request parameter pageId
   @ManagedProperty(value = "#{param.pageId}")
   private String pageId;

   //condional navigation based on pageId
   //if pageId is 1 show page1.xhtml,
   //if pageId is 2 show page2.xhtml
   //else show home.xhtml

   public String showPage() {
      if(pageId == null) {
         return "home";
      }

      if(pageId.equals("1")) {
         return "page1";
      }else if(pageId.equals("2")) {
         return "page2";
      }else {
         return "home";
      }
   }
}
在 JSF UI 元件中將 pageId 作為請求引數傳遞。
<h:form>
   <h:commandLink action = "#{navigationController.showPage}" value = "Page1">
      <f:param name = "pageId" value = "1" />
   </h:commandLink>
   <h:commandLink action = "#{navigationController.showPage}" value = "Page2">
      <f:param name = "pageId" value = "2" />
   </h:commandLink>
   <h:commandLink action = "#{navigationController.showPage}" value = "Home">
      <f:param name = "pageId" value = "3" />
   </h:commandLink>
</h:form>
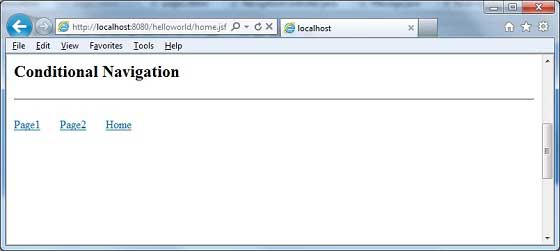
在這裡,當單擊“Page1”按鈕時。
JSF 將建立一個帶引數 pageId = 1 的請求
然後 JSF 將此引數傳遞到導航控制器的託管屬性 pageId
現在呼叫 navigationController.showPage(),它將在檢查 pageId 後將檢視返回為 page1
JSF 將解析檢視名稱 page1 為 page1.xhtml 副檔名
在當前目錄中找到相應的檢視檔案 page1.xhtml
基於 from-action 的導航解析
即使受管 Bean 中的不同方法返回相同的檢視名稱,JSF 也提供了導航解析選項。

檢視受管 Bean 中的以下程式碼。
public String processPage1() {
   return "page";
}
public String processPage2() {
   return "page";
}
要解析檢視,請在faces-config.xml中定義以下導航規則
<navigation-rule>
   <from-view-id>home.xhtml</from-view-id>

   <navigation-case>
      <from-action>#{navigationController.processPage1}</from-action>
      <from-outcome>page</from-outcome>
      <to-view-id>page1.jsf</to-view-id>
   </navigation-case>

   <navigation-case>
      <from-action>#{navigationController.processPage2}</from-action>
      <from-outcome>page</from-outcome>
      <to-view-id>page2.jsf</to-view-id>
   </navigation-case>

</navigation-rule>
這裡,當單擊 Page1 按鈕時 -
navigationController.processPage1()被呼叫,它將返回檢視 page
JSF 將解析檢視名稱page1,因為檢視名稱為page,並且faces-config中的from-action為navigationController.processPage1
在當前目錄中找到相應的檢視檔案page1.xhtml
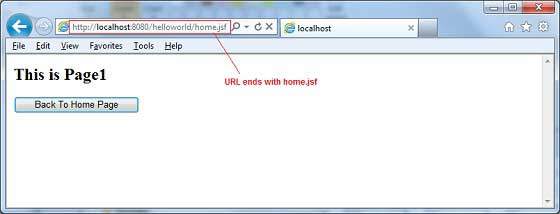
轉發與重定向
JSF 預設情況下在導航到另一個頁面時執行伺服器頁面轉發,並且應用程式的 URL 不會更改。
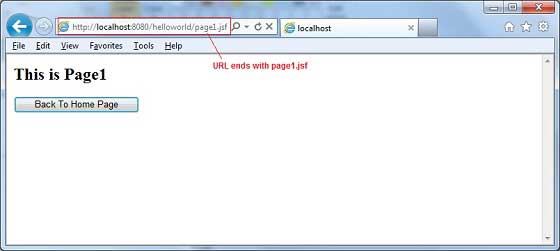
要啟用頁面重定向,請在檢視名稱的末尾附加faces-redirect=true。
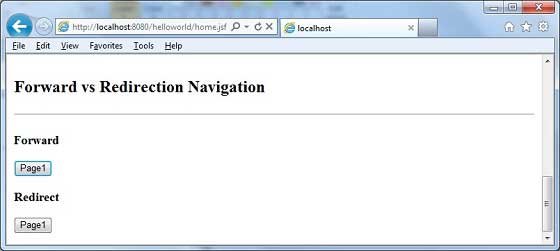
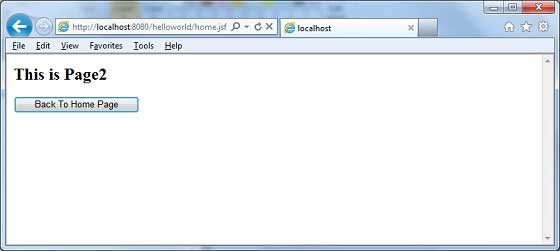
<h:form>
   <h3>Forward</h3>
   <h:commandButton action = "page1" value = "Page1" />
   <h3>Redirect</h3>
   <h:commandButton action = "page1?faces-redirect = true" value = "Page1" />
</h:form>
這裡,當單擊轉發下的Page1按鈕時,您將獲得以下結果。
這裡,當單擊重定向下的Page1按鈕時,您將獲得以下結果。
示例應用程式
讓我們建立一個測試 JSF 應用程式來測試上述所有導航示例。
| 步驟 | 描述 |
|---|---|
| 1 | 在JSF - 建立應用程式章節中說明的基礎上,建立一個名為helloworld的專案,放在package com.tutorialspoint.test下。 |
| 2 | 在package com.tutorialspoint.test下建立NavigationController.java,如下所示。 |
| 3 | 在WEB-INF資料夾下建立faces-config.xml並更新其內容,如下所示。 |
| 4 | 更新WEB-INF資料夾下的web.xml,如下所示。 |
| 5 | 在webapp資料夾下建立page1.xhtml和page2.xhtml並修改home.xhtml,如下所示。 |
| 6 | 編譯並執行應用程式以確保業務邏輯按要求工作。 |
| 7 | 最後,以 war 檔案的形式構建應用程式,並將其部署到 Apache Tomcat Webserver 中。 |
| 8 | 使用下面最後一步中說明的適當 URL 啟動您的 Web 應用程式。 |
NavigationController.java
package com.tutorialspoint.test;

import java.io.Serializable;

import javax.faces.bean.ManagedBean;
import javax.faces.bean.ManagedProperty;
import javax.faces.bean.RequestScoped;

@ManagedBean(name = "navigationController", eager = true)
@RequestScoped
public class NavigationController implements Serializable {
   private static final long serialVersionUID = 1L;
   @ManagedProperty(value = "#{param.pageId}")
   private String pageId;

   public String moveToPage1() {
      return "page1";
   }

   public String moveToPage2() {
      return "page2";
   }

   public String moveToHomePage() {
      return "home";
   }

   public String processPage1() {
      return "page";
   }

   public String processPage2() {
      return "page";
   }

   public String showPage() {
      if(pageId == null) {
         return "home";
      }

      if(pageId.equals("1")) {
         return "page1";
      }else if(pageId.equals("2")) {
         return "page2";
      }else {
         return "home";
      }
   }

   public String getPageId() {
      return pageId;
   }

   public void setPageId(String pageId) {
      this.pageId = pageId;
   }
}
faces-config.xml
<?xml version = "1.0" encoding = "UTF-8"?>

<faces-config
   xmlns = "http://java.sun.com/xml/ns/javaee"
   xmlns:xsi = "http://www.w3.org/2001/XMLSchema-instance"
   xsi:schemaLocation = "http://java.sun.com/xml/ns/javaee
   http://java.sun.com/xml/ns/javaee/web-facesconfig_2_0.xsd"
   version = "2.0">

   <navigation-rule>
      <from-view-id>home.xhtml</from-view-id>
      <navigation-case>
         <from-action>#{navigationController.processPage1}</from-action>
         <from-outcome>page</from-outcome>
         <to-view-id>page1.jsf</to-view-id>
      </navigation-case>
      <navigation-case>
         <from-action>#{navigationController.processPage2}</from-action>
         <from-outcome>page</from-outcome>
         <to-view-id>page2.jsf</to-view-id>
      </navigation-case>
   </navigation-rule>

</faces-config>
web.xml
<!DOCTYPE web-app PUBLIC
   "-//Sun Microsystems, Inc.//DTD Web Application 2.3//EN"
   "http://java.sun.com/dtd/web-app_2_3.dtd" >

<web-app>
   <display-name>Archetype Created Web Application</display-name>

   <context-param>
      <param-name>javax.faces.PROJECT_STAGE</param-name>
      <param-value>Development</param-value>
   </context-param>
   <context-param>
      <param-name>javax.faces.CONFIG_FILES</param-name>
      <param-value>/WEB-INF/faces-config.xml</param-value>
   </context-param>

   <servlet>
      <servlet-name>Faces Servlet</servlet-name>
      <servlet-class>javax.faces.webapp.FacesServlet</servlet-class>
   </servlet>
   <servlet-mapping>
      <servlet-name>Faces Servlet</servlet-name>
      <url-pattern>*.jsf</url-pattern>
   </servlet-mapping>

</web-app>
page1.xhtml
<?xml version = "1.0" encoding = "UTF-8"?>
<!DOCTYPE html PUBLIC "-//W3C//DTD XHTML 1.0 Transitional//EN"
   "http://www.w3.org/TR/xhtml1/DTD/xhtml1-transitional.dtd">
<html xmlns = "http://www.w3.org/1999/xhtml"
   xmlns:h = "http://java.sun.com/jsf/html">

   <h:body>
      <h2>This is Page1</h2>
      <h:form>
         <h:commandButton action = "home?faces-redirect = true"
            value = "Back To Home Page" />
      </h:form>
   </h:body>
</html>
page2.xhtml
<?xml version = "1.0" encoding = "UTF-8"?>
<!DOCTYPE html PUBLIC "-//W3C//DTD XHTML 1.0 Transitional//EN"
   "http://www.w3.org/TR/xhtml1/DTD/xhtml1-transitional.dtd">
<html xmlns = "http://www.w3.org/1999/xhtml"
   xmlns:h = "http://java.sun.com/jsf/html">

   <h:body>
      <h2>This is Page2</h2>
      <h:form>
         <h:commandButton action = "home?faces-redirect = true"
            value = "Back To Home Page" />
      </h:form>
   </h:body>
</html>
home.xhtml
<?xml version = "1.0" encoding = "UTF-8"?>
<!DOCTYPE html PUBLIC "-//W3C//DTD XHTML 1.0 Transitional//EN"
"http://www.w3.org/TR/xhtml1/DTD/xhtml1-transitional.dtd">

<html xmlns = "http://www.w3.org/1999/xhtml"
   xmlns:f = "http://java.sun.com/jsf/core"
   xmlns:h = "http://java.sun.com/jsf/html">

   <h:body>
      <h2>Implicit Navigation</h2>
      <hr />

      <h:form>
         <h3>Using Managed Bean</h3>
         <h:commandButton action = "#{navigationController.moveToPage1}"
            value = "Page1" />
         <h3>Using JSF outcome</h3>
         <h:commandButton action = "page2" value = "Page2" />
      </h:form>
      <br/>

      <h2>Conditional Navigation</h2>
      <hr />
      <h:form>
         <h:commandLink action = "#{navigationController.showPage}"
            value="Page1">
            <f:param name = "pageId" value = "1" />
         </h:commandLink>


         <h:commandLink action = "#{navigationController.showPage}"
            value="Page2">
            <f:param name = "pageId" value = "2" />
         </h:commandLink>


         <h:commandLink action = "#{navigationController.showPage}"
            value = "Home">
            <f:param name = "pageId" value = "3" />
         </h:commandLink>
      </h:form>
      <br/>

      <h2>"From Action" Navigation</h2>
      <hr />

      <h:form>
         <h:commandLink action = "#{navigationController.processPage1}"
         value = "Page1" />

         <h:commandLink action = "#{navigationController.processPage2}"
         value = "Page2" />

      </h:form>
      <br/>

      <h2>Forward vs Redirection Navigation</h2>
      <hr />
      <h:form>
         <h3>Forward</h3>
         <h:commandButton action = "page1" value = "Page1" />
         <h3>Redirect</h3>
         <h:commandButton action = "page1?faces-redirect = true"
         value = "Page1" />
      </h:form>
   </h:body>
</html>
準備好所有更改後,讓我們像在 JSF - 建立應用程式章節中那樣編譯和執行應用程式。如果您的應用程式一切正常,這將產生以下結果。

JSF - 基本標籤
在本節中,您將學習各種基本 JSF 標籤的型別。
JSF 提供了一個標準的 HTML 標籤庫。這些標籤被渲染成相應的 html 輸出。
對於這些標籤,您需要在 html 節點中使用以下 URI 名稱空間。
<html
   xmlns = "http://www.w3.org/1999/xhtml"
   xmlns:h = "http://java.sun.com/jsf/html">
以下是 JSF 2.0 中重要的基本標籤。
| 序號 | 標籤 & 描述 |
|---|---|
| 1 | h:inputText
渲染一個型別為“text”的 HTML 輸入,文字框。 |
| 2 | h:inputSecret
渲染一個型別為“password”的 HTML 輸入,文字框。 |
| 3 | h:inputTextarea
渲染一個 HTML 文字區域欄位。 |
| 4 | h:inputHidden
渲染一個型別為“hidden”的 HTML 輸入。 |
| 5 | h:selectBooleanCheckbox
渲染一個 HTML 複選框。 |
| 6 | h:selectManyCheckbox
渲染一組 HTML 複選框。 |
| 7 | h:selectOneRadio
渲染一個 HTML 單選按鈕。 |
| 8 | h:selectOneListbox
渲染一個 HTML 單選列表框。 |
| 9 | h:selectManyListbox
渲染一個 HTML 多選列表框。 |
| 10 | h:selectOneMenu
渲染一個 HTML 組合框。 |
| 11 | h:outputText
渲染一個 HTML 文字。 |
| 12 | h:outputFormat
渲染一個 HTML 文字。它接受引數。 |
| 13 | h:graphicImage
渲染一個影像。 |
| 14 | h:outputStylesheet
在 HTML 輸出中包含一個 CSS 樣式表。 |
| 15 | h:outputScript
在 HTML 輸出中包含一個指令碼。 |
| 16 | h:commandButton
渲染一個型別為“submit”的 HTML 輸入按鈕。 |
| 17 | h:Link
渲染一個 HTML 錨點。 |
| 18 | h:commandLink
渲染一個 HTML 錨點。 |
| 19 | h:outputLink
渲染一個 HTML 錨點。 |
| 20 | h:panelGrid
以網格形式渲染一個 HTML 表格。 |
| 21 | h:message
渲染 JSF UI 元件的訊息。 |
| 22 | h:messages
渲染所有 JSF UI 元件的訊息。 |
| 23 | f:param
將引數傳遞給 JSF UI 元件。 |
| 24 | f:attribute
將屬性傳遞給 JSF UI 元件。 |
| 25 | f:setPropertyActionListener
設定受管 Bean 屬性的值。 |
JSF - Facelets 標籤
JSF 提供了特殊的標籤來建立 Web 應用程式的通用佈局,稱為 Facelets 標籤。這些標籤提供了靈活地在一個地方管理多個頁面的公共部分。
對於這些標籤,您需要在 html 節點中使用以下 URI 名稱空間。
<html
   xmlns = "http://www.w3.org/1999/xhtml"
   xmlns:ui = "http://java.sun.com/jsf/facelets">
以下是 JSF 2.0 中重要的 Facelets 標籤。
| 序號 | 標籤 & 描述 |
|---|---|
| 1 | 模板
我們將演示如何使用以下標籤使用模板
|
| 2 | 引數
我們將演示如何使用以下標籤將引數傳遞給模板檔案
|
| 3 | 自定義
我們將演示如何建立自定義標籤 |
| 4 | 移除
我們將演示從生成的 HTML 頁面中移除 JSF 程式碼的功能 |
JSF - 轉換器標籤
JSF 提供了內建的轉換器,用於將 UI 元件的資料轉換為受管 Bean 中使用的物件,反之亦然。例如,這些標籤可以將文字轉換為日期物件,並驗證輸入的格式。
對於這些標籤,您需要在 html 節點中使用以下 URI 名稱空間。
<html
   xmlns = "http://www.w3.org/1999/xhtml"
   xmlns:f = "http://java.sun.com/jsf/core">
以下是 JSF 2.0 中重要的轉換器標籤 -
| 序號 | 標籤 & 描述 |
|---|---|
| 1 | f:convertNumber
將字串轉換為所需格式的數字 |
| 2 | f:convertDateTime
將字串轉換為所需格式的日期 |
| 3 | 自定義轉換器
建立自定義轉換器 |
JSF - 驗證器標籤
JSF 提供了內建的驗證器來驗證其 UI 元件。這些標籤可以驗證欄位的長度、輸入的型別,該型別可以是自定義物件。
對於這些標籤,您需要在 html 節點中使用以下 URI 名稱空間。
<html
   xmlns = "http://www.w3.org/1999/xhtml"
   xmlns:f = "http://java.sun.com/jsf/core">
以下是 JSF 2.0 中重要的驗證器標籤 -
| 序號 | 標籤 & 描述 |
|---|---|
| 1 | f:validateLength
驗證字串的長度 |
| 2 | f:validateLongRange
驗證數值的範圍 |
| 3 | f:validateDoubleRange
驗證浮點值的範圍 |
| 4 | f:validateRegex
使用給定的正則表示式驗證 JSF 元件 |
| 5 | 自定義驗證器
建立自定義驗證器 |
JSF - DataTable
JSF 提供了一個名為 DataTable 的豐富的控制元件來渲染和格式化 html 表格。
DataTable 可以迭代值集合或陣列以顯示資料。
DataTable 提供了以簡單的方式修改其資料的屬性。
HTML 標題
<html
   xmlns = "http://www.w3.org/1999/xhtml"
   xmlns:h = "http://java.sun.com/jsf/html">
</html>
以下是 JSF 2.0 中重要的 DataTable 操作 -
| 序號 | 標籤 & 描述 |
|---|---|
| 1 | 顯示 DataTable
如何顯示 dataTable |
| 2 | 新增資料
如何在 dataTable 中新增新行 |
| 3 | 編輯資料
如何在 dataTable 中編輯行 |
| 4 | 刪除資料
如何在 dataTable 中刪除行 |
| 5 | 使用 DataModel
使用 DataModel 在 dataTable 中顯示行號 |
JSF - 複合元件
JSF 為開發人員提供了強大的功能來定義他們自己的自定義元件,這些元件可用於渲染自定義內容。
定義自定義元件
在 JSF 中定義自定義元件是一個兩步過程。
| 步驟 | 描述 |
|---|---|
| 1a | 建立 resources 資料夾。 在 resources 資料夾中使用複合名稱空間建立 xhtml 檔案。 |
| 1b | 使用複合標籤composite:interface、composite:attribute和composite:implementation來定義複合元件的內容。在composite:implementation中使用cc.attrs來獲取在composite:interface中使用composite:attribute定義的變數。 |
步驟 1a:建立自定義元件:loginComponent.xhtml
在 resources 資料夾中建立一個名為 tutorialspoint 的資料夾,並在其中建立一個名為 loginComponent.xhtml 的檔案。
在 html 標題中使用複合名稱空間。
<html xmlns = "http://www.w3.org/1999/xhtml"
   xmlns:h = "http://java.sun.com/jsf/html"
   xmlns:f = "http://java.sun.com/jsf/core"
   xmlns:composite = "http://java.sun.com/jsf/composite">
...
</html>
步驟 1b:使用複合標籤:loginComponent.xhtml
下表描述了複合標籤的使用。
| 序號 | 標籤 & 描述 |
|---|---|
| 1 | composite:interface 宣告要在 composite:implementation 中使用的可配置值。 |
| 2 | composite:attribute 使用此標籤宣告配置值。 |
| 3 | composite:implementation 宣告 JSF 元件。可以使用 #{cc.attrs.attribute-name} 表示式訪問在 composite:interface 中定義的可配置值。 |
<composite:interface>
   <composite:attribute name = "usernameLabel" />
   <composite:attribute name = "usernameValue" />
</composite:interface>

<composite:implementation>
<h:form>
   #{cc.attrs.usernameLabel} :
   <h:inputText id = "username" value = "#{cc.attrs.usernameValue}" />
</h:form>
使用自定義元件
在 JSF 中使用自定義元件是一個簡單的過程。
| 步驟 | 描述 |
|---|---|
| 2a | 建立一個 xhtml 檔案並使用自定義元件的名稱空間。名稱空間將是http://java.sun.com/jsf/<folder-name>,其中folder-name是 resources 目錄中包含自定義元件的資料夾 |
| 2b | 像使用普通 JSF 標籤一樣使用自定義元件 |
步驟 2a:使用自定義名稱空間:home.xhtml
<html xmlns = "http://www.w3.org/1999/xhtml"
   xmlns:h = "http://java.sun.com/jsf/html"
   xmlns:ui = "http://java.sun.com/jsf/facelets">
   xmlns:tp = "http://java.sun.com/jsf/composite/tutorialspoint">
步驟 2b:使用自定義標籤:home.xhtml 並傳遞值
<h:form>
   <tp:loginComponent
      usernameLabel = "Enter User Name: "
      usernameValue = "#{userData.name}" />
</h:form>
示例應用程式
讓我們建立一個測試 JSF 應用程式來測試 JSF 中的自定義元件。
| 步驟 | 描述 |
|---|---|
| 1 | 在JSF - 第一個應用程式章節中說明的基礎上,建立一個名為helloworld的專案,放在package com.tutorialspoint.test下。 |
| 2 | 在src → main資料夾下建立resources資料夾。 |
| 3 | 在src → main → resources資料夾下建立tutorialspoint資料夾。 |
| 4 | 在src → main → resources → tutorialspoint資料夾下建立loginComponent.xhtml檔案。 |
| 5 | 修改UserData.java檔案,如下所示。 |
| 6 | 修改home.xhtml,如下所示。保持其餘檔案不變。 |
| 7 | 編譯並執行應用程式以確保業務邏輯按要求工作。 |
| 8 | 最後,以 war 檔案的形式構建應用程式,並將其部署到 Apache Tomcat Webserver 中。 |
| 9 | 使用下面最後一步中說明的適當 URL 啟動您的 Web 應用程式。 |
loginComponent.xhtml
<?xml version = "1.0" encoding = "UTF-8"?>
<!DOCTYPE html PUBLIC "-//W3C//DTD XHTML 1.0 Transitional//EN"
"http://www.w3.org/TR/xhtml1/DTD/xhtml1-transitional.dtd">

<html xmlns = "http://www.w3.org/1999/xhtml"
   xmlns:h = "http://java.sun.com/jsf/html"
   xmlns:f = "http://java.sun.com/jsf/core"
   xmlns:composite = "http://java.sun.com/jsf/composite">

   <composite:interface>
      <composite:attribute name = "usernameLabel" />
      <composite:attribute name = "usernameValue" />
      <composite:attribute name = "passwordLabel" />
      <composite:attribute name = "passwordValue" />
      <composite:attribute name = "loginButtonLabel" />
      <composite:attribute name = "loginButtonAction"
         method-signature = "java.lang.String login()" />
   </composite:interface>

   <composite:implementation>
      <h:form>
         <h:message for = "loginPanel" style = "color:red;" />

         <h:panelGrid columns = "2" id = "loginPanel">
            #{cc.attrs.usernameLabel} :
            <h:inputText id = "username" value = "#{cc.attrs.usernameValue}" />
            #{cc.attrs.passwordLabel} :
            <h:inputSecret id = "password" value = "#{cc.attrs.passwordValue}" />
         </h:panelGrid>

         <h:commandButton action = "#{cc.attrs.loginButtonAction}"
            value = "#{cc.attrs.loginButtonLabel}"/>
      </h:form>
   </composite:implementation>
</html>
UserData.java
package com.tutorialspoint.test;

import java.io.Serializable;

import javax.faces.bean.ManagedBean;
import javax.faces.bean.SessionScoped;

@ManagedBean(name = "userData", eager = true)
@SessionScoped
public class UserData implements Serializable {
   private static final long serialVersionUID = 1L;
   private String name;
   private String password;

   public String getName() {
      return name;
   }

   public void setName(String name) {
      this.name = name;
   }

   public String getPassword() {
      return password;
   }

   public void setPassword(String password) {
      this.password = password;
   }

   public String login() {
      return "result";
   }
}
home.xhtml
<?xml version = "1.0" encoding = "UTF-8"?>
<!DOCTYPE html PUBLIC "-//W3C//DTD XHTML 1.0 Transitional//EN"
"http://www.w3.org/TR/xhtml1/DTD/xhtml1-transitional.dtd">

<html xmlns = "http://www.w3.org/1999/xhtml"
   xmlns:h = "http://java.sun.com/jsf/html"
   xmlns:f = "http://java.sun.com/jsf/core"
   xmlns:tp = "http://java.sun.com/jsf/composite/tutorialspoint">

   <h:head>
      <title>JSF tutorial</title>
   </h:head>

   <h:body>
      <h2>Custom Component Example</h2>

      <h:form>
      <tp:loginComponent
         usernameLabel = "Enter User Name: "
         usernameValue = "#{userData.name}"
         passwordLabel = "Enter Password: "
         passwordValue = "#{userData.password}"
         loginButtonLabel = "Login"
         loginButtonAction = "#{userData.login}" />
      </h:form>
   </h:body>
</html>
完成所有更改後,讓我們像在 JSF - 第一個應用程式章節中一樣編譯並執行應用程式。如果您的應用程式一切正常,這將產生以下結果。

JSF - Ajax
AJAX 代表非同步 JavaScript 和 Xml。
Ajax 是一種使用 JavaScript 的 HTTPXMLObject 將資料非同步傳送到伺服器並從伺服器接收資料的技術。因此,使用 Ajax 技術,javascript 程式碼與伺服器交換資料,更新網頁的部分內容而無需重新載入整個頁面。
JSF 為進行 ajax 呼叫提供了極好的支援。它提供了 f:ajax 標籤來處理 ajax 呼叫。
JSF 標籤
<f:ajax execute = "input-component-name" render = "output-component-name" />
標籤屬性
| 序號 | 屬性 & 描述 |
|---|---|
| 1 | disabled 如果為 true,則 Ajax 行為將應用於任何父級或子級元件。如果為 false,則 Ajax 行為將被停用。 |
| 2 | Event 將呼叫 Ajax 請求的事件,例如“click”、“change”、“blur”、“keypress”等。 |
| 3 | Execute 應包含在 Ajax 請求中的元件的 ID 的空格分隔列表。 |
| 4 | Immediate 如果為“true”,則從此行為生成的事件將在“應用請求值”階段廣播。否則,這些事件將在“呼叫應用程式”階段廣播。 |
| 5 | Listener 在 Ajax 請求期間要呼叫的支援 Bean 中方法的 EL 表示式。 |
| 6 | Onerror 如果 Ajax 請求期間發生錯誤,將呼叫的 JavaScript 回撥函式的名稱。 |
| 7 | Onevent 將呼叫的 JavaScript 回撥函式的名稱以處理 UI 事件。 |
| 8 | Render 將在 Ajax 請求後更新的元件的 ID 的空格分隔列表。 |
示例應用程式
讓我們建立一個測試 JSF 應用程式來測試 JSF 中的自定義元件。
| 步驟 | 描述 |
|---|---|
| 1 | 在JSF - 第一個應用程式章節中說明的基礎上,建立一個名為helloworld的專案,放在package com.tutorialspoint.test下。 |
| 2 | 修改UserData.java檔案,如下所示。 |
| 3 | 修改home.xhtml,如下所示。保持其餘檔案不變。 |
| 4 | 編譯並執行應用程式以確保業務邏輯按要求工作。 |
| 5 | 最後,以 war 檔案的形式構建應用程式,並將其部署到 Apache Tomcat Webserver 中。 |
| 6 | 使用下面最後一步中說明的適當 URL 啟動您的 Web 應用程式。 |
UserData.java
package com.tutorialspoint.test;

import java.io.Serializable;

import javax.faces.bean.ManagedBean;
import javax.faces.bean.SessionScoped;

@ManagedBean(name = "userData", eager = true)
@SessionScoped
public class UserData implements Serializable {
   private static final long serialVersionUID = 1L;
   private String name;

   public String getName() {
      return name;
   }

   public void setName(String name) {
      this.name = name;
   }

   public String getWelcomeMessage() {
      return "Hello " + name;
   }
}
home.xhtml
<?xml version = "1.0" encoding = "UTF-8"?>
<!DOCTYPE html PUBLIC "-//W3C//DTD XHTML 1.0 Transitional//EN"
"http://www.w3.org/TR/xhtml1/DTD/xhtml1-transitional.dtd">

<html xmlns = "http://www.w3.org/1999/xhtml"
   xmlns:h = "http://java.sun.com/jsf/html"
   xmlns:f = "http://java.sun.com/jsf/core"
   xmlns:tp = "http://java.sun.com/jsf/composite/tutorialspoint">

   <h:head>
      <title>JSF tutorial</title>
   </h:head>

   <h:body>
      <h2>Ajax Example</h2>

      <h:form>
         <h:inputText id = "inputName" value = "#{userData.name}"></h:inputText>
         <h:commandButton value = "Show Message">
            <f:ajax execute = "inputName" render = "outputMessage" />
         </h:commandButton>
         <h2><h:outputText id = "outputMessage"
            value = "#{userData.welcomeMessage != null ?
            userData.welcomeMessage : ''}"
         /></h2>
      </h:form>
   </h:body>
</html>
完成所有更改後,讓我們像在 JSF - 第一個應用程式章節中一樣編譯並執行應用程式。如果您的應用程式一切正常,這將產生以下結果。
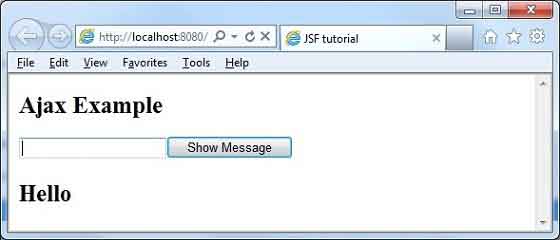
輸入名稱並按下“顯示訊息”按鈕。您將看到以下結果,而無需頁面重新整理/表單提交。

JSF - 事件處理
當用戶單擊 JSF 按鈕或連結或更改文字欄位中的任何值時,JSF UI 元件將觸發一個事件,該事件將由應用程式程式碼處理。為了處理此類事件,需要在應用程式程式碼或受管 Bean 中註冊事件處理程式。
當 UI 元件檢查使用者事件是否已發生時,它會建立相應事件類的例項並將其新增到事件列表中。然後,元件觸發事件,即檢查該事件的偵聽器列表,並在每個偵聽器或處理程式上呼叫事件通知方法。
JSF 還提供系統級事件處理程式,這些處理程式可用於在應用程式啟動或停止時執行某些任務。
以下是 JSF 2.0 中一些重要的事件處理程式 -
| 序號 | 事件處理程式 & 描述 |
|---|---|
| 1 | valueChangeListener
當用戶在輸入元件中進行更改時,將觸發值更改事件。 |
| 2 | actionListener
當用戶單擊按鈕或連結元件時,將觸發操作事件。 |
| 3 | 應用程式事件
在 JSF 生命週期期間觸發的事件:PostConstructApplicationEvent、PreDestroyApplicationEvent、PreRenderViewEvent。 |
JSF - JDBC 整合
本文將演示如何使用 JDBC 在 JSF 中整合資料庫。
以下是執行此示例所需的資料庫要求。
| 序號 | 軟體及描述 |
|---|---|
| 1 | PostgreSQL 9.1
開源且輕量級的資料庫 |
| 2 | PostgreSQL JDBC4 驅動程式
PostgreSQL 9.1 和 JDK 1.5 或更高版本的 JDBC 驅動程式 |
將 PostgreSQL JDBC4 驅動程式 jar 放入 Tomcat Web 伺服器的 lib 目錄中。
資料庫 SQL 命令
create user user1;
create database testdb with owner = user1;

CREATE TABLE IF NOT EXISTS authors (
    id int PRIMARY KEY,
    name VARCHAR(25)
);

INSERT INTO authors(id, name) VALUES(1, 'Rob Bal');
INSERT INTO authors(id, name) VALUES(2, 'John Carter');
INSERT INTO authors(id, name) VALUES(3, 'Chris London');
INSERT INTO authors(id, name) VALUES(4, 'Truman De Bal');
INSERT INTO authors(id, name) VALUES(5, 'Emile Capote');
INSERT INTO authors(id, name) VALUES(7, 'Breech Jabber');
INSERT INTO authors(id, name) VALUES(8, 'Bob Carter');
INSERT INTO authors(id, name) VALUES(9, 'Nelson Mand');
INSERT INTO authors(id, name) VALUES(10, 'Tennant Mark');

alter user user1 with password 'user1';

grant all on authors to user1;
示例應用程式
讓我們建立一個測試 JSF 應用程式來測試 JDBC 整合。
| 步驟 | 描述 |
|---|---|
| 1 | 在JSF - 第一個應用程式章節中說明的基礎上,建立一個名為helloworld的專案,放在package com.tutorialspoint.test下。 |
| 2 | 在src → main資料夾下建立resources資料夾。 |
| 3 | 在 src → main → resources 資料夾下建立 css 資料夾。 |
| 4 | 在 src → main → resources → css 資料夾下建立 styles.css 檔案。 |
| 5 | 修改 styles.css 檔案,如下所述。 |
| 6 | 修改 pom.xml 檔案,如下所述。 |
| 7 | 在 com.tutorialspoint.test 包下建立 Author.java 檔案,如下所述。 |
| 8 | 在 com.tutorialspoint.test 包下建立 UserData.java 檔案,如下所述。 |
| 9 | 修改home.xhtml,如下所示。保持其餘檔案不變。 |
| 10 | 編譯並執行應用程式以確保業務邏輯按要求工作。 |
| 11 | 最後,以 war 檔案的形式構建應用程式,並將其部署到 Apache Tomcat Webserver 中。 |
| 12 | 使用下面最後一步中說明的適當 URL 啟動您的 Web 應用程式。 |
styles.css
.authorTable {
   border-collapse:collapse;
   border-bottom:1px solid #000000;
}

.authorTableHeader {
   text-align:center;
   background:none repeat scroll 0 0 #B5B5B5;
   border-bottom:1px solid #000000;
   border-top:1px solid #000000;
   padding:2px;
}

.authorTableOddRow {
   text-align:center;
   background:none repeat scroll 0 0 #FFFFFFF;
}

.authorTableEvenRow {
   text-align:center;
   background:none repeat scroll 0 0 #D3D3D3;
}
pom.xml
<project xmlns = "http://maven.apache.org/POM/4.0.0"
   xmlns:xsi = "http://www.w3.org/2001/XMLSchema-instance"
   xsi:schemaLocation = "http://maven.apache.org/POM/4.0.0
   http://maven.apache.org/maven-v4_0_0.xsd">

   <modelVersion>4.0.0</modelVersion>
   <groupId>com.tutorialspoint.test</groupId>
   <artifactId>helloworld</artifactId>
   <packaging>war</packaging>
   <version>1.0-SNAPSHOT</version>
   <name>helloworld Maven Webapp</name>
   <url>http://maven.apache.org</url >

   <dependencies>
      <dependency>
         <groupId>junit</groupId>
         <artifactId>junit</artifactId>
         <version>3.8.1</version>
         <scope>test</scope>
      </dependency>

      <dependency>
         <groupId>com.sun.faces</groupId>
         <artifactId>jsf-api</artifactId>
         <version>2.1.7</version>
      </dependency>

      <dependency>
         <groupId>com.sun.faces</groupId>
         <artifactId>jsf-impl</artifactId>
         <version>2.1.7</version>
      </dependency>

      <dependency>
         <groupId>javax.servlet</groupId>
         <artifactId>jstl</artifactId>
         <version>1.2</version>
      </dependency>

      <dependency>
        <groupId>postgresql</groupId>
        <artifactId>postgresql</artifactId>
        <version>9.1-901.jdbc4</version>
     </dependency>
   </dependencies>

   <build>
      <finalName>helloworld</finalName>
      <plugins>
         <plugin>
            <groupId>org.apache.maven.plugins</groupId>
            <artifactId>maven-compiler-plugin</artifactId>
            <version>2.3.1</version>
            <configuration>
               <source>1.6</source>
               <target>1.6</target>
            </configuration>
         </plugin>

         <plugin>
            <artifactId>maven-resources-plugin</artifactId>
            <version>2.6</version>
            <executions>
               <execution>
                  <id>copy-resources</id>
                  <phase>validate</phase>
                  <goals>
                     <goal>copy-resources</goal>
                  </goals>

                  <configuration>
                     <outputDirectory>${basedir}/target/helloworld/resources
                        </outputDirectory>
                     <resources>
                        <resource>
                           <directory>src/main/resources</directory>
                           <filtering>true</filtering>
                        </resource>
                     </resources>
                  </configuration>
               </execution>
            </executions>
         </plugin>

      </plugins>
   </build>
</project>
Author.java
package com.tutorialspoint.test;

public class Author {
   int id;
   String name;

   public String getName() {
      return name;
   }

   public void setName(String name) {
      this.name = name;
   }

   public int getId() {
      return id;
   }

   public void setId(int id) {
      this.id = id;
   }
}
UserData.java
package com.tutorialspoint.test;

import java.io.Serializable;

import java.sql.Connection;
import java.sql.DriverManager;
import java.sql.PreparedStatement;
import java.sql.ResultSet;
import java.sql.SQLException;

import java.util.ArrayList;
import java.util.List;

import javax.faces.bean.ManagedBean;
import javax.faces.bean.SessionScoped;
import javax.faces.event.ComponentSystemEvent;

@ManagedBean(name = "userData", eager = true)
@SessionScoped
public class UserData implements Serializable {
   private static final long serialVersionUID = 1L;

   public List<Author> getAuthors() {
      ResultSet rs = null;
      PreparedStatement pst = null;
      Connection con = getConnection();
      String stm = "Select * from authors";
      List<Author> records = new ArrayList<Author>();

      try {
         pst = con.prepareStatement(stm);
         pst.execute();
         rs = pst.getResultSet();

         while(rs.next()) {
            Author author = new Author();
            author.setId(rs.getInt(1));
            author.setName(rs.getString(2));
            records.add(author);
         }
      } catch (SQLException e) {
         e.printStackTrace();
      }
      return records;
   }

   public Connection getConnection() {
      Connection con = null;
      String url = "jdbc:postgresql:///testdb";
      String user = "user1";
      String password = "user1";

      try {
         con = DriverManager.getConnection(url, user, password);
         System.out.println("Connection completed.");
      } catch (SQLException ex) {
         System.out.println(ex.getMessage());
      }

      finally {
      }
      return con;
   }
}
home.xhtml
<?xml version = "1.0" encoding = "UTF-8"?>
<!DOCTYPE html PUBLIC "-//W3C//DTD XHTML 1.0 Transitional//EN"
"http://www.w3.org/TR/xhtml1/DTD/xhtml1-transitional.dtd">

<html xmlns = "http://www.w3.org/1999/xhtml"
   xmlns:f = "http://java.sun.com/jsf/core"
   xmlns:h = "http://java.sun.com/jsf/html">

   <h:head>
      <title>JSF Tutorial!</title>
      <h:outputStylesheet library = "css" name = "styles.css"  />
   </h:head>

   <h:body>
      <h2>JDBC Integration Example</h2>

      <h:dataTable value = "#{userData.authors}" var = "c"
         styleClass = "authorTable"
         headerClass = "authorTableHeader"
         rowClasses = "authorTableOddRow,authorTableEvenRow">

         <h:column><f:facet name = "header">Author ID</f:facet>
            #{c.id}
         </h:column>

         <h:column><f:facet name = "header">Name</f:facet>
            #{c.name}
         </h:column>
      </h:dataTable>
   </h:body>
</html>
完成所有更改後,讓我們像在 JSF - 第一個應用程式章節中一樣編譯並執行應用程式。如果您的應用程式一切正常,這將產生以下結果。

JSF - Spring 整合
Spring 提供了一個特殊的類 DelegatingVariableResolver,可以無縫地將 JSF 和 Spring 整合在一起。
在 JSF 中整合 Spring 依賴注入 (IOC) 功能需要執行以下步驟。
步驟 1:新增 DelegatingVariableResolver
在 faces-config.xml 中新增一個 variable-resolver 條目,指向 Spring 類 DelegatingVariableResolver。
<faces-config>
   <application>
   <variable-resolver>
      org.springframework.web.jsf.DelegatingVariableResolver
   </variable-resolver>
   ...
</faces-config>
步驟 2:新增上下文監聽器
在 web.xml 中新增 Spring 框架提供的 ContextLoaderListener 和 RequestContextListener 監聽器。
<web-app>
   ...
   <!-- Add Support for Spring -->
   <listener>
      <listener-class>
         org.springframework.web.context.ContextLoaderListener
      </listener-class>
   </listener>

   <listener>
      <listener-class>
         org.springframework.web.context.request.RequestContextListener
      </listener-class>
   </listener>
   ...
</web-app>
步驟 3:定義依賴項
在 applicationContext.xml 中定義將在託管 Bean 中用作依賴項的 Bean。
<beans>
   <bean id = "messageService"
      class = "com.tutorialspoint.test.MessageServiceImpl">
      <property name = "message" value = "Hello World!" />
   </bean>
</beans>
步驟 4:新增依賴項
DelegatingVariableResolver 首先將值查詢委託給 JSF 的預設解析器,然後委託給 Spring 的 WebApplicationContext。這允許輕鬆地將基於 Spring 的依賴項注入到 JSF 託管 Bean 中。
我們在這裡將 messageService 注入為基於 Spring 的依賴項。
<faces-config>
   ...
   <managed-bean>
      <managed-bean-name>userData</managed-bean-name>
      <managed-bean-class>com.tutorialspoint.test.UserData</managed-bean-class>
      <managed-bean-scope>request</managed-bean-scope>

      <managed-property>
         <property-name>messageService</property-name>
         <value>#{messageService}</value>
      </managed-property>
   </managed-bean>
</faces-config>
步驟 5:使用依賴項
//jsf managed bean
public class UserData {

   //spring managed dependency
   private MessageService messageService;

   public void setMessageService(MessageService messageService) {
      this.messageService = messageService;
   }

   public String getGreetingMessage() {
      return messageService.getGreetingMessage();
   }
}
示例應用程式
讓我們建立一個測試 JSF 應用程式來測試 Spring 整合。
| 步驟 | 描述 |
|---|---|
| 1 | 在JSF - 第一個應用程式章節中說明的基礎上,建立一個名為helloworld的專案,放在package com.tutorialspoint.test下。 |
| 2 | 修改 pom.xml 檔案,如下所述。 |
| 3 | 在 WEB-INF 資料夾下建立 faces-config.xml 檔案,如下所述。 |
| 4 | 修改 web.xml 檔案,如下所述。 |
| 5 | 在 WEB-INF 資料夾下建立 applicationContext.xml 檔案,如下所述。 |
| 6 | 在 com.tutorialspoint.test 包下建立 MessageService.java 檔案,如下所述。 |
| 7 | 在 com.tutorialspoint.test 包下建立 MessageServiceImpl.java 檔案,如下所述。 |
| 8 | 在 com.tutorialspoint.test 包下建立 UserData.java 檔案,如下所述。 |
| 9 | 修改home.xhtml,如下所示。保持其餘檔案不變。 |
| 10 | 編譯並執行應用程式以確保業務邏輯按要求工作。 |
| 11 | 最後,以 war 檔案的形式構建應用程式,並將其部署到 Apache Tomcat Webserver 中。 |
| 12 | 使用下面最後一步中說明的適當 URL 啟動您的 Web 應用程式。 |
pom.xml
<project xmlns = "http://maven.apache.org/POM/4.0.0"
   xmlns:xsi = "http://www.w3.org/2001/XMLSchema-instance"
   xsi:schemaLocation = "http://maven.apache.org/POM/4.0.0
   http://maven.apache.org/maven-v4_0_0.xsd">

   <modelVersion>4.0.0</modelVersion>
   <groupId>com.tutorialspoint.test</groupId>
   <artifactId>helloworld</artifactId>
   <packaging>war</packaging>
   <version>1.0-SNAPSHOT</version>
   <name>helloworld Maven Webapp</name>
   <url>http://maven.apache.org</url>

   <dependencies>
      <dependency>
         <groupId>junit</groupId>
         <artifactId>junit</artifactId>
         <version>3.8.1</version>
         <scope>test</scope>
      </dependency>

      <dependency>
         <groupId>com.sun.faces</groupId>
         <artifactId>jsf-api</artifactId>
         <version>2.1.7</version>
      </dependency>

      <dependency>
         <groupId>com.sun.faces</groupId>
         <artifactId>jsf-impl</artifactId>
         <version>2.1.7</version>
      </dependency>

      <dependency>
         <groupId>javax.servlet</groupId>
         <artifactId>jstl</artifactId>
         <version>1.2</version>
      </dependency>

      <dependency>
         <groupId>org.springframework</groupId>
         <artifactId>spring-core</artifactId>
         <version>3.1.2.RELEASE</version>
      </dependency>

      <dependency>
         <groupId>org.springframework</groupId>
         <artifactId>spring-web</artifactId>
         <version>3.1.2.RELEASE</version>
      </dependency>
   </dependencies>

   <build>
      <finalName>helloworld</finalName>
      <plugins>
         <plugin>
            <groupId>org.apache.maven.plugins</groupId>
            <artifactId>maven-compiler-plugin</artifactId>
            <version>2.3.1</version>
            <configuration>
               <source>1.6</source>
               <target>1.6</target>
            </configuration>
         </plugin>

         <plugin>
            <artifactId>maven-resources-plugin</artifactId>
            <version>2.6</version>

            <executions>
               <execution>
                  <id>copy-resources</id>
                  <phase>validate</phase>
                  <goals>
                     <goal>copy-resources</goal>
                  </goals>

                  <configuration>
                     <outputDirectory>${basedir}/target/helloworld/resources
                        </outputDirectory>
                     <resources>
                        <resource>
                           <directory>src/main/resources</directory>
                           <filtering>true</filtering>
                        </resource>
                     </resources>
                  </configuration>
               </execution>
            </executions>

         </plugin>
      </plugins>
   </build>
</project>
faces-config.xml
<?xml version = "1.0" encoding = "UTF-8"?>
<faces-config
   xmlns = "http://java.sun.com/xml/ns/javaee"
   xmlns:xsi = "http://www.w3.org/2001/XMLSchema-instance"
   xsi:schemaLocation = "http://java.sun.com/xml/ns/javaee
   http://java.sun.com/xml/ns/javaee/web-facesconfig_2_0.xsd"
   version = "2.0">

   <application>
      <variable-resolver>
         org.springframework.web.jsf.DelegatingVariableResolver
      </variable-resolver>
   </application>

   <managed-bean>
      <managed-bean-name>userData</managed-bean-name>
      <managed-bean-class>com.tutorialspoint.test.UserData</managed-bean-class>
      <managed-bean-scope>request</managed-bean-scope>
      <managed-property>
         <property-name>messageService</property-name>
         <value>#{messageService}</value>
      </managed-property>
   </managed-bean>
</faces-config>
web.xml
<!DOCTYPE web-app PUBLIC
   "-//Sun Microsystems, Inc.//DTD Web Application 2.3//EN"
   "http://java.sun.com/dtd/web-app_2_3.dtd" >

<web-app>
   <display-name>Archetype Created Web Application</display-name>

   <context-param>
      <param-name>javax.faces.PROJECT_STAGE</param-name>
      <param-value>Development</param-value>
   </context-param>

   <!-- Add Support for Spring -->
   <listener>
      <listener-class>
         org.springframework.web.context.ContextLoaderListener
      </listener-class>
   </listener>

   <listener>
      <listener-class>
         org.springframework.web.context.request.RequestContextListener
      </listener-class>
   </listener>

   <servlet>
      <servlet-name>Faces Servlet</servlet-name>
      <servlet-class>javax.faces.webapp.FacesServlet</servlet-class>
   </servlet>

   <servlet-mapping>
      <servlet-name>Faces Servlet</servlet-name>
      <url-pattern>*.jsf</url-pattern>
   </servlet-mapping>
</web-app>
applicationContext.xml
<?xml version = "1.0" encoding = "UTF-8"?>
<!DOCTYPE beans PUBLIC "-//SPRING//DTD BEAN 2.0//EN"
   "http://www.springframework.org/dtd/spring-beans-2.0.dtd">

<beans>
   <bean id = "messageService"
      class = "com.tutorialspoint.test.MessageServiceImpl">
      <property name = "message" value = "Hello World!" />
   </bean>
</beans>
MessageService.java
package com.tutorialspoint.test;

public interface MessageService {
   String getGreetingMessage();
}
MessageServiceImpl.java
package com.tutorialspoint.test;

public class MessageServiceImpl implements MessageService {
   private String message;

   public String getGreetingMessage() {
      return message;
   }

   public String getMessage() {
      return message;
   }
   public void setMessage(String message) {
      this.message = message;
   }
}
UserData.java
package com.tutorialspoint.test;

import java.io.Serializable;

public class UserData implements Serializable {

   private static final long serialVersionUID = 1L;
	private MessageService messageService;

   public MessageService getMessageService() {
      return messageService;
   }

   public void setMessageService(MessageService messageService) {
      this.messageService = messageService;
   }

   public String getGreetingMessage() {
      return messageService.getGreetingMessage();
   }
}
home.xhtml
<?xml version = "1.0" encoding = "UTF-8"?>
<!DOCTYPE html PUBLIC "-//W3C//DTD XHTML 1.0 Transitional//EN"
"http://www.w3.org/TR/xhtml1/DTD/xhtml1-transitional.dtd">

<html xmlns = "http://www.w3.org/1999/xhtml"
   xmlns:f = "http://java.sun.com/jsf/core"
   xmlns:h = "http://java.sun.com/jsf/html">

   <h:head>
      <title>JSF Tutorial!</title>
   </h:head>

   <h:body>
      <h2>Spring Integration Example</h2>
      #{userData.greetingMessage}
   </h:body>
</html>
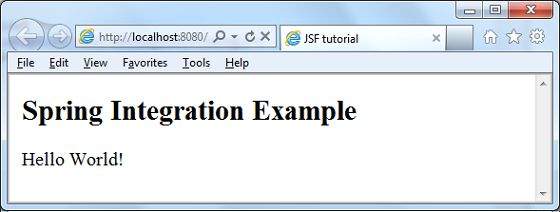
完成所有更改後,讓我們像在 JSF - 第一個應用程式章節中一樣編譯並執行應用程式。如果您的應用程式一切正常,這將產生以下結果。
JSF - 表示式語言
JSF 提供了一個豐富的表示式語言。我們可以使用 #{operation-expression} 表示法編寫常規操作。以下是 JSF 表示式語言的一些優點。
可以引用 Bean 屬性,其中 Bean 可以是儲存在請求、會話或應用程式作用域中的物件,或者是一個託管 Bean。
提供對集合元素的輕鬆訪問,集合可以是列表、對映或陣列。
提供對預定義物件的輕鬆訪問,例如請求。
可以使用表示式語言執行算術、邏輯和關係運算。
自動型別轉換。
將缺失值顯示為空字串,而不是 NullPointerException。
示例應用程式
讓我們建立一個測試 JSF 應用程式來測試表達式語言。
| 步驟 | 描述 |
|---|---|
| 1 | 在JSF - 第一個應用程式章節中說明的基礎上,建立一個名為helloworld的專案,放在package com.tutorialspoint.test下。 |
| 2 | 修改 com.tutorialspoint.test 包下的 UserData.java 檔案,如下所述。 |
| 3 | 修改home.xhtml,如下所示。保持其餘檔案不變。 |
| 4 | 編譯並執行應用程式以確保業務邏輯按要求工作。 |
| 5 | 最後,以 war 檔案的形式構建應用程式,並將其部署到 Apache Tomcat Webserver 中。 |
| 6 | 使用下面最後一步中說明的適當 URL 啟動您的 Web 應用程式。 |
UserData.java
package com.tutorialspoint.test;

import java.io.Serializable;
import java.util.Date;

import javax.faces.bean.ManagedBean;
import javax.faces.bean.SessionScoped;

@ManagedBean(name = "userData", eager = true)
@SessionScoped
public class UserData implements Serializable {
   private static final long serialVersionUID = 1L;
   private Date createTime = new Date();
   private String message = "Hello World!";

   public Date getCreateTime() {
      return(createTime);
   }

   public String getMessage() {
      return(message);
   }
}
home.xhtml
<?xml version = "1.0" encoding = "UTF-8"?>
<!DOCTYPE html PUBLIC "-//W3C//DTD XHTML 1.0 Transitional//EN"
"http://www.w3.org/TR/xhtml1/DTD/xhtml1-transitional.dtd">

<html xmlns = "http://www.w3.org/1999/xhtml"
   xmlns:f = "http://java.sun.com/jsf/core"
   xmlns:h = "http://java.sun.com/jsf/html">

   <h:head>
      <title>JSF Tutorial!</title>
   </h:head>

   <h:body>
      <h2>Expression Language Example</h2>
      Creation time:
      <h:outputText value = "#{userData.createTime}"/>
      <br/><br/>
      Message:
      <h:outputText value = "#{userData.message}"/>
   </h:body>
</html>
完成所有更改後,讓我們像在 JSF - 第一個應用程式章節中一樣編譯並執行應用程式。如果您的應用程式一切正常,這將產生以下結果。

JSF - 國際化
國際化是一種技術,其中狀態訊息、GUI 元件標籤、貨幣、日期不會硬編碼在程式中。相反,它們儲存在原始碼外部的資源包中,並動態檢索。JSF 提供了一種非常方便的方法來處理資源包。
國際化 JSF 應用程式需要執行以下步驟。
步驟 1:定義屬性檔案
為每個區域設定建立屬性檔案。名稱應採用 <file-name>_<locale>.properties 格式。
預設區域設定可以在檔名中省略。
messages.properties
greeting = Hello World!
messages_fr.properties
greeting = Bonjour tout le monde!
步驟 2:更新 faces-config.xml
faces-config.xml
<application>
   <locale-config>
      <default-locale>en</default-locale>
      <supported-locale>fr</supported-locale>
   </locale-config>

   <resource-bundle>
      <base-name>com.tutorialspoint.messages</base-name>
      <var>msg</var>
   </resource-bundle>
</application>
步驟 3:使用資源包變數
home.xhtml
<h:outputText value = "#{msg['greeting']}" />
示例應用程式
讓我們建立一個測試 JSF 應用程式來測試 JSF 中的國際化。
| 步驟 | 描述 |
|---|---|
| 1 | 在JSF - 第一個應用程式章節中說明的基礎上,建立一個名為helloworld的專案,放在package com.tutorialspoint.test下。 |
| 2 | 在 src → mai 資料夾下建立 resources 資料夾。 |
| 3 | 在 src → main → resources 資料夾下建立 com 資料夾。 |
| 4 | 在 src → main → resources → com 資料夾下建立 tutorialspoint 資料夾。 |
| 5 | 在 src → main → resources → com → tutorialspoint 資料夾下建立 messages.properties 檔案。修改它,如下所述。 |
| 6 | 在 src → main → resources → com → tutorialspoint 資料夾下建立 messages_fr.properties 檔案。修改它,如下所述。 |
| 7 | 在 WEB-INFf 資料夾下建立 faces-config.xml 檔案,如下所述。 |
| 8 | 在 com.tutorialspoint.test 包下建立 UserData.java 檔案,如下所述。 |
| 9 | 修改home.xhtml,如下所示。保持其餘檔案不變。 |
| 10 | 編譯並執行應用程式以確保業務邏輯按要求工作。 |
| 11 | 最後,以 war 檔案的形式構建應用程式,並將其部署到 Apache Tomcat Webserver 中。 |
| 12 | 使用下面最後一步中說明的適當 URL 啟動您的 Web 應用程式。 |
messages.properties
greeting = Hello World!
messages_fr.properties
greeting = Bonjour tout le monde!
faces-config.xml
<?xml version = "1.0" encoding = "UTF-8"?>
<faces-config
   xmlns = "http://java.sun.com/xml/ns/javaee"
   xmlns:xsi = "http://www.w3.org/2001/XMLSchema-instance"
   xsi:schemaLocation = "http://java.sun.com/xml/ns/javaee
   http://java.sun.com/xml/ns/javaee/web-facesconfig_2_0.xsd"
   version = "2.0">

   <application>
      <locale-config>
         <default-locale>en</default-locale>
         <supported-locale>fr</supported-locale>
      </locale-config>

      <resource-bundle>
         <base-name>com.tutorialspoint.messages</base-name>
         <var>msg</var>
      </resource-bundle>
   </application>
</faces-config>
UserData.java
package com.tutorialspoint.test;

import java.io.Serializable;
import java.util.LinkedHashMap;
import java.util.Locale;
import java.util.Map;

import javax.faces.bean.ManagedBean;
import javax.faces.bean.SessionScoped;
import javax.faces.context.FacesContext;
import javax.faces.event.ValueChangeEvent;

@ManagedBean(name = "userData", eager = true)
@SessionScoped
public class UserData implements Serializable {
   private static final long serialVersionUID = 1L;
   private String locale;

   private static Map<String,Object> countries;
      static {

      countries = new LinkedHashMap<String,Object>();
      countries.put("English", Locale.ENGLISH);
      countries.put("French", Locale.FRENCH);
   }

   public Map<String, Object> getCountries() {
      return countries;
   }

   public String getLocale() {
      return locale;
   }

   public void setLocale(String locale) {
      this.locale = locale;
   }

   //value change event listener
   public void localeChanged(ValueChangeEvent e) {
      String newLocaleValue = e.getNewValue().toString();

      for (Map.Entry<String, Object> entry : countries.entrySet()) {

         if(entry.getValue().toString().equals(newLocaleValue)) {
            FacesContext.getCurrentInstance()
               .getViewRoot().setLocale((Locale)entry.getValue());
         }
      }
   }
}
home.xhtml
<?xml version = "1.0" encoding = "UTF-8"?>
<!DOCTYPE html PUBLIC "-//W3C//DTD XHTML 1.0 Transitional//EN"
"http://www.w3.org/TR/xhtml1/DTD/xhtml1-transitional.dtd">

<html xmlns = "http://www.w3.org/1999/xhtml"
xmlns:h = "http://java.sun.com/jsf/html"
xmlns:f = "http://java.sun.com/jsf/core">

   <h:head>
      <title>JSF tutorial</title>
   </h:head>

   <h:body>
      <h2>Internalization Language Example</h2>

      <h:form>
         <h3><h:outputText value = "#{msg['greeting']}" /></h3>

         <h:panelGrid columns = "2">
            Language :
            <h:selectOneMenu value = "#{userData.locale}" onchange = "submit()"
               valueChangeListener = "#{userData.localeChanged}">
               <f:selectItems value = "#{userData.countries}" />
            </h:selectOneMenu>
         </h:panelGrid>

      </h:form>
   </h:body>
</html>
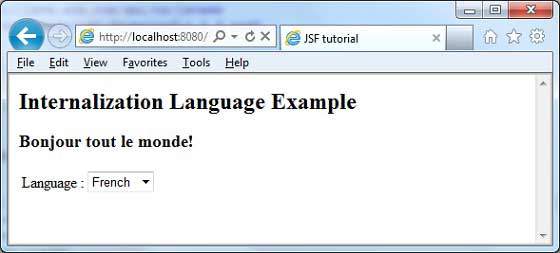
完成所有更改後,讓我們像在 JSF - 第一個應用程式章節中一樣編譯並執行應用程式。如果您的應用程式一切正常,這將產生以下結果。

從下拉列表中更改語言。您將看到以下輸出。