- Grav 外掛
- Grav - 外掛基礎
- Grav - 外掛教程
- Grav - 事件鉤子
- Grav 管理面板
- Grav - 管理員介紹
- Grav - 管理員儀表盤
- Grav - 配置系統
- Grav - 站點配置
- Grav - 管理面板頁面
- Grav - 頁面編輯器選項
- Grav - 頁面編輯器高階
- Grav 高階
- Grav - 藍圖
- Grav - 效能和快取
- Grav - 除錯和日誌記錄
- Grav - 命令列介面 (CLI)
- Grav - GPM (Grav 包管理器)
- Grav - 開發
- Grav - 生命週期
- Grav - YAML 語法
- Grav - 表單
- Grav 託管
- Grav - 網路託管
- Grav 故障排除
- Grav - 伺服器錯誤
- Grav - 許可權
- Grav 有用資源
- Grav - 面試問題
- Grav - 快速指南
- Grav - 有用資源
- Grav - 討論
Grav 主題教程
本章節,讓我們建立一個 Grav 主題來理解這個概念。
反物質主題 (Antimatter)
安裝 Grav 基礎包後,預設安裝了反物質 (Antimatter) 主題,它使用Nucleus(一套簡單的基礎 CSS 樣式)。Nucleus 是一個輕量級的 CSS 框架,包含基本的 CSS 樣式和 HTML 標記,提供獨特的視覺效果。
Bootstrap 主題
讓我們建立一個使用流行的Bootstrap 框架的主題。Bootstrap 是一個開源且最流行的 HTML、CSS 和 JS 框架,使前端 Web 開發更快更容易。
以下步驟描述了主題的建立:
步驟 1:基礎主題設定
正如我們在主題基礎章節中學習的那樣,Grav 主題有一些關鍵元素,需要遵循這些元素才能建立新的主題。
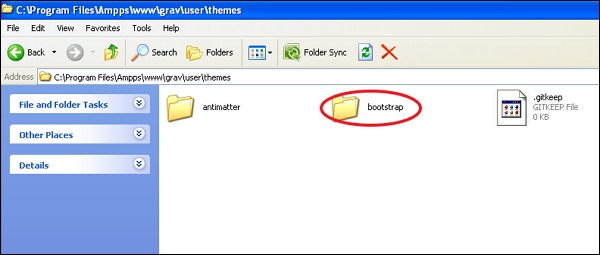
安裝 Grav 基礎包後,在user/themes資料夾下建立一個名為 bootstrap 的資料夾,如下所示。
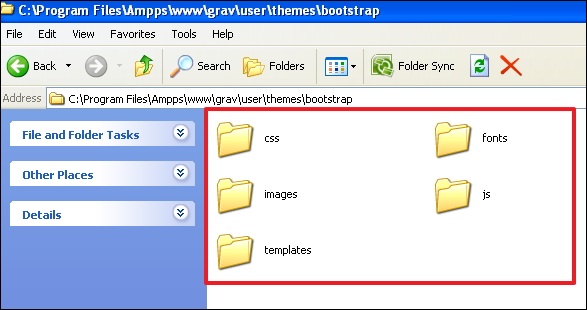
在user/themes/bootstrap資料夾內,建立css/、fonts/、images/、js/和templates/資料夾,如下所示。
在你的user/themes/bootstrap資料夾中建立一個名為bootstrap.php的主題檔案,並將以下內容貼上到其中。(此處應提供 bootstrap.php 程式碼)
<?php
namespace Grav\Theme;
use Grav\Common\Theme;
class Bootstrap extends Theme {}
現在,在themes/bootstrap資料夾中建立一個主題配置檔案bootstrap.yaml,並在其中寫入以下內容。(此處應提供 bootstrap.yaml 程式碼)
enable: true
我們將跳過blueprints資料夾,因為我們沒有配置選項,在本節中將使用常規 CSS。
步驟 2:新增 Bootstrap
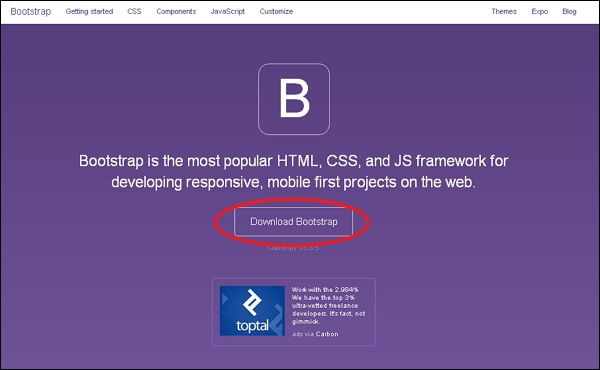
為了建立一個 Bootstrap 主題,你必須在你的主題中包含 Bootstrap。因此,你需要點選此連結下載最新的 Bootstrap 包,如下所示。
解壓該包,你會看到三個資料夾,分別是 css、fonts 和 js。現在將這三個資料夾的內容複製到前面建立的user/themes/bootstrap中同名資料夾中。
步驟 3:基本模板
正如我們在上一章節中學習的那樣,內容儲存在default.md檔案中,它指示 Grav 查詢名為default.html.twig的渲染模板。此檔案包含顯示頁面所需的一切。
有一個更好的解決方案,它利用 Twig 的extends標籤,允許你使用blocks定義基本佈局。這將允許 twig 模板擴充套件基本模板併為基本模板中定義的塊提供定義。
按照以下步驟建立一個簡單的 Bootstrap 基本模板:
在user/themes/bootstrap/templates資料夾中建立一個名為partials的資料夾。這用於儲存我們的基本模板。
在partials資料夾中,建立一個包含以下內容的base.html.twig檔案。(此處應提供 base.html.twig 程式碼)
<!DOCTYPE html>
<html lang = "en">
   <head>
      {% block head %}
      <meta charset = "utf-8">
      <meta http-equiv = "X-UA-Compatible" content = "IE = edge">
      <meta name = "viewport" content = "width = device-width, initial-scale = 1">
      {% if header.description %}
      <meta name = "description" content = "{{ header.description }}">
      {% else %}
      <meta name = "description" content = "{{ site.description }}">
      {% endif %}
      {% if header.robots %}
      <meta name = "robots" content = "{{ header.robots }}">
      {% endif %}
      <link rel = "icon" type = "image/png" href="{{ theme_url }}/images/favicon.png">

      <title>{% if header.title %}{{ header.title }} | {% endif %}{{ site.title }}</title>

      {% block stylesheets %}
         {# Bootstrap core CSS #}
         {% do assets.add('theme://css/bootstrap.min.css',101) %}

      {# Custom styles for this theme #}
         {% do assets.add('theme://css/bootstrap-custom.css',100) %}

         {{ assets.css() }}
      {% endblock %}

      {% block javascripts %}
         {% do assets.add('https://ajax.googleapis.com/ajax/libs/jquery/1.11.1/jquery.min.js', 101) %}
         {% do assets.add('theme://js/bootstrap.min.js') %}

         {% if browser.getBrowser == 'msie' and browser.getVersion >= 8 and browser.getVersion <= 9 %}
            {% do assets.add('https://oss.maxcdn.com/html5shiv/3.7.2/html5shiv.min.js') %}
            {% do assets.add('https://oss.maxcdn.com/respond/1.4.2/respond.min.js') %}
         {% endif %}

         {{ assets.js() }}
      {% endblock %}

      {% endblock head %}
   </head>
      <body>
         {# include the header + navigation #}
         {% include 'partials/header.html.twig' %}

         <div class = "container">
            {% block content %}{% endblock %}
         </div>

         <div class = "footer">
            <div class = "container">
               <p class = "text-muted">Bootstrap Theme for <a href = "http://getgrav.org">Grav</a></p>
            </div>
         </div>
      </body>
   {% block bottom %}{% endblock %}
</html>
步驟 4:程式碼分解
讓我們看看base.html.twig檔案中程式碼的工作原理,如下所示。
{% block head %}{% endblock head %} 語法用於在基本 Twig 模板中定義一個區域。{% endblock head %} 內的 head 是可選的。
if 語句測試頁面標題中是否設定了meta description。如果未設定,則模板應使用在user/config/site.yaml檔案中定義的site.description進行渲染。
當前主題的路徑由theme_url變數給出。
{% do assets.add('theme://css/bootstrap.min.css',101) %} 語法用於使用資源管理器。theme://表示當前主題路徑,101表示順序,較大的值優先於較小的值。我們也可以顯式提供 CDN 連結,例如:
{% do assets.addCss('http://fonts.googleapis.com/css?family = Open + Sans') %}
或者:
{% do assets.addJs(' https://ajax.googleapis.com/ajax/libs/jquery/1.11.3/jquery.min.js') %}
當呼叫{{ assets.css() }}或{{ assets.js() }}時,模板將分別渲染所有 JavaScript 標籤和 CSS 連結標籤。
{# ... #}語法用於在 Twig 中編寫註釋。
要包含另一個 Twig 模板,使用{% include 'partials/header.html.twig' %}標籤。
模板中的內容由{% block content %}{% endblock %}標籤提供。
要新增自定義 JavaScript 初始化或分析程式碼,{% block bottom %}{% endblock %}標籤用作模板的佔位符。
步驟 5:頭部模板
當執行{% include 'partials/header.html.twig' %}時,Twig 渲染引擎會搜尋 Twig 模板。因此,在user/themes/bootstrap/templates/partials資料夾中建立header.html.twig模板檔案,內容如下。(此處應提供 header.html.twig 程式碼)
<nav class = "navbar navbar-default navbar-inverse navbar-static-top" role = "navigation">
   <div class = "container">
      <div class = "navbar-header">
         <button type = "button" class = "navbar-toggle"
            data-toggle = "collapse" data-target = ".navbar-collapse">
               <span class = "sr-only">Toggle navigation</span>
               <span class = "icon-bar"></span>
               <span class = "icon-bar"></span>
               <span class = "icon-bar"></span>
         </button>
         <a class = "navbar-brand" href = "#">Grav</a>
      </div>

      <div class = "navbar-collapse collapse">
         <ul class = "nav navbar-nav navbar-right">
            {% for page in pages.children %}
            {% if page.visible %}
            {% set current_page = (page.active or page.activeChild) ? 'active' : '' %}
            <li class = "{{ current_page }}"><a href = "{{ page.url }}">{{ page.menu }}</a></li>
            {% endif %}
            {% endfor %}
         </ul>
      </div>

   </div>
</nav>
以上程式碼建立一個導航欄,並在user/pages資料夾中建立新頁面時自動顯示所有選單項。
步驟 6:預設模板
每個內容項都有一個特定的檔名,例如default.md,它指示 Grav 搜尋名為default.html.twig的模板檔案。現在讓我們在你的user/themes/bootstrap/templates/資料夾中建立default.html.twig檔案,內容如下。(此處應提供 default.html.twig 程式碼)
{% extends 'partials/base.html.twig' %}
{% block content %}
   {{ page.content }}
{% endblock %}
上面的default.html.twig檔案擴充套件了partials/base.html.twig,並告訴基本模板為content塊使用{{ page.content }}。
步驟 7:主題 CSS
在partials/base.html.twig檔案中,我們使用assets.add('theme://css/bootstrap-custom.css',100)引用了自定義主題 css,該檔案儲存你站點中使用的任何自定義 CSS。
現在讓我們在 user/themes/bootstrap/css 資料夾中建立一個 bootstrap-custom.css 檔案,內容如下:(此處應提供 bootstrap-custom.css 程式碼)
/* Restrict the width */
.container {
   width: auto;
   max-width: 960px;
   padding: 0 12px;
}

/* Place footer text center */
.container .text-muted {
   margin: 18px 0;
   text-align: center;
}

/* Sticky footer styles
-------------------------------------------------- */
html {
   position: relative;
   min-height: 80%;
}

body {
   /* Margin bottom by footer height */
   margin-bottom: 60px;
}

.footer {
   position: absolute;
   bottom: 0;
   width: 100%;
   /* Set the fixed height of the footer here */
   height: 50px;
   background-color: #dcdcdc;
}

/* Typography */
/* Tables */
table {
   width: 100%;
   border: 1px solid #f0f0f0;
   margin: 30px 0;
}

th {
   font-weight: bold;
   background: #f9f9f9;
   padding: 5px;
}

td {
   padding: 5px;
   border: 1px solid #f0f0f0;
}

/* Notice Styles */
blockquote {
   padding: 0 0 0 20px !important;
   font-size: 16px;
   color: #666;
}

blockquote > blockquote > blockquote {
   margin: 0;
}

blockquote > blockquote > blockquote p {
   padding: 15px;
   display: block;
   margin-top: 0rem;
   margin-bottom: 0rem;
   border: 1px solid #f0f0f0;
}

blockquote > blockquote > blockquote > p {
   /* Yellow */
   margin-left: -75px;
   color: #8a6d3b;
   background-color: #fcf8e3;
   border-color: #faebcc;
}

blockquote > blockquote > blockquote > blockquote > p {
   /* Red */
   margin-left: -100px;
   color: #a94442;
   background-color: #f2dede;
   border-color: #ebccd1;
}

blockquote > blockquote > blockquote > blockquote > blockquote > p {
   /* Blue */
   margin-left: -125px;
   color: #31708f;
   background-color: #d9edf7;
   border-color: #bce8f1;
}

blockquote > blockquote > blockquote > blockquote > blockquote > blockquote > p {
   /* Green */
   margin-left: -150px;
   color: #3c763d;
   background-color: #dff0d8;
   border-color: #d6e9c6;
}
步驟 8:測試
將你的預設主題更改為新的bootstrap主題。開啟user/config/system.yaml檔案並編輯包含以下內容的行:
pages:
   themes: antimatter
並將以上程式碼更改為:
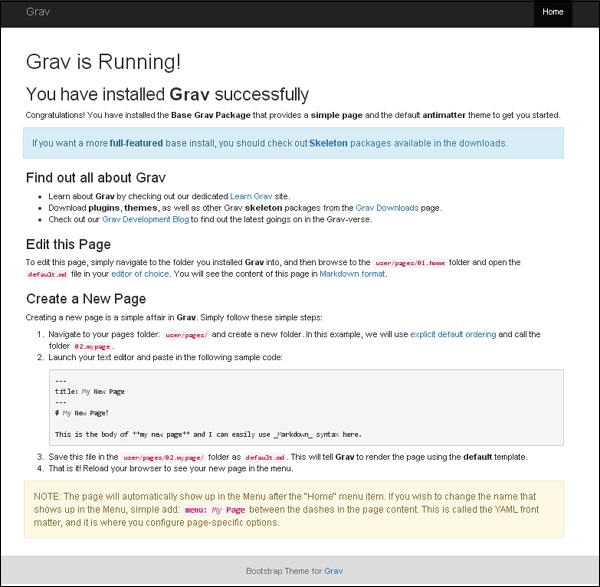
pages:
   theme: bootstrap
現在重新載入你的 Grav 站點,你將看到新安裝的主題,如下所示。(此處應有圖片)