- GraphQL 教程
- GraphQL - 首頁
- GraphQL - 簡介
- GraphQL - 環境搭建
- GraphQL - 架構
- GraphQL - 應用元件
- GraphQL - 示例
- GraphQL - 型別系統
- GraphQL - Schema
- GraphQL - Resolver
- GraphQL - 查詢
- GraphQL - 突變
- GraphQL - 驗證
- GraphQL - JQuery 整合
- GraphQL - React 整合
- GraphQL - Apollo Client
- GraphQL - 客戶端認證
- GraphQL - 快取
- GraphQL 有用資源
- GraphQL - 快速指南
- GraphQL - 有用資源
- GraphQL - 討論
GraphQL - React 整合
React 是一個用於構建使用者介面的 JavaScript 庫。本章解釋如何將 GraphQL 與 React 應用整合。
圖示
搭建 React 專案最快的方法是使用 Create React App 工具。在接下來的章節中,我們將學習如何搭建伺服器和客戶端。
搭建伺服器
要搭建伺服器,請按照以下步驟操作:
步驟 1 - 下載並安裝專案所需的依賴項
建立一個名為 react-server-app 的資料夾。在終端中將目錄更改為 react-server-app。按照“環境搭建”章節中步驟 3 到 5 的說明操作。
步驟 2 - 建立 Schema
在專案資料夾 react-server-app 中新增 schema.graphql 檔案,並新增以下程式碼:
type Query
{
   greeting: String
   sayHello(name:String!):String
}
該檔案定義了兩個查詢 – greeting 和 sayHello。sayHello 查詢接受一個字串引數並返回另一個字串。sayHello() 函式的引數不能為空。
步驟 3 - 建立 Resolver
在專案資料夾中建立一個名為 resolvers.js 的檔案,並新增以下程式碼:
const Query =
{
   greeting: () => 'Hello GraphQL  From TutorialsPoint !!' ,
   sayHello:(root,args,context,info) =>  `Hi ${args.name} GraphQL server says Hello to you!!`
}
module.exports = {Query}
這裡 greeting 和 sayHello 是兩個 Resolver。在 sayHello Resolver 中,傳遞給 name 引數的值可以透過 args 訪問。要訪問模組外部的 Resolver 函式,必須使用 module.exports 匯出 Query 物件。
步驟 4 - 執行應用
建立一個 server.js 檔案。參考“環境搭建”章節中的步驟 8。在終端中執行命令 npm start。伺服器將在 9000 埠啟動並執行。這裡,我們使用 GraphiQL 作為客戶端來測試應用程式。
開啟瀏覽器並輸入 URL https://:9000/graphiql。在編輯器中輸入以下查詢:
{
   greeting,
   sayHello(name:"Mohtashim")
}
伺服器返回的響應如下:
{
   "data": {
      "greeting": "Hello GraphQL  From TutorialsPoint !!",
      "sayHello": "Hi Mohtashim GraphQL server says Hello to you!!"
   }
}
搭建客戶端
為客戶端開啟一個新的終端。在執行客戶端應用程式之前,應保持伺服器終端執行。React 應用程式將在 3000 埠執行,伺服器應用程式將在 9000 埠執行。
步驟 1 - 建立一個 React 專案 hello-world-client
在客戶端終端中,鍵入以下命令:
npx create-react-app hello-world-client
這將安裝典型 React 應用程式所需的一切。npx 實用程式和 create-react-app 工具建立一個名為 hello-world-client 的專案。安裝完成後,在 VSCode 中開啟專案。
步驟 2 - 啟動 hello-world-client
在終端中將當前資料夾路徑更改為 hello-world-client。鍵入 npm start 啟動專案。這將在 3000 埠執行開發伺服器,並自動開啟瀏覽器並載入索引頁面。
如下圖所示:

步驟 3 - 修改 App 元件
在 src 資料夾內的 App.js 中,新增兩個函式,一個用於載入 greeting,另一個用於載入 sayHello 訊息。
以下是傳送 GraphQL 查詢以獲取 greeting 的 loadGreeting 函式:
async function loadGreeting() {
   const response = await fetch('https://:9000/graphql', {
      method:'POST',

      headers:{'content-type':'application/json'},
      body:JSON.stringify({query:'{greeting}'})
   })

   const rsponseBody = await response.json();
   return rsponseBody.data.greeting;

   console.log("end of function")
}
以下是傳送 GraphQL 查詢以獲取 sayHello 的 loadSayhello 函式:
async function  loadSayhello(name) {
   const response = await fetch('https://:9000/graphql', {
      method:'POST',
      headers:{'content-type':'application/json'},
      body:JSON.stringify({query:`{sayHello(name:"${name}")}`})
   })
}
完整的 App.js 檔案如下所示:
import React, { Component } from 'react';
import logo from './logo.svg';
import './App.css';

async function loadGreeting() {
   const response =  await fetch('https://:9000/graphql', {
      method:'POST',
      headers:{'content-type':'application/json'},
      body:JSON.stringify({query:'{greeting}'})
   })
   const rsponseBody =  await response.json();
   return rsponseBody.data.greeting;
   console.log("end of function")
}

async function  loadSayhello(name) {
   const response =  await fetch('https://:9000/graphql', {
      method:'POST',
      headers:{'content-type':'application/json'},
      body:JSON.stringify({query:`{sayHello(name:"${name}")}`})
   })
   const rsponseBody =  await response.json();
   return rsponseBody.data.sayHello;
}

class App extends Component {
   constructor(props) {
      super(props);
      this.state =  {greetingMessage:'',sayHelloMessage:'',userName:''}
      this.updateName =  this.updateName.bind(this);
      this.showSayHelloMessage =  this.showSayHelloMessage.bind(this);
      this.showGreeting =  this.showGreeting.bind(this);
   }

   showGreeting() {
      loadGreeting().then(g => this.setState({greetingMessage:g+" :-)"}))
   }

   showSayHelloMessage() {
      const name = this.state.userName;
      console.log(name)
      loadSayhello(name).then(m => this.setState({sayHelloMessage:m}))
   }

   updateName(event) {
      this.setState({userName:event.target.value})
   }
   render() {
      return (
         <div className = "App">
            <header className = "App-header">
               <img src = {logo} className = "App-logo" alt = "logo" />
               <h1 className = "App-title">Welcome to React</h1>
            </header>
            <br/><br/>
            <section>
               <button id = "btnGreet" onClick = {this.showGreeting}>Greet</button>
               <br/> <br/>
               <div id = "greetingDiv">
                  <h1>{this.state.greetingMessage}</h1>
               </div>
            </section>

            <hr/>

            <section>
               Enter a name:<input id = "txtName" type = "text" onChange = {this.updateName}
               value = {this.state.userName}/>
               <button id = "btnSayhello" onClick = {this.showSayHelloMessage}>SayHello</button>
               <br/>
               user name is:{this.state.userName}    <br/>
               <div id = "SayhelloDiv">
                  <h1>{this.state.sayHelloMessage}</h1>
               </div>
            </section>
         </div>
      );
   }
}

export default App;
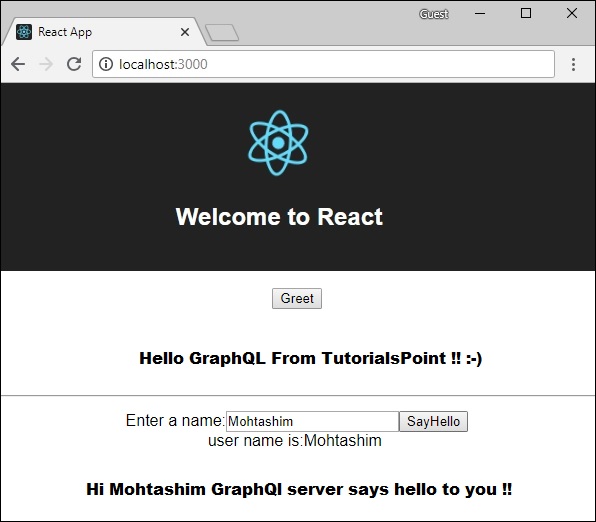
兩個應用程式都執行後,單擊問候按鈕。接下來,在文字框中輸入姓名,然後單擊 sayHello 按鈕。輸出將如下所示: