- GraphQL 教程
- GraphQL - 首頁
- GraphQL - 簡介
- GraphQL - 環境搭建
- GraphQL - 架構
- GraphQL - 應用元件
- GraphQL - 示例
- GraphQL - 型別系統
- GraphQL - 模式 (Schema)
- GraphQL - 解析器 (Resolver)
- GraphQL - 查詢 (Query)
- GraphQL - 突變 (Mutation)
- GraphQL - 驗證
- GraphQL - JQuery 整合
- GraphQL - React 整合
- GraphQL - Apollo Client
- GraphQL - 客戶端認證
- GraphQL - 快取
- GraphQL 有用資源
- GraphQL - 快速指南
- GraphQL - 有用資源
- GraphQL - 討論
GraphQL - 客戶端認證
身份驗證是驗證使用者或程序身份的過程或行為。應用程式對使用者進行身份驗證非常重要,以確保匿名使用者無法訪問資料。在本節中,我們將學習如何對 GraphQL 客戶端進行身份驗證。
Express JWT
在這個例子中,我們將使用 jQuery 建立一個客戶端應用程式。為了驗證請求,我們將在伺服器端使用 **express-jwt** 模組。
**express-jwt** 模組是一箇中間件,允許您使用 JWT 令牌對 HTTP 請求進行身份驗證。JSON Web 令牌 (JWT) 是一長串字串,用於標識已登入的使用者。
使用者成功登入後,伺服器會生成一個 JWT 令牌。此令牌唯一標識一個登入。換句話說,令牌是使用者身份的表示。因此,下次客戶端訪問伺服器時,必須出示此令牌才能獲取所需的資源。客戶端可以是移動應用程式或 Web 應用程式。

圖示
我們將按照分步驟的過程來理解此圖示。
設定伺服器
以下是設定伺服器的步驟:
步驟 1 - 下載並安裝專案所需的依賴項
建立一個資料夾 **auth-server-app**。從終端將您的目錄更改為 **auth-server-app**。按照“環境搭建”章節中步驟 3 到 5 的說明進行操作。
步驟 2 - 建立模式 (Schema)
在專案資料夾 **auth-server-app** 中新增 **schema.graphql** 檔案,並新增以下程式碼:type Query
{
greetingWithAuth:String
}
步驟 3 - 新增解析器 (Resolvers)
在專案資料夾中建立一個檔案 **resolvers.js**,並新增以下程式碼:
解析器將驗證 GraphQL 上下文物件中是否存在經過身份驗證的使用者物件。如果不存在經過身份驗證的使用者,它將引發異常。
const db = require('./db')

const Query = {
   greetingWithAuth:(root,args,context,info) => {

      //check if the context.user is null
      if (!context.user) {
         throw new Error('Unauthorized');
      }
      return "Hello from TutorialsPoint, welcome back : "+context.user.firstName;
   }
}

module.exports = {Query}
步驟 4 - 建立 Server.js 檔案
身份驗證中介軟體使用 JSON Web 令牌對呼叫者進行身份驗證。身份驗證的 URL 為 **https://:9000/login**。
這是一個 POST 操作。使用者必須提交其電子郵件和密碼,這些資訊將從後端進行驗證。如果使用 `jwt.sign` 方法生成了有效的令牌,則客戶端必須在後續請求的標頭中傳送此令牌。
如果令牌有效,則 `req.user` 將設定為已解碼的 JSON 物件,供後續中介軟體用於授權和訪問控制。
以下程式碼使用了兩個模組:`jsonwebtoken` 和 `express-jwt` 來驗證請求:
當用戶單擊“問候”按鈕時,將發出對 /graphql 路由的請求。如果使用者未經身份驗證,系統將提示他進行身份驗證。
使用者將看到一個接受電子郵件 ID 和密碼的表單。在我們的示例中,/login 路由負責對使用者進行身份驗證。
/login 路由驗證資料庫中是否存在與使用者提供的憑據匹配的條目。
如果憑據無效,則會向用戶返回 HTTP 401 異常。
如果憑據有效,伺服器將生成一個令牌。此令牌作為響應的一部分發送給使用者。這是由 `jwt.sign` 函式完成的。
const expressJwt = require('express-jwt');
const jwt = require('jsonwebtoken');

//private key
const jwtSecret = Buffer.from('Zn8Q5tyZ/G1MHltc4F/gTkVJMlrbKiZt', 'base64');

app.post('/login', (req, res) => {
   const {email, password} = req.body;

   //check database
   const user = db.students.list().find((user) =>  user.email === email);
   if (!(user && user.password === password)) {
      res.sendStatus(401);
      return;
   }

   //generate a token based on private key, token doesn't have an expiry
   const token = jwt.sign({sub: user.id}, jwtSecret);
   res.send({token});
});
對於每個請求,都將呼叫 `app.use()` 函式。這將依次呼叫 expressJWT 中介軟體。此中介軟體將解碼 JSON Web 令牌。儲存在令牌中的使用者 ID 將被檢索並存儲為請求物件中的 `user` 屬性。
//decodes the JWT and stores in request object
app.use(expressJwt({
   secret: jwtSecret,
   credentialsRequired: false
}));
為了在 GraphQL 上下文中使用 `user` 屬性,此屬性將分配給 **context** 物件,如下所示:
//Make req.user available to GraphQL context
app.use('/graphql', graphqlExpress((req) => ({
   schema,
   context: {user: req.user &&apm; db.students.get(req.user.sub)}
})));
在當前資料夾路徑中建立 **server.js**。完整的 server.js 檔案如下:
const bodyParser = require('body-parser');
const cors = require('cors');
const express = require('express');
const expressJwt = require('express-jwt'); //auth
const jwt = require('jsonwebtoken'); //auth
const db = require('./db');

var port = process.env.PORT || 9000
const jwtSecret = Buffer.from('Zn8Q5tyZ/G1MHltc4F/gTkVJMlrbKiZt', 'base64');
const app = express();

const fs = require('fs')
const typeDefs = fs.readFileSync('./schema.graphql',{encoding:'utf-8'})
const resolvers = require('./resolvers')
const {makeExecutableSchema} = require('graphql-tools')

const schema = makeExecutableSchema({typeDefs, resolvers})

app.use(cors(), bodyParser.json(), expressJwt({
   secret: jwtSecret,
   credentialsRequired: false
}));

const  {graphiqlExpress,graphqlExpress} = require('apollo-server-express')

app.use('/graphql', graphqlExpress((req) => ({
   schema,
   context: {user: req.user && db.students.get(req.user.sub)}
})));
app.use('/graphiql',graphiqlExpress({endpointURL:'/graphql'}))

//authenticate students
app.post('/login', (req, res) => {
   const email = req.body.email;
   const password = req.body.password;

   const user = db.students.list().find((user) =>  user.email === email);
   if (!(user && user.password === password)) {
      res.sendStatus(401);
      return;
   }
   const token = jwt.sign({sub: user.id}, jwtSecret);
   res.send({token});
});

app.listen(port, () => console.info(`Server started on port ${port}`));
步驟 5 - 執行應用程式
在終端中執行命令 `npm start`。伺服器將在 9000 埠啟動並執行。在這裡,我們使用 GraphiQL 作為客戶端來測試應用程式。
開啟瀏覽器並輸入 URL **https://:9000/graphiql**。在編輯器中鍵入以下查詢:
{
   greetingWithAuth
}
在下面的響應中,我們收到一個錯誤,因為我們不是經過身份驗證的使用者。
{
   "data": {
      "greetingWithAuth": null
   },
   "errors": [
      {
         "message": "Unauthorized",
         "locations": [
            {
               "line": 2,
               "column": 3
            }
         ],
         "path": [
            "greetingWithAuth"
         ]
      }
   ]
}
在下一節中,讓我們建立一個客戶端應用程式進行身份驗證。
設定 JQuery 客戶端
在客戶端應用程式中,提供了一個問候按鈕,它將呼叫模式 **greetingWithAuth**。如果您在登入之前單擊該按鈕,您將收到如下錯誤訊息:

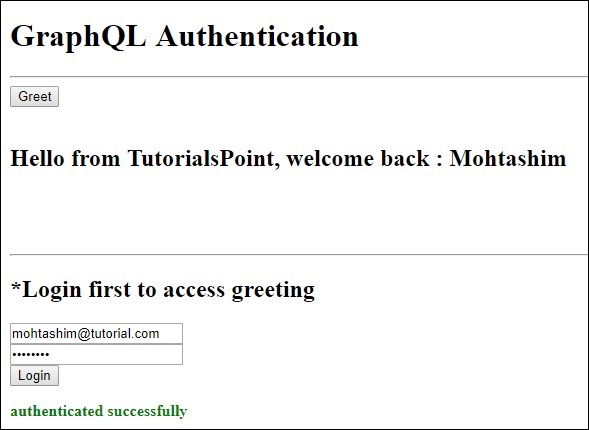
登入資料庫中可用的使用者後,將出現以下螢幕:
要訪問 **greeting**,我們首先需要訪問 URL **https://:9000/login** 路由,如下所示。
響應將包含從伺服器生成的令牌。
$.ajax({
   url:"https://:9000/login",
   contentType:"application/json",
   type:"POST",
   data:JSON.stringify({email,password}),
   success:function(response) {
      loginToken = response.token;
      $('#authStatus')
      .html("authenticated successfully")
      .css({"color":"green",'font-weight':'bold'});
      $("#greetingDiv").html('').css({'color':''});
   },
   error:(xhr,err) =>  alert('error')
})
成功登入後,我們可以訪問 `greetingWithAuth` 模式,如下所示。對於所有後續請求,都應包含一個 `Authorization` 標頭,其中包含 `bearer` 令牌。
{
   url: "https://:9000/graphql",
   contentType: "application/json",
   headers: {"Authorization": 'bearer '+loginToken},  type:'POST',
   data: JSON.stringify({
   query:`{greetingWithAuth}`
}
以下是 index.html 的程式碼:
<!DOCTYPE html>
<html>
   <head>
      <script src = "https://ajax.googleapis.com/ajax/libs/jquery/3.3.1/jquery.min.js"></script>
      <script>
         $(document).ready(function() {
            let loginToken = "";
            $("#btnGreet").click(function() {
                  $.ajax({url: "https://:9000/graphql",
                  contentType: "application/json",
                  headers: {"Authorization": 'bearer '+loginToken},
                  type:'POST',
                  data: JSON.stringify({
                  query:`{greetingWithAuth}` }),
                  success: function(result) {
                  $("#greetingDiv").html("<h1>"+result.data.greetingWithAuth+"</h1>")
                  },
                  error:function(jQxhr,error) {
                     if(jQxhr.status == 401) {
                        $("#greetingDiv").html('please authenticate first!!')
                        .css({"color":"red",'font-weight':'bold'})
                        return;
                     }
                     $("#greetingDiv").html('error').css("color","red");
                  }
               });
            });
            $('#btnAuthenticate').click(function() {
               var email =  $("#txtEmail").val();
               var password =  $("#txtPwd").val();
               if(email && password) {
                  $.ajax({
                     url:"https://:9000/login",
                     contentType:"application/json",
                     type:"POST",
                     data:JSON.stringify({email,password}),
                     success:function(response) {
                        loginToken =  response.token;
                        $('#authStatus')
                        .html("authenticated successfully")
                        .css({"color":"green",'font-weight':'bold'});
                        $("#greetingDiv").html('').css({'color':''});
                     },
                     error:(xhr,err) =>  alert('error')
                  })
               }else alert("email and pwd empty")
            })
         });
      </script>
   </head>

   <body>
      <h1> GraphQL Authentication </h1>
      <hr/>
      <section>
         <button id = "btnGreet">Greet</button>
         <br/> <br/>
         <div id = "greetingDiv"></div>
      </section>
      <br/> <br/> <br/>
      <hr/>

      <section id = "LoginSection">
         <header>
            <h2>*Login first to  access greeting </h2>
         </header>
         <input type = "text" value = "mohtashim.mohammad@tutorialpoint.org" placeholder = "enter email" id = "txtEmail"/>
         <br/>

         <input type = "password" value = "pass123" placeholder = "enter password" id = "txtPwd"/>
         <br/>

         <input type = "button" id = "btnAuthenticate"  value = "Login"/>
         <p id = "authStatus"></p>
      </section>
   </body>
</html>