- GraphQL 教程
- GraphQL - 首頁
- GraphQL - 簡介
- GraphQL - 環境搭建
- GraphQL - 架構
- GraphQL - 應用元件
- GraphQL - 示例
- GraphQL - 型別系統
- GraphQL - 模式 (Schema)
- GraphQL - 解析器 (Resolver)
- GraphQL - 查詢 (Query)
- GraphQL - 變更 (Mutation)
- GraphQL - 驗證
- GraphQL - JQuery 整合
- GraphQL - React 整合
- GraphQL - Apollo Client
- GraphQL - 客戶端認證
- GraphQL - 快取
- GraphQL 有用資源
- GraphQL 快速指南
- GraphQL - 有用資源
- GraphQL - 討論
GraphQL 快速指南
GraphQL - 簡介
GraphQL 是一種開源的伺服器端技術,由 Facebook 開發,用於最佳化 RESTful API 呼叫。它是一個執行引擎和資料查詢語言。本章將討論使用 GraphQL 的優勢。
為什麼選擇 GraphQL
RESTful API 遵循清晰且結構良好的資源導向方法。但是,當資料變得更復雜時,路由會變得更長。有時無法透過單個請求獲取資料。這就是 GraphQL 派上用場的地方。GraphQL 以圖形的形式組織資料,並使用其強大的查詢語法來遍歷、檢索和修改資料。
以下是使用 GraphQL 查詢語言的優勢:
索取所需內容 - 並獲得它
向您的 API 傳送 GraphQL 查詢,並獲得所需的確切內容。GraphQL 查詢始終返回可預測的結果。使用 GraphQL 的應用程式快速且穩定。與 RESTful 服務不同,這些應用程式可以限制應從伺服器獲取的資料。
以下示例將幫助您更好地理解這一點:
讓我們考慮一個具有屬性 *id*、*firstName*、*lastName* 和 *collegeName* 的業務物件 *Student*。假設一個移動應用程式只需要獲取 *firstName* 和 *id*。如果我們設計一個類似於 */api/v1/students* 的 REST 端點,它最終將為 *student* 物件的所有欄位獲取資料。這意味著 RESTful 服務會過度獲取資料。這個問題可以使用 GraphQL 來解決。
考慮以下 GraphQL 查詢:
{
   students {
      id
      firstName
   }
}
這將只返回 id 和 firstname 欄位的值。查詢不會獲取 student 物件其他屬性的值。上面所示查詢的響應如下所示:
{
   "data": {
      "students": [
         {
            "id": "S1001",
            "firstName": "Mohtashim"
         },
         {
            "id": "S1002",
            "firstName": "Kannan"
         }
      ]
   }
}
一次獲取多個資源
GraphQL 查詢有助於平滑地檢索關聯的業務物件,而典型的 REST API 需要從多個 URL 載入資料。GraphQL API 在單個請求中獲取應用程式所需的所有資料。即使在行動網路連線緩慢的情況下,使用 GraphQL 的應用程式也可以快速執行。
讓我們再考慮一個業務物件 *College*,它具有屬性:name 和 location。*Student* 業務物件與 College 物件具有關聯關係。如果我們要使用 REST API 來獲取學生及其學院的詳細資訊,我們將最終向伺服器發出兩個請求,例如 */api/v1/students* 和 */api/v1/colleges*。這將導致每次請求都資料獲取不足。因此,移動應用程式被迫向伺服器發出多個呼叫以獲取所需的資料。
但是,移動應用程式可以使用 GraphQL 在單個請求中獲取 Student 和 College 物件的詳細資訊。
以下是一個用於獲取資料的 GraphQL 查詢:
{
   students{
      id
      firstName
      lastName
      college{
         name
         location
      }
   }
}
上面查詢的輸出包含我們請求的那些欄位,如下所示:
{
   "data": {
      "students": [
         {
            "id": "S1001",
            "firstName": "Mohtashim",
            "lastName": "Mohammad",
            "college": {
               "name": "CUSAT",
               "location": "Kerala"
            }
         },

         {
            "id": "S1002",
            "firstName": "Kannan",
            "lastName": "Sudhakaran",
            "college": {
               "name": "AMU",
               "location": "Uttar Pradesh"
            }
         },

         {
            "id": "S1003",
            "firstName": "Kiran",
            "lastName": "Panigrahi",
            "college": {
               "name": "AMU",
               "location": "Uttar Pradesh"
            }
         }
      ]
   }
}
使用型別系統描述可能性
GraphQL 是強型別的,查詢基於欄位及其關聯的資料型別。如果 GraphQL 查詢中存在型別不匹配,伺服器應用程式將返回清晰且有用的錯誤訊息。這有助於客戶端應用程式平滑地進行除錯和輕鬆檢測錯誤。GraphQL 還提供客戶端庫,可以幫助減少顯式的資料轉換和解析。
以下是 *Student* 和 *College* 資料型別的示例:
type Query {
   students:[Student]
}

type Student {
   id:ID!
   firstName:String
   lastName:String
   fullName:String
   college:College
}

type College {
   id:ID!
   name:String
   location:String
   rating:Float
   students:[Student]
}
使用強大的開發者工具更快地開發
GraphQL 提供豐富的開發者工具來編寫文件和測試查詢。GraphiQL 是一個優秀的工具,它生成查詢及其模式的文件。它還提供查詢編輯器來測試 GraphQL API,並在構建查詢時提供智慧程式碼補全功能。
GraphQL - 環境搭建
在本章中,我們將學習 GraphQL 的環境搭建。要執行本教程中的示例,您需要:
執行 Linux、macOS 或 Windows 的計算機。
一個 Web 瀏覽器,最好是最新版本的 Google Chrome。
安裝了最新版本的 Node.js。推薦使用最新的 LTS 版本。
安裝了 GraphQL for VSCode 擴充套件的 Visual Studio Code 或您選擇的任何程式碼編輯器。
如何使用 Node.js 構建 GraphQL 伺服器
我們將逐步詳細介紹如何使用 Node.js 構建 GraphQL 伺服器,如下所示:
步驟 1 - 驗證 Node 和 npm 版本
安裝 Node.js 後,使用以下命令在終端上驗證 node 和 npm 的版本:
C:\Users\Admin>node -v
v8.11.3

C:\Users\Admin>npm -v
5.6.0
步驟 2 - 建立專案資料夾並在 VSCode 中開啟
專案的根資料夾可以命名為 test-app。
按照以下說明使用 Visual Studio Code 編輯器開啟資料夾:
C:\Users\Admin>mkdir test-app
C:\Users\Admin>cd test-app
C:\Users\Admin\test-app>code.
步驟 3 - 建立 package.json 並安裝依賴項
建立一個 package.json 檔案,其中將包含 GraphQL 伺服器應用程式的所有依賴項。
{
   "name": "hello-world-server",
   "private": true,
   "scripts": {
      "start": "nodemon --ignore data/ server.js"
   },

   "dependencies": {
      "apollo-server-express": "^1.4.0",
      "body-parser": "^1.18.3",
      "cors": "^2.8.4",
      "express": "^4.16.3",
      "graphql": "^0.13.2",
      "graphql-tools": "^3.1.1"
   },

   "devDependencies": {
      "nodemon": "1.17.1"
   }
}
使用以下命令安裝依賴項:
C:\Users\Admin\test-app>npm install
步驟 4 - 在 Data 資料夾中建立平面檔案資料庫
在此步驟中,我們使用平面檔案來儲存和檢索資料。建立一個名為 data 的資料夾,並新增兩個檔案 **students.json** 和 **colleges.json**。
以下是 **colleges.json** 檔案:
[
   {
      "id": "col-101",
      "name": "AMU",
      "location": "Uttar Pradesh",
      "rating":5.0
   },

   {
      "id": "col-102",
      "name": "CUSAT",
      "location": "Kerala",
      "rating":4.5
   }
]
以下是 **students.json** 檔案:
[
   {
      "id": "S1001",
      "firstName":"Mohtashim",
      "lastName":"Mohammad",
      "email": "mohtashim.mohammad@tutorialpoint.org",
      "password": "pass123",
      "collegeId": "col-102"
   },

   {
      "id": "S1002",
      "email": "kannan.sudhakaran@tutorialpoint.org",
      "firstName":"Kannan",
      "lastName":"Sudhakaran",
      "password": "pass123",
      "collegeId": "col-101"
   },

   {
      "id": "S1003",
      "email": "kiran.panigrahi@tutorialpoint.org",
      "firstName":"Kiran",
      "lastName":"Panigrahi",
      "password": "pass123",
      "collegeId": "col-101"
   }
]
步驟 5 - 建立資料訪問層
我們需要建立一個數據儲存,它載入 data 資料夾的內容。在這種情況下,我們需要集合變數 *students* 和 *colleges*。每當應用程式需要資料時,它都會使用這些集合變數。
在專案資料夾中建立 db.js 檔案,如下所示:
const { DataStore } = require('notarealdb');

const store = new DataStore('./data');

module.exports = {
   students:store.collection('students'),
   colleges:store.collection('colleges')
};
步驟 6 - 建立模式檔案 schema.graphql
在當前專案資料夾中建立一個 schema 檔案,並新增以下內容:
type Query  {
   test: String
}
步驟 7 - 建立解析器檔案 resolvers.js
在當前專案資料夾中建立一個解析器檔案,並新增以下內容:
const Query = {
   test: () => 'Test Success, GraphQL server is up & running !!'
}
module.exports = {Query}
步驟 8 - 建立 server.js 並配置 GraphQL
建立一個伺服器檔案並配置 GraphQL,如下所示:
const bodyParser = require('body-parser');
const cors = require('cors');
const express = require('express');
const db = require('./db');

const port = process.env.PORT || 9000;
const app = express();

const fs = require('fs')
const typeDefs = fs.readFileSync('./schema.graphql',{encoding:'utf-8'})
const resolvers = require('./resolvers')

const {makeExecutableSchema} = require('graphql-tools')
const schema = makeExecutableSchema({typeDefs, resolvers})

app.use(cors(), bodyParser.json());

const  {graphiqlExpress,graphqlExpress} = require('apollo-server-express')
app.use('/graphql',graphqlExpress({schema}))
app.use('/graphiql',graphiqlExpress({endpointURL:'/graphql'}))

app.listen(
   port, () => console.info(
      `Server started on port ${port}`
   )
);
步驟 9 - 執行應用程式並使用 GraphiQL 進行測試
驗證專案 test-app 的資料夾結構,如下所示:
test-app /
   -->package.json
   -->db.js
   -->data
      students.json
      colleges.json
   -->resolvers.js
   -->schema.graphql
   -->server.js
執行命令 npm start,如下所示:
C:\Users\Admin\test-app>npm start
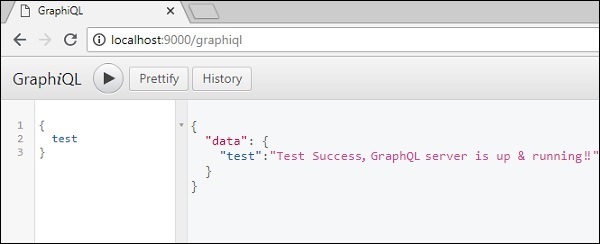
伺服器在 9000 埠執行,因此我們可以使用 GraphiQL 工具測試應用程式。開啟瀏覽器並輸入 URL https://:9000/graphiql。在編輯器中鍵入以下查詢:
{
   Test
}
伺服器的響應如下所示:
{
   "data": {
      "test": "Test Success, GraphQL server is running !!"
   }
}
GraphQL - 架構
GraphQL 是一種規範,它描述了 GraphQL 伺服器的行為。它是一組關於如何處理請求和響應的指南,例如支援的協議、伺服器可以接受的資料格式、伺服器返回的響應格式等。客戶端向 GraphQL 伺服器發出的請求稱為查詢。GraphQL 的另一個重要概念是其傳輸層無關性。它可以與任何可用的網路協議一起使用,例如 TCP、websocket 或任何其他傳輸層協議。它也與資料庫無關,因此您可以將其與關係資料庫或 NoSQL 資料庫一起使用。
GraphQL 伺服器可以透過以下三種方法中的任何一種進行部署:
- 連線資料庫的 GraphQL 伺服器
- 整合現有系統的 GraphQL 伺服器
- 混合方法
連線資料庫的 GraphQL 伺服器
此架構具有集成了資料庫的 GraphQL 伺服器,並且通常可以與新專案一起使用。在收到查詢後,伺服器讀取請求有效負載並從資料庫中獲取資料。這稱為解析查詢。返回給客戶端的響應符合官方 GraphQL 規範中指定的格式。
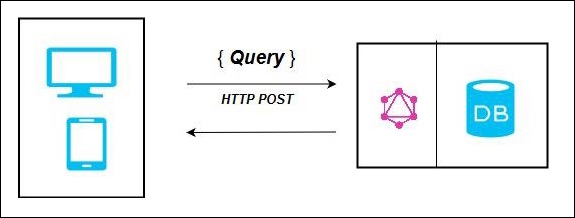
在上圖中,GraphQL 伺服器和資料庫整合在單個節點上。客戶端(桌面/移動)透過 HTTP 與 GraphQL 伺服器通訊。伺服器處理請求,從資料庫中獲取資料並將其返回給客戶端。
整合現有系統的 GraphQL 伺服器
這種方法對於擁有遺留基礎設施和不同 API 的公司很有幫助。GraphQL 可用於統一現有系統中的微服務、遺留基礎設施和第三方 API。
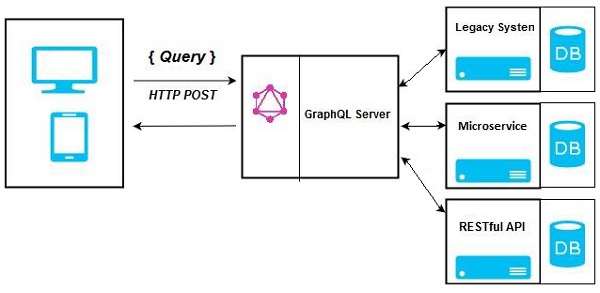
在上圖中,GraphQL API 充當客戶端和現有系統之間的介面。客戶端應用程式與 GraphQL 伺服器通訊,後者反過來解析查詢。
混合方法
最後,我們可以結合上述兩種方法來構建 GraphQL 伺服器。在此架構中,GraphQL 伺服器將解析收到的任何請求。它將從連線的資料庫或整合的 API 中檢索資料。這在下圖中表示:

GraphQL - 應用元件
本章討論不同的 GraphQL 元件以及它們之間如何相互通訊。整個應用程式元件可以區分如下:
- 伺服器端元件
- 客戶端元件
伺服器端元件
GraphQL 伺服器構成伺服器端核心元件,並允許解析來自 GraphQL 客戶端應用程式的查詢。Apollo Server 是 GraphQL 規範最常用的實現。其他伺服器程式設計元件包括:
| 序號 | 伺服器要點和描述 |
|---|---|
| 1 | 模式 (Schema) GraphQL 模式位於任何 GraphQL 伺服器實現的核心,並描述了連線到它的客戶端可用的功能。 |
| 2 | 查詢 GraphQL 查詢是客戶端應用程式向資料庫或遺留 API 檢索資料的請求。 |
| 3 | 解析器 解析器提供將 GraphQL 操作轉換為資料的指令。它們透過定義解析器函式來將查詢解析為資料。 |
客戶端元件
以下是客戶端元件:
| 序號 | 工具和描述 |
|---|---|
| 1 | GraphiQL 基於瀏覽器的介面,用於編輯和測試 GraphQL 查詢和變異。 |
| 2 | ApolloClient 構建 GraphQL 客戶端應用程式的最佳工具。與所有 JavaScript 前端良好整合。 |
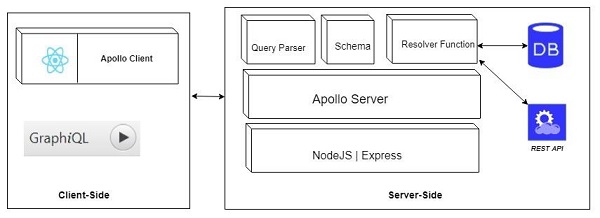
下圖顯示了**客戶端-伺服器架構**。Web 伺服器基於 NodeJs 和 Express 框架構建。ReactJS 應用程式(使用 Apollo Client 庫構建)或 GraphiQL 瀏覽器應用程式向 Apollo GraphQL 伺服器發出請求。查詢將在伺服器中定義的模式上進行解析和驗證。如果請求模式透過驗證,則將執行關聯的解析器函式。解析器將包含從 API 或資料庫中獲取資料的程式碼。
GraphQL - 示例
本章將建立一個簡單的 API,返回問候訊息“HelloWorld”,並使用 GraphiQL 訪問它。
示例
此示例基於 NodeJS、Express 和 Apollo 伺服器。我們將學習如何透過以下步驟將所有概念結合在一起:
步驟 1 - 設定 Express
ExpressJS 是一個 Web 應用程式框架,有助於構建網站和 Web 應用程式。在此示例中,我們將在 Express 框架之上構建 GraphQL API。
下一步是建立一個名為**hello-world-server**的資料夾,並從終端導航到同一個資料夾。新增 package.json,併為包命名。由於此包僅在內部使用,我們可以將其宣告為私有的。
{
   "name":"hello-world-server",
   "private":true
}
如下所示安裝 Express 伺服器的依賴項:
C:\Users\Admin\hello-world-server>npm install express body-parser cors
body-parser是一箇中間件包,它幫助 Express 高效地處理 HTTP Post 請求。cors是另一個處理跨源資源共享的中介軟體包。
在專案資料夾中建立一個名為**server.js**的檔案,並在其中鍵入以下內容:
const bodyParser = require('body-parser')
   const cors = require('cors')
   const express = require('express')
   const port = process.env.PORT|| 9000
   const app = express()

   //register middleware
   app.use(bodyParser.json() , cors())
   app.listen(port, () =>  console.log(`server is up and running at ${port}`)
要驗證 Express 伺服器是否正在執行,請在終端視窗中執行以下程式碼:
C:\Users\Admin\hello-world-server>node server.js
伺服器控制檯中將顯示以下輸出。這表明 Express 伺服器正在 9000 埠上執行。
server is up and running at 9000
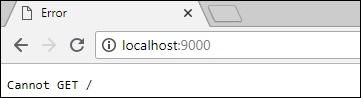
如果您開啟瀏覽器並鍵入 **https://:9000**,您將看到以下螢幕:
要停止伺服器,請按 **Ctrl + C**。
步驟 2 - 安裝 GraphQL 和 Apollo Server
現在 Express 已配置完成,下一步是下載以下 GraphQL 依賴項:
- graphql
- graphql-tools
- apollo-server-express@1
我們將使用 Apollo Server v1.0,因為它是一個穩定的版本。鍵入以下命令來安裝這些依賴項:
C:\Users\Admin\hello-world-server>npm install graphql graphql-tools apollo-server-express@1
我們可以透過檢查之前建立的 **package.json** 檔案來驗證這些依賴項是否已成功安裝。
{
   "name": "hello-world-server",
   "private": true,

   "dependencies": {
      "apollo-server-express": "^1.4.0",
      "body-parser": "^1.18.3",
      "cors": "^2.8.4",
      "express": "^4.16.3",
      "graphql": "^0.13.2",
      "graphql-tools": "^3.1.1"
   }
}
步驟 3 - 定義模式
GraphQL 模式定義了可以從服務中獲取哪種型別的物件以及它有哪些欄位。可以使用 **GraphQL 模式定義語言**來定義模式。現在,在 **server.js** 檔案中新增以下程式碼段:
// Adding Type Definitions
const typeDefinition = `
   type Query  {
      greeting: String
   }
在這裡,查詢包含一個返回字串值的greeting屬性。
步驟 4 - 建立解析器
建立解析器的第一步是新增一些程式碼來處理對 greeting 欄位的請求。這在解析器中指定。解析器函式的結構必須與模式匹配。在 **server.js** 檔案中新增以下程式碼段。
// Adding resolver
const  resolverObject = {
   Query : {
      greeting: () => 'Hello GraphQL  From TutorialsPoint !!'
   }
}
第二步是使用 **makeExecutableSchema** 繫結模式和解析器。此函式在 graphql-tools 模組中預定義。在 **server.js** 檔案中新增以下程式碼段。
const {makeExecutableSchema} = require('graphql-tools')
const schema = makeExecutableSchema({typeDefs:typeDefinition, resolvers:resolverObject})
步驟 5 - 定義從 ReactJS/GraphiQL 應用程式獲取資料的路由
在 **server.js** 檔案中新增以下程式碼段:
const {graphqlExpress, graphiqlExpress} = require('apollo-server-express')

   //create routes for graphql and graphiql
   app.use('/graphql',graphqlExpress({schema}))

   app.use('/graphiql',graphiqlExpress({endpointURL:'/graphql'}))
graphqlExpress 函式有助於註冊路由 **https://:9000/graphql**。ReactJS 應用程式可以使用此端點來查詢資料。類似地,graphqliExpress 函式有助於註冊路由 **https://:9000/graphiql**。這將由 GraphiQL 瀏覽器客戶端用於測試 API。
完整的 server.js 程式碼如下所示:
const bodyParser = require('body-parser')
const cors = require('cors')
const express = require('express')
const port = process.env.PORT||9000
const app = express()

app.use(bodyParser.json() , cors())
const typeDefinition = `
type Query  {
   greeting: String
}`
const  resolverObject = {
   Query : {
      greeting: () => 'Hello GraphQL  From TutorialsPoint !!'
   }
}
const {makeExecutableSchema} = require('graphql-tools')

const schema = makeExecutableSchema({typeDefs:typeDefinition, resolvers:resolverObject})

const {graphqlExpress,graphiqlExpress} = require('apollo-server-express')

app.use('/graphql',graphqlExpress({schema}))
app.use('/graphiql',graphiqlExpress({endpointURL:'/graphql'}))
app.listen(port, () =>  console.log(`server is up and running ${port}`))
步驟 6 - 啟動應用程式
使用 Node.js 執行 **server.js**,如下所示:
C:\Users\Admin\hello-world-server>node server.js
步驟 7 - 測試 GraphQL API
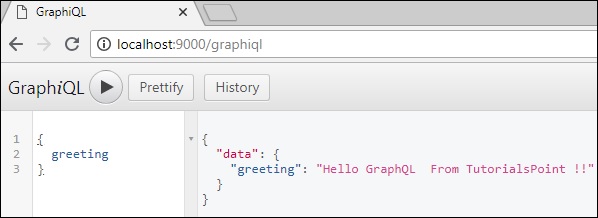
開啟瀏覽器並鍵入 **https://:9000/graphiql**。在 GraphiQL 的查詢選項卡中,輸入以下內容:
{
   greeting
}
伺服器的響應如下所示:
{
   "data": {
      "greeting": "Hello GraphQL From TutorialsPoint !!"
   }
}
下圖顯示了響應:
**注意** - 請確保使用 Apollo Server 1.0 版本。
GraphQL - 型別系統
GraphQL 是一種強型別語言。型別系統定義了可在 GraphQL 應用程式中使用的各種資料型別。型別系統有助於定義模式,這是客戶端和伺服器之間的契約。常用的 GraphQL 資料型別如下:
| 序號 | 型別和描述 |
|---|---|
| 1 | 標量 儲存單個值 |
| 2 | 物件 顯示可以獲取哪種型別的物件 |
| 3 | 查詢 到其他特定型別的入口點型別 |
| 4 | 變異 資料操作的入口點 |
| 5 | 列舉 在需要使用者從規定的選項列表中進行選擇的情況下很有用 |
標量型別
標量型別是原始資料型別,只能儲存單個值。GraphQL 提供的預設標量型別如下:
Int - 帶符號的 32 位整數
Float - 帶符號的雙精度浮點值
String - UTF-8 字元序列
Boolean - 真或假
ID - 唯一識別符號,通常用作獲取物件的唯一識別符號或快取的鍵。
定義標量型別的語法如下:
field: data_type
以下程式碼片段定義了一個名為 greeting 的欄位,該欄位返回 String 值。
greeting: String
物件型別
物件型別是模式中最常用的型別,表示一組欄位。物件型別中的每個欄位都對映到另一個型別,從而允許巢狀型別。換句話說,物件型別由多個標量型別或物件型別組成。
定義物件型別的語法如下:
type object_type_name
{
   field1: data_type
   field2:data_type
   ....
   fieldn:data_type
}
您可以考慮以下程式碼片段:
--Define an object type--

type Student {
   stud_id:ID
   firstname: String
   age: Int
   score:Float
}
--Defining a GraphQL schema--

type Query
{
   stud_details:[Student]
}
上面的示例定義了一個物件資料型別 Student。根 Query 模式中的 stud_details 欄位將返回 Student 物件列表。
查詢型別
GraphQL 查詢用於獲取資料。它就像在基於 REST 的 API 中請求資源一樣。為簡單起見,Query 型別是從客戶端應用程式傳送到 GraphQL 伺服器的請求。GraphQL 使用 **模式定義語言 (SDL)** 來定義查詢。查詢型別是 GraphQL 中許多根級型別之一。
定義查詢的語法如下:
type Query {
   field1: data_type
   field2:data_type
   field2(param1:data_type,param2:data_type,...paramN:data_type):data_type
}
定義查詢的示例:
type Query  {
   greeting: String
}
變異型別
變異是傳送到伺服器以建立、更新或刪除資料的操作。這類似於呼叫基於 REST 的 API 的 PUT、POST、PATCH 和 DELETE 動詞。
變異是 GraphQL 中的根級資料型別之一。Query 型別定義資料獲取操作的入口點,而 Mutation 型別指定資料操作的入口點。
定義 Mutation 型別的語法如下:
type Mutation {
   field1: data_type
   field2(param1:data_type,param2:data_type,...paramN:data_type):data_type
}
例如,我們可以定義一個變異型別來新增新的學生,如下所示:
type Mutation {
   addStudent(firstName: String, lastName: String): Student
}
列舉型別
列舉類似於標量型別。在欄位的值必須來自規定的選項列表的情況下,列舉很有用。
定義列舉型別的語法為:
type enum_name{
   value1
   value2
}
以下程式碼段說明了如何定義列舉型別:
type Days_of_Week{
   SUNDAY
   MONDAY
   TUESDAY
   WEDNESDAY
   THURSDAY
   FRIDAY
   SATURDAY
}
列表型別
列表可用於表示特定型別的陣列值。列表使用型別修飾符 [] 定義,該修飾符包裝物件型別、標量和列舉。
可以使用以下語法來定義列表型別:
field:[data_type]
以下示例定義了一個列表型別 todos:
type Query {
   todos: [String]
}
非空型別
預設情況下,每個核心標量型別都可以設定為 null。換句話說,這些型別可以返回指定型別的 value,也可以沒有 value。要覆蓋此預設值並指定必須定義欄位,可以將感嘆號 (!) 附加到型別。這確保了查詢返回的結果中存在 value。
可以使用以下語法來定義非空欄位:
field:data_type!
在下面的示例中,stud_id 被宣告為必填欄位。
type Student {
   stud_id:ID!
   firstName:String
   lastName:String
   fullName:String
   college:College
}
GraphQL - 模式 (Schema)
GraphQL 模式是任何 GraphQL 伺服器實現的核心。它描述了連線到它的客戶端應用程式可用的功能。我們可以使用任何程式語言來建立 GraphQL 模式並在其周圍構建介面。
GraphQL 執行時定義了一個通用的基於圖的模式來發布它所表示的資料服務的 capabilities。客戶端應用程式可以在其 capabilities 內查詢模式。這種方法將客戶端與伺服器解耦,並允許兩者獨立發展和擴充套件。
在本章中,我們使用 Apollo 伺服器來執行 GraphQL 查詢。graphql-tools 中的 **makeExecutableSchema** 函式幫助您繫結模式和解析器。
makeExecutableSchema 函式語法
**makeExecutableSchema** 函式接受一個 Object 型別的單個引數 {}。使用此函式的語法如下:
import { makeExecutableSchema } from 'graphql-tools';

const jsSchema = makeExecutableSchema({
   typeDefs,
   resolvers, // optional
   logger, // optional
   allowUndefinedInResolve = false, // optional
   resolverValidationOptions = {}, // optional
   directiveResolvers = null, // optional
   schemaDirectives = null,  // optional
   parseOptions = {},  // optional
   inheritResolversFromInterfaces = false  // optional
});
| 序號 | 引數和描述 |
|---|---|
| 1 | typeDefs 這是必需引數。它表示作為 UTF-8 字串的 GraphQL 查詢。 |
| 2 | Resolvers 這是一個可選引數(預設為空物件)。它具有處理查詢的函式。 |
| 3 | logger 這是一個可選引數,可用於將錯誤列印到伺服器控制檯。 |
| 4 | parseOptions 這是一個可選引數,允許在將 typeDefs 指定為字串時自定義解析。 |
| 5 | allowUndefinedInResolve 預設情況下為 true。設定為 false 時,如果解析函式返回 undefined,則會導致它們引發錯誤。 |
| 6 | resolverValidationOptions 這是一個可選引數,並接受一個包含布林屬性的物件。 |
| 7 | inheritResolversFromInterfaces 這是一個可選引數,並接受一個布林引數來檢查解析器物件的繼承。 |
圖示
讓我們建立一個簡單的應用程式來理解這個模式。這將建立一個用於從伺服器查詢學生列表的模式。學生資料將儲存在平面檔案中,我們將使用名為 **notarealdb** 的節點模組來模擬資料庫並從平面檔案中讀取。
步驟 1 - 下載並安裝專案所需的依賴項
建立一個名為 **schema-app** 的資料夾。將您的目錄從終端更改為 schema-app。然後,按照“環境設定”一章中解釋的步驟 3 到步驟 5 完成下載和安裝過程。
步驟 2 - 建立模式
在專案資料夾 **schema-app** 中新增 **schema.graphql** 檔案,並新增以下程式碼:
type Query {
   greeting:String
   students:[Student]
}

type Student {
   id:ID!
   firstName:String
   lastName:String
   password:String
   collegeId:String
}
模式的根將是 Query 型別。查詢有兩個欄位 - greeting 和 Students,它們分別返回 String 和學生列表。Student 被宣告為 Object 型別,因為它包含多個欄位。ID 欄位被宣告為非空。
步驟 3 - 建立解析器
在專案資料夾中建立一個名為resolvers.js的檔案,並新增以下程式碼:
const db = require('./db')
const Query = {
   greeting:() => {
      return "hello from  TutorialsPoint !!!"
   },
   students:() => db.students.list()
}

module.exports = {Query}
這裡,greeting 和 students 是處理查詢的解析器。students 解析器函式從資料訪問層返回學生列表。要訪問模組外部的解析器函式,必須使用module.exports匯出 Query 物件。
步驟 4:執行應用程式
建立一個 server.js 檔案,並參考環境設定章節中的步驟 8。下一步是在終端執行命令 npm start。伺服器將在 9000 埠啟動並執行。這裡,我們使用 GraphiQL 作為客戶端來測試應用程式。開啟瀏覽器並輸入 URL:https://:9000/graphiql。
在編輯器中輸入以下查詢:
{
   greeting
   students {
      id
      firstName
      lastName
   }
}
查詢將顯示如下所示的輸出:

注意:我們可以用 RESTful API 呼叫替換 students.json 來檢索學生資料,甚至可以使用 MySQL 或 MongoDB 等真實資料庫。GraphQL 成為原始應用程式層周圍的一個薄包裝器,以提高效能。
GraphQL - 解析器 (Resolver)
解析器是生成 GraphQL 查詢響應的函式集合。簡單來說,解析器充當 GraphQL 查詢處理器。GraphQL 模式中的每個解析器函式都接受如下所示的四個位置引數:
fieldName:(root, args, context, info) => { result }
解析器函式示例如下所示:
//resolver function  with no parameters and returning string
greeting:() => {
   return "hello from  TutorialsPoint !!!"
}

//resolver function with no parameters and returning list
students:() => db.students.list()

//resolver function with arguments and returning object
studentById:(root,args,context,info) => {
   return db.students.get(args.id);
}
以下是位置引數及其描述:
| 序號 | 引數及描述 |
|---|---|
| 1 | root 包含父欄位解析器返回的結果的物件。 |
| 2 | args 包含傳遞到查詢中欄位的引數的物件。 |
| 3 | context 這是特定查詢中所有解析器共享的物件。 |
| 4 | info 它包含有關查詢執行狀態的資訊,包括欄位名稱、從根到欄位的路徑。 |
解析器結果格式
GraphQL 中的解析器可以返回不同型別的值,如下所示:
| 序號 | 引數和描述 |
|---|---|
| 1 | null 或 undefined 這表示找不到該物件 |
| 2 | 陣列 只有當模式指示欄位的結果應該是列表時,這才有效 |
| 3 | Promise 解析器通常執行非同步操作,例如從資料庫或後端 API 獲取資料,因此它們可以返回 Promise |
| 4 | 標量或物件 解析器也可以返回其他值 |
圖示
讓我們建立一個簡單的應用程式來理解解析器。這將建立一個模式,用於從伺服器按 ID 查詢學生。學生資料將儲存在平面檔案中,我們將使用名為notarealdb的節點模組來模擬資料庫並從平面檔案讀取。
以下是建立簡單應用程式的分步過程:
步驟 1 - 下載並安裝專案所需的依賴項
建立一個名為resolver-app的資料夾。從終端將您的目錄更改為resolver-app。稍後,請按照環境設定章節中的步驟 3 到 5 操作。
步驟 2 - 建立模式
在專案資料夾 resolver-app 中新增 schema.graphql 檔案,並新增以下程式碼:
type Query {
   greeting:String
   students:[Student]
   studentById(id:ID!):Student
}

type Student {
   id:ID!
   firstName:String
   lastName:String
   password:String
   collegeId:String
}
模式檔案顯示使用者可以查詢greeting、students和studentById。要檢索具有特定 ID 的學生,我們使用資料型別 ID!這顯示了一個非空唯一識別符號欄位。students欄位返回一個學生陣列,greeting返回一個簡單的字串值。
步驟 3 - 建立解析器
在專案資料夾中建立一個名為resolvers.js的檔案,並新增以下程式碼:
const db = require('./db')
const Query = {
   //resolver function for greeting
   greeting:() => {
      return "hello from  TutorialsPoint !!!"
   },

   //resolver function for students returns list
   students:() => db.students.list(),

   //resolver function for studentbyId
   studentById:(root,args,context,info) => {
      //args will contain parameter passed in query
      return db.students.get(args.id);
   }
}
module.exports = {Query}
這裡,studentById接受三個引數。正如本章所討論的,studentId可以從 args 中檢索;root 將包含 Query 物件本身。要返回特定學生,我們需要使用 id 引數呼叫 students 集合的 get 方法。
這裡greeting、students、studentById是處理查詢的解析器。students 解析器函式從資料訪問層返回學生列表。要訪問模組外部的解析器函式,必須使用 module.exports 匯出 Query 物件。
步驟 4:執行應用程式
建立一個 server.js 檔案。參考環境設定章節中的步驟 8。在終端執行命令 npm start。伺服器將在 9000 埠啟動並執行。這裡,我們使用 GraphiQL 作為客戶端來測試應用程式。
開啟瀏覽器並輸入 URL:https://:9000/graphiql。在編輯器中輸入以下查詢:
{
   studentById(id:"S1001") {
      id
      firstName
      lastName
   }
}
上述查詢的輸出如下所示:
{
   "data": {
      "studentById": {
         "id": "S1001",
         "firstName": "Mohtashim",
         "lastName": "Mohammad"
      }
   }
}
GraphQL - 查詢 (Query)
GraphQL 操作可以是讀取操作或寫入操作。GraphQL 查詢用於讀取或獲取值,而變異用於寫入或釋出值。無論哪種情況,操作都是 GraphQL 伺服器可以用特定格式的資料解析和響應的簡單字串。通常用於移動和 Web 應用程式的常用響應格式是 JSON。
定義查詢的語法如下:
//syntax 1
query query_name{ someField }

//syntax 2
{ someField }
以下是一個查詢示例:
//query with name myQuery
query myQuery{
   greeting
}

// query without any name
{
   greeting
}
從上面的例子可以清楚地看出,query 關鍵字是可選的。
GraphQL 查詢有助於減少資料的過度獲取。與 RESTful API 不同,GraphQL 允許使用者限制應從伺服器獲取的欄位。這意味著更小的查詢和更少的網路流量;這反過來又減少了響應時間。
圖示 1 - 使用自定義欄位查詢學生模型
在這個例子中,我們有一組儲存在 json 檔案中的學生。每個學生模型都有 firstName、lastName 和 id 等欄位,但沒有 fullName。在這裡,我們將討論如何進行查詢以檢索所有學生的 fullName。為此,我們需要在模式解析器中建立 fullName 欄位。
讓我們看看如何使用以下步驟進行此圖示:
步驟 1 - 下載並安裝專案所需的依賴項
建立一個名為query-app的資料夾。從終端將您的目錄更改為query-app。稍後,請按照環境設定章節中解釋的步驟 3 到 5 操作。
步驟 2 - 建立模式
在專案資料夾 query-app 中新增schema.graphql檔案,並新增以下程式碼:
type Query {
   greeting:String
   students:[Student]
   studentById(id:ID!):Student
}

type Student {
   id:ID!
   firstName:String
   lastName:String
   fullName:String
}
請注意,students.json檔案中沒有fullName欄位。但是,我們需要透過查詢獲取學生的fullname。在這種情況下,fullName將是一個數據源中不可用的自定義欄位。
步驟 3 - 建立解析器
在專案資料夾中建立一個名為resolvers.js的檔案,並新增以下程式碼:
const db = require('./db')
const Query = {
   //resolver function for greeting
   greeting:() => {
      return "hello from  TutorialsPoint !!!"
   },

   //resolver function for students returns list
   students:() => db.students.list(),

   //resolver function for studentbyId
   studentById:(root,args,context,info) => {
      //args will contain parameter passed in query
      return db.students.get(args.id);
   }
}

//for each single student object returned,resolver is invoked

const Student = {
   fullName:(root,args,context,info) => {
      return root.firstName+":"+root.lastName
   }
}

module.exports = {Query,Student}
步驟 4:執行應用程式
建立一個server.js檔案。參考環境設定章節中的步驟 8。在終端執行命令npm start。伺服器將在 9000 埠啟動並執行。這裡,我們使用 GraphiQL 作為客戶端來測試應用程式。
開啟瀏覽器並輸入 URL https://:9000/graphiql。在編輯器中輸入以下查詢:
{
   students{
      id
      fullName
   }
}
查詢的響應如下所示:
{
   "data": {
      "students": [
         {
            "id": "S1001",
            "fullName": "Mohtashim:Mohammad"
         },

         {
            "id": "S1002",
            "fullName": "Kannan:Sudhakaran"
         },

         {
            "id": "S1003",
            "fullName": "Kiran:Panigrahi"
         }
      ]
   }
}
建立一個server.js檔案並新增以下程式碼:
const bodyParser = require('body-parser');
const cors = require('cors');
const express = require('express');

const db = require('./db');
const port = 9000;
const app = express();

//loading type definitions from schema file
const fs = require('fs')
const typeDefs = fs.readFileSync('./schema.graphql',{encoding:'utf-8'})

//loading resolvers
const resolvers = require('./resolvers')

//binding schema and resolver
const {makeExecutableSchema} = require('graphql-tools')
const schema = makeExecutableSchema({typeDefs, resolvers})

//enabling cross domain calls and form post
app.use(cors(), bodyParser.json());

//enabling routes
const  {graphiqlExpress,graphqlExpress} = require('apollo-server-express')
app.use('/graphql',graphqlExpress({schema}))
app.use('/graphiql',graphiqlExpress({endpointURL:'/graphql'}))

//registering port
app.listen(port, () => console.info(`Server started on port ${port}`));
在終端執行命令 npm start。伺服器將在 9000 埠啟動並執行。這裡,我們使用 GraphiQL 作為客戶端來測試應用程式。
開啟瀏覽器並輸入 URL https://:9000/graphiql。在編輯器中輸入以下查詢:
{
   students{
      id
      fullName
   }
}
查詢的響應如下所示:
{
   "data": {
      "students": [
         {
            "id": "S1001",
            "fullName": "Mohtashim:Mohammad"
         },
         {
            "id": "S1002",
            "fullName": "Kannan:Sudhakaran"
         },
         {
            "id": "S1003",
            "fullName": "Kiran:Panigrahi"
         }
      ]
   }
}
圖示 2 - 巢狀查詢
讓我們建立一個巢狀查詢來獲取學生詳細資訊及其學院詳細資訊。我們將使用相同的專案資料夾。
步驟 1 - 編輯模式
模式檔案已具有student欄位。讓我們新增一個 college 欄位並定義其型別。
type College {
   id:ID!
   name:String
   location:String
   rating:Float
}

type Student {
   id:ID!
   firstName:String
   lastName:String
   fullName:String
   college:College
}
步驟 2 - 修改 resolver.js
我們需要新增如下所示的 college 解析器函式。將為返回的每個學生物件執行 college 解析器函式。在這種情況下,解析器的 root 引數將包含student。
const Student = {
   fullName:(root,args,context,info) => {
      return root.firstName+":"+root.lastName
   },
   college:(root) => {
      return db.colleges.get(root.collegeId);
   }
}
module.exports = {Query,Student}
解析器透過呼叫 college 集合的 get 方法並傳遞collegeId來返回每個學生的學院。我們透過collegeId在學生和學院之間建立了關聯關係。
步驟 3 - 測試應用程式
開啟終端視窗並導航到專案資料夾。鍵入命令 -npm start。啟動瀏覽器並輸入 URL https://:9000/graphiql。
在 GraphiQL 視窗中輸入以下查詢:
{
   students{
      id
      firstName
      college {
         id
         name
         location
         rating
      }
   }
}
查詢的響應如下所示:
{
   "data": {
      "students": [
         {
            "id": "S1001",
            "firstName": "Mohtashim",
            "college": {
               "id": "col-102",
               "name": "CUSAT",
               "location": "Kerala",
               "rating": 4.5
            }
         },

         {
            "id": "S1002",
            "firstName": "Kannan",
            "college": {
               "id": "col-101",
               "name": "AMU",
               "location": "Uttar Pradesh",
               "rating": 5
            }
         },

         {
            "id": "S1003",
            "firstName": "Kiran",
            "college": {
               "id": "col-101",
               "name": "AMU",
               "location": "Uttar Pradesh",
               "rating": 5
            }
         }
      ]
   }
}
什麼是查詢變數?
如果查詢有一些要傳遞的動態值,則使用變量表示這些動態值。因此,客戶端應用程式可以重用該查詢。
圖示
讓我們建立一個簡單的應用程式來理解查詢變數。
步驟 1 - 編輯模式檔案
新增一個sayHello欄位,該欄位採用字串引數並返回一個字串。name 值在客戶端應用程式中將是動態的。
type Query {
   sayHello(name:String!):String
}
步驟 2 - 編輯 resolver.js 檔案
新增一個sayHello解析器,該解析器採用如下引數:
sayHello:(root,args,context,info) => `Hi ${args.name} GraphQL server says Hello to you!!`
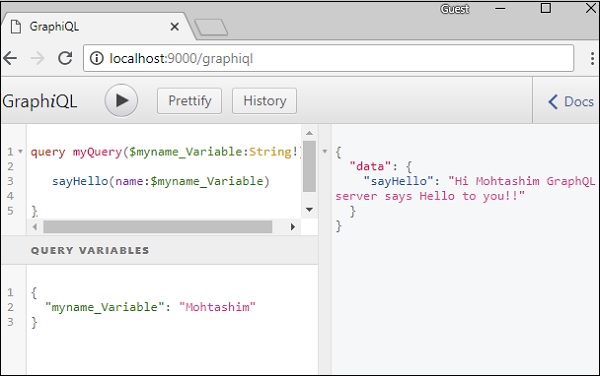
步驟 3 - 在 GraphiQL 中宣告查詢變數
變數宣告以 $ 後跟變數名稱開頭。例如:$myname_Variable。
宣告 $myname_Variable 後,必須將其與命名查詢語法一起使用。查詢 myQuery 獲取字串值並將其傳遞給 sayHello,如下所示:
query myQuery($myname_Variable:String!) {
   sayHello(name:$myname_Variable)
}
在 GraphiQL 客戶端的查詢變數部分中設定 $myname_Variable 的值作為 JSON 物件。
{
   "myname_Variable": "Mohtashim"
}
以上程式碼的輸出如下:
{
   "data": {
      "sayHello": "Hi Mohtashim GraphQL server says Hello to you!!"
   }
}
如何在列舉中使用查詢變數
讓我們看看在欄位引數為列舉型別時如何使用查詢變數。
步驟 1 - 編輯 schema.graphql 檔案
enum ColorType {
   RED
   BLUE
   GREEN
}

type Query {
   setFavouriteColor(color:ColorType):String
}
setFavouriteColor函式以列舉作為輸入並返回一個字串值。
步驟 2 - 編輯 resolvers.js 檔案
解析器函式setFavouriteColor接受root和args。執行時傳遞給函式的列舉值可以透過 args 引數訪問。
setFavouriteColor:(root,args) => {
   return  "Your Fav Color is :"+args.color;
}
步驟 3 - 在 GraphiQL 中宣告查詢變數
查詢名為query_to_setColor,它接受名為 color_variable 的 ColorType 變數。此變數傳遞給 setFavouriteColor 方法。
query query_to_setColor($color_variable:ColorType) {
   setFavouriteColor(color:$color_variable)
}
在 GraphiQL 的查詢變數部分中,鍵入以下程式碼:
{
   "color_variable":"RED"
}
響應如下所示:
{
   "data": {
      "setFavouriteColor": "Your Fav Color is: RED"
   }
}

GraphQL - 變更 (Mutation)
在本章中,我們將學習 GraphQL 中的變異查詢。
變異查詢修改資料儲存中的資料並返回一個值。它可以用來插入、更新或刪除資料。變異定義為模式的一部分。
變異查詢的語法如下所示:
mutation{
   someEditOperation(dataField:"valueOfField"):returnType
}
圖示
讓我們瞭解如何使用變異查詢將新的學生記錄新增到資料儲存中。
步驟 1 - 下載並安裝專案所需的依賴項
建立一個名為 mutation-app 的專案資料夾。從終端將您的目錄更改為 mutation-app。按照環境設定章節中解釋的步驟 3 到 5 操作。
步驟 2 - 建立 schema.graphql 檔案
在專案資料夾 mutation-app 中新增schema.graphql檔案,並新增以下程式碼:
type Query {
   greeting:String
}

type Mutation {
   createStudent(collegeId:ID,firstName:String,lastName:String):String
}
請注意,createStudent 函式返回 String 型別。這是一個在建立學生後生成的唯一識別符號 (ID)。
步驟 3 - 建立 resolver.js 檔案
在專案資料夾中建立一個檔案 resolvers.js,並新增以下程式碼:
const db = require('./db')
const Mutation = {
   createStudent:(root,args,context,info) => {
      return db.students.create({collegeId:args.collegeId,
      firstName:args.firstName,
      lastName:args.lastName})
   }
}
const Query = {
   greeting:() => "hello"
}

module.exports = {Query,Mutation}
變異函式指向資料儲存中的 students 集合。要新增新的student,請呼叫 students 集合中的 create 方法。args物件將包含在查詢中傳遞的引數。students集合的 create 方法將返回新建立的學生物件的 id。
步驟 4:執行應用程式
建立一個server.js檔案。參考環境設定章節中的步驟 8。在終端執行命令 npm start。伺服器將在 9000 埠啟動並執行。這裡,我們使用 GraphiQL 作為客戶端來測試應用程式。
下一步是開啟瀏覽器並輸入 URL https://:9000/graphiql。在編輯器中輸入以下查詢:
//college Id should be matched with data from colleges.json for easy retrieval

mutation {
   createStudent(collegeId:"col-2",firstName:"Tim",lastName:"George")
}
上述查詢將在 student.json 檔案中建立一個學生物件。查詢將返回一個唯一識別符號。查詢的響應如下所示:
{
   "data": {
      "createStudent": "SkQtxYBUm"
   }
}
要驗證是否建立了學生物件,我們可以使用 studentById 查詢。您還可以開啟 data 資料夾中的 students.json 檔案以驗證 id。
要使用 studentById 查詢,請按如下所示編輯schema.graphql:
type Query {
   studentById(id:ID!):Student
}

type Student {
   id:ID!
   firstName:String
   lastName:String
   collegeId:String
}
按如下所示編輯resolver.js檔案:
const db = require('./db')
const Query = {
   studentById:(root,args,context,info) => {
      return db.students.get(args.id);
   }
}

const Mutation = {
   createStudent:(root,args,context,info) => {
      return db.students.create({collegeId:args.collegeId,
      firstName:args.firstName,
      lastName:args.lastName})
   }
}

module.exports = {Query,Mutation}
以下是使用變異查詢返回的唯一 id 獲取學生的查詢:
{
    studentById(id:"SkQtxYBUm") {
    id
    firstName
    lastName
  }
}
伺服器返回的結果如下:
{
   "data": {
      "studentById": {
         "id": "SkQtxYBUm",
         "firstName": "Tim",
         "lastName":"George"
      }
   }
}
在變異中返回物件
最佳實踐是在變異中返回一個物件。例如,客戶端應用程式想要獲取學生和學院的詳細資訊。在這種情況下,我們可以建立一個查詢來返回包含學生及其學院詳細資訊的物件,而不是發出兩個不同的請求。
步驟 1 - 編輯模式檔案
在 **schema.graphql** 中新增一個名為 **addStudent** 的新方法,該方法在變異型別中返回物件。
讓我們學習如何透過學生詳細資訊訪問學院詳細資訊。在模式檔案中新增學院型別。
type Mutation {
   addStudent_returns_object(collegeId:ID,firstName:String,lastName:String):Student

   createStudent(collegeId:ID,firstName:String,lastName:String):String
}

type College {
   id:ID!
   name:String
   location:String
   rating:Float
}

type Student {
   id:ID!
   firstName:String
   lastName:String
   college:College
}
步驟 2 - 更新 resolvers.js 檔案
更新專案資料夾中的 **resolvers.js** 檔案,並新增以下程式碼:
const Mutation = {
   createStudent:(root,args,context,info) => {

      return db.students.create({
         collegeId:args.collegeId,
         firstName:args.firstName,
         lastName:args.lastName
      })
   },

   // new resolver function
   addStudent_returns_object:(root,args,context,info) => {
      const id = db.students.create({
         collegeId:args.collegeId,
         firstName:args.firstName,
         lastName:args.lastName
      })

      return db.students.get(id)
   }
}

//for each single student object returned,resolver is invoked
const Student = {
   college:(root) => {
      return db.colleges.get(root.collegeId);
   }
}

module.exports = {Query,Student,Mutation}
步驟 3 - 啟動伺服器並在 GraphiQL 中鍵入請求查詢
接下來,我們將啟動伺服器並在 GraphiQL 中使用以下程式碼請求查詢:
mutation {
   addStudent_returns_object(collegeId:"col-101",firstName:"Susan",lastName:"George") {
      id
      firstName
      college{
         id
         name
      }
   }
}
以上查詢添加了一個新的學生並檢索了學生物件以及學院物件。這節省了往返伺服器的次數。
返回的結果如下:
{
   "data": {
      "addStudent_returns_object": {
         "id": "rklUl08IX",
         "firstName": "Susan",
         "college": {
            "id": "col-101",
            "name": "AMU"
         }
      }
   }
}
GraphQL - 驗證
在新增或修改資料時,務必驗證使用者輸入。例如,我們可能需要確保欄位的值始終不為空。我們可以在 GraphQL 中使用 **! (非空)** 型別標記來執行此類驗證。
使用 **!** 型別標記的語法如下所示:
type TypeName {
   field1:String!,
   field2:String!,
   field3:Int!
}
上述語法確保所有欄位都不為空。
如果我們想要實現其他規則,例如檢查字串的長度或檢查數字是否在給定範圍內,我們可以定義自定義驗證器。自定義驗證邏輯將成為解析器函式的一部分。讓我們透過一個例子來理解這一點。
示例 - 實現自定義驗證器
讓我們建立一個帶有基本驗證的登錄檔單。該表單將具有電子郵件、名字和密碼欄位。
步驟 1 - 下載並安裝專案所需的依賴項
建立一個名為 **validation-app** 的資料夾。從終端更改目錄到 **validation-app**。按照環境設定章節中解釋的步驟 3 到 5 進行操作。
步驟 2 - 建立模式
在專案資料夾 **validation-app** 中新增 **schema.graphql** 檔案,並新增以下程式碼:
type Query {
   greeting:String
}

type Mutation {
   signUp(input:SignUpInput):String
}

input SignUpInput {
   email:String!,
   password:String!,
   firstName:String!
}
**注意** - 我們可以使用輸入型別 SignUpInput 來減少 signUp 函式中的引數數量。因此,signUp 函式只接受一個 SignUpInput 型別的引數。
步驟 3 - 建立解析器
在專案資料夾中建立一個 **resolvers.js** 檔案,並新增以下程式碼:
const Query = {
   greeting:() => "Hello"
}

const Mutation ={
   signUp:(root,args,context,info) => {

      const {email,firstName,password} = args.input;

      const emailExpression = /^(([^<>()\[\]\\.,;:\s@"]+(\.[^<>()\[\]\\.,;:\s@"]+)*)|(".+"))@((\[[0-9]{1,3}\.[0-9]{1,3}\.[0-9]{1,3}\.[0-9]{1,3}\])|(([a-zA-Z\-0-9]+\.)+[a-zA-Z]{2,}))$/;

      const isValidEmail =  emailExpression.test(String(email).toLowerCase())
      if(!isValidEmail)
      throw new Error("email not in proper format")

      if(firstName.length > 15)
      throw new Error("firstName should be less than 15 characters")

      if(password.length < 8 )
      throw new Error("password should be minimum 8 characters")

      return "success";
   }
}
module.exports = {Query,Mutation}
解析器函式 signUp 接受引數 email、password 和 firstName。這些將透過 input 變數傳遞,以便可以透過 args.input 訪問它們。
步驟 4:執行應用程式
建立一個 server.js 檔案。參考環境設定章節中的步驟 8。在終端中執行命令 *npm start*。伺服器將在 9000 埠啟動並執行。在這裡,我們將使用 GraphiQL 作為客戶端來測試應用程式。
開啟瀏覽器並輸入 URL **https://:9000/graphiql**。在編輯器中鍵入以下查詢:
mutation doSignUp($input:SignUpInput) {
   signUp(input:$input)
}
由於 signup 函式的輸入是一個複雜型別,我們需要在 graphiql 中使用查詢變數。為此,我們需要首先為查詢命名並將其命名為 doSignUp,$input 是一個查詢變數。
必須在 graphiql 的查詢變數選項卡中輸入以下查詢變數:
{
   "input":{
      "email": "abc@abc",
      "firstName": "kannan",
      "password": "pass@1234"
   }
}
errors 陣列包含驗證錯誤的詳細資訊,如下所示:
{
   "data": {
      "signUp": null
   },

   "errors": [
      {
         "message": "email not in proper format",
         "locations": [
            {
               "line": 2,
               "column": 4
            }
         ],
         "path": [
            "signUp"
         ]
      }
   ]
}
我們必須為每個欄位輸入正確的輸入,如下所示:
{
   "input":{
      "email": "abc@abc.com",
      "firstName": "kannan",
      "password": "pass@1234"
   }
}
返回的結果如下:
{
   "data": {
      "signUp": "success"
   }
}
在這裡,在下面的查詢中,我們沒有分配任何密碼。
{
   "input":{
      "email": "abc@abc.com",
      "firstName": "kannan"
   }
}
如果沒有提供必需的欄位,則 qraphql 伺服器將顯示以下錯誤:
{
   "errors": [
      {
         "message": "Variable \"$input\" got invalid value {\"email\":\"abc@abc.com\",\"firstName\":\"kannan\"}; Field value.password of required type String! was not provided.",
         "locations": [
            {
               "line": 1,
               "column": 19
            }
         ]
      }
   ]
}
GraphQL - JQuery 整合
Web 應用程式非同步地(在後臺)傳送和檢索資料。AJAX 允許網站在不重新整理頁面的情況下將內容載入到螢幕上。jQuery 提供了幾種 AJAX 功能的方法,從而使其更容易使用 AJAX。在本節中,我們將學習如何將 GraphQL 與 jQuery 整合。
考慮一個使用客戶端伺服器架構的應用程式。我們可以構建一個前端網頁,該網頁從 GraphQL 伺服器請求資料。網頁將使用 jQuery 向 GraphQL 伺服器發出 AJAX 呼叫。
為了將 GraphQL 與 JQuery 整合,讓我們檢查 GraphiQL 請求頭並瞭解請求引數。
啟動 **hello-world** 應用程式(有關相關示例,請參考第 6 章)。在 GraphiQL 視窗中鍵入 graphql 查詢 {greeting}。右鍵單擊並檢查或在 Chrome 上按 (ctrl + shift + I) 以轉到網路選項卡,如下所示:
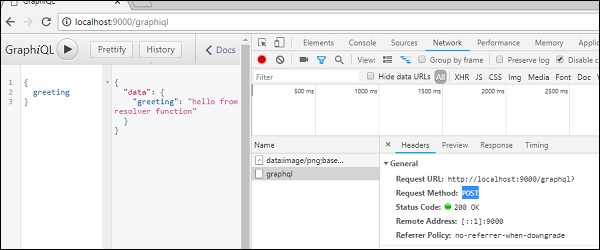
從簡單的 **hello-world** 示例中,我們可以理解使用的 **http 方法** 是 **POST**。現在在瀏覽器中,向下滾動到標題部分以檢視 *請求有效負載*。
單擊 **檢視程式碼** 後,您將在 Chrome 的請求有效負載部分看到以下內容。
{"query":"{\n greeting\n}","variables":null,"operationName":null}
還要注意請求 URL **https://:9000/graphql**,應從客戶端應用程式呼叫該 URL。
圖示
讓我們瞭解如何使用分步過程將 GraphQL 與 JQuery 整合。
設定伺服器
我們將學習如何使用以下步驟設定伺服器:
步驟 1 - 下載並安裝專案所需的依賴項
建立一個名為 **jquery-server-app** 的資料夾。從終端更改您的目錄到 jquery-server-app。按照環境設定章節中解釋的步驟 3 到 5 進行操作。
步驟 2 - 建立模式
在專案資料夾 **jquery-server-app** 中新增 schema.graphql 檔案,並新增以下程式碼:
type Query
{
   greeting: String
   sayHello(name:String!):String
}
該檔案定義了兩個查詢 **greeting** 和 **sayHello**。sayHello 查詢接受一個字串引數並返回另一個字串。sayHello() 函式的引數不為空。
步驟 3 - 建立解析器
在專案資料夾中建立一個檔案 resolvers.js,並新增以下程式碼:
const Query =
{
   greeting: () => 'Hello GraphQL  From TutorialsPoint !!' ,
   sayHello:(root,args,context,info) =>  `Hi ${args.name} GraphQL server says Hello to you!!`
}
module.exports = {Query}
這裡,**greeting** 和 **sayHello** 是兩個解析器。在 sayHello 解析器中,傳遞給 name 引數的值可以透過 args 訪問。要訪問模組外部的解析器函式,必須使用 **module.exports** 匯出 Query 物件。
步驟 4:執行應用程式
建立一個 server.js 檔案。參考環境設定章節中的步驟 8。在終端中執行命令 *npm start*。伺服器將在 9000 埠啟動並執行。在這裡,我們將使用 GraphiQL 作為客戶端來測試應用程式。
開啟瀏覽器並鍵入 URL **https://:9000/graphiql**。在編輯器中鍵入以下查詢:
{
   greeting,
   sayHello(name:"Mohtashim")
}
伺服器返回的結果如下:
{
   "data": {
      "greeting": "Hello GraphQL From TutorialsPoint !!",
      "sayHello": "Hi Mohtashim GraphQL server says Hello to you!!"
   }
}
設定客戶端
由於我們已經設定了伺服器,現在我們將學習如何設定客戶端。
步驟 1 - 在當前專案資料夾之外建立一個新資料夾 jquery-client-app
首先,我們將在專案資料夾之外建立一個名為 **jquery-client-app** 的資料夾。
步驟 2 - 為 jQuery 整合建立一個 HTML 頁面 index.html
我們將在 jquery 中建立一個客戶端應用程式並呼叫這兩種方法。以下是 **index.html** 檔案的程式碼。**index.html** 頁面在單擊按鈕 – **Greet** 和 **SayHello** 時向伺服器傳送請求。我們將使用 $.ajax() 函式發出非同步請求。
<!DOCTYPE html>
<html>
<head>
<script src = "https://ajax.googleapis.com/ajax/libs/jquery/3.3.1/jquery.min.js"></script>
<script>
$(document).ready(function() {
$("#btnSayhello").click(function() {
const name = $("#txtName").val();
console.log(name);
$("#SayhelloDiv").html('loading....');
$.ajax({url: "https://:9000/graphql",
contentType: "application/json",type:'POST',
data: JSON.stringify({ query:`{
sayHello(name:"${name}")}`
}),
success: function(result) {
console.log(JSON.stringify(result))
$("#SayhelloDiv").html("<h1>"+result.data.sayHello +"</h1>");
}
});
});
$("#btnGreet").click(function() {
$("#greetingDiv").html('loading....');
//https://kannan-first-graphql-app.herokuapp.com/graphql
$.ajax({url: "https://:9000/graphql",
contentType: "application/json",
type:'POST',
data: JSON.stringify({
query:`{greeting}`
}),
success: function(result) {
$("#greetingDiv").html("<h1>"+result.data.greeting+"</h1>");
}
});
});
});
</script>
</head>
<body>
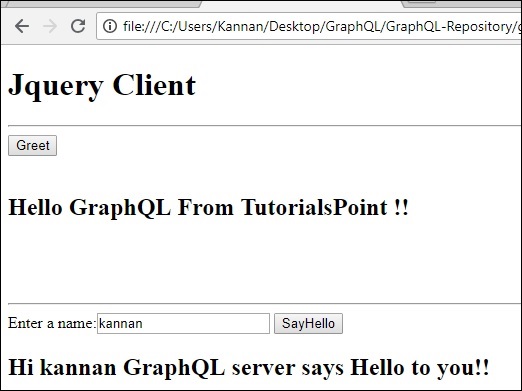
<h1>Jquery Client </h1>
<hr/>
<section>
<button id = "btnGreet">Greet</button>
<br/> <br/>
<div id = "greetingDiv"> </div>
</section>
<br/> <br/> <br/>
<hr/>
<section>
Enter a name:<input id = "txtName" type = "text" value = "kannan"/>
<button id = "btnSayhello">SayHello</button>
<div id = "SayhelloDiv"> </div>
</section>
</body>
</html>
在瀏覽器中開啟此檔案並單擊按鈕以檢視響應。輸出將如下所示:
GraphQL - React 整合
React 是一個用於構建使用者介面的 Javascript 庫。本章解釋瞭如何將 GraphQL 與 React 應用程式整合。
圖示
設定 React 專案最快的方法是使用 *Create React App* 工具。在後續章節中,我們將學習如何設定伺服器和客戶端。
設定伺服器
要設定伺服器,請按照以下步驟操作:
步驟 1 - 下載並安裝專案所需的依賴項
建立一個資料夾 **react-server-app**。從終端更改您的目錄到 **react-server-app**。按照環境設定章節中解釋的步驟 3 到 5 進行操作。
步驟 2 - 建立模式
在專案資料夾 **react-server-app** 中新增 **schema.graphql** 檔案,並新增以下程式碼:
type Query
{
   greeting: String
   sayHello(name:String!):String
}
該檔案定義了兩個查詢 – greeting 和 sayHello。sayHello 查詢接受一個字串引數並返回另一個字串。sayHello() 函式的引數不為空。
步驟 3 - 建立解析器
在專案資料夾中建立一個名為resolvers.js的檔案,並新增以下程式碼:
const Query =
{
   greeting: () => 'Hello GraphQL  From TutorialsPoint !!' ,
   sayHello:(root,args,context,info) =>  `Hi ${args.name} GraphQL server says Hello to you!!`
}
module.exports = {Query}
這裡 greeting 和 sayHello 是兩個解析器。在 sayHello 解析器中,傳遞給 name 引數的值可以透過 args 訪問。要訪問模組外部的解析器函式,必須使用 module.exports 匯出 Query 物件。
步驟 4:執行應用程式
建立一個 server.js 檔案。參考環境設定章節中的步驟 8。在終端中執行命令 *npm start*。伺服器將在 9000 埠啟動並執行。在這裡,我們將使用 GraphiQL 作為客戶端來測試應用程式。
開啟瀏覽器並鍵入 URL **https://:9000/graphiql**。在編輯器中鍵入以下查詢:
{
   greeting,
   sayHello(name:"Mohtashim")
}
伺服器的響應如下所示:
{
   "data": {
      "greeting": "Hello GraphQL  From TutorialsPoint !!",
      "sayHello": "Hi Mohtashim GraphQL server says Hello to you!!"
   }
}
設定客戶端
為客戶端開啟一個新終端。在執行客戶端應用程式之前,應保持伺服器終端執行。React 應用程式將在 3000 埠執行,伺服器應用程式將在 9000 埠執行。
步驟 1 - 建立一個 React 專案 hello-world-client
在客戶端終端中,鍵入以下命令:
npx create-react-app hello-world-client
這將安裝典型 React 應用程式所需的一切。npx 實用程式和 create-react-app 工具建立一個名為 hello-world-client 的專案。安裝完成後,在 VSCode 中開啟該專案。
步驟 2 - 啟動 hello-world-client
將終端中的當前資料夾路徑更改為 hello-world-client。鍵入 npm start 啟動專案。這將在 3000 埠執行開發伺服器,並將自動開啟瀏覽器並載入索引頁面。
這在下面給出的螢幕截圖中顯示:

步驟 3 - 修改 App 元件
在 src 資料夾內的 App.js 中,新增兩個函式,一個用於載入 greeting,另一個用於載入 sayHello 訊息。
以下是傳送 greeting 的 GraphQL 查詢的 loadGreeting 函式。
async function loadGreeting() {
   const response = await fetch('https://:9000/graphql', {
      method:'POST',

      headers:{'content-type':'application/json'},
      body:JSON.stringify({query:'{greeting}'})
   })

   const rsponseBody = await response.json();
   return rsponseBody.data.greeting;

   console.log("end of function")
}
以下是傳送 sayHello 的 GraphQL 查詢的 **loadSayhello** 函式:
async function  loadSayhello(name) {
   const response = await fetch('https://:9000/graphql', {
      method:'POST',
      headers:{'content-type':'application/json'},
      body:JSON.stringify({query:`{sayHello(name:"${name}")}`})
   })
}
完整的 **App.js** 檔案如下所示:
import React, { Component } from 'react';
import logo from './logo.svg';
import './App.css';
async function loadGreeting() {
const response = await fetch('https://:9000/graphql', {
method:'POST',
headers:{'content-type':'application/json'},
body:JSON.stringify({query:'{greeting}'})
})
const rsponseBody = await response.json();
return rsponseBody.data.greeting;
console.log("end of function")
}
async function loadSayhello(name) {
const response = await fetch('https://:9000/graphql', {
method:'POST',
headers:{'content-type':'application/json'},
body:JSON.stringify({query:`{sayHello(name:"${name}")}`})
})
const rsponseBody = await response.json();
return rsponseBody.data.sayHello;
}
class App extends Component {
constructor(props) {
super(props);
this.state = {greetingMessage:'',sayHelloMessage:'',userName:''}
this.updateName = this.updateName.bind(this);
this.showSayHelloMessage = this.showSayHelloMessage.bind(this);
this.showGreeting = this.showGreeting.bind(this);
}
showGreeting() {
loadGreeting().then(g => this.setState({greetingMessage:g+" :-)"}))
}
showSayHelloMessage() {
const name = this.state.userName;
console.log(name)
loadSayhello(name).then(m => this.setState({sayHelloMessage:m}))
}
updateName(event) {
this.setState({userName:event.target.value})
}
render() {
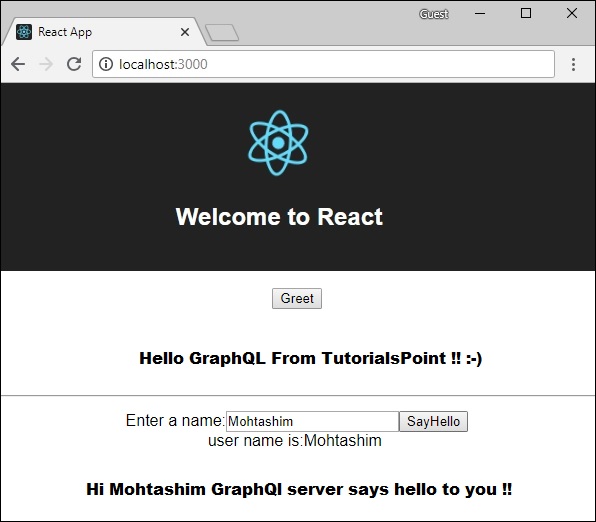
return (
<div className = "App">
<header className = "App-header">
<img src = {logo} className = "App-logo" alt = "logo" />
<h1 className = "App-title">Welcome to React</h1>
</header>
<br/><br/>
<section>
<button id = "btnGreet" onClick = {this.showGreeting}>Greet</button>
<br/> <br/>
<div id = "greetingDiv">
<h1>{this.state.greetingMessage}</h1>
</div>
</section>
<hr/>
<section>
Enter a name:<input id = "txtName" type = "text" onChange = {this.updateName}
value = {this.state.userName}/>
<button id = "btnSayhello" onClick = {this.showSayHelloMessage}>SayHello</button>
<br/>
user name is:{this.state.userName} <br/>
<div id = "SayhelloDiv">
<h1>{this.state.sayHelloMessage}</h1>
</div>
</section>
</div>
);
}
}
export default App;
兩個應用程式都執行後,單擊問候按鈕。接下來,在文字框中輸入名稱,然後單擊 sayHello 按鈕。輸出將如下所示:
GraphQL - Apollo Client
我們使用 Apollo Server 在伺服器端構建 graphql 規範。構建可用於生產環境的 GraphQL 伺服器既快速又容易。現在讓我們瞭解客戶端。
Apollo Client 是使用 GraphQL 構建客戶端應用程式的最佳方法。該客戶端旨在幫助開發人員快速構建一個使用 GraphQL 獲取資料的 UI,並且可以與任何 JavaScript 前端一起使用。
Apollo Client 支援以下平臺:
| 序號 | 平臺和框架 |
|---|---|
| 1 | Javascript React、Angular、Vue、Meteor、Ember |
| 2 | WebComponents Polymer、lit-apollo |
| 3 | 原生移動 使用 Java 的原生 Android,使用 Swift 的原生 iOS |
快取是 Apollo Client 的主要功能之一。apollo-boost 是一個便捷的軟體包,它包含了許多其他依賴項。
圖示
讓我們看看如何使用 Apollo Client 使用以下步驟構建客戶端應用程式:
設定伺服器
我們必須按照以下步驟設定伺服器:
步驟 1 - 下載並安裝專案所需的依賴項
建立一個資料夾 apollo-server-app。從終端更改您的目錄到 **apollo-server-app**。然後,按照環境設定章節中解釋的步驟 3 到 5 進行操作。
步驟 2 - 建立模式
在專案資料夾 **apollo-server-app** 中新增 **schema.graphql** 檔案,並新增以下程式碼:
type Query
{
   students:[Student]
}

type Student {
   id:ID!
   firstName:String
   lastName:String
   college:College
}

type College {
   id:ID!
   name:String
   location:String
   rating:Float
}
步驟 3 - 新增解析器
在專案資料夾中建立一個名為resolvers.js的檔案,並新增以下程式碼:
const db = require('./db')

const Query = {
   //resolver function for students returns list
   students:() => db.students.list(),
}

const Student = {
   college:(root) => {
      return db.colleges.get(root.collegeId);
   }
}
module.exports = {Query,Student}
步驟 4:執行應用程式
建立一個 **server.js** 檔案。參考環境設定章節中的步驟 8。在終端中執行命令 *npm start*。伺服器將在 9000 埠啟動並執行。在這裡,我們將使用 GraphiQL 作為客戶端來測試應用程式。
開啟瀏覽器並鍵入 URL **https://:9000/graphiql**。在編輯器中鍵入以下查詢。
{
   students{
      id
      firstName
      college{
         name
      }
   }
}
查詢的響應如下所示:
{
   "data": {
      "students": [
         {
            "id": "S1001",
            "firstName": "Mohtashim",
            "college": {
               "name": "CUSAT"
            }
         },

         {
            "id": "S1002",
            "firstName": "Kannan",
            "college": {
               "name": "AMU"
            }
         },

         {
            "id": "S1003",
            "firstName": "Kiran",
            "college": {
               "name": "AMU"
            }
         }
      ]
   }
}
設定客戶端
為客戶端開啟一個新終端。在執行客戶端應用程式之前,應保持伺服器終端執行。React 應用程式將在 3000 埠執行,伺服器應用程式將在 9000 埠執行。
步驟 1 - 建立一個 React 應用程式
在客戶端終端中,鍵入以下命令:
npx create-react-app hello-world-client
這將安裝典型 React 應用程式所需的一切。npx 實用程式和 create-react-app 工具建立一個名為hello-world-client的專案。安裝完成後,在 VSCode 中開啟專案。
步驟 2 - 啟動 hello-world-client
將終端中的當前資料夾路徑更改為hello-world-client。輸入 npm start 啟動專案。這將在 3000 埠執行開發伺服器,並自動開啟瀏覽器並載入索引頁面。
這在下面給出的螢幕截圖中顯示:
步驟 3 - 安裝 Apollo Client 庫
要安裝 Apollo Client,請開啟一個新終端,並位於當前專案資料夾路徑中。鍵入以下命令:
npm install apollo-boost graphql
這將下載客戶端的 graphql 庫和 Apollo Boost 包。我們可以透過鍵入 npm view apollo-boost dependencies 來交叉檢查這一點。這將具有許多依賴項,如下所示:
{
   'apollo-cache': '^1.1.15',
   'apollo-cache-inmemory': '^1.2.8',
   'apollo-client': '^2.4.0',
   'apollo-link': '^1.0.6',
   'apollo-link-error': '^1.0.3',
   'apollo-link-http': '^1.3.1',
   'apollo-link-state': '^0.4.0',
   'graphql-tag': '^2.4.2'
}
我們可以清楚地看到已安裝 Apollo-Client 庫。
步驟 4 - 修改 index.js 檔案中的 App 元件
使用 Apollo Client,我們可以直接呼叫伺服器,而無需使用 fetch API。此外,查詢和變異不應嵌入用反引號編寫的字串中。這是因為 gql 函式直接解析查詢。這意味著,程式設計師可以在使用 GraphiQL 工具編寫查詢時以相同的方式直接編寫查詢。gql 是一個標籤函式,它將反引號表示法中編寫的模板字串解析為 graphql 查詢物件。Apollo Client 的 query 方法返回一個 Promise。
以下程式碼片段顯示瞭如何匯入 Apollo Client:
import {ApolloClient, HttpLink, InMemoryCache} from 'apollo-boost'

const endPointUrl = 'https://:9000/graphql'
const client = new ApolloClient({
   link: new HttpLink({uri:endPointUrl}),
   cache:new InMemoryCache()
});
在上一章中,我們討論瞭如何使用 fetch API 進行 HTTP 請求。以下程式碼顯示瞭如何使用 gql 函式。loadStudentsAsync 函式使用 graphql 客戶端查詢伺服器。
async function loadStudentsAsync() {
   const query = gql`
   {
      students{
         id
         firstName
         lastName
         college{
            name
         }
      }
   }`
   const {data} = await client.query({query}) ;
   return data.students;
}
您只需要保留 src 資料夾中的 index.js 和 public 資料夾中的 index.html;所有其他自動生成的可以刪除。
目錄結構如下:
hello-world-client /
   -->node_modules
   -->public
         index.html
   -->src
         index.js
   -->package.json
以下是 React 應用程式中的 index.js:
import React, {Component} from 'react';
import ReactDOM from 'react-dom';
// apollo client
import {ApolloClient, HttpLink, InMemoryCache} from 'apollo-boost'
import gql from 'graphql-tag'
const endPointUrl = 'https://:9000/graphql'
const client = new ApolloClient({
link: new HttpLink({uri:endPointUrl}),
cache:new InMemoryCache()
});
async function loadStudentsAsync() {
const query = gql`
{
students{
id
firstName
lastName
college{
name
}
}
}
`
const {data} = await client.query({query}) ;
return data.students;
}
class App extends Component {
constructor(props) {
super(props);
this.state = {
students:[]
}
this.studentTemplate = [];
}
async loadStudents() {
const studentData = await loadStudentsAsync();
this.setState({
students: studentData
})
console.log("loadStudents")
}
render() {
return(
<div>
<input type = "button" value = "loadStudents" onClick = {this.loadStudents.bind(this)}/>
<div>
<br/>
<hr/>
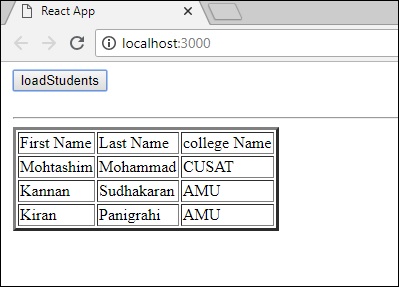
<table border = "3">
<thead>
<tr>
<td>First Name</td>
<td>Last Name</td>
<td>college Name</td>
</tr>
</thead>
<tbody>
{
this.state.students.map(s => {
return (
<tr key = {s.id}>
<td>
{s.firstName}
</td>
<td>
{s.lastName}
</td>
<td>
{s.college.name}
</td>
</tr>
)
})
}
</tbody>
</table>
</div>
</div>
)
}
}
ReactDOM.render(<App/>, document.getElementById('root'));
一旦我們單擊如下所示的 loadStudents 按鈕,React 應用程式將從 GraphQL 伺服器載入學生:
GraphQL - 客戶端認證
身份驗證是驗證使用者或程序身份的過程或行為。應用程式對使用者進行身份驗證非常重要,以確保匿名使用者無法訪問資料。在本節中,我們將學習如何對 GraphQL 客戶端進行身份驗證。
Express JWT
在這個例子中,我們將使用 jQuery 建立一個客戶端應用程式。為了對請求進行身份驗證,我們將在伺服器端使用 express-jwt 模組。
express-jwt 模組是一箇中間件,允許您使用 JWT 令牌對 HTTP 請求進行身份驗證。JSON Web 令牌 (JWT) 是一個長的字串,用於標識已登入的使用者。
使用者成功登入後,伺服器將生成一個 JWT 令牌。此令牌清晰地標識一個日誌。換句話說,令牌是使用者身份的表示。因此,下次客戶端連線到伺服器時,它必須出示此令牌才能獲取所需的資源。客戶端可以是移動應用程式或 Web 應用程式。

圖示
我們將遵循逐步的過程來理解此示例。
設定伺服器
以下是設定伺服器的步驟:
步驟 1 - 下載並安裝專案所需的依賴項
建立一個資料夾 auth-server-app。從終端將您的目錄更改為 auth-server-app。按照“環境設定”一章中說明的步驟 3 到 5 操作。
步驟 2 - 建立模式
在專案資料夾 auth-server-app 中新增 schema.graphql 檔案,並新增以下程式碼:type Query
{
greetingWithAuth:String
}
步驟 3 - 新增解析器
在專案資料夾中建立一個名為resolvers.js的檔案,並新增以下程式碼:
解析器將驗證 GraphQL 上下文物件中是否存在經過身份驗證的使用者物件。如果不存在經過身份驗證的使用者,它將引發異常。
const db = require('./db')

const Query = {
   greetingWithAuth:(root,args,context,info) => {

      //check if the context.user is null
      if (!context.user) {
         throw new Error('Unauthorized');
      }
      return "Hello from TutorialsPoint, welcome back : "+context.user.firstName;
   }
}

module.exports = {Query}
步驟 4 - 建立 Server.js 檔案
身份驗證中介軟體使用 JSON Web 令牌對呼叫者進行身份驗證。身份驗證的 URL 為 https://:9000/login。
這是一個 POST 操作。使用者必須提交其電子郵件和密碼,這些資訊將從後端進行驗證。如果使用 jwt.sign 方法生成有效的令牌,則客戶端必須在後續請求的標頭中傳送此令牌。
如果令牌有效,則 req.user 將設定為解碼的 JSON 物件,供後續中介軟體用於授權和訪問控制。
以下程式碼使用兩個模組 - jsonwebtoken 和 express-jwt 來對請求進行身份驗證:
當用戶單擊問候按鈕時,將發出對 /graphql 路由的請求。如果使用者未經身份驗證,系統將提示他進行身份驗證。
使用者將看到一個接受電子郵件 ID 和密碼的表單。在我們的示例中,/login 路由負責對使用者進行身份驗證。
/login 路由將驗證是否在資料庫中找到與使用者提供的憑據匹配的項。
如果憑據無效,則會向用戶返回 HTTP 401 異常。
如果憑據有效,伺服器將生成一個令牌。此令牌作為響應的一部分發送給使用者。這是由 jwt.sign 函式完成的。
const expressJwt = require('express-jwt');
const jwt = require('jsonwebtoken');

//private key
const jwtSecret = Buffer.from('Zn8Q5tyZ/G1MHltc4F/gTkVJMlrbKiZt', 'base64');

app.post('/login', (req, res) => {
   const {email, password} = req.body;

   //check database
   const user = db.students.list().find((user) =>  user.email === email);
   if (!(user && user.password === password)) {
      res.sendStatus(401);
      return;
   }

   //generate a token based on private key, token doesn't have an expiry
   const token = jwt.sign({sub: user.id}, jwtSecret);
   res.send({token});
});
對於每個請求,都將呼叫 app.use() 函式。這反過來將呼叫 expressJWT 中介軟體。此中介軟體將解碼 JSON Web 令牌。儲存在令牌中的使用者 ID 將被檢索並存儲為請求物件中的 user 屬性。
//decodes the JWT and stores in request object
app.use(expressJwt({
   secret: jwtSecret,
   credentialsRequired: false
}));
為了在 GraphQL 上下文中提供 user 屬性,此屬性將分配給 context 物件,如下所示:
//Make req.user available to GraphQL context
app.use('/graphql', graphqlExpress((req) => ({
   schema,
   context: {user: req.user &&apm; db.students.get(req.user.sub)}
})));
在當前資料夾路徑中建立 server.js。完整的 server.js 檔案如下:
const bodyParser = require('body-parser');
const cors = require('cors');
const express = require('express');
const expressJwt = require('express-jwt'); //auth
const jwt = require('jsonwebtoken'); //auth
const db = require('./db');

var port = process.env.PORT || 9000
const jwtSecret = Buffer.from('Zn8Q5tyZ/G1MHltc4F/gTkVJMlrbKiZt', 'base64');
const app = express();

const fs = require('fs')
const typeDefs = fs.readFileSync('./schema.graphql',{encoding:'utf-8'})
const resolvers = require('./resolvers')
const {makeExecutableSchema} = require('graphql-tools')

const schema = makeExecutableSchema({typeDefs, resolvers})

app.use(cors(), bodyParser.json(), expressJwt({
   secret: jwtSecret,
   credentialsRequired: false
}));

const  {graphiqlExpress,graphqlExpress} = require('apollo-server-express')

app.use('/graphql', graphqlExpress((req) => ({
   schema,
   context: {user: req.user && db.students.get(req.user.sub)}
})));
app.use('/graphiql',graphiqlExpress({endpointURL:'/graphql'}))

//authenticate students
app.post('/login', (req, res) => {
   const email = req.body.email;
   const password = req.body.password;

   const user = db.students.list().find((user) =>  user.email === email);
   if (!(user && user.password === password)) {
      res.sendStatus(401);
      return;
   }
   const token = jwt.sign({sub: user.id}, jwtSecret);
   res.send({token});
});

app.listen(port, () => console.info(`Server started on port ${port}`));
步驟 5 - 執行應用程式
在終端中執行命令 npm start。伺服器將在 9000 埠啟動並執行。在這裡,我們使用 GraphiQL 作為客戶端來測試應用程式。
開啟瀏覽器並鍵入 URL **https://:9000/graphiql**。在編輯器中鍵入以下查詢:
{
   greetingWithAuth
}
在下面的響應中,我們收到一個錯誤,因為我們不是經過身份驗證的使用者。
{
   "data": {
      "greetingWithAuth": null
   },
   "errors": [
      {
         "message": "Unauthorized",
         "locations": [
            {
               "line": 2,
               "column": 3
            }
         ],
         "path": [
            "greetingWithAuth"
         ]
      }
   ]
}
在下一節中,讓我們建立一個客戶端應用程式來進行身份驗證。
設定 JQuery 客戶端
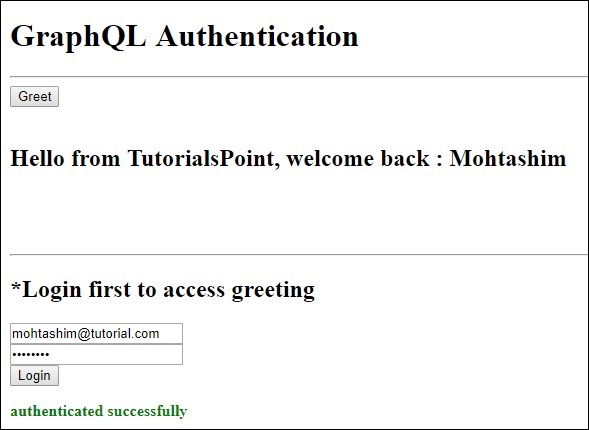
在客戶端應用程式中,提供了一個問候按鈕,它將呼叫模式 greetingWithAuth。如果您在未登入的情況下單擊該按鈕,它將顯示如下錯誤訊息:

登入資料庫中可用的使用者後,將出現以下螢幕:
要訪問 greeting,我們首先需要訪問 URL https://:9000/login 路由,如下所示。
響應將包含從伺服器生成的令牌。
$.ajax({
   url:"https://:9000/login",
   contentType:"application/json",
   type:"POST",
   data:JSON.stringify({email,password}),
   success:function(response) {
      loginToken = response.token;
      $('#authStatus')
      .html("authenticated successfully")
      .css({"color":"green",'font-weight':'bold'});
      $("#greetingDiv").html('').css({'color':''});
   },
   error:(xhr,err) =>  alert('error')
})
成功登入後,我們可以訪問 greetingWithAuth 模式,如下所示。對於所有後續請求,都應該有一個 Authorization 標頭和 bearer 令牌。
{
   url: "https://:9000/graphql",
   contentType: "application/json",
   headers: {"Authorization": 'bearer '+loginToken},  type:'POST',
   data: JSON.stringify({
   query:`{greetingWithAuth}`
}
以下是 index.html 的程式碼:
<!DOCTYPE html>
<html>
   <head>
      <script src = "https://ajax.googleapis.com/ajax/libs/jquery/3.3.1/jquery.min.js"></script>
      <script>
         $(document).ready(function() {
            let loginToken = "";
            $("#btnGreet").click(function() {
                  $.ajax({url: "https://:9000/graphql",
                  contentType: "application/json",
                  headers: {"Authorization": 'bearer '+loginToken},
                  type:'POST',
                  data: JSON.stringify({
                  query:`{greetingWithAuth}` }),
                  success: function(result) {
                  $("#greetingDiv").html("<h1>"+result.data.greetingWithAuth+"</h1>")
                  },
                  error:function(jQxhr,error) {
                     if(jQxhr.status == 401) {
                        $("#greetingDiv").html('please authenticate first!!')
                        .css({"color":"red",'font-weight':'bold'})
                        return;
                     }
                     $("#greetingDiv").html('error').css("color","red");
                  }
               });
            });
            $('#btnAuthenticate').click(function() {
               var email =  $("#txtEmail").val();
               var password =  $("#txtPwd").val();
               if(email && password) {
                  $.ajax({
                     url:"https://:9000/login",
                     contentType:"application/json",
                     type:"POST",
                     data:JSON.stringify({email,password}),
                     success:function(response) {
                        loginToken =  response.token;
                        $('#authStatus')
                        .html("authenticated successfully")
                        .css({"color":"green",'font-weight':'bold'});
                        $("#greetingDiv").html('').css({'color':''});
                     },
                     error:(xhr,err) =>  alert('error')
                  })
               }else alert("email and pwd empty")
            })
         });
      </script>
   </head>

   <body>
      <h1> GraphQL Authentication </h1>
      <hr/>
      <section>
         <button id = "btnGreet">Greet</button>
         <br/> <br/>
         <div id = "greetingDiv"></div>
      </section>
      <br/> <br/> <br/>
      <hr/>

      <section id = "LoginSection">
         <header>
            <h2>*Login first to  access greeting </h2>
         </header>
         <input type = "text" value = "mohtashim.mohammad@tutorialpoint.org" placeholder = "enter email" id = "txtEmail"/>
         <br/>

         <input type = "password" value = "pass123" placeholder = "enter password" id = "txtPwd"/>
         <br/>

         <input type = "button" id = "btnAuthenticate"  value = "Login"/>
         <p id = "authStatus"></p>
      </section>
   </body>
</html>
GraphQL - 快取
快取是將資料儲存在稱為快取的臨時儲存區域中的過程。當您返回到最近訪問的頁面時,瀏覽器可以從快取而不是原始伺服器獲取這些檔案。這節省了您的時間,並減輕了網路的額外流量負擔。
與 GraphQL 互動的客戶端應用程式負責在其端快取資料。這方面的一種可能的模式是保留一個欄位(如 id)作為全域性唯一識別符號。
記憶體中快取
InMemoryCache 是一個規範化的資料儲存,通常用於不使用 Redux 等其他庫的 GraphQL 客戶端應用程式。
以下是在 ApolloClient 中使用 InMemoryCache 的示例程式碼:
import {ApolloClient, HttpLink, InMemoryCache} from 'apollo-boost'
const cache = new InMemoryCache();

const client = new ApolloClient({
   link: new HttpLink(),
   cache
});
InMemoryCache 建構函式採用一個可選的 config 物件,其中包含用於自定義快取的屬性。
| 序號 | 引數和描述 |
|---|---|
| 1 | addTypename 一個布林值,用於確定是否將 __typename 新增到文件(預設值:true) |
| 2 | dataIdFromObject 一個函式,它接受一個數據物件並返回一個唯一識別符號,該識別符號將在規範化儲存中的資料時使用 |
| 3 | fragmentMatcher 預設情況下,InMemoryCache 使用啟發式片段匹配器 |
| 4 | cacheRedirects 一個函式對映,用於在請求發生之前將查詢重定向到快取中的另一個條目。 |
圖示
我們將在 ReactJS 中建立一個單頁應用程式,其中包含兩個選項卡 - 一個用於主頁選項卡,另一個用於學生選項卡。學生選項卡將從 GraphQL 伺服器 API 載入資料。當用戶從主頁選項卡導航到學生選項卡時,應用程式將查詢學生資料。生成的將由應用程式快取。
我們還將使用 getTime 欄位查詢伺服器時間,以驗證頁面是否已快取。如果從快取返回資料,則頁面將顯示傳送到伺服器的第一個請求的時間。如果資料是向伺服器發出的新請求的結果,它將始終顯示伺服器的最新時間。
設定伺服器
以下是設定伺服器的步驟:
步驟 1 - 下載並安裝專案所需的依賴項
建立一個資料夾 cache-server-app。從終端將您的目錄更改為 cache-server-app。按照“環境設定”一章中說明的步驟 3 到 5 操作。
步驟 2 - 建立模式
在專案資料夾 cache-server-app 中新增 schema.graphql 檔案,並新增以下程式碼:
type Query {
   students:[Student]
   getTime:String
}

type Student {
   id:ID!
   firstName:String
   lastName:String
   fullName:String
}
步驟 3 - 新增解析器
在專案資料夾中建立一個檔案 resolvers.js,並新增以下程式碼:
const db = require('./db')

const Query = {
      students:() => db.students.list(),
      getTime:() => {
      const today = new Date();
      var h = today.getHours();
      var m = today.getMinutes();
      var s = today.getSeconds();
      return `${h}:${m}:${s}`;
   }
}
module.exports = {Query}
步驟 4:執行應用程式
建立一個 server.js 檔案。參考環境設定章節中的步驟 8。在終端中執行命令 *npm start*。伺服器將在 9000 埠啟動並執行。在這裡,我們將使用 GraphiQL 作為客戶端來測試應用程式。
開啟瀏覽器並輸入 URL https://:9000/graphiql。在編輯器中鍵入以下查詢:
{
   getTime
   students {
      id
      firstName
   }
}
示例響應顯示學生姓名和伺服器時間。
{
   "data": {
      "getTime": "22:18:42",
      "students": [
         {
            "id": "S1001",
            "firstName": "Mohtashim"
         },
         {
            "id": "S1002",
            "firstName": "Kannan"
         },
         {
            "id": "S1003",
            "firstName": "Kiran"
         }
      ]
   }
}
設定 ReactJS 客戶端
為客戶端開啟一個新終端。在執行客戶端應用程式之前,應保持伺服器終端執行。React 應用程式將在 3000 埠執行,伺服器應用程式將在 9000 埠執行。
步驟 1 - 建立一個 React 應用程式
在客戶端終端中,鍵入以下命令:
npx create-react-app hello-world-client
這將安裝典型 React 應用程式所需的一切。npx 實用程式和 create-react-app 工具建立一個名為 hello-world-client 的專案。安裝完成後,在 VSCode 中開啟專案。
使用以下命令安裝 React 的路由器模組:npm install react-router-dom。
步驟 2 - 啟動 hello-world-client
將終端中的當前資料夾路徑更改為 hello-world-client。鍵入 npm start 啟動專案。這將在 3000 埠執行開發伺服器,並將自動開啟瀏覽器並載入索引頁面。
這在下面給出的螢幕截圖中顯示:

步驟 3 - 安裝 Apollo Client 庫
要安裝 Apollo Client,請開啟一個新終端,並位於當前專案資料夾路徑中。鍵入以下命令:
npm install apollo-boost graphql
這將下載客戶端的 graphql 庫和 Apollo Boost 包。我們可以透過鍵入 npm view apollo-boost dependencies 來交叉驗證這一點。這將具有許多依賴項,如下所示:
{
   'apollo-cache': '^1.1.15',
   'apollo-cache-inmemory': '^1.2.8',
   'apollo-client': '^2.4.0',
   'apollo-link': '^1.0.6',
   'apollo-link-error': '^1.0.3',
   'apollo-link-http': '^1.3.1',
   'apollo-link-state': '^0.4.0',
   'graphql-tag': '^2.4.2'
}
我們可以清楚地看到已安裝 apollo-client 庫。
步驟 4 - 修改 index.js 檔案中的 App 元件
對於簡單的 React 應用程式,您只需要保留 src 資料夾中的 index.js 和 public 資料夾中的 index.html;所有其他自動生成的可以刪除。
目錄結構如下:
hello-world-client /
   -->node_modules
   -->public
      index.html
   -->src
      index.js
      students.js
   -->package.json
新增一個附加檔案 students.js,它將包含 Students 元件。學生詳細資訊透過 Student 元件獲取。在 App 元件中,我們使用 HashRouter。
以下是 React 應用程式中的 index.js:
import React, {Component} from 'react';
import ReactDOM from 'react-dom';
import {HashRouter, Route, Link} from 'react-router-dom'

//components
import Students from './students'
class App extends Component {
   render() {
      return(
         <div><h1>Home !!</h1>
         <h2>Welcome to React Application !! </h2>
         </div>
      )
   }
}

function getTime() {
   var d = new Date();
   return d.getHours()+":"+d.getMinutes()+":"+d.getSeconds()
}

const routes = <HashRouter>
   <div>
      <h4>Time from react app:{getTime()}</h4>
      <header>
         <h1>  <Link to="/">Home</Link>
         <Link to = "/students">Students</Link>  </h1>
      </header>
      <Route exact path = "/students" component = {Students}></Route>
      <Route exact path = "/" component = {App}></Route>
   </div>
</HashRouter>

ReactDOM.render(routes, document.querySelector("#root"))
步驟 5 - 編輯 Students.js 中的元件 Students
在 Students 元件中,我們將使用以下兩種方法來載入資料:
Fetch API (loadStudents_noCache) - 這將每次單擊學生選項卡時都會觸發新的請求。
Apollo Client (loadWithApolloclient) - 這將從快取中獲取資料。
新增一個函式 **loadWithApolloclient**,用於從伺服器查詢學生資訊和時間。此函式將啟用快取功能。這裡我們使用 gql 函式來解析查詢。
async loadWithApolloclient() {
   const query = gql`{
      getTime
      students {
         id
         firstName
      }
   }`;

   const {data} = await  client.query({query})
   return data;
}
**Fetch API** 是一個用於獲取資源的簡單介面。與舊的 XMLHttpRequest 相比,Fetch 使得進行網路請求和處理響應更加容易。以下方法展示瞭如何使用 Fetch API 直接載入資料:
async  loadStudents_noCache() {
      const response = await fetch('https://:9000/graphql', {
      method:'POST',
      headers:{'content-type':'application/json'},
      body:JSON.stringify({query:`{
         getTime
         students {
            id
            firstName
         }
      }`})
   })

   const rsponseBody = await response.json();
   return rsponseBody.data;
}
在 StudentsComponent 的建構函式中,呼叫 **loadWithApolloClient** 方法。完整的 **Student.js** 檔案如下:
import React, {Component} from 'react';
import { Link} from 'react-router-dom'

//Apollo Client
import {ApolloClient, HttpLink, InMemoryCache} from 'apollo-boost'
import gql from 'graphql-tag'
const client = new ApolloClient({
   link: new HttpLink({uri:`https://:9000/graphql`}),
   cache:new InMemoryCache()
})

class Students extends Component {
   constructor(props) {
      super(props);
      this.state = {
         students:[{id:1,firstName:'test'}],
         serverTime:''
      }
      this.loadWithApolloclient().then(data => {
         this.setState({
            students:data.students,
            serverTime:data.getTime
         })
      })
   }

   async  loadStudents_noCache() {
      const response = await fetch('https://:9000/graphql', {
         method:'POST',
         headers:{'content-type':'application/json'},
         body:JSON.stringify({query:`{
            getTime
            students {
               id
               firstName
            }
         }`})
      })
      const rsponseBody =  await response.json();
      return rsponseBody.data;
   }

   async loadWithApolloclient() {
      console.log("inside apollo client function")
      const query = gql`{
         getTime
         students {
            id
            firstName
         }
      }`;
      const {data} = await  client.query({query})
      return data;
   }

   render() {
      return(
         <div>
            <h3>Time from GraphQL server :{this.state.serverTime}</h3>
            <p>Following Students Found </p>
            <div>
               <ul>
                  {
                     this.state.students.map(s => {
                        return(
                           <li key = {s.id}>
                              {s.firstName}
                           </li>
                        )
                     })
                  }
               </ul>
            </div>
         </div>
      )
   }
}
export default Students
步驟 6 - 使用 npm start 執行 React 應用
您可以透過從主頁選項卡切換到學生選項卡來測試 React 應用。一旦學生選項卡載入了來自伺服器的資料,它就會快取這些資料。您可以透過多次在主頁和學生選項卡之間切換來測試它。輸出結果如下所示:
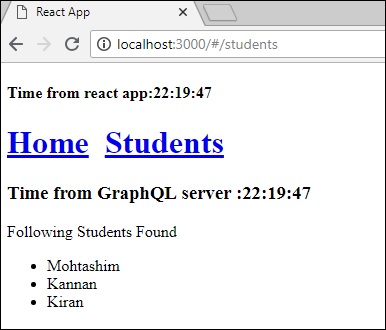
如果您首先透過輸入 URL **https://:3000/#/students** 載入了學生頁面,您會發現 React 應用和 GraphQL 的載入時間大致相同。之後,如果您切換到主頁檢視並返回到 GraphQL 伺服器,時間不會改變。這表明資料已被快取。
步驟 7 - 將 loadWithApolloclient 呼叫更改為 loadStudents_noCache
如果您將 StudentComponent 建構函式中的載入方法更改為 **loadStudents_noCache**,輸出將不會快取資料。這顯示了快取和非快取之間的區別。
this.loadStudents_noCache().then(data => {
   this.setState({
      students:data.students,
      serverTime:data.getTime
   })
})
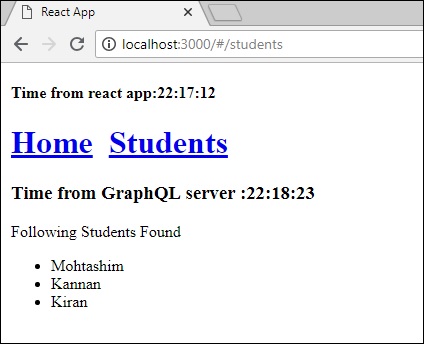
從以上輸出可以看出,如果您在選項卡之間來回切換,來自 GraphQL 伺服器的時間將始終是最新的,這意味著資料未被快取。