- GraphQL 教程
- GraphQL - 首頁
- GraphQL - 簡介
- GraphQL - 環境搭建
- GraphQL - 架構
- GraphQL - 應用元件
- GraphQL - 示例
- GraphQL - 型別系統
- GraphQL - 模式 (Schema)
- GraphQL - 解析器 (Resolver)
- GraphQL - 查詢
- GraphQL - 變異 (Mutation)
- GraphQL - 驗證
- GraphQL - JQuery 整合
- GraphQL - React 整合
- GraphQL - Apollo Client
- GraphQL - 客戶端身份驗證
- GraphQL - 快取
- GraphQL 有用資源
- GraphQL - 快速指南
- GraphQL - 有用資源
- GraphQL - 討論
GraphQL - 查詢
GraphQL 操作可以是讀取或寫入操作。GraphQL 查詢用於讀取或獲取值,而變異 (Mutation) 用於寫入或釋出值。無論哪種情況,操作都是一個簡單的字串,GraphQL 伺服器可以解析該字串,並以特定格式的資料進行響應。通常用於移動和 Web 應用程式的流行響應格式是 JSON。
定義查詢的語法如下:
//syntax 1
query query_name{ someField }

//syntax 2
{ someField }
以下是一個查詢示例:
//query with name myQuery
query myQuery{
   greeting
}

// query without any name
{
   greeting
}
從上面的例子可以看出,query 關鍵字是可選的。
GraphQL 查詢有助於減少資料過度獲取。與 RESTful API 不同,GraphQL 允許使用者限制應從伺服器獲取的欄位。這意味著查詢更小,網路流量更少;從而減少響應時間。
圖示 1 - 使用自定義欄位查詢學生模型
在這個例子中,我們有一組儲存在 json 檔案中的學生。每個學生模型都有 firstName、lastName 和 id 等欄位,但沒有 fullName。在這裡,我們將討論如何進行查詢以檢索所有學生的 fullName。為此,我們需要在模式解析器中建立 fullName 欄位。
讓我們看看如何使用以下步驟完成此圖示:
步驟 1 - 下載並安裝專案所需的依賴項
建立一個名為 **query-app** 的資料夾。從終端將目錄更改為 **query-app**。稍後,按照“環境搭建”章節中說明的步驟 3 到 5 進行操作。
步驟 2 - 建立模式 (Schema)
在專案資料夾 query-app 中新增 **schema.graphql** 檔案,並新增以下程式碼:
type Query {
   greeting:String
   students:[Student]
   studentById(id:ID!):Student
}

type Student {
   id:ID!
   firstName:String
   lastName:String
   fullName:String
}
請注意,**students.json** 檔案中沒有 *fullName* 欄位。但是,我們需要透過查詢來獲取學生的 *fullName*。在這種情況下,*fullName* 將是一個數據源中不存在的自定義欄位。
步驟 3 - 建立解析器 (Resolver)
在專案資料夾中建立一個 **resolvers.js** 檔案,並新增以下程式碼:
const db = require('./db')
const Query = {
   //resolver function for greeting
   greeting:() => {
      return "hello from  TutorialsPoint !!!"
   },

   //resolver function for students returns list
   students:() => db.students.list(),

   //resolver function for studentbyId
   studentById:(root,args,context,info) => {
      //args will contain parameter passed in query
      return db.students.get(args.id);
   }
}

//for each single student object returned,resolver is invoked

const Student = {
   fullName:(root,args,context,info) => {
      return root.firstName+":"+root.lastName
   }
}

module.exports = {Query,Student}
步驟 4 - 執行應用程式
建立一個 **server.js** 檔案。參考“環境搭建”章節中的步驟 8。在終端中執行命令 *npm* start。伺服器將在 9000 埠啟動並執行。在這裡,我們使用 GraphiQL 作為客戶端來測試應用程式。
開啟瀏覽器並輸入 URL **https://:9000/graphiql**。在編輯器中鍵入以下查詢:
{
   students{
      id
      fullName
   }
}
查詢的響應如下:
{
   "data": {
      "students": [
         {
            "id": "S1001",
            "fullName": "Mohtashim:Mohammad"
         },

         {
            "id": "S1002",
            "fullName": "Kannan:Sudhakaran"
         },

         {
            "id": "S1003",
            "fullName": "Kiran:Panigrahi"
         }
      ]
   }
}
建立一個 **server.js** 檔案並新增以下程式碼:
const bodyParser = require('body-parser');
const cors = require('cors');
const express = require('express');

const db = require('./db');
const port = 9000;
const app = express();

//loading type definitions from schema file
const fs = require('fs')
const typeDefs = fs.readFileSync('./schema.graphql',{encoding:'utf-8'})

//loading resolvers
const resolvers = require('./resolvers')

//binding schema and resolver
const {makeExecutableSchema} = require('graphql-tools')
const schema = makeExecutableSchema({typeDefs, resolvers})

//enabling cross domain calls and form post
app.use(cors(), bodyParser.json());

//enabling routes
const  {graphiqlExpress,graphqlExpress} = require('apollo-server-express')
app.use('/graphql',graphqlExpress({schema}))
app.use('/graphiql',graphiqlExpress({endpointURL:'/graphql'}))

//registering port
app.listen(port, () => console.info(`Server started on port ${port}`));
在終端中執行命令 npm start。伺服器將在 9000 埠啟動並執行。在這裡,我們使用 GraphiQL 作為客戶端來測試應用程式。
開啟瀏覽器並輸入 URL **https://:9000/graphiql**。在編輯器中鍵入以下查詢:
{
   students{
      id
      fullName
   }
}
查詢的響應如下:
{
   "data": {
      "students": [
         {
            "id": "S1001",
            "fullName": "Mohtashim:Mohammad"
         },
         {
            "id": "S1002",
            "fullName": "Kannan:Sudhakaran"
         },
         {
            "id": "S1003",
            "fullName": "Kiran:Panigrahi"
         }
      ]
   }
}
圖示 2 - 巢狀查詢
讓我們建立一個巢狀查詢來獲取學生詳細資訊及其大學詳細資訊。我們將使用同一個專案資料夾。
步驟 1 - 編輯模式 (Schema)
模式檔案已經有了 *student* 欄位。讓我們新增一個 college 欄位並定義其型別。
type College {
   id:ID!
   name:String
   location:String
   rating:Float
}

type Student {
   id:ID!
   firstName:String
   lastName:String
   fullName:String
   college:College
}
步驟 2 - 修改 resolvers.js
我們需要新增如下所示的 college 解析器函式。在這種情況下,將為返回的每個學生物件執行 college 解析器函式。此處的解析器的 root 引數將包含 *student*。
const Student = {
   fullName:(root,args,context,info) => {
      return root.firstName+":"+root.lastName
   },
   college:(root) => {
      return db.colleges.get(root.collegeId);
   }
}
module.exports = {Query,Student}
解析器透過呼叫 college 集合的 get 方法並傳遞 *collegeId* 來返回每個學生的 college。我們透過 *collegeId* 在學生和大學之間建立了關聯關係。
步驟 3 - 測試應用程式
開啟終端視窗並導航到專案資料夾。鍵入命令 -npm start。啟動瀏覽器並輸入 URL **https://:9000/graphiql**。
在 GraphiQL 視窗中輸入以下查詢:
{
   students{
      id
      firstName
      college {
         id
         name
         location
         rating
      }
   }
}
查詢的響應如下:
{
   "data": {
      "students": [
         {
            "id": "S1001",
            "firstName": "Mohtashim",
            "college": {
               "id": "col-102",
               "name": "CUSAT",
               "location": "Kerala",
               "rating": 4.5
            }
         },

         {
            "id": "S1002",
            "firstName": "Kannan",
            "college": {
               "id": "col-101",
               "name": "AMU",
               "location": "Uttar Pradesh",
               "rating": 5
            }
         },

         {
            "id": "S1003",
            "firstName": "Kiran",
            "college": {
               "id": "col-101",
               "name": "AMU",
               "location": "Uttar Pradesh",
               "rating": 5
            }
         }
      ]
   }
}
什麼是查詢變數?
如果查詢有一些要傳遞的動態值,則使用變數來表示這些動態值。因此,客戶端應用程式可以重用該查詢。
圖示
讓我們建立一個簡單的應用程式來理解查詢變數。
步驟 1 - 編輯 Schema 檔案
新增一個 *sayHello* 欄位,該欄位接受一個字串引數並返回一個字串。name 值將在客戶端應用程式中動態變化。
type Query {
   sayHello(name:String!):String
}
步驟 2 - 編輯 resolver.js 檔案
新增一個 *sayHello* 解析器,該解析器接受如下引數:
sayHello:(root,args,context,info) => `Hi ${args.name} GraphQL server says Hello to you!!`
步驟 3 - 在 GraphiQL 中宣告查詢變數
變數宣告以 $ 加上變數名稱開頭。例如:$myname_Variable。
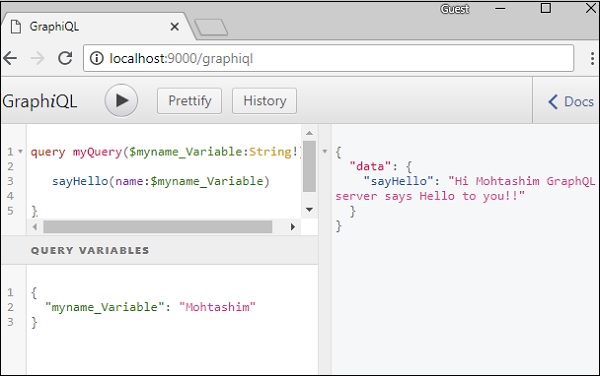
一旦聲明瞭 $myname_Variable,就必須與命名查詢語法一起使用。查詢 myQuery 獲取字串值並將其傳遞給 sayHello,如下所示:
query myQuery($myname_Variable:String!) {
   sayHello(name:$myname_Variable)
}
在 GraphiQL 客戶端的“查詢變數”部分中,將值設定為 $myname_Variable 的 JSON 物件。
{
   "myname_Variable": "Mohtashim"
}
以上程式碼的輸出如下:
{
   "data": {
      "sayHello": "Hi Mohtashim GraphQL server says Hello to you!!"
   }
}
如何將查詢變數與列舉一起使用
讓我們看看當欄位引數為 **列舉型別** 時如何使用查詢變數。
步驟 1 - 編輯 schema.graphql 檔案
enum ColorType {
   RED
   BLUE
   GREEN
}

type Query {
   setFavouriteColor(color:ColorType):String
}
*setFavouriteColor* 函式以列舉作為輸入並返回一個字串值。
步驟 2 - 編輯 resolvers.js 檔案
解析器函式 *setFavouriteColor* 接受 *root* 和 *args*。執行時傳遞給函式的列舉值可以透過 args 引數訪問。
setFavouriteColor:(root,args) => {
   return  "Your Fav Color is :"+args.color;
}
步驟 3 - 在 GraphiQL 中宣告查詢變數
查詢名為 **query_to_setColor**,它獲取名為 color_variable 的 ColorType 變數。此變數將傳遞給 setFavouriteColor 方法。
query query_to_setColor($color_variable:ColorType) {
   setFavouriteColor(color:$color_variable)
}
在 GraphiQL 的查詢變數部分,鍵入以下程式碼:
{
   "color_variable":"RED"
}
響應如下所示:
{
   "data": {
      "setFavouriteColor": "Your Fav Color is: RED"
   }
}
