- Electron 教程
- Electron - 主頁
- Electron - 概述
- Electron - 安裝
- Electron 的工作原理是什麼?
- Electron - Hello World
- Electron - 構建 UI
- Electron - 檔案處理
- Electron - 本機 Node 庫
- 程序間通訊 (IPC)
- Electron - 系統對話方塊
- Electron - 選單
- Electron - 系統托盤
- Electron - 通知
- Electron - Webview
- Electron - 音訊和影片捕獲
- Electron - 定義快捷方式
- Electron - 環境變數
- Electron - 除錯
- Electron - 打包應用
- Electron - 資源
- Electron 有用資源
- Electron - 快速指南
- Electron - 有用資源
- Electron - 討論
Electron - 檔案處理
檔案處理是構建桌面應用程式非常重要的一部分。幾乎所有桌面應用程式都會與檔案互動。
我們將在應用程式中建立一個窗體,該窗體將把一個姓名和一個電子郵件地址作為輸入。此窗體將儲存到檔案中,並將建立一個列表以將其作為輸出顯示。
使用 main.js 檔案中的以下程式碼設定主程序 −
const {app, BrowserWindow} = require('electron')
const url = require('url')
const path = require('path')

let win

function createWindow() {
   win = new BrowserWindow({width: 800, height: 600})
   win.loadURL(url.format ({
      pathname: path.join(__dirname, 'index.html'),
      protocol: 'file:',
      slashes: true
   }))
}

app.on('ready', createWindow)
現在開啟 index.html 檔案並在其中輸入以下程式碼 −
<!DOCTYPE html>
<html>
   <head>
      <meta charset = "UTF-8">
      <title>File System</title>
      <link rel = "stylesheet"
         href = "./bower_components/bootstrap/dist/css/bootstrap.min.css" />

      <style type = "text/css">
         #contact-list {
            height: 150px;
            overflow-y: auto;
         }
      </style>
   </head>

   <body>
      <div class = "container">
         <h1>Enter Names and Email addresses of your contacts</h1>
         <div class = "form-group">
            <label for = "Name">Name</label>
            <input type = "text" name = "Name" value = "" id = "Name"
               placeholder = "Name" class = "form-control" required>
         </div>

         <div class = "form-group">
            <label for = "Email">Email</label>
            <input type = "email" name = "Email" value = "" id = "Email"
               placeholder = "Email" class = "form-control" required>
         </div>

         <div class = "form-group">
            <button class = "btn btn-primary" id = "add-to-list">Add to list!</button>
         </div>

         <div id = "contact-list">
            <table class = "table-striped" id = "contact-table">
               <tr>
                  <th class = "col-xs-2">S. No.</th>
                  <th class = "col-xs-4">Name</th>
                  <th class = "col-xs-6">Email</th>
               </tr>
            </table>
         </div>

         <script src = "./view.js" ></script>
      </div>
   </body>
</html>
現在我們需要處理新增事件。我們將在 view.js 檔案中執行此操作。
我們將建立一個函式 loadAndDisplayContacts(),它將最初從檔案中載入聯絡人。建立 loadAndDisplayContacts() 函式後,我們將在“新增到列表”按鈕上建立一個點選處理程式。這將把條目新增到檔案和表格中。
在 view.js 檔案中,輸入以下程式碼 −
let $ = require('jquery')
let fs = require('fs')
let filename = 'contacts'
let sno = 0

$('#add-to-list').on('click', () => {
   let name = $('#Name').val()
   let email = $('#Email').val()

   fs.appendFile('contacts', name + ',' + email + '\n')

   addEntry(name, email)
})

function addEntry(name, email) {
   if(name && email) {
      sno++
      let updateString = '<tr><td>'+ sno + '</td><td>'+ name +'</td><td>'
         + email +'</td></tr>'
      $('#contact-table').append(updateString)
   }
}

function loadAndDisplayContacts() {

   //Check if file exists
   if(fs.existsSync(filename)) {
      let data = fs.readFileSync(filename, 'utf8').split('\n')

      data.forEach((contact, index) => {
         let [ name, email ] = contact.split(',')
         addEntry(name, email)
      })

   } else {
      console.log("File Doesn\'t Exist. Creating new file.")
      fs.writeFile(filename, '', (err) => {
         if(err)
            console.log(err)
      })
   }
}

loadAndDisplayContacts()
現在執行應用程式,使用以下命令 −
$ electron ./main.js
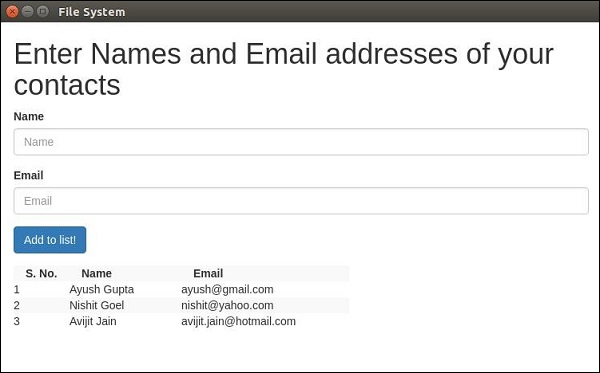
向其中新增一些聯絡人後,應用程式將如下所示 −
有關更多 fs 模組 API 呼叫,請參閱 Node 檔案系統教程。
現在我們可以使用 Electron 處理檔案。我們將在對話方塊章節中瞭解如何在對話方塊中呼叫檔案的儲存和開啟對話方塊(本機)。
廣告