- Cypress 教程
- Cypress - 首頁
- Cypress - 簡介
- Cypress - 架構和環境設定
- Cypress - 測試執行器
- Cypress - 構建第一個測試
- Cypress - 支援的瀏覽器
- Cypress - 基本命令
- Cypress - 變數
- Cypress - 別名
- Cypress - 定位器
- Cypress - 斷言
- Cypress - 文字驗證
- Cypress - 非同步行為
- Cypress - 處理 XHR
- Cypress - jQuery
- Cypress - 複選框
- Cypress - 標籤頁
- Cypress - 下拉列表
- Cypress - 警報
- Cypress - 子視窗
- Cypress - 隱藏元素
- Cypress - 框架
- Cypress - Web 表格
- Cypress - 滑鼠操作
- Cypress - Cookie
- Cypress - Get 和 Post
- Cypress - 檔案上傳
- Cypress - 資料驅動測試
- Cypress - 提示彈出視窗
- Cypress - 儀表盤
- Cypress - 螢幕截圖和影片
- Cypress - 除錯
- Cypress - 自定義命令
- Cypress - Fixtures
- Cypress - 環境變數
- Cypress - 鉤子
- Cypress - JSON 檔案配置
- Cypress - 報告
- Cypress - 外掛
- Cypress - GitHub
- Cypress 有用資源
- Cypress - 快速指南
- Cypress - 有用資源
- Cypress - 討論
Cypress - Web 表格
Cypress 能夠處理網頁表格。表格基本上分為兩種型別:動態和靜態。與動態表格不同,靜態表格的行和列數量是固定的。
在 html 程式碼中,表格由 table 標籤表示,行由 tr 表示,列由 td 表示。
要訪問行,Cypress 命令如下:
cy.get("tr")
要訪問列,Cypress 命令如下:
cy.get("td") or cy.get("tr td")
要訪問特定列,CSS 表示式應如下所示:
td:nth-child(column number)
要遍歷表格的行/列,使用 Cypress 命令 each。
在 Cypress 中,我們使用命令next來切換到緊鄰的下一個兄弟元素。此命令必須與 get 命令連結。命令 prev 用於切換到緊鄰的前一個兄弟元素。
表格的 Html 結構如下所示:

示例
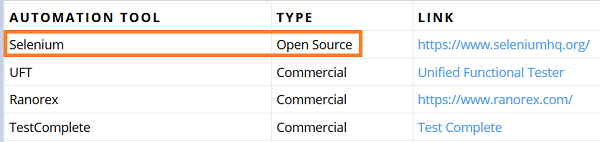
讓我們以一個表格為例,並驗證第二列 TYPE(開源)中對應於第一列 AUTOMATION TOOL 中的值 Selenium 的內容。
您的計算機上將出現以下螢幕:
實現
以下是與表格相關的 Cypress 命令的實現:
describe('Tutorialspoint Test', function () {
   // test case
   it('Scenario 1', function (){
      //URL launch
      cy.visit("https://sqengineer.com/practice-sites/practice-tables-selenium/")
      // identify first column
      cy.get('#table1> tbody > tr > td:nth-child(1)').each(($elm, index, $list)=> {
         // text captured from column1
         const t = $elm.text();
         // matching criteria
         if (t.includes('Selenium')){
            // next sibling captured
            cy.get('#table1 > tbody > tr > td:nth-child(1)')
            .eq(index).next().then(function(d) {
               // text of following sibling
               const r = d.text()
               //assertion
               expect(r).to.contains('Commercial');
            })
         }
      })
   });
});
執行結果
輸出如下:
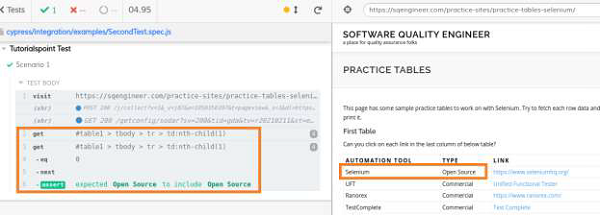
執行日誌顯示 TYPE 列中的值為 Open Source。這是因為它與同一行中出現的元素 Selenium(第一列)緊鄰。
廣告