- Cypress 教程
- Cypress - 首頁
- Cypress - 簡介
- Cypress - 架構和環境設定
- Cypress - 測試執行器
- Cypress - 構建第一個測試
- Cypress - 支援的瀏覽器
- Cypress - 基本命令
- Cypress - 變數
- Cypress - 別名
- Cypress - 定位器
- Cypress - 斷言
- Cypress - 文字驗證
- Cypress - 非同步行為
- Cypress - 使用 XHR
- Cypress - jQuery
- Cypress - 複選框
- Cypress - 標籤頁
- Cypress - 下拉列表
- Cypress - 警報
- Cypress - 子視窗
- Cypress - 隱藏元素
- Cypress - 框架
- Cypress - 網頁表格
- Cypress - 滑鼠操作
- Cypress - Cookie
- Cypress - GET 和 POST
- Cypress - 檔案上傳
- Cypress - 資料驅動測試
- Cypress - 提示彈出視窗
- Cypress - 儀表盤
- Cypress - 螢幕截圖和影片
- Cypress - 除錯
- Cypress - 自定義命令
- Cypress - Fixture
- Cypress - 環境變數
- Cypress - Hook
- Cypress - JSON 檔案配置
- Cypress - 報告
- Cypress - 外掛
- Cypress - GitHub
- Cypress 有用資源
- Cypress - 快速指南
- Cypress - 有用資源
- Cypress - 討論
Cypress - 檔案上傳
為了在 Cypress 中執行檔案上傳任務,我們首先需要使用下面提到的命令安裝一個外掛:
npm install –dev cypress-file-upload
您的計算機上將出現以下螢幕:

安裝完成後,我們需要在 command.js 檔案中新增語句 import 'cypress-file-upload'。此檔案位於 Cypress 專案的 support 資料夾內。
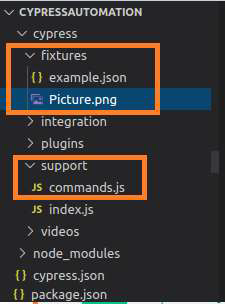
此外,我們將把要上傳的檔案新增到 fixtures 資料夾(Picture.png 檔案)。將顯示以下螢幕:
要上傳檔案,我們需要使用 Cypress 命令 attachFile 並將要上傳的檔案路徑作為引數傳遞給它。
實現
在 Cypress 中上傳檔案的命令實現如下:
describe('Tutorialspoint Test', function () {
   // test case
   it('Test Case6', function (){
      //file to be uploaded path in project folder
      const p = 'Picture.png'
      // launch URL
      cy.visit("https://the-internet.herokuapp.com/upload")
      //upload file with attachFile
      cy.get('#file-upload').attachFile(p)
      //click on upload
      cy.get('#file-submit').click()
      //verify uploaded file
      cy.get('#uploaded-files').contains('Picture')
   });
});
執行結果
輸出如下:
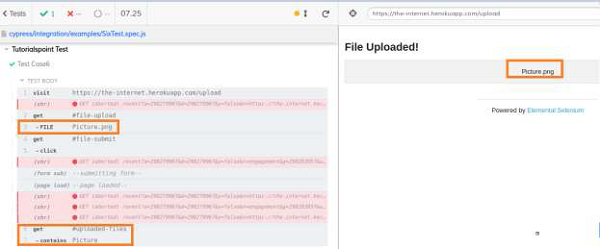
執行日誌顯示檔案 Picture.png 已上傳,並且檔名已反映在頁面上。
廣告