- ASP.NET MVC 教程
- ASP.NET MVC - 首頁
- ASP.NET MVC - 概述
- ASP.NET MVC - 設計模式
- ASP.NET MVC - 環境設定
- ASP.NET MVC - 快速入門
- ASP.NET MVC - 生命週期
- ASP.NET MVC - 路由
- ASP.NET MVC - 控制器
- ASP.NET MVC - 操作方法
- ASP.NET MVC - 過濾器
- ASP.NET MVC - 選擇器
- ASP.NET MVC - 檢視
- ASP.NET MVC - 資料模型
- ASP.NET MVC - 輔助方法
- ASP.NET MVC - 模型繫結
- ASP.NET MVC - 資料庫
- ASP.NET MVC - 驗證
- ASP.NET MVC - 安全性
- ASP.NET MVC - 快取
- ASP.NET MVC - Razor
- ASP.NET MVC - 資料註解
- Nuget 包管理
- ASP.NET MVC - Web API
- ASP.NET MVC - 腳手架
- ASP.NET MVC - Bootstrap
- ASP.NET MVC - 單元測試
- ASP.NET MVC - 部署
- ASP.NET MVC - 自託管
- ASP.NET MVC 有用資源
- ASP.NET MVC - 快速指南
- ASP.NET MVC - 有用資源
- ASP.NET MVC - 討論
ASP.NET MVC - 模型繫結
ASP.NET MVC 模型繫結允許您將 HTTP 請求資料與模型對映。它是一個使用瀏覽器在 HTTP 請求中傳送的資料建立 .NET 物件的過程。剛接觸 ASP.Net MVC 的 ASP.NET Web Forms 開發人員大多不清楚檢視中的值是如何在到達控制器的操作方法時轉換為模型類的,因此這種轉換是由模型繫結器完成的。
模型繫結是 HTTP 請求和 C# 操作方法之間精心設計的橋樑。它使開發人員能夠輕鬆處理表單(檢視)上的資料,因為 POST 和 GET 會自動轉換為您指定的資料模型。ASP.NET MVC 使用預設繫結器在後臺完成此操作。
讓我們來看一個簡單的例子,在這個例子中,我們從上一章的專案中新增一個“建立檢視”,我們將看到如何將這些值從檢視獲取到 EmployeeController 操作方法。
以下是 POST 的建立操作方法。
// POST: Employee/Create
[HttpPost]
public ActionResult Create(FormCollection collection){
   try{
      // TODO: Add insert logic here
      return RedirectToAction("Index");
   }catch{
      return View();
   }
}
右鍵單擊“建立操作方法”,然後選擇“新增檢視…”
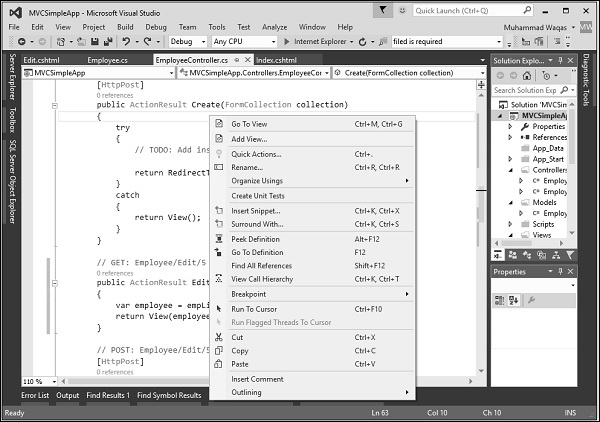
它將顯示“新增檢視”對話方塊。
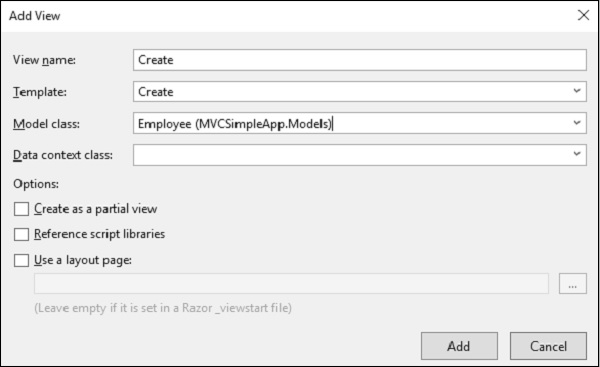
正如您在上面的螢幕截圖中看到的,預設名稱已提到。現在從“模板”下拉列表中選擇“建立”,從“模型類”下拉列表中選擇“Employee”。
您將在 Create.cshtml 檢視中看到預設程式碼。
@model MVCSimpleApp.Models.Employee
@{
   Layout = null;
}

<!DOCTYPE html>
<html>
   <head>
      <meta name = "viewport" content = "width = device-width" />
      <title>Create</title>
   </head>

   <body>
      @using (Html.BeginForm()){
         @Html.AntiForgeryToken()
         <div class = "form-horizontal">
            <h4>Employee</h4>
            <hr />
            @Html.ValidationSummary(true, "", new { @class = "text-danger" })

            <div class = "form-group">
               @Html.LabelFor(model => model.Name, htmlAttributes:
                  new{ @class = "control-label col-md-2" })

               <div class = "col-md-10">
                  @Html.EditorFor(model => model.Name, new{ htmlAttributes =
                     new { @class = "form-control" } })

                  @Html.ValidationMessageFor(model => model.Name, "",
                     new{ @class = "text-danger" })
               </div>
            </div>

            <div class = "form-group">
               @Html.LabelFor(model => model.JoiningDate, htmlAttributes:
                  new{ @class = "control-label col-md-2" })

               <div class = "col-md-10">
                  @Html.EditorFor(model => model.JoiningDate, new{ htmlAttributes =
                     new { @class = "form-control" } })

                  @Html.ValidationMessageFor(model => model.JoiningDate, "",
                     new { @class = "text-danger" })
               </div>
            </div>

            <div class = "form-group">
               @Html.LabelFor(model => model.Age, htmlAttributes:
                  new { @class = "control-label col-md-2" })

               <div class = "col-md-10">
                  @Html.EditorFor(model => model.Age, new { htmlAttributes =
                     new { @class = "form-control" } })

                  @Html.ValidationMessageFor(model => model.Age, "", new{ @class = "text-danger" })
               </div>
            </div>

            <div class = "form-group">
               <div class = "col-md-offset-2 col-md-10">
                  <input type = "submit" value = "Create" class = "btn btn-default"/>
               </div>
            </div>

         </div>
      }

      <div>
         @Html.ActionLink("Back to List", "Index")
      </div>

   </body>
</html>
當用戶在“建立檢視”中輸入值時,它在 FormCollection 和 Request.Form 中都可用。我們可以使用這些值中的任何一個來填充來自檢視的員工資訊。
讓我們使用以下程式碼使用 FormCollection 建立員工。
// POST: Employee/Create
[HttpPost]
public ActionResult Create(FormCollection collection){
   try {
      Employee emp = new Employee();
      emp.Name = collection["Name"];
      DateTime jDate;
      DateTime.TryParse(collection["DOB"], out jDate);
      emp.JoiningDate = jDate;
      string age = collection["Age"];
      emp.Age = Int32.Parse(age);
      empList.Add(emp);
      return RedirectToAction("Index");
   }catch {
      return View();
   }
}
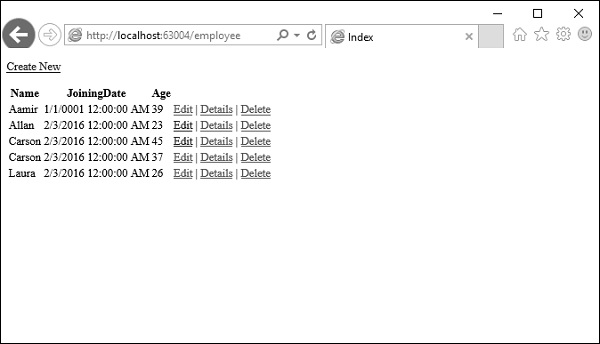
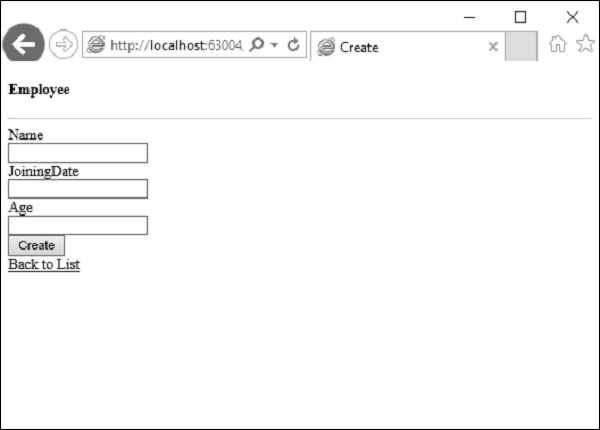
執行此應用程式並請求此 URL https://:63004/Employee/。您將收到以下輸出。

單擊頁面頂部的“建立新”連結,它將轉到以下檢視。

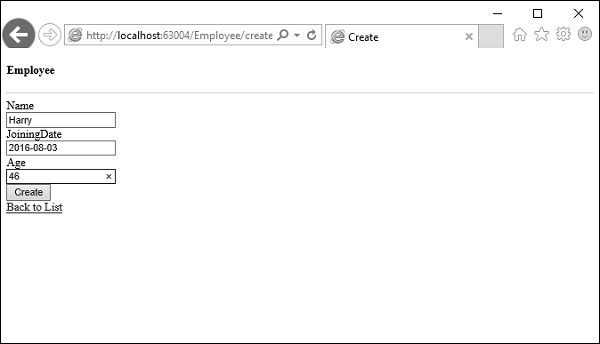
讓我們輸入要新增的另一個員工的資料。
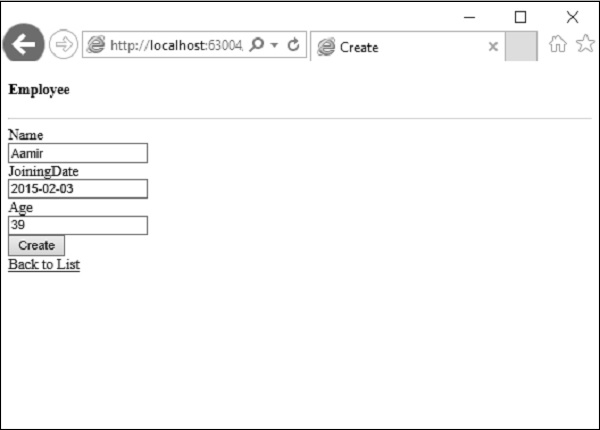
單擊“建立”按鈕,您將看到新員工已新增到您的列表中。
在上面的示例中,我們獲取 HTML 檢視中所有釋出的值,然後將這些值對映到 Employee 屬性並逐個賦值。
在這種情況下,我們還將在釋出的值與模型屬性的格式不同的地方進行型別轉換。
這也被稱為手動繫結,這種型別的實現對於簡單的小型資料模型來說可能還不錯。但是,如果您有龐大的資料模型並且需要大量的型別轉換,那麼我們可以利用 ASP.NET MVC 模型繫結的強大功能和易用性。
讓我們看看我們為模型繫結所做的相同示例。
我們需要將 Create 方法的引數更改為接受 Employee 模型物件,而不是像以下程式碼中所示的 FormCollection。
// POST: Employee/Create
[HttpPost]
public ActionResult Create(Employee emp){
   try{
      empList.Add(emp);
      return RedirectToAction("Index");
   }catch{
      return View();
   }
}
現在,模型繫結的魔力取決於提供值的 HTML 變數的 ID。
對於我們的 Employee 模型,HTML 輸入欄位的 ID 應該與 Employee 模型的屬性名稱相同,您可以看到 Visual Studio 在建立檢視時使用了模型的相同屬性名稱。
@Html.EditorFor(model => model.Name, new { htmlAttributes = new { @class = "form-control" } })
對映將預設基於屬性名稱。在這裡,我們會發現 HTML 輔助方法非常有用,因為這些輔助方法將生成具有模型繫結所需正確名稱的 HTML。
執行此應用程式並請求 URL **https://:63004/Employee/**。您將看到以下輸出。

讓我們單擊頁面頂部的“建立新”連結,它將轉到以下檢視。
讓我們輸入要新增的另一個員工的資料。
現在單擊“建立”按鈕,您將看到新員工已使用 ASP.Net MVC 模型繫結新增到您的列表中。
