- Angular 4 教程
- Angular 4 - 首頁
- Angular 4 – 概述
- Angular 4 – 環境搭建
- Angular 4 – 專案搭建
- Angular 4 – 元件
- Angular 4 – 模組
- Angular 4 – 資料繫結
- Angular 4 – 事件繫結
- Angular 4 – 模板
- Angular 4 – 指令
- Angular 4 – 管道
- Angular 4 – 路由
- Angular 4 – 服務
- Angular 4 – Http 服務
- Angular 4 – 表單
- Angular 4 – 動畫
- Angular 4 – 材料(Material)
- Angular 4 – 命令列介面 (CLI)
- Angular 4 – 示例
- Angular 4 有用資源
- Angular 4 快速指南
- Angular 4 - 有用資源
- Angular 4 - 討論
Angular 4 快速指南
Angular 4 - 概述
Angular 有三個主要版本。第一個釋出的版本是 Angular1,也稱為 AngularJS。Angular1 之後是 Angular2,與 Angular1 相比,它帶來了許多變化。
Angular 的結構基於元件/服務架構。AngularJS 基於模型-檢視-控制器。Angular 4 於 2017 年 3 月釋出,是一個重大突破,是 Angular 團隊繼 Angular2 之後的最新版本。
Angular 4 幾乎與 Angular 2 相同。它與 Angular 2 向後相容。使用 Angular 2 開發的專案可以在 Angular 4 中無任何問題地執行。
現在讓我們看看 Angular 4 中的新功能和更改。
為什麼是 Angular4 而不是 Angular3?
Angular 團隊在內部的模組版本控制方面遇到了一些問題,由於衝突,他們不得不繼續併發布 Angular 的下一個版本——Angular4。
現在讓我們看看 Angular 4 中新增的新功能:
ngIf
Angular2 只支援if條件。但是,Angular 4 也支援if else條件。讓我們看看如何使用 ng-template 來實現。
<span *ngIf="isavailable; else condition1">Condition is valid.</span>
<ng-template #condition1>Condition is invalid</ng-template>
for 迴圈中的 as 關鍵字
藉助as關鍵字,您可以儲存值,如下所示:
<div *ngFor="let i of months | slice:0:5 as total">
   Months: {{i}} Total: {{total.length}}
</div>
變數 total 使用as關鍵字儲存切片的結果。
動畫包
Angular 4 中的動畫作為一個單獨的包提供,需要從 @angular/animations 匯入。在 Angular2 中,它與 @angular/core 一起提供。為了向後相容,它仍然保持不變。
模板
Angular 4 使用<ng-template>作為標籤,而不是<template>;後者在 Angular2 中使用。Angular 4 將<template>更改為<ng-template>的原因是<template>標籤與 html <template>標準標籤的名稱衝突。未來它將被完全棄用。這是 Angular 4 的主要變化之一。
TypeScript 2.2
Angular 4 更新到最新的 TypeScript 版本 2.2。這有助於提高速度並在專案中提供更好的型別檢查。
管道標題大小寫
Angular 4 添加了一個新的管道 title case,它將每個單詞的首字母更改為大寫。
<div>
   <h2>{{ 'Angular 4 titlecase' | titlecase }}</h2>
</div>
以上程式碼行生成以下輸出:Angular 4 Titlecase。
Http 搜尋引數
簡化了 http get api 的搜尋引數。我們不需要像在 Angular2 中那樣呼叫URLSearchParams。
更小更快的應用
與 Angular2 相比,Angular 4 應用程式更小更快。它使用 TypeScript 2.2 版本(最新版本),使最終編譯後的檔案大小更小。
Angular 4 - 環境搭建
本章將討論 Angular 4 所需的環境搭建。要安裝 Angular 4,我們需要以下內容:
- Node.js
- npm
- Angular CLI
- 用於編寫程式碼的 IDE
Node.js 版本必須高於 4,npm 版本必須高於 3。
Node.js
要檢查系統中是否安裝了 Node.js,請在終端中輸入node –v。這將幫助您檢視當前系統上安裝的 Node.js 版本。
C:\>node –v
v6.11.0
如果沒有任何輸出,請在您的系統上安裝 Node.js。要安裝 Node.js,請訪問 Node.js 的主頁https://nodejs.com.tw/en/download/並根據您的作業系統安裝軟體包。
Node.js 的主頁如下所示:
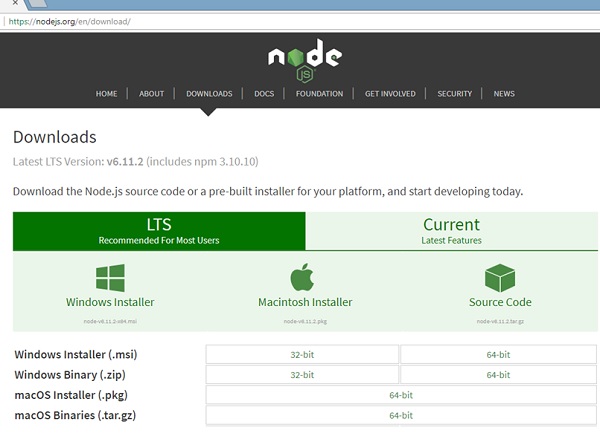
根據您的作業系統安裝所需的軟體包。安裝 Node.js 後,npm 也會隨之安裝。要檢查 npm 是否已安裝,請在終端中輸入 npm –v。它應該顯示 npm 的版本。
C:\>npm –v
5.3.0
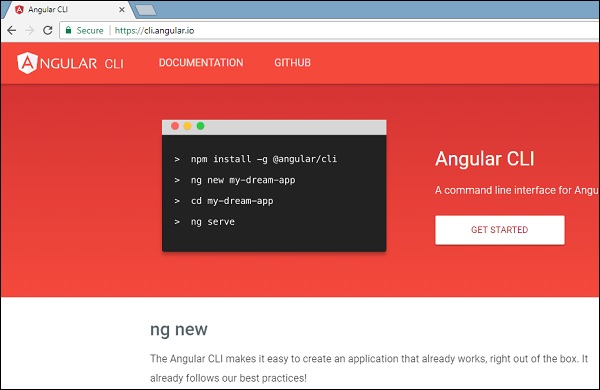
藉助 Angular CLI,Angular 4 的安裝非常簡單。訪問 Angular 的主頁https://cli.angular.io/以獲取命令的參考。
輸入npm install –g @angular/cli,以在您的系統上安裝 Angular CLI。
安裝 Angular CLI 後,您將在終端中看到上述安裝資訊。您可以使用任何您選擇的 IDE,例如 WebStorm、Atom、Visual Studio Code 等。
專案設定的詳細資訊將在下一章中解釋。
Angular 4 - 專案搭建
AngularJS 基於模型-檢視-控制器,而 Angular 2 基於元件結構。Angular 4 使用與 Angular2 相同的結構,但速度更快。
Angular4 使用 TypeScript 2.2 版本,而 Angular 2 使用 TypeScript 1.8 版本。這帶來了很大的效能差異。
為了安裝 Angular 4,Angular 團隊推出了 Angular CLI,簡化了安裝過程。您需要執行幾個命令來安裝 Angular 4。
訪問此網站https://cli.angular.io以安裝 Angular CLI。
要開始安裝,我們首先需要確保已安裝最新版本的 Node.js 和 npm。npm 包會與 Node.js 一起安裝。
訪問 Node.js 網站https://nodejs.com.tw/en/。

建議使用者使用 Node.js v6.11.0 最新版本。已經安裝了高於 4 的 Node.js 版本的使用者可以跳過上述過程。安裝 Node.js 後,您可以在命令列中使用命令 node –v 檢查 Node 的版本,如下所示:

命令提示符顯示 v6.11.0。安裝 Node.js 後,npm 也會隨之安裝。
要檢查 npm 的版本,請在終端中輸入命令npm –v。它將顯示 npm 的版本,如下所示。
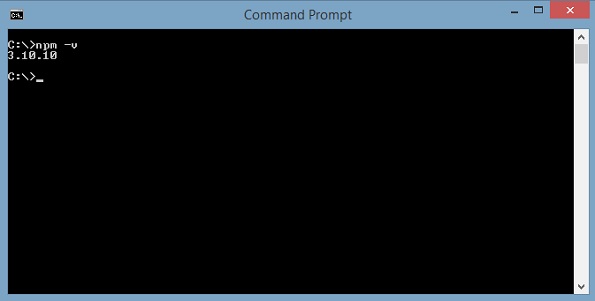
npm 的版本是 3.10.10。現在我們已經安裝了 Node.js 和 npm,讓我們執行 Angular CLI 命令來安裝 Angular 4。您將在網頁上看到以下命令:
npm install -g @angular/cli //command to install angular 4

ng new Angular 4-app // name of the project

cd my-dream-app

ng serve
讓我們從命令列中的第一個命令開始,看看它是如何工作的。
首先,我們將建立一個空目錄,在其中我們將執行 Angular CLI 命令。

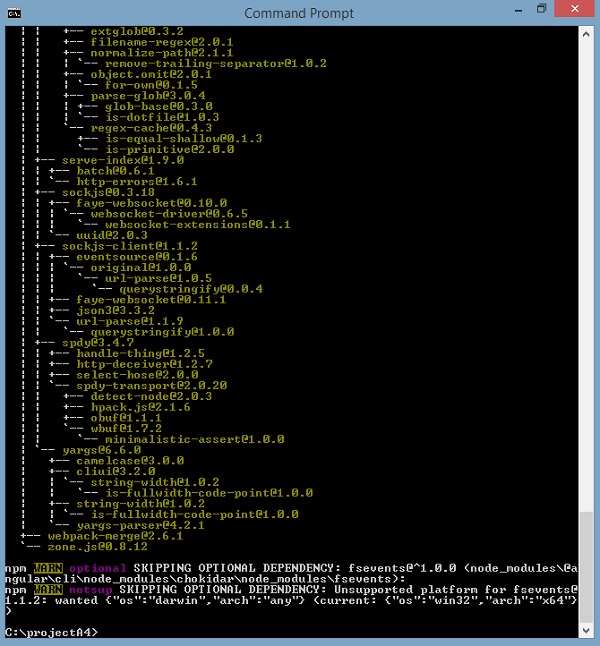
輸入以上命令以安裝 Angular 4。安裝過程將開始,並需要幾分鐘才能完成。

完成上述安裝命令後,將出現以下命令提示符:

我們建立了一個空資料夾ProjectA4並安裝了 Angular CLI 命令。我們還使用了-g全域性安裝 Angular CLI。現在,您可以在任何目錄或資料夾中建立您的 Angular 4 專案,而無需按專案安裝 Angular CLI,因為它已全域性安裝在您的系統上,您可以從任何目錄使用它。
現在讓我們檢查 Angular CLI 是否已安裝。要檢查安裝情況,請在終端中執行以下命令:
ng -v
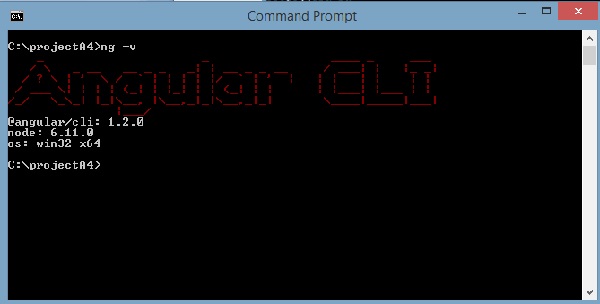
我們獲得了 @angular/cli 版本,目前是 1.2.0。正在執行的 Node 版本是 6.11.0,還包括作業系統詳細資訊。以上詳細資訊告訴我們,我們已成功安裝 Angular CLI,現在我們可以開始我們的專案了。
我們現在已經安裝了 Angular 4。現在讓我們在 Angular 4 中建立我們的第一個專案。要在 Angular 4 中建立專案,我們將使用以下命令:
ng new projectname
我們將專案命名為ng new Angular 4-app。
現在讓我們在命令列中執行以上命令。

專案Angular 4-app已成功建立。它安裝了專案在 Angular 4 中執行所需的所有必要軟體包。現在讓我們切換到已建立的專案,該專案位於目錄Angular 4-app中。更改命令列中的目錄 - cd Angular 4-app。
我們將使用 Visual Studio Code IDE 來處理 Angular 4;您可以使用任何 IDE,例如 Atom、WebStorm 等。
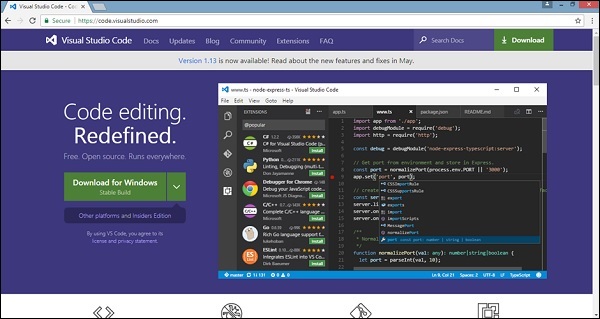
要下載 Visual Studio Code,請訪問https://vscode.com.tw/並點選下載 Windows 版。
點選下載 Windows 版安裝 IDE 並執行安裝程式以開始使用 IDE。
編輯器如下所示:
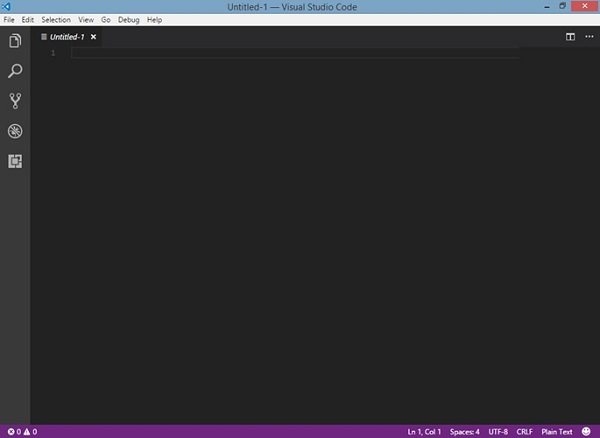
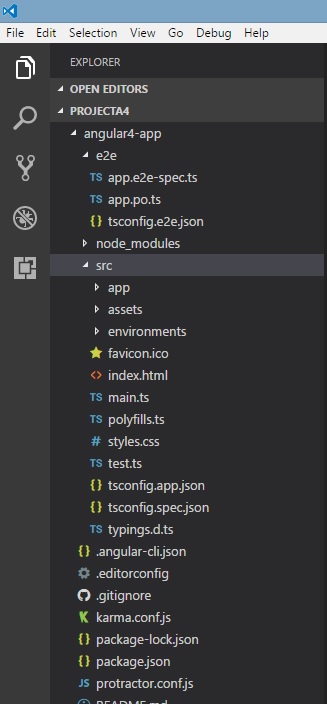
我們還沒有在其中啟動任何專案。現在讓我們使用 angular-cli 建立的專案。
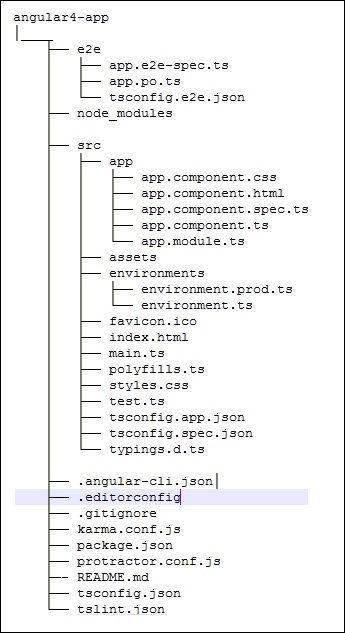
我們將考慮Angular 4-app專案。讓我們開啟 Angular 4-app 並檢視資料夾結構。
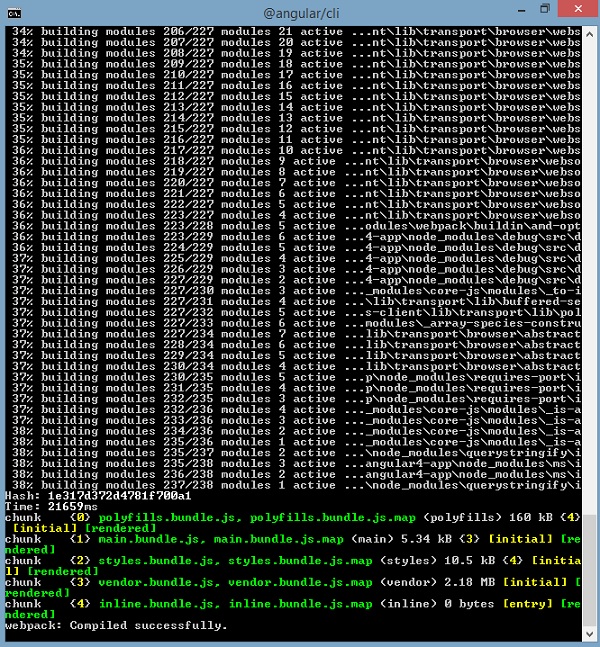
現在我們有了專案的資料夾結構,讓我們使用以下命令編譯我們的專案:
ng serve
ng serve命令構建應用程式並啟動 Web 伺服器。

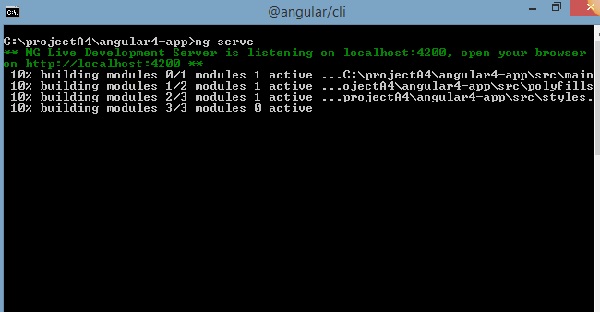
Web 伺服器在埠 4200 上啟動。在瀏覽器中輸入 url https://:4200/並檢視輸出。專案編譯完成後,您將收到以下輸出:
在瀏覽器中執行https://:4200/後,您將被定向到以下螢幕:
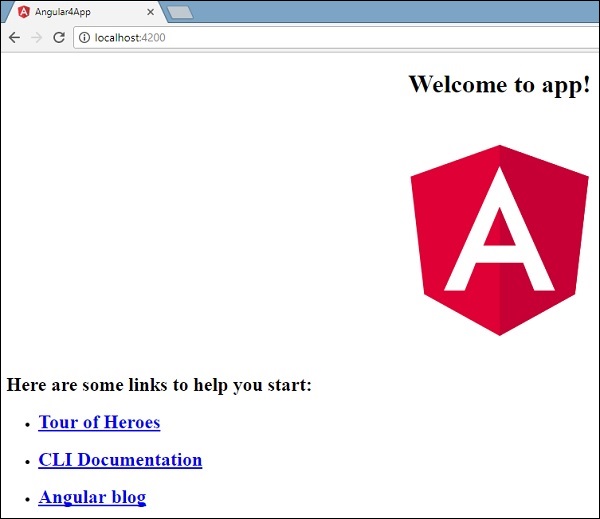
現在讓我們進行一些更改以顯示以下內容:
“歡迎來到 Angular 4 專案”

我們已經更改了檔案——app.component.html和app.component.ts。我們將在後續章節中詳細討論。
讓我們完成專案設定。如果您看到我們使用了埠 4200,這是 angular-cli 在編譯時使用的預設埠。如果願意,您可以使用以下命令更改埠:
ng serve --host 0.0.0.0 –port 4205
Angular 4 應用程式資料夾具有以下資料夾結構:
e2e - 端到端測試資料夾。e2e 主要用於整合測試,並有助於確保應用程式正常工作。
node_modules - 已安裝的 npm 包是 node_modules。您可以開啟資料夾並檢視可用的包。
src - 我們將在其中使用 Angular 4 處理專案。
Angular 4 應用程式資料夾具有以下檔案結構:
.angular-cli.json - 它基本上包含專案名稱、cli 版本等。
.editorconfig - 這是編輯器的配置檔案。
.gitignore - 為了與克隆儲存庫的任何其他使用者共享忽略規則,應該將 .gitignore 檔案提交到儲存庫中。
karma.conf.js - 這用於透過 protractor 進行單元測試。karma.conf.js 檔案提供了專案所需的所有資訊。
package.json - package.json 檔案指示在執行 npm install 時將哪些庫安裝到 node_modules 中。
目前,如果您在編輯器中開啟該檔案,您將看到其中添加了以下模組。
"@angular/animations": "^4.0.0",
"@angular/common": "^4.0.0",
"@angular/compiler": "^4.0.0",
"@angular/core": "^4.0.0",
"@angular/forms": "^4.0.0",
"@angular/http": "^4.0.0",
"@angular/platform-browser": "^4.0.0",
"@angular/platform-browser-dynamic": "^4.0.0",
"@angular/router": "^4.0.0",
如果您需要新增更多庫,您可以在此處新增這些庫並執行 npm install 命令。
protractor.conf.js - 這是應用程式所需的測試配置。
tsconfig.json - 這基本上包含編譯期間所需的編譯器選項。
tslint.json - 這是包含編譯時應考慮的規則的配置檔案。
src 資料夾是主資料夾,內部具有不同的檔案結構。
app
它包含下面描述的檔案。這些檔案預設情況下由 angular-cli 安裝。
app.module.ts − 如果開啟此檔案,您會看到程式碼引用了不同的庫,這些庫已匯入。Angular-cli 使用這些預設庫進行匯入 – angular/core、platform-browser。名稱本身解釋了庫的用途。
它們被匯入並儲存到諸如declarations、imports、providers和bootstrap之類的變數中。
import { BrowserModule } from '@angular/platform-browser';
import { NgModule } from '@angular/core';
import { AppComponent } from './app.component';

@NgModule({
   declarations: [
      AppComponent
   ],
   imports: [
      BrowserModule
   ],
   providers: [],
   bootstrap: [AppComponent]
})

export class AppModule { }
declarations − 在 declarations 中,儲存對元件的引用。AppComponent 是預設元件,每當啟動新專案時都會建立它。我們將在另一節中學習建立新元件。
imports − 這將包含如上所示匯入的模組。目前,BrowserModule 是 imports 的一部分,它從 @angular/platform-browser 匯入。
providers − 這將包含對已建立服務的引用。服務將在後續章節中討論。
bootstrap − 這包含對建立的預設元件的引用,即 AppComponent。
app.component.css − 您可以在此處編寫 css 結構。目前,我們已將背景顏色新增到 div,如下所示。
.divdetails{
   background-color: #ccc;
}
app.component.html − html 程式碼將在此檔案中可用。
<!--The content below is only a placeholder and can be replaced.-->
<div class = "divdetails">
   <div style = "text-align:center">
      <h1>
         Welcome to {{title}}!
      </h1>
      <img width = "300" src = "data:image/svg+xml;base64,PD94bWwgdmVyc2lvbj0iMS4wIiBlbmNv
      ZGluZz0idXRmLTgiPz4NCjwhLS0gR2VuZXJhdG9yOiBBZG9iZSBJbGx1c3RyYXRvciAxOS4xLjAsIFNWRyBFe
      HBvcnQgUGx1Zy1JbiAuIFNWRyBWZXJzaW9uOiA2LjAwIEJ1aWxkIDApICAtLT4NCjxzdmcgdmVyc2lvbj0iMS4
      xIiBpZD0iTGF5ZXJfMSIgeG1sbnM9Imh0dHA6Ly93d3cudzMub3JnLzIwMDAvc3ZnIiB4bWxuczp4bGluaz0iaH
      R0cDovL3d3dy53My5vcmcvMTk5OS94bGluayIgeD0iMHB4IiB5PSIwcHgiDQoJIHZpZXdCb3g9IjAgMCAyNTAg
      MjUwIiBzdHlsZT0iZW5hYmxlLWJhY2tncm91bmQ6bmV3IDAgMCAyNTAgMjUwOyIgeG1sOnNwYWNlPSJwcmVzZXJ2
      ZSI+DQo8c3R5bGUgdHlwZT0idGV4dC9jc3MiPg0KCS5zdDB7ZmlsbDojREQwMDMxO30NCgkuc3Qxe2ZpbGw6I0M
      zMDAyRjt9DQoJLnN0MntmaWxsOiNGRkZGRkY7fQ0KPC9zdHlsZT4NCjxnPg0KCTxwb2x5Z29uIGNsYXNzPSJzdD
      AiIHBvaW50cz0iMTI1LDMwIDEyNSwzMCAxMjUsMzAgMzEuOSw2My4yIDQ2LjEsMTg2LjMgMTI1LDIzMCAxMjUsMj
      MwIDEyNSwyMzAgMjAzLjksMTg2LjMgMjE4LjEsNjMuMiAJIi8+DQoJPHBvbHlnb24gY2xhc3M9InN0MSIgcG9pbn
      RzPSIxMjUsMzAgMTI1LDUyLjIgMTI1LDUyLjEgMTI1LDE1My40IDEyNSwxNTMuNCAxMjUsMjMwIDEyNSwyMzAgMj
      AzLjksMTg2LjMgMjE4LjEsNjMuMiAxMjUsMzAgCSIvPg0KCTxwYXRoIGNsYXNzPSJzdDIiIGQ9Ik0xMjUsNTIuMU
      w2Ni44LDE4Mi42aDBoMjEuN2gwbDExLjctMjkuMmg0OS40bDExLjcsMjkuMmgwaDIxLjdoMEwxMjUsNTIuMUwxMj
      UsNTIuMUwxMjUsNTIuMUwxMjUsNTIuMQ0KCQlMMTI1LDUyLjF6IE0xNDIsMTM1LjRIMTA4bDE3LTQwLjlMMTQyLD
      EzNS40eiIvPg0KPC9nPg0KPC9zdmc+DQo=">
   </div>
   <h2>Here are some links to help you start: </h2>
   <ul>
      <li>
         <h2>
            <a target = "_blank" href="https://angular.io/tutorial">Tour of Heroes</a>
         </h2>
      </li>
      <li>
         <h2>
            <a target = "_blank" href = "https://github.com/angular/angular-cli/wiki">
               CLI Documentation
            </a>
         </h2>
      </li>
      <li>
         <h2>
            <a target="_blank" href="http://angularjs.blogspot.ca/">Angular blog</a>
         </h2>
      </li>
   </ul>
</div>
這是專案建立時當前可用的預設 html 程式碼。
app.component.spec.ts − 這些是自動生成的檔案,包含源元件的單元測試。
app.component.ts − 元件的類在此處定義。您可以在 .ts 檔案中處理 html 結構。處理將包括連線資料庫、與其他元件互動、路由、服務等活動。
檔案結構如下所示:
import { Component } from '@angular/core';

@Component({
   selector: 'app-root',
   templateUrl: './app.component.html',
   styleUrls: ['./app.component.css']
})
export class AppComponent {
   title = 'app';
}
Assets
您可以在此資料夾中儲存影像和 js 檔案。
Environment
此資料夾包含生產或開發環境的詳細資訊。該資料夾包含兩個檔案。
- environment.prod.ts
- environment.ts
這兩個檔案都包含最終檔案是否應在生產環境或開發環境中編譯的詳細資訊。
Angular 4 app 資料夾的其他檔案結構包括:
favicon.ico
這是一個通常位於網站根目錄中的檔案。
index.html
這是在瀏覽器中顯示的檔案。
<!doctype html>
<html lang = "en">
   <head>
      <meta charset = "utf-8">
      <title>HTTP Search Param</title>
      <base href = "/">
      <link href = "https://fonts.googleapis.com/icon?family=Material+Icons" rel="stylesheet">
      <link href = "https://fonts.googleapis.com/css?family=Roboto|Roboto+Mono" rel="stylesheet">
      <link href = "styles.c7c7b8bf22964ff954d3.bundle.css" rel="stylesheet">
      <meta name = "viewport" content="width=device-width, initial-scale=1">
      <link rel = "icon" type="image/x-icon" href="favicon.ico">
   </head>

   <body>
      <app-root></app-root>
   </body>
</html>
主體包含<app-root></app-root>。這是在app.component.ts檔案中使用的選擇器,並將顯示來自 app.component.html 檔案的詳細資訊。
main.ts
main.ts 是我們從那裡開始專案開發的檔案。它從匯入我們需要的基本模組開始。現在,如果您看到 angular/core、angular/platform-browser-dynamic、app.module 和 environment,它們在 angular-cli 安裝和專案設定期間預設匯入。
import { enableProdMode } from '@angular/core';
import { platformBrowserDynamic } from '@angular/platform-browser-dynamic';

import { AppModule } from './app/app.module';
import { environment } from './environments/environment';

if (environment.production) {
   enableProdMode();
}
platformBrowserDynamic().bootstrapModule(AppModule);
platformBrowserDynamic().bootstrapModule(AppModule) 包含父模組引用AppModule。因此,當它在瀏覽器中執行時,呼叫的檔案是 index.html。index.html 內部引用 main.ts,當以下程式碼執行時,它呼叫父模組,即 AppModule:
platformBrowserDynamic().bootstrapModule(AppModule);
呼叫 AppModule 時,它會呼叫 app.module.ts,後者根據 bootstrap 進一步呼叫 AppComponent:
bootstrap: [AppComponent]
在 app.component.ts 中,有一個selector: app-root,它用於 index.html 檔案中。這將顯示 app.component.html 中的內容。
瀏覽器中將顯示以下內容:
polyfill.ts
這主要用於向後相容性。
styles.css
這是專案所需的樣式檔案。
test.ts
在這裡,將處理用於測試專案的單元測試用例。
tsconfig.app.json
這在編譯期間使用,它包含執行應用程式所需使用的配置詳細資訊。
tsconfig.spec.json
這有助於維護測試詳細資訊。
typings.d.ts
它用於管理 TypeScript 定義。
最終檔案結構如下所示:
Angular 4 - 元件
使用 Angular 4 進行的大部分開發都在元件中完成。元件基本上是與元件的 .html 檔案互動的類,該檔案顯示在瀏覽器上。我們在之前的章節中已經看到了檔案結構。檔案結構包含 app 元件,它包含以下檔案:
app.component.css
app.component.html
app.component.spec.ts
app.component.ts
app.module.ts
使用 angular-cli 命令建立新專案時,以上檔案預設建立。
如果開啟app.module.ts檔案,它會匯入一些庫,還會宣告一個如下所示的 appcomponent:
import { BrowserModule } from '@angular/platform-browser';
import { NgModule } from '@angular/core';
import { AppComponent } from './app.component';

@NgModule({
   declarations: [
      AppComponent
   ],
   imports: [
      BrowserModule
   ],
   providers: [],
   bootstrap: [AppComponent]
})

export class AppModule { }
declarations 包含 AppComponent 變數,我們已經匯入了它。這成為父元件。
現在,angular-cli 有一個命令來建立您自己的元件。但是,預設建立的 app 元件將始終保持為父元件,之後建立的下一個元件將構成子元件。
現在讓我們執行命令來建立元件。
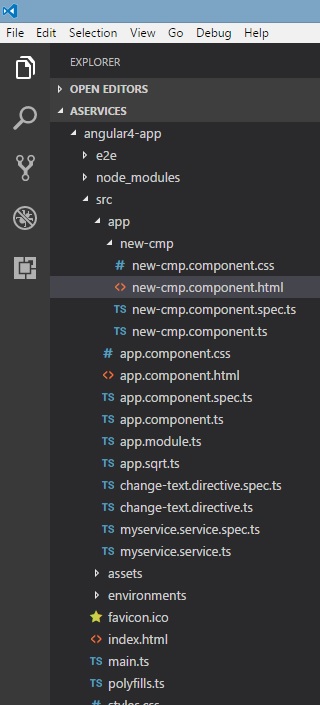
ng g component new-cmp
當您在命令列中執行上述命令時,您將收到以下輸出:
C:\projectA4\Angular 4-app>ng g component new-cmp
installing component
   create src\app\new-cmp\new-cmp.component.css
   create src\app\new-cmp\new-cmp.component.html
   create src\app\new-cmp\new-cmp.component.spec.ts
   create src\app\new-cmp\new-cmp.component.ts
   update src\app\app.module.ts
現在,如果我們去檢查檔案結構,我們將在 src/app 資料夾下看到建立的新資料夾 new-cmp。
在新資料夾 new-cmp 中建立了以下檔案:
new-cmp.component.css − 建立了新元件的 css 檔案。
new-cmp.component.html − 建立了 html 檔案。
new-cmp.component.spec.ts − 這可用於單元測試。
new-cmp.component.ts − 在這裡,我們可以定義模組、屬性等。
對 app.module.ts 檔案進行了如下更改:
import { BrowserModule } from '@angular/platform-browser';
import { NgModule } from '@angular/core';
import { AppComponent } from './app.component';
import { NewCmpComponent } from './new-cmp/new-cmp.component';
// includes the new-cmp component we created

@NgModule({
   declarations: [
      AppComponent,
      NewCmpComponent // here it is added in declarations and will behave as a child component
   ],
   imports: [
      BrowserModule
   ],
   providers: [],
   bootstrap: [AppComponent] //for bootstrap the AppComponent the main app component is given.
})

export class AppModule { }
new-cmp.component.ts 檔案生成如下:
import { Component, OnInit } from '@angular/core'; // here angular/core is imported .

@Component({
   // this is a declarator which starts with @ sign. The component word marked in bold needs to be the same.
   selector: 'app-new-cmp', //
   templateUrl: './new-cmp.component.html',
   // reference to the html file created in the new component.
   styleUrls: ['./new-cmp.component.css'] // reference to the style file.
})

export class NewCmpComponent implements OnInit {
   constructor() { }
   ngOnInit() {}
}
如果您看到上面的 new-cmp.component.ts 檔案,它會建立一個名為 NewCmpComponent 的新類,它實現 OnInit。其中包含一個建構函式和一個名為 ngOnInit() 的方法。當類執行時,預設情況下會呼叫 ngOnInit。
讓我們檢查流程是如何工作的。現在,預設建立的 app 元件成為父元件。之後新增的任何元件都成為子元件。
當我們在https://:4200/瀏覽器中訪問 url 時,它首先執行 index.html 檔案,如下所示:
<!doctype html>
<html lang = "en">
   <head>
      <meta charset = "utf-8">
      <title>Angular 4App</title>
      <base href = "/">
      <meta name="viewport" content="width = device-width, initial-scale = 1">
      <link rel = "icon" type = "image/x-icon" href = "favicon.ico">
   </head>

   <body>
      <app-root></app-root>
   </body>
</html>
以上是普通的 html 檔案,我們沒有看到任何列印在瀏覽器上的內容。看一下 body 部分中的標籤。
<app-root></app-root>
這是 Angular 預設建立的根標籤。此標籤在main.ts檔案中引用。
import { enableProdMode } from '@angular/core';
import { platformBrowserDynamic } from '@angular/platform-browser-dynamic';
import { AppModule } from './app/app.module';
import { environment } from './environments/environment';

if (environment.production) {
   enableProdMode();
}

platformBrowserDynamic().bootstrapModule(AppModule);
AppModule 從主父模組的 app 中匯入,並將相同的模組傳遞給 bootstrapModule,這使得 appmodule 載入。
現在讓我們看看app.module.ts檔案:
import { BrowserModule } from '@angular/platform-browser';
import { NgModule } from '@angular/core';
import { AppComponent } from './app.component';
import { NewCmpComponent } from './new-cmp/new-cmp.component';

@NgModule({
   declarations: [
      AppComponent,
      NewCmpComponent
   ],
   imports: [
      BrowserModule
   ],
   providers: [],
   bootstrap: [AppComponent]
})

export class AppModule { }
這裡,AppComponent 是給定的名稱,即用於儲存app.Component.ts引用的變數,並將相同的變數傳遞給 bootstrap。現在讓我們看看app.component.ts檔案。
import { Component } from '@angular/core';

@Component({
   selector: 'app-root',
   templateUrl: './app.component.html',
   styleUrls: ['./app.component.css']
})

export class AppComponent {
   title = 'Angular 4 Project!';
}
匯入 Angular core 並將其稱為 Component,並在 Declarator 中使用它:
@Component({
   selector: 'app-root',
   templateUrl: './app.component.html',
   styleUrls: ['./app.component.css']
})
在宣告器中,給出了選擇器、templateUrl和styleUrl的引用。這裡的選擇器只不過是我們上面看到的 index.html 檔案中放置的標籤。
類 AppComponent 有一個名為 title 的變數,它顯示在瀏覽器中。
@Component 使用名為 app.component.html 的 templateUrl,其內容如下:
<!--The content below is only a placeholder and can be replaced.-->
<div style="text-align:center">
   <h1>
      Welcome to {{title}}.
   </h1>
</div>
它只有 html 程式碼和花括號中的變數 title。它將替換為app.component.ts檔案中存在的 value。這稱為繫結。我們將在後續章節中討論繫結的概念。
既然我們已經建立了一個名為new-cmp的新元件。當執行建立新元件的命令時,它會被包含在app.module.ts檔案中。
app.module.ts包含對建立的新元件的引用。
現在讓我們檢查在新資料夾 new-cmp 中建立的檔案。
new-cmp.component.ts
import { Component, OnInit } from '@angular/core';
@Component({
   selector: 'app-new-cmp',
   templateUrl: './new-cmp.component.html',
   styleUrls: ['./new-cmp.component.css']
})

export class NewCmpComponent implements OnInit {
   constructor() { }
   ngOnInit() {}
}
在這裡,我們也必須匯入 core。元件的引用在宣告器中使用。
宣告器包含名為app-new-cmp的選擇器以及templateUrl和styleUrl。
名為new-cmp.component.html的 .html 如下所示:
<p>
   new-cmp works!
</p>
如上所示,我們有 html 程式碼,即 p 標籤。樣式檔案為空,因為我們目前不需要任何樣式。但是,當我們執行專案時,我們沒有看到任何與新元件在瀏覽器中顯示相關的內容。現在讓我們新增一些內容,稍後可以在瀏覽器中看到這些內容。
需要在app.component.html檔案中新增選擇器,即app-new-cmp,如下所示:
<!--The content below is only a placeholder and can be replaced.-->
<div style="text-align:center">
   <h1>
      Welcome to {{title}}.
   </h1>
</div>

<app-new-cmp></app-new-cmp>
當新增<app-new-cmp></app-new-cmp>標籤時,新元件的 .html 檔案中存在的所有內容都將與父元件資料一起顯示在瀏覽器上。
讓我們看看new component .html檔案和new-cmp.component.ts檔案。
new-cmp.component.ts
import { Component, OnInit } from '@angular/core';

@Component({
   selector: 'app-new-cmp',
   templateUrl: './new-cmp.component.html',
   styleUrls: ['./new-cmp.component.css']
})

export class NewCmpComponent implements OnInit {
   newcomponent = "Entered in new component created";
   constructor() {}
   ngOnInit() { }
}
在類中,我們添加了一個名為 new component 的變數,其值為“Entered in new component created”。
上面的變數在.new-cmp.component.html檔案中繫結如下:
<p>
   {{newcomponent}}
</p>

<p>
   new-cmp works!
</p>
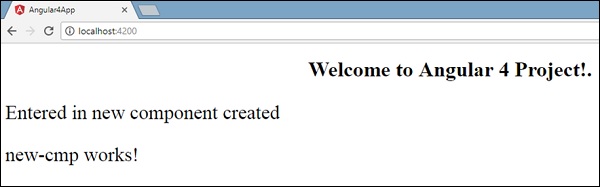
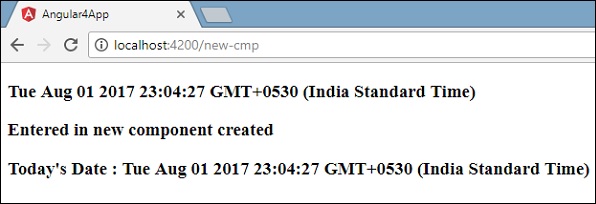
現在,由於我們在app.component.html(父元件的 .html)中包含了<app-new-cmp></app-new-cmp>選擇器,因此新元件 .html 檔案 (new-cmp.component.html) 中存在的內容將顯示在瀏覽器上,如下所示:
同樣,我們可以根據我們的需求建立元件並使用 app.component.html 檔案中的選擇器連結它們。
Angular 4 - 模組
Angular 中的模組是指您可以對與應用程式相關的元件、指令、管道和服務進行分組的地方。
如果您正在開發一個網站,則頁首、頁尾、左側、中心和右側部分都成為模組的一部分。
要定義模組,我們可以使用NgModule。當您使用 Angular –cli 命令建立新專案時,ngmodule 預設在 app.module.ts 檔案中建立,如下所示:
import { BrowserModule } from '@angular/platform-browser';
import { NgModule } from '@angular/core';
import { AppComponent } from './app.component';

@NgModule({
   declarations: [
      AppComponent
   ],
   imports: [
      BrowserModule
   ],
   providers: [],
   bootstrap: [AppComponent]
})

export class AppModule { }
需要匯入 NgModule,如下所示:
import { NgModule } from '@angular/core';
ngmodule 的結構如下所示:
@NgModule({
   declarations: [
      AppComponent
   ],
   imports: [
      BrowserModule
   ],
   providers: [],
   bootstrap: [AppComponent]
})
它以@NgModule開頭,包含一個物件,其中包含 declarations、imports、providers 和 bootstrap。
Declaration
這是一個已建立的元件陣列。如果建立任何新元件,將首先匯入它,並將引用包含在宣告中,如下所示:
declarations: [
   AppComponent,
   NewCmpComponent
]
匯入
這是一個應用程式需要使用的模組陣列。宣告陣列中的元件也可以使用它。例如,現在在@NgModule中,我們看到匯入了BrowserModule。如果您的應用程式需要表單,您可以按如下方式包含模組:
import { FormsModule } from '@angular/forms';
@NgModule中的匯入將如下所示:
imports: [
   BrowserModule,
   FormsModule
]
提供程式
這將包含已建立的服務。
引導
這包括用於啟動執行的主應用程式元件。
Angular 4 - 資料繫結
資料繫結從AngularJS、Angular 2開始就可用,現在在Angular 4中也可用。我們使用花括號進行資料繫結 - {{}}; 此過程稱為插值。我們已經在之前的示例中看到了如何將值宣告為變數title,並在瀏覽器中打印出來。
app.component.html檔案中引用的變數為{{title}},title的值在app.component.ts檔案中初始化,在app.component.html中顯示值。
現在讓我們在瀏覽器中建立一個月份下拉列表。為此,我們已在app.component.ts中建立了一個月份陣列,如下所示:
import { Component } from '@angular/core';

@Component({
   selector: 'app-root',
   templateUrl: './app.component.html',
   styleUrls: ['./app.component.css']
})
export class AppComponent {
   title = 'Angular 4 Project!';
   // declared array of months.
   months = ["January", "Feburary", "March", "April", "May",
            "June", "July", "August", "September",
            "October", "November", "December"];
}
上面顯示的月份陣列將在瀏覽器中的下拉列表中顯示。為此,我們將使用以下程式碼行:
<!--The content below is only a placeholder and can be replaced. -->
<div style="text-align:center">
   <h1>
      Welcome to {{title}}.
   </h1>
</div>

<div> Months :
   <select>
      <option *ngFor="let i of months">{{i}}</option>
   </select>
</div>
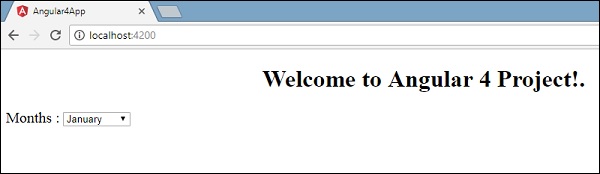
我們建立了帶有選項的普通select標籤。在option中,我們使用了for迴圈。for迴圈用於迭代月份陣列,這將依次建立具有月份中存在的值的option標籤。
Angular中的語法for是*ngFor = “let I of months”,要獲取月份的值,我們將其顯示在{{i}}中。
兩個花括號有助於資料繫結。您在app.component.ts檔案中宣告變數,並且將使用花括號替換相同的變數。
讓我們看看上面月份陣列在瀏覽器中的輸出
在app.component.ts中設定的變數可以使用花括號與app.component.html繫結;例如,{{}}。
現在讓我們根據條件在瀏覽器中顯示資料。在這裡,我們添加了一個變數並將值設定為true。使用if語句,我們可以隱藏/顯示要顯示的內容。
示例
import { Component } from '@angular/core';

@Component({
   selector: 'app-root',
   templateUrl: './app.component.html',
   styleUrls: ['./app.component.css']
})

export class AppComponent {
   title = 'Angular 4 Project!';
   //array of months.
   months = ["January", "February", "March", "April",
            "May", "June", "July", "August", "September",
            "October", "November", "December"];
   isavailable = true;   //variable is set to true
}
<!--The content below is only a placeholder and can be replaced.-->
<div style = "text-align:center">
<h1>
Welcome to {{title}}.
</h1>
</div>
<div> Months :
<select>
<option *ngFor = "let i of months">{{i}}</option>
</select>
</div>
<br/>
<div>
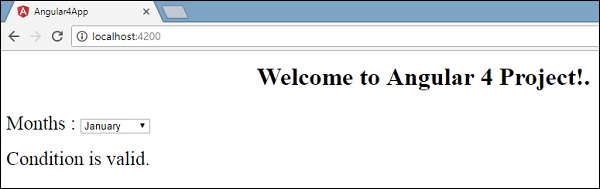
<span *ngIf = "isavailable">Condition is valid.</span>
//over here based on if condition the text condition is valid is displayed.
If the value of isavailable is set to false it will not display the text.
</div>
輸出
讓我們使用IF THEN ELSE條件嘗試上述示例。
示例
import { Component } from '@angular/core';

@Component({
   selector: 'app-root',
   templateUrl: './app.component.html',
   styleUrls: ['./app.component.css']
})

export class AppComponent {
   title = 'Angular 4 Project!';
   //array of months.
   months = ["January", "February", "March", "April",
            "May", "June", "July", "August", "September",
            "October", "November", "December"];
   isavailable = false;
}
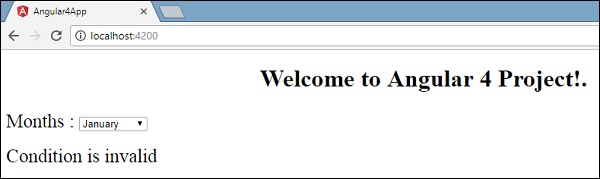
在這種情況下,我們將isavailable變數設定為false。要列印else條件,我們將不得不建立ng-template,如下所示:
<ng-template #condition1>Condition is invalid</ng-template>
完整的程式碼如下所示:
<!--The content below is only a placeholder and can be replaced.-->
<div style="text-align:center">
<h1>
Welcome to {{title}}.
</h1>
</div>
<div> Months :
<select>
<option *ngFor="let i of months">{{i}}</option>
</select>
</div>
<br/>
<div>
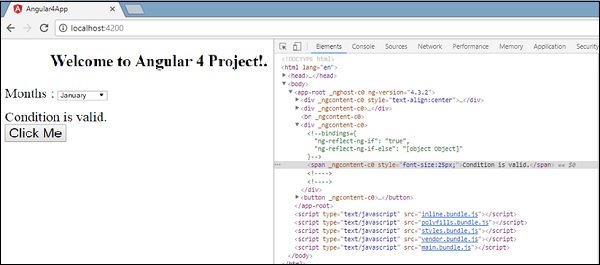
<span *ngIf="isavailable; else condition1">Condition is valid.</span>
<ng-template #condition1>Condition is invalid</ng-template>
</div>
If與else條件一起使用,使用的變數為condition1。相同的值被賦值為ng-template的id,當available變數設定為false時,將顯示文字Condition is invalid。
以下螢幕截圖顯示了瀏覽器中的顯示。
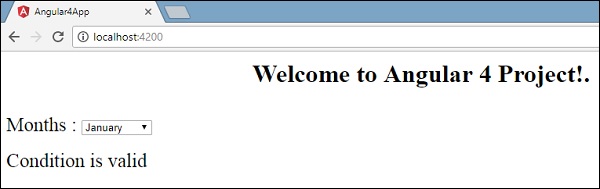
現在讓我們使用if then else條件。
import { Component } from '@angular/core';

@Component({
   selector: 'app-root',
   templateUrl: './app.component.html',
   styleUrls: ['./app.component.css']
})

export class AppComponent {
   title = 'Angular 4 Project!';
   //array of months.
   months = ["January", "February", "March", "April",
            "May", "June", "July", "August", "September",
            "October", "November", "December"];
   isavailable = true;
}
現在,我們將變數isavailable設定為true。在html中,條件如下所示:
<!--The content below is only a placeholder and can be replaced.-->
<div style="text-align:center">
   <h1>
   Welcome to {{title}}.
   </h1>
</div>

<div> Months :
   <select>
      <option *ngFor="let i of months">{{i}}</option>
   </select>
</div>
<br/>

<div>
   <span *ngIf="isavailable; then condition1 else condition2">Condition is valid.</span>
   <ng-template #condition1>Condition is valid</ng-template>
   <ng-template #condition2>Condition is invalid</ng-template>
</div>
如果變數為true,則為condition1,否則為condition2。現在,建立了兩個帶有id #condition1和#condition2的模板。
瀏覽器中的顯示如下:
Angular 4 - 事件繫結
在本章中,我們將討論Angular 4中事件繫結是如何工作的。當用戶以鍵盤移動、滑鼠點選或滑鼠懸停的形式與應用程式互動時,它會生成一個事件。需要處理這些事件才能執行某種操作。這就是事件繫結發揮作用的地方。
讓我們考慮一個示例來更好地理解這一點。
app.component.html
<!--The content below is only a placeholder and can be replaced.-->
<div style = "text-align:center">
<h1>
Welcome to {{title}}.
</h1>
</div>
<div> Months :
<select>
<option *ngFor = "let i of months">{{i}}</option>
</select>
</div>
<br/>
<div>
<span *ngIf = "isavailable; then condition1 else condition2">
Condition is valid.
</span>
<ng-template #condition1>Condition is valid</ng-template>
<ng-template #condition2>Condition is invalid</ng-template>
</div>
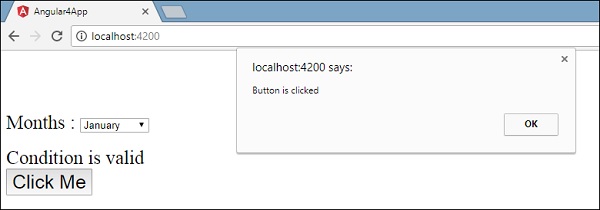
<button (click)="myClickFunction($event)">
Click Me
</button>
在app.component.html檔案中,我們定義了一個按鈕並使用click事件向其添加了一個函式。
以下是定義按鈕並向其新增函式的語法。
(click)="myClickFunction($event)"
該函式在.ts檔案中定義:app.component.ts
import { Component } from '@angular/core';

@Component({
   selector: 'app-root',
   templateUrl: './app.component.html',
   styleUrls: ['./app.component.css']
})

export class AppComponent {
   title = 'Angular 4 Project!';
   //array of months.
   months = ["January", "Feburary", "March", "April",
      "May", "June", "July", "August", "September",
      "October", "November", "December"];
   isavailable = true;
   myClickFunction(event) {
      //just added console.log which will display the event details in browser on click of the button.
      alert("Button is clicked");
      console.log(event);
   }
}
單擊按鈕後,控制元件將進入函式myClickFunction,並出現一個對話方塊,顯示the Button is clicked,如下面的螢幕截圖所示:
現在讓我們向下拉選單新增change事件。
以下程式碼行將幫助您向下拉選單新增change事件:
<!--The content below is only a placeholder and can be replaced.-->
<div style = "text-align:center">
<h1>
Welcome to {{title}}.
</h1>
</div>
<div> Months :
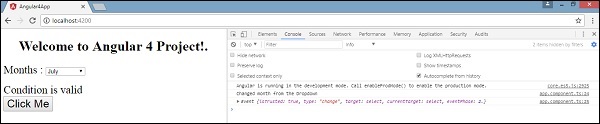
<select (change) = "changemonths($event)">
<option *ngFor = "let i of months">{{i}}</option>
</select>
</div>
<br/>
<div>
<span *ngIf = "isavailable; then condition1 else condition2">
Condition is valid.
</span>
<ng-template #condition1>Condition is valid</ng-template>
<ng-template #condition2>Condition is invalid</ng-template>
</div>
<button (click) = "myClickFunction($event)">Click Me</button>
該函式在app.component.ts檔案中宣告:
import { Component } from '@angular/core';

@Component({
   selector: 'app-root',
   templateUrl: './app.component.html',
   styleUrls: ['./app.component.css']
})

export class AppComponent {
   title = 'Angular 4 Project!';
   //array of months.
   months = ["January", "Feburary", "March", "April",
      "May", "June", "July", "August", "September",
      "October", "November", "December"];
   isavailable = true;
   myClickFunction(event) {
      alert("Button is clicked");
      console.log(event);
   }
   changemonths(event) {
      console.log("Changed month from the Dropdown");
      console.log(event);
   }
}
控制檯訊息“Changed month from the Dropdown”與事件一起顯示在控制檯中。
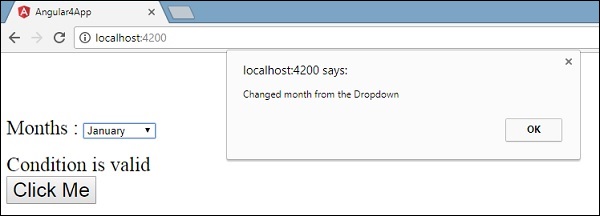
當下拉列表中的值更改時,讓我們在app.component.ts中新增一個警報訊息,如下所示:
import { Component } from '@angular/core';

@Component({
   selector: 'app-root',
   templateUrl: './app.component.html',
   styleUrls: ['./app.component.css']
})

export class AppComponent {
   title = 'Angular 4 Project!';
   //array of months.
   months = ["January", "February", "March", "April",
         "May", "June", "July", "August", "September",
         "October", "November", "December"];

   isavailable = true;
   myClickFunction(event) {
      //just added console.log which will display the event details in browser
      on click of the button.
      alert("Button is clicked");
      console.log(event);
   }
   changemonths(event) {
      alert("Changed month from the Dropdown");
   }
}
當下拉列表中的值更改時,將出現一個對話方塊,並顯示以下訊息:“Changed month from the Dropdown”。
Angular 4 - 模板
Angular 4使用<ng-template>作為標籤,而不是Angular 2中使用的<template>。Angular 4將<template>更改為<ng-template>的原因是<template>標籤與html <template>標準標籤之間存在命名衝突。它將完全棄用。這是Angular 4中的主要變化之一。
現在讓我們將模板與if else條件一起使用,並檢視輸出。
app.component.html
<!--The content below is only a placeholder and can be replaced.-->
<div style = "text-align:center">
   <h1>
      Welcome to {{title}}.
   </h1>
</div>

<div> Months :
   <select (change) = "changemonths($event)" name = "month">
      <option *ngFor = "let i of months">{{i}}</option>
   </select>
</div>
<br/>

<div>
   <span *ngIf = "isavailable;then condition1 else condition2">Condition is valid.</span>
   <ng-template #condition1>Condition is valid from template</ng-template>
   <ng-template #condition2>Condition is invalid from template</ng-template>
</div>
<button (click) = "myClickFunction($event)">Click Me</button>
對於Span標籤,我們添加了帶有else條件的if語句,並將呼叫模板condition1,否則呼叫condition2。
模板的呼叫方式如下:
<ng-template #condition1>Condition is valid from template</ng-template>
<ng-template #condition2>Condition is invalid from template</ng-template>
如果條件為真,則呼叫condition1模板,否則呼叫condition2。
app.component.ts
import { Component } from '@angular/core';

@Component({
   selector: 'app-root',
   templateUrl: './app.component.html',
   styleUrls: ['./app.component.css']
})
export class AppComponent {
   title = 'Angular 4 Project!';
   //array of months.
   months = ["January", "February", "March", "April",
            "May", "June", "July", "August", "September",
            "October", "November", "December"];
   isavailable = false;
   myClickFunction(event) {
      this.isavailable = false;
   }
   changemonths(event) {
      alert("Changed month from the Dropdown");
      console.log(event);
   }
}
瀏覽器中的輸出如下所示:
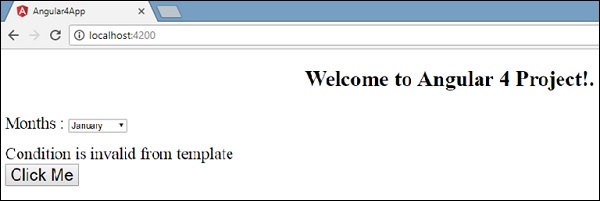
變數isavailable為false,因此列印condition2模板。如果您單擊按鈕,將呼叫相應的模板。如果您檢查瀏覽器,您會發現您從未在dom中獲得span標籤。以下示例將幫助您理解這一點。

如果您檢查瀏覽器,您會看到dom中沒有span標籤。它在dom中具有Condition is invalid from template。
html中的以下程式碼行將幫助我們在dom中獲得span標籤。
<!--The content below is only a placeholder and can be replaced.-->
<div style = "text-align:center">
   <h1>
      Welcome to {{title}}.
   </h1>
</div>

<div> Months :
   <select (change) = "changemonths($event)" name = "month">
      <option *ngFor = "let i of months">{{i}}</option>
   </select>
</div>
<br/>

<div>
   <span *ngIf = "isavailable; else condition2">Condition is valid.</span>
   <ng-template #condition1>Condition is valid from template</ng-template>
   <ng-template #condition2>Condition is invalid from template</ng-template>
</div>

<button (click)="myClickFunction($event)">Click Me</button>
如果我們刪除then條件,我們將在瀏覽器中獲得“Condition is valid”訊息,並且span標籤也可用在dom中。例如,在app.component.ts中,我們將isavailable變數設定為true。
Angular 4 - 指令
Angular中的指令是一個js類,宣告為@directive。我們在Angular中有3個指令。指令列在下面:
元件指令
這些構成了主類,其中包含有關如何在執行時處理、例項化和使用元件的詳細資訊。
結構指令
結構指令基本上處理操作dom元素。結構指令在指令前有一個*號。例如,*ngIf和*ngFor。
屬性指令
屬性指令用於更改dom元素的外觀和行為。您可以建立自己的指令,如下所示。
如何建立自定義指令?
在本節中,我們將討論要在元件中使用的自定義指令。自定義指令由我們建立,而不是標準的。
讓我們看看如何建立自定義指令。我們將使用命令列建立指令。使用命令列建立指令的命令是:
ng g directive nameofthedirective

e.g

ng g directive changeText
這在命令列中的樣子
C:\projectA4\Angular 4-app>ng g directive changeText
installing directive
   create src\app\change-text.directive.spec.ts
   create src\app\change-text.directive.ts
   update src\app\app.module.ts
上面建立的檔案,即change-text.directive.spec.ts和change-text.directive.ts,以及app.module.ts檔案已更新。
app.module.ts
import { BrowserModule } from '@angular/platform-browser';
import { NgModule } from '@angular/core';
import { AppComponent } from './app.component';

import { NewCmpComponent } from './new-cmp/new-cmp.component';
import { ChangeTextDirective } from './change-text.directive';

@NgModule({
   declarations: [
      AppComponent,
      NewCmpComponent,
      ChangeTextDirective
   ],

   imports: [
      BrowserModule
   ],

   providers: [],
   bootstrap: [AppComponent]
})

export class AppModule { }
ChangeTextDirective類包含在上面檔案中的宣告中。該類也從下面給出的檔案中匯入。
change-text.directive
import { Directive } from '@angular/core';
@Directive({
   selector: '[changeText]'
})

export class ChangeTextDirective {
   constructor() { }
}
上面的檔案有一個指令,它還有一個selector屬性。我們在selector中定義的內容必須與我們在其中分配自定義指令的檢視匹配。
在app.component.html檢視中,讓我們按如下方式新增指令:
<div style="text-align:center">
   <span changeText >Welcome to {{title}}.</span>
</div>
我們將按如下方式在change-text.directive.ts檔案中編寫更改:
change-text.directive.ts
import { Directive, ElementRef} from '@angular/core';
@Directive({
selector: '[changeText]'
})
export class ChangeTextDirective {
constructor(Element: ElementRef) {
console.log(Element);
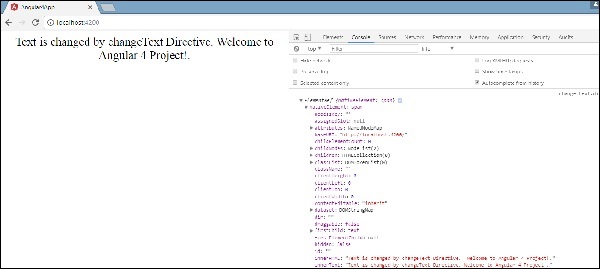
Element.nativeElement.innerText="Text is changed by changeText Directive. ";
}
}
在上面的檔案中,有一個名為ChangeTextDirective的類和一個建構函式,它採用型別為ElementRef的元素,這是必需的。該元素包含應用Change Text指令的所有詳細資訊。
我們添加了console.log元素。可以在瀏覽器控制檯中看到它的輸出。元素的文字也如上所示更改。
現在,瀏覽器將顯示以下內容。
Angular 4 - 管道
在本章中,我們將討論Angular 4中的管道是什麼。管道在Angular 1中以前稱為過濾器,在Angular 2和4中稱為管道。
| 字元用於轉換資料。以下是相同的語法
{{ Welcome to Angular 4 | lowercase}}
它以整數、字串、陣列和日期作為輸入,用|分隔,以所需的格式進行轉換,並在瀏覽器中顯示。
讓我們考慮一些使用管道的示例。
在這裡,我們想將給定的文字顯示為大寫。這可以使用管道按如下方式完成:
在app.component.ts檔案中,我們定義了title變數:
app.component.ts
import { Component } from '@angular/core';
@Component({
selector: 'app-root',
templateUrl: './app.component.html',
styleUrls: ['./app.component.css']
})
export class AppComponent {
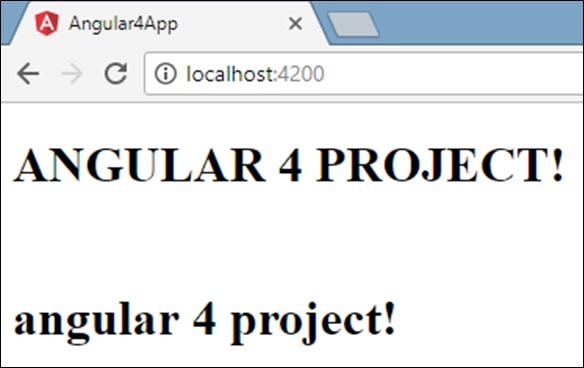
title = 'Angular 4 Project!';
}
以下程式碼行進入app.component.html檔案。
<b>{{title | uppercase}}</b><br/>
<b>{{title | lowercase}}</b>
瀏覽器顯示如下面的螢幕截圖所示:
Angular 4提供了一些內建管道。管道列在下面:
- Lowercasepipe
- Uppercasepipe
- Datepipe
- Currencypipe
- Jsonpipe
- Percentpipe
- Decimalpipe
- Slicepipe
我們已經看到了lowercase和uppercase管道。現在讓我們看看其他管道是如何工作的。
以下程式碼行將幫助我們在app.component.ts檔案中定義所需的變數:
import { Component } from '@angular/core';

@Component({
   selector: 'app-root',
   templateUrl: './app.component.html',
   styleUrls: ['./app.component.css']
})

export class AppComponent {
   title = 'Angular 4 Project!';
   todaydate = new Date();
   jsonval = {name:'Rox', age:'25', address:{a1:'Mumbai', a2:'Karnataka'}};
   months = ["Jan", "Feb", "Mar", "April", "May", "Jun",
             "July", "Aug", "Sept", "Oct", "Nov", "Dec"];
}
我們將在app.component.html檔案中使用管道。
<!--The content below is only a placeholder and can be replaced.-->
<div style = "width:100%;">
<div style = "width:40%;float:left;border:solid 1px black;">
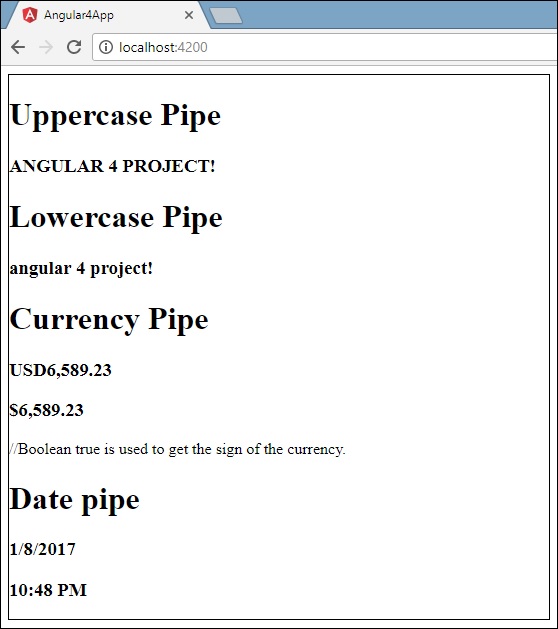
<h1>Uppercase Pipe</h1>
<b>{{title | uppercase}}</b><br/>
<h1>Lowercase Pipe</h1>
<b>{{title | lowercase}}</b>
<h1>Currency Pipe</h1>
<b>{{6589.23 | currency:"USD"}}</b><br/>
<b>{{6589.23 | currency:"USD":true}}</b> //Boolean true is used to get the sign of the currency.
<h1>Date pipe</h1>
<b>{{todaydate | date:'d/M/y'}}</b><br/>
<b>{{todaydate | date:'shortTime'}}</b>
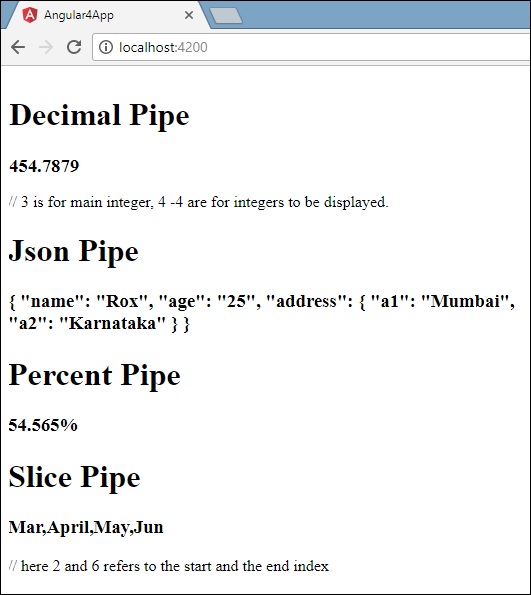
<h1>Decimal Pipe</h1>
<b>{{ 454.78787814 | number: '3.4-4' }}</b> // 3 is for main integer, 4 -4 are for integers to be displayed.
</div>
<div style = "width:40%;float:left;border:solid 1px black;">
<h1>Json Pipe</h1>
<b>{{ jsonval | json }}</b>
<h1>Percent Pipe</h1>
<b>{{00.54565 | percent}}</b>
<h1>Slice Pipe</h1>
<b>{{months | slice:2:6}}</b>
// here 2 and 6 refers to the start and the end index
</div>
</div>
以下螢幕截圖顯示每個管道的輸出:
如何建立自定義管道?
要建立自定義管道,我們建立了一個新的ts檔案。在這裡,我們想建立sqrt自定義管道。我們為檔案指定了相同的名稱,它如下所示:
app.sqrt.ts
import {Pipe, PipeTransform} from '@angular/core';
@Pipe ({
   name : 'sqrt'
})
export class SqrtPipe implements PipeTransform {
   transform(val : number) : number {
      return Math.sqrt(val);
   }
}
要建立自定義管道,我們必須從Angular/core匯入Pipe和PipeTransform。在@Pipe指令中,我們必須為我們的管道命名,這將在我們的.html檔案中使用。由於我們正在建立sqrt管道,我們將將其命名為sqrt。
隨著我們的進一步推進,我們必須建立該類,並且類名為SqrtPipe。此類將實現PipeTransform。
在類中定義的transform方法將引數作為數字,並在開平方後返回該數字。
由於我們建立了一個新檔案,我們需要在app.module.ts中新增它。操作如下:
import { BrowserModule } from '@angular/platform-browser';
import { NgModule } from '@angular/core';
import { AppComponent } from './app.component';

import { NewCmpComponent } from './new-cmp/new-cmp.component';
import { ChangeTextDirective } from './change-text.directive';
import { SqrtPipe } from './app.sqrt';

@NgModule({
   declarations: [
      SqrtPipe,
      AppComponent,
      NewCmpComponent,
      ChangeTextDirective
   ],

   imports: [
      BrowserModule
   ],
   providers: [],
   bootstrap: [AppComponent]
})
export class AppModule { }
我們建立了app.sqrt.ts類。我們必須在app.module.ts中匯入它並指定檔案的路徑。它也必須包含在宣告中,如上所示。
現在讓我們看看在app.component.html檔案中對sqrt管道的呼叫。
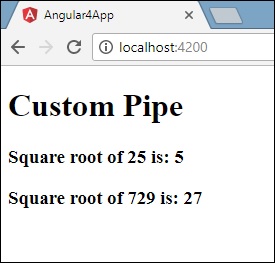
<h1>Custom Pipe</h1>
<b>Square root of 25 is: {{25 | sqrt}}</b>
<br/>
<b>Square root of 729 is: {{729 | sqrt}}</b>
輸出如下所示:
Angular 4 - 路由
路由基本上意味著在頁面之間導航。您已經看到許多帶有連結的站點,這些連結會將您定向到新頁面。這可以使用路由來實現。這裡我們引用的頁面將以元件的形式存在。我們已經看到了如何建立元件。現在讓我們建立一個元件,並看看如何使用路由。
在主父元件app.module.ts中,我們現在需要包含路由模組,如下所示:
import { BrowserModule } from '@angular/platform-browser';
import { NgModule } from '@angular/core';
import { RouterModule} from '@angular/router';

import { AppComponent } from './app.component';
import { NewCmpComponent } from './new-cmp/new-cmp.component';
import { ChangeTextDirective } from './change-text.directive';
import { SqrtPipe } from './app.sqrt';
@NgModule({
   declarations: [
      SqrtPipe,
      AppComponent,
      NewCmpComponent,
      ChangeTextDirective
   ],
   imports: [
      BrowserModule,
      RouterModule.forRoot([
         {
            path: 'new-cmp',
            component: NewCmpComponent
         }
      ])
   ],
   providers: [],
   bootstrap: [AppComponent]
})
export class AppModule { }
import { RouterModule} from '@angular/router'
這裡,RouterModule 從 angular/router 匯入。該模組包含在 imports 中,如下所示:
RouterModule.forRoot([
   {
      path: 'new-cmp',
      component: NewCmpComponent
   }
])
RouterModule 指的是forRoot,它接收一個數組作為輸入,該陣列又包含路徑和元件的物件。路徑是路由器的名稱,元件是類的名稱,即建立的元件。
現在讓我們看看建立的元件檔案:
New-cmp.component.ts
import { Component, OnInit } from '@angular/core';

@Component({
   selector: 'app-new-cmp',
   templateUrl: './new-cmp.component.html',
   styleUrls: ['./new-cmp.component.css']
})

export class NewCmpComponent implements OnInit {
   newcomponent = "Entered in new component created";
   constructor() {}
   ngOnInit() { }
}
突出顯示的類在主模組的 imports 中被提及。
New-cmp.component.html
<p>
   {{newcomponent}}
</p>

<p>
   new-cmp works!
</p>
現在,我們需要在需要時或從主模組點選時顯示html檔案中的上述內容。為此,我們需要在app.component.html中新增路由詳細資訊。
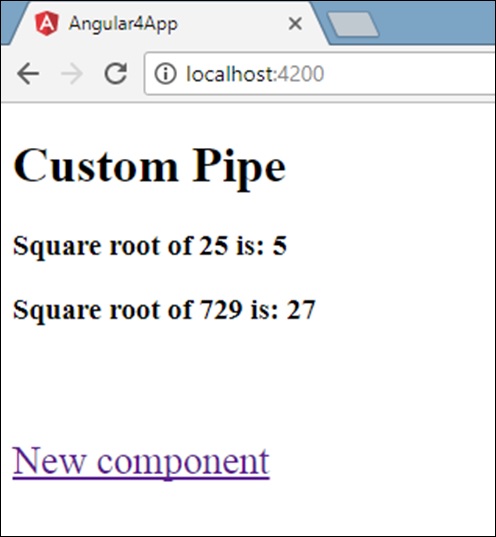
<h1>Custom Pipe</h1>
<b>Square root of 25 is: {{25 | sqrt}}</b><br/>
<b>Square root of 729 is: {{729 | sqrt}}</b>

<br />
<br />
<br />
<a routerLink = "new-cmp">New component</a>

<br />
<br/>
<router-outlet></router-outlet>
在上面的程式碼中,我們建立了錨鏈接標籤,並將其routerLink設定為“new-cmp”。這在app.module.ts中作為路徑被引用。
當用戶點選new component時,頁面應該顯示內容。為此,我們需要以下標籤 - <router-outlet> </router-outlet>。
上面的標籤確保當用戶點選new component時,new-cmp.component.html中的內容將顯示在頁面上。
現在讓我們看看輸出如何在瀏覽器中顯示。
當用戶點選New component時,您將在瀏覽器中看到以下內容。
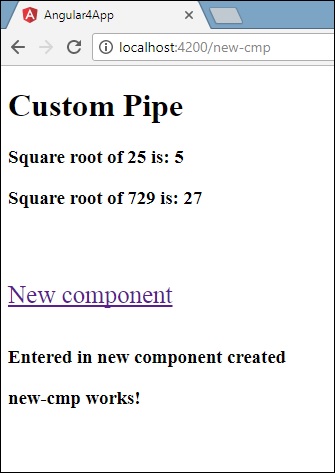
url 包含https://:4200/new-cmp。這裡,new-cmp 附加到原始 url,這是app.module.ts中給出的路徑和app.component.html中的router-link。
當用戶點選New component時,頁面不會重新整理,內容會顯示給使用者而無需重新載入。只有點選時,網站程式碼的特定部分才會重新載入。當頁面上有大量內容需要根據使用者互動載入時,此功能很有幫助。此功能還提供了良好的使用者體驗,因為頁面不會重新載入。
Angular 4 - 服務
本章我們將討論Angular 4中的服務。
我們可能會遇到需要在頁面上的任何地方使用某些程式碼的情況。它可以用於需要跨元件共享的資料連線等。服務幫助我們實現這一點。使用服務,我們可以訪問整個專案中其他元件的方法和屬性。
要建立一個服務,我們需要使用命令列。相應的命令是:
C:\projectA4\Angular 4-app>ng g service myservice
installing service
   create src\app\myservice.service.spec.ts
   create src\app\myservice.service.ts
   WARNING Service is generated but not provided, it must be provided to be used

   C:\projectA4\Angular 4-app>
檔案如下在app資料夾中建立:
以下是底部建立的檔案:myservice.service.specs.ts 和 myservice.service.ts。
myservice.service.ts
import { Injectable } from '@angular/core';

@Injectable()
export class MyserviceService {
   constructor() { }
}
這裡,Injectable 模組從@angular/core匯入。它包含@Injectable方法和一個名為MyserviceService的類。我們將在這個類中建立我們的服務函式。
在建立新服務之前,我們需要在主父app.module.ts中包含已建立的服務。
import { BrowserModule } from '@angular/platform-browser';
import { NgModule } from '@angular/core';
import { RouterModule} from '@angular/router';
import { AppComponent } from './app.component';

import { MyserviceService } from './myservice.service';
import { NewCmpComponent } from './new-cmp/new-cmp.component';
import { ChangeTextDirective } from './change-text.directive';
import { SqrtPipe } from './app.sqrt';

@NgModule({
   declarations: [
      SqrtPipe,
      AppComponent,
      NewCmpComponent,
      ChangeTextDirective
   ],
   imports: [
      BrowserModule,
      RouterModule.forRoot([
         {
            path: 'new-cmp',
            component: NewCmpComponent
         }
      ])
   ],
   providers: [MyserviceService],
   bootstrap: [AppComponent]
})

export class AppModule { }
我們已經使用類名匯入了服務,並且在 providers 中使用了相同的類。現在讓我們切換回服務類並建立一個服務函式。
在服務類中,我們將建立一個函式來顯示今天的日期。我們可以在主父元件app.component.ts以及上一章中建立的新元件new-cmp.component.ts中使用相同的函式。
現在讓我們看看該函式在服務中的外觀以及如何在元件中使用它。
import { Injectable } from '@angular/core';
@Injectable()
export class MyserviceService {
   constructor() { }
   showTodayDate() {
      let ndate = new Date();
      return ndate;
   }
}
在上面的服務檔案中,我們建立了一個函式showTodayDate。現在我們將返回新建立的Date()。讓我們看看如何在元件類中訪問此函式。
app.component.ts
import { Component } from '@angular/core';
import { MyserviceService } from './myservice.service';

@Component({
   selector: 'app-root',
   templateUrl: './app.component.html',
   styleUrls: ['./app.component.css']
})

export class AppComponent {
   title = 'Angular 4 Project!';
   todaydate;
   constructor(private myservice: MyserviceService) {}
   ngOnInit() {
      this.todaydate = this.myservice.showTodayDate();
   }
}
ngOnInit函式在建立的任何元件中預設被呼叫。日期從服務中獲取,如上所示。要獲取服務的更多詳細資訊,我們需要首先在元件ts檔案中包含該服務。
我們將在.html檔案中顯示日期,如下所示:
{{todaydate}}
<app-new-cmp></app-new-cmp>
// data to be displayed to user from the new component class.
現在讓我們看看如何在建立的新元件中使用服務。
import { Component, OnInit } from '@angular/core';
import { MyserviceService } from './../myservice.service';

@Component({
   selector: 'app-new-cmp',
   templateUrl: './new-cmp.component.html',
   styleUrls: ['./new-cmp.component.css']
})

export class NewCmpComponent implements OnInit {
   todaydate;
   newcomponent = "Entered in new component created";
   constructor(private myservice: MyserviceService) {}

   ngOnInit() {
      this.todaydate = this.myservice.showTodayDate();
   }
}
在我們建立的新元件中,我們需要首先匯入我們想要的服務並訪問其方法和屬性。請參見突出顯示的程式碼。todaydate 在元件 html 中顯示如下:
<p>
   {{newcomponent}}
</p>
<p>
   Today's Date : {{todaydate}}
</p>
新元件的選擇器用於app.component.html檔案。來自上述 html 檔案的內容將顯示在瀏覽器中,如下所示:
如果更改任何元件中服務的屬性,則其他元件中的屬性也會發生更改。現在讓我們看看這是如何工作的。
我們將在服務中定義一個變數,並在父元件和新元件中使用它。我們將再次更改父元件中的屬性,並將檢視新元件中是否也更改了。
在myservice.service.ts中,我們建立了一個屬性並在其他父元件和新元件中使用了它。
import { Injectable } from '@angular/core';

@Injectable()
export class MyserviceService {
   serviceproperty = "Service Created";
   constructor() { }
   showTodayDate() {
      let ndate = new Date();
      return ndate;
   }
}
現在讓我們在其他元件中使用serviceproperty變數。在app.component.ts中,我們訪問變數的方式如下:
import { Component } from '@angular/core';
import { MyserviceService } from './myservice.service';
@Component({
   selector: 'app-root',
   templateUrl: './app.component.html',
   styleUrls: ['./app.component.css']
})

export class AppComponent {
   title = 'Angular 4 Project!';
   todaydate;
   componentproperty;
   constructor(private myservice: MyserviceService) {}
   ngOnInit() {
      this.todaydate = this.myservice.showTodayDate();
      console.log(this.myservice.serviceproperty);
      this.myservice.serviceproperty = "component created"; // value is changed.
      this.componentproperty = this.myservice.serviceproperty;
   }
}
我們現在將獲取變數並在console.log中處理。在下一行,我們將變數的值更改為“component created”。我們將在new-cmp.component.ts中執行相同的操作。
import { Component, OnInit } from '@angular/core';
import { MyserviceService } from './../myservice.service';

@Component({
   selector: 'app-new-cmp',
   templateUrl: './new-cmp.component.html',
   styleUrls: ['./new-cmp.component.css']
})

export class NewCmpComponent implements OnInit {
   todaydate;
   newcomponentproperty;
   newcomponent = "Entered in newcomponent";
   constructor(private myservice: MyserviceService) {}
   ngOnInit() {
      this.todaydate = this.myservice.showTodayDate();
      this.newcomponentproperty = this.myservice.serviceproperty;
   }
}
在上面的元件中,我們沒有更改任何內容,而是直接將屬性賦值給元件屬性。
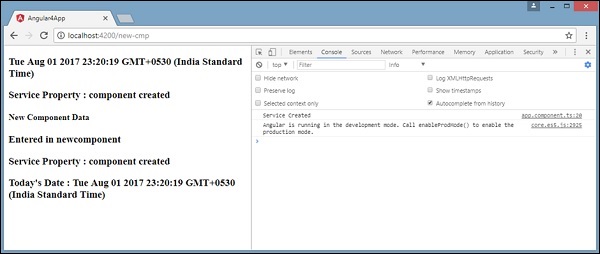
現在,當您在瀏覽器中執行它時,服務屬性將被更改,因為它的值在app.component.ts中已更改,並且對於new-cmp.component.ts也將顯示相同的值。
更改之前,請檢查控制檯中的值。
Angular 4 - Http 服務
Http 服務將幫助我們獲取外部資料、向其釋出資料等。我們需要匯入 http 模組才能使用 http 服務。讓我們考慮一個例子來了解如何使用 http 服務。
要開始使用 http 服務,我們需要在app.module.ts中匯入模組,如下所示:
import { BrowserModule } from '@angular/platform-browser';
import { NgModule } from '@angular/core';
import { BrowserAnimationsModule } from '@angular/platform-browser/animations';
import { HttpModule } from '@angular/http';
import { AppComponent } from './app.component';

@NgModule({
   declarations: [
      AppComponent
   ],
   imports: [
      BrowserModule,
      BrowserAnimationsModule,
      HttpModule
   ],
   providers: [],
   bootstrap: [AppComponent]
})
export class AppModule { }
如果您看到突出顯示的程式碼,我們已經從@angular/http匯入了HttpModule,並且它也新增到imports陣列中。
現在讓我們在app.component.ts中使用http服務。
import { Component } from '@angular/core';
import { Http } from '@angular/http';
import 'rxjs/add/operator/map';

@Component({
   selector: 'app-root',
   templateUrl: './app.component.html',
   styleUrls: ['./app.component.css']
})

export class AppComponent {
   constructor(private http: Http) { }
   ngOnInit() {
      this.http.get("http://jsonplaceholder.typicode.com/users").
      map((response) ⇒ response.json()).
      subscribe((data) ⇒ console.log(data))
   }
}
讓我們瞭解上面突出顯示的程式碼。我們需要匯入http才能使用該服務,方法如下:
import { Http } from '@angular/http';
在類AppComponent中,建立一個建構函式和型別為Http的私有變數http。要獲取資料,我們需要使用http提供的get API,如下所示
this.http.get();
它將要獲取的 url 作為引數,如程式碼中所示。
我們將使用測試 url - https://jsonplaceholder.typicode.com/users 來獲取 json 資料。在獲取的 url 資料上執行兩個操作:map 和 subscribe。Map 方法有助於將資料轉換為 json 格式。要使用 map,我們需要匯入它,如下所示:
import 'rxjs/add/operator/map';
完成 map 後,subscribe 將在控制檯中記錄輸出,如瀏覽器中所示:
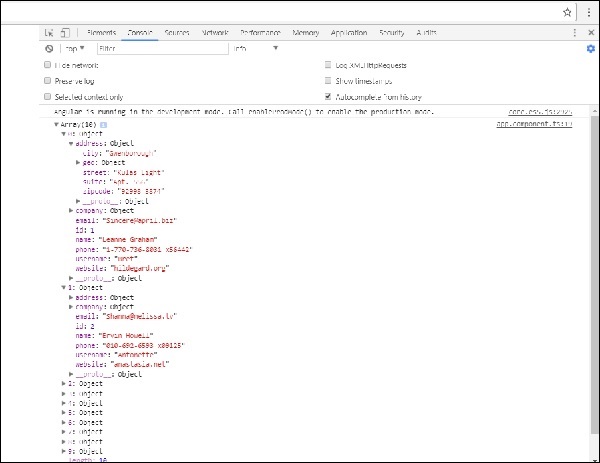
如果您看到,json 物件顯示在控制檯中。這些物件也可以顯示在瀏覽器中。
要將物件顯示在瀏覽器中,請按如下方式更新app.component.html和app.component.ts中的程式碼:
import { Component } from '@angular/core';
import { Http } from '@angular/http';
import 'rxjs/add/operator/map';

@Component({
   selector: 'app-root',
   templateUrl: './app.component.html',
   styleUrls: ['./app.component.css']
})
export class AppComponent {
   constructor(private http: Http) { }
   httpdata;
   ngOnInit() {
      this.http.get("http://jsonplaceholder.typicode.com/users").
      map(
         (response) ⇒ response.json()
      ).
      subscribe(
         (data) ⇒ {this.displaydata(data);}
      )
   }
   displaydata(data) {this.httpdata = data;}
}
在app.component.ts中,使用 subscribe 方法,我們將呼叫 display data 方法並將獲取的資料作為引數傳遞給它。
在 display data 方法中,我們將資料儲存在一個名為 httpdata 的變數中。使用for迴圈遍歷此httpdata變數,在app.component.html檔案中顯示資料。
<ul *ngFor = "let data of httpdata">
   <li>Name : {{data.name}} Address: {{data.address.city}}</li>
</ul>
json 物件如下所示:
{
   "id": 1,
   "name": "Leanne Graham",
   "username": "Bret",
   "email": "Sincere@april.biz",

   "address": {
      "street": "Kulas Light",
      "suite": "Apt. 556",
      "city": "Gwenborough",
      "zipcode": "92998-3874",
      "geo": {
         "lat": "-37.3159",
         "lng": "81.1496"
      }
   },

   "phone": "1-770-736-8031 x56442",
   "website": "hildegard.org",
   "company": {
      "name": "Romaguera-Crona",
      "catchPhrase": "Multi-layered client-server neural-net",
      "bs": "harness real-time e-markets"
   }
}
該物件具有 id、name、username、email 和 address 等屬性,address 內部包含 street、city 等以及與電話、網站和公司相關的其他詳細資訊。使用for迴圈,我們將在瀏覽器中顯示名稱和城市詳細資訊,如app.component.html檔案中所示。
這就是在瀏覽器中顯示的方式:

現在讓我們新增搜尋引數,它將根據特定資料進行過濾。我們需要根據傳遞的搜尋引數來獲取資料。
以下是app.component.html和app.component.ts檔案中所做的更改:
app.component.ts
import { Component } from '@angular/core';
import { Http } from '@angular/http';
import 'rxjs/add/operator/map';

@Component({
   selector: 'app-root',
   templateUrl: './app.component.html',
   styleUrls: ['./app.component.css']
})
export class AppComponent {
   title = 'app';
   searchparam = 2;
   jsondata;
   name;
   constructor(private http: Http) { }
   ngOnInit() {
      this.http.get("http://jsonplaceholder.typicode.com/users?id="+this.searchparam).
      map(
         (response) ⇒ response.json()
      ).
      subscribe((data) ⇒ this.converttoarray(data))
   }
   converttoarray(data) {
      console.log(data);
      this.name = data[0].name;
   }
}
對於get api,我們將新增搜尋引數 id = this.searchparam。searchparam 等於 2。我們需要 json 檔案中id=2的詳細資訊。
app.component.html
{{name}}
這就是瀏覽器顯示的方式:
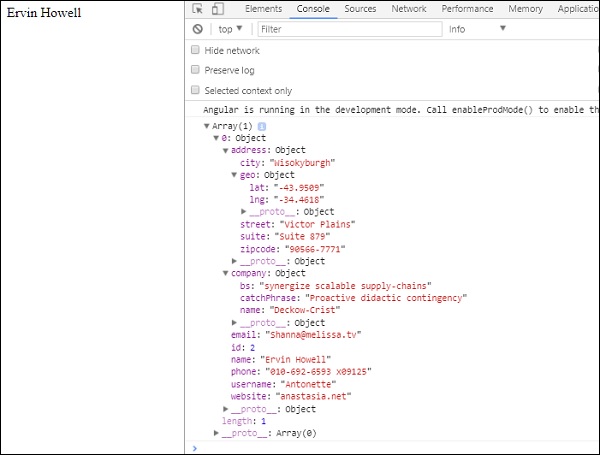
我們在瀏覽器中輸出了從http接收到的資料。它顯示在瀏覽器控制檯中。瀏覽器中顯示了json中id=2的名稱。
Angular 4 - 表單
本章我們將瞭解如何在Angular 4中使用表單。我們將討論兩種處理表單的方式:模板驅動表單和模型驅動表單。
模板驅動表單
使用模板驅動表單,大部分工作都在模板中完成;使用模型驅動表單,大部分工作都在元件類中完成。
現在讓我們考慮處理模板驅動表單。我們將建立一個簡單的登入表單,並在表單中新增電子郵件 ID、密碼和提交按鈕。首先,我們需要從@angular/core匯入FormsModule,在app.module.ts中如下所示:
import { BrowserModule } from '@angular/platform-browser';
import { NgModule } from '@angular/core';
import { RouterModule} from '@angular/router';

import { HttpModule } from '@angular/http';
import { FormsModule } from '@angular/forms';
import { AppComponent } from './app.component';

import { MyserviceService } from './myservice.service';
import { NewCmpComponent } from './new-cmp/new-cmp.component';
import { ChangeTextDirective } from './change-text.directive';
import { SqrtPipe } from './app.sqrt';

@NgModule({
   declarations: [
      SqrtPipe,
      AppComponent,
      NewCmpComponent,
      ChangeTextDirective
   ],
   imports: [
      BrowserModule,
      HttpModule,
      FormsModule,
      RouterModule.forRoot([
         {path: 'new-cmp',component: NewCmpComponent}
      ])
   ],
   providers: [MyserviceService],
   bootstrap: [AppComponent]
})

export class AppModule { }
所以在app.module.ts中,我們匯入了FormsModule,並在imports陣列中添加了它,如突出顯示的程式碼所示。
現在讓我們在app.component.html檔案中建立表單。
<form #userlogin = "ngForm" (ngSubmit) = "onClickSubmit(userlogin.value)" >
   <input type = "text" name = "emailid" placeholder = "emailid" ngModel>
   <br/>
   <input type = "password" name = "passwd" placeholder = "passwd" ngModel>
   <br/>
   <input type = "submit" value = "submit">
</form>
我們建立了一個簡單的表單,其中包含具有電子郵件 ID、密碼和提交按鈕的輸入標籤。我們為其分配了型別、名稱和佔位符。
在模板驅動表單中,我們需要透過新增ngModel指令和name屬性來建立模型表單控制元件。因此,無論我們希望 Angular 從表單中訪問我們的資料,都要在該標籤中新增 ngModel,如上所示。現在,如果我們必須讀取 emailid 和 passwd,我們需要在其上新增 ngModel。
如果您看到,我們還將 ngForm 新增到#userlogin。需要將ngForm指令新增到我們建立的表單模板中。我們還添加了函式onClickSubmit併為其分配了userlogin.value。
現在讓我們在app.component.ts中建立函式並獲取表單中輸入的值。
import { Component } from '@angular/core';
import { MyserviceService } from './myservice.service';

@Component({
   selector: 'app-root',
   templateUrl: './app.component.html',
   styleUrls: ['./app.component.css']
})

export class AppComponent {
   title = 'Angular 4 Project!';
   todaydate;
   componentproperty;
   constructor(private myservice: MyserviceService) { }
   ngOnInit() {
      this.todaydate = this.myservice.showTodayDate();
   }
   onClickSubmit(data) {
      alert("Entered Email id : " + data.emailid);
   }
}
在上面的app.component.ts檔案中,我們定義了函式onClickSubmit。當您點選表單提交按鈕時,控制將轉到上面的函式。
這就是瀏覽器顯示的方式:
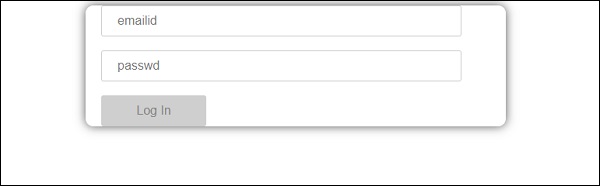
表單如下所示。讓我們在其中輸入資料,在提交函式中,電子郵件 ID 已經輸入。
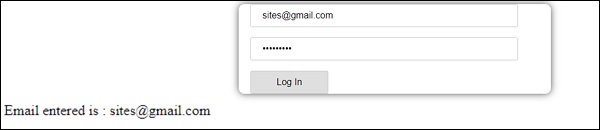
電子郵件 ID 在底部顯示,如上面的螢幕截圖所示。
模型驅動表單
在模型驅動表單中,我們需要從@angular/forms匯入ReactiveFormsModule,並在imports陣列中使用它。
app.module.ts中有一個更改。
import { BrowserModule } from '@angular/platform-browser';
import { NgModule } from '@angular/core';
import { RouterModule} from '@angular/router';

import { HttpModule } from '@angular/http';
import { ReactiveFormsModule } from '@angular/forms';
import { AppComponent } from './app.component';

import { MyserviceService } from './myservice.service';
import { NewCmpComponent } from './new-cmp/new-cmp.component';
import { ChangeTextDirective } from './change-text.directive';
import { SqrtPipe } from './app.sqrt';

@NgModule({
   declarations: [
      SqrtPipe,
      AppComponent,
      NewCmpComponent,
      ChangeTextDirective
   ],
   imports: [
      BrowserModule,
      HttpModule,
      ReactiveFormsModule,
      RouterModule.forRoot([
         {
            path: 'new-cmp',
            component: NewCmpComponent
         }
      ])
   ],
   providers: [MyserviceService],
   bootstrap: [AppComponent]
})
export class AppModule { }
在app.component.ts中,我們需要為模型驅動表單匯入一些模組。例如,import { FormGroup, FormControl } from '@angular/forms'。
import { Component } from '@angular/core';
import { MyserviceService } from './myservice.service';
import { FormGroup, FormControl } from '@angular/forms';

@Component({
   selector: 'app-root',
   templateUrl: './app.component.html',
   styleUrls: ['./app.component.css']
})
export class AppComponent {
   title = 'Angular 4 Project!';
   todaydate;
   componentproperty;
   emailid;
   formdata;
   constructor(private myservice: MyserviceService) { }
   ngOnInit() {
      this.todaydate = this.myservice.showTodayDate();
      this.formdata = new FormGroup({
         emailid: new FormControl("angular@gmail.com"),
         passwd: new FormControl("abcd1234")
      });
   }
   onClickSubmit(data) {this.emailid = data.emailid;}
}
變數 formdata 在類的開頭初始化,並如上所示使用 FormGroup 初始化。變數 emailid 和 passwd 初始化為預設值,以便在表單中顯示。如果需要,可以將其保留為空。
這就是值在表單 UI 中顯示的方式。
我們使用 formdata 初始化表單值;我們需要在表單 UI app.component.html中使用它。
<div>
   <form [formGroup]="formdata" (ngSubmit) = "onClickSubmit(formdata.value)" >
      <input type="text" class="fortextbox" name="emailid" placeholder="emailid"
      formControlName="emailid">
      <br/>

      <input type="password" class="fortextbox" name="passwd"
      placeholder="passwd" formControlName="passwd">
      <br/>

      <input type="submit" class="forsubmit" value="Log In">
   </form>
</div>
<p>
   Email entered is : {{emailid}}
</p>
在 .html 檔案中,我們使用方括號中的 formGroup 來表示表單;例如,[formGroup]=”formdata”。提交時,呼叫函式 **onClickSubmit**,並傳入 **formdata.value**。
使用了輸入標籤 **formControlName**。它被賦予了一個我們在 **app.component.ts** 檔案中使用的值。
單擊提交後,控制權將傳遞給 **app.component.ts** 檔案中定義的 **onClickSubmit** 函式。

單擊“登入”後,將顯示以上截圖所示的值。
表單驗證
現在讓我們討論一下使用模型驅動表單進行表單驗證。您可以使用內建的表單驗證,也可以使用自定義驗證方法。我們將在表單中同時使用這兩種方法。我們將繼續使用我們在前面章節中建立的同一個示例。在 Angular 4 中,我們需要從 **@angular/forms** 匯入 Validators,如下所示:
import { FormGroup, FormControl, Validators} from '@angular/forms'
Angular 具有內建的驗證器,例如 **必填欄位、最小長度、最大長度** 和 **模式**。這些驗證器可以透過 Validators 模組訪問。
您可以只新增所需的驗證器或驗證器陣列,以告知 Angular 特定欄位是否為必填欄位。
現在讓我們在一個輸入文字框(即電子郵件 ID)上嘗試一下。對於電子郵件 ID,我們添加了以下驗證引數:
- 必填
- 模式匹配
這就是 **app.component.ts** 中程式碼的驗證方式。
import { Component } from '@angular/core';
import { FormGroup, FormControl, Validators} from '@angular/forms';

@Component({
   selector: 'app-root',
   templateUrl: './app.component.html',
   styleUrls: ['./app.component.css']
})

export class AppComponent {
   title = 'Angular 4 Project!';
   todaydate;
   componentproperty;
   emailid;
   formdata;
   ngOnInit() {
      this.formdata = new FormGroup({
         emailid: new FormControl("", Validators.compose([
            Validators.required,
            Validators.pattern("[^ @]*@[^ @]*")
         ])),
         passwd: new FormControl("")
      });
   }
   onClickSubmit(data) {this.emailid = data.emailid;}
}
在 **Validators.compose** 中,您可以新增要在輸入欄位上驗證的各項內容的列表。目前,我們添加了 **必填** 和 **模式匹配** 引數,以僅接受有效的電子郵件。
在 **app.component.html** 中,如果任何表單輸入無效,則提交按鈕將被停用。操作方法如下:
<div>
   <form [formGroup] = "formdata" (ngSubmit) = "onClickSubmit(formdata.value)" >
      <input type = "text" class = "fortextbox" name = "emailid" placeholder = "emailid"
         formControlName = "emailid">
      <br/>
      <input type = "password" class = "fortextbox" name = "passwd"
         placeholder = "passwd" formControlName = "passwd">
      <br/>
      <input type = "submit" [disabled] = "!formdata.valid" class = "forsubmit"
         value = "Log In">
   </form>
</div>

<p>
   Email entered is : {{emailid}}
</p>
對於提交按鈕,我們在方括號中添加了 disabled 屬性,其值為 **!formdata.valid**。因此,如果 formdata.valid 無效,則按鈕將保持停用狀態,使用者將無法提交。
讓我們看看它在瀏覽器中的執行方式:
在上述情況下,輸入的電子郵件 ID 無效,因此登入按鈕被停用。現在讓我們嘗試輸入有效的電子郵件 ID 並檢視區別。
現在,輸入的電子郵件 ID 有效。因此,我們可以看到登入按鈕已啟用,使用者可以提交它。提交後,輸入的電子郵件 ID 將顯示在底部。
現在讓我們嘗試使用相同的表單進行自定義驗證。對於自定義驗證,我們可以定義我們自己的自定義函式並在其中新增所需細節。我們現在將看到一個示例。
import { Component } from '@angular/core';
import { FormGroup, FormControl, Validators} from '@angular/forms';
@Component({
selector: 'app-root',
templateUrl: './app.component.html',
styleUrls: ['./app.component.css']
})
export class AppComponent {
title = 'Angular 4 Project!';
todaydate;
componentproperty;
emailid;
formdata;
ngOnInit() {
this.formdata = new FormGroup({
emailid: new FormControl("", Validators.compose([
Validators.required,
Validators.pattern("[^ @]*@[^ @]*")
])),
passwd: new FormControl("", this.passwordvalidation)
});
}
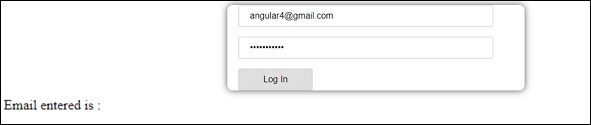
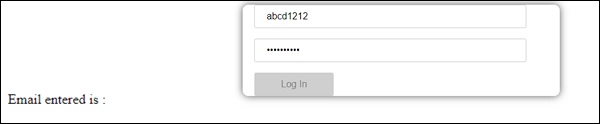
passwordvalidation(formcontrol) {
if (formcontrol.value.length <'; 5) {
return {"passwd" : true};
}
}
onClickSubmit(data) {this.emailid = data.emailid;}
}
在上面的示例中,我們建立了一個函式 **password validation**,並在前面章節的 formcontrol 中使用了它 - **passwd: new FormControl("", this.passwordvalidation)**。
在我們建立的函式中,我們將檢查輸入字元的長度是否合適。如果字元少於五個,它將返回 passwd 為 true,如上所示 - **return {"passwd" : true};**。如果字元多於五個,則認為它有效,並且登入將被啟用。
現在讓我們看看它在瀏覽器中的顯示方式:

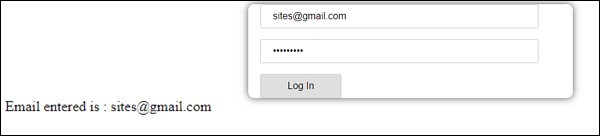
我們在密碼中只輸入了三個字元,登入被停用。要啟用登入,我們需要五個以上的字元。現在讓我們輸入有效長度的字元並檢查。

由於電子郵件 ID 和密碼均有效,因此登入已啟用。登入後,電子郵件將顯示在底部。
Angular 4 - 動畫
動畫增加了 html 元素之間的許多互動。Angular 2 也提供了動畫功能。Angular 4 與 Angular 2 的區別在於,動畫不再是 **@angular/core** 庫的一部分,而是一個需要在 **app.module.ts** 中匯入的單獨包。
首先,我們需要匯入庫,如下所示:
import { BrowserAnimationsModule } from '@angular/platform-browser/animations';
需要將 **BrowserAnimationsModule** 新增到 **app.module.ts** 中的匯入陣列中,如下所示:
app.module.ts
import { BrowserModule } from '@angular/platform-browser';
import { NgModule } from '@angular/core';

import { BrowserAnimationsModule } from '@angular/platform-browser/animations';
import { AppComponent } from './app.component';

@NgModule({
   declarations: [
      AppComponent
   ],
   imports: [
      BrowserModule,
      BrowserAnimationsModule
   ],
   providers: [],
   bootstrap: [AppComponent]
})
export class AppModule { }
在 **app.component.html** 中,我們添加了需要進行動畫處理的 html 元素。
<div>
   <button (click)="animate()">Click Me</button>
   <div [@myanimation] = "state" class="rotate">
      <img src="assets/images/img.png" width="100" height="100">
   </div>
</div>
對於主 div,我們添加了一個按鈕和一個帶有影像的 div。有一個點選事件,為此呼叫 animate 函式。對於 div,添加了 **@myanimation** 指令,並將其值設定為 state。
現在讓我們看看定義動畫的 **app.component.ts**。
import { Component } from '@angular/core';
import { trigger, state, style, transition, animate } from '@angular/animations';

@Component({
   selector: 'app-root',
   templateUrl: './app.component.html',
   styleUrls: ['./app.component.css'],
   styles:[`
      div{
         margin: 0 auto;
         text-align: center;
         width:200px;
      }
      .rotate{
         width:100px;
         height:100px;
         border:solid 1px red;
      }
   `],
   animations: [
      trigger('myanimation',[
         state('smaller',style({
            transform : 'translateY(100px)'
         })),
         state('larger',style({
            transform : 'translateY(0px)'
         })),
         transition('smaller <=> larger',animate('300ms ease-in'))
      ])
   ]
})

export class AppComponent {
   state: string = "smaller";
   animate() {
      this.state= this.state == 'larger' ? 'smaller' : 'larger';
   }
}
我們必須匯入要在 .ts 檔案中使用的動畫函式,如上所示。
import { trigger, state, style, transition, animate } from '@angular/animations';
在這裡,我們從 @angular/animations 匯入了 trigger、state、style、transition 和 animate。
現在,我們將動畫屬性新增到 @Component() 裝飾器中:
animations: [
   trigger('myanimation',[
      state('smaller',style({
         transform : 'translateY(100px)'
      })),
      state('larger',style({
         transform : 'translateY(0px)'
      })),
      transition('smaller <=> larger',animate('300ms ease-in'))
   ])
]
Trigger 定義動畫的開始。它的第一個引數是需要應用動畫的 html 標籤要賦予的動畫名稱。第二個引數是我們匯入的函式 - state、transition 等。
**state** 函式包含動畫步驟,元素將在這些步驟之間進行轉換。現在我們定義了兩個狀態,smaller 和 larger。對於 smaller 狀態,我們給出了樣式 **transform:translateY(100px)** 和 **transform:translateY(100px)**。
Transition 函式向 html 元素新增動畫。第一個引數採用狀態,即開始和結束;第二個引數接受 animate 函式。animate 函式允許您定義轉換的長度、延遲和緩動。
現在讓我們看看 .html 檔案,瞭解 transition 函式是如何工作的
<div>
   <button (click)="animate()">Click Me</button>
   <div [@myanimation] = "state" class="rotate">
      <img src="assets/images/img.png" width="100" height="100">
   </div>
</div>
在 **@component** 指令中添加了一個 style 屬性,它將 div 居中對齊。讓我們考慮以下示例來理解這一點:
styles:[`
   div{
      margin: 0 auto;
      text-align: center;
      width:200px;
   }
   .rotate{
      width:100px;
      height:100px;
      border:solid 1px red;
   }
`],
這裡,使用特殊字元 [``] 來新增 html 元素的樣式(如果有)。對於 div,我們給出了在 app.component.ts 檔案中定義的動畫名稱。
單擊按鈕時,它將呼叫 animate 函式,該函式在 app.component.ts 檔案中定義如下:
export class AppComponent {
   state: string = "smaller";
   animate() {
      this.state= this.state == ‘larger’? 'smaller' : 'larger';
   }
}
定義了 state 變數,並將其預設值設定為 smaller。animate 函式在點選時更改狀態。如果狀態為 larger,它將轉換為 smaller;如果狀態為 smaller,它將轉換為 larger。
這就是瀏覽器 (**https://:4200/**) 中的輸出外觀:

單擊“單擊我”按鈕後,影像的位置將發生更改,如下面的螢幕截圖所示:

transform 函式應用於 **y** 方向,當單擊“單擊我”按鈕時,它從 0 更改為 100px。影像儲存在 **assets/images** 資料夾中。
Angular 4 - 材料設計
**材料設計** 為您的專案提供了許多內建模組。自動完成、日期選擇器、滑塊、選單、網格和工具欄等功能可用於 Angular 4 中的材料設計。
要使用材料設計,我們需要匯入包。Angular 2 也具有上述所有功能,但它們作為 @angular/core 模組的一部分提供。Angular 4 提供了一個單獨的模組 **@angular/materials**。這有助於使用者匯入所需的材料設計元件。
要開始使用材料設計,您需要安裝兩個包 - 材料設計和 cdk。材料設計元件依賴於動畫模組才能實現高階功能,因此您需要相應的動畫包,即 @angular/animations。該包已在上一章中更新。
npm install --save @angular/material @angular/cdk
現在讓我們看看 package.json。已安裝 **@angular/material** 和 **@angular/cdk**。
{
   "name": "angularstart",
   "version": "0.0.0",
   "license": "MIT",
   "scripts": {
      "ng": "ng",
      "start": "ng serve",
      "build": "ng build",
      "test": "ng test",
      "lint": "ng lint",
      "e2e": "ng e2e"
   },

   "private": true,

   "dependencies": {
      "@angular/animations": "^4.0.0",
      "@angular/cdk": "^2.0.0-beta.8",
      "@angular/common": "^4.0.0",
      "@angular/compiler": "^4.0.0",
      "@angular/core": "^4.0.0",
      "@angular/forms": "^4.0.0",

      "@angular/http": "^4.0.0",
      "@angular/material": "^2.0.0-beta.8",
      "@angular/platform-browser": "^4.0.0",
      "@angular/platform-browser-dynamic": "^4.0.0",
      "@angular/router": "^4.0.0",
      "core-js": "^2.4.1",
      "rxjs": "^5.1.0",
      "zone.js": "^0.8.4"
   },

   "devDependencies": {
      "@angular/cli": "1.2.0",
      "@angular/compiler-cli": "^4.0.0",
      "@angular/language-service": "^4.0.0",
      "@types/jasmine": "~2.5.53",
      "@types/jasminewd2": "~2.0.2",
      "@types/node": "~6.0.60",
      "codelyzer": "~3.0.1",
      "jasmine-core": "~2.6.2",
      "jasmine-spec-reporter": "~4.1.0",

      "karma": "~1.7.0",
      "karma-chrome-launcher": "~2.1.1",
      "karma-cli": "~1.0.1",
      "karma-coverage-istanbul-reporter": "^1.2.1",
      "karma-jasmine": "~1.1.0",
      "karma-jasmine-html-reporter": "^0.2.2",

      "protractor": "~5.1.2",
      "ts-node": "~3.0.4",
      "tslint": "~5.3.2",
      "typescript": "~2.3.3"
   }
}
我們重點介紹了安裝以與材料設計一起使用的包。
我們現在將在父模組 - **app.module.ts** 中匯入模組,如下所示。
import { BrowserModule } from '@angular/platform-browser';
import { NgModule } from '@angular/core';

import { BrowserAnimationsModule } from '@angular/platform-browser/animations';
import { MdButtonModule, MdMenuModule, MdSidenavModule } from '@angular/material';

import { FormsModule } from '@angular/forms';
import { AppComponent } from './app.component';

@NgModule({
   declarations: [
      AppComponent
   ],
   imports: [
      BrowserModule,
      BrowserAnimationsModule,
      MdButtonModule,
      MdMenuModule,
      FormsModule,
      MdSidenavModule
   ],
   providers: [],
   bootstrap: [AppComponent]
})
export class AppModule { }
在上面的檔案中,我們從 @angular/materials 匯入了以下模組。
import { MdButtonModule, MdMenuModule, MdSidenavModule } from '@angular/material';
並在 imports 陣列中使用它們,如下所示:
imports: [
   BrowserModule,
   BrowserAnimationsModule,
   MdButtonModule,
   MdMenuModule,
   FormsModule,
   MdSidenavModule
]
**app.component.ts** 如下所示:
import { Component } from '@angular/core';

@Component({
   selector: 'app-root',
   templateUrl: './app.component.html',
   styleUrls: ['./app.component.css']
})

export class AppComponent {
   myData: Array<any>;
   constructor() {}
}
現在讓我們在 **app.component.html** 中新增材料設計元件。
<button md-button [mdMenuTriggerFor]="menu">Menu</button>
<md-menu #menu="mdMenu">
<button md-menu-item>
File
</button>
<button md-menu-item>
Save As
</button>
</md-menu>
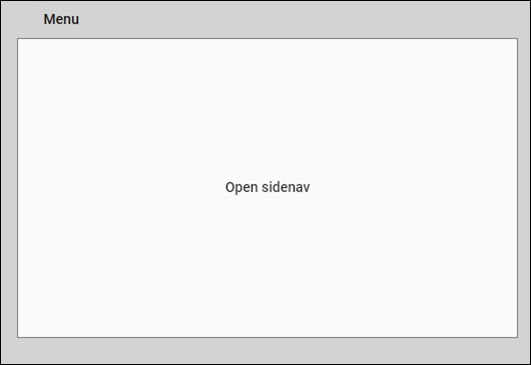
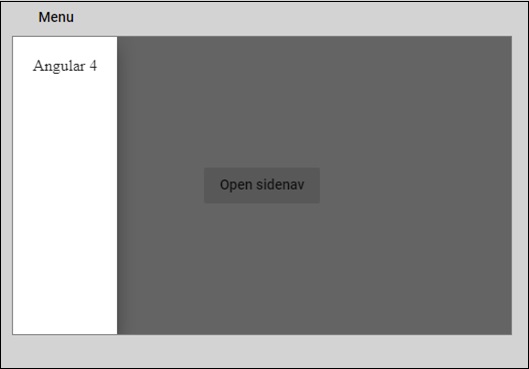
<md-sidenav-container class="example-container">
<md-sidenav #sidenav class="example-sidenav">
Angular 4
</md-sidenav>
<div class="example-sidenav-content">
<button type="button" md-button (click)="sidenav.open()">
Open sidenav
</button>
</div>
</md-sidenav-container>
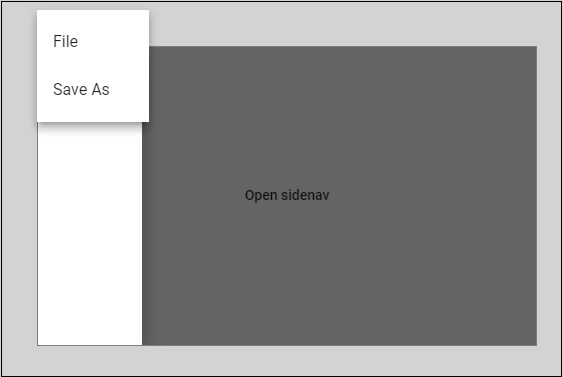
在上面的檔案中,我們添加了 Menu 和 SideNav。
選單
要新增選單,使用 **<md-menu></md-menu>**。**檔案** 和 **另存為** 專案新增到 **md-menu** 下的按鈕中。添加了一個主按鈕 **選單**。透過使用 **[mdMenuTriggerFor]=”menu”** 並使用帶有 **# 的 <md-menu>** 將其引用賦予 <md-menu>。
側邊導航欄
要新增 sidenav,我們需要 **<md-sidenav-container></md-sidenav-container>**。**<md-sidenav></md-sidenav>** 作為子元素新增到容器中。添加了另一個 div,它透過使用 **(click)=”sidenav.open()”** 來觸發 sidenav。以下是選單和 sidenav 在瀏覽器中的顯示:
單擊 **opensidenav** 後,它將顯示側邊欄,如下所示:
單擊選單後,您將獲得兩個專案 **檔案** 和 **另存為**,如下所示:
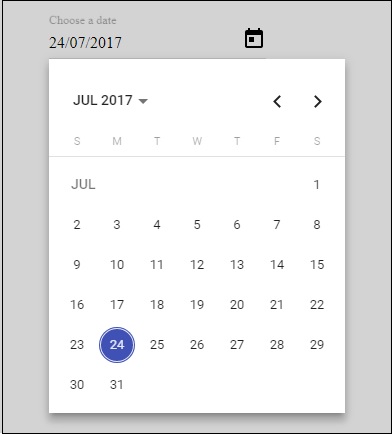
現在讓我們使用材料設計新增日期選擇器。要新增日期選擇器,我們需要匯入顯示日期選擇器所需的模組。
在 **app.module.ts** 中,我們匯入了以下模組,如下所示,用於日期選擇器。
import { BrowserModule } from '@angular/platform-browser';
import { NgModule } from '@angular/core';
import { BrowserAnimationsModule } from '@angular/platform-browser/animations';

import { MdDatepickerModule, MdInputModule, MdNativeDateModule } from '@angular/material';
import { FormsModule } from '@angular/forms';
import { AppComponent } from './app.component';

@NgModule({
   declarations: [
      AppComponent
   ],
   imports: [
      BrowserModule,
      BrowserAnimationsModule,
      FormsModule,
      MdDatepickerModule,
      MdInputModule,
      MdNativeDateModule
   ],
   providers: [],
   bootstrap: [AppComponent]
})
export class AppModule { }
在這裡,我們匯入了 **MdDatepickerModule、MdInputModule** 和 **MdNativeDateModule** 等模組。
現在,**app.component.ts** 如下所示:
import { Component } from '@angular/core';
@Component({
   selector: 'app-root',
   templateUrl: './app.component.html',
   styleUrls: ['./app.component.css']
})

export class AppComponent {
   myData: Array<any>;
   constructor() {}
}
**app.component.html** 如下所示:
<md-input-container>
   <input mdInput [mdDatepicker]="picker" placeholder="Choose a date">
   <button mdSuffix [mdDatepickerToggle]="picker"></button>
</md-input-container>

<md-datepicker #picker></md-datepicker>
這就是日期選擇器在瀏覽器中的顯示方式:
Angular 4 - CLI
Angular CLI 使啟動任何 Angular 專案變得容易。Angular CLI 附帶的命令可以幫助我們快速建立和啟動專案。現在讓我們瞭解一下可用於建立專案、元件和服務、更改埠等的命令。
要使用 Angular CLI,我們需要在系統上安裝它。讓我們使用以下命令:
npm install -g @angular/cli
要建立一個新專案,我們可以在命令列中執行以下命令,然後將建立該專案。
ng new PROJECT-NAME
cd PROJECT-NAME
ng serve //
ng serve // 將編譯,您可以在瀏覽器中看到專案的輸出:
https://:4200/
建立新專案時使用 4200 作為預設埠。您可以使用以下命令更改埠:
ng serve --host 0.0.0.0 --port 4201
下表列出了使用 Angular 4 專案時所需的一些重要命令。
| 元件 | ng g component new-component |
| 指令 | ng g directive new-directive |
| 管道 | ng g pipe new-pipe |
| 服務 | ng g service new-service |
| 模組 | ng g module my-module |
每當建立新的模組、元件或服務時,都會在父模組 **app.module.ts** 中更新其引用。
Angular 4 - 示例
在本章中,我們將討論一些與 Angular 4 相關的示例。
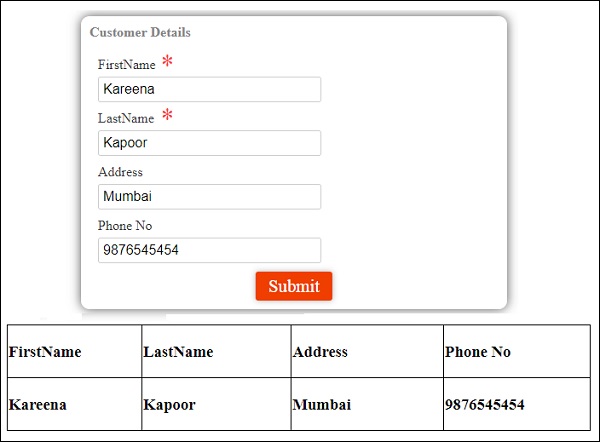
首先,我們建立了一個示例,該示例顯示一個登入表單,其輸入為 **使用者名稱** 和 **密碼**。輸入正確的值後,它將進入內部並顯示另一個表單,您可以在其中輸入客戶詳細資訊。此外,我們還建立了四個元件 - header、footer、userlogin 和 mainpage。
元件是使用以下命令建立的:
ng g component header
C:\ngexamples\aexamples>ng g component header
installing component
   create src\app\header\header.component.css
   create src\app\header\header.component.html
   create src\app\header\header.component.spec.ts
   create src\app\header\header.component.ts
   update src\app\app.module.ts
ng g component footer
C:\ngexamples\aexamples>ng g component footer
installing component
   create src\app\footer\footer.component.css
   create src\app\footer\footer.component.html
   create src\app\footer\footer.component.spec.ts
   create src\app\footer\footer.component.ts
   update src\app\app.module.ts
ng g component userlogin
C:\ngexamples\aexamples>ng g component userlogin
installing component
   create src\app\userlogin\userlogin.component.css
   create src\app\userlogin\userlogin.component.html
   create src\app\userlogin\userlogin.component.spec.ts
   create src\app\userlogin\userlogin.component.ts
   update src\app\app.module.ts
ng g component mainpage
C:\ngexamples\aexamples>ng g component mainpage
installing component
   create src\app\mainpage\mainpage.component.css
   create src\app\mainpage\mainpage.component.html
   create src\app\mainpage\mainpage.component.spec.ts
   create src\app\mainpage\mainpage.component.ts
   update src\app\app.module.ts
在 **app.module.ts** 中,父模組在建立時添加了所有元件。該檔案如下所示:
import { BrowserModule } from '@angular/platform-browser';
import { NgModule } from '@angular/core';
import { ReactiveFormsModule } from '@angular/forms';

import { RouterModule, Routes} froms '@angular/router';
import { BrowserAnimationsModule } from '@angular/platform-browser/animations';
import {MdTableModule} from '@angular/material';

import {HttpModule} from "@angular/http";
import {MdInputModule} from '@angular/material';
import { AppComponent } from './app.component';

import { HeaderComponent } from './header/header.component';
import { FooterComponent } from './footer/footer.component';
import { UserloginComponent } from './userlogin/userlogin.component';
import { MainpageComponent } from './mainpage/mainpage.component';

const appRoutes: Routes = [
   {
      path: '',
      component: UserloginComponent
   },
   {
      path: 'app-mainpage',
      component: MainpageComponent
   }
];

@NgModule({
   declarations: [
      AppComponent,
      HeaderComponent,
      FooterComponent,
      UserloginComponent,
      MainpageComponent
   ],

   imports: [
      BrowserModule,
      ReactiveFormsModule,
      RouterModule.forRoot(appRoutes),
      BrowserAnimationsModule,
      HttpModule,
      MdTableModule,
      MdInputModule
   ],

   providers: [],
   bootstrap: [AppComponent]
})
export class AppModule { }
添加了上面建立的元件:
import { HeaderComponent } from './header/header.component';
import { FooterComponent } from './footer/footer.component';
import { UserloginComponent } from './userlogin/userlogin.component';
import { MainpageComponent } from './mainpage/mainpage.component';
這些元件也新增到 declarations 中:
declarations: [
   AppComponent,
   HeaderComponent,
   FooterComponent,
   UserloginComponent,
   MainpageComponent
],
在父 **app.component.html** 中,我們添加了使用者將看到的該檔案的主要結構。
<div class="mainpage">
   <app-header></app-header>
   <router-outlet></router-outlet>
   <app-footer></app-footer>
</div>
我們建立了一個 div 並添加了 **<app-header></app-header>**、**<router-outlet></router-outlet>** 和 **<app-footer></app-footer>**。
**<router-outlet></router-outlet>** 用於在頁面之間導航。在這裡,頁面是登入表單,一旦成功,它將重定向到 mainpage,即客戶表單。
要首先獲取登入表單,然後獲取 mainpage.component.html,需要在 **app.module.ts** 中進行如下所示的更改:
import { BrowserModule } from '@angular/platform-browser';
import { NgModule } from '@angular/core';
import { ReactiveFormsModule } from '@angular/forms';

import { RouterModule, Routes} from '@angular/router';
import { BrowserAnimationsModule } from '@angular/platform-browser/animations';
import {MdTableModule} from '@angular/material';

import {HttpModule} from "@angular/http";
import {MdInputModule} from '@angular/material';
import { AppComponent } from './app.component';

import { HeaderComponent } from './header/header.component';
import { FooterComponent } from './footer/footer.component';
import { UserloginComponent } from './userlogin/userlogin.component';
import { MainpageComponent } from './mainpage/mainpage.component';

const appRoutes: Routes = [
   {
      path: '',
      component: UserloginComponent
   },
   {
      path: 'app-mainpage',
      component: MainpageComponent
   }
];

@NgModule({
   declarations: [
      AppComponent,
      HeaderComponent,
      FooterComponent,
      UserloginComponent,
      MainpageComponent
   ],

   imports: [
      BrowserModule,
      ReactiveFormsModule,
      RouterModule.forRoot(appRoutes),
      BrowserAnimationsModule,
      HttpModule,
      MdTableModule,
      MdInputModule
   ],
   providers: [],
   bootstrap: [AppComponent]
})
export class AppModule { }
我們從 **@anuglar/router** 匯入了 **RouterModule** 和 **Routes**。在 imports 中,RouterModule 以 appRoutes 作為引數,該引數在上面定義為:
const appRoutes: Routes = [
   {
      path: '',
      component: UserloginComponent
   },
   {
      path: 'app-mainpage',
      component: MainpageComponent
   }
];
Routes 獲取元件陣列,預設情況下呼叫 userloginComponent。
在**userlogin.component.ts**檔案中,我們匯入了路由器,並根據如下所示的條件跳轉到mainpage.component.html。
import { Component, OnInit } from '@angular/core';
import { FormGroup, FormControl, Validators} from '@angular/forms';
import { Router} from '@angular/router';

@Component({
   selector: 'app-userlogin',
   templateUrl: './userlogin.component.html',
   styleUrls: ['./userlogin.component.css']
})

export class UserloginComponent implements OnInit {
   formdata;
   constructor(private router: Router) { }
   ngOnInit() {
      this.formdata = new FormGroup({
         uname: new FormControl("", Validators.compose([
            Validators.required,
            Validators.minLength(6)
         ])),
         passwd: new FormControl("", this.passwordvalidation)
      });
   }

   passwordvalidation(formcontrol) {
      if (formcontrol.value.length < 5) {
         return {"passwd" : true};
      }
   }

   onClickSubmit(data) {
      console.log(data.uname);
      if (data.uname=="systemadmin" && data.passwd=="admin123") {
         alert("Login Successful");
         this.router.navigate(['app-mainpage'])
      } else {
         alert("Invalid Login");
         return false;
      }
   }
}
以下是**app.component.ts**的.ts檔案。其中只有預設細節。
import { Component } from '@angular/core';

@Component({
   selector: 'app-root',
   templateUrl: './app.component.html',
   styleUrls: ['./app.component.css']
})
export class AppComponent {title = 'app';}
現在讓我們顯示每個元件檔案的細節。首先,我們來看一下頭部元件。對於新的元件,建立了四個檔案:**header.component.ts、header.component.html、header.component.css和header.component.spec.ts**。
header.component.ts
import { Component, OnInit } from '@angular/core';

@Component({
   selector: 'app-header',
   templateUrl: './header.component.html',
   styleUrls: ['./header.component.css']
})

export class HeaderComponent implements OnInit {
   constructor() { }
   ngOnInit() {}
}
header.component.html
<div>
   <hr />
</div>
我們沒有新增任何css樣式。這使得header.component.css檔案為空。同樣,由於此處未考慮測試用例,**header.compoent.spec.ts**檔案也為空。
對於頭部,我們將繪製一條水平線。可以新增徽標或其他細節,使頭部看起來更具創意。
現在讓我們考慮建立一個頁尾元件。
對於頁尾元件,建立了**footer.component.ts、footer.component.html、footer.component.spec.ts和footer.component.css**檔案。
footer.component.ts
import { Component, OnInit } from '@angular/core';

@Component({
   selector: 'app-footer',
   templateUrl: './footer.component.html',
   styleUrls: ['./footer.component.css']
})

export class FooterComponent implements OnInit {
   constructor() { }
   ngOnInit() { }
}
footer.component.html
<hr/>
由於我們沒有新增任何css樣式,**footer.component.css**檔案為空。同樣,由於此處未考慮測試用例,**footer.compoent.spec.ts**檔案也為空。
對於頁尾,我們只繪製一條水平線,如.html檔案中所示。
現在讓我們看看userlogin元件是如何工作的。為userlogin元件建立的檔案有**userlogin.component.css、userlogin.component.html、userlogin.component.ts和userlogin.component.spec.ts**。
檔案的詳細資訊如下:
userlogin.component.html
<div class="form_container">
   <form [formGroup]="formdata" (ngSubmit) = "onClickSubmit(formdata.value)" >
      <header>Login</header>
      <label>Username <span>*</span></label>
      <input type="text" name="uname" formControlName="uname"/>

      <div class="help">At least 6 character</div>
      <label>Password <span>*</span></label>
      <input type="password" class="fortextbox" name="passwd" formControlName="passwd"/>

      <div class="help">Use upper and lowercase lettes as well</div>
      <button [disabled]="!formdata.valid" value="Login">Login</button>
   </form>
</div>
在這裡,我們建立了一個包含兩個輸入控制元件**使用者名稱**和**密碼**的表單。這是一種模型驅動表單方法,其詳細資訊在第14章 - 表單中解釋。
我們將使用者名稱和密碼視為必填項,因此在ts檔案中添加了相應的驗證。點選提交按鈕後,控制權將傳遞給在ts檔案中定義的**onClickSubmit**函式。
userlogin.component.ts
import { Component, OnInit } from '@angular/core';
import { FormGroup, FormControl, Validators} from '@angular/forms';
import { Router} from '@angular/router';

@Component({
   selector: 'app-userlogin',
   templateUrl: './userlogin.component.html',
   styleUrls: ['./userlogin.component.css']
})

export class UserloginComponent implements OnInit {
   formdata;
   constructor(private router: Router) { }
   ngOnInit() {
      this.formdata = new FormGroup({
         uname: new FormControl("", Validators.compose([
            Validators.required,
            Validators.minLength(6)
         ])),
         passwd: new FormControl("", this.passwordvalidation)
      });
   }
   passwordvalidation(formcontrol) {
      if (formcontrol.value.length < 5) {
         return {"passwd" : true};
      }
   }
   onClickSubmit(data) {
      console.log(data.uname);
      if (data.uname == "systemadmin" && data.passwd == "admin123") {
         alert("Login Successful");
         this.router.navigate(['app-mainpage'])
      }
   }
}
對於表單控制元件和驗證,模組按如下所示匯入:
import { FormGroup, FormControl, Validators} from '@angular/forms';
當用戶名和密碼正確時,我們需要一個路由器來導航到不同的元件。為此,路由器按如下所示匯入:
import { Router} from '@angular/router';
在**ngOnInit**中,對錶單進行驗證。我們需要使用者名稱超過六個字元,並且該欄位是必填項。密碼也適用相同的條件。
點選提交後,我們可以檢查使用者名稱是否為**systemadmin**,密碼是否為**admin123**。如果是,則會出現一個顯示**登入成功**的對話方塊,並且路由器會導航到app-mainpage,這是mainpage元件的選擇器。
在**userlogin.component.css**檔案中為表單添加了css樣式:
.form_container{
   margin : 0 auto;
   width:600px;
}

form {
   background: white;
   width: 500px;
   box-shadow: 0px 0px 20px rgba(0, 0, 0, 0.7);
   font-family: lato;
   position: relative;
   color: #333;
   border-radius: 10px;
}

form header {
   background: #FF3838;
   padding: 30px 20px;
   color: white;
   font-size: 1.2em;
   font-weight: 600;
   border-radius: 10px 10px 0 0;
}

form label {
   margin-left: 20px;
   display: inline-block;
   margin-top: 30px;
   margin-bottom: 5px;
   position: relative;
}

form label span {
   color: #FF3838;
   font-size: 2em;
   position: absolute;
   left: 2.3em;
   top: -10px;
}
form input {
   display: block;
   width: 50%;
   margin-left: 20px;
   padding: 5px 20px;
   font-size: 1em;
   border-radius: 3px;
   outline: none;
   border: 1px solid #ccc;
}

form .help {
   margin-left: 20px;
   font-size: 0.8em;
   color: #777;
}

form button {
   position: relative;
   margin-top: 30px;
   margin-bottom: 30px;
   left: 50%;
   transform: translate(-50%, 0);
   font-family: inherit;
   color: white;
   background: #FF3838;
   outline: none;
   border: none;
   padding: 5px 15px;
   font-size: 1.3em;
   font-weight: 400;
   border-radius: 3px;
   box-shadow: 0px 0px 10px rgba(51, 51, 51, 0.4);
   cursor: pointer;
   transition: all 0.15s ease-in-out;
}
form button:hover {
   background: #ff5252;
}
**userlogin.component.spec.ts**檔案為空,因為目前沒有測試用例。
現在讓我們討論mainpage元件是如何工作的。為mainpage元件建立的檔案有**mainpage.component.ts、mainpage.component.html、mainpage.component.css和mainpage.component.spect.ts**。
mainpage.component.ts
import { Component, OnInit, ViewChild} from '@angular/core';
import { FormGroup, FormControl, Validators} from '@angular/forms';

import {Http, Response, Headers, RequestOptions } from "@angular/http";
import 'rxjs/add/operator/map';

@Component({
   selector: 'app-mainpage',
   templateUrl: './mainpage.component.html',
   styleUrls: ['./mainpage.component.css']
})

export class MainpageComponent implements OnInit {
   formdata;
   cutomerdata;
   constructor(private http: Http) { }
   stateCtrl: FormControl;
   ngOnInit() {
      this.formdata = new FormGroup({
         fname: new FormControl("", Validators.compose([
            Validators.required,
            Validators.minLength(3)
         ])),
         lname: new FormControl("", Validators.compose([
            Validators.required,
            Validators.minLength(3)
         ])),
         address:new FormControl(""),
         phoneno:new FormControl("")
      });
   }
   onClickSubmit(data) {
      document.getElementById("custtable").style.display="";
      this.cutomerdata = [];
      for (var prop in data) {
         this.cutomerdata.push(data[prop]);
      }
      console.log(this.cutomerdata);
   }
}
我們建立了一個包含名字、姓氏、地址和電話號碼的客戶表單。使用**ngOnInit**函式對錶單進行驗證。點選提交後,控制權將傳遞到**onClickSubmit**函式。在這裡,用於顯示輸入詳細資訊的表格將可見。
customerdata從json轉換為陣列,以便我們可以在.html檔案中使用ngFor在表格中使用它,如下所示。
mainpage.component.html
<div class="form_container">
   <form [formGroup]="formdata" (ngSubmit) = "onClickSubmit(formdata.value)" >
      <header>Customer Details</header>
      <label>FirstName <span>*</span></label>
      <input type="text" name="fname" formControlName="fname"/>
      <label>LastName <span>*</span></label>

      <input type="text" name="lname" formControlName="lname"/>
      <label>Address <span></span></label>
      <input type="text" name="address" formControlName="address"/>
      <label>Phone No <span></span></label>
      <input type="text" name="phoneno" formControlName="phoneno"/>
      <button [disabled]="!formdata.valid" value="Submit">Submit</button>
   </form>
</div>
<br/>

<div id="custtable" style="display:none;margin:0 auto;">
   <table>
      <tr>
         <td>FirstName</td>
         <td>LastName</td>
         <td>Address</td>
         <td>Phone No</td>
      </tr>
      <tr>
         <td *ngFor="let data of cutomerdata">
            <h5>{{data}}</h5>
         </td>
      </tr>
   </table>
</div>
這裡,第一個div包含客戶詳細資訊,第二個div包含表格,該表格將顯示輸入的詳細資訊。使用者登入和客戶詳細資訊的顯示如下所示。這是一個帶有登入表單、頭部和頁尾的頁面。
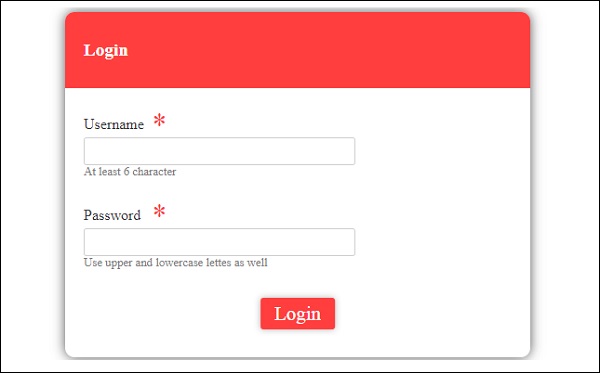
輸入詳細資訊後,顯示如下所示
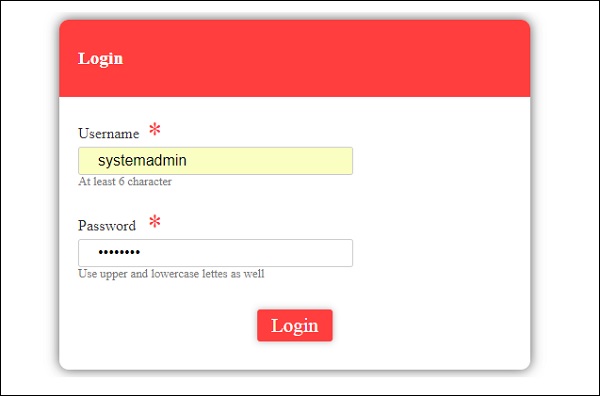
點選提交後,會出現一個顯示“登入成功”的對話方塊。
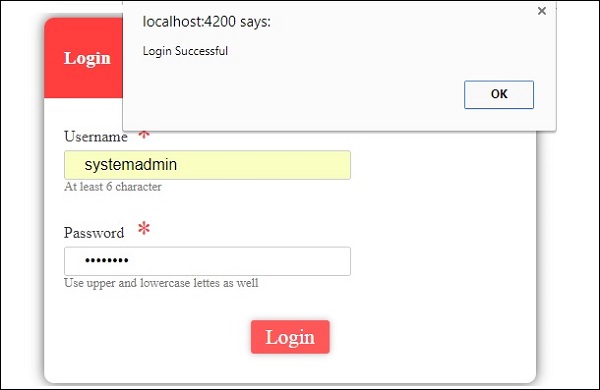
如果詳細資訊無效,則會出現一個顯示“登入無效”的對話方塊,如下所示:

如果登入成功,則將繼續進行客戶詳細資訊的下一個表單,如下所示:

輸入並提交詳細資訊後,會出現一個顯示“客戶詳細資訊已新增”的對話方塊,如下面的螢幕截圖所示:
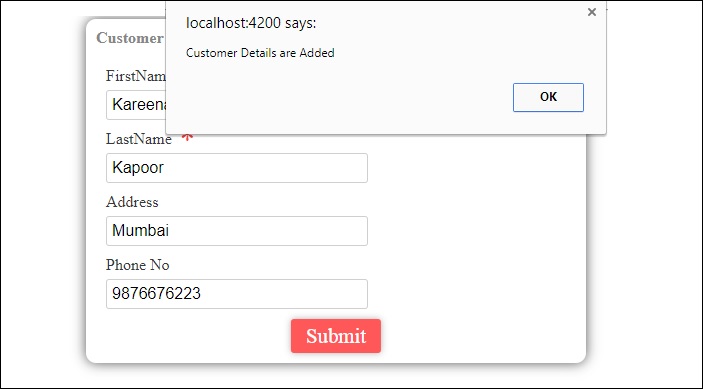
在上面的螢幕截圖中點選“確定”後,詳細資訊將顯示如下面的螢幕截圖所示: