- Angular 4 教程
- Angular 4 - 首頁
- Angular 4 – 概覽
- Angular 4 – 環境設定
- Angular 4 – 專案設定
- Angular 4 – 元件
- Angular 4 – 模組
- Angular 4 – 資料繫結
- Angular 4 – 事件繫結
- Angular 4 – 模板
- Angular 4 – 指令
- Angular 4 – 管道
- Angular 4 – 路由
- Angular 4 – 服務
- Angular 4 – Http 服務
- Angular 4 – 表單
- Angular 4 - 動畫
- Angular 4 – 材質設計
- Angular 4 – CLI
- Angular 4 – 示例
- Angular 4 有用資源
- Angular 4 - 快速指南
- Angular 4 - 有用資源
- Angular 4 - 討論
Angular 4 - 動畫
動畫在 html 元素之間添加了許多互動。Angular2 中也提供了動畫功能。Angular 4 與 Angular2 的區別在於,動畫不再是 @angular/core 庫的一部分,而是一個需要在 app.module.ts 中匯入的單獨包。
首先,我們需要匯入庫,如下所示:
import { BrowserAnimationsModule } from '@angular/platform-browser/animations';
需要將 BrowserAnimationsModule 新增到 app.module.ts 中的匯入陣列中,如下所示:
app.module.ts
import { BrowserModule } from '@angular/platform-browser';
import { NgModule } from '@angular/core';

import { BrowserAnimationsModule } from '@angular/platform-browser/animations';
import { AppComponent } from './app.component';

@NgModule({
   declarations: [
      AppComponent
   ],
   imports: [
      BrowserModule,
      BrowserAnimationsModule
   ],
   providers: [],
   bootstrap: [AppComponent]
})
export class AppModule { }
在 app.component.html 中,我們添加了需要進行動畫的 html 元素。
<div>
   <button (click)="animate()">Click Me</button>
   <div [@myanimation] = "state" class="rotate">
      <img src="assets/images/img.png" width="100" height="100">
   </div>
</div>
對於主 div,我們添加了一個按鈕和一個包含影像的 div。有一個點選事件,呼叫 animate 函式。對於 div,添加了 @myanimation 指令並將其值設定為 state。
現在讓我們看看定義動畫的 app.component.ts 檔案。
import { Component } from '@angular/core';
import { trigger, state, style, transition, animate } from '@angular/animations';

@Component({
   selector: 'app-root',
   templateUrl: './app.component.html',
   styleUrls: ['./app.component.css'],
   styles:[`
      div{
         margin: 0 auto;
         text-align: center;
         width:200px;
      }
      .rotate{
         width:100px;
         height:100px;
         border:solid 1px red;
      }
   `],
   animations: [
      trigger('myanimation',[
         state('smaller',style({
            transform : 'translateY(100px)'
         })),
         state('larger',style({
            transform : 'translateY(0px)'
         })),
         transition('smaller <=> larger',animate('300ms ease-in'))
      ])
   ]
})

export class AppComponent {
   state: string = "smaller";
   animate() {
      this.state= this.state == 'larger' ? 'smaller' : 'larger';
   }
}
我們必須匯入要在 .ts 檔案中使用的動畫函式,如上所示。
import { trigger, state, style, transition, animate } from '@angular/animations';
在這裡,我們從 @angular/animations 中匯入了 trigger、state、style、transition 和 animate。
現在,我們將動畫屬性新增到 @Component() 裝飾器中:
animations: [
   trigger('myanimation',[
      state('smaller',style({
         transform : 'translateY(100px)'
      })),
      state('larger',style({
         transform : 'translateY(0px)'
      })),
      transition('smaller <=> larger',animate('300ms ease-in'))
   ])
]
Trigger 定義動畫的開始。第一個引數是需要應用動畫的 html 標籤要賦予的動畫名稱。第二個引數是我們匯入的函式 - state、transition 等。
state 函式包含元素將在其間過渡的動畫步驟。現在我們定義了兩個狀態,smaller 和 larger。對於 smaller 狀態,我們給出了樣式 transform:translateY(100px) 和 transform:translateY(100px)。
Transition 函式向 html 元素新增動畫。第一個引數獲取狀態,即開始和結束;第二個引數接受 animate 函式。animate 函式允許您定義過渡的長度、延遲和緩動。
現在讓我們看看 .html 檔案,看看 transition 函式是如何工作的。
<div>
   <button (click)="animate()">Click Me</button>
   <div [@myanimation] = "state" class="rotate">
      <img src="assets/images/img.png" width="100" height="100">
   </div>
</div>
在 @component 指令中添加了一個 style 屬性,它將 div 居中對齊。讓我們考慮以下示例來理解這一點:
styles:[`
   div{
      margin: 0 auto;
      text-align: center;
      width:200px;
   }
   .rotate{
      width:100px;
      height:100px;
      border:solid 1px red;
   }
`],
在這裡,使用特殊字元 [``] 向 html 元素新增樣式(如果有)。對於 div,我們給出了在 app.component.ts 檔案中定義的動畫名稱。
點選按鈕時,它會呼叫 animate 函式,該函式在 app.component.ts 檔案中定義如下:
export class AppComponent {
   state: string = "smaller";
   animate() {
      this.state= this.state == ‘larger’? 'smaller' : 'larger';
   }
}
定義了 state 變數,並將其預設值設定為 smaller。animate 函式在點選時更改狀態。如果狀態為 larger,它將轉換為 smaller;如果為 smaller,它將轉換為 larger。
瀏覽器中的輸出 (https://:4200/) 將如下所示:
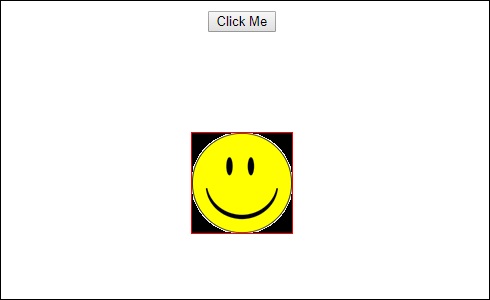
點選“點選我”按鈕後,影像的位置會發生變化,如下面的螢幕截圖所示:
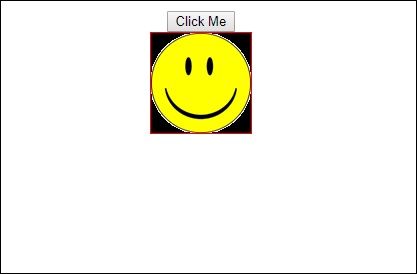
transform 函式應用於 y 方向,當點選“點選我”按鈕時,它從 0 更改為 100px。影像儲存在 assets/images 資料夾中。