- WebRTC 教程
- WebRTC - 首頁
- WebRTC - 概述
- WebRTC - 架構
- WebRTC - 環境
- WebRTC - MediaStream APIs
- WebRTC - RTCPeerConnection APIs
- WebRTC - RTCDataChannel APIs
- WebRTC - 傳送訊息
- WebRTC - 信令
- WebRTC - 瀏覽器支援
- WebRTC - 移動端支援
- WebRTC - 影片演示
- WebRTC - 語音演示
- WebRTC - 文字演示
- WebRTC - 安全性
- WebRTC 資源
- WebRTC - 快速指南
- WebRTC - 有用資源
- WebRTC - 討論
WebRTC - 信令
大多數 WebRTC 應用不僅僅是能夠透過影片和音訊進行通訊。它們需要許多其他功能。在本章中,我們將構建一個基本的信令伺服器。
信令和協商
要連線到另一個使用者,您應該知道他在網路上的位置。您的裝置的IP地址允許啟用網際網路的裝置彼此之間直接傳送資料。RTCPeerConnection 物件負責此操作。一旦裝置知道如何在網際網路上找到彼此,它們就開始交換有關每個裝置支援的協議和編解碼器的資訊。
要與另一個使用者通訊,您只需交換聯絡資訊,其餘部分將由 WebRTC 完成。連線到另一個使用者的過程也稱為信令和協商。它包括以下幾個步驟:
建立對等連線的潛在候選者列表。
使用者或應用程式選擇一個使用者進行連線。
信令層通知另一個使用者有人想要連線到他。他可以接受或拒絕。
第一個使用者收到對報價的接受通知。
第一個使用者使用另一個使用者啟動RTCPeerConnection。
兩個使用者透過信令伺服器交換軟體和硬體資訊。
兩個使用者交換位置資訊。
連線成功或失敗。
WebRTC 規範不包含任何關於交換資訊的標準。因此,請記住,以上只是信令發生方式的一個示例。您可以使用任何您喜歡的協議或技術。
構建伺服器
我們將構建的伺服器能夠將兩個不在同一臺計算機上的使用者連線在一起。我們將建立我們自己的信令機制。我們的信令伺服器將允許一個使用者呼叫另一個使用者。一旦使用者呼叫了另一個使用者,伺服器就會在他們之間傳遞 offer、answer 和 ICE 候選者,並建立 WebRTC 連線。

上圖是使用信令伺服器時使用者之間的訊息流。首先,每個使用者向伺服器註冊。在本例中,這將是一個簡單的字串使用者名稱。使用者註冊後,他們就可以互相呼叫了。使用者 1 使用他希望呼叫的使用者的識別符號發出一個 offer。另一個使用者應該回答。最後,ICE 候選者在使用者之間傳送,直到他們能夠建立連線。
要建立 WebRTC 連線,客戶端必須能夠在不使用 WebRTC 對等連線的情況下傳輸訊息。這就是我們將使用 HTML5 WebSockets 的地方——兩個端點(Web 伺服器和 Web 瀏覽器)之間的雙向套接字連線。現在讓我們開始使用 WebSocket 庫。建立server.js檔案並插入以下程式碼:
//require our websocket library
var WebSocketServer = require('ws').Server;

//creating a websocket server at port 9090
var wss = new WebSocketServer({port: 9090});

//when a user connects to our sever
wss.on('connection', function(connection) {
   console.log("user connected");

   //when server gets a message from a connected user
   connection.on('message', function(message){
      console.log("Got message from a user:", message);
   });

   connection.send("Hello from server");
});
第一行需要我們已經安裝的 WebSocket 庫。然後我們在埠 9090 上建立一個套接字伺服器。接下來,我們監聽connection事件。當用戶與伺服器建立 WebSocket 連線時,將執行此程式碼。然後,我們監聽使用者傳送的任何訊息。最後,我們向已連線的使用者傳送“Hello from server”的響應。
現在執行node server,伺服器應該開始監聽套接字連線。
為了測試我們的伺服器,我們將使用我們也已經安裝的wscat實用程式。此工具有助於直接連線到 WebSocket 伺服器並測試命令。在一個終端視窗中執行我們的伺服器,然後開啟另一個視窗並執行wscat -c ws://:9090命令。您應該在客戶端看到以下內容:

伺服器還應該記錄已連線的使用者:

使用者註冊
在我們的信令伺服器中,我們將為每個連線使用基於字串的使用者名稱,以便我們知道將訊息傳送到哪裡。讓我們稍微更改一下我們的connection處理程式:
connection.on('message', function(message) {
   var data;

   //accepting only JSON messages
   try {
      data = JSON.parse(message);
   } catch (e) {
      console.log("Invalid JSON");
      data = {};
   }

});
這樣,我們只接受 JSON 訊息。接下來,我們需要將所有已連線的使用者儲存在某個地方。我們將為此使用一個簡單的 Javascript 物件。更改我們檔案頂部的內容:
//require our websocket library
var WebSocketServer = require('ws').Server;

//creating a websocket server at port 9090
var wss = new WebSocketServer({port: 9090});

//all connected to the server users
var users = {};
我們將為來自客戶端的每條訊息新增一個type欄位。例如,如果使用者想要登入,他傳送login型別的訊息。讓我們定義它:
connection.on('message', function(message){
   var data;

   //accepting only JSON messages
   try {
      data = JSON.parse(message);
   } catch (e) {
      console.log("Invalid JSON");
      data = {};
   }

   //switching type of the user message
   switch (data.type) {
      //when a user tries to login
      case "login":
         console.log("User logged:", data.name);

         //if anyone is logged in with this username then refuse
         if(users[data.name]) {
            sendTo(connection, {
               type: "login",
               success: false
            });
         } else {
            //save user connection on the server
            users[data.name] = connection;
            connection.name = data.name;

            sendTo(connection, {
               type: "login",
               success: true
            });

         }

         break;

      default:
         sendTo(connection, {
            type: "error",
            message: "Command no found: " + data.type
         });

         break;
   }

});
如果使用者傳送一條帶有login型別的訊息,我們將:
檢查是否有人已經使用此使用者名稱登入
如果是,則告訴使用者他未成功登入
如果沒有人使用此使用者名稱,我們將使用者名稱作為鍵新增到連線物件。
如果命令無法識別,我們將傳送錯誤。
以下程式碼是用於向連線傳送訊息的輔助函式。將其新增到server.js檔案中:
function sendTo(connection, message) {
   connection.send(JSON.stringify(message));
}
上述函式確保我們所有的訊息都以 JSON 格式傳送。
當用戶斷開連線時,我們應該清理其連線。當close事件觸發時,我們可以刪除使用者。將以下程式碼新增到connection處理程式中:
connection.on("close", function() {
   if(connection.name) {
      delete users[connection.name];
   }
});
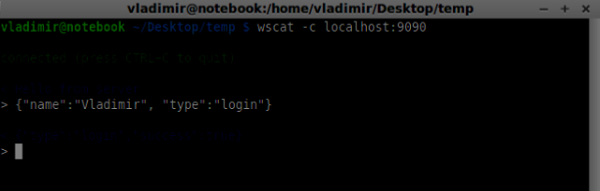
現在讓我們使用登入命令測試我們的伺服器。請記住,所有訊息都必須以 JSON 格式編碼。執行我們的伺服器並嘗試登入。您應該看到類似以下內容:
撥打電話
成功登入後,使用者想要呼叫另一個使用者。他應該向另一個使用者發出offer來實現它。新增offer處理程式:
case "offer":
   //for ex. UserA wants to call UserB
   console.log("Sending offer to: ", data.name);

   //if UserB exists then send him offer details
   var conn = users[data.name];

   if(conn != null){
      //setting that UserA connected with UserB
      connection.otherName = data.name;

      sendTo(conn, {
         type: "offer",
         offer: data.offer,
         name: connection.name
      });
   }

   break;
首先,我們獲取我們嘗試呼叫的使用者connection。如果它存在,我們將向他傳送offer詳細資訊。我們還將otherName新增到connection物件。這是為了簡化以後查詢它。
應答
對響應的應答具有與我們在offer處理程式中使用的類似模式。我們的伺服器只是將所有訊息作為answer傳遞給另一個使用者。在offer處理程式之後新增以下程式碼:
case "answer":
   console.log("Sending answer to: ", data.name);

   //for ex. UserB answers UserA
   var conn = users[data.name];

   if(conn != null) {
      connection.otherName = data.name;
      sendTo(conn, {
         type: "answer",
         answer: data.answer
      });
   }

   break;
您可以看到這與offer處理程式如何相似。請注意,此程式碼遵循RTCPeerConnection物件上的createOffer和createAnswer函式。
現在我們可以測試我們的 offer/answer 機制。同時連線兩個客戶端並嘗試發出 offer 和 answer。您應該看到以下內容:
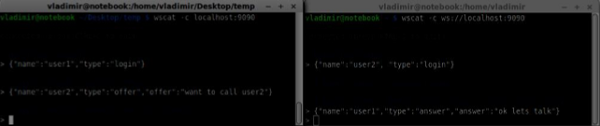
在此示例中,offer和answer是簡單的字串,但在實際應用程式中,它們將填充 SDP 資料。
ICE 候選者
最後一部分是在使用者之間處理 ICE 候選者。我們使用相同的技術將訊息傳遞給使用者。主要區別在於,候選者訊息可能每個使用者多次發生,並且順序可能不同。新增candidate處理程式:
case "candidate":
   console.log("Sending candidate to:",data.name);
   var conn = users[data.name];

   if(conn != null) {
      sendTo(conn, {
         type: "candidate",
         candidate: data.candidate
      });
   }

   break;
它應該與offer和answer處理程式類似地工作。
離開連線
為了允許我們的使用者從另一個使用者斷開連線,我們應該實現結束通話功能。它還會告訴伺服器刪除所有使用者引用。新增leave處理程式:
case "leave":
   console.log("Disconnecting from", data.name);
   var conn = users[data.name];
   conn.otherName = null;

   //notify the other user so he can disconnect his peer connection
   if(conn != null) {
      sendTo(conn, {
         type: "leave"
      });
   }

   break;
這也會向另一個使用者傳送leave事件,以便他可以相應地斷開他的對等連線。我們還應該處理使用者從信令伺服器中斷開連線的情況。讓我們修改我們的close處理程式:
connection.on("close", function() {

   if(connection.name) {
      delete users[connection.name];

      if(connection.otherName) {
         console.log("Disconnecting from ", connection.otherName);
         var conn = users[connection.otherName];
         conn.otherName = null;

         if(conn != null) {
            sendTo(conn, {
               type: "leave"
            });
         }
      }
   }
});
現在,如果連線終止,我們的使用者將斷開連線。當我們仍處於offer、answer或candidate狀態時,使用者關閉瀏覽器視窗時將觸發close事件。
完整的信令伺服器
這是我們信令伺服器的完整程式碼:
//require our websocket library
var WebSocketServer = require('ws').Server;

//creating a websocket server at port 9090
var wss = new WebSocketServer({port: 9090});

//all connected to the server users
var users = {};

//when a user connects to our sever
wss.on('connection', function(connection) {

   console.log("User connected");

   //when server gets a message from a connected user
   connection.on('message', function(message) {

      var data;
      //accepting only JSON messages
      try {
         data = JSON.parse(message);
      } catch (e) {
         console.log("Invalid JSON");
         data = {};
      }

      //switching type of the user message
      switch (data.type) {
         //when a user tries to login

         case "login":
            console.log("User logged", data.name);

            //if anyone is logged in with this username then refuse
            if(users[data.name]) {
               sendTo(connection, {
                  type: "login",
                  success: false
               });
            } else {
               //save user connection on the server
               users[data.name] = connection;
               connection.name = data.name;

               sendTo(connection, {
                  type: "login",
                  success: true
               });
            }

            break;

         case "offer":
            //for ex. UserA wants to call UserB
            console.log("Sending offer to: ", data.name);

            //if UserB exists then send him offer details
            var conn = users[data.name];

            if(conn != null) {
               //setting that UserA connected with UserB
               connection.otherName = data.name;

               sendTo(conn, {
                  type: "offer",
                  offer: data.offer,
                  name: connection.name
               });
            }

            break;

         case "answer":
            console.log("Sending answer to: ", data.name);
            //for ex. UserB answers UserA
            var conn = users[data.name];

            if(conn != null) {
               connection.otherName = data.name;
               sendTo(conn, {
                  type: "answer",
                  answer: data.answer
               });
            }

            break;

         case "candidate":
            console.log("Sending candidate to:",data.name);
            var conn = users[data.name];

            if(conn != null) {
               sendTo(conn, {
                  type: "candidate",
                  candidate: data.candidate
               });
            }

            break;

         case "leave":
            console.log("Disconnecting from", data.name);
            var conn = users[data.name];
            conn.otherName = null;

            //notify the other user so he can disconnect his peer connection
            if(conn != null) {
               sendTo(conn, {
                  type: "leave"
               });
            }

            break;

         default:
            sendTo(connection, {
               type: "error",
               message: "Command not found: " + data.type
            });

            break;
      }
   });

   //when user exits, for example closes a browser window
   //this may help if we are still in "offer","answer" or "candidate" state
   connection.on("close", function() {

      if(connection.name) {
      delete users[connection.name];

         if(connection.otherName) {
            console.log("Disconnecting from ", connection.otherName);
            var conn = users[connection.otherName];
            conn.otherName = null;

            if(conn != null) {
               sendTo(conn, {
                  type: "leave"
               });
            }
         }
      }
   });

   connection.send("Hello world");

});

function sendTo(connection, message) {
   connection.send(JSON.stringify(message));
}
所以工作完成了,我們的信令伺服器已經準備好了。請記住,在建立 WebRTC 連線時,如果操作順序錯誤,可能會導致問題。
總結
在本章中,我們構建了一個簡單直接的信令伺服器。我們介紹了信令過程、使用者註冊和 offer/answer 機制。我們還實現了在使用者之間傳送候選者。