- WebRTC 教程
- WebRTC - 首頁
- WebRTC - 概述
- WebRTC - 架構
- WebRTC - 環境
- WebRTC - MediaStream APIs
- WebRTC - RTCPeerConnection APIs
- WebRTC - RTCDataChannel APIs
- WebRTC - 傳送訊息
- WebRTC - 信令
- WebRTC - 瀏覽器支援
- WebRTC - 移動端支援
- WebRTC - 影片演示
- WebRTC - 語音演示
- WebRTC - 文字演示
- WebRTC - 安全性
- WebRTC 資源
- WebRTC - 快速指南
- WebRTC - 有用資源
- WebRTC - 討論
WebRTC - 安全性
在本章中,我們將為在“WebRTC信令”一章中建立的信令伺服器新增安全功能。將有兩個增強功能:
- 使用Redis資料庫進行使用者身份驗證
- 啟用安全套接字連線
首先,您應該安裝Redis。
從http://redis.io/download(在我的例子中是3.05版本)下載最新的穩定版本。
解壓它
在下載的資料夾內執行sudo make install
安裝完成後,執行make test以檢查一切是否正常工作。
Redis有兩個可執行命令:
redis-cli - Redis的命令列介面(客戶端部分)
redis-server - Redis資料儲存
要在終端控制檯中執行Redis伺服器,請鍵入redis-server。您應該看到以下內容:

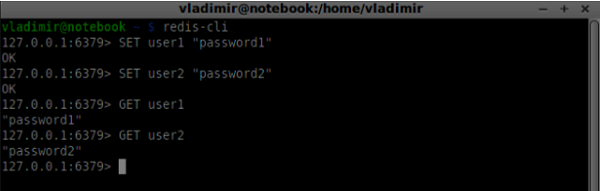
現在開啟一個新的終端視窗並執行redis-cli以開啟客戶端應用程式。

基本上,Redis是一個鍵值資料庫。要建立具有字串值的鍵,應使用SET命令。要讀取鍵值,應使用GET命令。讓我們新增兩個使用者及其密碼。鍵將是使用者名稱,這些鍵的值將是相應的密碼。
現在我們應該修改我們的信令伺服器以新增使用者身份驗證。將以下程式碼新增到server.js檔案的頂部:
//require the redis library in Node.js
var redis = require("redis");

//creating the redis client object
var redisClient = redis.createClient();
在上面的程式碼中,我們為Node.js需要Redis庫,併為我們的伺服器建立一個redis客戶端。
要新增身份驗證,請修改連線物件上的message處理程式:
//when a user connects to our sever
wss.on('connection', function(connection) {
   console.log("user connected");

   //when server gets a message from a connected user
   connection.on('message', function(message) {

      var data;
      //accepting only JSON messages
      try {
         data = JSON.parse(message);
      } catch (e) {
         console.log("Invalid JSON");
         data = {};
      }

      //check whether a user is authenticated
      if(data.type != "login") {

         //if user is not authenticated
         if(!connection.isAuth) {
            sendTo(connection, {
               type: "error",
               message: "You are not authenticated"
            });
            return;
         }
      }

      //switching type of the user message
      switch (data.type) {
         //when a user tries to login
         case "login":
            console.log("User logged:", data.name);
            //get password for this username from redis database

            redisClient.get(data.name, function(err, reply) {
               //check if password matches with the one stored in redis
               var loginSuccess = reply === data.password;

               //if anyone is logged in with this username or incorrect password
                  then refuse
               if(users[data.name] || !loginSuccess) {
                  sendTo(connection, {
                     type: "login",
                     success: false
                  });
               } else {
                  //save user connection on the server
                  users[data.name] = connection;
                  connection.name = data.name;
                  connection.isAuth = true;

                  sendTo(connection, {
                     type: "login",
                     success: true
                  });
               }
            });

            break;
      }
   });

}

//...
//*****other handlers*******
在上面的程式碼中,如果使用者嘗試登入,我們將從Redis獲取他的密碼,檢查它是否與儲存的密碼匹配,如果成功,我們將他的使用者名稱儲存在伺服器上。我們還向連線添加了isAuth標誌,以檢查使用者是否已透過身份驗證。注意這段程式碼:
//check whether a user is authenticated
if(data.type != "login") {

   //if user is not authenticated
   if(!connection.isAuth) {
      sendTo(connection, {
         type: "error",
         message: "You are not authenticated"
      });

      return;
   }
}
如果未經身份驗證的使用者嘗試傳送offer或離開連線,我們將簡單地傳送錯誤訊息。
下一步是啟用安全套接字連線。強烈建議用於WebRTC應用程式。PKI(公鑰基礎設施)是CA(證書頒發機構)的數字簽名。然後,使用者檢查用於簽署證書的私鑰是否與CA證書的公鑰匹配。出於開發目的,我們將使用自簽名安全證書。
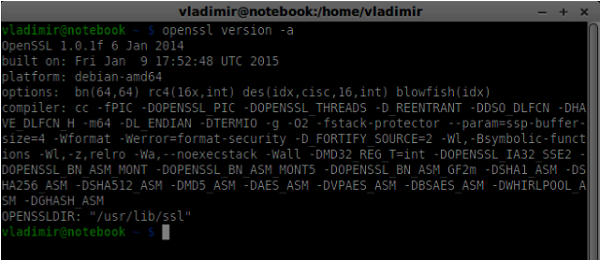
我們將使用openssl。它是一個開源工具,實現了SSL(安全套接字層)和TLS(傳輸層安全)協議。它通常在Unix系統上預設安裝。執行openssl version -a以檢查它是否已安裝。
要生成公共和私有安全證書金鑰,您應該按照以下步驟操作:
生成臨時伺服器密碼金鑰
openssl genrsa -des3 -passout pass:x -out server.pass.key 2048

生成伺服器私鑰
openssl rsa -passin pass:12345 -in server.pass.key -out server.key

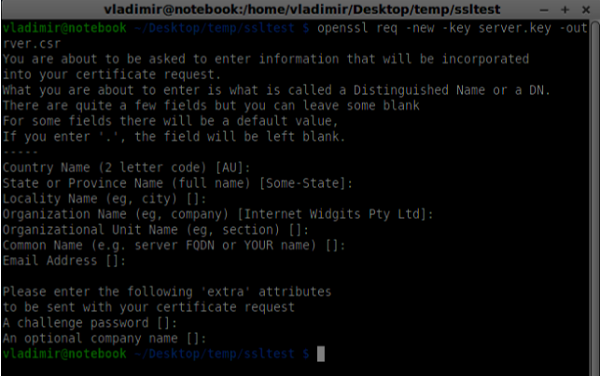
生成簽名請求。系統會詢問您有關公司的一些其他問題。只需一直按“Enter”鍵即可。
openssl req -new -key server.key -out server.csr
生成證書
openssl x509 -req -days 1095 -in server.csr -signkey server.key -out server.crt

現在您有兩個檔案,證書(server.crt)和私鑰(server.key)。將它們複製到信令伺服器根資料夾。
要啟用安全套接字連線,請修改我們的信令伺服器。
//require file system module
var fs = require('fs');
var httpServ = require('https');

//https://github.com/visionmedia/superagent/issues/205
process.env.NODE_TLS_REJECT_UNAUTHORIZED = "0";

//out secure server will bind to the port 9090
var cfg = {
   port: 9090,
   ssl_key: 'server.key',
   ssl_cert: 'server.crt'
};

//in case of http request just send back "OK"
var processRequest = function(req, res) {
   res.writeHead(200);
   res.end("OK");
};

//create our server with SSL enabled
var app = httpServ.createServer({
   key: fs.readFileSync(cfg.ssl_key),
   cert: fs.readFileSync(cfg.ssl_cert)
}, processRequest).listen(cfg.port);

//require our websocket library
var WebSocketServer = require('ws').Server;

//creating a websocket server at port 9090
var wss = new WebSocketServer({server: app});

//all connected to the server users
var users = {};

//require the redis library in Node.js
var redis = require("redis");

//creating the redis client object
var redisClient = redis.createClient();

//when a user connects to our sever
wss.on('connection', function(connection){
//...other code
在上面的程式碼中,我們使用了fs庫來讀取私鑰和證書,建立了包含繫結埠以及私鑰和證書路徑的cfg物件。然後,我們使用金鑰建立HTTPS伺服器以及9090埠上的WebSocket伺服器。
現在在Opera中開啟https://:9090。您應該看到以下內容:
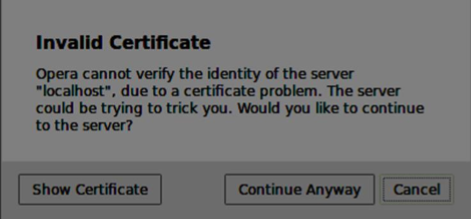
單擊“繼續”按鈕。您應該看到“確定”訊息。
為了測試我們的安全信令伺服器,我們將修改在“WebRTC文字演示”教程中建立的聊天應用程式。我們只需要新增一個密碼欄位。以下是完整的index.html檔案:
<html>

   <head>
      <title>WebRTC Text Demo</title>
      <link rel = "stylesheet" href = "node_modules/bootstrap/dist/css/bootstrap.min.css"/>
   </head>

   <style>
      body {
         background: #eee;
         padding: 5% 0;
      }
   </style>

   <body>
      <div id = "loginPage" class = "container text-center">

         <div class = "row">
            <div class = "col-md-4 col-md-offset-4">
               <h2>WebRTC Text Demo. Please sign in</h2>
               <label for = "usernameInput" class = "sr-only">Login</label>
               <input type = "email" id = "usernameInput"
                  class = "form-control formgroup" placeholder = "Login"
                  required = "" autofocus = "">
               <input type = "text" id = "passwordInput"
                  class = "form-control form-group" placeholder = "Password"
                  required = "" autofocus = "">
               <button id = "loginBtn" class = "btn btn-lg btn-primary btnblock"
                  >Sign in</button>
            </div>
         </div>

      </div>

      <div id = "callPage" class = "call-page container">

         <div class = "row">
            <div class = "col-md-4 col-md-offset-4 text-center">
               <div class = "panel panel-primary">
                  <div class = "panel-heading">Text chat</div>
                  <div id = "chatarea" class = "panel-body text-left"></div>
               </div>
            </div>
         </div>

         <div class = "row text-center form-group">
            <div class = "col-md-12">
               <input id = "callToUsernameInput" type = "text"
                  placeholder = "username to call" />
               <button id = "callBtn" class = "btn-success btn">Call</button>
               <button id = "hangUpBtn" class = "btn-danger btn">Hang Up</button>
            </div>
         </div>

         <div class = "row text-center">
            <div class = "col-md-12">
               <input id = "msgInput" type = "text" placeholder = "message" />
               <button id = "sendMsgBtn" class = "btn-success btn">Send</button>
            </div>
         </div>

      </div>

      <script src = "client.js"></script>

   </body>

</html>
我們還需要透過這一行var conn = new WebSocket('wss://:9090');在client.js檔案中啟用安全套接字連線。注意wss協議。然後,必須修改登入按鈕處理程式以連同使用者名稱一起傳送密碼:
loginBtn.addEventListener("click", function (event) {
   name = usernameInput.value;
   var pwd = passwordInput.value;

   if (name.length > 0) {
      send({
         type: "login",
         name: name,
         password: pwd
      });
   }

});
以下是完整的client.js檔案:
//our username
var name;
var connectedUser;

//connecting to our signaling server
var conn = new WebSocket('wss://:9090');

conn.onopen = function () {
   console.log("Connected to the signaling server");
};

//when we got a message from a signaling server
conn.onmessage = function (msg) {
   console.log("Got message", msg.data);

   var data = JSON.parse(msg.data);

   switch(data.type) {
      case "login":
         handleLogin(data.success);
         break;
      //when somebody wants to call us
      case "offer":
         handleOffer(data.offer, data.name);
         break;
      case "answer":
         handleAnswer(data.answer);
         break;
      //when a remote peer sends an ice candidate to us
      case "candidate":
         handleCandidate(data.candidate);
         break;
      case "leave":
         handleLeave();
         break;
      default:
         break;
   }
};

conn.onerror = function (err) {
   console.log("Got error", err);
};

//alias for sending JSON encoded messages
function send(message) {
   //attach the other peer username to our messages
   if (connectedUser) {
      message.name = connectedUser;
   }

   conn.send(JSON.stringify(message));
};

//******
//UI selectors block
//******

var loginPage = document.querySelector('#loginPage');
var usernameInput = document.querySelector('#usernameInput');
var passwordInput = document.querySelector('#passwordInput');
var loginBtn = document.querySelector('#loginBtn');

var callPage = document.querySelector('#callPage');
var callToUsernameInput = document.querySelector('#callToUsernameInput');
var callBtn = document.querySelector('#callBtn');
var hangUpBtn = document.querySelector('#hangUpBtn');

var msgInput = document.querySelector('#msgInput');
var sendMsgBtn = document.querySelector('#sendMsgBtn');
var chatArea = document.querySelector('#chatarea');

var yourConn;
var dataChannel;

callPage.style.display = "none";

// Login when the user clicks the button
loginBtn.addEventListener("click", function (event) {
   name = usernameInput.value;
   var pwd = passwordInput.value;

   if (name.length > 0) {
      send({
         type: "login",
         name: name,
         password: pwd
      });
   }

});

function handleLogin(success) {
   if (success === false) {
      alert("Ooops...incorrect username or password");
   } else {
      loginPage.style.display = "none";
      callPage.style.display = "block";

      //**********************
      //Starting a peer connection
      //**********************

      //using Google public stun server
      var configuration = {
         "iceServers": [{ "url": "stun:stun2.1.google.com:19302" }]
      };

      yourConn = new webkitRTCPeerConnection(configuration, {optional: [{RtpDataChannels: true}]});

      // Setup ice handling
      yourConn.onicecandidate = function (event) {
         if (event.candidate) {
            send({
               type: "candidate",
               candidate: event.candidate
            });
         }
      };

      //creating data channel
      dataChannel = yourConn.createDataChannel("channel1", {reliable:true});

      dataChannel.onerror = function (error) {
         console.log("Ooops...error:", error);
      };

      //when we receive a message from the other peer, display it on the screen
      dataChannel.onmessage = function (event) {
         chatArea.innerHTML += connectedUser + ": " + event.data + "<br />";
      };

      dataChannel.onclose = function () {
         console.log("data channel is closed");
      };
   }

};

//initiating a call
callBtn.addEventListener("click", function () {
   var callToUsername = callToUsernameInput.value;

   if (callToUsername.length > 0) {

      connectedUser = callToUsername;

      // create an offer
      yourConn.createOffer(function (offer) {
         send({
            type: "offer",
            offer: offer
         });

         yourConn.setLocalDescription(offer);

      }, function (error) {
         alert("Error when creating an offer");
      });
   }
});

//when somebody sends us an offer
function handleOffer(offer, name) {
   connectedUser = name;
   yourConn.setRemoteDescription(new RTCSessionDescription(offer));

   //create an answer to an offer
   yourConn.createAnswer(function (answer) {
      yourConn.setLocalDescription(answer);

      send({
         type: "answer",
         answer: answer
      });

   }, function (error) {
      alert("Error when creating an answer");
   });

};

//when we got an answer from a remote user
function handleAnswer(answer) {
   yourConn.setRemoteDescription(new RTCSessionDescription(answer));
};

//when we got an ice candidate from a remote user
function handleCandidate(candidate) {
   yourConn.addIceCandidate(new RTCIceCandidate(candidate));
};

//hang up
hangUpBtn.addEventListener("click", function () {

   send({
      type: "leave"
   });

   handleLeave();
});

function handleLeave() {
   connectedUser = null;
   yourConn.close();
   yourConn.onicecandidate = null;
};

//when user clicks the "send message" button
sendMsgBtn.addEventListener("click", function (event) {
   var val = msgInput.value;
   chatArea.innerHTML += name + ": " + val + "<br />";

   //sending a message to a connected peer
   dataChannel.send(val);
   msgInput.value = "";
});
現在透過node server執行我們的安全信令伺服器。在修改後的聊天演示資料夾內執行node static。在兩個瀏覽器標籤頁中開啟localhost:8080。嘗試登入。請記住,只有“user1”和“password1”以及“user2”和“password2”才能登入。然後建立RTCPeerConnection(呼叫另一個使用者)並嘗試傳送訊息。

以下是我們的安全信令伺服器的完整程式碼:
//require file system module
var fs = require('fs');
var httpServ = require('https');

//https://github.com/visionmedia/superagent/issues/205
process.env.NODE_TLS_REJECT_UNAUTHORIZED = "0";

//out secure server will bind to the port 9090
var cfg = {
   port: 9090,
   ssl_key: 'server.key',
   ssl_cert: 'server.crt'
};

//in case of http request just send back "OK"
var processRequest = function(req, res){
   res.writeHead(200);
   res.end("OK");
};

//create our server with SSL enabled
var app = httpServ.createServer({
   key: fs.readFileSync(cfg.ssl_key),
   cert: fs.readFileSync(cfg.ssl_cert)
}, processRequest).listen(cfg.port);

//require our websocket library
var WebSocketServer = require('ws').Server;

//creating a websocket server at port 9090
var wss = new WebSocketServer({server: app});

//all connected to the server users
var users = {};

//require the redis library in Node.js
var redis = require("redis");

//creating the redis client object
var redisClient = redis.createClient();

//when a user connects to our sever
wss.on('connection', function(connection) {
   console.log("user connected");

   //when server gets a message from a connected user
   connection.on('message', function(message) {

      var data;
      //accepting only JSON messages
      try {
         data = JSON.parse(message);
      } catch (e) {
         console.log("Invalid JSON");
         data = {};
      }

      //check whether a user is authenticated
      if(data.type != "login") {
         //if user is not authenticated
         if(!connection.isAuth) {
            sendTo(connection, {
               type: "error",
               message: "You are not authenticated"
            });

            return;
         }
      }

      //switching type of the user message
      switch (data.type) {
         //when a user tries to login
         case "login":
            console.log("User logged:", data.name);
            //get password for this username from redis database
            redisClient.get(data.name, function(err, reply) {

               //check if password matches with the one stored in redis
               var loginSuccess = reply === data.password;

               //if anyone is logged in with this username or incorrect password
                  then refuse
               if(users[data.name] || !loginSuccess) {
                  sendTo(connection, {
                     type: "login",
                     success: false
                  });
               } else {
                  //save user connection on the server
                  users[data.name] = connection;
                  connection.name = data.name;
                  connection.isAuth = true;

                  sendTo(connection, {
                     type: "login",
                     success: true
                  });
               }
            });

            break;

         case "offer":
            //for ex. UserA wants to call UserB
            console.log("Sending offer to: ", data.name);

            //if UserB exists then send him offer details
            var conn = users[data.name];

            if(conn != null) {
               //setting that UserA connected with UserB
               connection.otherName = data.name;

               sendTo(conn, {
                  type: "offer",
                  offer: data.offer,
                  name: connection.name
               });
            }

            break;

         case "answer":
            console.log("Sending answer to: ", data.name);
            //for ex. UserB answers UserA
            var conn = users[data.name];

            if(conn != null) {
               connection.otherName = data.name;

               sendTo(conn, {
                  type: "answer",
                  answer: data.answer
               });
            }

            break;

         case "candidate":
            console.log("Sending candidate to:",data.name);
            var conn = users[data.name];

            if(conn != null) {
               sendTo(conn, {
                  type: "candidate",
                  candidate: data.candidate
               });
            }

            break;

         case "leave":
            console.log("Disconnecting from", data.name);
            var conn = users[data.name];
            conn.otherName = null;

            //notify the other user so he can disconnect his peer connection
            if(conn != null) {
               sendTo(conn, {
                  type: "leave"
               });
            }

            break;

         connection.on("close", function() {

            if(connection.name) {
               delete users[connection.name];

               if(connection.otherName) {
                  console.log("Disconnecting from ", connection.otherName);
                  var conn = users[connection.otherName];
                  conn.otherName = null;

                  if(conn != null) {
                     sendTo(conn, {
                        type: "leave"
                    });
                  }

               }
            }
         });

         default:
            sendTo(connection, {
               type: "error",
               message: "Command no found: " + data.type
            });

            break;
      }
   });

   //when user exits, for example closes a browser window
   //this may help if we are still in "offer","answer" or "candidate" state
   connection.on("close", function() {
      if(connection.name) {
         delete users[connection.name];
      }
   });

   connection.send("Hello from server");
});

function sendTo(connection, message) {
   connection.send(JSON.stringify(message));
}
總結
在本章中,我們向信令伺服器添加了使用者身份驗證。我們還學習瞭如何建立自簽名SSL證書並在WebRTC應用程式的範圍內使用它們。