- Three.js 教程
- Three.js - 首頁
- Three.js - 簡介
- Three.js - 安裝
- Three.js - Hello Cube 應用
- Three.js - 渲染器和響應式
- Three.js - 響應式設計
- Three.js - 除錯和統計
- Three.js - 相機
- Three.js - 控制元件
- Three.js - 光照與陰影
- Three.js - 幾何體
- Three.js - 材質
- Three.js - 紋理
- Three.js - 繪製線條
- Three.js - 動畫
- Three.js - 建立文字
- Three.js - 載入3D模型
- Three.js - 庫和外掛
- Three.js 有用資源
- Three.js - 快速指南
- Three.js - 有用資源
- Three.js - 討論
Three.js - 紋理
紋理是新增到材質上的影像或顏色,以提供更多細節或美感。紋理是Three.js中的一個重要主題。在本節中,我們將瞭解如何將基本紋理應用於我們的材質。
基本紋理
首先,您應該建立一個載入器。Three.js有一個內建函式`TextureLoader()`用於將紋理載入到您的Three.js專案中。然後,您可以透過在`load()`函式中指定其路徑來載入任何紋理或影像。
const loader = new THREE.TextureLoader()
texture.load('/path/to/the/image')
然後,將材質的`map`屬性設定為此紋理。就是這樣;您已將紋理應用於平面幾何體。
紋理具有用於重複、偏移和旋轉紋理的設定。預設情況下,three.js中的紋理不會重複。有兩個屬性,`wrapS`用於水平環繞,`wrapT`用於垂直環繞,用於設定紋理是否重複。並將重複模式設定為`THREE.RepeatWrapping`。
texture.wrapS = THREE.RepeatWrapping
texture.wrapT = THREE.RepeatWrapping
texture.magFilter = THREE.NearestFilter
在Three.js中,您可以選擇在紋理繪製尺寸大於其原始尺寸時以及在紋理繪製尺寸小於其原始尺寸時發生的情況。
對於設定過濾器,當紋理大於其原始尺寸時,您可以將`texture.magFilter`屬性設定為`THREE.NearestFilter`或`THREE.LinearFilter`。
NearestFilter - 此過濾器使用它可以找到的最近紋理畫素的顏色。
LinearFilter - 此過濾器更高階,它使用四個相鄰紋理畫素的顏色值來確定正確的顏色。
而且,您可以新增紋理重複的次數。
const timesToRepeatHorizontally = 4
const timesToRepeatVertically = 2
texture.repeat.set(timesToRepeatHorizontally, timesToRepeatVertically)
示例
檢視以下示例。
texture.html
<!DOCTYPE html>
<html lang="en">
   <head>
      <meta charset="UTF-8" />
      <meta http-equiv="X-UA-Compatible" content="ie=edge" />
      <meta name="viewport" content="width=device-width, initial-scale=1.0" />
      <title>Three.js - Checker Board</title>
      <style>
         * {
            margin: 0;
            padding: 0;
            box-sizing: border-box;
            font-family: -applesystem, BlinkMacSystemFont, 'Segoe UI', Roboto, Oxygen, Ubuntu,
            Cantarell, 'Open Sans', 'Helvetica Neue', sans-serif;
         }
         html,
         body {
            height: 100vh;
            width: 100vw;
         }
         #threejs-container {
            position: block;
            width: 100%;
            height: 100%;
         }
      </style>
      <script src="https://cdnjs.cloudflare.com/ajax/libs/three.js/r128/three.min.js"></script>
      <script src="https://cdnjs.cloudflare.com/ajax/libs/dat-gui/0.7.7/dat.gui.js"></script>
   </head>
   <body>
      <div id="threejs-container"></div>
      <script type="module">
         // Creating a checker-board using Textures
         // applying the texture to 2d plane geometry
         // GUI
         const gui = new dat.GUI()
         // sizes
         let width = window.innerWidth
         let height = window.innerHeight
         // scene
         const scene = new THREE.Scene()
         scene.background = new THREE.Color(0x262626)
         // camera
         const camera = new THREE.PerspectiveCamera(75, width / height, 0.1, 100)
         camera.position.set(0, 0, 10)
         const camFolder = gui.addFolder('Camera')
         camFolder.add(camera.position, 'z').min(10).max(60).step(10)
         camFolder.open()
         // Light
         const ambientLight = new THREE.AmbientLight(0xffffff, 1)
         scene.add(ambientLight)
         // texture
         const planeSize = 10
         const loader = new THREE.TextureLoader()
         const texture = loader.load(' https://cloud-nfpbfxp6x-hack-clubbot.vercel.app/0height.png ')
         texture.wrapS = THREE.RepeatWrapping
         texture.wrapT = THREE.RepeatWrapping
         texture.magFilter = THREE.NearestFilter
         const repeats = planeSize / 2
         texture.repeat.set(repeats, repeats)
         class StringToNumberHelper {
            constructor(obj, prop) {
               this.obj = obj
               this.prop = prop
            }
            get value() {
               return this.obj[this.prop]
            }
            set value(v) {
               this.obj[this.prop] = parseFloat(v)
            }
         }
         const wrapModes = {
            ClampToEdgeWrapping: THREE.ClampToEdgeWrapping,
            RepeatWrapping: THREE.RepeatWrapping,
            MirroredRepeatWrapping: THREE.MirroredRepeatWrapping
         }
         function updateTexture() {
            texture.needsUpdate = true
         }
         gui
            .add(new StringToNumberHelper(texture, 'wrapS'), 'value', wrapModes)
            .name('texture.wrapS')
            .onChange(updateTexture)
         gui
            .add(new StringToNumberHelper(texture, 'wrapT'), 'value', wrapModes)
            .name('texture.wrapT')
            .onChange(updateTexture)
         gui.add(texture.repeat, 'x', 0, 5, 0.01).name('texture.repeat.x')
         gui.add(texture.repeat, 'y', 0, 5, 0.01).name('texture.repeat.y')
         // plane for board
         const geometry = new THREE.PlaneGeometry(planeSize, planeSize)
         const material = new THREE.MeshPhongMaterial({
            map: texture,
            side: THREE.DoubleSide
         })
         const board = new THREE.Mesh(geometry, material)
         board.position.set(0, 0, 0)
         scene.add(board)
         // responsiveness
         window.addEventListener('resize', () => {
            width = window.innerWidth
            height = window.innerHeight
            camera.aspect = width / height
            camera.updateProjectionMatrix()
            renderer.setSize(window.innerWidth, window.innerHeight)
            renderer.render(scene, camera)
         })
         // renderer
         const renderer = new THREE.WebGL1Renderer()
         renderer.setSize(width, height)
         renderer.setPixelRatio(Math.min(window.devicePixelRatio, 2))
         // animation
         function animate() {
            requestAnimationFrame(animate)
            renderer.render(scene, camera)
         }
         // rendering the scene
         const container = document.querySelector('#threejs-container')
         container.append(renderer.domElement)
         renderer.render(scene, camera)
         console.log(scene.children)
         animate()
      </script>
   </body>
</html>
輸出
紋理對映
基礎顏色貼圖
這是您新增到物件的紋理的基本彩色影像。使用基礎顏色貼圖,我們向表面新增顏色。
const textureMap = new THREE.TextureLoader().load('/path/to/texture-map')
material.map = textureMap
您可以使用凹凸貼圖、法線貼圖或距離貼圖來新增深度的效果。
凹凸貼圖
凹凸貼圖是一個灰度影像,其中每個畫素的強度決定了高度。您可以只將材質的`bumpMap`屬性設定為紋理。它為紋理添加了精細的細節。
const textureBumpMap = new THREE.TextureLoader().load('/path/to/bump-map')
material.bumpMap = textureBumpMap
法線貼圖
法線貼圖描述每個畫素的法線向量,這應該用於計算光線如何影響幾何體中使用的材質。它為平面表面創造了深度的錯覺。
const textureNormalMap = new THREE.TextureLoader().load('/path/to/normal-map')
material.normalMap = textureNormalMap
置換貼圖
雖然法線貼圖提供了深度的錯覺,但我們根據紋理中的資訊改變了模型的形狀,使用了置換貼圖。
const textureDisplacementMap = new THREE.TextureLoader().load(
   '/path/to/displacement-map'
)
material.displacemetMap = textureDisplacementMap
粗糙度貼圖
粗糙度貼圖定義了哪些區域是粗糙的,這會影響表面的反射銳度。
const textureRoughnessMap = new THREE.TextureLoader().load(
   '/path/to/roughness-map'
)
material.roughnessMap = textureRoughnessMap
環境光遮蔽貼圖
它突出顯示物件的陰影區域。它需要第二組UV。
const textureAmbientOcclusionMap = new THREE.TextureLoader().load(
   '/path/to/AmbientOcclusion-map'
)
material.aoMap = textureAmbientOcclusionMap
// second UV
mesh.geometry.attributes.uv2 = mesh.geometry.attributes.uv
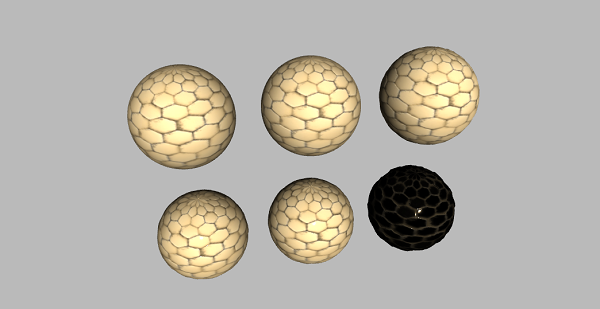
如果您比較具有粗糙度貼圖和環境光遮蔽貼圖的物件,您可以觀察到使用aoMap後陰影更加突出。
金屬度貼圖
它定義了材質有多少像金屬。
const textureMetalnessMap = new THREE.TextureLoader().load(
   '/path/to/metalness-map'
)
material.metalnessMap = textureMetalnessMap
示例
現在,檢視以下示例
texture-maps.html
<!DOCTYPE html>
<html lang="en">
   <head>
      <meta charset="UTF-8" />
      <meta http-equiv="X-UA-Compatible" content="ie=edge" />
      <meta name="viewport" content="width=device-width, initial-scale=1.0" />
      <title>Three.js - Texture Mapping</title>
      <style>
         * {
            margin: 0;
            padding: 0;
            box-sizing: border-box;
            font-family: -applesystem, BlinkMacSystemFont, 'Segoe UI', Roboto, Oxygen, Ubuntu,
            Cantarell, 'Open Sans', 'Helvetica Neue', sans-serif;
         }
         html,
         body {
            height: 100vh;
            width: 100vw;
         }
         #threejs-container {
            position: block;
            width: 100%;
            height: 100%;
         }
      </style>
      <script src="https://cdnjs.cloudflare.com/ajax/libs/three.js/r128/three.min.js"></script>
      <script src="https://cdnjs.cloudflare.com/ajax/libs/dat-gui/0.7.7/dat.gui.js"></script>
   </head>
   <body>
      <div id="threejs-container"></div>
      <script type="module">
         // Using different types of texture maps
         import { OrbitControls } from "https://threejs.org/examples/jsm/controls/OrbitControls.js"

         // sizes
         let width = window.innerWidth
         let height = window.innerHeight
         // scene
         const scene = new THREE.Scene()
         scene.background = new THREE.Color(0xffffff)
         // lights
         const ambientLight = new THREE.AmbientLight(0xffffff, 0.5)
         scene.add(ambientLight)
         const light = new THREE.DirectionalLight(0xffffff, 4.0)
         light.position.set(0, 10, 20)
         light.castShadow = true
         light.shadow.mapSize.width = 512
         light.shadow.mapSize.height = 512
         light.shadow.camera.near = 0.5
         light.shadow.camera.far = 100
         scene.add(light)
         // camera
         const camera = new THREE.PerspectiveCamera(45, width / height, 0.1, 100)
         camera.position.set(0, 0, 10)
         // textures
         const loader = new THREE.TextureLoader()
         const texture = loader.load('https://cloud-nfpbfxp6x-hack-clubbot.vercel.app/5basecolor.jpg')
         const normalmap = loader.load('https://cloud-nfpbfxp6x-hack-clubbot.vercel.app/2normal.jpg')
         const heightmap = loader.load('https://cloud-nfpbfxp6x-hack-clubbot.vercel.app/0height.png')
         const roughmap = loader.load('https://cloud-nfpbfxp6x-hack-clubbot.vercel.app/3roughness.jpg')
         const ambientOcclusionmap = loader.load('https://cloud-nfpbfxp6x-hackclub-bot.vercel.app/4ambientocclusion.jpg')
         const metallicmap = loader.load('https://cloud-nfpbfxp6x-hack-clubbot.vercel.app/1metallic.jpg')
         // plane
         const planeGeometry = new THREE.PlaneGeometry(100, 100)
         const plane = new THREE.Mesh(
            planeGeometry,
            new THREE.MeshPhongMaterial({ color: 0xffffff, side: THREE.DoubleSide })
         )
         plane.rotateX(-Math.PI / 2)
         plane.position.y = -2.75
         plane.receiveShadow = true
         scene.add(plane)
         // object
         const geometry = new THREE.SphereGeometry(1, 64, 64)
         const material1 = new THREE.MeshStandardMaterial({
            map: texture,
            side: THREE.DoubleSide
         })
         const object1 = new THREE.Mesh(geometry, material1)
         object1.position.set(-2.5, 1.5, 0)
         object1.castShadow = true
         scene.add(object1)
         // normal map
         const material2 = new THREE.MeshStandardMaterial({
            color: 0xffffff,
            map: texture,
            side: THREE.DoubleSide,
            normalMap: normalmap
         })
         const object2 = new THREE.Mesh(geometry, material2)
         object2.position.set(0, 1.5, 0)
         object2.castShadow = true
         scene.add(object2)
         // displacement map
         const material3 = new THREE.MeshStandardMaterial({
            color: 0xffffff,
            map: texture,
            side: THREE.DoubleSide,
            normalMap: normalmap,
            displacementMap: heightmap,
            displacementScale: 0.05
         })
         const object3 = new THREE.Mesh(geometry, material3)
         object3.position.set(2.5, 1.5, 0)
         object3.castShadow = true
         scene.add(object3)
         console.log(object3)
         // roughness map
         const material4 = new THREE.MeshStandardMaterial({
            color: 0xffffff,
            map: texture,
            side: THREE.DoubleSide,
            normalMap: normalmap,
            displacementMap: heightmap,
            displacementScale: 0.05,
            roughnessMap: roughmap,
            roughness: 0.5
         })
         const object4 = new THREE.Mesh(geometry, material4)
         object4.position.set(-2.5, -1.5, 0)
         object4.castShadow = true
         scene.add(object4)
         console.log(object4)
         // ambient occlusion map
         const material5 = new THREE.MeshStandardMaterial({
            color: 0xffffff,
            map: texture,
            side: THREE.DoubleSide,
            normalMap: normalmap,
            displacementMap: heightmap,
            displacementScale: 0.05,
            roughnessMap: roughmap,
            roughness: 0.1,
            aoMap: ambientOcclusionmap
         })
         const object5 = new THREE.Mesh(geometry, material5)
         object5.position.set(0, -1.5, 0)
         object5.geometry.attributes.uv2 = object5.geometry.attributes.uv
         object5.castShadow = true
         scene.add(object5)
         console.log(object5)
         // for env maps
         const cubeRenderTarget = new THREE.WebGLCubeRenderTarget(128, {
            format: THREE.RGBFormat,
            generateMipMaps: true,
            minFilter: THREE.LinearMipmapLinearFilter,
            encoding: THREE.sRGBEncoding
         })
         const cubeCamera = new THREE.CubeCamera(1, 10000, cubeRenderTarget)
         cubeCamera.position.set(0, 100, 0)
         scene.add(cubeCamera)
         // metallic map
         const material6 = new THREE.MeshStandardMaterial({
            color: 0xffffff,
            map: texture,
            side: THREE.DoubleSide,
            normalMap: normalmap,
            displacementMap: heightmap,
            displacementScale: 0.15,
            roughnessMap: roughmap,
            roughness: 0.1,
            aoMap: ambientOcclusionmap,
            metalnessMap: metallicmap,
            metalness: 1,
            envMap: cubeRenderTarget.texture
         })
         const object6 = new THREE.Mesh(geometry, material6)
         object6.position.set(2.5, -1.5, 0)
         object6.geometry.attributes.uv2 = object6.geometry.attributes.uv
         object6.castShadow = true
         scene.add(object6)
         console.log(object6)
         cubeCamera.position.copy(object6.position)
         // responsiveness
         window.addEventListener('resize', () => {
            width = window.innerWidth
            height = window.innerHeight
            camera.aspect = width / height
            camera.updateProjectionMatrix()
            renderer.setSize(window.innerWidth, window.innerHeight)
            renderer.render(scene, camera)
         })
         // renderer - anti-aliasing
         const renderer = new THREE.WebGLRenderer({ antialias: true })
         renderer.physicallyCorrectLights = true
         renderer.setSize(width, height)
         renderer.setPixelRatio(Math.min(window.devicePixelRatio, 2))
         const controls = new OrbitControls(camera, renderer.domElement)
         // animation
         function animate() {
            requestAnimationFrame(animate)
            let objects = [object1, object2, object3, object4, object5, object6]
            objects.forEach((i) => {
               //i.rotation.x += 0.005
               i.rotation.y += 0.01
            })
            controls.update()
            cubeCamera.update(renderer, scene)
            renderer.render(scene, camera)
         }
         // rendering the scene
         const container = document.querySelector('#threejs-container')
         container.append(renderer.domElement)
         renderer.render(scene, camera)
         animate()
      </script>
   </body>
</html>
輸出
還有一些其他貼圖用於在計算機圖形學中建立真實世界的模型。您可以瞭解更多資訊 這裡。