- Three.js 教程
- Three.js - 首頁
- Three.js - 簡介
- Three.js - 安裝
- Three.js - Hello Cube 應用
- Three.js - 渲染器和響應性
- Three.js - 響應式設計
- Three.js - 除錯和統計
- Three.js - 相機
- Three.js - 控制器
- Three.js - 光照與陰影
- Three.js - 幾何體
- Three.js - 材質
- Three.js - 紋理
- Three.js - 繪製線條
- Three.js - 動畫
- Three.js - 建立文字
- Three.js - 載入 3D 模型
- Three.js - 庫和外掛
- Three.js 有用資源
- Three.js - 快速指南
- Three.js - 有用資源
- Three.js - 討論
Three.js - 光照與陰影
光照使物體可見,類似地,在 Three.js 中,THREE.Light 照亮場景並使某些東西可見。並非所有材質都會受到光照的影響。MeshBasicMaterial 和 MeshNormalMaterial 是自發光的,因此它們不需要光照就能在場景中可見。但是,大多數其他材質都需要,例如 MeshLambertMaterial、MeshPhongMaterial、MeshStandardMaterial、MeshPhysicalMaterial 和 MeshToonMaterial。我們將在後面的章節中討論更多材質。在本章中,我們將重點介紹 Three.js 中不同型別的燈光。
每個燈光都有顏色和強度屬性。
color − (可選)燈光的十六進位制顏色。預設為 0xffffff(白色)。
intensity − (可選)燈光的強度/亮度的數值。預設為 1。
投射陰影
來自特定方向的光可以投射陰影。首先,我們應該使場景準備好投射陰影。
步驟 - 1
我們應該首先告訴渲染器我們想要啟用陰影。投射陰影是一個代價高昂的操作。WebGLRenderer 僅支援此功能。它使用陰影貼圖,這是一種特定於 WebGL 的技術,直接在 GPU 上執行。
renderer.shadowMapEnabled = true
以上程式碼行告訴渲染器在場景中投射陰影。
注意 - Three.js 預設使用陰影貼圖。陰影貼圖適用於投射陰影的光。場景從光源的視角渲染所有標記為投射陰影的物體。
如果您的陰影邊緣看起來有點塊狀,則表示陰影貼圖太小。要增加陰影貼圖的大小,您可以為燈光定義 shadowMapHeight 和 shadowMapWidht 屬性。或者,您也可以嘗試更改 WebGLRenderer 的 shadowMapType 屬性。您可以將其設定為 THREE.BasicShadowMap、THREE.PCFShadowMap 或 THREE.PCFSoftShadowMap。
// to antialias the shadow
renderer.shadowMapType = THREE.PCFSoftShadowMap
// or
directionalLight.shadowMapWidth = 2048
directionalLight.shadowMapHeight = 2048
步驟 - 2
您應該配置物件以投射陰影。您可以告知 Three.js 哪些物件可以投射陰影,哪些物件可以接收陰影。
object.castShadow = true
object.recieveShadow = true
步驟 - 3
以上所有步驟對於每種燈光都相同。下一步是設定與陰影相關的屬性。
light.castShadow = true
light.shadow.camera.near = 10
light.shadow.camera.far = 100
light.shadow.camera.left = -50
light.shadow.camera.right = 50
light.shadow.camera.top = 50
light.shadow.camera.bottom = -50
第一個屬性 castShadow 告訴 Three.js 此燈光投射陰影。由於投射陰影是一個代價高昂的操作,我們需要定義陰影可以出現的區域。您可以使用 shadow.camera.near、shadow.camera.far 和 shadow.camera.left 等屬性來實現。使用上述屬性,我們建立了一個類似盒子的區域,Three.js 在其中渲染陰影。
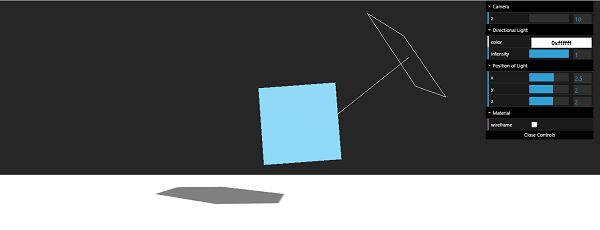
示例
在此示例中瞭解更多資訊。
directional.html
<!DOCTYPE html>
<html lang="en">
   <head>
      <meta charset="UTF-8" />
      <meta http-equiv="X-UA-Compatible" content="ie=edge" />
      <meta name="viewport" content="width=device-width, initial-scale=1.0" />
      <title>Three.js - Directional Light</title>
      <style>
         * {
            margin: 0;
            padding: 0;
            box-sizing: border-box;
            font-family: -applesystem, BlinkMacSystemFont, 'Segoe UI', Roboto, Oxygen, Ubuntu,
            Cantarell, 'Open Sans', 'Helvetica Neue', sans-serif;
         }
         html,
         body {
            height: 100vh;
            width: 100vw;
         }
         #threejs-container {
            position: block;
            width: 100%;
            height: 100%;
         }
      </style>
      <script src="https://cdnjs.cloudflare.com/ajax/libs/three.js/r128/three.min.js"></script>
      <script src="https://cdnjs.cloudflare.com/ajax/libs/dat-gui/0.7.7/dat.gui.js"></script>
   </head>
   <body>
   <div id="container"></div>
      <script type="module">
         // Adding directional light to the scene
         // The lights falls from the light only in one direction.
         // You can see the position of light using helpers provided in Three.j
         s for debugging purposes

         // GUI
         const gui = new dat.GUI()
         // sizes
         let width = window.innerWidth
         let height = window.innerHeight
         // scene
         const scene = new THREE.Scene()
         scene.background = new THREE.Color(0x262626)
         // camera
         const camera = new THREE.PerspectiveCamera(45, width / height, 0.1, 1000)
         camera.position.set(0, 0, 10)
         const camFolder = gui.addFolder('Camera')
         camFolder.add(camera.position, 'z', 10, 80, 1)
         camFolder.open()
         // lights
         const ambientLight = new THREE.AmbientLight(0xffffff, 0.5)
         scene.add(ambientLight)
         const light = new THREE.DirectionalLight()
         light.position.set(2.5, 2, 2)
         light.castShadow = true
         light.shadow.mapSize.width = 512
         light.shadow.mapSize.height = 512
         light.shadow.camera.near = 0.5
         light.shadow.camera.far = 100
         scene.add(light)
         const helper = new THREE.DirectionalLightHelper(light)
         scene.add(helper)
         // light controls
         const lightColor = {
            color: light.color.getHex()
         }
         const lightFolder = gui.addFolder('Directional Light')
         lightFolder.addColor(lightColor, 'color').onChange(() => {
         light.color.set(lightColor.color)
         })
         lightFolder.add(light, 'intensity', 0, 1, 0.01)
         lightFolder.open()
         const directionalLightFolder = gui.addFolder('Position of Light')
         directionalLightFolder.add(light.position, 'x', -10, 10, 0.1)
         directionalLightFolder.add(light.position, 'y', -10, 10, 0.1)
         directionalLightFolder.add(light.position, 'z', -10, 10, 0.1)
         directionalLightFolder.open()
         // plane
         const planeGeometry = new THREE.PlaneGeometry(100, 20)
         const plane = new THREE.Mesh(planeGeometry, new THREE.MeshPhongMateria
         l({ color: 0xffffff }))
         plane.rotateX(-Math.PI / 2)
         plane.position.y = -1.75
         plane.receiveShadow = true
         scene.add(plane)
         // cube
         const geometry = new THREE.BoxGeometry(2, 2, 2)
         const material = new THREE.MeshStandardMaterial({
            color: 0x87ceeb
         })
         const materialFolder = gui.addFolder('Material')
         materialFolder.add(material, 'wireframe')
         materialFolder.open()
         const cube = new THREE.Mesh(geometry, material)
         cube.position.set(0, 0.5, 0)
         cube.castShadow = true
         cube.receiveShadow = true
         scene.add(cube)
         // responsiveness
         window.addEventListener('resize', () => {
            width = window.innerWidth
            height = window.innerHeight
            camera.aspect = width / height
            camera.updateProjectionMatrix()
            renderer.setSize(window.innerWidth, window.innerHeight)
            renderer.render(scene, camera)
         })
         // renderer
         const renderer = new THREE.WebGL1Renderer()
         renderer.setSize(window.innerWidth, window.innerHeight)
         renderer.shadowMap.enabled = true
         renderer.shadowMap.type = THREE.PCFSoftShadowMap
         renderer.setPixelRatio(Math.min(window.devicePixelRatio, 2))
         // animation
         function animate() {
            requestAnimationFrame(animate)
            cube.rotation.x += 0.005
            cube.rotation.y += 0.01
            renderer.render(scene, camera)
         }
         // rendering the scene
         const container = document.querySelector('#container')
         container.append(renderer.domElement)
         renderer.render(scene, camera)
         animate()
      </script>
   </body>
</html>
輸出
| 序號 | 燈光與描述 |
|---|---|
| 1 |
它是最基本的燈光,它均勻地照亮整個場景。 |
| 2 |
方向光來自特定點,並從遠處直接發出到目標。 |
| 3 |
它是另一種燈光,它來自錐形形狀的特定方向。 |
| 4 |
點光源是一種從單個點向所有方向發射光的光源。 |
| 5 |
它是一種用於建立自然光照的特殊燈光。 |