- Pygame 教程
- Pygame - 首頁
- Pygame - 概述
- Pygame - Hello World
- Pygame - 顯示模式
- Pygame - Locals 模組
- Pygame - 顏色物件
- Pygame - 事件物件
- Pygame - 鍵盤事件
- Pygame - 滑鼠事件
- Pygame - 繪製形狀
- Pygame - 載入影像
- Pygame - 在視窗中顯示文字
- Pygame - 移動影像
- Pygame - 使用數字小鍵盤移動
- Pygame - 使用滑鼠移動
- Pygame - 移動矩形物體
- Pygame - 使用文字作為按鈕
- Pygame - 影像變換
- Pygame - 音效物件
- Pygame - 混音器通道
- Pygame - 播放音樂
- Pygame - 播放影片
- Pygame - 使用攝像頭模組
- Pygame - 載入游標
- Pygame - 訪問 CDROM
- Pygame - 精靈模組
- Pygame - PyOpenGL
- Pygame - 錯誤和異常
- Pygame 有用資源
- Pygame - 快速指南
- Pygame - 有用資源
- Pygame - 討論
Pygame - 影像變換
pygame.transform 模組包含許多函式的定義,用於操作從影像或文字塊獲得的 Surface 物件。Surface 物件的操作包括翻轉、旋轉、縮放、調整大小和縮放物件。
pygame.transform 模組中包含以下函式。
| flip() | 垂直和水平翻轉 |
| scale() | 調整到新的解析度 |
| rotate() | 旋轉影像 |
| rotozoom() | 過濾縮放和旋轉 |
| scale2x() | 專業的影像倍增 |
| smoothscale() | 平滑地將 surface 縮放至任意大小 |
| get_smoothscale_backend() | 返回正在使用的 smoothscale 濾波器版本 - 'GENERIC'、'MMX' 或 'SSE' |
| set_smoothscale_backend() | 將 smoothscale 濾波器版本設定為 - 'GENERIC'、'MMX' 或 'SSE' 之一 |
| chop() | 獲取影像的副本,其中內部區域已移除 |
| laplacian() | 查詢 surface 中的邊緣 |
| average_surfaces() | 從多個 surface 中查詢平均 surface。 |
| average_color() | 查詢 surface 的平均顏色 |
| threshold() | 查詢 surface 中哪些畫素以及有多少畫素在“search_color”或“search_surf”的閾值範圍內。 |
讓我們首先使用 flip() 函式,其語法如下:
flip(Surface, xbool, ybool)
此函式可以水平、垂直或同時翻轉 surface 物件。方向由兩個布林引數決定。
要水平翻轉影像,請使用以下命令:
pygame.transform.flip(img2,True, False)
要垂直翻轉,請使用以下命令:
pygame.transform.flip(img2,False, True)
在下面的示例中,pygame 徽標影像正常顯示,並沿兩個方向翻轉。首先從原始影像物件獲取翻轉後的 surface,獲取其 Rect 物件,然後構建它。要渲染水平翻轉的影像,
img1 = pygame.image.load('pygame.png')
img2=img1
img2=pygame.transform.flip(img2,True, False)
#inside event loop
rect2 = img2.get_rect()
   rect2.center = 200, 150
   screen.blit(img2, rect2)
示例
渲染原始 Pygame 徽標及其翻轉影像的完整程式碼如下:
import pygame

pygame.init()
screen = pygame.display.set_mode((400, 300))
pygame.display.set_caption("Flip image")
img1 = pygame.image.load('pygame.png')
img2=img1
img3=img1
img2=pygame.transform.flip(img2,True, False)
img3=pygame.transform.flip(img3, False, True)
done = False
bg = (127,127,127)
while not done:
   for event in pygame.event.get():
      screen.fill(bg)
      rect1 = img1.get_rect()
      rect1.center = 200, 50
      screen.blit(img1, rect1)
      rect2 = img2.get_rect()
      rect2.center = 200, 150
      screen.blit(img2, rect2)
      rect3 = img3.get_rect()
      rect3.center = 200, 250
      screen.blit(img3, rect3)
      if event.type == pygame.QUIT:
         done = True
   pygame.display.update()
輸出

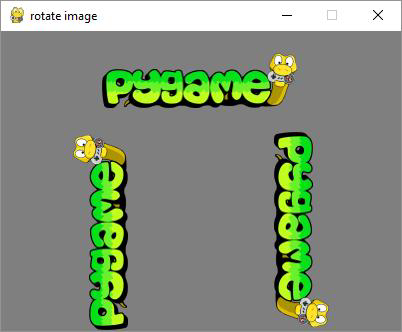
rotate() 函式採用以下引數:
rotate(Surface, angle)
示例
角度的負值會使 surface 順時針旋轉。
import pygame

pygame.init()
screen = pygame.display.set_mode((400, 300))
pygame.display.set_caption("rotate image")
img1 = pygame.image.load('pygame.png')
img2=img1
img3=img1
img2=pygame.transform.rotate(img2,90)
img3=pygame.transform.rotate(img3, -90)
done = False
bg = (127,127,127)
while not done:
   for event in pygame.event.get():
      screen.fill(bg)
      rect1 = img1.get_rect()
      rect1.center = 200, 50
      screen.blit(img1, rect1)
      rect2 = img2.get_rect()
      rect2.center = 100, 200
      screen.blit(img2, rect2)
      rect3 = img3.get_rect()
      rect3.center = 300,200
      screen.blit(img3, rect3)
      if event.type == pygame.QUIT:
         done = True
   pygame.display.update()
輸出
示例
laplacian() 函式提取 surface 物件的輪廓。該函式只接受一個引數,即影像物件本身。
import pygame
pygame.init()
screen = pygame.display.set_mode((400, 300))
pygame.display.set_caption("Laplacian of image")
img1 = pygame.image.load('pygame.png')
img2=img1
img2=pygame.transform.laplacian(img2)
done = False
bg = (127,127,127)
while not done:
   for event in pygame.event.get():
      screen.fill(bg)
      rect1 = img1.get_rect()
      rect1.center = 200, 50
      screen.blit(img1, rect1)
      rect2 = img2.get_rect()
      rect2.center = 200, 200
      screen.blit(img2, rect2)

      if event.type == pygame.QUIT:
         done = True
   pygame.display.update()
輸出

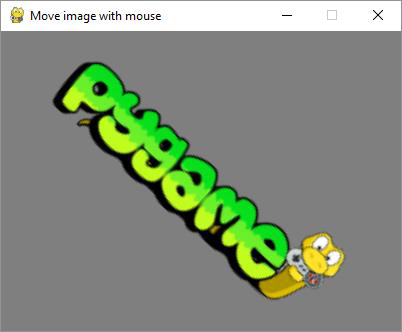
為了使 Surface 物件隨著滑鼠移動而移動,請根據影像中心計算 x、y 座標。我們還計算中心與滑鼠之間的距離 d。atan2(y, x) 數學函式允許找到旋轉角度。我們需要將弧度轉換為度數。根據滑鼠與中心的距離,我們計算縮放參數。
mouse = event.pos
Pygame
54
x = mouse[0] - 200
y = mouse[1] - 150
d = math.sqrt(x ** 2 + y ** 2)
angle = math.degrees(-math.atan2(y, x))
scale = abs(5 * d / 400)
最後,我們使用 rotzoom() 函式,該函式執行組合旋轉和縮放變換。
rotozoom(Surface, angle, scale)
示例
以下程式碼渲染可以根據滑鼠移動旋轉的 Pygame 徽標影像。
import pygame , math
from pygame.locals import *
pygame.init()
screen = pygame.display.set_mode((400, 300))
pygame.display.set_caption("Move image with mouse")
img1 = pygame.image.load('pygame.png')
done = False
bg = (127,127,127)
while not done:
   for event in pygame.event.get():
      screen.fill(bg)

      if event.type == pygame.QUIT:
         done = True
      if event.type == MOUSEMOTION:
         mouse = event.pos
         x = mouse[0] - 200
         y = mouse[1] - 150
         d = math.sqrt(x ** 2 + y ** 2)
         angle = math.degrees(-math.atan2(y, x))
         scale = abs(5 * d / 400)
         img2 = pygame.transform.rotozoom(img1, angle, scale)
         rect = img2.get_rect()
         rect.center = (200,150)
         screen.blit(img2, rect)
   pygame.display.update()
輸出
執行上述程式碼,嘗試沿顯示視窗移動滑鼠游標。影像將相應地旋轉並縮小或放大。
廣告