- Pygame 教程
- Pygame - 首頁
- Pygame - 概述
- Pygame - Hello World
- Pygame - 顯示模式
- Pygame - Locals 模組
- Pygame - 顏色物件
- Pygame - 事件物件
- Pygame - 鍵盤事件
- Pygame - 滑鼠事件
- Pygame - 繪製形狀
- Pygame - 載入影像
- Pygame - 在視窗中顯示文字
- Pygame - 移動影像
- Pygame - 使用數字小鍵盤移動
- Pygame - 使用滑鼠移動
- Pygame - 移動矩形物體
- Pygame - 使用文字作為按鈕
- Pygame - 變換影像
- Pygame - 音效物件
- Pygame - 混音通道
- Pygame - 播放音樂
- Pygame - 播放影片
- Pygame - 使用攝像頭模組
- Pygame - 載入游標
- Pygame - 訪問 CDROM
- Pygame - Sprite 模組
- Pygame - PyOpenGL
- Pygame - 錯誤和異常
- Pygame 有用資源
- Pygame - 快速指南
- Pygame - 有用資源
- Pygame - 討論
Pygame - 移動矩形物體
Pygame.Rect 類具有儲存和操作矩形區域的功能。可以使用左、上、寬和高值構造 Rect 物件。Rect 類中的函式可以複製、移動和調整 Rect 物件的大小。
Rect 物件具有以下虛擬屬性:

除了移動之外,Rect 類還具有測試矩形之間碰撞的方法。
| copy() | 返回一個與原始矩形具有相同位置和大小的新矩形。 |
| move() | 返回一個透過給定偏移量移動的新矩形。x 和 y 引數可以是任何整數,正數或負數。 |
| move_ip() | 與 Rect.move() 方法相同,但就地操作。 |
| inflate(x,y) | 返回一個大小根據給定偏移量改變的新矩形。負值將縮小矩形。 |
| inflate_ip(x, y) | 與 Rect.inflate() 方法相同,但就地操作。 |
| clamp(Rect) | 返回一個移動到完全位於引數 Rect 內的新矩形。 |
| clip(Rect) | 返回一個裁剪到完全位於引數 Rect 內的新矩形。 |
| union(Rect) | 返回一個完全覆蓋兩個提供的矩形區域的新矩形。 |
| union_ip(Rect) | 與 Rect.union() 方法相同,但就地操作。 |
| contains(Rect) | 當引數完全位於 Rect 內時返回 true。 |
| collidepoint((x,y)) | 如果給定點位於矩形內,則返回 true。 |
| colliderect(Rect) | 如果兩個矩形的任何部分重疊,則返回 true。 |
示例
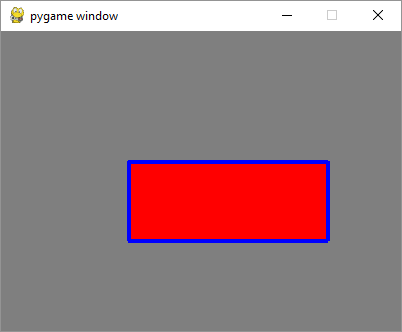
在下面的程式中,用紅色輪廓繪製一個 Rect 物件。使用 copy() 方法建立其克隆以進行移動。移動由 move_ip() 方法實現。箭頭鍵透過將 x/y 座標遞增/遞減 + 或 -5 畫素來移動複製矩形的位置。
import pygame
from pygame.locals import *
from sys import exit
pygame.init()
screen = pygame.display.set_mode((400,300))
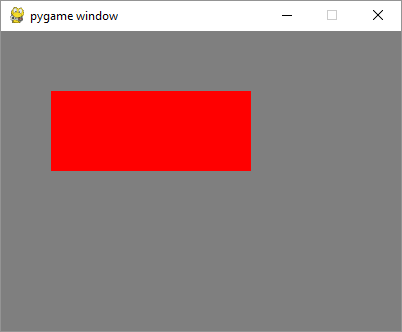
rect1 = Rect(50, 60, 200, 80)
rect2=rect1.copy()
running = True
x=0
y=0
while running:
for event in pygame.event.get():
if event.type == QUIT:
running = False
if event.type == KEYDOWN:
if event.key==K_LEFT:
x= -5
y=0
if event.key == K_RIGHT:
x=5
y=0
if event.key == K_UP:
x = 0
y = -5
if event.key == K_DOWN:
x = 0
y = 5
rect2.move_ip(x,y)
screen.fill((127,127,127))
pygame.draw.rect(screen, (255,0,0), rect1, 1)
pygame.draw.rect(screen, (0,0,255), rect2, 5)
pygame.display.update()
pygame.quit()
輸出
下面的輸出顯示帶有紅色輪廓的矩形是原始矩形。它的副本不斷移動以響應箭頭鍵,並具有藍色輪廓。

示例
將 move_ip() 方法更改為 inflate_ip() 方法,以根據按下的箭頭鍵來增大/縮小矩形。
while running:
   for event in pygame.event.get():
      if event.type == QUIT:
         running = False
      if event.type == KEYDOWN:
         if event.key==K_LEFT:
            x= -5
            y=0
         if event.key == K_RIGHT:
            x=5
            y=0
         if event.key == K_UP:
            x = 0
            y = -5
         if event.key == K_DOWN:
            x = 0
            y = 5
      rect2.inflate_ip(x,y)
   screen.fill((127,127,127))
   pygame.draw.rect(screen, (255,0,0), rect1, 1)
   pygame.draw.rect(screen, (0,0,255), rect2, 5)
   pygame.display.update()
輸出
以下是箭頭鍵按下活動的螢幕截圖:

示例
為了透過檢測 MOUSEMOTION 事件來移動矩形,我們需要首先按下原始矩形內的滑鼠。為了驗證滑鼠位置是否在矩形內,我們使用 Rect 物件的 collidepoint() 方法。當滑鼠移動時,矩形物件透過 move_ip() 方法就地移動。當滑鼠釋放時,移動將停止。
import pygame
from pygame.locals import *
from sys import exit
pygame.init()
screen = pygame.display.set_mode((400,300))
rect = Rect(50, 60, 200, 80)
moving = False
running = True
while running:
   for event in pygame.event.get():
      if event.type == QUIT:
         running = False
      elif event.type == MOUSEBUTTONDOWN:
         if rect.collidepoint(event.pos):
            moving = True
      elif event.type == MOUSEBUTTONUP:
         moving = False
      elif event.type == MOUSEMOTION and moving:
         rect.move_ip(event.rel)
   screen.fill((127,127,127))
   pygame.draw.rect(screen, (255,0,0), rect)
   if moving:
      pygame.draw.rect(screen, (0,0,255), rect, 4)
   pygame.display.flip()
pygame.quit()
輸出
示例
要透過滑鼠繪製矩形,請在 MOUSEBUTTONDOWN 和 MOUSEBUTTONUP 事件中捕獲滑鼠指標座標,計算左上角座標、寬度和高度,然後呼叫 rect() 函式。
import pygame
from pygame.locals import *
from sys import exit
pygame.init()
screen = pygame.display.set_mode((400,300))
pygame.display.set_caption("Draw Rectangle with Mouse")
screen.fill((127,127,127))
x=0
y=0
w=0
h=0
drawmode=True
running = True
while running:
   for event in pygame.event.get():
      if event.type == QUIT:
         running = False
      if event.type == MOUSEBUTTONDOWN:
         x,y = pygame.mouse.get_pos()
         drawmode = True
      if event.type == MOUSEBUTTONUP:
         x1,y1 = pygame.mouse.get_pos()
         w=x1-x
         h=y1-y
         drawmode= False

   rect = pygame.Rect(x,y,w,h)
   if drawmode == False:
      pygame.draw.rect(screen, (255,0,0), rect)
   pygame.display.flip()
pygame.quit()
輸出

廣告