
 資料結構
資料結構 網路
網路 關係資料庫管理系統
 作業系統
作業系統 Java
Java iOS
iOS HTML
HTML CSS
CSS Android
 Python
 C 程式設計
 C++
C++ C#
C# MongoDB
 MySQL
MySQL Javascript
 PHP
PHP如何在 Android 上使用 Kotlin 在 Google 地圖上顯示當前位置?
此示例演示瞭如何使用 Kotlin 在 Android 上的 Google 地圖上顯示當前位置。
步驟 1 - 在 Android Studio 中建立一個新專案,轉到檔案 ⇒ 新建專案,並填寫所有必需的詳細資訊以建立新專案。
步驟 2 - 將以下程式碼新增到 res/layout/activity_main.xml。
<fragment xmlns:android="http://schemas.android.com/apk/res/android"
   xmlns:tools="http://schemas.android.com/tools"
   android:id="@+id/myMap"
   android:name="com.google.android.gms.maps.SupportMapFragment"
   android:layout_width="match_parent"
   android:layout_height="match_parent"
   tools:context=".MainActivity" />
步驟 3 - 在 build.gradle (Module: app) 中新增給定的依賴項
implementation 'com.google.android.gms:play-services-maps:17.0.0'
implementation 'com.google.android.gms:play-services-location:17.0.0'
implementation 'com.google.android.gms:play-services-maps:17.0.0'
步驟 4 - 將以下程式碼新增到 src/MainActivity.kt
import android.Manifest
import android.content.pm.PackageManager
import android.location.Location
import android.os.Bundle
import android.widget.Toast
import androidx.core.app.ActivityCompat
import androidx.fragment.app.FragmentActivity
import com.google.android.gms.location.FusedLocationProviderClient
import com.google.android.gms.location.LocationServices
import com.google.android.gms.maps.CameraUpdateFactory
import com.google.android.gms.maps.GoogleMap
import com.google.android.gms.maps.OnMapReadyCallback
import com.google.android.gms.maps.SupportMapFragment
import com.google.android.gms.maps.model.LatLng
import com.google.android.gms.maps.model.MarkerOptions
class MainActivity : FragmentActivity(), OnMapReadyCallback {
   private lateinit var currentLocation: Location
   private lateinit var fusedLocationProviderClient: FusedLocationProviderClient
   private val permissionCode = 101
   override fun onCreate(savedInstanceState: Bundle?) {
      super.onCreate(savedInstanceState)
      setContentView(R.layout.activity_main)
      fusedLocationProviderClient =  LocationServices.getFusedLocationProviderClient(this@MainActivity)
      fetchLocation()
   }
   private fun fetchLocation() {
      if (ActivityCompat.checkSelfPermission(
      this, Manifest.permission.ACCESS_FINE_LOCATION) !=
      PackageManager.PERMISSION_GRANTED && ActivityCompat.checkSelfPermission(
      this, Manifest.permission.ACCESS_COARSE_LOCATION) !=
      PackageManager.PERMISSION_GRANTED) {
         ActivityCompat.requestPermissions(this,
         arrayOf(Manifest.permission.ACCESS_FINE_LOCATION), permissionCode)
         return
      }
      val task = fusedLocationProviderClient.lastLocation
      task.addOnSuccessListener { location −>
         if (location != null) {
            currentLocation = location
            Toast.makeText(applicationContext, currentLocation.latitude.toString() + "" +
            currentLocation.longitude, Toast.LENGTH_SHORT).show()
            val supportMapFragment = (supportFragmentManager.findFragmentById(R.id.myMap) as
            SupportMapFragment?)!!
            supportMapFragment.getMapAsync(this@MainActivity)
         }
      }
   }
   override fun onMapReady(googleMap: GoogleMap?) {
      val latLng = LatLng(currentLocation.latitude, currentLocation.longitude)
      val markerOptions = MarkerOptions().position(latLng).title("I am here!")
      googleMap?.animateCamera(CameraUpdateFactory.newLatLng(latLng))
      googleMap?.animateCamera(CameraUpdateFactory.newLatLngZoom(latLng, 5f))
      googleMap?.addMarker(markerOptions)
   }
   override fun onRequestPermissionsResult(requestCode: Int, permissions: Array<String?>,
   grantResults: IntArray) {
      when (requestCode) {
         permissionCode −> if (grantResults.isNotEmpty() && grantResults[0] ==
         PackageManager.PERMISSION_GRANTED) {
            fetchLocation()
         }
      }
   }
}
步驟 5 - 要獲取 google API 金鑰 (map_key),請按照以下步驟操作
點選專案下拉選單,選擇或建立要為其新增 API 金鑰的專案。
點選選單按鈕
 並選擇 API 和服務 > 憑據。
在“憑據”頁面上,點選“建立憑據”>“API 金鑰”。“已建立的 API 金鑰”對話方塊會顯示您新建立的 API 金鑰。
點選關閉。
在清單檔案中新增 API 金鑰 <meta−data></meta−data>,如步驟 6 所示
步驟 6 - 將以下程式碼新增到 androidManifest.xml
<?xml version="1.0" encoding="utf-8"?>
<manifest xmlns:android="http://schemas.android.com/apk/res/android" package="com.example.q15">
   <uses-permission android:name="android.permission.ACCESS_COARSE_LOCATION" />
   <uses-permission android:name="android.permission.ACCESS_FINE_LOCATION"/>
   <application
      android:allowBackup="true"
      android:icon="@mipmap/ic_launcher"
      android:label="@string/app_name"
      android:roundIcon="@mipmap/ic_launcher_round"
      android:supportsRtl="true"
      android:theme="@style/AppTheme">
      <activity android:name=".MainActivity">
         <intent-filter>
            <action android:name="android.intent.action.MAIN" />
            <category android:name="android.intent.category.LAUNCHER" />
         </intent-filter>
      </activity>
      <meta-data
      android:name="com.google.android.geo.API_KEY"
      android:value="AIzaSyCiSh4VnnI1jemtZTytDoj2X7Wl6evey30" />
   </application>
</manifest>
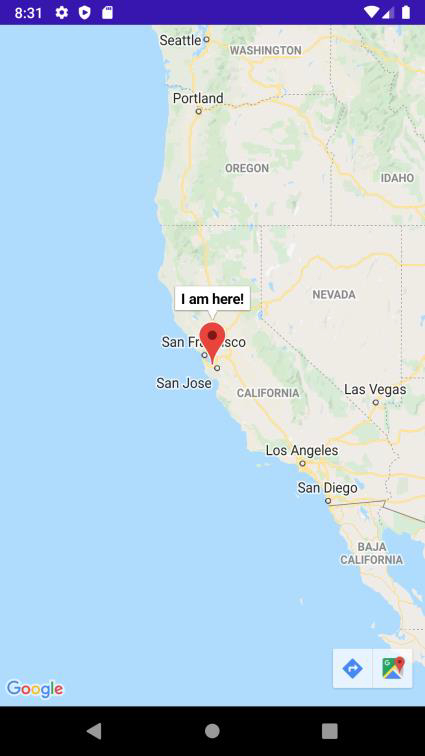
讓我們嘗試執行您的應用程式。我假設您已將您的實際 Android 移動裝置連線到您的計算機。要從 Android Studio 執行應用程式,請開啟您專案中的一個活動檔案,然後點選工具欄中的執行圖示![]() 。選擇您的移動裝置作為選項,然後檢查您的移動裝置,它將顯示您的預設螢幕
。選擇您的移動裝置作為選項,然後檢查您的移動裝置,它將顯示您的預設螢幕

更新於: 2020 年 11 月 5 日
4K+ 次檢視

廣告