
 資料結構
資料結構 網路
網路 關係型資料庫管理系統
 作業系統
作業系統 Java
Java iOS
iOS HTML
HTML CSS
CSS Android
 Python
 C 語言程式設計
 C++
C++ C#
C# MongoDB
 MySQL
MySQL Javascript
 PHP
PHP如何使用 Kotlin 在 Android 裝置上跟蹤當前位置(緯度和經度)?\n
此示例演示瞭如何使用 Kotlin 在 Android 裝置上跟蹤當前位置(緯度和經度)。
步驟 1 - 在 Android Studio 中建立一個新專案,轉到檔案 ⇒ 新建專案,並填寫所有必需的詳細資訊以建立新專案。
步驟 2 - 將以下程式碼新增到 res/layout/activity_main.xml 中。
<?xml version="1.0" encoding="utf-8"?>
<LinearLayout xmlns:android="http://schemas.android.com/apk/res/android"
   xmlns:tools="http://schemas.android.com/tools"
   android:id="@+id/linearLayout"
   android:layout_width="match_parent"
   android:layout_height="match_parent"
   android:gravity="center"
   android:orientation="vertical"
   tools:context=".MainActivity">
   <TextView
      android:layout_width="wrap_content"
      android:layout_height="wrap_content"
      android:layout_marginStart="10dp"
      android:text="Current Location in Latitude and Longitude:"
      android:textAlignment="center"
      android:textColor="@color/common_google_signin_btn_text_dark_focused"
      android:textIsSelectable="true"
      android:textSize="24sp"
      android:textStyle="bold" />
   <TextView
      android:id="@+id/latitudeText"
      android:layout_width="wrap_content"
      android:layout_height="wrap_content"
      android:layout_marginStart="10dp"
      android:textColor="@color/common_google_signin_btn_text_dark_focused"
      android:textIsSelectable="true"
      android:textSize="24sp"
      android:textStyle="bold" />
   <TextView
      android:id="@+id/longitudeText"
      android:layout_width="wrap_content"
      android:layout_height="wrap_content"
      android:layout_marginStart="10dp"
      android:layout_marginTop="20dp"
      android:textColor="@color/common_google_signin_btn_text_dark_focused"
      android:textIsSelectable="true"
      android:textSize="24sp"
      android:textStyle="bold" />
</LinearLayout>
步驟 3 - 將以下程式碼新增到 src/MainActivity.kt 中。
package app.com.kotlipapp
import android.Manifest
import android.content.Intent
import android.content.pm.PackageManager
import android.location.Location
import android.net.Uri
import android.os.Build
import androidx.appcompat.app.AppCompatActivity
import android.os.Bundle
import android.provider.Settings
import android.util.Log
import android.view.View
import android.widget.TextView
import android.widget.Toast
import androidx.core.app.ActivityCompat
import com.google.android.gms.location.FusedLocationProviderClient
import com.google.android.gms.location.LocationServices
class MainActivity : AppCompatActivity() {
   private var fusedLocationClient: FusedLocationProviderClient? = null
   private var lastLocation: Location? = null
   private var latitudeLabel: String? = null
   private var longitudeLabel: String? = null
   private var latitudeText: TextView? = null
   private var longitudeText: TextView? = null
   override fun onCreate(savedInstanceState: Bundle?) {
      super.onCreate(savedInstanceState)
      setContentView(R.layout.activity_main)
      latitudeLabel = resources.getString(R.string.latitudeBabel)
      longitudeLabel = resources.getString(R.string.longitudeBabel)
      latitudeText = findViewById<View>(R.id.latitudeText) as TextView
      longitudeText = findViewById<View>(R.id.longitudeText) as TextView
      fusedLocationClient = LocationServices.getFusedLocationProviderClient(this)
   }
   public override fun onStart() {
      super.onStart()
      if (!checkPermissions()) {
         if (Build.VERSION.SDK_INT >= Build.VERSION_CODES.M) {
            requestPermissions()
         }
      }
      else {
         getLastLocation()
      }
   }
   private fun getLastLocation() {
      fusedLocationClient?.lastLocation!!.addOnCompleteListener(this) { task ->
         if (task.isSuccessful && task.result != null) {
            lastLocation = task.result
            latitudeText!!.text = latitudeLabel + ": " + (lastLocation)!!.latitude
            longitudeText!!.text = longitudeLabel + ": " + (lastLocation)!!.longitude
         }
         else {
            Log.w(TAG, "getLastLocation:exception", task.exception)
            showMessage("No location detected. Make sure location is enabled on the device.")
         }
      }
   }
   private fun showMessage(string: String) {
      val container = findViewById<View>(R.id.linearLayout)
      if (container != null) {
         Toast.makeText(this@MainActivity, string, Toast.LENGTH_LONG).show()
      }
   }
   private fun showSnackbar(
      mainTextStringId: String, actionStringId: String,
      listener: View.OnClickListener
   ) {
      Toast.makeText(this@MainActivity, mainTextStringId, Toast.LENGTH_LONG).show()
   }
   private fun checkPermissions(): Boolean {
      val permissionState = ActivityCompat.checkSelfPermission(
      this,
      Manifest.permission.ACCESS_COARSE_LOCATION
   )
   return permissionState == PackageManager.PERMISSION_GRANTED
}
private fun startLocationPermissionRequest() {
   ActivityCompat.requestPermissions(
      this@MainActivity,
      arrayOf(Manifest.permission.ACCESS_COARSE_LOCATION),
      REQUEST_PERMISSIONS_REQUEST_CODE
   )
}
private fun requestPermissions() {
   val shouldProvideRationale = ActivityCompat.shouldShowRequestPermissionRationale(
      this,
      Manifest.permission.ACCESS_COARSE_LOCATION
   )
   if (shouldProvideRationale) {
      Log.i(TAG, "Displaying permission rationale to provide additional context.")
      showSnackbar("Location permission is needed for core functionality", "Okay",
      View.OnClickListener {
         startLocationPermissionRequest()
      })
   }
   else {
      Log.i(TAG, "Requesting permission")
      startLocationPermissionRequest()
   }
}
override fun onRequestPermissionsResult(
   requestCode: Int, permissions: Array<String>,
   grantResults: IntArray
) {
   Log.i(TAG, "onRequestPermissionResult")
   if (requestCode == REQUEST_PERMISSIONS_REQUEST_CODE) {
      when {
         grantResults.isEmpty() -> {
            // If user interaction was interrupted, the permission request is cancelled and you
            // receive empty arrays.
            Log.i(TAG, "User interaction was cancelled.")
         }
         grantResults[0] == PackageManager.PERMISSION_GRANTED -> {
            // Permission granted.
            getLastLocation()
         }
         else -> {
            showSnackbar("Permission was denied", "Settings",
               View.OnClickListener {
                  // Build intent that displays the App settings screen.
                  val intent = Intent()
                  intent.action = Settings.ACTION_APPLICATION_DETAILS_SETTINGS
                  val uri = Uri.fromParts(
                     "package",
                     Build.DISPLAY, null
                  )
                  intent.data = uri
                  intent.flags = Intent.FLAG_ACTIVITY_NEW_TASK
                  startActivity(intent)
                  }
               )
            }
         }
      }
   }
   companion object {
      private val TAG = "LocationProvider"
      private val REQUEST_PERMISSIONS_REQUEST_CODE = 34
   }
}
步驟 4 - 將以下程式碼新增到 res/strings.xml 中。
<resources>
   <string name="app_name">KotlipApp</string>
   <string name="latitudeBabel">Latitude</string>
   <string name="longitudeBabel">Longitude</string>
</resources>
步驟 5 - 將以下程式碼新增到 androidManifest.xml 中。
<?xml version="1.0" encoding="utf-8"?>
<manifest xmlns:android="http://schemas.android.com/apk/res/android"
   package="app.com.kotlipapp">
   <uses-permission android:name="android.permission.INTERNET"/>
   <uses-permission android:name="android.permission.ACCESS_COARSE_LOCATION"/>
   <uses-permission android:name="android.permission.ACCESS_FINE_LOCATION"/>
   <application
      android:allowBackup="true"
      android:icon="@mipmap/ic_launcher"
      android:label="@string/app_name"
      android:roundIcon="@mipmap/ic_launcher_round"
      android:supportsRtl="true"
      android:theme="@style/AppTheme>
      <activity android:name=".MainActivity>
         <intent-filter>
            <action android:name="android.intent.action.MAIN" />
            <category android:name="android.intent.category.LAUNCHER" />
         </intent-filter>
      </activity>
   </application>
</manifest>
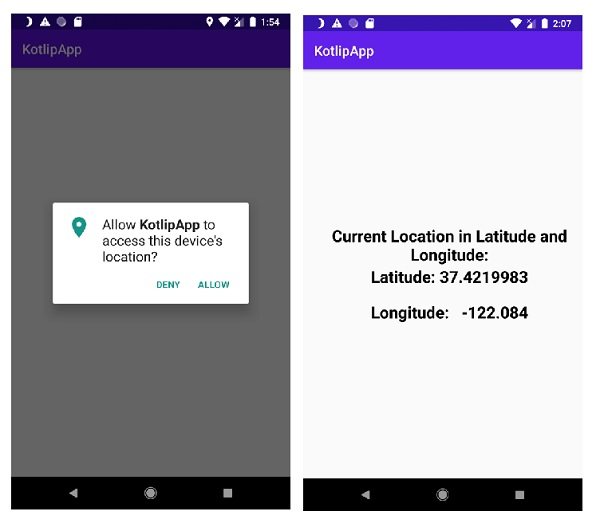
讓我們嘗試執行您的應用程式。我假設您已將您的實際 Android 移動裝置連線到您的計算機。要從 Android Studio 執行應用程式,請開啟您的一個專案活動檔案,然後單擊工具欄中的執行 ![]() 圖示。選擇您的移動裝置作為選項,然後檢查您的移動裝置,它將顯示您的預設螢幕 -
圖示。選擇您的移動裝置作為選項,然後檢查您的移動裝置,它將顯示您的預設螢幕 -
點選 此處 下載專案程式碼。

更新於: 2020年4月20日
2K+ 次檢視

廣告