- Arduino 教程
- Arduino - 首頁
- Arduino - 概述
- Arduino - 開發板描述
- Arduino - 安裝
- Arduino - 程式結構
- Arduino - 資料型別
- Arduino - 變數和常量
- Arduino - 運算子
- Arduino - 控制語句
- Arduino - 迴圈
- Arduino - 函式
- Arduino - 字串
- Arduino - 字串物件
- Arduino - 時間
- Arduino - 陣列
- Arduino 函式庫
- Arduino - I/O 函式
- Arduino - 高階 I/O 函式
- Arduino - 字元函式
- Arduino - 數學庫
- Arduino - 三角函式
- Arduino 高階
- Arduino - Due 和 Zero
- Arduino - 脈衝寬度調製
- Arduino - 隨機數
- Arduino - 中斷
- Arduino - 通訊
- Arduino - 互聯積體電路
- Arduino - 序列外設介面
- Arduino 專案
- Arduino - 閃爍 LED
- Arduino - 漸變 LED
- Arduino - 讀取模擬電壓
- Arduino - LED 條形圖
- Arduino - 鍵盤登出
- Arduino - 鍵盤訊息
- Arduino - 滑鼠按鈕控制
- Arduino - 鍵盤序列埠
- Arduino 感測器
- Arduino - 溼度感測器
- Arduino - 溫度感測器
- Arduino - 水位檢測/感測器
- Arduino - PIR 感測器
- Arduino - 超聲波感測器
- Arduino - 連線開關
- 電機控制
- Arduino - 直流電機
- Arduino - 伺服電機
- Arduino - 步進電機
- Arduino 和聲音
- Arduino - 音調庫
- Arduino - 無線通訊
- Arduino - 網路通訊
- Arduino 有用資源
- Arduino - 快速指南
- Arduino - 有用資源
- Arduino - 討論
Arduino - 滑鼠按鈕控制
使用 Mouse 庫,您可以使用 Arduino Leonardo、Micro 或 Due 控制計算機的螢幕游標。
此特定示例使用五個按鈕來移動螢幕游標。四個按鈕是方向鍵(上、下、左、右),一個用於滑鼠左鍵單擊。Arduino 的游標移動始終是相對的。每次讀取輸入時,游標的位置都會相對於其當前位置更新。
每當按下其中一個方向鍵時,Arduino 都會移動滑鼠,將 HIGH 輸入對映到相應方向的 5 個範圍。
第五個按鈕用於控制滑鼠左鍵單擊。當按鈕釋放時,計算機將識別該事件。
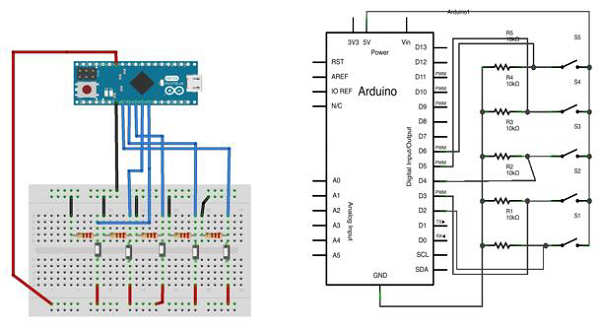
所需元件
您將需要以下元件 -
- 1 × 麵包板
- 1 × Arduino Leonardo、Micro 或 Due 開發板
- 5 × 10k 歐姆電阻
- 5 × 瞬時按鈕
步驟
按照電路圖,將元件連線到麵包板上,如下圖所示。
草圖
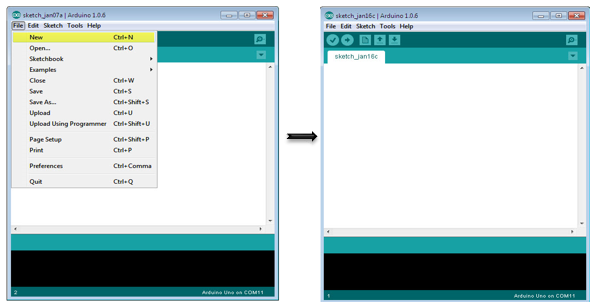
在您的計算機上開啟 Arduino IDE 軟體。使用 Arduino 語言進行編碼將控制您的電路。透過單擊“新建”開啟新的草圖檔案。
對於此示例,您需要使用 Arduino IDE 1.6.7
Arduino 程式碼
/*
   Button Mouse Control
   For Leonardo and Due boards only .Controls the mouse from
   five pushbuttons on an Arduino Leonardo, Micro or Due.
   Hardware:
   * 5 pushbuttons attached to D2, D3, D4, D5, D6
   The mouse movement is always relative. This sketch reads
   four pushbuttons, and uses them to set the movement of the mouse.
   WARNING: When you use the Mouse.move() command, the Arduino takes
   over your mouse! Make sure you have control before you use the mouse commands.
*/

#include "Mouse.h"
// set pin numbers for the five buttons:
const int upButton = 2;
const int downButton = 3;
const int leftButton = 4;
const int rightButton = 5;
const int mouseButton = 6;
int range = 5; // output range of X or Y movement; affects movement speed
int responseDelay = 10; // response delay of the mouse, in ms

void setup() {
   // initialize the buttons' inputs:
   pinMode(upButton, INPUT);
   pinMode(downButton, INPUT);
   pinMode(leftButton, INPUT);
   pinMode(rightButton, INPUT);
   pinMode(mouseButton, INPUT);
   // initialize mouse control:
   Mouse.begin();
}

void loop() {
   // read the buttons:
   int upState = digitalRead(upButton);
   int downState = digitalRead(downButton);
   int rightState = digitalRead(rightButton);
   int leftState = digitalRead(leftButton);
   int clickState = digitalRead(mouseButton);
   // calculate the movement distance based on the button states:
   int xDistance = (leftState - rightState) * range;
   int yDistance = (upState - downState) * range;
   // if X or Y is non-zero, move:
   if ((xDistance != 0) || (yDistance != 0)) {
      Mouse.move(xDistance, yDistance, 0);
   }

   // if the mouse button is pressed:
   if (clickState == HIGH) {
      // if the mouse is not pressed, press it:
      if (!Mouse.isPressed(MOUSE_LEFT)) {
         Mouse.press(MOUSE_LEFT);
      }
   } else {                           // else the mouse button is not pressed:
      // if the mouse is pressed, release it:
      if (Mouse.isPressed(MOUSE_LEFT)) {
         Mouse.release(MOUSE_LEFT);
      }
   }
   // a delay so the mouse does not move too fast:
   delay(responseDelay);
}
程式碼註釋
使用 micro-USB 線纜將開發板連線到您的計算機。按鈕連線到來自 2 到 6 號引腳的數字輸入。確保使用 10k 下拉電阻。
廣告