- Arduino 教程
- Arduino - 首頁
- Arduino - 概述
- Arduino - 開發板說明
- Arduino - 安裝
- Arduino - 程式結構
- Arduino - 資料型別
- Arduino - 變數與常量
- Arduino - 運算子
- Arduino - 控制語句
- Arduino - 迴圈
- Arduino - 函式
- Arduino - 字串
- Arduino - 字串物件
- Arduino - 時間
- Arduino - 陣列
- Arduino 函式庫
- Arduino - I/O 函式
- Arduino - 高階 I/O 函式
- Arduino - 字元函式
- Arduino - 數學庫
- Arduino - 三角函式
- Arduino 高階應用
- Arduino - Due & Zero
- Arduino - 脈寬調製 (PWM)
- Arduino - 隨機數
- Arduino - 中斷
- Arduino - 通訊
- Arduino - I2C 通訊
- Arduino - SPI 通訊
- Arduino 專案
- Arduino - LED 閃爍
- Arduino - LED 漸變
- Arduino - 讀取模擬電壓
- Arduino - LED 條形圖
- Arduino - 鍵盤登出
- Arduino - 鍵盤訊息
- Arduino - 滑鼠按鍵控制
- Arduino - 鍵盤序列埠
- Arduino 感測器
- Arduino - 溼度感測器
- Arduino - 溫度感測器
- Arduino - 水位檢測/感測器
- Arduino - PIR 感測器
- Arduino - 超聲波感測器
- Arduino - 連線開關
- 電機控制
- Arduino - 直流電機
- Arduino - 伺服電機
- Arduino - 步進電機
- Arduino 與聲音
- Arduino - 音調庫
- Arduino - 無線通訊
- Arduino - 網路通訊
- Arduino 有用資源
- Arduino - 快速指南
- Arduino - 有用資源
- Arduino - 討論
Arduino - 鍵盤序列埠
此示例監聽來自序列埠的位元組。接收到位元組後,開發板會向計算機發送一個按鍵。傳送的按鍵比接收到的按鍵高一位,因此如果您從序列埠監視器傳送一個“a”,您將從連線到計算機的開發板接收一個“b”。“1”將返回“2”,依此類推。
警告 − 當您使用Keyboard.print()命令時,Leonardo、Micro 或 Due 開發板將接管您的計算機鍵盤。為確保在執行包含此函式的程式時不會失去對計算機的控制,請在呼叫 Keyboard.print() 之前設定可靠的控制系統。此程式設計僅在開發板透過序列埠接收到位元組後傳送鍵盤命令。
所需元件
您將需要以下元件:
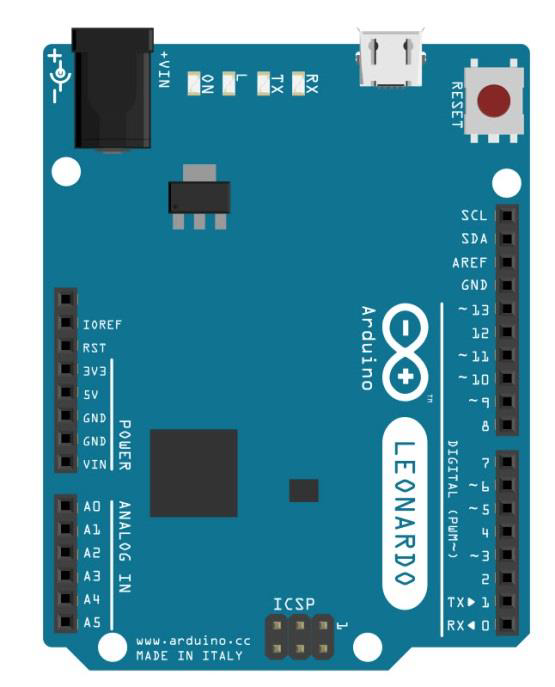
- 1 個 Arduino Leonardo、Micro 或 Due 開發板
步驟
只需使用 USB 資料線將您的開發板連線到計算機。
程式
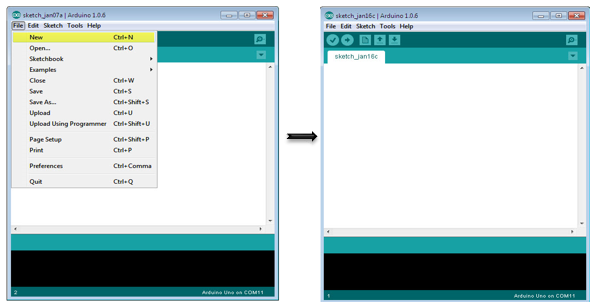
在您的計算機上開啟 Arduino IDE 軟體。使用 Arduino 語言進行編碼將控制您的電路。點選新建開啟一個新的程式檔案。
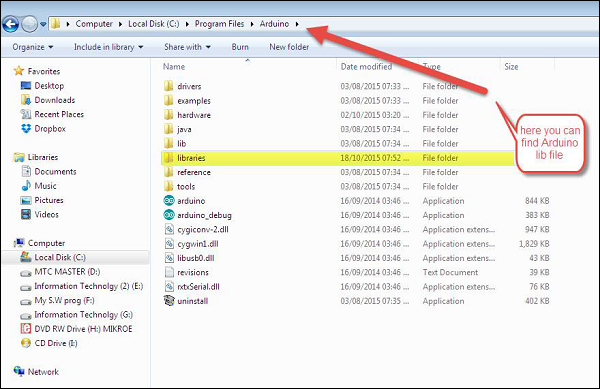
注意 − 您必須在 Arduino 庫檔案中包含鍵盤庫。將鍵盤庫檔案複製並貼上到以黃色突出顯示的名稱為“libraries”的檔案中。
Arduino 程式碼
/*
   Keyboard test
   For the Arduino Leonardo, Micro or Due Reads
      a byte from the serial port, sends a keystroke back.
   The sent keystroke is one higher than what's received, e.g. if you send a, you get b, send
      A you get B, and so forth.
   The circuit:
   * none
*/

#include "Keyboard.h"

void setup() {
   // open the serial port:
   Serial.begin(9600);
   // initialize control over the keyboard:
   Keyboard.begin();
}

void loop() {
   // check for incoming serial data:
   if (Serial.available() > 0) {
      // read incoming serial data:
      char inChar = Serial.read();
      // Type the next ASCII value from what you received:
      Keyboard.write(inChar + 1);
   }
}
程式碼說明
程式設計完成後,開啟序列埠監視器併發送一個位元組。開發板將回復一個比它高一位的按鍵。
結果
當您傳送一個位元組時,開發板將在 Arduino IDE 序列埠監視器上回復一個高一位的按鍵。
廣告