- WebdriverIO 教程
- WebdriverIO - 首頁
- WebdriverIO - 簡介
- WebdriverIO - 預備條件
- WebdriverIO - 架構
- WebdriverIO - NodeJS 入門
- WebdriverIO - NPM 安裝
- WebdriverIO - VS Code 安裝
- WebdriverIO - package.json
- WebdriverIO - Mocha 安裝
- Selenium 獨立伺服器安裝
- WebdriverIO - 配置檔案生成
- WebdriverIO - VS Code 智慧提示
- WebdriverIO - wdio.conf.js 檔案
- WebdriverIO - XPath 定位器
- WebdriverIO - CSS 定位器
- WebdriverIO - 連結文字定位器
- WebdriverIO - ID 定位器
- WebdriverIO - 標籤名定位器
- WebdriverIO - 類名定位器
- WebdriverIO - 名稱定位器
- 斷言的 Expect 語句
- WebdriverIO - 正確流程
- WebdriverIO - 常用瀏覽器命令
- WebdriverIO - 處理瀏覽器大小
- WebdriverIO - 瀏覽器導航命令
- 處理複選框和下拉選單
- WebdriverIO - 滑鼠操作
- 處理子視窗/彈出視窗
- WebdriverIO - 隱藏元素
- WebdriverIO - 框架
- WebdriverIO - 拖放
- WebdriverIO - 雙擊
- WebdriverIO - Cookie
- WebdriverIO - 處理單選按鈕
- Web元素的 Chai 斷言
- WebdriverIO - 多個視窗/標籤頁
- WebdriverIO - 滾動操作
- WebdriverIO - 警報
- WebdriverIO - 除錯程式碼
- WebdriverIO - 截圖捕獲
- WebdriverIO - JavaScript 執行器
- WebdriverIO - 等待
- WebdriverIO - 並行執行測試
- WebdriverIO - 資料驅動測試
- 從命令列引數執行測試
- 使用 Mocha 選項執行測試
- 從 Allure 生成 HTML 報告
- WebdriverIO 有用資源
- WebdriverIO - 快速指南
- WebdriverIO - 有用資源
- WebdriverIO - 討論
WebdriverIO - 截圖捕獲
我們可以使用 `saveScreenshot` 方法在使用 WebdriverIO 開發的自動化測試中捕獲截圖。通常情況下,如果遇到應用程式錯誤、斷言失敗等情況,就會捕獲截圖。
語法
捕獲截圖的語法如下:
browser.saveScreenshot("name along with path to store screenshot")
這裡,將截圖儲存的名稱和路徑作為引數傳遞給方法。在 WebdriverIO 中,我們無法選擇對特定元素進行截圖。
首先,按照“使用 WebdriverIO 的正確流程”章節中步驟 1 到 5 的操作,步驟如下:
步驟 1 - 安裝 NodeJS。關於如何執行此安裝的詳細資訊,請參閱“使用 NodeJS 入門”章節。
步驟 2 - 安裝 NPM。關於如何執行此安裝的詳細資訊,請參閱“NPM 安裝”章節。
步驟 3 - 安裝 VS Code。關於如何執行此安裝的詳細資訊,請參閱“VS Code 安裝”章節。
步驟 4 - 建立配置檔案。關於如何執行此安裝的詳細資訊,請參閱“配置檔案生成”章節。
步驟 5 - 建立規範檔案。關於如何執行此安裝的詳細資訊,請參閱“Mocha 安裝”章節。
步驟 6 - 將以下程式碼新增到已建立的 Mocha 規範檔案中。
// test suite name
describe('Tutorialspoint application', function(){
   //test case
   it('Screenshot', function(){
      // launch url
      browser.url('https://tutorialspoint.tw/index.htm')
      //identify element then enter text
      const e = $("#gsc-i-id1")
      e.setValue('WebdriverIO')
      //capture screenshot of page
      browser.saveScreenshot("screenshot.png")
   });
});
使用以下命令執行配置檔案 - wdio.conf.js 檔案:
npx wdio run wdio.conf.js
關於如何建立配置檔案的詳細資訊,請參閱“wdio.conf.js 檔案”章節和“配置檔案生成”章節。您的計算機上將顯示以下螢幕:
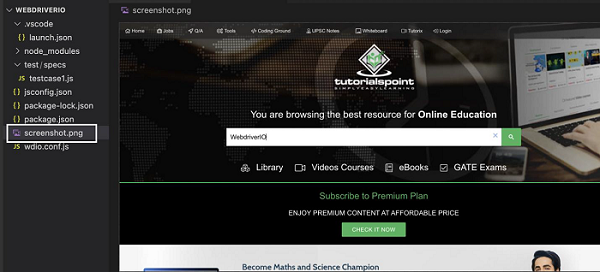
命令成功執行後,專案資料夾中將生成一個名為 screenshot.png 的檔案。該檔案包含捕獲的頁面截圖。
廣告