- Symfony 教程
- Symfony - 首頁
- Symfony - 簡介
- Symfony - 安裝
- Symfony - 架構
- Symfony - 元件
- Symfony - 服務容器
- Symfony - 事件 & 事件監聽器
- Symfony - 表示式
- Symfony - Bundles
- 建立簡單的 Web 應用程式
- Symfony - 控制器
- Symfony - 路由
- Symfony - 檢視引擎
- Symfony - Doctrine ORM
- Symfony - 表單
- Symfony - 驗證
- Symfony - 檔案上傳
- Symfony - Ajax 控制
- Cookies & 會話管理
- Symfony - 國際化
- Symfony - 日誌記錄
- Symfony - 郵件管理
- Symfony - 單元測試
- Symfony - 高階概念
- Symfony - REST 版本
- Symfony - CMF 版本
- 完整的執行示例
- Symfony 有用資源
- Symfony - 快速指南
- Symfony - 有用資源
- Symfony - 討論
Symfony - 快速指南
Symfony - 簡介
PHP Web 框架是一組類,有助於開發 Web 應用程式。Symfony 是一個開源的 MVC 框架,用於快速開發現代 Web 應用程式。Symfony 是一個全棧 Web 框架。它包含一組可重用的 PHP 元件。您可以在應用程式中獨立於框架使用任何 Symfony 元件。
Symfony 擁有大量的功能和活躍的社群。它使用 YAML、XML 或註釋進行靈活的配置。Symfony 與獨立庫和 PHP Unit 整合。Symfony 主要受到 Ruby on Rails、Django 和 Spring Web 應用程式框架的啟發。Symfony 元件被許多開源專案使用,其中包括 Composer、Drupal 和 phpBB。
Symfony 框架由多個元件組成,例如 HttpFoundation 元件,它理解 HTTP 並提供一個由其他元件使用的良好的請求和響應物件。其他元件僅僅是輔助元件,例如 Validator,它有助於驗證資料。Kernel 元件是系統的核心。Kernel 基本上是管理環境並負責處理 http 請求的“主類”。
Symfony 組織良好的結構、簡潔的程式碼和良好的程式設計實踐使 Web 開發變得更容易。Symfony 非常靈活,可用於構建微型站點和處理具有數十億連線的企業應用程式。
Symfony 框架 - 特性
Symfony 旨在最佳化 Web 應用程式的開發,並在每個版本中增加功能。
Symfony 框架的一些主要特性如下:
- 基於模型-檢視-控制器 (MVC) 的系統
- 高效能 PHP 框架
- 靈活的 URI 路由
- 程式碼可重用且易於維護
- 會話管理
- 錯誤日誌記錄
- 具有對多個平臺支援的功能齊全的資料庫類
- 支援龐大而活躍的社群
- 一組解耦且可重用的元件
- 應用程式的標準化和互操作性
- 防止跨站點請求偽造和其他攻擊的安全措施
- Twig 模板引擎
Symfony 為開發人員提供了很大的靈活性。它具有用於除錯、程式碼可讀性和開發可擴充套件程式的強大功能。
Symfony 是一個全棧 Web 框架;它是建立 Web 應用程式的非常有效的工具。許多公司向客戶提供 Symfony 服務。
以下是使用 Symfony 框架獲得的一些好處。
微框架 - Symfony 可用於開發特定功能。您無需重新開發或安裝整個框架。
減少開發時間開銷。
極其成熟的模板引擎,可以快速向用戶交付內容。
相容且可擴充套件 - 程式設計師可以輕鬆擴充套件所有框架類。
Symfony 框架 - 應用
Symfony 元件可以用作其他應用程式的一部分,例如 Drupal、Laravel、phpBB、Behat、Doctrine 和 Joomla。
Drupal 8 - Drupal 是一個開源的內容管理 PHP 框架。Drupal 8 使用 Symfony 的核心層並擴充套件它以提供對 Drupal 模組的支援。
Thelia - Thelia 是一個基於 Symfony 的電子商務解決方案。最初,Thelia 是用 PHP 程式碼和 MySQL 編寫的,但它在生成更快的應用程式方面存在不足。為了克服這個缺點,Thelia 集成了 Symfony 以自定義的方式開發應用程式。
Dailymotion - Dailymotion 是法國最大的獨立影片娛樂網站之一。一旦他們決定遷移到具有大型社群的開源框架,Dailymotion 開發人員就決定使用 Symfony 元件的功能來實現其靈活性。
Symfony - 安裝
本章介紹如何在您的機器上安裝 Symfony 框架。Symfony 框架的安裝非常簡單易行。您有兩種方法可以在 Symfony 框架中建立應用程式。第一種方法是使用 Symfony Installer,這是一個在 Symfony 框架中建立專案的應用程式。第二種方法是基於 Composer 的安裝。讓我們在以下部分詳細瞭解每種方法。
系統要求
在開始安裝之前,您需要滿足以下系統要求。
- Web 伺服器(以下任意一個)
- WAMP (Windows)
- LAMP (Linux)
- XAMP (跨平臺)
- MAMP (Macintosh)
- Nginx (跨平臺)
- Microsoft IIS (Windows)
- PHP 內建開發 Web 伺服器 (跨平臺)
- 作業系統:跨平臺
- 瀏覽器支援:IE (Internet Explorer 8+)、Firefox、Google Chrome、Safari、Opera
- PHP 相容性:PHP 5.4 或更高版本。為了獲得最大收益,請使用最新版本。
在本教程中,我們將使用 PHP 內建開發 Web 伺服器。
Symfony 安裝程式
Symfony Installer 用於在 Symfony 框架中建立 Web 應用程式。現在,讓我們使用以下命令配置 Symfony 安裝程式。
$ sudo mkdir -p /usr/local/bin
$ sudo curl -LsS https://symfony.com/installer -o /usr/local/bin/symfony
$ sudo chmod a+x /usr/local/bin/symfony
現在,您已在您的機器上安裝了 Symfony 安裝程式。
建立您的第一個 Symfony 應用程式
以下語法用於在最新版本中建立 Symfony 應用程式。
語法
symfony new app_name
這裡,app_name 是您的新應用程式名稱。您可以指定任何您想要的名稱。
示例
symfony new HelloWorld
執行上述命令後,您將看到以下響應。
Downloading Symfony...

0 B/5.5 MiB ░░░░░░░░░░░
……………………………………………………………
……………………………………………………………
Preparing project...
✔  Symfony 3.2.7 was successfully installed. Now you can:
   * Change your current directory to /Users/../workspace/firstapp
   * Configure your application in app/config/parameters.yml file.
   * Run your application:
      1. Execute the php bin/console server:run command.
      2. Browse to the https://:8000 URL.
   * Read the documentation at http://symfony.com/doc
此命令建立一個名為“firstapp/”的新目錄,其中包含 Symfony 框架最新版本的空專案。
安裝特定版本
如果您需要安裝特定版本的 Symfony,請使用以下命令。
symfony new app_name 2.8
symfony new app_name 3.1
基於 Composer 的安裝
您可以使用 Composer 建立 Symfony 應用程式。希望您已在您的機器上安裝了 Composer。如果未安裝 Composer,請下載並安裝它。
以下命令用於使用 Composer 建立專案。
$ composer create-project symfony/framework-standard-edition app_name
如果您需要指定特定版本,可以在上述命令中指定。
執行應用程式
移動到專案目錄並使用以下命令執行應用程式。
cd HelloWorld
php bin/console server:run
執行上述命令後,開啟瀏覽器並請求 url https://:8000/。它會產生以下結果。
結果
Symfony - 架構
Symfony 基本上是高質量元件和 Bundles 的集合。元件是提供單個核心功能的類的集合。例如,Cache 元件提供快取功能,可以新增到任何應用程式中。元件是 Symfony 應用程式的構建塊。Symfony 擁有 30 多個高質量元件,這些元件被許多 PHP 框架(如 Laravel、Silex 等)使用。
Bundles 類似於外掛,但易於建立且易於使用。實際上,Symfony 應用程式本身就是一個由其他 Bundles 組成的 Bundle。單個 Bundle 可以使用任意數量的 Symfony 元件以及第三方元件來提供諸如 Web 框架、資料庫訪問等功能。Symfony 核心 Web 框架是一個名為 FrameworkBundle 的 Bundle,還有一個名為 FrameworkExtraBundle 的 Bundle,它提供了更復雜的選項來編寫 Web 應用程式。
元件、Bundles 和 Symfony 應用程式之間的關係在以下圖中指定。

Web 框架
Symfony 主要旨在以相對輕鬆的方式編寫高質量的 Web 應用程式。它提供了各種選項來編寫不同型別的 Web 應用程式,從簡單的網站到高階基於 REST 的 Web 服務。Symfony 將 Web 框架作為單獨的 Bundles 提供。Symfony Web 框架中常用的 Bundles 如下:
- FrameworkBundle
- FrameworkExtraBundle
- DoctrineBundle
Symfony Web 框架基於模型-檢視-控制器 (MVC) 架構。模型表示我們的業務實體的結構。檢視根據情況以最佳方式向用戶顯示模型。控制器處理來自使用者的全部請求,透過與模型互動執行實際工作,最後向檢視提供必要的資料以將其顯示給使用者。
Symfony Web 框架提供了企業級應用程式所需的所有高階功能。以下是 Symfony Web 應用程式的簡單工作流程。
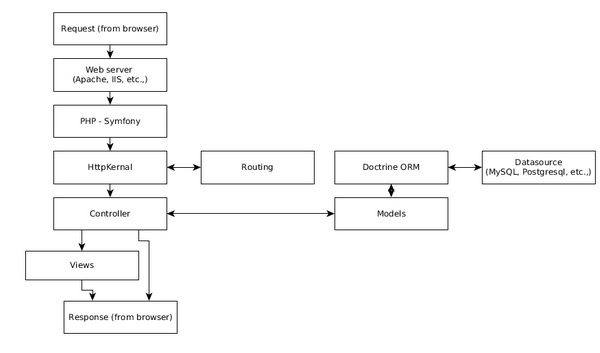
工作流程包括以下步驟。
步驟 1 - 使用者透過瀏覽器嚮應用程式傳送請求,例如 http://www.symfonyexample.com/index。
步驟 2 - 瀏覽器將向 Web 伺服器(例如 Apache Web 伺服器)傳送請求。
步驟 3 - Web 伺服器將請求轉發到底層的 PHP,後者又將其傳送到 Symfony Web 框架。
步驟 4 - HttpKernel 是 Symfony Web 框架的核心元件。HttpKernel 使用 Routing 元件解析給定請求的控制器,並將請求轉發到目標控制器。
步驟 5 - 所有業務邏輯都在目標控制器中進行。
步驟 6 - 控制器將與模型互動,後者又透過 Doctrine ORM 與資料來源互動。
步驟 7 - 一旦控制器完成處理,它要麼自己生成響應,要麼透過檢視引擎生成響應,並將其傳送回 Web 伺服器。
步驟 8 - 最後,Web 伺服器將響應傳送到請求的瀏覽器。
Symfony - 元件
如前所述,Symfony 元件是獨立的 PHP 庫,提供特定功能,可以在任何 PHP 應用程式中使用。每個 Symfony 版本都會引入新的有用元件。目前,Symfony 框架中有 30 多個高質量元件。讓我們在本節中瞭解 Symfony 元件的使用。
安裝 Symfony 元件
Symfony 元件可以透過 Composer 命令輕鬆安裝。以下通用命令可用於安裝任何 Symfony 元件。
cd /path/to/project/dir
composer require symfony/<component_name>
讓我們建立一個簡單的 PHP 應用程式並嘗試安裝 **Filesystem** 元件。
**步驟 1** - 為應用程式建立一個資料夾,**filesystem-example**
cd /path/to/dev/folder
mdkir filesystem-example
cd filesystem-example
**步驟 2** - 使用以下命令安裝 Filesystem 元件。
composer require symfony/filesystem
**步驟 3** - 建立一個檔案 **main.php** 並輸入以下程式碼。
<?php
   require_once __DIR__ . '/vendor/autoload.php';
   use Symfony\Component\Filesystem\Filesystem;
   use Symfony\Component\Filesystem\Exception\IOExceptionInterface;

   $fs = new Filesystem();
   try {
      $fs->mkdir('./sample-dir');
      $fs->touch('./sample-dir/text.txt');
   } catch (IOExceptionInterface $e) {
      echo $e;
   }
?>
第一行非常重要,它載入了使用 Composer 命令安裝的所有元件中所有必要的類。接下來的幾行使用 Filesystem 類。
**步驟 4** - 使用以下命令執行應用程式,它將在其中建立一個新的資料夾 **sample-dir** 和一個檔案 **test.txt**。
php main.php
Symfony 元件詳情
Symfony 提供了從簡單功能(例如檔案系統)到高階功能(例如事件、容器技術和依賴注入)的元件。讓我們在以下部分逐一瞭解所有元件。
Filesystem
Filesystem 元件提供了與檔案和目錄相關的基本系統命令,例如檔案建立、資料夾建立、檔案是否存在等。Filesystem 元件可以使用以下命令安裝。
composer require symfony/filesystem
Finder
Finder 元件提供流暢的類來查詢指定路徑中的檔案和目錄。它提供了一種簡單的方法來迭代路徑中的檔案。Finder 元件可以使用以下命令安裝。
composer require symfony/finder
Console
Console 元件提供了各種選項來輕鬆建立命令,這些命令可以在終端中執行。Symfony 廣泛使用 **Command** 元件來提供各種功能,例如建立新應用程式、建立捆綁包等。甚至 PHP 內建的 Web 伺服器也可以使用 Symfony 命令呼叫,例如在安裝部分看到的 **php bin/console server:run**。**Console** 元件可以使用以下命令安裝。
composer require symfony/console
讓我們建立一個簡單的應用程式,並使用 **Console** 元件建立一個名為 **HelloCommand** 的命令並呼叫它。
**步驟 1** - 使用以下命令建立一個專案。
cd /path/to/project
composer require symfony/console
**步驟 2** - 建立一個檔案 **main.php** 幷包含以下程式碼。
<?php
   require __DIR__ . '/vendor/autoload.php';
   use Symfony\Component\Console\Application;

   $app = new Application();
   $app->run();
?>
**Application** 類設定了基本控制檯應用程式的必要功能。
**步驟 3** - 執行應用程式 **php main.php**,這將產生以下結果。
Console Tool
Usage:
   command [options] [arguments]
Options:
   -h, --help            Display this help message
   -q, --quiet           Do not output any message
   -V, --version         Display this application version
         --ansi            Force ANSI output
         --no-ansi         Disable ANSI output
   -n, --no-interaction  Do not ask any interactive question
   -v|vv|vvv, --verbose  Increase the verbosity of messages: 1 for normal output,
      2 for more verbose output and 3 for debug
Available commands:
   help  Displays help for a command
   list  Lists commands
**步驟 4** - 在 **main.php** 本身中建立一個名為 **HelloCommand** 的類,該類擴充套件了 **Command** 類。
use Symfony\Component\Console\Command\Command;
use Symfony\Component\Console\Input\InputInterface;
use Symfony\Component\Console\Output\OutputInterface;
use Symfony\Component\Console\Input\InputArgument;

class HelloCommand extends Command {
}
應用程式使用 **Command** 元件中以下四個類。
**Command** - 用於建立新命令
**InputInterface** - 用於設定使用者輸入
**InputArgument** - 用於獲取使用者輸入
**OutputInterface** - 用於將輸出列印到控制檯
**步驟 5** - 建立一個函式 **configure()** 並設定名稱、描述和幫助文字。
protected function configure() {
   $this
      ->setName('app:hello')
      ->setDescription('Sample command, hello')
      ->setHelp('This command is a sample command')
}
**步驟 6** - 為命令建立一個輸入引數 **user** 並將其設定為必填項。
protected function configure() {
   $this
      ->setName('app:hello')
      ->setDescription('Sample command, hello')
      ->setHelp('This command is a sample command')
      ->addArgument('name', InputArgument::REQUIRED, 'name of the user');
}
**步驟 7** - 建立一個函式 **execute()**,它有兩個引數 **InputArgument** 和 **OutputArgument**。
protected function execute(InputInterface $input, OutputInterface $output) {
}
**步驟 8** - 使用 **InputArgument** 獲取使用者輸入的使用者詳細資訊,並使用 **OutputArgument** 將其列印到控制檯。
protected function execute(InputInterface $input, OutputInterface $output) {
   $name = $input->getArgument('name');
   $output->writeln('Hello, ' . $name);
}
**步驟 9** - 使用 **Application** 類的 **add** 方法將 **HelloCommand** 註冊到應用程式中。
$app->add(new HelloCommand());
完整的應用程式如下所示。
<?php
   require __DIR__ . '/vendor/autoload.php';
   use Symfony\Component\Console\Application;
   use Symfony\Component\Console\Command\Command;
   use Symfony\Component\Console\Input\InputInterface;
   use Symfony\Component\Console\Output\OutputInterface;
   use Symfony\Component\Console\Input\InputArgument;

   class HelloCommand extends Command {
      protected function configure() {
         $this
            ->setName('app:hello')
            ->setDescription('Sample command, hello')
            ->setHelp('This command is a sample command')
            ->addArgument('name', InputArgument::REQUIRED, 'name of the user');
      }
      protected function execute(InputInterface $input, OutputInterface $output) {
         $name = $input->getArgument('name');
         $output->writeln('Hello, ' . $name);
      }
      $app = new Application();
      $app->add(new HelloCommand());
      $app->run();
   }
?>
**步驟 10** - 現在,使用以下命令執行應用程式,結果將如預期的那樣為 Hello, Jon。
php main.php app:hello Jon
Symfony 在任何 Symfony Web 應用程式的 bin 目錄中都帶有一個預構建的二進位制檔案,稱為 **console**,可用於呼叫應用程式中的命令。
Process
Process 元件提供選項以安全有效的方式在子程序中執行任何系統命令。Process 元件可以使用以下命令安裝。
composer require symfony/process
ClassLoader
ClassLoader 元件提供了 **PSR-0** 和 **PSR-4** 類載入器標準的實現。它可用於自動載入類。它將在不久的將來被棄用。基於 Composer 的類載入器優於此元件。ClassLoader 元件可以使用以下命令安裝。
composer require symfony/class-loader
PropertyAccess
PropertyAccess 元件提供了各種選項,可以使用字串表示法讀取和寫入物件和陣列詳細資訊。例如,具有鍵 **price** 的陣列 **Product** 可以使用 **[price]** 字串動態訪問。
$product = array(
   'name' => 'Cake'
   'price' => 10
);
var priceObj = $propertyAccesserObj->getValue($product, '[price]');
PropertyAccess 元件可以使用以下命令安裝。
composer require symfony/property-access
PropertyInfo
PropertyInfo 元件類似於 PropertyAccess 元件,但它僅適用於 PHP 物件並提供更多功能。
class Product {
   private $name = 'Cake';
   private $price = 10;

   public function getName() {
      return $this->name;
   }
   public function getPrice() {
      return $this->price;
   }
}
$class = Product::class;
$properties = $propertyInfoObj->getProperties($class);
/*
   Example Result
   --------------
   array(2) {
      [0] => string(4) "name"
      [1] => string(5) "price"
   }
*/
PropertyInfo 元件可以使用以下命令安裝。
composer require symfony/property-info
EventDispatcher
EventDispatcher 元件提供了 PHP 中基於事件的程式設計。它使物件能夠透過分派事件和偵聽事件相互通訊。我們將在事件和事件偵聽器章節學習如何建立事件和偵聽事件。
EventDispatcher 元件可以使用以下命令安裝。
composer require symfony/event-dispatcher
DependencyInjection
DependencyInjection 元件提供了一種簡單有效的方法來建立具有其依賴項的物件。當專案發展壯大時,它具有許多具有深度依賴項的類,這些類需要正確處理。否則,專案將失敗。DependencyInjection 提供了一個簡單而強大的容器來處理依賴項。我們將在服務容器章節學習有關容器和依賴注入概念的知識。
DependencyInjection 元件可以使用以下命令安裝。
composer require symfony/dependency-injection
Serializer
Serializer 元件提供了一個選項,可以將 PHP 物件轉換為特定格式(例如 XML、JSON、Binary 等),然後允許將其轉換回原始物件,而不會丟失任何資料。
Serializer 元件可以使用以下命令安裝。
composer require symfony/serializer
Config
Config 元件提供了載入、解析、讀取和驗證 XML、YAML、PHP 和 ini 型別配置的選項。它還提供了各種選項來從資料庫載入配置詳細資訊。這是在清晰簡潔的方式中配置 Web 應用程式的有用重要元件之一。Config 元件可以使用以下命令安裝。
composer require symfony/config
ExpressionLanguage
ExpessionLanguage 元件提供了一個功能齊全的表示式引擎。表示式是一行程式碼,旨在返回值。表示式引擎能夠輕鬆編譯、解析和從表示式中獲取值。它使非 PHP 程式設計師(例如系統管理員)能夠在配置環境(檔案)中使用一個或多個表示式。
composer require symfony/expression-language
OptionsResolver
OptionsResolver 元件提供了一種驗證系統中使用的選項系統的方法。例如,資料庫設定放置在陣列 dboption 中,其中 host、username、password 等作為鍵。在使用它連線到資料庫之前,您需要驗證條目。OptionsResolver 透過提供一個簡單的類 OptionsResolver 和一個方法 resolver 來簡化此任務,該方法解析資料庫設定,如果存在任何驗證問題,它將報告它。
$options = array(
   'host'     => '<db_host>',
   'username' => '<db_user>',
   'password' => '<db_password>',
);
$resolver = new OptionsResolver();
$resolver->setDefaults(array(
   'host'     => '<default_db_host>',
   'username' => '<default_db_user>',
   'password' => '<default_db_password>',
));
$resolved_options = $resolver->resolve($options);
OptionsResolver 元件可以使用以下命令安裝。
composer require symfony/options-resolver
Dotenv
Dotenv 元件提供了各種選項來解析 .env 檔案以及其中定義的變數,以便可以透過 **getenv()**、**$_ENV** 或 **$_SERVER** 訪問。Dotenv 元件可以使用以下命令安裝。
composer require symfony/dotenv
Cache
Cache 元件提供了擴充套件的 **PSR-6** 實現。它可用於向我們的 Web 應用程式新增快取功能。由於它遵循 **PSR-6**,因此易於上手,並且可以輕鬆地替代其他基於 PSR-6 的快取元件。Cache 元件可以使用以下命令安裝。
composer require symfony/cache
Intl
Intl 元件是 C Intl 擴充套件的替換庫。Intl 元件可以使用以下命令安裝。
composer require symfony/intl
Translation
Translation 元件提供了各種選項來國際化我們的應用程式。通常,不同語言的翻譯詳細資訊將儲存在一個檔案中,每種語言一個檔案,並在應用程式執行時動態載入。編寫翻譯檔案有不同的格式。Translation 元件提供了各種選項來載入任何型別的格式,例如純 PHP 檔案、CSV、ini、Json、Yaml、ICU 資原始檔等。Translation 元件可以使用以下命令安裝。
composer require symfony/translation
Workflow
Workflow 元件提供了處理有限狀態機的先進工具。透過以簡單且面向物件的方式提供此功能,Workflow 元件使 PHP 中的高階程式設計相對容易。我們將在高階概念章節詳細瞭解它。
Workflow 元件可以使用以下命令安裝。
composer require symfony/workflow
Yaml
Yaml 元件提供了一個選項,該選項解析 YAML 檔案格式並將其轉換為 PHP 陣列。它還能夠從純 php 陣列寫入 YAML 檔案。Yaml 元件可以使用以下命令安裝。
composer require symfony/yaml
Ldap
Ldap 元件提供 PHP 類來連線到 LDAP 或 Active Directory 伺服器並針對它對使用者進行身份驗證。它提供了一個選項來連線到 Windows 域控制器。Ldap 元件可以使用以下命令安裝。
composer require symfony/ldap
Debug
Debug 元件提供了各種選項來啟用 PHP 環境中的除錯。通常,除錯 PHP 程式碼很困難,但除錯元件提供了簡單的類來簡化除錯過程並使其變得乾淨和結構化。Debug 元件可以使用以下命令安裝。
composer require symfony/debug
Stopwatch
Stopwatch 元件提供 Stopwatch 類來分析我們的 PHP 程式碼。一個簡單的用法如下所示。
use Symfony\Component\Stopwatch\Stopwatch;
$stopwatch = new Stopwatch();
$stopwatch->start('somename');

// our code to profile
$profiled_data = $stopwatch->stop('somename');
echo $profiled_data->getPeriods()
Stopwatch 元件可以使用以下命令安裝。
composer require symfony/stopwatch
VarDumper
VarDumper 元件提供了更好的 **dump()** 函式。只需包含 VarDumper 元件並使用 dump 函式即可獲得改進的功能。VarDumper 元件可以使用以下命令安裝。
composer require symfony/var-dumper
BrowserKit
BrowserKit 元件提供了一個抽象的瀏覽器客戶端介面。它可用於以程式設計方式測試 Web 應用程式。例如,它可以請求表單,輸入示例資料並提交它以以程式設計方式查詢表單中的任何問題。BrowserKit 元件可以使用以下命令安裝。
composer require symfony/browser-kit
PHPUnit Bridge
PHPUnit Bridge 元件提供了許多選項來改進 PHPUnit 測試環境。PHPUnit Bridge 元件可以使用以下命令安裝。
composer require symfony/phpunit-bridge
Asset
Asset 元件提供了 Web 應用程式中通用的資產處理。它為資產(如 CSS、HTML、JavaScript)生成 URL,並執行版本維護。我們將在檢視引擎章節詳細檢查資產元件。Asset 元件可以使用以下命令安裝。
composer require symfony/asset
CssSelector
CssSelector 元件提供了一個選項,可以將基於 CSS 的選擇器轉換為 XPath 表示式。Web 開發人員比 XPath 表示式更瞭解基於 CSS 的選擇器表示式,但查詢 HTML 和 XML 文件中元素的最有效表示式是 **XPath 表示式**。
CssSelector 使開發人員能夠以 *CSS 選擇器* 的形式編寫表示式,但是,該元件在執行之前將其轉換為 XPath 表示式。因此,開發人員可以利用 CSS 選擇器的簡單性和 XPath 表示式的效率。
CssSelector 元件可以使用以下命令安裝。
composer require symfony/css-selector
DomCrawler
DomCrawler 元件提供了各種選項,可以使用 DOM 概念在 HTML 和 XML 文件中查詢元素。它還提供選項使用 XPath 表示式查詢元素。DomCrawler 元件可以與 CssSelector 元件一起使用,以使用 CSS 選擇器而不是 XPath 表示式。DomCrawler 元件可以使用以下命令安裝。
composer require symfony/dom-crawler
Form
Form 元件使在 Web 應用程式中輕鬆建立表單成為可能。我們將在表單章節詳細學習表單程式設計。Form 元件可以使用以下命令安裝。
composer require symfony/form
HttpFoundation
HttpFoundation 元件為 HTTP 規範提供了一個面向物件的層。預設情況下,PHP 將 HTTP 請求和響應的詳細資訊作為基於陣列的物件提供,例如 **$_GET、$_POST、$_FILES、$_SESSION** 等。基於 HTTP 的功能(例如設定 cookie)可以使用簡單的舊函式 **setCookie()** 來完成。HttpFoundation 在一小組類(如 Request、Response、RedirectResponse 等)中提供了所有與 HTTP 相關的功能,我們將在後面的章節中學習這些類。
可以使用以下命令安裝 HttpFoundation 元件。
composer require symfony/http-foundation
HttpKernel
HttpKernel 元件是 Symfony Web 設定的核心元件。它提供了 Web 應用程式所需的所有功能——從接收 **Request** 物件到傳送回 **Response** 物件。Symfony Web 應用程式的完整架構由 HttpKernel 提供,如 Symfony Web 框架的架構中所述。
可以使用以下命令安裝 HttpKernel 元件。
composer require symfony/http-kernel
路由
路由元件將 HTTP 請求對映到一組預定義的配置變數。路由決定我們應用程式的哪個部分應該處理請求。我們將在路由章節中詳細瞭解路由。
可以使用以下命令安裝路由元件。
composer require symfony/filesystem
模板
模板元件提供了構建高效模板系統所需的必要基礎結構。Symfony 使用模板元件來實現其檢視引擎。我們將在檢視引擎章節中詳細瞭解模板元件。
可以使用以下命令安裝模板元件。
composer require symfony/templating
驗證器
驗證器元件提供了 **JSR-303 Bean Validation Specification** 的實現。它可用於在 Web 環境中驗證表單。我們將在驗證章節中詳細瞭解驗證器。
可以使用以下命令安裝驗證器元件。
composer require symfony/validator
安全
安全元件為我們的 Web 應用程式提供了完整的安全系統,無論是 HTTP 基本身份驗證、HTTP 摘要身份驗證、基於互動表單的身份驗證、X.509 證書登入等。它還透過內建的 ACL 系統提供基於使用者角色的授權機制。我們將在高階概念章節中詳細瞭解。
可以使用以下命令安裝安全元件。
composer require symfony/security
Symfony - 服務容器
在任何應用程式中,隨著應用程式的增長,物件往往會增加。隨著物件數量的增加,物件之間的依賴關係也會增加。為了使應用程式成功執行,需要正確處理物件依賴關係。
如元件章節所述,Symfony 提供了一個簡單而高效的元件 **DependencyInjection** 來處理物件依賴關係。服務容器是一個包含物件的容器,物件之間具有正確解析的依賴關係。讓我們在本節中學習如何使用 DependencyInjection 元件。
讓我們建立一個 **Greeter** 類。Greeter 類的目的是像以下示例中所示那樣向用戶問候。
$greeter = new Greeter('Hi');
$greeter->greet('Jon'); // print "Hi, Jon"
Greeter 類的完整程式碼如下所示。
class Greeter {
   private $greetingText;

   public function __construct($greetingText) {
      $this->greetingText = $greetingText;
   }
   public function greet($name) {
      echo $this->greetingText . ", " . $name . "\r\n";
   }
}
現在,讓我們將 Greeter 類新增到服務容器中。Symfony 提供 **ContainerBuilder** 來建立一個新容器。建立容器後,可以使用容器的 register 方法將其註冊到其中。
use Symfony\Component\DependencyInjection\ContainerBuilder;
$container = new ContainerBuilder();
$container
   ->register('greeter', 'Greeter')
   ->addArgument('Hi');
在這裡,我們使用了靜態引數來指定問候文字 Hi。Symfony 還提供了動態設定引數的功能。要使用動態引數,我們需要選擇一個名稱並在 % 之間指定它,並且可以使用容器的 **setParameter** 方法設定該引數。
$container = new ContainerBuilder();
$container
   ->register('greeter', 'Greeter')
   ->addArgument('%greeter.text%');
$container->setParameter('greeter.text', 'Hi');
我們已經註冊了一個帶有正確設定的 Greeter 類。現在,我們可以要求容器使用容器的 **get** 方法提供一個正確配置的 Greeter 物件。
$greeter = $container->get('greeter');
$greeter->greet('Jon'); // prints "Hi, Jon"
我們已成功將一個類 Greeter 註冊到容器中,從容器中獲取它並使用它。現在,讓我們建立另一個類 **User**,它使用 Greeter 類,並檢視如何註冊它。
class User {
   private $greeter;
   public $name;
   public $age;

   public function setGreeter(\Greeter $greeter) {
      $this->greeter = $greeter;
   }
   public function greet() {
      $this->greeter->greet($this->name);
   }
}
User 類使用其 setter 方法之一 **setGreeter** 獲取 Greeter 類。對於這種情況,Symfony 提供了一個方法 **addMethodCall** 和一個類 **Reference** 來引用另一個類,如下面的程式碼所示。
use Symfony\Component\DependencyInjection\Reference;
$container
   ->register('user', 'User')
   ->addMethodCall('setGreeter', array(new Reference('greeter')));
最後,我們註冊了兩個類 **Greeter** 和 **User**,它們之間存在緊密的關聯。現在,我們可以安全地從容器中獲取具有正確配置的 Greeter 類的 User 物件,如下面的程式碼所示。
$container->setParameter('greeter.text', 'Hi');
$user = $container->get('user');
$user->name = "Jon";
$user->age = 20;
$user->greet(); // Prints "Hi, Jon"
我們已經瞭解瞭如何使用 PHP 本身在容器中配置物件。Symfony 還提供了其他機制。它們是 XML 和 YAML 配置檔案。讓我們看看如何使用 YAML 配置容器。為此,請安裝 **symfony/config** 和 **symfony/yaml** 元件以及 **symfony/dependency-injection** 元件。
cd /path/to/dir
mkdir dependency-injection-example
cd dependency-injection-example
composer require symfony/dependency-injection
composer require symfony/config
composer require symfony/yaml
YAML 配置將寫入一個單獨的檔案 **services.yml** 中。YAML 配置由兩個部分組成:**parameters** 和 **services**。Parameters 部分定義所有必需的引數。Services 部分定義所有物件。Services 部分進一步細分為多個部分,即 **class、arguments** 和 **calls**。Class 指定實際的類。Arguments 指定建構函式的引數。最後,calls 指定 setter 方法。可以使用 @ 符號引用另一個類,例如 @greeter。
parameters:
   greeter.text: 'Hello'
services:
   greeter:
      class: Greeter
      arguments: ['%greeter.text%']
   user:
      class: User
      calls:
         - [setGreeter, ['@greeter']]
現在,可以使用 **FileLoader** 和 **YamlFileLoader** 載入和配置 **services.yml**,如下面的程式碼所示。
use Symfony\Component\Config\FileLocator;
use Symfony\Component\DependencyInjection\Loader\YamlFileLoader;

$yamlContainer = new ContainerBuilder();
$loader = new YamlFileLoader($yamlContainer, new FileLocator(__DIR__));
$loader->load('services.yml');

$yamlUser = $yamlContainer->get('user');
$yamlUser->name = "Jon";
$yamlUser->age = 25;
$yamlUser->greet();
完整的程式碼列表如下所示。
main.php
<?php
   require __DIR__ . '/vendor/autoload.php';
   use Symfony\Component\DependencyInjection\ContainerBuilder;
   use Symfony\Component\Config\FileLocator;
   use Symfony\Component\DependencyInjection\Loader\YamlFileLoader;
   use Symfony\Component\DependencyInjection\Reference;

   class Greeter {
      private $greetingText;

      public function __construct($greetingText) {
         $this->greetingText = $greetingText;
      }
      public function greet($name) {
         echo $this->greetingText . ", " . $name . "\r\n";
      }
   }
   class User {
      private $greeter;
      public $name;
      public $age;

      public function setGreeter(\Greeter $greeter) {
         $this->greeter = $greeter;
      }
      public function greet() {
         $this->greeter->greet($this->name);
      }
   }
   $container = new ContainerBuilder();
   $container
      ->register('greeter', 'Greeter')
      ->addArgument('%greeter.text%');
   $container
      ->register('user', 'User')
      ->addMethodCall('setGreeter', array(new Reference('greeter')));

   $container->setParameter('greeter.text', 'Hi');
   $greeter = $container->get('greeter');
   $greeter->greet('Jon');

   $user = $container->get('user');
   $user->name = "Jon";
   $user->age = 20;
   $user->greet();

   $yamlContainer = new ContainerBuilder();
   $loader = new YamlFileLoader($yamlContainer, new FileLocator(__DIR__));
   $loader->load('services.yml');

   $yamlHello = $yamlContainer->get('greeter');
   $yamlHello->greet('Jon');

   $yamlUser = $yamlContainer->get('user');
   $yamlUser->name = "Jon";
   $yamlUser->age = 25;
   $yamlUser->greet();
?>
services.yml
parameters:
   greeter.text: 'Hello'
services:
   greeter:
      class: Greeter
      arguments: ['%greeter.text%']
   user:
      class: User
      calls:
         - [setGreeter, ['@greeter']]
Symfony Web 框架廣泛使用依賴注入元件。所有元件都由集中的服務容器繫結。Symfony Web 框架透過 **container** 屬性在其所有 **Controller** 中公開容器。我們可以透過它獲取其中註冊的所有物件,例如 logger、mailer 等。
$logger = $this->container->get('logger');
$logger->info('Hi');
要查詢容器中註冊的物件,請使用以下命令。
cd /path/to/app
php bin/console debug:container
在安裝章節中建立的 **hello** Web 應用程式中大約有 200 多個物件。
Symfony - 事件和事件監聽器
Symfony 透過其 **EventDispatcher** 元件提供基於事件的程式設計。任何企業應用程式都需要基於事件的程式設計來建立高度可定製的應用程式。事件是物件相互互動的主要工具之一。沒有事件,物件無法有效地互動。
基於事件的程式設計過程可以概括為:一個稱為 **事件源** 的物件要求中央排程程式物件註冊一個事件,例如 user.registered。一個或多個稱為監聽器的物件要求中央排程程式物件監聽特定事件,例如 user.registered。在某個時間點,事件源物件要求中央排程程式物件排程事件,例如 user.registered 以及包含必要資訊的事件物件。中央排程程式會通知所有監聽器物件有關事件(例如 user.registered)及其事件物件的資訊。
在基於事件的程式設計中,我們有四種類型的物件:事件源、事件監聽器、事件排程器和事件本身。
讓我們編寫一個簡單的應用程式來理解這個概念。
**步驟 1** - 建立一個專案 **event-dispatcher-example**。
cd /path/to/dir
mkdir event-dispatcher-example
cd event-dispatcher-example
composer require symfony/event-dispatcher
**步驟 2** - 建立一個類 **.User**。
class User {
   public $name;
   public $age;
}

$user = new User();
$user->name = "Jon";
$user->age = 25
**步驟 3** - 建立一個事件 **UserRegisteredEvent**。
use Symfony\Component\EventDispatcher\Event;
class UserRegisteredEvent extends Event {
   const NAME = 'user.registered';
   protected $user;

   public function __construct(User $user) {
      $this-<user = $user;
   }
   public function getUser() {
      return $this-<user;
   }
}
$event = new UserRegisteredEvent($user);
在這裡,**UserRegisteredEvent** 可以訪問 **User** 物件。事件的名稱為 **user.registered**。
**步驟 4** - 建立一個監聽器 **UserListener**。
class UserListener {
   public function onUserRegistrationAction(Event $event) {
      $user = $event->getUser();
         echo $user->name . "\r\n";
         echo $user->age . "\r\n";
   }
}
$listener = new UserListener();
**步驟 5** - 建立一個事件排程程式物件。
use Symfony\Component\EventDispatcher\EventDispatcher;
$dispatcher = new EventDispatcher();
**步驟 6** - 使用排程程式物件及其方法 **addListener** 連線監聽器和事件。
$dispatcher
   ->addListener(
      UserRegisteredEvent::NAME,
      array($listener, 'onUserRegistrationAction'));
我們還可以新增一個匿名函式作為事件監聽器,如下面的程式碼所示。
$dispatcher
   ->addListener(
      UserRegisteredEvent::NAME,

      function(Event $event) {
         $user = $event->getUser();
         echo $user->name . "\r\n";
      });
**步驟 7** - 最後,使用事件排程程式的方法 **dispatch** 觸發/排程事件。
$dispatcher->dispatch(UserRegisteredEvent::NAME, $event);
完整的程式碼列表如下所示。
main.php
<?php
   require __DIR__ . '/vendor/autoload.php';
   use Symfony\Component\EventDispatcher\EventDispatcher;
   use Symfony\Component\EventDispatcher\Event;

   class User {
      public $name;
      public $age;
   }
   class UserRegisteredEvent extends Event {
      const NAME = 'user.registered';
      protected $user;

      public function __construct(User $user) {
         $this->user = $user;
      }
      public function getUser() {
         return $this->user;
      }
   }
   class UserListener {
      public function onUserRegistrationAction(Event $event) {
         $user = $event->getUser();
         echo $user->name . "\r\n";
         echo $user->age . "\r\n";
      }
   }
   $user = new User();
   $user->name = "Jon";
   $user->age = 25;

   $event = new UserRegisteredEvent($user);
   $listener = new UserListener();

   $dispatcher = new EventDispatcher();
   $dispatcher
      ->addListener(
         UserRegisteredEvent::NAME,

         function(Event $event) {
            $user = $event->getUser();
            echo $user->name . "\r\n";
         });
   $dispatcher
      ->addListener(
         UserRegisteredEvent::NAME, array($listener, 'onUserRegistrationAction'));

   $dispatcher->dispatch(UserRegisteredEvent::NAME, $event);
?>
結果
Jon
Jon
25
Symfony Web 框架有很多事件,人們可以為這些事件註冊監聽器並相應地對其進行程式設計。其中一個示例事件是 kernel.exception,相應的事件是 **GetResponseForExceptionEvent**,它包含響應物件(Web 請求的輸出)。這用於捕獲異常並使用通用錯誤資訊修改響應,而不是向用戶顯示執行時錯誤。
Symfony - 表示式
正如我們之前討論的那樣,表示式語言是 Symfony 應用程式的顯著特性之一。Symfony 表示式主要用於配置環境。它使非程式設計師能夠輕鬆配置 Web 應用程式。讓我們建立一個簡單的應用程式來測試表達式。
**步驟 1** - 建立一個專案 **expression-language-example**。
cd /path/to/dir
mkdir expression-language-example
cd expression-language-example
composer require symfony/expression-language
**步驟 2** - 建立一個表示式物件。
use Symfony\Component\ExpressionLanguage\ExpressionLanguage;
$language = new ExpressionLanguage();
**步驟 3** - 測試一個簡單的表示式。
echo "Evaluated Value: " . $language->evaluate('10 + 12') . "\r\n" ;
echo "Compiled Code: " . $language->compile('130 % 34') . "\r\n" ;
**步驟 4** - Symfony 表示式功能強大,它可以在表示式語言中攔截 PHP 物件及其屬性。
class Product {
   public $name;
   public $price;
}
$product = new Product();
$product->name = 'Cake';
$product->price = 10;

echo "Product price is " . $language
   ->evaluate('product.price', array('product' => $product,)) . "\r\n";
echo "Is Product price higher than 5: " . $language
   ->evaluate('product.price > 5', array('product' => $product,)) . "\r\n";
在這裡,表示式 **product.price** 和 **product.price > 5** 攔截 **$product** 物件的屬性 **price** 並評估結果。
完整的編碼如下所示。
main.php
<?php
   require __DIR__ . '/vendor/autoload.php';
   use Symfony\Component\ExpressionLanguage\ExpressionLanguage;
   $language = new ExpressionLanguage();

   echo "Evaluated Value: " . $language->evaluate('10 + 12') . "\r\n" ;
   echo "Compiled Code: " . $language->compile('130 % 34') . "\r\n" ;

   class Product {
      public $name;
      public $price;
   }
   $product = new Product();
   $product->name = 'Cake';
   $product->price = 10;

   echo "Product price is " . $language
      ->evaluate('product.price', array('product' => $product,)) . "\r\n";
   echo "Is Product price higher than 5: " . $language
      ->evaluate('product.price > 5', array('product' => $product,)) . "\r\n";
?>
結果
Evaluated Value: 22
Compiled Code: (130 % 34)
Product price is 10
Is Product price higher than 5: 1
Symfony - Bundles
Symfony 捆綁包是一組以特定結構組織的檔案和資料夾。捆綁包的建模方式使其可以在多個應用程式中重複使用。主應用程式本身被打包成一個捆綁包,通常稱為 **AppBundle**。
捆綁包可以針對特定應用程式進行打包,例如 AdminBundle(管理部分)、BlogBundle(站點的部落格)等。此類捆綁包無法在應用程式之間共享。相反,我們可以將應用程式的某個部分(例如部落格)建模為通用捆綁包,以便我們可以簡單地將捆綁包從一個應用程式複製到另一個應用程式以重用部落格功能。
捆綁包的結構
捆綁包的基本結構如下所示。
**Controller** - 所有控制器都需要放在這裡。
**DependencyInjection** - 所有與依賴注入相關的程式碼和配置都需要放在這裡。
**Resources/config** - 捆綁包相關的配置放在這裡。
**Resources/view** - 捆綁包相關的檢視模板放在這裡。
**Resources/public** - 捆綁包相關的樣式表、JavaScript、影像等放在這裡。
**Tests** - 捆綁包相關的單元測試檔案放在這裡。
建立捆綁包
讓我們在 **HelloWorld** 應用程式中建立一個簡單的捆綁包 **TutorialspointDemoBundle**。
**步驟 1** - 選擇名稱空間。捆綁包的名稱空間應包含供應商名稱和捆綁包名稱。在我們的例子中,它是 **Tutorialspoint\DemoBundle**。
**步驟 2** - 建立一個空類 **TutorialspointDemoBundle**,透過擴充套件 **Bundle** 類並將其放在 **src/Tutorialspoint/DemoBundle** 下。
namespace Tutorialspoint\DemoBundle;
use Symfony\Component\HttpKernel\Bundle\Bundle;

class TutorialspointDemoBundle extends Bundle {
}
**步驟 3** - 在 **AppKernel** 類中支援的捆綁包列表中註冊該類。
public function registerBundles() {
   $bundles = array(
      // ...
      // register your bundle
      new Tutorialspoint\DemoBundle\TutorialspointDemoBundle(),
   );
   return $bundles;
}
這對於建立空捆綁包來說已經足夠了,所有其他概念都與應用程式相同。Symfony 還提供了一個控制檯命令 **generate:bundle** 來簡化建立新捆綁包的過程,如下所示。
php bin/console generate:bundle --namespace = Tutorialspoint/DemoBundle
結果
Welcome to the Symfony bundle generator!

Are you planning on sharing this bundle across multiple applications? [no]: no

Your application code must be written in bundles. This command helps
you generate them easily.

Give your bundle a descriptive name, like BlogBundle.
Bundle name [Tutorialspoint/DemoBundle]:

In your code, a bundle is often referenced by its name. It can be the
concatenation of all namespace parts but it's really up to you to come
up with a unique name (a good practice is to start with the vendor name).
Based on the namespace, we suggest TutorialspointDemoBundle.

Bundle name [TutorialspointDemoBundle]:
Bundles are usually generated into the src/ directory. Unless you're
doing something custom, hit enter to keep this default!
Target Directory [src/]:

What format do you want to use for your generated configuration?

Configuration format (annotation, yml, xml, php) [annotation]:

Bundle generation

> Generating a sample bundle skeleton into app/../src/Tutorialspoint/DemoBundle
   created ./app/../src/Tutorialspoint/DemoBundle/
   created ./app/../src/Tutorialspoint/DemoBundle/TutorialspointDemoBundle.php
   created ./app/../src/Tutorialspoint/DemoBundle/Controller/
   created ./app/../src/Tutorialspoint/DemoBundle/Controller/DefaultController.php
   created ./app/../tests/TutorialspointDemoBundle/Controller/
   created ./app/../tests/TutorialspointDemoBundle/Controller/DefaultControllerTest.php
   created ./app/../src/Tutorialspoint/DemoBundle/Resources/views/Default/
   created ./app/../src/Tutorialspoint/DemoBundle/Resources/views/Default/index.html.twig
   created ./app/../src/Tutorialspoint/DemoBundle/Resources/config/
   created ./app/../src/Tutorialspoint/DemoBundle/Resources/config/services.yml
> Checking that the bundle is autoloaded
> Enabling the bundle inside app/AppKernel.php
   updated ./app/AppKernel.php
> Importing the bundle's routes from the app/config/routing.yml file
   updated ./app/config/routing.yml
> Importing the bundle's services.yml from the app/config/config.yml file
   updated ./app/config/config.yml
Everything is OK! Now get to work :).
建立簡單的 Web 應用程式
本章介紹瞭如何在 Symfony 框架中建立一個簡單的應用程式。如前所述,您知道如何在 Symfony 中建立一個新專案。
我們可以以“學生”詳細資訊為例。讓我們首先使用以下命令建立一個名為“student”的專案。
symfony new student
執行命令後,將建立一個空專案。
控制器
Symfony 基於模型-檢視-控制器 (MVC) 開發模式。MVC 是一種軟體方法,它將應用程式邏輯與表示分離。控制器在 Symfony 框架中扮演著重要的角色。應用程式中的所有網頁都需要由控制器處理。
**DefaultController** 類位於 **“src/AppBundle/Controller”** 中。您可以在那裡建立您自己的 Controller 類。
移動到 **“src/AppBundle/Controller”** 位置並建立一個新的 **StudentController** 類。
以下是 **StudentController** 類的基本語法。
StudentController.php
namespace AppBundle\Controller;
use Symfony\Component\HttpFoundation\Response;
class StudentController {
}
現在,您已經建立了一個 StudentController。在下一章中,我們將詳細討論有關控制器的更多內容。
建立路由
一旦控制器建立完成,我們需要為特定頁面建立路由。路由將請求 URI 對映到特定控制器的某個方法。
以下是路由的基本語法。
namespace AppBundle\Controller;
use Sensio\Bundle\FrameworkExtraBundle\Configuration\Route;
use Symfony\Component\HttpFoundation\Response;
use Symfony\Bundle\FrameworkBundle\Controller\Controller;

class StudentController {
   /**
      * @Route("/student/home")
   */
   public function homeAction() {
      return new Response('Student details application!');
   }
}
在上述語法中,@Route(“/student/home”) 是路由。它定義了頁面的 URL 模式。
homeAction() 是動作方法,您可以在其中構建頁面並返回一個 Response 物件。
我們將在接下來的章節中詳細介紹路由。現在,請求 url “https://:8000/student/home”,它會產生以下結果。
結果

Symfony - 控制器
控制器負責處理進入 Symfony 應用程式的每個請求。控制器從請求中讀取資訊。然後,建立並向客戶端返回一個響應物件。
根據 Symfony,DefaultController 類位於 “src/AppBundle/Controller”。其定義如下。
DefaultController.php
<?php
namespace AppBundle\Controller;
use Symfony\Bundle\FrameworkBundle\Controller\Controller;
use Symfony\Component\HttpFoundation\Response;

class DefaultController extends Controller {
}
這裡,HttpFoundation 元件為 HTTP 規範定義了一個面向物件的層,而 FrameworkBundle 包含了大部分“基礎”框架功能。
請求物件
Request 類是 HTTP 請求訊息的面向物件表示。
建立請求物件
可以使用 createFromGlobals() 方法建立請求。
use Symfony\Component\HttpFoundation\Request;
$request = Request::createFromGlobals();
您可以使用全域性變數模擬請求。除了基於 PHP 全域性變數建立請求之外,您還可以模擬請求。
$request = Request::create(
   '/student',
   'GET',
   array('name' => 'student1')
);
這裡,create() 方法基於 URI、方法和一些引數建立請求。
覆蓋請求物件
您可以使用 overrideGlobals() 方法覆蓋 PHP 全域性變數。其定義如下。
$request->overrideGlobals();
訪問請求物件
可以使用基礎控制器的 getRequest() 方法在控制器(動作方法)中訪問網頁的請求。
$request = $this->getRequest();
識別請求物件
如果您想在應用程式中識別請求,“PathInfo" 方法將返回請求 url 的唯一標識。其定義如下。
$request->getPathInfo();
響應物件
控制器唯一的需求是返回一個 Response 物件。Response 物件儲存來自給定請求的所有資訊,並將其傳送回客戶端。
以下是一個簡單的示例。
示例
use Symfony\Component\HttpFoundation\Response;
$response = new Response(‘Default'.$name, 10);
您可以如下以 JSON 格式定義 Response 物件。
$response = new Response(json_encode(array('name' => $name)));
$response->headers->set('Content-Type', 'application/json');
Response 建構函式
建構函式包含三個引數 -
- 響應內容
- 狀態碼
- HTTP 頭陣列
以下是基本語法。
use Symfony\Component\HttpFoundation\Response;
$response = new Response(
   'Content',
   Response::HTTP_OK,
   array('content-type' => 'text/html')
);
例如,您可以將 content 引數傳遞為:
$response->setContent(’Student details’);
類似地,您也可以傳遞其他引數。
傳送響應
您可以使用 send() 方法向客戶端傳送響應。其定義如下。
$response->send();
要將客戶端重定向到另一個 URL,您可以使用 RedirectResponse 類。
其定義如下。
use Symfony\Component\HttpFoundation\RedirectResponse;
$response = new RedirectResponse('https://tutorialspoint.tw/');
前端控制器
一個處理進入應用程式的每個請求的單個 PHP 檔案。FrontController 執行不同 URL 到應用程式內部不同部分的路由。
以下是 FrontController 的基本語法。
use Symfony\Component\HttpFoundation\Request;
use Symfony\Component\HttpFoundation\Response;

$request = Request::createFromGlobals();
$path = $request->getPathInfo(); // the URI path being requested

if (in_array($path, array('', '/')))  {
   $response = new Response(’Student home page.');
} elseif (‘/about’ === $path) {
   $response = new Response(’Student details page’);
} else {
   $response = new Response('Page not found.', Response::HTTP_NOT_FOUND);
}
$response->send();
這裡,in_array() 函式在一個數組中搜索特定值。
Symfony - 路由
路由將請求 URI 對映到特定控制器的某個方法。通常,任何 URI 都有以下三個部分 -
- 主機名段
- 路徑段
- 查詢段
例如,在 URI/URL https://tutorialspoint.tw/index?q=data 中,www.tutorialspoint.com 是主機名段,index 是路徑段,q=data 是查詢段。通常,路由會根據一組約束檢查頁面段。如果任何約束匹配,則返回一組值。其中一個主要值是控制器。
註解
註解在 Symfony 應用程式的配置中扮演著重要的角色。註解透過在程式碼本身中宣告配置來簡化配置。註解只不過是提供有關類、方法和屬性的元資訊。路由廣泛使用註解。即使可以在沒有註解的情況下進行路由,註解在很大程度上簡化了路由。
以下是一個註解示例。
/**
   * @Route(“/student/home”)
*/
public function homeAction() {
   // ...
}
路由概念
考慮在“student”專案中建立的 StudentController 類。
StudentController.php
// src/AppBundle/Controller/StudentController.php
namespace AppBundle\Controller;

use Symfony\Bundle\FrameworkBundle\Controller\Controller;
use Sensio\Bundle\FrameworkExtraBundle\Configuration\Route;

class StudentController extends Controller {
   /**
      * @Route(“/student/home”)
   */
   public function homeAction() {
      // ...
   }

   /**
      * @Route(“/student/about”)
   */
   public function aboutAction() {
   }
}
這裡,路由執行兩個步驟。如果您訪問 /student/home,則首先匹配第一個路由,然後執行 homeAction()。否則,如果您訪問 /student/about,則匹配第二個路由,然後執行 aboutAction()。
新增萬用字元格式
假設您有一個分頁的學生記錄列表,其 URL 為 /student/2 和 /student/3,分別對應第 2 頁和第 3 頁。然後,如果您想更改路由的路徑,可以使用萬用字元格式。
示例
// src/AppBundle/Controller/BlogController.php
namespace AppBundle\Controller;

use Symfony\Bundle\FrameworkBundle\Controller\Controller;
use Sensio\Bundle\FrameworkExtraBundle\Configuration\Route;

class StudentController extends Controller {
   /**
      * @Route(“/student/{page}", name = “student_about”, requirements = {"page": "\d+"})
   */
   public function aboutAction($page) {
      // ...
   }
}
這裡,\d+ 是一個正則表示式,它匹配任意長度的數字。
分配佔位符
您可以在路由中分配佔位符值。其定義如下。
// src/AppBundle/Controller/BlogController.php
namespace AppBundle\Controller;

use Symfony\Bundle\FrameworkBundle\Controller\Controller;
use Sensio\Bundle\FrameworkExtraBundle\Configuration\Route;

class StudentController extends Controller {
   /**
      * @Route(“/student/{page}", name = “student_about”, requirements = {"page": "\d+"})
   */

   public function aboutAction($page = 1) {
      // ...
   }
}
這裡,如果您訪問 /student,則 student_about 路由將匹配,並且 $page 將預設為值 1。
重定向到頁面
如果您想將使用者重定向到另一個頁面,請使用 redirectToRoute() 和 redirect() 方法。
public function homeAction() {
   // redirect to the "homepage" route
   return $this->redirectToRoute('homepage');

   // redirect externally
   \return $this->redirect('http://example.com/doc');
}
生成 URL
要生成 URL,請考慮一個路由名稱 student_name 和一個萬用字元名稱 student-names,它們在該路由的路徑中使用。生成 URL 的完整列表定義如下。
class StudentController extends Controller {
   public function aboutAction($name) {
      // ...
      // /student/student-names
      $url = $this->generateUrl(
         ‘student_name’,
         array(‘name’ =>
         ’student-names’)
      );
   }
}
StudentController
考慮一個在 StudentController 類中進行路由的簡單示例,如下所示。
StudentController.php
<?php
namespace AppBundle\Controller;

use Sensio\Bundle\FrameworkExtraBundle\Configuration\Route;
use Symfony\Component\HttpFoundation\Response;
use Symfony\Bundle\FrameworkBundle\Controller\Controller;

class StudentController  {
   /**
      * @Route("/student/home")
   */

   public function homeAction() {
      $name = 'Student details application';
      return new Response(
         '<html><body>Project: '.$name.'</body></html>'
      );
   }
}
現在,請求 url ”https://:8000/student/home”,它會產生以下結果。

類似地,您也可以為 aboutAction() 建立另一個路由。
Symfony - 檢視引擎
檢視層是 MVC 應用程式的表示層。它將應用程式邏輯與表示邏輯分離。
當控制器需要生成 HTML、CSS 或任何其他內容時,它會將任務轉發給模板引擎。
模板
模板基本上是用於生成任何基於文字的文件(如 HTML、XML 等)的文字檔案。它用於節省時間並減少錯誤。
預設情況下,模板可以位於兩個不同的位置 -
app/Resources/views/ - 應用程式的檢視目錄可以包含應用程式的佈局和應用程式捆綁包的模板。它還可以覆蓋第三方捆綁包模板。
vendor/path/to/Bundle/Resources/views/ - 每個第三方捆綁包在其“Resources/views/”目錄中包含其模板。
Twig 引擎
Symfony 使用一種稱為 Twig 的強大的模板語言。Twig 允許您以非常簡單的方式編寫簡潔易讀的模板。Twig 模板很簡單,不會處理 PHP 標記。Twig 執行空白控制、沙箱和自動 HTML 轉義。
語法
Twig 包含三種類型的特殊語法 -
{{ ... }} - 將變數或表示式的結果列印到模板中。
{% ... %} - 控制模板邏輯的標籤。它主要用於執行函式。
{# ... #} - 註釋語法。它用於新增單行或多行註釋。
twig 基本模板位於 “app/Resources/views/base.html.twig”。
示例
讓我們透過一個使用 twig 引擎的簡單示例來了解一下。
StudentController.php
<?php
namespace AppBundle\Controller;

use Sensio\Bundle\FrameworkExtraBundle\Configuration\Route;
use Symfony\Component\HttpFoundation\Response;
use Symfony\Bundle\FrameworkBundle\Controller\Controller;

class StudentController extends Controller {
   /**
      * @Route("/student/home")
   */
   public function homeAction() {
      return $this->render('student/home.html.twig');
   }
}
這裡,render() 方法渲染一個模板並將該內容放入 Response 物件中。
現在轉到“views”目錄並建立一個名為“student”的資料夾,在該資料夾中建立一個名為“home.html.twig”的檔案。在檔案中新增以下更改。
home.html.twig
//app/Resources/views/student/home.html.twig
<h3>Student application!</h3>
您可以透過請求 url “https://:8000/student/home”來獲取結果。
預設情況下,Twig 帶有一長串標籤、過濾器和函式。讓我們逐一詳細瞭解一下。
標籤
Twig 支援以下重要標籤 -
Do
do 標籤執行與正則表示式類似的功能,區別在於它不列印任何內容。其語法如下 -
{% do 5 + 6 %}
Include
include 語句包含一個模板,並將該檔案的渲染內容返回到當前名稱空間。其語法如下 -
{% include 'template.html' %}
Extends
extends 標籤可用於從另一個模板擴充套件模板。其語法如下 -
{% extends "template.html" %}
Block
Block 充當佔位符並替換內容。塊名稱由字母數字字元和下劃線組成。例如,
<title>{% block title %}{% endblock %}</title>
Embed
embed 標籤執行 include 和 extends 的組合。它允許您包含另一個模板的內容。它還允許您覆蓋包含的模板中定義的任何塊,例如擴充套件模板時。
{% embed “new_template.twig” %}
   {# These blocks are defined in “new_template.twig" #}
   {% block center %}
      Block content
   {% endblock %}
{% endembed %}
Filter
Filter 部分允許您對模板資料塊應用常規 Twig 過濾器。例如,
{% filter upper %}
   symfony framework
{% endfilter %}
這裡,文字將更改為大寫。
For
For 迴圈獲取序列中的每個專案。例如,
{% for x in 0..10 %}
   {{ x }}
{% endfor %}
If
Twig 中的 if 語句類似於 PHP。表示式計算結果為真或假。例如,
{% if value == true %}
   <p>Simple If statement</p>
{% endif %}
過濾器
Twig 包含過濾器。它用於在渲染之前修改內容。以下是一些值得注意的過濾器。
Length
length 過濾器返回字串的長度。其語法如下 -
{% if name|length > 5 %}
   ...
{% endif %}
Lower
lower 過濾器將值轉換為小寫。例如,
{{ 'SYMFONY'|lower }}
它將產生以下結果 -
symfony
類似地,您可以嘗試大寫。
Replace
replace 過濾器透過替換佔位符來格式化給定的字串。例如,
{{ "tutorials point site %si% and %te%."|replace({'%si%': web, '%te%': "site"}) }}
它將產生以下結果 -
tutorials point website
Title
title 過濾器返回值的標題大小寫版本。例如,
{{ 'symfony framework '|title }}
它將產生以下結果 -
Symfony Framework
Sort
sort 過濾器對陣列進行排序。其語法如下 -
{% for user in names|sort %}
   ...
{% endfor %}
Trim
trim 過濾器修剪字串開頭和結尾處的空格(或其他字元)。例如,
{{ ' Symfony! '|trim }}
它將產生以下結果 -
Symfony!
函式
Twig 支援函式。它用於獲取特定結果。以下是一些重要的 Twig 函式。
Attribute
attribute 函式可用於訪問變數的“動態”屬性。其語法如下 -
{{ attribute(object, method) }}
{{ attribute(object, method, arguments) }}
{{ attribute(array, item) }}
例如,
{{ attribute(object, method) is defined ? 'Method exists' : 'Method does not exist' }}
Constant
Constant 函式返回指定字串的常量值。例如,
{{ constant('Namespace\\Classname::CONSTANT_NAME') }}
Cycle
cycle 函式迴圈遍歷一個值的陣列。例如,
{% set months = [‘Jan’, ‘Feb’, ‘Mar’] %}
{% for x in 0..12 %}
   { cycle(months, x) }}
{% endfor %}
Date
將引數轉換為日期以允許日期比較。例如,
<p>Choose your location before {{ 'next Monday'|date('M j, Y') }}</p>
它將產生以下結果 -
Choose your location before May 15, 2017
引數必須採用 PHP 支援的日期和時間格式之一。
您可以將時區作為第二個引數傳遞。
Dump
dump 函式轉儲有關模板變數的資訊。例如,
{{ dump(user) }}
Max
max 函式返回序列中的最大值。例如,
{{ max(1, 5, 9, 11, 15) }}
Min
min 函式返回序列中的最小值。例如,
{{ min(1, 3, 2) }}
Include
include 函式返回模板的渲染內容。例如,
{{ include('template.html') }}
Random
random 函式生成一個隨機值。例如,
{{ random([‘Jan’, ‘Feb’, ‘Mar’, ‘Apr’]) }}
{# example output: Jan #}
Range
Range 函式返回一個包含整數算術級數的列表。例如,
{% for x in range(1, 5) %}
   {{ x }},
{% endfor %}
它將產生以下結果 -
1,2,3,4,5
佈局
佈局表示多個檢視的公共部分,例如頁面標題和頁尾。
模板繼承
一個模板可以被另一個模板使用。我們可以使用模板繼承的概念來實現這一點。模板繼承允許您構建一個基本“佈局”模板,其中包含定義為塊的網站的所有公共元素。
讓我們舉一個簡單的例子來進一步瞭解模板繼承。
示例
考慮位於“app/Resources/views/base.html.twig”的基本模板。在檔案中新增以下更改。
base.html.twig
<!DOCTYPE html>
<html>
   <head>
      <meta charset = "UTF-8">
      <title>{% block title %}Parent template Layout{% endblock %}</title>
   </head>
</html>
現在轉到位於 “app/Resources/views/default/index.html.twig“ 的索引模板檔案。在其中新增以下更改。
index.html.twig
{% extends 'base.html.twig' %}
{% block title %}Child template Layout{% endblock %}
這裡,{% extends %} 標籤通知模板引擎首先評估基礎模板,基礎模板設定佈局並定義塊。然後渲染子模板。子模板可以擴充套件基礎佈局並覆蓋標題塊。現在,請求 url “https://:8000”,您可以獲取其結果。
資產
Asset 管理 Web 資產(如 CSS 樣式表、JavaScript 檔案和影像檔案)的 URL 生成和版本控制。
JavaScript
要包含 JavaScript 檔案,請在任何模板中使用javascripts標籤。
{# Include javascript #}
{% block javascripts %}
   {% javascripts '@AppBundle/Resources/public/js/*' %}
      <script src="{{ asset_url }}"></script>
   {% endjavascripts %}
{% endblock %}
樣式表
要包含樣式表文件,請在任何模板中使用stylesheets標籤。
{# include style sheet #}
{% block stylesheets %}
   {% stylesheets 'bundles/app/css/*' filter = 'cssrewrite' %}
      <link rel = "stylesheet" href="{{ asset_url }}" />
   {% endstylesheets %}
{% endblock %}
影像
要包含影像,您可以使用 image 標籤。其定義如下。
{% image '@AppBundle/Resources/public/images/example.jpg' %}
   <img src = "{{ asset_url }}" alt = "Example" />
{% endimage %}
複合資產
您可以將多個檔案合併成一個檔案。這有助於減少 HTTP 請求次數,並提高前端效能。
{% javascripts
   '@AppBundle/Resources/public/js/*'
   '@AcmeBarBundle/Resources/public/js/form.js'
   '@AcmeBarBundle/Resources/public/js/calendar.js' %}
   <script src = "{{ asset_url }}"></script>
{% endjavascripts %}
Symfony - Doctrine ORM
在 Symfony Web 框架中,模型起著重要的作用。它們是業務實體。它們要麼由客戶提供,要麼從後端資料庫中獲取,根據業務規則進行操作並持久化回資料庫。它們是由檢視呈現的資料。在本章中,讓我們學習模型以及它們如何與後端系統互動。
資料庫模型
我們需要將我們的模型對映到後端關係型資料庫項,以便安全有效地獲取和持久化模型。此對映可以使用物件關係對映 (ORM) 工具完成。Symfony 提供了一個單獨的捆綁包DoctrineBundle,它將 Symfony 與第三方 PHP 資料庫 ORM 工具Doctrine整合。
Doctrine ORM
預設情況下,Symfony 框架不提供任何用於處理資料庫的元件。但是,它與Doctrine ORM緊密整合。Doctrine 包含多個用於資料庫儲存和物件對映的 PHP 庫。
以下示例將幫助您瞭解 Doctrine 的工作原理、如何配置資料庫以及如何儲存和檢索資料。
Doctrine ORM 示例
在此示例中,我們將首先配置資料庫並建立一個 Student 物件,然後對其執行一些操作。
為此,我們需要遵循以下步驟。
步驟 1:建立 Symfony 應用程式
使用以下命令建立一個名為dbsample的 Symfony 應用程式。
symfony new dbsample
步驟 2:配置資料庫
通常,資料庫資訊在“app/config/parameters.yml”檔案中配置。
開啟檔案並新增以下更改。
parameter.yml
parameters:
   database_host: 127.0.0.1
   database_port: null
   database_name: studentsdb
   database_user: <user_name>
   database_password: <password>
   mailer_transport: smtp
   mailer_host: 127.0.0.1
   mailer_user: null
   mailer_password: null
   secret: 037ab82c601c10402408b2b190d5530d602b5809

   doctrine:
      dbal:
      driver:   pdo_mysql
      host:     '%database_host%'
      dbname:   '%database_name%'
      user:     '%database_user%'
      password: '%database_password%'
      charset: utf8mb4
現在,Doctrine ORM 可以連線到資料庫。
步驟 3:建立資料庫
發出以下命令以生成“studentsdb”資料庫。此步驟用於在 Doctrine ORM 中繫結資料庫。
php bin/console doctrine:database:create
執行命令後,它會自動生成一個空的“studentsdb”資料庫。您可以在螢幕上看到以下響應。
Created database `studentsdb` for connection named default
步驟 4:對映資訊
對映資訊只不過是“元資料”。它是一組規則,準確地告知 Doctrine ORM Student 類及其屬性如何對映到特定的資料庫表。
好吧,此元資料可以使用多種不同的格式指定,包括 YAML、XML,或者您可以使用註釋直接傳遞 Student 類。其定義如下。
Student.php
在檔案中新增以下更改。
<?php
namespace AppBundle\Entity;

use Doctrine\ORM\Mapping as ORM;
/**
   * @ORM\Entity
   * @ORM\Table(name = "students")
*/
class Student {
   /**
      * @ORM\Column(type = "integer")
      * @ORM\Id
      * @ORM\GeneratedValue(strategy = "AUTO")
   */
   private $id;

   /**
      * @ORM\Column(type = "string", length = 50)
   */
   private $name;

   /**
     * @ORM\Column(type = "text")
     */
   private $address;
}
這裡,表名是可選的。如果未指定表名,則將根據實體類的名稱自動確定表名。
步驟 5:繫結實體
Doctrine 為您建立簡單的實體類。它可以幫助您構建任何實體。
發出以下命令以生成實體。
php bin/console doctrine:generate:entities AppBundle/Entity/Student
然後您將看到以下結果,並且實體將被更新。
Generating entity "AppBundle\Entity\Student"
   > backing up Student.php to Student.php~
   > generating AppBundle\Entity\Student
Student.php
<?php
namespace AppBundle\Entity;

use Doctrine\ORM\Mapping as ORM;
/**
   * @ORM\Entity
   * @ORM\Table(name="students")
*/
class Student {
   /**
      * @ORM\Column(type="integer")
      * @ORM\Id
      * @ORM\GeneratedValue(strategy="AUTO")
   */
   private $id;

   /**
      * @ORM\Column(type = "string", length = 50)
   */
   private $name;

   /**
      * @ORM\Column(type = "text")
   */
   private $address;

   /**
      * Get id
      *
      * @return integer
   */
   public function getId() {
      return $this->id;
   }

   /**
      * Set name
      *
      * @param string $name
      *
      * @return Student
   */

   public function setName($name) {
      $this->name = $name;
      return $this;
   }

   /**
      * Get name
      *
      * @return string
   */

   public function getName() {
      return $this->name;
   }

   /**
      * Set address
      *
      * @param string $address
      *
      * @return Student
   */

   public function setAddress($address) {
      $this->address = $address;
      return $this;
   }

   /**
      * Get address
      *
      * @return string
   */

   public function getAddress() {
      return $this->address;
   }
}
步驟 6:對映驗證
建立實體後,應使用以下命令驗證對映。
php bin/console doctrine:schema:validate
它將產生以下結果 -
[Mapping]  OK - The mapping files are correct.
[Database] FAIL - The database schema is not in sync with the current mapping file
由於我們尚未建立 students 表,因此實體不同步。讓我們在下一步中使用 Symfony 命令建立 students 表。
步驟 7:建立模式
Doctrine 可以自動建立 Student 實體所需的所有資料庫表。這可以使用以下命令完成。
php bin/console doctrine:schema:update --force
執行命令後,您可以看到以下響應。
Updating database schema...
Database schema updated successfully! "1" query was executed
此命令將資料庫應有的外觀與其實際外觀進行比較,並執行更新資料庫模式以使其達到預期狀態所需的 SQL 語句。
現在,再次使用以下命令驗證模式。
php bin/console doctrine:schema:validate
它將產生以下結果 -
[Mapping]  OK - The mapping files are correct.
[Database] OK - The database schema is in sync with the mapping files
步驟 8:Getter 和 Setter
如“繫結實體”部分所示,以下命令將為 Student 類生成所有 Getter 和 Setter。
$ php bin/console doctrine:generate:entities AppBundle/Entity/Student
步驟 9:將物件持久化到資料庫
現在,我們已將 Student 實體對映到其對應的 Student 表。我們現在應該能夠將 Student 物件持久化到資料庫中。將以下方法新增到捆綁包的 StudentController 中。
StudentController.php
<?php
namespace AppBundle\Controller;

use Sensio\Bundle\FrameworkExtraBundle\Configuration\Route;
use Symfony\Bundle\FrameworkBundle\Controller\Controller;
use Symfony\Component\HttpFoundation\Response;
use AppBundle\Entity\Student;

class StudentController extends Controller {
   /**
      * @Route("/student/add")
   */
   public function addAction() {
      $stud = new Student();
      $stud->setName('Adam');
      $stud->setAddress('12 north street');
      $doct = $this->getDoctrine()->getManager();

      // tells Doctrine you want to save the Product
      $doct->persist($stud);

      //executes the queries (i.e. the INSERT query)
      $doct->flush();

      return new Response('Saved new student with id ' . $stud->getId());
   }
}
這裡,我們透過基礎控制器的 getDoctrine() 使用 getManager() 方法訪問了 doctrine 管理器,然後使用 doctrine 管理器的 persist() 方法持久化當前物件。persist()方法將命令新增到佇列中,但flush()方法執行實際工作(持久化學生物件)。
步驟 10:從資料庫中獲取物件
在 StudentController 中建立一個函式,該函式將顯示學生詳細資訊。
StudentController.php
/**
   * @Route("/student/display")
*/
public function displayAction() {
   $stud = $this->getDoctrine()
   ->getRepository('AppBundle:Student')
   ->findAll();
   return $this->render('student/display.html.twig', array('data' => $stud));
}
步驟 11:建立檢視
讓我們建立一個指向 display 操作的檢視。移動到 views 目錄並建立一個檔案“display.html.twig”。在檔案中新增以下更改。
display.html.twig
<style>
   .table { border-collapse: collapse; }
   .table th, td {
      border-bottom: 1px solid #ddd;
      width: 250px;
      text-align: left;
      align: left;
   }
</style>

<h2>Students database application!</h2>
<table class = "table">
   <tr>
      <th>Name</th>
      <th>Address</th>
   </tr>
   {% for x in data %}
   <tr>
      <td>{{ x.Name }}</td>
      <td>{{ x.Address }}</td>
   </tr>
   {% endfor %}
</table>
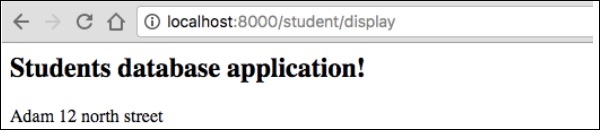
您可以透過在瀏覽器中請求 URL“https://:8000/student/display”來獲取結果。
它將在螢幕上生成以下輸出:
步驟 12:更新物件
要在 StudentController 中更新物件,請建立一個操作並新增以下更改。
/**
   * @Route("/student/update/{id}")
*/
public function updateAction($id) {
   $doct = $this->getDoctrine()->getManager();
   $stud = $doct->getRepository('AppBundle:Student')->find($id);

   if (!$stud) {
      throw $this->createNotFoundException(
         'No student found for id '.$id
      );
   }
   $stud->setAddress('7 south street');
   $doct->flush();

   return new Response('Changes updated!');
}
現在,請求 URL“https://:8000/Student/update/1”,它將生成以下結果。
它將在螢幕上生成以下輸出:

步驟 13:刪除物件
刪除物件類似,它需要呼叫實體(doctrine)管理器的 remove() 方法。
這可以使用以下命令完成。
/**
   * @Route("/student/delete/{id}")
*/
public function deleteAction($id) {
   $doct = $this->getDoctrine()->getManager();
   $stud = $doct->getRepository('AppBundle:Student')->find($id);

   if (!$stud) {
      throw $this->createNotFoundException('No student found for id '.$id);
   }

   $doct->remove($stud);
   $doct->flush();

   return new Response('Record deleted!');
}
Symfony - 表單
Symfony 提供各種內建標籤來輕鬆安全地處理 HTML 表單。Symfony 的表單元件執行表單建立和驗證過程。它連線模型和檢視層。它提供一組表單元素,以便從預定義的模型建立功能齊全的 html 表單。本章詳細解釋了表單。
表單欄位
Symfony 框架 API 支援大量欄位型別。讓我們詳細瞭解每種欄位型別。
FormType
它用於在 Symfony 框架中生成表單。其語法如下:
use Symfony\Component\Form\Extension\Core\Type\TextType;
use Symfony\Component\Form\Extension\Core\Type\EmailType;
use Symfony\Component\Form\Extension\Core\Type\FormType;
// ...

$builder = $this->createFormBuilder($studentinfo);
$builder
   ->add('title', TextType::class);
這裡,$studentinfo是 Student 型別的實體。createFormBuilder用於建立 HTML 表單。add 方法用於在表單內新增輸入元素。title指的是學生標題屬性。TextType::class指的是 html 文字欄位。Symfony 為所有 html 元素提供類。
TextType
TextType 欄位表示最基本的輸入文字欄位。其語法如下:
use Symfony\Component\Form\Extension\Core\Type\TextType;
$builder->add(‘name’, TextType::class);
這裡,名稱與實體對映。
TextareaType
呈現 textarea HTML 元素。其語法如下:
use Symfony\Component\Form\Extension\Core\Type\TextareaType;
$builder->add('body', TextareaType::class, array(
   'attr' => array('class' => 'tinymce'),
));
EmailType
EmailType 欄位是一個文字欄位,使用 HTML5 email 標籤呈現。其語法如下:
use Symfony\Component\Form\Extension\Core\Type\EmailType;
$builder->add('token', EmailType::class, array(
   'data' => 'abcdef', ));
PasswordType
PasswordType 欄位呈現一個輸入密碼文字框。其語法如下:
use Symfony\Component\Form\Extension\Core\Type\PasswordType;
$bulder->add('password', PasswordType::class);
RangeType
RangeType 欄位是一個滑塊,使用 HTML5 range 標籤呈現。其語法如下:
use Symfony\Component\Form\Extension\Core\Type\RangeType;
// ...
$builder->add('name', RangeType::class, array(
   'attr' => array(
      'min' => 100,
      'max' => 200
   )
));
PercentType
PercentType 呈現一個輸入文字欄位,專門用於處理百分比資料。其語法如下:
use Symfony\Component\Form\Extension\Core\Type\PercentType;
// ...
$builder->add('token', PercentType::class, array(
   'data' => 'abcdef',
));
DateType
呈現日期格式。其語法如下:
use Symfony\Component\Form\Extension\Core\Type\DateType;
// ...
$builder->add(‘joined’, DateType::class, array(
   'widget' => 'choice',
));
這裡,Widget 是呈現欄位的基本方法。
它執行以下功能。
choice - 呈現三個選擇輸入。選擇的順序在 format 選項中定義。
text - 呈現三個型別為文字的欄位輸入(月、日、年)。
single_text - 呈現一個型別為日期的單個輸入。使用者輸入根據 format 選項進行驗證。
CheckboxType
建立一個單選複選框。這應該始終用於具有布林值的欄位。其語法如下:
use Symfony\Component\Form\Extension\Core\Type\CheckboxType;
// ...
$builder-<add(‘sports’, CheckboxType::class, array(
   'label'    =< ‘Are you interested in sports?’,
   'required' =< false,
));
RadioType
建立一個單選按鈕。如果選中單選按鈕,則欄位將設定為指定的值。其語法如下:
use Symfony\Component\Form\Extension\Core\Type\RadioType;
// ...
$builder->add('token', RadioType::class, array(
   'data' => 'abcdef',
));
請注意,單選按鈕無法取消選中,只有當另一個名稱相同的單選按鈕被選中時,值才會更改。
RepeatedType
這是一個特殊的欄位“組”,它建立兩個必須匹配值的相同欄位。其語法如下:
use Symfony\Component\Form\Extension\Core\Type\RepeatedType;
use Symfony\Component\Form\Extension\Core\Type\PasswordType;

// ...
$builder->add('password', RepeatedType::class, array(
   'type' => PasswordType::class,
   'invalid_message' => 'The password fields must match.',
   'options' => array('attr' => array('class' => 'password-field')),
   'required' => true,
   'first_options'  => array('label' => 'Password'),
   'second_options' => array('label' => 'Repeat Password'),
));
這主要用於檢查使用者的密碼或電子郵件。
ButtonType
一個簡單的可點選按鈕。其語法如下:
use Symfony\Component\Form\Extension\Core\Type\ButtonType;
// ...
$builder->add('save', ButtonType::class, array(
   'attr' => array('class' => 'save'),
));
ResetType
一個將所有欄位重置為其初始值的按鈕。其語法如下:
use Symfony\Component\Form\Extension\Core\Type\ResetType;
// ...
$builder->add('save', ResetType::class, array(
   'attr' => array('class' => 'save'),
));
ChoiceType
一個多用途欄位,用於允許使用者“選擇”一個或多個選項。它可以呈現為選擇標籤、單選按鈕或複選框。其語法如下:
use Symfony\Component\Form\Extension\Core\Type\ChoiceType;
// ...
$builder->add(‘gender’, ChoiceType::class, array(
   'choices'  => array(
      ‘Male’ => true,
      ‘Female’ => false,
   ),
));
SubmitType
提交按鈕用於提交表單資料。其語法如下:
use Symfony\Component\Form\Extension\Core\Type\SubmitType;
// ...
$builder->add('save', SubmitType::class, array(
   'attr' => array('class' => 'save'),
))
表單助手函式
表單助手函式是 Twig 函式,用於在模板中輕鬆建立表單。
form_start
返回一個指向有效操作、路由或 URL 的 HTML 表單標籤。其語法如下:
{{ form_start(form, {'attr': {'id': 'form_person_edit'}}) }}
form_end
關閉使用 form_start 建立的 HTML 表單標籤。其語法如下:
{{ form_end(form) }}
textarea
返回一個 textarea 標籤,可選地用內聯富文字 JavaScript 編輯器包裝。
checkbox
返回一個型別為“checkbox”的 XHTML 相容輸入標籤。其語法如下:
echo checkbox_tag('choice[]', 1);
echo checkbox_tag('choice[]', 2);
echo checkbox_tag('choice[]', 3);
echo checkbox_tag('choice[]', 4);
input_password_tag
返回一個型別為“password”的 XHTML 相容輸入標籤。其語法如下:
echo input_password_tag('password');
echo input_password_tag('password_confirm');
input_tag
返回一個型別為“text”的 XHTML 相容輸入標籤。其語法如下:
echo input_tag('name');
label
返回帶有指定引數的 label 標籤。
radiobutton
返回一個型別為“radio”的 XHTML 相容輸入標籤。其語法如下:
echo ' Yes '.radiobutton_tag(‘true’, 1);
echo ' No '.radiobutton_tag(‘false’, 0);
reset_tag
返回一個型別為“reset”的 XHTML 相容輸入標籤。其語法如下:
echo reset_tag('Start Over');
select
返回一個包含世界所有國家/地區的 select 標籤。其語法如下:
echo select_tag(
   'url', options_for_select($url_list),
   array('onChange' => 'Javascript:this.form.submit();'));
submit
返回一個型別為“submit”的 XHTML 相容輸入標籤。其語法如下:
echo submit_tag('Update Record');
在下一節中,我們將學習如何使用表單欄位建立表單。
學生表單應用程式
讓我們使用 Symfony 表單欄位建立一個簡單的學生詳細資訊表單。為此,我們應遵循以下步驟:
步驟 1:建立 Symfony 應用程式
使用以下命令建立一個名為formsample的 Symfony 應用程式。
symfony new formsample
實體通常在“src/AppBundle/Entity/“目錄下建立。
步驟 2:建立實體
在“src/AppBundle/Entity/”目錄下建立檔案“StudentForm.php”。在檔案中新增以下更改。
StudentForm.php
<?php
namespace AppBundle\Entity;

class StudentForm {
   private $studentName;
   private $studentId;
   public $password;
   private $address;
   public $joined;
   public $gender;
   private $email;
   private $marks;
   public $sports;

   public function getStudentName() {
      return $this->studentName;
   }
   public function setStudentName($studentName) {
      $this->studentName = $studentName;
   }
   public function getStudentId() {
      return $this->studentId;
   }
   public function setStudentId($studentid) {
      $this->studentid = $studentid;
   }
   public function getAddress() {
      return $this->address;
   }
   public function setAddress($address) {
      $this->address = $address;
   }
   public function getEmail() {
      return $this->email;
   }
   public function setEmail($email) {
      $this->email = $email;
   }
   public function getMarks() {
      return $this->marks;
   }
   public function setMarks($marks) {
      $this->marks = $marks;
   }
}
步驟 3:新增 StudentController
移動到“src/AppBundle/Controller”目錄,建立“StudentController.php”檔案,並在其中新增以下程式碼。
StudentController.php
<?php
namespace AppBundle\Controller;

use AppBundle\Entity\StudentForm;
use AppBundle\Form\FormValidationType;

use Symfony\Bundle\FrameworkBundle\Controller\Controller;
use Symfony\Component\HttpFoundation\Request;
use Sensio\Bundle\FrameworkExtraBundle\Configuration\Route;

use Symfony\Component\HttpFoundation\Response;
use Symfony\Component\Form\Extension\Core\Type\TextType;
use Symfony\Component\Form\Extension\Core\Type\DateType;
use Symfony\Component\Form\Extension\Core\Type\SubmitType;
use Symfony\Component\Form\Extension\Core\Type\ChoiceType;
use Symfony\Component\Form\Extension\Core\Type\PasswordType;
use Symfony\Component\Form\Extension\Core\Type\RangeType;
use Symfony\Component\Form\Extension\Core\Type\EmailType;
use Symfony\Component\Form\Extension\Core\Type\CheckboxType;
use Symfony\Component\Form\Extension\Core\Type\ButtonType;
use Symfony\Component\Form\Extension\Core\Type\TextareaType;
use Symfony\Component\Form\Extension\Core\Type\PercentType;
use Symfony\Component\Form\Extension\Core\Type\RepeatedType;

class StudentController extends Controller {
   /**
      * @Route("/student/new")
   */
   public function newAction(Request $request) {
      $stud = new StudentForm();
      $form = $this->createFormBuilder($stud)
         ->add('studentName', TextType::class)
         ->add('studentId', TextType::class)
         ->add('password', RepeatedType::class, array(
            'type' => PasswordType::class,
            'invalid_message' => 'The password fields
            must match.', 'options' => array('attr' => array('class' => 'password-field')),
            'required' => true, 'first_options'  => array('label' => 'Password'),
            'second_options' => array('label' => 'Re-enter'),
         ))

         ->add('address', TextareaType::class)
         ->add('joined', DateType::class, array(
               'widget' => 'choice',
         ))

         ->add('gender', ChoiceType::class, array(
            'choices'  => array(
               'Male' => true,
               'Female' => false,
            ),
         ))

         ->add('email', EmailType::class)
         ->add('marks', PercentType::class)
         ->add('sports', CheckboxType::class, array(
            'label'    => 'Are you interested in sports?', 'required' => false,
         ))

         ->add('save', SubmitType::class, array('label' => 'Submit'))
         ->getForm();
         return $this->render('student/new.html.twig', array(
            'form' => $form->createView(),
         ));
   }
}
步驟 4:渲染檢視
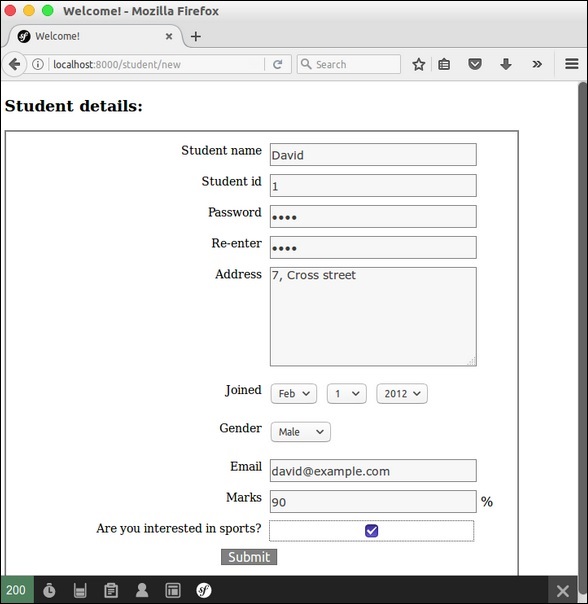
移動到“app/Resources/views/student/”目錄,建立“new.html.twig”檔案並在其中新增以下更改。
{% extends 'base.html.twig' %}
{% block stylesheets %}
<style>
   #simpleform {
      width:600px;
      border:2px solid grey;
      padding:14px;
   }
   #simpleform label {
      font-size:14px;
      float:left;
      width:300px;
      text-align:right;
      display:block;
   }
   #simpleform span {
      font-size:11px;
      color:grey;
      width:100px;
      text-align:right;
      display:block;
   }
   #simpleform input {
      border:1px solid grey;
      font-family:verdana;
      font-size:14px;
      color:light blue;
      height:24px;
      width:250px;
      margin: 0 0 10px 10px;
   }
   #simpleform textarea {
      border:1px solid grey;
      font-family:verdana;
      font-size:14px;
      color:light blue;
      height:120px;
      width:250px;
      margin: 0 0 20px 10px;
   }
   #simpleform select {
      margin: 0 0 20px 10px;
   }
   #simpleform button {
      clear:both;
      margin-left:250px;
      background: grey;
      color:#FFFFFF;
      border:solid 1px #666666;
      font-size:16px;
   }
</style>

{% endblock %}
   {% block body %}
   <h3>Student details:</h3>
   <div id="simpleform">
      {{ form_start(form) }}
      {{ form_widget(form) }}
      {{ form_end(form) }}
   </div>
{% endblock %}
現在請求 URL“https://:8000/student/new”,它會產生以下結果。
結果
Symfony - 驗證
驗證是在設計應用程式時最重要的方面之一。它會驗證傳入的資料。本章詳細介紹表單驗證。
驗證約束
驗證器旨在根據約束驗證物件。如果要驗證物件,只需將其類對映到一個或多個約束,然後將其傳遞給驗證器服務。預設情況下,在驗證物件時,將檢查相應類中的所有約束以檢視它們是否實際透過。Symfony 支援以下值得注意的驗證約束。
NotBlank
驗證屬性是否為空白。其語法如下:
namespace AppBundle\Entity;
use Symfony\Component\Validator\Constraints as Assert;

class Student {
   /**
      * @Assert\NotBlank()
   */
   protected $studentName;
}
此 NotBlank 約束確保 studentName 屬性不為空白。
NotNull
驗證值是否嚴格等於 null。其語法如下:
namespace AppBundle\Entity;
use Symfony\Component\Validator\Constraints as Assert;

class Student {
   /**
      * @Assert\NotNull()
   */
   protected $studentName;
}
驗證值是否為有效的電子郵件地址。其語法如下:
namespace AppBundle\Entity;
use Symfony\Component\Validator\Constraints as Assert;

class Student {
   /**
      * @Assert\Email(
         * message = "The email '{{ value }}' is not a valid email.",
         * checkMX = true
      * )
   */
   protected $email;
}
IsNull
驗證值是否完全等於 null。其語法如下:
namespace AppBundle\Entity;
use Symfony\Component\Validator\Constraints as Assert;

class Student {
   /**
      * @Assert\IsNull()
   */
   protected $studentName;
}
Length
驗證給定字串的長度是否在某個最小值和最大值之間。其語法如下:
namespace AppBundle\Entity;
use Symfony\Component\Validator\Constraints as Assert;

class Student {
   /**
      * @Assert\Length(
         * min = 5,
         * max = 25,
         * minMessage = "Your first name must be at least {{ limit }} characters long",
         * maxMessage = "Your first name cannot be longer than {{ limit }} characters"
      * )
   */
   protected $studentName;
}
Range
驗證給定數字是否在某個最小值和最大值之間。其語法如下:
namespace AppBundle\Entity;
use Symfony\Component\Validator\Constraints as Assert;
class Student {
   /**
      * @Assert\Range(
         * min = 40,
         * max = 100,
         * minMessage = "You must be at least {{ limit }} marks”,
         * maxMessage = "Your maximum {{ limit }} marks”
      * )
   */
   protected $marks;
}
Date
驗證值是否為有效日期。它遵循有效的 YYYY-MM-DD 格式。其語法如下:
namespace AppBundle\Entity;
use Symfony\Component\Validator\Constraints as Assert;

class Student {
   /**
      * @Assert\Date()
   */
   protected $joinedAt;
}
Choice
此約束用於確保給定值是一組給定有效選項之一。它也可用於驗證專案陣列中的每個專案是否為這些有效選項之一。其語法如下:
namespace AppBundle\Entity;
use Symfony\Component\Validator\Constraints as Assert;

class Student {
   /**
      * @Assert\Choice(choices = {"male", "female"}, message = "Choose a valid gender.")
   */
   protected $gender;
}
UserPassword
這會驗證輸入值是否等於當前已認證使用者的密碼。這在使用者可以更改密碼但出於安全原因需要輸入舊密碼的表單中很有用。其語法如下:
namespace AppBundle\Form\Model;
use Symfony\Component\Security\Core\Validator\Constraints as SecurityAssert;

class ChangePassword {
   /**
      * @SecurityAssert\UserPassword(
         * message = "Wrong value for your current password"
      * )
   */
   protected $oldPassword;
}
此約束驗證舊密碼是否與使用者的當前密碼匹配。
驗證示例
讓我們編寫一個簡單的應用程式示例來理解驗證的概念。
步驟 1 - 建立驗證應用程式。
使用以下命令建立 Symfony 應用程式 validationsample。
symfony new validationsample
步驟 2 - 在 “src/AppBundle/Entity/” 目錄下的檔案 “FormValidation.php” 中建立名為 FormValidation 的實體。在檔案中新增以下更改。
FormValidation.php
<?php
namespace AppBundle\Entity;
use Symfony\Component\Validator\Constraints as Assert;

class FormValidation {
   /**
      * @Assert\NotBlank()
   */
   protected $name;

   /**
      * @Assert\NotBlank()
   */
   protected $id;
   protected $age;

   /**
      * @Assert\NotBlank()
   */
   protected $address;
   public $password;

   /**
      * @Assert\Email(
         * message = "The email '{{ value }}' is not a valid email.",
         * checkMX = true
      * )
   */
   protected $email;

   public function getName() {
      return $this->name;
   }
   public function setName($name) {
      $this->name = $name;
   }
   public function getId() {
      return $this->id;
   }
   public function setId($id) {
      $this->id = $id;
   }
   public function getAge() {
      return $this->age;
   }
   public function setAge($age) {
      $this->age = $age;
   }
   public function getAddress() {
      return $this->address;
   }
   public function setAddress($address) {
      $this->address = $address;
   }
   public function getEmail() {
      return $this->email;
   }
   public function setEmail($email) {
      $this->email = $email;
   }
}
步驟 3 - 在 StudentController 中建立 validateAction 方法。移動到 “src/AppBundle/Controller” 目錄,建立 “studentController.php” 檔案,並在其中新增以下程式碼。
StudentController.php
use AppBundle\Entity\FormValidation;
/**
   * @Route("/student/validate")
*/
public function validateAction(Request $request) {
   $validate = new FormValidation();
   $form = $this->createFormBuilder($validate)
      ->add('name', TextType::class)
      ->add('id', TextType::class)
      ->add('age', TextType::class)
      ->add('address', TextType::class)
      ->add('email', TextType::class)
      ->add('save', SubmitType::class, array('label' => 'Submit'))
      ->getForm();

   $form->handleRequest($request);
   if ($form->isSubmitted() && $form->isValid()) {
      $validate = $form->getData();
      return new Response('Form is validated.');
   }
   return $this->render('student/validate.html.twig', array(
      'form' => $form->createView(),
   ));
}
在這裡,我們使用 Form 類建立了表單,然後處理了表單。如果表單已提交且有效,則會顯示錶單驗證訊息。否則,將顯示預設表單。
步驟 4 - 為 StudentController 中上面建立的操作建立檢視。移動到 “app/Resources/views/student/” 目錄。建立 “validate.html.twig” 檔案並在其中新增以下程式碼。
{% extends 'base.html.twig' %}
{% block stylesheets %}
   <style>
      #simpleform {
         width:600px;
         border:2px solid grey;
         padding:14px;
      }
      #simpleform label {
         font-size:14px;
         float:left;
         width:300px;
         text-align:right;
         display:block;
      }
      #simpleform span {
         font-size:11px;
         color:grey;
         width:100px;
         text-align:right;
         display:block;
      }
      #simpleform input {
         border:1px solid grey;
         font-family:verdana;
         font-size:14px;
         color:light blue;
         height:24px;
         width:250px;
         margin: 0 0 10px 10px;
      }
      #simpleform textarea {
         border:1px solid grey;
         font-family:verdana;
         font-size:14px;
         color:light blue;
         height:120px;
         width:250px;
         margin: 0 0 20px 10px;
      }
      #simpleform select {
         margin: 0 0 20px 10px;
      }
      #simpleform button {
         clear:both;
         margin-left:250px;
         background: grey;
         color:#FFFFFF;
         border:solid 1px #666666;
         font-size:16px;
      }
   </style>
{% endblock %}

{% block body %}
   <h3>Student form validation:</h3>
   <div id = "simpleform">
      {{ form_start(form) }}
      {{ form_widget(form) }}
      {{ form_end(form) }}
   </div>
{% endblock %}
在這裡,我們使用了表單標籤來建立表單。
步驟 5 - 最後,執行應用程式 https://:8000/student/validate。
結果:初始頁面

結果:最終頁面

Symfony - 檔案上傳
Symfony Form 元件提供 FileType 類來處理檔案輸入元素。它可以輕鬆上傳影像、文件等。讓我們學習如何使用 FileType 功能建立簡單的應用程式。
步驟 1 - 使用以下命令建立一個新應用程式 fileuploadsample。
symfony new fileuploadsample
步驟 2 - 建立一個名為 Student 的實體,其中包含名稱、年齡和照片,如下面的程式碼所示。
src/AppBundle/Entity/Student.php
<?php
namespace AppBundle\Entity;
use Symfony\Component\Validator\Constraints as Assert;  class Student {
   /**
      * @Assert\NotBlank()
   */
   private $name;

   /**
      * @Assert\NotBlank()
   */
   private $age;

   /**
      * @Assert\NotBlank(message="Please, upload the photo.")
      * @Assert\File(mimeTypes={ "image/png", "image/jpeg" })
   */
   private $photo;

   public function getName() {
      return $this->name;
   }
   public function setName($name) {
      $this->name = $name;
      return $this;
   }
   public function getAge() {
      return $this->age;
   }
   public function setAge($age) {
      $this->age = $age;
      return $this;
   }
   public function getPhoto() {
      return $this->photo;
   }
   public function setPhoto($photo) {
      $this->photo = $photo;
      return $this;
   }
}
在這裡,我們為 photo 屬性指定了 File。
步驟 3 - 建立學生控制器 StudentController 和一個新方法 addAction,如下面的程式碼所示。
<?php
namespace AppBundle\Controller;

use AppBundle\Entity\Student;
use AppBundle\Form\FormValidationType;
use Symfony\Bundle\FrameworkBundle\Controller\Controller;
use Sensio\Bundle\FrameworkExtraBundle\Configuration\Route;

use Symfony\Component\HttpFoundation\Request;
use Symfony\Component\HttpFoundation\Response;
use Symfony\Component\Form\Extension\Core\Type\TextType;
use Symfony\Component\Form\Extension\Core\Type\FileType;
use Symfony\Component\Form\Extension\Core\Type\SubmitType;

class StudentController extends Controller {
   /**
      * @Route("/student/new")
   */
   public function newAction(Request $request) {
      $student = new Student();
      $form = $this->createFormBuilder($student)
         ->add('name', TextType::class)
         ->add('age', TextType::class)
         ->add('photo', FileType::class, array('label' => 'Photo (png, jpeg)'))
         ->add('save', SubmitType::class, array('label' => 'Submit'))
         ->getForm();

      $form->handleRequest($request);
      if ($form->isSubmitted() && $form->isValid()) {
         $file = $student->getPhoto();
         $fileName = md5(uniqid()).'.'.$file->guessExtension();
         $file->move($this->getParameter('photos_directory'), $fileName);
         $student->setPhoto($fileName);
         return new Response("User photo is successfully uploaded.");
      } else {
         return $this->render('student/new.html.twig', array(
            'form' => $form->createView(),
         ));
      }
   }
}
在這裡,我們為學生實體建立了表單並處理了請求。當用戶提交表單且有效時,我們將使用引數 photos_directory 將上傳的檔案移動到我們的上傳目錄。
步驟 4 - 使用以下表單標籤建立檢視 new.html.twig。
{% extends 'base.html.twig' %}
{% block javascripts %}
   <script language = "javascript" src = "https://code.jquery.com/jquery-2.2.4.min.js"></script>
{% endblock %}
{% block stylesheets %}
   <style>
      #simpleform {
         width:600px;
         border:2px solid grey;
         padding:14px;
      }
      #simpleform label {
         font-size:12px;
         float:left;
         width:300px;
         text-align:right;
         display:block;
      }
      #simpleform span {
         font-size:11px;
         color:grey;
         width:100px;
         text-align:right;
         display:block;
      }
      #simpleform input {
         border:1px solid grey;
         font-family:verdana;
         font-size:14px;
         color:grey;
         height:24px;
         width:250px;
         margin: 0 0 20px 10px;
      }
      #simpleform button {
         clear:both;
         margin-left:250px;
         background:grey;
         color:#FFFFFF;
         border:solid 1px #666666;
         font-size:16px;
      }
   </style>
{% endblock %}
{% block body %}
   <h3>Student form</h3>
   <div id="simpleform">
      {{ form_start(form) }}
      {{ form_widget(form) }}
      {{ form_end(form) }}
   </div>
{% endblock %}
步驟 5 - 在引數配置檔案中設定引數 photos_directory,如下所示。
app/config/config.xml
parameters: photos_directory: '%kernel.root_dir%/../web/uploads/photos'
步驟 6 - 現在,執行應用程式並開啟 https://:8000/student/new 並上傳照片。上傳的照片將上傳到 photos_directory,並將顯示一條成功訊息。
結果:初始頁面
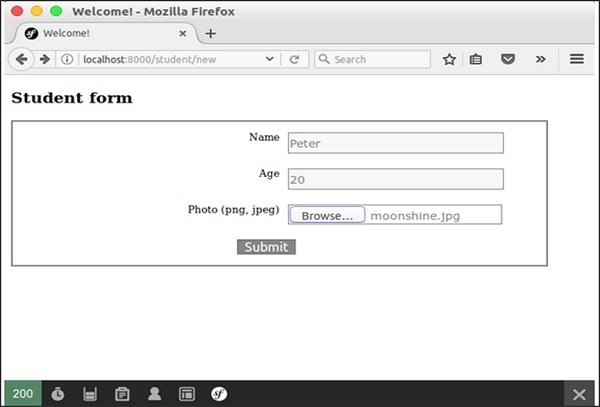
結果:檔案上傳頁面
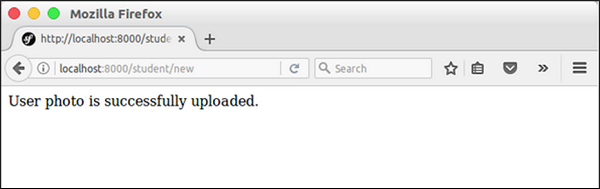
Symfony - Ajax 控制
AJAX 是 Web 程式設計中的一項現代技術。它提供在網頁中非同步傳送和接收資料而無需重新整理頁面的選項。讓我們在本節中學習 Symfony AJAX 程式設計。
Symfony 框架提供識別請求型別是否為 AJAX 的選項。Symfony HttpFoundation 元件的 Request 類為此目的提供了一個方法 isXmlHttpRequest()。如果發出了 AJAX 請求,則當前請求物件的 isXmlHttpRequest() 方法將返回 true,否則返回 false。
此方法用於在伺服器端正確處理 AJAX 請求。
if ($request->isXmlHttpRequest()) {
   // Ajax request
} else {
   // Normal request
}
Symfony 還提供了一個基於 JSON 的 Response 類 JsonResponse,用於以 JSON 格式建立響應。我們可以結合這兩種方法來建立一個簡單幹淨的基於 AJAX 的 Web 應用程式。
AJAX - 工作示例
讓我們在學生應用程式中新增一個新頁面 student/ajax 並嘗試非同步獲取學生資訊。
步驟 1 - 在 StudentController(src/AppBundle/Controller/StudentController.php) 中新增 ajaxAction 方法。
/**
   * @Route("/student/ajax")
*/
public function ajaxAction(Request $request) {
   $students = $this->getDoctrine()
      ->getRepository('AppBundle:Student')
      ->findAll();

   if ($request->isXmlHttpRequest() || $request->query->get('showJson') == 1) {
      $jsonData = array();
      $idx = 0;
      foreach($students as $student) {
         $temp = array(
            'name' => $student->getName(),
            'address' => $student->getAddress(),
         );
         $jsonData[$idx++] = $temp;
      }
      return new JsonResponse($jsonData);
   } else {
      return $this->render('student/ajax.html.twig');
   }
}
在這裡,如果請求是 AJAX,我們將獲取學生資訊,將其編碼為 JSON 並使用 JsonResponse 物件返回它。否則,我們只渲染相應的檢視。
步驟 2 - 在學生檢視目錄 app/Resources/views/student/ 中建立一個檢視檔案 ajax.html.twig 並新增以下程式碼。
{% extends 'base.html.twig' %}
{% block javascripts %}
   <script language = "javascript"
      src = "https://code.jquery.com/jquery-2.2.4.min.js"></script>

   <script language = "javascript">
      $(document).ready(function(){
         $("#loadstudent").on("click", function(event){
            $.ajax({
               url:        '/student/ajax',
               type:       'POST',
               dataType:   'json',
               async:      true,

               success: function(data, status) {
                  var e = $('<tr><th>Name</th><th>Address</th></tr>');
                  $('#student').html('');
                  $('#student').append(e);

                  for(i = 0; i < data.length; i++) {
                     student = data[i];
                     var e = $('<tr><td id = "name"></td><td id = "address"></td></tr>');

                     $('#name', e).html(student['name']);
                     $('#address', e).html(student['address']);
                     $('#student').append(e);
                  }
               },
               error : function(xhr, textStatus, errorThrown) {
                  alert('Ajax request failed.');
               }
            });
         });
      });
   </script>
{% endblock %}

{% block stylesheets %}
   <style>
      .table { border-collapse: collapse; }
      .table th, td {
         border-bottom: 1px solid #ddd;
         width: 250px;
         text-align: left;
         align: left;
      }
   </style>
{% endblock %}

{% block body %}
   <a id = "loadstudent" href = "#">Load student information</a>
   </br>
   </br>

   <table class = "table">
      <tbody id = "student"></tbody>
   </table>
{% endblock %}
在這裡,我們建立了一個錨標籤(id:loadstudent)以使用 AJAX 呼叫載入學生資訊。AJAX 呼叫是使用 JQuery 完成的。當用戶單擊時,附加到 loadstudent 標籤上的事件會被啟用。然後,它將使用 AJAX 呼叫獲取學生資訊並動態生成所需的 HTML 程式碼。
步驟 3 - 最後,執行應用程式 https://:8000/student/ajax 並單擊“載入學生資訊”錨標籤。
結果:初始頁面
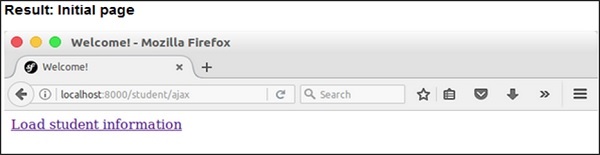
結果:包含學生資訊的頁面
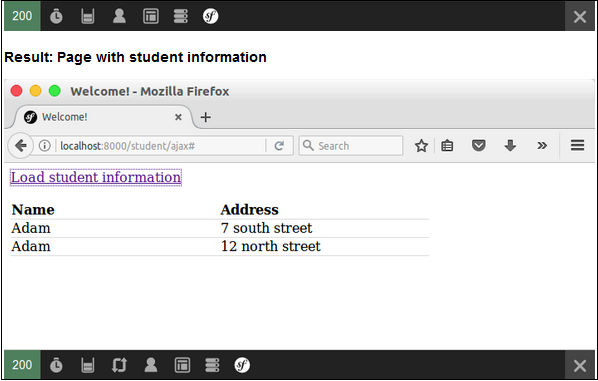
Symfony - Cookie 和會話管理
Symfony HttpFoundation 元件以面向物件的方式提供 Cookie 和會話管理。Cookie 提供客戶端資料儲存,並且僅支援少量資料。通常,每個域為 2KB,具體取決於瀏覽器。Session 提供伺服器端資料儲存,並且支援大量資料。讓我們看看如何在 Symfony Web 應用程式中建立 Cookie 和會話。
Cookie
Symfony 提供 Cookie 類來建立 Cookie 專案。讓我們建立一個名為 color 的 Cookie,它將在 24 小時後過期,其值為 blue。Cookie 類的建構函式引數如下。
- name(型別:字串) - Cookie 名稱
- value(型別:字串) - Cookie 值
- expire(型別:整數/字串/日期時間) - 過期資訊
- path(型別:字串) - Cookie 可用的伺服器路徑
- domain(型別:字串) - Cookie 可用的域名地址
- secure(型別:布林值) - Cookie 是否需要在 HTTPS 連線中傳輸
- httpOnly(型別:布林值) - Cookie 是否僅在 HTTP 協議中可用
use Symfony\Component\HttpFoundation\Cookie;
$cookie = new Cookie('color', 'green', strtotime('tomorrow'), '/',
   'somedomain.com', true, true);
Symfony 還提供了以下基於字串的 Cookie 建立選項。
$cookie = Cookie::fromString('color = green; expires = Web, 4-May-2017 18:00:00 +0100;
path=/; domain = somedomain.com; secure; httponly');
現在,建立的 Cookie 需要附加到 http 響應物件的標頭,如下所示。
$response->headers->setCookie($cookie);
要獲取 Cookie,我們可以使用 Request 物件,如下所示。
$cookie = $request->cookie->get('color');
在這裡,request->cookie 的型別為 PropertyBag,我們可以使用 PropertyBag 方法對其進行操作。
Session
Symfony 提供了一個實現 SessionInterface 介面的 Session 類。重要的 Session API 如下:
start - 啟動會話。
Session $session = new Session();
$session->start();
invalidate - 清除所有會話資料並重新生成會話 ID。
set - 使用鍵將資料儲存在會話中。
$session->set('key', 'value');
我們可以在會話值中使用任何資料,從簡單的整數到複雜的物件。
get - 使用鍵從會話中獲取資料。
$val = $session->get('key');
remove - 從會話中刪除鍵。
clear - 刪除會話資料。
FlashBag
Session 提供了另一個有用的功能,稱為 FlashBag。它是會話內部的一個特殊容器,僅在頁面重定向期間儲存資料。它在 http 重定向中很有用。在重定向到頁面之前,可以將資料儲存在 FlashBag 中而不是普通的會話容器中,並且儲存的資料將在下一個請求(重定向的頁面)中可用。然後,資料將自動失效。
$session->getFlashBag()->add('key', 'value');
$session->getFlashBag()->get('key');
Symfony - 國際化
國際化 (i18n) 和 本地化 (l10n) 有助於增加 Web 應用程式的客戶覆蓋面。Symfony 為此目的提供了一個優秀的 Translation 元件。讓我們在本節中學習如何使用 Translation 元件。
啟用翻譯
預設情況下,Symfony Web 框架會停用 Translation 元件。要啟用它,請在配置檔案 app/config/config.yml 中新增 translator 部分。
framework: translator: { fallbacks: [en] }
翻譯檔案
Translation 元件使用翻譯資原始檔翻譯文字。資原始檔可以用 PHP、XML 和 YAML 編寫。資原始檔的預設位置是 app/Resources/translations。每個語言都需要一個資原始檔。讓我們為法語編寫一個資原始檔 messages.fr.yml。
I love Symfony: J'aime Symfony
I love %name%: J'aime %name%
左側文字為英文,右側文字為法文。第二行顯示了佔位符的使用。佔位符資訊可以在使用翻譯時動態新增。
用法
預設情況下,Symfony Web 框架將設定使用者系統的預設語言環境。如果 Web 應用程式中未配置預設語言環境,它將回退到英文。語言環境也可以在網頁的 URL 中設定。
http://www.somedomain.com/en/index
http://www.somedomain.com/fr/index
讓我們在我們的示例中使用基於 URL 的語言環境來輕鬆理解翻譯概念。在 DefaultController(src/AppBundle/Controller/DefaultController.php)中建立一個新函式 translationSample,並使用路由 /{_locale}/translation/sample。{_locale} 是 Symfony 中用於指定預設語言環境的特殊關鍵字。
/**
   * @Route("/{_locale}/translation/sample", name="translation_sample")
*/
public function translationSample() {
   $translated = $this->get('translator')->trans('I love Symfony');
   return new Response($translated);
}
在這裡,我們使用了翻譯方法 trans,它會將內容翻譯成當前語言環境。在這種情況下,當前語言環境是 URL 的第一部分。現在,執行應用程式並在瀏覽器中載入頁面 https://:8000/en/translation/sample。
結果將是英文“I love Symfony”。現在,在瀏覽器中載入頁面 https://:8000/fr/translation/sample。現在,文字將翻譯成法語,如下所示。
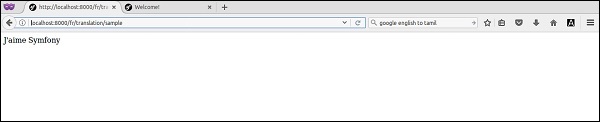
類似地,twig 模板也有 {% trans %} 塊,可以在檢視中啟用翻譯功能。要檢查它,請新增一個新函式 translationTwigSample 和相應的檢視,位於 app/Resources/views/translate/index.html.twig。
/**
   * @Route("/{_locale}/translation/twigsample", name="translation_twig_sample")
*/
public function translationTwigSample() {
   return $this->render('translate/index.html.twig');
}
檢視
{% extends 'base.html.twig' %}
{% block body %}
   {% trans with {'%name%': 'Symfony'} from "app" into "fr" %}I love %name% {% endtrans %}
{% endblock %}
在這裡,trans 塊也指定了佔位符。頁面結果如下所示。

Symfony - 日誌記錄
日誌對於 Web 應用至關重要。Web 應用同時被數百甚至數千使用者使用。為了快速瞭解 Web 應用周圍發生的事情,應該啟用日誌記錄。如果沒有日誌記錄,開發人員將無法找到應用程式的狀態。假設終端使用者報告了一個問題,或者專案干係人報告了效能問題,那麼開發人員的第一個工具就是日誌記錄。透過檢查日誌資訊,可以瞭解問題的可能原因。
Symfony 透過整合 Monolog 日誌框架提供了出色的日誌記錄功能。Monolog 是 PHP 環境中事實上的日誌記錄標準。日誌記錄在每個 Symfony Web 應用中都已啟用,並且作為一個服務提供。只需使用以下基本控制器獲取日誌記錄物件。
$logger = $this->get('logger');
獲取日誌記錄物件後,我們可以使用它記錄資訊、警告和錯誤。
$logger->info('Hi, It is just a information. Nothing to worry.');
$logger->warn('Hi, Something is fishy. Please check it.');
$logger->error('Hi, Some error occured. Check it now.');
$logger->critical('Hi, Something catastrophic occured. Hurry up!');
Symfony Web 應用配置檔案app/config/config.yml 具有日誌記錄框架的單獨部分。它可用於更新日誌記錄框架的工作方式。
Symfony - 郵件管理
電子郵件功能是 Web 框架中最常請求的功能。即使是簡單的應用也會有一個聯絡表單,並且詳細資訊將透過電子郵件傳送到系統管理員。Symfony 集成了SwiftMailer,這是市場上最好的 PHP 電子郵件模組。SwiftMailer 是一個優秀的電子郵件庫,提供了一個選項,可以使用舊式的 sendmail 傳送電子郵件到最新的基於雲的郵件應用程式。
讓我們透過傳送簡單的電子郵件來了解 Symfony 中郵件的概念。在編寫郵件功能之前,請在app/config/parameters.yml 中設定郵件配置詳細資訊。然後,在DefaultController 中建立一個新函式MailerSample 並新增以下程式碼。
/**
   * @Route("/mailsample/send", name="mail_sample_send")
*/
public function MailerSample() {
   $message = \Swift_Message::newInstance()
      ->setSubject('Hello Email')
      ->setFrom('someone@gmail.com')
      ->setTo('anotherone@gmail.com')
      ->setBody(
      $this->renderView('Emails/sample.html.twig'), 'text/html' );

   $this->get('mailer')->send($message);
   return new Response("Mail send");
}
在這裡,我們只是使用SwiftMailer元件建立了一個訊息,並使用Twig模板渲染了訊息的主體。然後,我們從控制器的get方法中獲取了郵件元件,其鍵為“mailer”。最後,我們使用send方法傳送了訊息,並列印了Mail send訊息。
現在,執行頁面https://:8000/mailsample/send,結果如下。
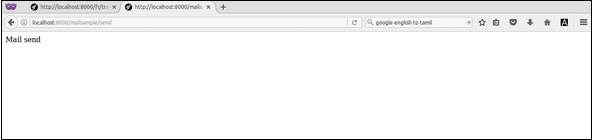
Symfony - 單元測試
單元測試對於大型專案的持續開發至關重要。單元測試將自動測試應用程式的元件,並在出現問題時發出警報。單元測試可以手動完成,但通常是自動化的。
PHPUnit
Symfony 框架與 PHPUnit 單元測試框架整合。要為 Symfony 框架編寫單元測試,我們需要設定 PHPUnit。如果未安裝 PHPUnit,則下載並安裝它。如果安裝正確,則會看到以下響應。
phpunit
PHPUnit 5.1.3 by Sebastian Bergmann and contributors
單元測試
單元測試是對單個 PHP 類(也稱為單元)的測試。
在 AppBundle 的 Libs/ 目錄中建立一個名為 Student 的類。它位於“src/AppBundle/Libs/Student.php”。
Student.php
namespace AppBundle\Libs;

class Student {
   public function show($name) {
      return $name. “ , Student name is tested!”;
   }
}
現在,在“tests/AppBundle/Libs”目錄中建立一個 StudentTest 檔案。
StudentTest.php
namespace Tests\AppBundle\Libs;
use AppBundle\Libs\Student;

class StudentTest extends \PHPUnit_Framework_TestCase {
   public function testShow() {
      $stud = new Student();
      $assign = $stud->show(‘stud1’);
      $check = “stud1 , Student name is tested!”;
      $this->assertEquals($check, $assign);
   }
}
執行測試
要在目錄中執行測試,請使用以下命令。
$ phpunit
執行上述命令後,您將看到以下響應。
PHPUnit 5.1.3 by Sebastian Bergmann and contributors.
Usage: phpunit [options] UnitTest [UnitTest.php]
   phpunit [options] <directory>
Code Coverage Options:
   --coverage-clover <file>  Generate code coverage report in Clover XML format.
   --coverage-crap4j <file>  Generate code coverage report in Crap4J XML format.
   --coverage-html <dir>     Generate code coverage report in HTML format.
現在,在 Libs 目錄中執行測試,如下所示。
$ phpunit tests/AppBundle/Libs
結果
Time: 26 ms, Memory: 4.00Mb
OK (1 test, 1 assertion)
Symfony - 高階概念
在本章中,我們將學習 Symfony 框架中的一些高階概念。
HTTP 快取
Web 應用中的快取可以提高效能。例如,購物車 Web 應用中的熱門產品可以快取一段時間,以便能夠快速呈現給客戶,而無需訪問資料庫。以下是快取的一些基本元件。
快取項
快取項是作為鍵/值對儲存的資訊的單個單元。鍵應該是字串,值可以是任何 PHP 物件。PHP 物件透過序列化儲存為字串,並在讀取項時轉換回物件。
快取介面卡
快取介面卡是將項儲存在儲存中的實際機制。儲存可以是記憶體、檔案系統、資料庫、Redis 等。快取元件提供了一個AdapterInterface,透過它介面卡可以將快取項儲存在後端儲存中。有很多內建的快取介面卡可用。其中一些如下所示:
陣列快取介面卡 - 快取項儲存在 PHP 陣列中。
檔案系統快取介面卡 - 快取項儲存在檔案中。
PHP 檔案快取介面卡 - 快取項儲存為 php 檔案。
APCu 快取介面卡 - 快取項使用 PHP APCu 擴充套件儲存在共享記憶體中。
Redis 快取介面卡 - 快取項儲存在 Redis 伺服器中。
PDO 和 Doctrine DBAL 快取介面卡 - 快取項儲存在資料庫中。
鏈式快取介面卡 - 組合多個快取介面卡以實現複製目的。
代理快取介面卡 - 快取項使用實現 CacheItemPoolInterface 的第三方介面卡儲存。
快取池
快取池是快取項的邏輯儲存庫。快取池由快取介面卡實現。
簡單應用
讓我們建立一個簡單的應用來了解快取的概念。
步驟 1 - 建立一個新應用cache-example。
cd /path/to/app
mkdir cache-example
cd cache-example
步驟 2 - 安裝快取元件。
composer require symfony/cache
步驟 3 - 建立檔案系統介面卡。
require __DIR__ . '/vendor/autoload.php';
use Symfony\Component\Cache\Adapter\FilesystemAdapter;
$cache = new FilesystemAdapter();
步驟 4 - 使用介面卡的getItem和set方法建立快取項。getItem 使用其鍵獲取快取項。如果鍵不存在,則建立一個新項。set 方法儲存實際資料。
$usercache = $cache->getitem('item.users');
$usercache->set(['jon', 'peter']);
$cache->save($usercache);
步驟 5 - 使用getItem、isHit和get方法訪問快取項。isHit 通知快取項的可用性,get 方法提供實際資料。
$userCache = $cache->getItem('item.users');
if(!$userCache->isHit()) {
   echo "item.users is not available";
} else {
   $users = $userCache->get();
   var_dump($users);
}
步驟 6 - 使用deleteItem方法刪除快取項。
$cache->deleteItem('item.users');
完整的程式碼列表如下所示。
<?php
   require __DIR__ . '/vendor/autoload.php';
   use Symfony\Component\Cache\Adapter\FilesystemAdapter;

   $cache = new FilesystemAdapter();
   $usercache = $cache->getitem('item.users');
   $usercache->set(['jon', 'peter']);
   $cache->save($usercache);
   $userCache = $cache->getItem('item.users');

   if(!$userCache->isHit()) {
      echo "item.users is not available";
   } else {
      $users = $userCache->get();
      var_dump($users);
   }
   $cache->deleteItem('item.users');
?>
結果
array(2) {
   [0]=>
   string(3) "jon"
   [1]=>
   string(5) "peter"
}
Debug
除錯是在開發應用時最常進行的活動之一。Symfony 提供了一個單獨的元件來簡化除錯過程。我們可以透過簡單地呼叫 Debug 類的enable方法來啟用 Symfony 除錯工具。
use Symfony\Component\Debug\Debug
Debug::enable()
Symfony 提供了兩個類ErrorHandler和ExceptionHandler用於除錯目的。ErrorHandler 捕獲 PHP 錯誤並將其轉換為異常(ErrorException 或 FatalErrorException),ExceptionHandler 捕獲未捕獲的 PHP 異常並將其轉換為有用的 PHP 響應。ErrorHandler 和 ExceptionHandler 預設情況下是停用的。我們可以使用 register 方法啟用它。
use Symfony\Component\Debug\ErrorHandler;
use Symfony\Component\Debug\ExceptionHandler;
ErrorHandler::register();
ExceptionHandler::register();
在 Symfony Web 應用中,debug 環境由 DebugBundle 提供。在 AppKernel 的registerBundles方法中註冊該捆綁包以啟用它。
if (in_array($this->getEnvironment(), ['dev', 'test'], true)) {
   $bundles[] = new Symfony\Bundle\DebugBundle\DebugBundle();
}
探查器
應用的開發需要一個世界一流的分析工具。分析工具收集有關應用的所有執行時資訊,例如執行時間、各個模組的執行時間、資料庫活動花費的時間、記憶體使用情況等。除了上述指標外,Web 應用還需要更多資訊,例如請求時間、建立響應花費的時間等。
Symfony 預設情況下在 Web 應用中啟用了所有這些資訊。Symfony 為 Web 分析提供了一個單獨的捆綁包,稱為WebProfilerBundle。可以透過在 AppKernel 的 registerBundles 方法中註冊該捆綁包來在 Web 應用中啟用 Web 探查器捆綁包。
if (in_array($this->getEnvironment(), ['dev', 'test'], true)) {
   $bundles[] = new Symfony\Bundle\WebProfilerBundle\WebProfilerBundle();
}
Web 探查器元件可以在應用配置檔案app/config/config.xml的web_profile 部分下進行配置。
web_profiler:
   toolbar:      false
   position:     bottom
Symfony 應用在頁面底部顯示分析資料作為單獨的部分。
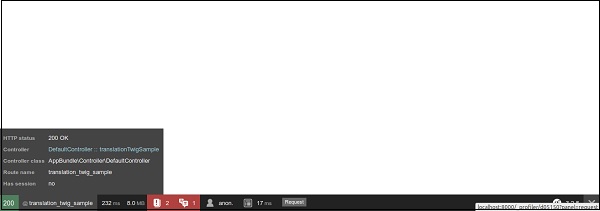
Symfony 還提供了一種簡單的方法,可以使用DataCollectorInterface 介面和 Twig 模板在分析資料中新增有關頁面的自定義詳細資訊。簡而言之,Symfony 透過提供一個相對簡單的世界一流的分析框架,使 Web 開發人員能夠輕鬆建立世界一流的應用。
安全
如前所述,Symfony 透過其安全元件提供了一個強大的安全框架。安全元件分為以下四個子元件。
- symfony/security-core - 核心安全功能。
- symfony/security-http - HTTP 協議中的整合安全功能。
- symfony/security-csrf - 防禦 Web 應用中的跨站點請求偽造。
- symfony/security-acl - 基於高階訪問控制列表的安全框架。
簡單身份驗證和授權
讓我們使用一個簡單的演示應用學習身份驗證和授權的概念。
步驟 1 - 使用以下命令建立一個新的 Web 應用securitydemo。
symfony new securitydemo
步驟 2 - 使用安全配置檔案在應用中啟用安全功能。安全相關的配置放在一個單獨的檔案security.yml中。預設配置如下所示。
security:
   providers:
      in_memory:
         memory: ~
   firewalls:
      dev:
         pattern: ^/(_(profiler|wdt)|css|images|js)/
         security: false
   main:
      anonymous: ~
      #http_basic: ~
      #form_login: ~
預設配置啟用了基於記憶體的安全提供程式,並允許匿名訪問所有頁面。防火牆部分將與模式^/(_(profiler|wdt)|css|images|js)/匹配的檔案排除在安全框架之外。預設模式包括樣式表、影像和 JavaScript(以及像探查器這樣的開發工具)。
步驟 3 - 透過在 main 部分新增 http_basic 選項來啟用基於 HTTP 的安全身份驗證系統,如下所示。
security:
   # ...
   firewalls:
      # ...
      main:
         anonymous: ~
         http_basic: ~
         #form_login: ~
步驟 4 - 在記憶體提供程式部分新增一些使用者。另外,為使用者新增角色。
security:
   providers:
      in_memory:
         memory:
            users:
               myuser:
                  password: user
                  roles: 'ROLE_USER'
                     myadmin:
                        password: admin
                        roles: 'ROLE_ADMIN'
我們添加了兩個使用者,user的角色為 ROLE_USER,admin的角色為 ROLE_ADMIN。
步驟 5 - 新增編碼器以獲取當前登入使用者的完整詳細資訊。編碼器的目的是從 Web 請求中獲取當前使用者物件的完整詳細資訊。
security:
   # ...
   encoders:
      Symfony\Component\Security\Core\User\User: bcrypt
      # ...
Symfony 提供了一個介面UserInterface來獲取使用者詳細資訊,例如使用者名稱、角色、密碼等。我們需要根據我們的需求實現該介面並在編碼器部分進行配置。
例如,假設使用者詳細資訊在資料庫中。然後,我們需要建立一個新的 User 類並實現 UserInterface 方法以從資料庫中獲取使用者詳細資訊。一旦資料可用,安全系統就會使用它來允許/拒絕使用者。Symfony 為記憶體提供程式提供了一個預設的使用者實現。演算法用於解密使用者密碼。
步驟 6 - 使用bcrypt演算法加密使用者密碼,並將其放在配置檔案中。由於我們使用了bcrypt演算法,User 物件會嘗試解密配置檔案中指定的密碼,然後嘗試與使用者輸入的密碼進行匹配。Symfony 控制檯應用提供了一個簡單的命令來加密密碼。
php bin/console security:encode-password admin
Symfony Password Encoder Utility
================================
------------------ -----------------------------------
Key   Value
------------------ ------------------------------------
Encoder used       Symfony\Component\Security\Core\Encoder\BCryptPasswordEncoder
Encoded password
$2y$12$0Hy6/.MNxWdFcCRDdstHU.hT5j3Mg1tqBunMLIUYkz6..IucpaPNO
------------------ ------------------------------------
! [NOTE] Bcrypt encoder used: the encoder generated its own built-in salt.
[OK] Password encoding succeeded
步驟 7 - 使用該命令生成加密的密碼,並在配置檔案中更新它。
# To get started with security, check out the documentation:
# http://symfony.com/doc/current/security.html
   security:
      # http://symfony.com/doc/current/security.html#b-configuring-how-users-are-loaded
      providers:
         in_memory:
            memory:
               users:
                  user:
                     password: $2y$13$WsGWNufreEnVK1InBXL2cO/U7WftvfNvH
                     Vb/IJBH6JiYoDwVN4zoi
                     roles: 'ROLE_USER'
                     admin:
                        password: $2y$13$jQNdIeoNV1BKVbpnBuhKRuOL01NeMK
                        F7nEqEi/Mqlzgts0njK3toy
                        roles: 'ROLE_ADMIN'

         encoders:
            Symfony\Component\Security\Core\User\User: bcrypt
         firewalls:
            # disables authentication for assets and the profiler,
            # adapt it according to your needs
         dev:
            pattern: ^/(_(profiler|wdt)|css|images|js)/
         security: false
         main:
            anonymous: ~
            # activate different ways to authenticate
            # http://symfony.com/doc/current/security.html#a-co
            nfiguring-howyour-users-will-authenticate
            http_basic: ~
            # http://symfony.com/doc/current/cookbook/security/
            form_login_setup.html
            #form_login: ~
步驟 8 - 現在,將安全應用於應用的某些部分。例如,將管理員部分限制為 ROLE_ADMIN 角色的使用者。
security:
   # ...
      firewalls:
         # ...
      default:
         # ...
      access_control:
         # require ROLE_ADMIN for /admin*
         - { path: ^/admin, roles: 'ROLE_ADMIN' }
步驟 9 - 在 DefaultController 中新增一個管理員頁面,如下所示。
/**
   * @Route("/admin")
*/
public function adminLandingAction() {
   return new Response('<html><body>This is admin section.</body></html>');
}
步驟 10 - 最後,在瀏覽器中訪問管理員頁面以檢查安全配置。瀏覽器將要求輸入使用者名稱和密碼,並且只允許已配置的使用者。
結果

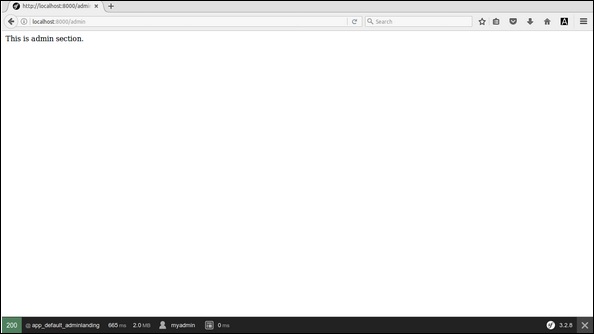
Workflow
工作流是一個高階概念,在許多企業應用中都有使用。在電子商務應用中,產品交付流程就是一個工作流。產品首先被計費(訂單建立),從商店採購幷包裝(包裝/準備發貨),然後發貨給使用者。如果出現任何問題,產品將從使用者處退回,並且訂單將被撤銷。操作流程的順序非常重要。例如,在沒有計費的情況下,我們無法交付產品。
Symfony 元件提供了一種面向物件的方式來定義和管理工作流。流程中的每個步驟稱為位置,從一個位置移動到另一個位置所需的動作稱為轉換。建立工作流的位置和轉換的集合稱為工作流定義。
讓我們透過為請假管理建立一個簡單的應用來了解工作流的概念。
步驟 1 - 建立一個新應用workflow-example。
cd /path/to/dev
mkdir workflow-example

cd workflow-example
composer require symfony/workflow
步驟 2 - 建立一個新類Leave,它具有applied_by、leave_on和status屬性。
class Leave {
   public $applied_by;
   public $leave_on;
   public $status;
}
這裡,applied_by 指的是想要請假的員工。leave_on 指的是請假日期。status 指的是請假狀態。
步驟 3 - 請假管理有四個位置,applied、in_process 和 approved/rejected。
use Symfony\Component\Workflow\DefinitionBuilder;
use Symfony\Component\Workflow\Transition;
use Symfony\Component\Workflow\Workflow;
use Symfony\Component\Workflow\MarkingStore\SingleStateMarkingStore;
use Symfony\Component\Workflow\Registry;
use Symfony\Component\Workflow\Dumper\GraphvizDumper;

$builder = new DefinitionBuilder();
$builder->addPlaces(['applied', 'in_process', 'approved', 'rejected']);
在這裡,我們使用DefinitionBuilder建立了一個新的定義,並使用addPlaces方法添加了位置。
步驟 4 − 定義從一個地方移動到另一個地方所需的動作。
$builder->addTransition(new Transition('to_process', 'applied', 'in_process'));
$builder->addTransition(new Transition('approve', 'in_process', 'approved'));
$builder->addTransition(new Transition('reject', 'in_process', 'rejected'));
這裡,我們有三個轉換,to_process、approve 和 reject。to_process 轉換接受請假申請並將位置從 applied 移動到 in_process。approve 轉換批准請假申請並將位置移動到 approved。類似地,reject 轉換拒絕請假申請並將位置移動到 rejected。我們使用 addTransition 方法建立了所有轉換。
步驟 5 − 使用 build 方法構建定義。
$definition = $builder->build();
步驟 6 − 可選地,定義可以以 graphviz dot 格式轉儲,可以將其轉換為影像檔案以供參考。
$dumper = new GraphvizDumper();
echo $dumper->dump($definition);
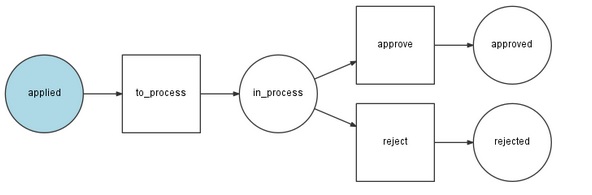
步驟 7 − 建立標記儲存,用於儲存物件的當前位置/狀態。
$marking = new SingleStateMarkingStore('status');
這裡,我們使用SingleStateMarkingStore 類建立標記,並將當前狀態標記到物件的 status 屬性中。在我們的示例中,物件是 Leave 物件。
步驟 8 − 使用定義和標記建立工作流。
$leaveWorkflow = new Workflow($definition, $marking);
這裡,我們使用Workflow 類建立工作流。
步驟 9 − 使用Registry 類將工作流新增到工作流框架的登錄檔中。
$registry = new Registry();
$registry->add($leaveWorkflow, Leave::class);
步驟 10 − 最後,使用工作流查詢給定轉換是否使用can 方法應用,如果應用,則使用 apply 方法應用轉換。應用轉換時,物件的狀態會從一個位置移動到另一個位置。
$workflow = $registry->get($leave);
echo "Can we approve the leave now? " . $workflow->can($leave, 'approve') . "\r\n";
echo "Can we approve the start process now? " . $workflow->can($leave, 'to_process') . "\r\n";

$workflow->apply($leave, 'to_process');
echo "Can we approve the leave now? " . $workflow->can($leave, 'approve') . "\r\n";
echo $leave->status . "\r\n";

$workflow->apply($leave, 'approve');
echo $leave->status . "\r\n";
完整的編碼如下所示:
<?php
   require __DIR__ . '/vendor/autoload.php';

   use Symfony\Component\Workflow\DefinitionBuilder;
   use Symfony\Component\Workflow\Transition;
   use Symfony\Component\Workflow\Workflow;
   use Symfony\Component\Workflow\MarkingStore\SingleStateMarkingStore;
   use Symfony\Component\Workflow\Registry;
   use Symfony\Component\Workflow\Dumper\GraphvizDumper;

   class Leave {
      public $applied_by;
      public $leave_on;
      public $status;
   }
   $builder = new DefinitionBuilder();
   $builder->addPlaces(['applied', 'in_process', 'approved', 'rejected']);
   $builder->addTransition(new Transition('to_process', 'applied', 'in_process'));
   $builder->addTransition(new Transition('approve', 'in_process', 'approved'));
   $builder->addTransition(new Transition('reject', 'in_process', 'rejected'));
   $definition = $builder->build();

   // $dumper = new GraphvizDumper();
   // echo $dumper->dump($definition);

   $marking = new SingleStateMarkingStore('status');
   $leaveWorkflow = new Workflow($definition, $marking);
   $registry = new Registry();
   $registry->add($leaveWorkflow, Leave::class);

   $leave = new Leave();
   $leave->applied_by = "Jon";
   $leave->leave_on = "1998-12-12";
   $leave->status = 'applied';

   $workflow = $registry->get($leave);
   echo "Can we approve the leave now? " . $workflow->can($leave, 'approve') . "\r\n";
   echo "Can we approve the start process now? " . $workflow->can($leave, 'to_process') . "\r\n";

   $workflow->apply($leave, 'to_process');
   echo "Can we approve the leave now? " . $workflow->can($leave, 'approve') . "\r\n";
   echo $leave->status . "\r\n";

   $workflow->apply($leave, 'approve');
   echo $leave->status . "\r\n";
?>
結果
Can we approve the leave now?
Can we approve the start process now? 1
Can we approve the leave now? 1
in_process
approved
Symfony - REST 版本
在任何現代應用程式中,REST 服務都是核心基礎構建塊之一。無論是基於 Web 的應用程式還是流暢的移動應用程式,前端通常都是後端 REST 服務的精心設計的介面。Symfony REST 版提供了一個現成的模板來啟動我們的基於 REST 的 Web 應用程式。
讓我們學習如何使用 Symfony REST 版安裝模板 REST 應用程式。
步驟 1 − 使用以下命令下載 Symfony REST 版。
composer create-project gimler/symfony-rest-edition --stability=dev path/to/install
這將下載 Symfony REST 版。
步驟 2 − 透過詢問一些問題來嘗試配置它。對於所有問題,選擇預設答案,除了資料庫。對於資料庫,選擇 pdo_sqlite。如果尚未安裝,您可能需要啟用 PHP 的 sqlite 擴充套件。
步驟 3 − 現在,使用以下命令執行應用程式。
php app/console server:run
步驟 4 − 最後,在瀏覽器中使用 https://:8000/ 開啟應用程式。
它將產生以下結果 -
Symfony - CMF 版本
內容管理系統是 Web 應用程式領域中最大的市場之一。有大量可用於內容管理系統的框架,幾乎涵蓋了所有程式語言。大多數框架對於終端使用者來說易於使用,但對於開發人員來說卻很難使用,反之亦然。
Symfony 為開發人員提供了一個簡單易用的框架來入門。它還具有終端使用者期望的所有基本功能。簡而言之,開發人員有責任為終端使用者提供良好的體驗。
讓我們看看如何使用 Symfony CMF 版安裝 CMS 應用程式模板。
步驟 1 − 使用以下命令下載 Symfony CMF 沙箱。
composer create-project symfony-cmf/sandbox cmf-sandbox
這將下載 Symfony CMF。
步驟 2 − 透過詢問一些問題來嘗試配置它。對於所有問題,選擇預設答案,除了資料庫。對於資料庫,選擇 pdo_sqlite。如果尚未安裝,您可能需要啟用 PHP 的 sqlite 擴充套件。
步驟 3 − 使用控制檯應用程式建立演示資料庫,如下所示。
php app/console doctrine:database:create
步驟 4 − 使用以下命令將演示資料載入到資料庫中。
php app/console doctrine:phpcr:init:dbal --force
php app/console doctrine:phpcr:repository:init
php app/console doctrine:phpcr:fixtures:load -n
步驟 5 − 現在,使用以下命令執行應用程式。
php app/console server:run
步驟 6 − 最後,在瀏覽器中使用 https://:8000/ 開啟應用程式。
它將產生以下輸出:
Symfony - 工作示例
在本章中,我們將學習如何在 Symfony 框架中建立一個完整的基於 MVC 的BookStore 應用程式。以下是步驟。
步驟 1:建立專案
讓我們使用以下命令在 Symfony 中建立一個名為“BookStore”的新專案。
symfony new BookStore
步驟 2:建立控制器和路由
在“src/AppBundle/Controller”目錄中建立 BooksController。其定義如下。
BooksController.php
<?php
namespace AppBundle\Controller;

use Sensio\Bundle\FrameworkExtraBundle\Configuration\Route;
use Symfony\Bundle\FrameworkBundle\Controller\Controller;
use Symfony\Component\HttpFoundation\Response;

class BooksController {
   /**
      * @Route("/books/author")
   */
   public function authorAction() {
      return new Response('Book store application!');
   }
}
現在,我們已經建立了一個 BooksController,接下來建立一個檢視來呈現操作。
步驟 3:建立檢視
讓我們在“app/Resources/views/”目錄中建立一個名為“Books”的新資料夾。在資料夾內,建立一個檔案“author.html.twig”並新增以下更改。
author.html.twig
<h3> Simple book store application</h3>
現在,在 BooksController 類中呈現檢視。其定義如下。
BooksController.php
<?php
namespace AppBundle\Controller;

use Sensio\Bundle\FrameworkExtraBundle\Configuration\Route;
use Symfony\Bundle\FrameworkBundle\Controller\Controller;
use Symfony\Component\HttpFoundation\Response;

class BooksController extends Controller {
   /**
      * @Route("/books/author")
   */
   public function authorAction() {
      return $this->render('books/author.html.twig');
   }
}
到目前為止,我們已經建立了一個基本的 BooksController,並且結果已呈現。您可以使用 URL“https://:8000/books/author”在瀏覽器中檢視結果。
步驟 4:資料庫配置
在“app/config/parameters.yml”檔案中配置資料庫。
開啟檔案並新增以下更改。
parameter.yml
# This file is auto-generated during the composer install
parameters:
   database_driver: pdo_mysql
   database_host: localhost
   database_port: 3306
   database_name: booksdb
   database_user: <database_username>
   database_password: <database_password>
   mailer_transport: smtp
   mailer_host: 127.0.0.1
   mailer_user: null
   mailer_password: null
   secret: 0ad4b6d0676f446900a4cb11d96cf0502029620d

   doctrine:
      dbal:
      driver:   pdo_mysql
      host:     '%database_host%'
      dbname:   '%database_name%'
      user:     '%database_user%'
      password: '%database_password%'
      charset: utf8mb4
現在,Doctrine 可以連線到您的資料庫“booksdb”。
步驟 5:建立資料庫
發出以下命令以生成“booksdb”資料庫。此步驟用於在 Doctrine 中繫結資料庫。
php bin/console doctrine:database:create
執行命令後,它會自動生成一個空的“booksdb”資料庫。您可以在螢幕上看到以下響應。
它將產生以下結果 -
Created database `booksdb` for connection named default
步驟 6:對映資訊
在 Entity 目錄內建立 Book 實體類,該目錄位於“src/AppBundle/Entity”中。
您可以使用註解直接傳遞 Book 類。其定義如下。
Book.php
在檔案中新增以下程式碼。
<?php
namespace AppBundle\Entity;
use Doctrine\ORM\Mapping as ORM;

/**
   * @ORM\Entity
   * @ORM\Table(name = "Books")
*/
class Book {
   /**
      * @ORM\Column(type = "integer")
      * @ORM\Id
      * @ORM\GeneratedValue(strategy = "AUTO")
   */
   private $id;

   /**
      * @ORM\Column(type = "string", length = 50)
   */
   private $name;

   /**
      * @ORM\Column(type = "string", length = 50)
   */

   private $author;
   /**
      * @ORM\Column(type = "decimal", scale = 2)
   */
   private $price;
}
這裡,表名是可選的。
如果未指定表名,則將根據實體類的名稱自動確定。
步驟 7:繫結實體
Doctrine 為您建立簡單的實體類。它可以幫助您構建任何實體。
發出以下命令以生成實體。
php bin/console doctrine:generate:entities AppBundle/Entity/Book
然後您將看到以下結果,並且實體將被更新。
Generating entity "AppBundle\Entity\Book”
   > backing up Book.php to Book.php~
   > generating AppBundle\Entity\Book
Book.php
<?php
namespace AppBundle\Entity;

use Doctrine\ORM\Mapping as ORM;
/**
   * @ORM\Entity
   * @ORM\Table(name = "Books")
*/
class Book {
   /**
      * @ORM\Column(type = "integer")
      * @ORM\Id
      * @ORM\GeneratedValue(strategy = "AUTO")
   */
   private $id;

   /**
      * @ORM\Column(type = "string", length = 50)
   */
   private $name;

   /**
      * @ORM\Column(type = "string", length = 50)
   */
   private $author;

   /**
      * @ORM\Column(type = "decimal", scale = 2)
   */
   private $price;

   /**
      * Get id
      *
      * @return integer
   */
   public function getId() {
      return $this->id;
   }

   /**
      * Set name
      *
      * @param string $name
      *
      * @return Book
   */
   public function setName($name) {
      $this->name = $name;
      return $this;
   }

   /**
      * Get name
      *
      * @return string
   */
   public function getName() {
      return $this->name;
   }

   /**
      * Set author
      *
      * @param string $author
      *
      * @return Book
   */
   public function setAuthor($author) {
      $this->author = $author;
      return $this;
   }

   /**
      * Get author
      *
      * @return string
   */
   public function getAuthor() {
      return $this->author;
   }

   /**
      * Set price
      *
      * @param string $price
      *
      * @return Book
   */
   public function setPrice($price) {
      $this->price = $price;
      return $this;
   }

   /**
      * Get price
      *
      * @return string
   */
   public function getPrice() {
      return $this->price;
   }
}
步驟 8:對映驗證
建立實體後,應使用以下命令驗證對映。
php bin/console doctrine:schema:validate
它將產生以下結果 -
[Mapping]  OK - The mapping files are correct
[Database] FAIL - The database schema is not in sync with the current mapping file.
由於我們尚未建立 Books 表,因此實體不同步。讓我們在下一步中使用 Symfony 命令建立 Books 表。
步驟 9:建立模式
Doctrine 可以自動建立 Book 實體所需的所有資料庫表。這可以透過以下命令完成。
php bin/console doctrine:schema:update --force
執行命令後,您將看到以下響應。
Updating database schema...
Database schema updated successfully! "1" query was executed
現在,再次使用以下命令驗證模式。
php bin/console doctrine:schema:validate
它將產生以下結果 -
[Mapping]  OK - The mapping files are correct.
[Database] OK - The database schema is in sync with the mapping files.
步驟 10:Getter 和 Setter
如“繫結實體”部分所示,以下命令為 Book 類生成所有 getter 和 setter。
$ php bin/console doctrine:generate:entities AppBundle/Entity/Book
步驟 11:從資料庫中獲取物件
在 BooksController 中建立一個方法,該方法將顯示書籍的詳細資訊。
BooksController.php
/**
   * @Route("/books/display", name="app_book_display")
*/
public function displayAction() {
   $bk = $this->getDoctrine()
   ->getRepository('AppBundle:Book')
   ->findAll();
   return $this->render('books/display.html.twig', array('data' => $bk));
}
步驟 12:建立檢視
讓我們建立一個指向 display 操作的檢視。移動到 views 目錄並建立檔案“display.html.twig”。在檔案中新增以下更改。
display.html.twig
{% extends 'base.html.twig' %}
{% block stylesheets %}
   <style>
      .table { border-collapse: collapse; }
      .table th, td {
         border-bottom: 1px solid #ddd;
         width: 250px;
         text-align: left;
         align: left;
      }
   </style>
{% endblock %}
{% block body %}
   <h2>Books database application!</h2>
   <table class = "table">
      <tr>
         <th>Name</th>
         <th>Author</th>
         <th>Price</th>
      </tr>
      {% for x in data %}
      <tr>
         <td>{{ x.Name }}</td>
         <td>{{ x.Author }}</td>
         <td>{{ x.Price }}</td>
      </tr>
      {% endfor %}
   </table>
{% endblock %}
您可以透過在瀏覽器中請求 URL“https://:8000/books/display”來獲得結果。
結果

步驟 13:新增書籍表單
讓我們建立一個將書籍新增到系統中的功能。建立一個新頁面,在 BooksController 中新增 newAction 方法,如下所示。
// use section
use Symfony\Component\HttpFoundation\Request;
use Symfony\Component\Form\Extension\Core\Type\TextType;
use Symfony\Component\Form\Extension\Core\Type\SubmitType;

// methods section
/**
   * @Route("/books/new")
*/

public function newAction(Request $request) {
   $stud = new StudentForm();
      $form = $this->createFormBuilder($stud)
         ->add('name', TextType::class)
         ->add('author', TextType::class)
         ->add('price', TextType::class)
         ->add('save', SubmitType::class, array('label' => 'Submit'))
         ->getForm();
   return $this->render('books/new.html.twig', array('form' => $form->createView(),));
}
步驟 14:為書籍表單建立檢視
讓我們建立一個指向 new 操作的檢視。移動到 views 目錄並建立檔案“new.html.twig”。在檔案中新增以下更改。
{% extends 'base.html.twig' %}
{% block stylesheets %}
   <style>
      #simpleform {
         width:600px;
         border:2px solid grey;
         padding:14px;
      }
      #simpleform label {
         font-size:14px;
         float:left;
         width:300px;
         text-align:right;
         display:block;
      }
      #simpleform span {
         font-size:11px;
         color:grey;
         width:100px;
         text-align:right;
         display:block;
      }
      #simpleform input {
         border:1px solid grey;
         font-family:verdana;
         font-size:14px;
         color:light blue;
         height:24px;
         width:250px;
         margin: 0 0 10px 10px;
      }
      #simpleform textarea {
         border:1px solid grey;
         font-family:verdana;
         font-size:14px;
         color:light blue;
         height:120px;
         width:250px;
         margin: 0 0 20px 10px;
      }
      #simpleform select {
         margin: 0 0 20px 10px;
      }
      #simpleform button {
         clear:both;
         margin-left:250px;
         background: grey;
         color:#FFFFFF;
         border:solid 1px #666666;
         font-size:16px;
      }
   </style>
{% endblock %}
{% block body %}
   <h3>Book details:</h3>
   <div id = "simpleform">
      {{ form_start(form) }}
      {{ form_widget(form) }}
      {{ form_end(form) }}
   </div>
{% endblock %}
它將產生以下螢幕作為輸出:

步驟 15:收集書籍資訊並存儲它
讓我們更改 newAction 方法幷包含處理表單提交的程式碼。此外,將書籍資訊儲存到資料庫中。
/**
   * @Route("/books/new", name="app_book_new")
*/
public function newAction(Request $request) {
   $book = new Book();
   $form = $this->createFormBuilder($book)
      ->add('name', TextType::class)
      ->add('author', TextType::class)
      ->add('price', TextType::class)
      ->add('save', SubmitType::class, array('label' => 'Submit'))
      ->getForm();

   $form->handleRequest($request);

   if ($form->isSubmitted() && $form->isValid()) {
      $book = $form->getData();
      $doct = $this->getDoctrine()->getManager();

      // tells Doctrine you want to save the Product
      $doct->persist($book);

      //executes the queries (i.e. the INSERT query)
      $doct->flush();

      return $this->redirectToRoute('app_book_display');
   } else {
      return $this->render('books/new.html.twig', array(
         'form' => $form->createView(),
      ));
   }
}
將書籍儲存到資料庫後,重定向到書籍顯示頁面。
步驟 16:更新書籍
要更新書籍,請建立一個操作 updateAction 並新增以下更改。
/**
   * @Route("/books/update/{id}", name = "app_book_update" )
*/
public function updateAction($id, Request $request) {
   $doct = $this->getDoctrine()->getManager();
   $bk = $doct->getRepository('AppBundle:Book')->find($id);

   if (!$bk) {
      throw $this->createNotFoundException(
         'No book found for id '.$id
      );
   }
   $form = $this->createFormBuilder($bk)
      ->add('name', TextType::class)
      ->add('author', TextType::class)
      ->add('price', TextType::class)
      ->add('save', SubmitType::class, array('label' => 'Submit'))
      ->getForm();

   $form->handleRequest($request);

   if ($form->isSubmitted() && $form->isValid()) {
      $book = $form->getData();
      $doct = $this->getDoctrine()->getManager();

      // tells Doctrine you want to save the Product
      $doct->persist($book);

      //executes the queries (i.e. the INSERT query)
      $doct->flush();
      return $this->redirectToRoute('app_book_display');
   } else {
      return $this->render('books/new.html.twig', array(
         'form' => $form->createView(),
      ));
   }
}
這裡,我們正在處理兩個功能。如果請求僅包含 id,則我們從資料庫中獲取它並在書籍表單中顯示它。並且,如果請求包含完整的書籍資訊,則我們更新資料庫中的詳細資訊並重定向到書籍顯示頁面。
步驟 17:刪除物件
刪除物件需要呼叫實體(doctrine)管理器的 remove() 方法。
這可以透過以下程式碼完成。
/**
* @Route("/books/delete/{id}", name="app_book_delete")
*/
public function deleteAction($id) {
$doct = $this->getDoctrine()->getManager();
$bk = $doct->getRepository('AppBundle:Book')->find($id);
if (!$bk) {
throw $this->createNotFoundException('No book found for id '.$id);
}
$doct->remove($bk);
$doct->flush();
return $this->redirectToRoute('app_book_display');
}
這裡,我們刪除了書籍並重定向到書籍顯示頁面。
步驟 18:在顯示頁面中包含新增/編輯/刪除功能
現在,更新顯示檢視中的 body 塊幷包含新增/編輯/刪除連結,如下所示。
{% block body %}
<h2>Books database application!</h2>
<div>
<a href = "{{ path('app_book_new') }}">Add</a>
</div>
<table class = "table">
<tr>
<th>Name</th>
<th>Author</th>
<th>Price</th>
<th></th>
<th></th>
</tr>
{% for x in data %}
<tr>
<td>{{ x.Name }}</td>
<td>{{ x.Author }}</td>
<td>{{ x.Price }}</td>
<td><a href = "{{ path('app_book_update', { 'id' : x.Id }) }}">Edit</a></td>
<td><a href = "{{ path('app_book_delete', { 'id' : x.Id }) }}">Delete</a></td>
</tr>
{% endfor %}
</table>
{% endblock %}
它將產生以下螢幕作為輸出:

Symfony 包含一組 PHP 元件、一個應用程式框架、一個社群和一種理念。Symfony 非常靈活,能夠滿足高階使用者、專業人士的所有需求,並且是所有 PHP 初學者的理想選擇。