- Symfony 教程
- Symfony - 首頁
- Symfony - 簡介
- Symfony - 安裝
- Symfony - 架構
- Symfony - 元件
- Symfony - 服務容器
- Symfony - 事件與事件監聽器
- Symfony - 表示式
- Symfony - Bundles
- 建立簡單的Web應用程式
- Symfony - 控制器
- Symfony - 路由
- Symfony - 檢視引擎
- Symfony - Doctrine ORM
- Symfony - 表單
- Symfony - 驗證
- Symfony - 檔案上傳
- Symfony - Ajax控制
- Cookie與會話管理
- Symfony - 國際化
- Symfony - 日誌記錄
- Symfony - 郵件管理
- Symfony - 單元測試
- Symfony - 高階概念
- Symfony - REST 版本
- Symfony - CMF 版本
- 完整的執行示例
- Symfony 有用資源
- Symfony - 快速指南
- Symfony - 有用資源
- Symfony - 討論
Symfony - 檔案上傳
Symfony 表單元件提供`FileType`類來處理檔案輸入元素。它可以輕鬆上傳影像、文件等。讓我們學習如何使用`FileType`特性建立一個簡單的應用程式。
**步驟 1** - 使用以下命令建立一個新應用程式,`fileuploadsample`。
symfony new fileuploadsample
**步驟 2** - 建立一個實體`Student`,包含名稱、年齡和照片,如下程式碼所示。
src/AppBundle/Entity/Student.php
<?php
namespace AppBundle\Entity;
use Symfony\Component\Validator\Constraints as Assert;  class Student {
   /**
      * @Assert\NotBlank()
   */
   private $name;

   /**
      * @Assert\NotBlank()
   */
   private $age;

   /**
      * @Assert\NotBlank(message="Please, upload the photo.")
      * @Assert\File(mimeTypes={ "image/png", "image/jpeg" })
   */
   private $photo;

   public function getName() {
      return $this->name;
   }
   public function setName($name) {
      $this->name = $name;
      return $this;
   }
   public function getAge() {
      return $this->age;
   }
   public function setAge($age) {
      $this->age = $age;
      return $this;
   }
   public function getPhoto() {
      return $this->photo;
   }
   public function setPhoto($photo) {
      $this->photo = $photo;
      return $this;
   }
}
在這裡,我們為`photo`屬性指定了`File`。
**步驟 3** - 建立學生控制器`StudentController`和一個新方法`addAction`,如下程式碼所示。
<?php
namespace AppBundle\Controller;

use AppBundle\Entity\Student;
use AppBundle\Form\FormValidationType;
use Symfony\Bundle\FrameworkBundle\Controller\Controller;
use Sensio\Bundle\FrameworkExtraBundle\Configuration\Route;

use Symfony\Component\HttpFoundation\Request;
use Symfony\Component\HttpFoundation\Response;
use Symfony\Component\Form\Extension\Core\Type\TextType;
use Symfony\Component\Form\Extension\Core\Type\FileType;
use Symfony\Component\Form\Extension\Core\Type\SubmitType;

class StudentController extends Controller {
   /**
      * @Route("/student/new")
   */
   public function newAction(Request $request) {
      $student = new Student();
      $form = $this->createFormBuilder($student)
         ->add('name', TextType::class)
         ->add('age', TextType::class)
         ->add('photo', FileType::class, array('label' => 'Photo (png, jpeg)'))
         ->add('save', SubmitType::class, array('label' => 'Submit'))
         ->getForm();

      $form->handleRequest($request);
      if ($form->isSubmitted() && $form->isValid()) {
         $file = $student->getPhoto();
         $fileName = md5(uniqid()).'.'.$file->guessExtension();
         $file->move($this->getParameter('photos_directory'), $fileName);
         $student->setPhoto($fileName);
         return new Response("User photo is successfully uploaded.");
      } else {
         return $this->render('student/new.html.twig', array(
            'form' => $form->createView(),
         ));
      }
   }
}
在這裡,我們為學生實體建立了表單並處理了請求。當用戶提交表單且表單有效時,我們將使用引數`photos_directory`將上傳的檔案移動到我們的上傳目錄。
**步驟 4** - 使用以下表單標籤建立檢視`new.html.twig`。
{% extends 'base.html.twig' %}
{% block javascripts %}
   <script language = "javascript" src = "https://code.jquery.com/jquery-2.2.4.min.js"></script>
{% endblock %}
{% block stylesheets %}
   <style>
      #simpleform {
         width:600px;
         border:2px solid grey;
         padding:14px;
      }
      #simpleform label {
         font-size:12px;
         float:left;
         width:300px;
         text-align:right;
         display:block;
      }
      #simpleform span {
         font-size:11px;
         color:grey;
         width:100px;
         text-align:right;
         display:block;
      }
      #simpleform input {
         border:1px solid grey;
         font-family:verdana;
         font-size:14px;
         color:grey;
         height:24px;
         width:250px;
         margin: 0 0 20px 10px;
      }
      #simpleform button {
         clear:both;
         margin-left:250px;
         background:grey;
         color:#FFFFFF;
         border:solid 1px #666666;
         font-size:16px;
      }
   </style>
{% endblock %}
{% block body %}
   <h3>Student form</h3>
   <div id="simpleform">
      {{ form_start(form) }}
      {{ form_widget(form) }}
      {{ form_end(form) }}
   </div>
{% endblock %}
**步驟 5** - 在引數配置檔案中設定引數`photos_directory`,如下所示。
app/config/config.xml
parameters: photos_directory: '%kernel.root_dir%/../web/uploads/photos'
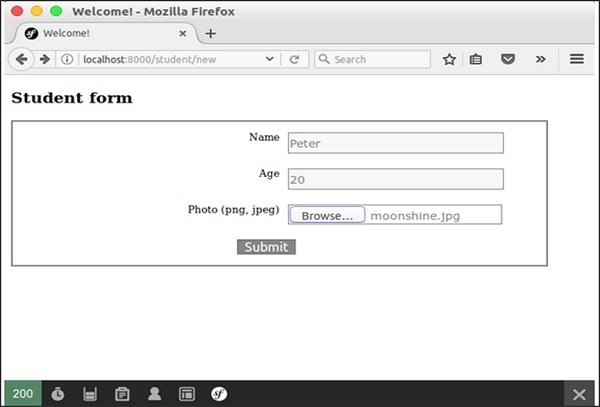
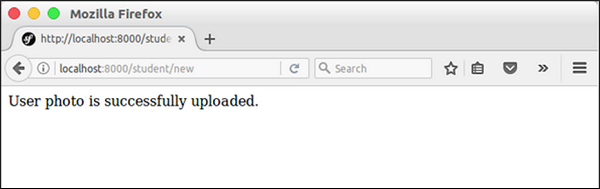
**步驟 6** - 現在,執行應用程式並開啟https://:8000/student/new,上傳照片。上傳的照片將上傳到`photos_directory`,並將顯示成功訊息。
結果:初始頁面
結果:檔案上傳頁面
廣告