- Spring Security 教程
- Spring Security - 首頁
- Spring Security - 簡介
- Spring Security - 架構
- Spring Security - 專案模組
- Spring Security - 環境搭建
- Spring Security - 表單登入
- Spring Security - 自定義表單登入
- Spring Security - 登出
- Spring Security - 記住我
- Spring Security - 重定向
- Spring Security - 標籤庫
- Spring Security - XML 配置
- Spring Security - 認證提供程式
- Spring Security - 基本認證
- Spring Security - 認證失敗處理器
- Spring Security - JWT
- Spring Security - 獲取使用者資訊
- Spring Security - Maven
- Spring Security - 預設密碼編碼器
- Spring Security – 密碼編碼
- Spring Security - 方法級別
- Spring Security 有用資源
- Spring Security 快速指南
- Spring Security - 有用資源
- Spring Security - 討論
Spring Security 快速指南
Spring Security - 基於資料庫的表單登入
目錄
- 介紹和概述
- Spring Security 的基本元件
- AuthenticationFilter
- AuthenticationManager
- AuthenticationProvider
- UserDetailsService
- PasswordEncoder
- Spring Security 上下文
- 表單登入
- 使用資料庫登入
- 登入嘗試限制
- 入門(實用指南)
介紹和概述
除了提供各種內建的認證和授權選項外,Spring Security 還允許我們根據需要自定義認證過程。從自定義登入頁面到我們自己的自定義認證提供程式和認證過濾器,我們可以自定義認證過程的各個方面。我們可以定義自己的認證流程,從使用使用者名稱和密碼的基本認證到使用令牌和OTP進行的兩因素認證等複雜認證。此外,我們可以使用各種資料庫——關係型和非關係型,使用各種密碼編碼器,鎖定惡意使用者帳戶等等。
今天,我們將討論三種這樣的自定義方法,即自定義表單登入、資料庫提供的身份驗證和限制登入嘗試。雖然這些都是非常基本的使用案例,但它們仍然讓我們能夠更深入地瞭解 Spring Security 的身份驗證和授權過程。我們還將設定一個註冊頁面,使用者可以透過該頁面在我們的應用程式中註冊。
首先,讓我們看一下 Spring Security 的架構。它從servlet過濾器開始。這些過濾器攔截請求,對它們執行操作,然後將請求傳遞給過濾器鏈中的下一個過濾器或請求處理程式,或者如果它們不滿足某些條件則阻止它們。在這個過程中,Spring Security 可以驗證請求並在請求上執行各種身份驗證檢查。它還可以透過不允許未經身份驗證或惡意請求透過來防止未經身份驗證或惡意請求訪問我們的受保護資源。因此,我們的應用程式和資源保持受保護。
Spring Security 架構元件

如上圖所示,Spring Security 的基本元件如下所示。在接下來的過程中,我們將簡要討論它們。我們還將討論它們在身份驗證和授權過程中的作用。
AuthenticationFilter
這是攔截請求並嘗試對其進行身份驗證的過濾器。在 Spring Security 中,它將請求轉換為 Authentication 物件並將身份驗證委託給 AuthenticationManager。
AuthenticationManager
它是身份驗證的主要策略介面。它使用唯一的 authenticate() 方法來驗證請求。authenticate() 方法執行身份驗證,並在成功身份驗證時返回 Authentication 物件,或者在身份驗證失敗時丟擲 AuthenticationException。如果該方法無法決定,它將返回 null。此過程中的身份驗證過程委託給 AuthenticationProvider,我們將在下面討論。
AuthenticationProvider
AuthenticationManager 由 ProviderManager 實現,後者將該過程委託給一個或多個 AuthenticationProvider 例項。任何實現 AuthenticationProvider 介面的類都必須實現兩個方法——authenticate() 和 supports()。首先,讓我們談談 supports() 方法。它用於檢查我們的 AuthenticationProvider 實現類是否支援特定身份驗證型別。如果支援,則返回 true,否則返回 false。接下來是 authenticate() 方法。身份驗證發生在此處。如果支援身份驗證型別,則啟動身份驗證過程。在這個類中,可以使用**UserDetailsService**實現的 loadUserByUsername() 方法。如果找不到使用者,它會丟擲 UsernameNotFoundException。
另一方面,如果找到使用者,則使用使用者的身份驗證詳細資訊來驗證使用者。例如,在基本身份驗證方案中,可以將使用者提供的密碼與資料庫中的密碼進行檢查。如果發現它們彼此匹配,則這是一個成功的情況。然後,我們可以從此方法返回一個 Authentication 物件,該物件將儲存在 Security Context 中,我們將在後面討論。
UserDetailsService
它是 Spring Security 的核心介面之一。任何請求的身份驗證主要取決於 UserDetailsService 介面的實現。它最常用於資料庫支援的身份驗證,以檢索使用者資料。資料透過 loadUserByUsername() 方法的實現來檢索,我們可以在其中提供我們的邏輯來獲取使用者的使用者詳細資訊。如果找不到使用者,該方法將丟擲 UsernameNotFoundException。
PasswordEncoder
在 Spring Security 4 之前,PasswordEncoder 的使用是可選的。使用者可以使用記憶體身份驗證儲存純文字密碼。但是 Spring Security 5 要求使用 PasswordEncoder 來儲存密碼。這使用其眾多實現之一對使用者的密碼進行編碼。其最常見的實現是 BCryptPasswordEncoder。此外,我們可以將 NoOpPasswordEncoder 例項用於我們的開發目的。它允許以純文字形式儲存密碼。但不應將其用於生產或實際應用程式。
Spring Security 上下文
這是在成功身份驗證後儲存當前已認證使用者的詳細資訊的位置。然後,認證物件在整個會話期間可在整個應用程式中使用。因此,如果我們需要使用者名稱或任何其他使用者詳細資訊,我們需要先獲取 SecurityContext。這是透過 SecurityContextHolder(一個輔助類)完成的,它提供對安全上下文的訪問。我們可以分別使用 setAuthentication() 和 getAuthentication() 方法來儲存和檢索使用者詳細資訊。
接下來,讓我們討論我們將用於應用程式的三個自定義實現。
表單登入
當我們將 Spring Security 新增到現有的 Spring 應用程式時,它會新增一個登入表單並設定一個虛擬使用者。這是 Spring Security 的自動配置模式。在此模式下,它還設定預設過濾器、身份驗證管理器、身份驗證提供程式等等。此設定是記憶體中的身份驗證設定。我們可以覆蓋此自動配置以設定我們自己的使用者和身份驗證過程。我們還可以設定自定義登入方法,例如自定義登入表單。Spring Security 只需要知道登入表單的詳細資訊,例如登入表單的 URI、登入處理 URL 等。然後,它將為應用程式呈現我們的登入表單並執行身份驗證過程以及其他提供的配置或 Spring 自身的實現。
此自定義表單設定只需要遵守某些規則才能與 Spring Security 整合。我們需要一個使用者名稱引數和一個密碼引數,並且引數名稱應為“username”和“password”,因為這些是預設名稱。如果我們在自定義中對這些欄位使用我們自己的引數名稱,則必須使用 usernameParameter() 和 passwordParameter() 方法通知 Spring Security 這些更改。類似地,對於我們對登入表單或表單登入方法所做的每一個更改,我們都必須使用適當的方法通知 Spring Security 這些更改,以便它可以將它們與身份驗證過程整合。
使用資料庫登入
正如我們所討論的,Spring Security 預設情況下會自動提供記憶體中的身份驗證實現。我們可以透過驗證其詳細資訊儲存在資料庫中的使用者來覆蓋此功能。在這種情況下,在驗證使用者時,我們可以根據資料庫中的憑據驗證使用者提供的憑據以進行身份驗證。我們還可以讓新使用者在我們的應用程式中註冊並將他們的憑據儲存在同一資料庫中。此外,我們還可以提供更改或更新其密碼、角色或其他資料的方法。因此,這為我們提供了可長期使用的永續性使用者資料。
登入嘗試限制
為了限制我們應用程式中的登入嘗試,我們可以使用 Spring Security 的 isAccountNonLocked 屬性。Spring Security 的 UserDetails 為我們提供了該屬性。我們可以設定一個身份驗證方法,其中,如果任何使用者或其他人多次提供不正確的憑據,我們可以鎖定其帳戶。即使使用者提供了正確的憑據,Spring Security 也會停用已鎖定使用者的身份驗證。這是 Spring Security 提供的內建功能。我們可以將錯誤登入嘗試次數儲存在我們的資料庫中。然後,針對每次不正確的身份驗證嘗試,我們可以更新並檢查資料庫表。當此類嘗試次數超過給定數量時,我們可以將使用者鎖定在其帳戶之外。因此,使用者將無法再次登入,直到他們的帳戶被解鎖。
入門(實用指南)
現在讓我們開始我們的應用程式。我們將需要此應用程式的工具列在下面:
Java IDE − 首選 STS 4,但 Eclipse、IntelliJ Idea 或任何其他 IDE 都可以。
MySql Server 社群版 − 我們需要在系統中下載並安裝 MySql 社群伺服器。我們可以點選此處訪問官方網站。
MySql Workbench − 這是一個 GUI 工具,我們可以使用它來與 MySql 資料庫互動。
資料庫設定
讓我們首先設定資料庫。我們將為此應用程式使用 MySql 資料庫例項。MySql Server 社群版 可免費下載和使用。我們將使用 MySql Workbench 連線到我們的 MySql 伺服器並建立一個名為“spring”的資料庫以與我們的應用程式一起使用。
然後,我們將建立兩個表——users 和 attempts——來持久化我們的使用者和登入嘗試。如前所述,在我們的應用程式中註冊的使用者的詳細資訊將儲存在 users 表中。任何使用者的登入嘗試次數將儲存在 attempts 表中,對應於他的使用者名稱。這樣我們就可以跟蹤嘗試並採取必要的措施。
讓我們看一下用於設定 users 表和 attempts 表的 SQL 語句。
CREATE TABLE users (
   username VARCHAR(45) NOT NULL , password VARCHAR(45) NOT NULL ,
   account_non_locked TINYINT NOT NULL DEFAULT 1 ,
   PRIMARY KEY (username)
);
CREATE TABLE attempts (
   id int(45) NOT NULL AUTO_INCREMENT,
   username varchar(45) NOT NULL, attempts varchar(45) NOT NULL, PRIMARY KEY (id)
);
現在我們可以向我們的應用程式新增一個虛擬使用者了。
INSERT INTO users(username,password,account_non_locked)
VALUES ('user','12345', true);
專案設定
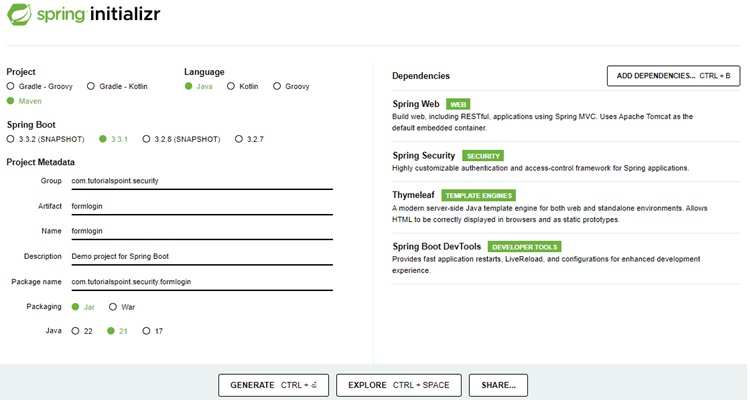
和往常一樣,我們將使用 Spring Initializer 來設定我們的專案。我們將建立一個 Maven 專案,使用 Spring Boot 版本 2.3.2。讓我們將專案命名為 formlogin(我們可以選擇任何名稱)並將 group id 設定為 com.tutorial.spring.security。此外,我們將在此專案中使用 Java 8 版本。
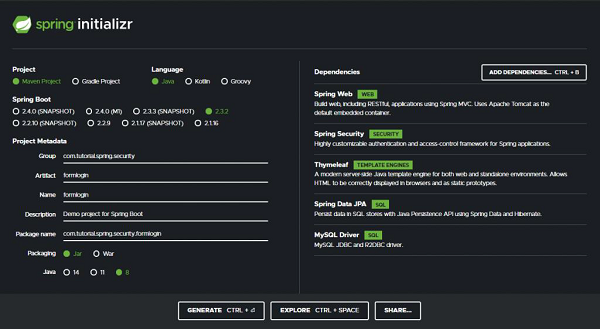
依賴項
現在,關於依賴項,我們將使我們的應用程式儘可能簡單,以便進行演示。我們將專注於我們今天想要探索的功能。因此,我們將選擇最少的依賴項,這將幫助我們快速設定和執行應用程式。讓我們來看一下依賴項:
Spring Web − 它捆綁了所有與 Web 開發相關的依賴項,包括 Spring MVC、REST 和嵌入式 Tomcat 伺服器。
Spring Security − 用於實現 Spring Security 提供的安全功能。
Thymeleaf − 一個用於 HTML5/XHTML/XML 的伺服器端 Java 模板引擎。
Spring Data JPA − 除了使用 JPA 規範定義的所有功能外,Spring Data JPA 還添加了自己的功能,例如儲存庫模式的無程式碼實現以及從方法名稱建立資料庫查詢。
Mysql Driver − 用於 MySQL 資料庫驅動程式。
有了這五個依賴項,我們現在可以設定我們的專案了。讓我們點選“生成”按鈕。這將把我們的專案下載為 zip 檔案。我們可以將其解壓到我們選擇的資料夾中。然後我們在我們的 IDE 中開啟專案。我們將為此示例使用 Spring Tool Suite 4。
讓我們將專案載入到 STS 中。IDE 下載依賴項並驗證它們需要一些時間。讓我們看一下我們的 pom.xml 檔案。
pom.xml
<?xml version="1.0" encoding="ISO-8859-1"?>
<project xsi:schemaLocation="http://maven.apache.org/POM/4.0.0
   https://maven.apache.org/xsd/maven-4.0.0.xsd"
   xmlns:xsi="http://www.w3.org/2001/XMLSchema-instance"
   xmlns="http://maven.apache.org/POM/4.0.0">
   <modelVersion>4.0.0</modelVersion>
   <parent>
      <groupId>org.springframework.boot</groupId>
      <artifactId>spring-boot-starter-parent</artifactId>
      <version>2.3.1.RELEASE</version>
      <relativePath/>
      <!-- lookup parent from repository -->
   </parent>
   <groupId>com.tutorial.spring.security</groupId>
   <artifactId>formlogin</artifactId>
   <version>0.0.1-SNAPSHOT</version>
   <name>formlogin</name>
   <description>Demo project for Spring Boot</description>
   <properties> <java.version>1.8</java.version>
   </properties>
   <dependencies>
      <dependency>
         <groupId>org.springframework.boot</groupId>
         <artifactId>spring-boot-starter-data-jpa</artifactId>
      </dependency>
      <dependency>
         <groupId>org.springframework.boot</groupId>
         <artifactId>spring-boot-starter-security</artifactId>
      </dependency>
      <dependency>
         <groupId>org.springframework.boot</groupId>
         <artifactId>spring-boot-starter-thymeleaf</artifactId>
      </dependency>
      <dependency>
         <groupId>org.springframework.boot</groupId>
         <artifactId>spring-boot-starter-web</artifactId>
      </dependency>
      <dependency>
         <groupId>org.springframework.boot</groupId>
         <artifactId>spring-boot-devtools</artifactId>
         <scope>runtime<scope> <optional>true</optional>
      </dependency>
      <dependency>
      <groupId>mysql</groupId>
      <artifactId>mysql-connector-java</artifactId>
      <scope>runtime</scope> </dependency>
      <dependency>
         <groupId>org.springframework.boot</groupId>
         <artifactId>spring-boot-starter-test</artifactId>
         <scope>test</scope>
         <exclusions>
         <exclusion>
         <groupId>org.junit.vintage</groupId>
         <artifactId>junit-vintage-engine</artifactId>
         </exclusion>
         </exclusions>
      </dependency>
      <dependency>
         <groupId>org.springframework.security</groupId>
         <artifactId>spring-security-test<artifactId>
         <scope>test</scope>
      </dependency>
   </dependencies>
   <build>
      <plugins>
         <plugin>
            <groupId>org.springframework.boot</groupId>
            <artifactId>spring-boot-maven-plugin</artifactId>
         </plugin>
      </plugins>
   </build>
</project>
我們可以看到我們的專案詳細資訊以及我們的依賴項都列在這裡。
資料來源
我們將在 application.properties 檔案中配置我們的資料來源。由於我們將使用本地 MySQL 資料庫作為資料來源,因此我們將在這裡提供本地資料庫例項的 URL、使用者名稱和密碼。我們將資料庫命名為“spring”。
spring.datasource.url=jdbc:mysql://:3306/spring
spring.datasource.username=root
spring.datasource.password=root
實體
現在讓我們建立我們的實體。我們從 User 實體開始,它包含三個欄位:使用者名稱、密碼和 accountNonLocked。此 User 類還實現了 Spring Security 的 UserDetails 介面。此類提供核心使用者資訊。它用於儲存使用者資料,這些資料稍後可以封裝到 Authentication 物件中。不建議直接實現此介面。但是對於我們的情況,由於這是一個簡單的應用程式,用於演示使用資料庫登入,因此我們在這裡直接實現了此介面以簡化操作。我們可以透過使用 User 實體的包裝類來實現此介面。
User.java
package com.tutorial.spring.security.formlogin.model;

import java.util.Collection;
import java.util.List;
import javax.persistence.Column;
import javax.persistence.Entity;
import javax.persistence.Id;
import javax.persistence.Table;
import org.springframework.security.core.GrantedAuthority;
import org.springframework.security.core.userdetails.UserDetails;

@Entity
@Table(name = "users")
public class User implements UserDetails {

   /**
   *
   */
   private static final long serialVersionUID = 1L;

   @Id
   private String username;
   private String password; @Column(name = "account_non_locked")
   private boolean accountNonLocked;

   public User() {
   }
   public User(String username, String password, boolean accountNonLocked) {
      this.username = username;
      this.password = password;
      this.accountNonLocked = accountNonLocked;
   }
   @Override
   public Collection< extends GrantedAuthority> getAuthorities() {
      return List.of(() -> "read");
   }
   @Override
   public String getPassword() {
      return password;
   }
   public void setPassword(String password) {
      this.password = password;
   }
   @Override
   public String getUsername() {
      return username;
   }
   public void setUsername(String username) {
      this.username = username;
   }
   @Override
   public boolean isAccountNonExpired() {
      return true;
   }
   @Override
   public boolean isAccountNonLocked() {
      return accountNonLocked;
   }
   @Override public boolean isCredentialsNonExpired() {
      return true;
   }
   @Override public boolean isEnabled() {
   return true;
   }

   public void setAccountNonLocked(Boolean accountNonLocked) {
      this.accountNonLocked = accountNonLocked;
   }
   public boolean getAccountNonLocked() {
      return accountNonLocked;
   }
}
這裡需要注意accountNonLocked欄位。Spring Security 中的每個使用者預設情況下帳戶都是解鎖的。為了覆蓋該屬性並在使用者超過允許的嘗試次數後將其帳戶鎖定,我們將使用此屬性。如果使用者超過允許的無效嘗試次數,我們將使用此屬性將其帳戶鎖定。此外,在每次身份驗證嘗試期間,我們將使用 isAccountNonLocked() 方法以及憑據一起檢查此屬性以對使用者進行身份驗證。任何帳戶被鎖定的使用者都將無法登入應用程式。
對於 UserDetails 介面的其他方法,我們現在可以簡單地提供返回 true 的實現,因為我們不會在此應用程式中探索這些屬性。
對於此使用者的許可權列表,讓我們現在為他分配一個虛擬角色。我們也不會在此應用程式中使用此屬性。
Attempts.java
接下來,讓我們建立 Attempts 實體來持久化我們的無效嘗試計數。如資料庫中建立的那樣,我們這裡將有三個欄位:使用者名稱、一個名為 attempts 的整數用於儲存嘗試次數以及一個識別符號。
package com.tutorial.spring.security.formlogin.model;

import javax.persistence.Entity;
import javax.persistence.GeneratedValue;
import javax.persistence.GenerationType;
import javax.persistence.Id;

@Entity
public class Attempts {
   @Id
   @GeneratedValue(strategy = GenerationType.IDENTITY)
   private int id;
   private String username;
   private int attempts;

   /**
   * @return the id
   */
   public int getId() {
      return id;
   }
   /**
   * @param id the id to set
   */
   public void setId(int id) {
      this.id = id;
   }
   /**
   * @return the username
   */
   public String getUsername() {
      return username;
   }
   /**
   * @param username the username to set
   */
   public void setUsername(String username) {
      this.username = username;
   }
   /**
   * @return the attempts
   */
   public int getAttempts() {
      return attempts;
   }
   /**
   * @param attempts the attempts to set
   */
   public void setAttempts(int attempts) {
      this.attempts = attempts;
   }
}
儲存庫
我們建立了實體,讓我們建立儲存庫來儲存和檢索資料。我們將有兩個儲存庫,每個實體類一個。對於這兩個儲存庫介面,我們將擴充套件 JpaRepository,它為我們提供了內建的實現來儲存和檢索 application.properties 檔案中配置的資料庫中的資料。除了提供的那些方法之外,我們還可以在此處新增我們自己的方法或查詢。
UserRepository.java
package com.tutorial.spring.security.formlogin.repository;

import java.util.Optional;
import org.springframework.data.jpa.repository.JpaRepository;
import org.springframework.stereotype.Repository;
import com.tutorial.spring.security.formlogin.model.User;

@Repository public interface UserRepository extends JpaRepository<User, String> {
   Optional<User> findUserByUsername(String username);
}
如上所述,我們在此處添加了用於按使用者名稱檢索使用者的方法。這將返回我們的使用者詳細資訊,包括使用者名稱、密碼和帳戶鎖定狀態。
AttemptsRepository.java
package com.tutorial.spring.security.formlogin.repository;

import java.util.Optional;
import org.springframework.data.jpa.repository.JpaRepository;
import org.springframework.stereotype.Repository;
import com.tutorial.spring.security.formlogin.model.Attempts;

@Repository
public interface AttemptsRepository extends JpaRepository<Attempts, Integer> {
   Optional<Attempts> findAttemptsByUsername(String username);
}
類似地,對於 Attempts,在我們的 AttemptsRepository 中,我們添加了一個自定義方法 findAttemptsByUsername(String username) 來使用使用者名稱獲取使用者嘗試資料。這將返回一個 Attempts 物件,其中包含使用者名稱和使用者進行的失敗身份驗證嘗試次數。
配置
由於我們將使用自定義登入表單,因此我們必須覆蓋 Spring Security 的預設配置。為此,我們建立擴充套件 Spring Security 的 WebSecurityConfigurerAdapter 類的配置類。
package com.tutorial.spring.security.formlogin.config;

import org.springframework.context.annotation.Bean;
import org.springframework.context.annotation.Configuration;
import org.springframework.security.config.annotation.web.builders.HttpSecurity;
import org.springframework.security.config.annotation.web.configuration.WebSecurityConfigurerAdapter;
import org.springframework.security.crypto.bcrypt.BCryptPasswordEncoder;
import org.springframework.security.crypto.password.PasswordEncoder;
@Configuration
public class ApplicationConfig extends WebSecurityConfigurerAdapter {
   @Bean
   public PasswordEncoder passwordEncoder() {
      return new BCryptPasswordEncoder();
   }
   @Override
   protected void configure(HttpSecurity http) throws Exception {
      http
      .csrf().disable()
      .authorizeRequests().antMatchers("/register**")
      .permitAll() .anyRequest().authenticated()
      .and()
      .formLogin() .loginPage("/login")
      .permitAll()
      .and()
      .logout() .invalidateHttpSession(true)
      .clearAuthentication(true) .permitAll();
   }
}
我們在這裡做了兩件事:
- 首先,我們指定了我們將使用的 PasswordEncoder 介面的實現。在這個例子中,我們使用了 BCryptPasswordEncoder 的例項來編碼我們的密碼。PasswordEncoder 介面有很多實現,我們可以使用其中的任何一個。我們在這裡選擇 BCryptPasswordEncoder,因為它是最常用的實現。它使用非常強大的 BCrypt 雜湊演算法來編碼密碼。它透過加入鹽來防止彩虹表攻擊。除此之外,bcrypt 是一個自適應函式:隨著時間的推移,迭代次數可以增加以使其變慢,因此即使計算能力不斷提高,它仍然能夠抵抗暴力搜尋攻擊。
- 其次,我們覆蓋了 configure() 方法以提供我們對登入方法的實現。
- 每當我們使用自定義表單進行身份驗證來代替 Spring Security 提供的身份驗證表單時,我們必須使用 formLogin() 方法通知 Spring Security。
- 然後,我們還指定了我們的登入 URL:/login。稍後,我們將在我們的 Controller 中將 URL 對映到我們的自定義登入頁面。
- 我們還指定了以 /register、/login 開頭的端點和登出頁面不需要受到保護。我們使用 permitAll() 方法進行了此操作。這允許每個人訪問這些端點。除這些端點外,所有端點都需要進行身份驗證()。也就是說,使用者必須登入才能訪問所有其他端點。
- 登出時,我們指定會話將失效,並清除儲存在應用程式 SecurityContext 中的身份驗證。
安全設定
現在,我們將設定我們的身份驗證過程。我們將使用資料庫和使用者帳戶鎖定來設定身份驗證。
讓我們首先建立 UserDetailsService 的實現。正如我們之前討論的那樣,我們需要提供我們自定義的實現來使用資料庫進行身份驗證。這是因為,眾所周知,Spring Security 預設情況下只提供記憶體中的身份驗證實現。因此,我們需要使用基於資料庫的流程來覆蓋該實現。為此,我們需要覆蓋 UserDetailsService 的 loadUserByUsername() 方法。
UserDetailsService
package com.tutorial.spring.security.formlogin.security;

import java.util.Optional;
import org.springframework.beans.factory.annotation.Autowired;
import org.springframework.security.core.userdetails.UserDetails;
import org.springframework.security.core.userdetails.UserDetailsService;
import org.springframework.security.core.userdetails.UsernameNotFoundException;
import org.springframework.security.provisioning.UserDetailsManager;
import org.springframework.stereotype.Service;
import com.tutorial.spring.security.formlogin.model.User;
import com.tutorial.spring.security.formlogin.repository.UserRepository;

@Service
public class SecurityUserDetailsService implements UserDetailsService {
   @Autowired
   private UserRepository userRepository;

   @Override
   public UserDetails loadUserByUsername(String username)
   throws UsernameNotFoundException {
      User user = userRepository.findUserByUsername(username)
         .orElseThrow(() -< new UsernameNotFoundException("User not present"));
         return user;
   }
   public void createUser(UserDetails user) {
      userRepository.save((User) user);
   }
}
正如我們在這裡看到的,我們在這裡實現了 loadUserByUsername() 方法。在這裡,我們使用 UserRepository 介面從我們的資料庫中獲取使用者。如果找不到使用者,則會丟擲 UsernameNotFoundException。
我們還有一個 createUser() 方法。我們將使用此方法向使用 UserRepository 在我們的應用程式中註冊的使用者新增資料庫使用者。
身份驗證提供程式
我們現在將實現我們自定義的身份驗證提供程式。它將實現 AuthenticationProvider 介面。我們這裡有兩個方法需要覆蓋和實現。
package com.tutorial.spring.security.formlogin.security;

import java.util.Optional;
import org.springframework.beans.factory.annotation.Autowired;
import org.springframework.security.authentication.AuthenticationProvider;
import org.springframework.security.authentication.BadCredentialsException;
import org.springframework.security.authentication.LockedException;
import org.springframework.security.authentication.UsernamePasswordAuthenticationToken;
import org.springframework.security.core.Authentication;
import org.springframework.security.core.AuthenticationException;
import org.springframework.security.crypto.password.PasswordEncoder;
import org.springframework.stereotype.Component;

import com.tutorial.spring.security.formlogin.model.Attempts;
import com.tutorial.spring.security.formlogin.model.User;
import com.tutorial.spring.security.formlogin.repository.AttemptsRepository;
import com.tutorial.spring.security.formlogin.repository.UserRepository;

@Component public class AuthProvider implements AuthenticationProvider {
   private static final int ATTEMPTS_LIMIT = 3;

   @Autowired
   private SecurityUserDetailsService userDetailsService;
   @Autowired private PasswordEncoder passwordEncoder;
   @Autowired private AttemptsRepository attemptsRepository;
   @Autowired private UserRepository userRepository;
   @Override
   public Authentication authenticate(Authentication authentication)
   throws AuthenticationException {
      String username = authentication.getName();

import com.tutorial.spring.security.formlogin.repository.UserRepository;

@Component public class AuthProvider implements AuthenticationProvider {
   private static final int ATTEMPTS_LIMIT = 3;
   @Autowired private SecurityUserDetailsService userDetailsService;
   @Autowired private PasswordEncoder passwordEncoder;
   @Autowired private AttemptsRepository attemptsRepository;
   @Autowired private UserRepository userRepository;
   @Override
   public Authentication authenticate(Authentication authentication)
   throws AuthenticationException {
      String username = authentication.getName();
      Optional<Attempts>
      userAttempts = attemptsRepository.findAttemptsByUsername(username);
      if (userAttempts.isPresent()) {
         Attempts attempts = userAttempts.get();
         attempts.setAttempts(0); attemptsRepository.save(attempts);
      }
   }
   private void processFailedAttempts(String username, User user) {
      Optional<Attempts>
      userAttempts = attemptsRepository.findAttemptsByUsername(username);
      if (userAttempts.isEmpty()) {
         Attempts attempts = new Attempts();
         attempts.setUsername(username);
         attempts.setAttempts(1);
         attemptsRepository.save(attempts);
      } else {
         Attempts attempts = userAttempts.get();
         attempts.setAttempts(attempts.getAttempts() + 1);
         attemptsRepository.save(attempts);

         if (attempts.getAttempts() + 1 >
         ATTEMPTS_LIMIT) {
            user.setAccountNonLocked(false);
            userRepository.save(user);
            throw new LockedException("Too many invalid attempts. Account is locked!!");
         }
      }
   }
   @Override public boolean supports(Class<?> authentication) {
      return true;
   }
}
- authenticate() − 此方法在成功身份驗證後返回一個完整的已驗證物件,包括憑據。然後將此物件儲存在 SecurityContext 中。為了執行身份驗證,我們將使用應用程式的 SecurityUserDetailsService 類的 loaduserByUsername() 方法。在這裡,我們執行多項操作:
- 首先,我們從作為引數傳遞給我們的函式的身份驗證請求物件中提取使用者憑據。此身份驗證物件由 AuthenticationFilter 類準備並透過 AuthenticationManager 傳遞到 AuthenticationProvider。
- 我們還使用 loadUserByUsername() 方法從資料庫中獲取使用者詳細資訊。
- 現在,首先,我們檢查使用者帳戶是否由於之前的失敗身份驗證嘗試而被鎖定。如果我們發現帳戶被鎖定,我們將丟擲 LockedException,並且使用者將無法進行身份驗證,除非帳戶再次解鎖。
- 如果帳戶未鎖定,我們將提供的密碼與資料庫中針對使用者儲存的密碼進行匹配。這是使用 PasswordEncoder 介面的 matches() 方法完成的。
- 如果密碼匹配,並且帳戶尚未被鎖定,我們將返回一個完全經過身份驗證的物件。在這裡,我們使用了實現 Authentication 的 UsernamePasswordAuthenticationToken 類例項(因為它是使用者名稱密碼身份驗證)。同時,我們還將嘗試計數器重置為 0。
- 另一方面,如果密碼不匹配,我們將檢查一些條件:
- 如果這是使用者的第一次嘗試,那麼他的名字可能不在資料庫中。我們使用 AttemptsRepository 的 findAttemptsByUsername() 方法檢查這一點。
- 如果未找到,我們在資料庫中為使用者建立一個條目,並將嘗試次數設定為 1。
- 如果找到使用者,則我們將嘗試次數增加 1。
- 然後,我們使用之前定義的常量值檢查允許的最大失敗嘗試次數。
- 如果嘗試次數超過允許次數,則使用者將被鎖定在應用程式之外,並丟擲 LockedException 異常。
- supports() 方法 - 我們還有一個 supports 方法,用於檢查我們的身份驗證型別是否受我們的 AuthenticationProvider 實現類支援。如果匹配,則返回 true;如果不匹配,則返回 false;如果無法確定,則返回 null。目前我們將其硬編碼為 true。
控制器
現在讓我們建立我們的控制器包。它將包含我們的 HelloController 類。使用此控制器類,我們將把我們的檢視對映到端點,並在訪問相應的端點時提供這些檢視。我們還將在該元件中自動裝配 PasswordEncoder 和 UserDetailsService 類。這些注入的依賴項將用於建立我們的使用者。現在讓我們建立我們的端點。
package com.tutorial.spring.security.formlogin.controller;

import java.util.Map;
import javax.servlet.http.HttpServletRequest;
import javax.servlet.http.HttpSession;
import org.springframework.beans.factory.annotation.Autowired;
import org.springframework.http.MediaType;
import org.springframework.security.authentication.BadCredentialsException;
import org.springframework.security.authentication.LockedException;
import org.springframework.security.crypto.password.PasswordEncoder;
import org.springframework.stereotype.Controller;
import org.springframework.web.bind.annotation.GetMapping;
import org.springframework.web.bind.annotation.PostMapping;
import org.springframework.web.bind.annotation.RequestParam;
import com.tutorial.spring.security.formlogin.model.User;
import com.tutorial.spring.security.formlogin.security.SecurityUserDetailsService;
@Controller
public class HelloController {
   @Autowired private SecurityUserDetailsService userDetailsManager;
   @Autowired
   private PasswordEncoder passwordEncoder;

   @GetMapping("/")
   public String index() {
      return "index";
   }
   @GetMapping("/login")
   public String login(HttpServletRequest request, HttpSession session) {
      session.setAttribute(
         "error", getErrorMessage(request, "SPRING_SECURITY_LAST_EXCEPTION")
      );
      return "login";
   }
   @GetMapping("/register")
   public String register() {
      return "register";
   }
   @PostMapping(
      value = "/register",
      consumes = MediaType.APPLICATION_FORM_URLENCODED_VALUE, produces = {
      MediaType.APPLICATION_ATOM_XML_VALUE, MediaType.APPLICATION_JSON_VALUE }
   )
   public void addUser(@RequestParam Map<String, String> body) {
      User user = new User(); user.setUsername(body.get("username"));
      user.setPassword(passwordEncoder.encode(body.get("password")));
      user.setAccountNonLocked(true); userDetailsManager.createUser(user);
   }
   private String getErrorMessage(HttpServletRequest request, String key) {
      Exception exception = (Exception) request.getSession().getAttribute(key);
      String error = "";
      if (exception instanceof BadCredentialsException) {
         error = "Invalid username and password!";
      } else if (exception instanceof LockedException) {
         error = exception.getMessage();
      } else {
         error = "Invalid username and password!";
      }
      return error;
   }
}
- index ("/") – 此端點將提供應用程式的索引頁面。正如我們之前配置的那樣,我們將保護此頁面,並且只有經過身份驗證的使用者才能訪問此頁面。
- login ("/login") – 這將用於提供我們自定義的登入頁面,如前所述。任何未經身份驗證的使用者都將被重定向到此端點進行身份驗證。
- register("/register") (GET) – 我們的應用程式將有兩個“register”端點。一個用於提供註冊頁面。另一個用於處理註冊過程。因此,前者將使用 HTTP GET 方法,後者將是 POST 端點。
- register("/register") (POST) – 我們將使用此端點來處理使用者註冊過程。我們將從引數中獲取使用者名稱和密碼。然後,我們將使用已@Autowired到此元件中的 passwordEncoder 對密碼進行編碼。我們也在此處將使用者帳戶設定為未鎖定狀態。然後,我們將使用 createUser() 方法將此使用者資料儲存到我們的 users 表中。
除此之外,我們還有 getErrorMessage() 方法。它用於確定最後丟擲的異常,以便在我們的登入模板中新增訊息。這樣,我們可以瞭解身份驗證錯誤並顯示正確的訊息。
資源
我們已經建立了我們的端點,剩下的就是建立我們的檢視。
首先,我們將建立我們的索引頁面。此頁面只有在成功身份驗證後才能供使用者訪問。此頁面可以使用 Servlet 請求物件,我們可以使用它來顯示登入使用者的使用者名稱。
<!DOCTYPE html>
<html xmlns="http://www.w3.org/1999/xhtml" xmlns:th="https://www.thymeleaf.org" xmlns:sec="https://www.thymeleaf.org/thymeleaf-extras-springsecurity3">
   <head>
      <title>
         Hello World!
      </title>
   </head>
   <body>
      <h1 th:inline="text">Hello [[${#httpServletRequest.remoteUser}]]!</h1>
      <form th:action="@{/logout}" method="post">
         <input type="submit" value="Sign Out"/>
         </form>
   </body>
<html>
接下來,我們建立登入檢視。這將顯示我們的自定義登入表單,其中包含使用者名稱和密碼欄位。如果登出或身份驗證失敗,此檢視也將呈現,並將為每種情況顯示相應的訊息。
<!DOCTYPE html>
<html xmlns="http://www.w3.org/1999/xhtml"      xmlns:th="https://www.thymeleaf.org" xmlns:sec="https://www.thymeleaf.org/thymeleaf-extras-springsecurity3">
   <head>
      <title>Spring Security Example</title>
   </head>
   <body>
   <div th:if="${param.error}">
      <p th:text="${session.error}" th:unless="${session == null}">[...]</p>
   </div>
   <div th:if="${param.logout}">You have been logged out.</div>
   <form th:action="@{/login}" method="post>
   <div>
      <label> User Name : <input type="text" name="username" /> </label>
   </div>
   <div>
   <label> Password: <input type="password" name="password" /> </label>
   </div>
   <div>
      <input type="submit" value="Sign In" /> </div>
      </form>
   </body>
</html>
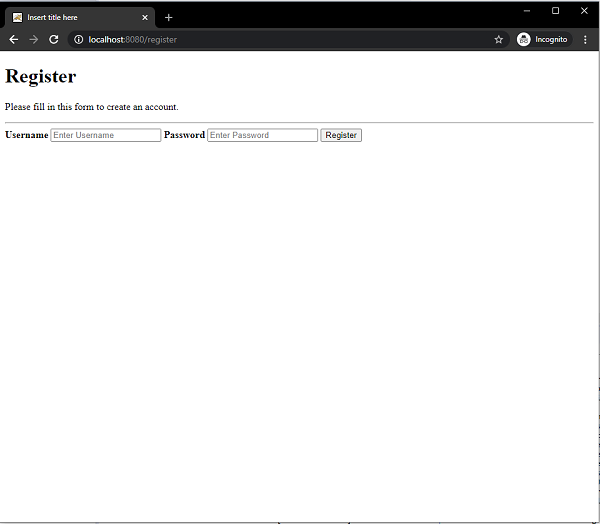
接下來,我們建立所需的檢視,即註冊檢視。此檢視將允許使用者在應用程式中註冊自己。此使用者資料將儲存在資料庫中,然後用於身份驗證。
<!DOCTYPE html>
<html>
   <head>
      <meta charset="ISO-8859-1">
      <title>Insert title here</title>
   </head>
   <body>
      <form action="/register" method="post">
         <div class="container">
            <h1>Register</h1>
            <p>Please fill in this form to create an account.</p>
            <hr>

            <label for="username">
            <b>Username</b>
            </label>
            <input type="text" placeholder="Enter Username" name="username" id="username" required>

            <label for="password"><b>Password</b></label>
            <input type="password" placeholder="Enter Password" name="password" id="password" required>

            <button type="submit" class="registerbtn">Register</button>
         </div>

      </form>
   </body>
</html>
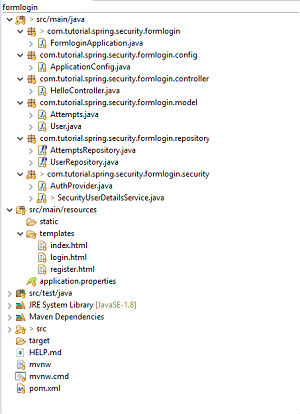
最終專案結構
我們的最終專案結構應該與此類似。
執行應用程式
然後,我們可以將應用程式作為 SpringBootApp 執行。當我們在瀏覽器中訪問 localhost:8080 時,它會將我們重定向回登入頁面。

成功身份驗證後,它將帶我們進入帶有問候語的索引檢視。

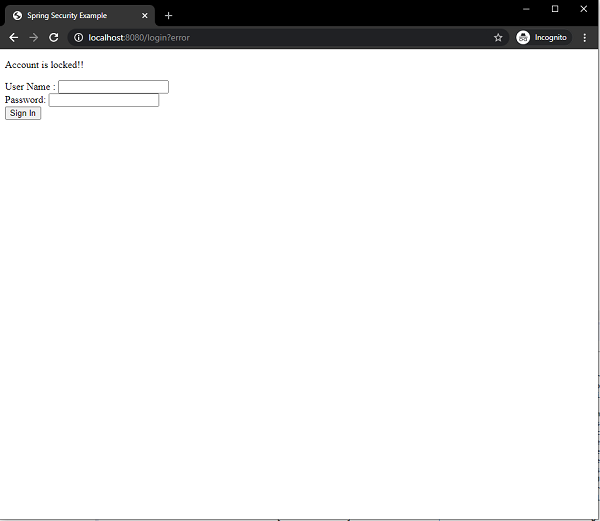
由於我們只允許在帳戶被鎖定之前進行三次失敗嘗試,因此在第三次身份驗證失敗後,使用者將被鎖定,並且訊息會顯示在螢幕上。
點選 /register 端點,我們還可以註冊新使用者。
從今天的文章中,我們學習瞭如何使用基於註解的配置使用資料庫為登入使用自定義表單。我們還學習瞭如何防止多次登入失敗嘗試。在此過程中,我們瞭解瞭如何實現我們自己的 **AuthenticationProvider** 和 **UserDetailsService** 來使用我們的自定義身份驗證過程來驗證使用者。
結論
Spring Security - 表單登入、記住我以及登出
目錄
- 介紹和概述
- 入門(實用指南)
介紹和概述
Spring Security 為我們提供了許多內建功能和工具,方便我們使用。在此示例中,我們將討論其中三個有趣且有用的功能:
- 表單登入
- 記住我
- 登出
表單登入
基於表單的登入是 Spring Security 提供支援的一種使用者名稱/密碼身份驗證形式。這是透過 HTML 表單提供的。
每當使用者請求受保護的資源時,Spring Security 都會檢查請求的身份驗證。如果請求未經身份驗證/授權,使用者將被重定向到登入頁面。登入頁面必須以某種方式由應用程式呈現。Spring Security 預設情況下提供該登入表單。
此外,如果需要任何其他配置,則必須明確提供如下所示:
protected void configure(HttpSecurity http) throws Exception {
http
   // ...
   .formLogin(
      form -> form       .loginPage("/login")
      .permitAll()
   );
}
此程式碼需要在 templates 資料夾中存在一個 login.html 檔案,該檔案將在訪問 /login 時返回。此 HTML 檔案應包含一個登入表單。此外,請求應為對 /login 的 POST 請求。引數名稱對於使用者名稱和密碼分別應為“username”和“password”。此外,表單還需要包含一個 CSRF 令牌。
完成程式碼練習後,上面的程式碼片段將更加清晰。
記住我
這種型別的身份驗證需要將“記住我”cookie 傳送到瀏覽器。此 cookie 儲存使用者資訊/身份驗證主體,並存儲在瀏覽器中。因此,網站下次啟動會話時可以記住使用者的身份。Spring Security 已經為此操作準備了必要的實現。一種使用雜湊來保持基於 cookie 的令牌的安全性,另一種使用資料庫或其他永續性儲存機制來儲存生成的令牌。
登出
預設 URL /logout 透過以下方式登出使用者:
- 使 HTTP 會話無效
- 清理任何已配置的 RememberMe 身份驗證
- 清除 SecurityContextHolder
- 重定向到 /login?logout
**WebSecurityConfigurerAdapter** 自動將登出功能應用於 Spring Boot 應用程式。
**入門(實踐指南)** 像往常一樣,我們將從 start.spring.io 開始。在這裡,我們選擇一個 Maven 專案。我們將專案命名為“formlogin”,並選擇所需的 Java 版本。在此示例中,我選擇的是 Java 8。我們還繼續新增以下依賴項:
- Spring Web
- Spring Security
- Thymeleaf
- Spring Boot DevTools
Thymeleaf 是一個用於 Java 的模板引擎。它允許我們快速開發靜態或動態網頁,以便在瀏覽器中呈現。它具有極強的可擴充套件性,允許我們詳細定義和自定義模板的處理過程。此外,我們可以點選此 連結 瞭解更多關於 Thymeleaf 的資訊。
讓我們繼續生成我們的專案並下載它。然後,我們將其解壓到我們選擇的資料夾中,並使用任何 IDE 開啟它。我將使用 Spring Tools Suite 4。它可以從 https://springframework.tw/tools 網站免費下載,並且針對 Spring 應用程式進行了最佳化。
讓我們看看我們的 pom.xml 檔案。它應該與此類似:
<?xml version="1.0" encoding="UTF-8"?>
<project xmlns="http://maven.apache.org/POM/4.0.0"    xmlns:xsi="http://www.w3.org/2001/XMLSchema-instance"
   xsi:schemaLocation="http://maven.apache.org/POM/4.0.0 https://maven.apache.org/xsd/maven-4.0.0.xsd">
   <modelVersion>4.0.0</modelVersion>
   <parent>
      <groupId>org.springframework.boot</groupId>
      <artifactId>spring-boot-starter-parent</artifactId>
      <version>2.3.1.RELEASE</version>
      <relativePath />
      <!-- lookup parent from repository -->
   </parent>
   <groupId>            com.spring.security</groupId>
   <artifactId>formlogin</artifactId>
   <version>0.0.1-SNAPSHOT</version>
   <name>formlogin</name>
   <description>Demo project for Spring Boot</description>

   <properties>
      <java.version>1.8</java.version>
   </properties>

   <dependencies>
      <dependency>
         <groupId>org.springframework.boot</groupId>
         <artifactId>spring-boot-starter-security</artifactId>
      </dependency>
   <dependency>
      <groupId>org.springframework.boot</groupId>
      <artifactId>spring-boot-starter-web</artifactId>
   </dependency>
   <dependency>
      <groupId>org.springframework.boot</groupId>
      <artifactId>spring-boot-starter-thymeleaf</artifactId>
   </dependency>
   <dependency>
      <groupId>org.springframework.boot</groupId>
      <artifactId>spring-boot-devtools</artifactId>
   </dependency>
   <dependency>
   <groupId>org.springframework.boot</groupId>
   <artifactId>spring-boot-starter-test</artifactId>
   <scope>test</scope>
   <exclusions>
      <exclusion>
         <groupId>org.junit.vintage</groupId>
         <artifactId>junit-vintage-engine</artifactId>
      </exclusion>
   </exclusions>
   </dependency>
   <dependency>
      <groupId>org.springframework.security</groupId>
      <artifactId>spring-security-test</artifactId>
      <scope>test</scope>
   </dependency>
   </dependencies>

   <build>
      <plugins>
         <plugin>
            <groupId>org.springframework.boot</groupId>
            <artifactId>spring-boot-maven-plugin</artifactId>
         </plugin>
      </plugins>
   </build>
</project>
讓我們在預設包下的 /src/main/java 資料夾中建立一個包。我們將將其命名為 config,因為我們將在此處放置所有配置類。因此,名稱應該與此類似:com.tutorial.spring.security.formlogin.config。
配置類
package com.tutorial.spring.security.formlogin.config;

import java.util.List;
import org.springframework.beans.factory.annotation.Autowired;
import org.springframework.context.annotation.Bean;
import org.springframework.context.annotation.Configuration;
import org.springframework.security.config.annotation.web.builders.HttpSecurity;
import org.springframework.security.config.annotation.web.configuration.WebSecurityConfigurerAdapter;
import org.springframework.security.core.userdetails.User;
import org.springframework.security.core.userdetails.UserDetails;
import org.springframework.security.core.userdetails.UserDetailsService;
import org.springframework.security.crypto.bcrypt.BCryptPasswordEncoder;
import org.springframework.security.crypto.password.NoOpPasswordEncoder;
import org.springframework.security.crypto.password.PasswordEncoder;
import org.springframework.security.provisioning.InMemoryUserDetailsManager; import org.springframework.security.provisioning.UserDetailsManager;
import org.springframework.security.web.authentication.UsernamePasswordAuthenticationFilter;
import org.springframework.security.web.util.matcher.AntPathRequestMatcher;

import com.spring.security.formlogin.AuthFilter;

@Configuration
public class WebSecurityConfig extends WebSecurityConfigurerAdapter {

   @Bean
   protected UserDetailsService userDetailsService() {
   UserDetailsManager userDetailsManager = new InMemoryUserDetailsManager();
   UserDetails user = User.withUsername("abby")
   .password(passwordEncoder().encode("12345"))
      .authorities("read") .build();
      userDetailsManager.createUser(user);
      return userDetailsManager;

   }
   @Bean
   public PasswordEncoder passwordEncoder() {
      return new BCryptPasswordEncoder(); };
      @Override
      protected void configure(HttpSecurity http) throws Exception {
      http.csrf().disable() .authorizeRequests().anyRequest()
      .authenticated() .and()
      .formLogin()
      .and()
      .rememberMe()
      .and() .logout() .logoutUrl("/logout")
      .logoutSuccessUrl("/login") .deleteCookies("remember-me");
   }
}
程式碼分解
在我們的 config 包中,我們建立了 WebSecurityConfig 類。此類擴充套件了 Spring Security 的 WebSecurityConfigurerAdapter。我們將使用此類進行安全配置,因此讓我們使用 @Configuration 註解對其進行註解。結果,Spring Security 知道將此類視為配置類。正如我們所看到的,Spring 使配置應用程式變得非常容易。
讓我們看看我們的配置類。
- 首先,我們將使用 userDetailsService() 方法建立 UserDetailsService 類的 bean。我們將使用此 bean 來管理此應用程式的使用者。在這裡,為了簡化起見,我們將使用 InMemoryUserDetailsManager 例項來建立一個使用者。此使用者以及我們提供的使用者名稱和密碼將包含一個簡單的“read”許可權。
- 現在,讓我們看看我們的 PasswordEncoder。我們將在此示例中使用 BCryptPasswordEncoder 例項。因此,在建立使用者時,我們使用了 passwordEncoder 來對我們的純文字密碼進行編碼,如下所示:
.password(passwordEncoder().encode("12345"))
- 完成上述步驟後,我們繼續進行下一個配置。在這裡,我們覆蓋 WebSecurityConfigurerAdapter 類的 configure 方法。此方法將 HttpSecurity 作為引數。我們將將其配置為使用我們的表單登入和登出以及“記住我”功能。
HTTP 安全配置
我們可以觀察到 Spring Security 中提供了所有這些功能。讓我們詳細研究以下部分:
http.csrf().disable()
   .authorizeRequests().anyRequest().authenticated()
   .and()
   .formLogin()
   .and()
   .rememberMe()
   .and()
   .logout()
   .logoutUrl("/logout") .logoutSuccessUrl("/login") .deleteCookies("remember-me");
這裡需要注意幾點:
- 我們停用了 csrf 或 跨站請求偽造 保護。因為這只是一個用於演示目的的簡單應用程式,所以我們現在可以安全地停用它。
- 然後,我們新增需要對所有請求進行身份驗證的配置。正如我們稍後將看到的,為了簡單起見,我們將為應用程式的索引頁面只有一個“/”端點。
- 之後,我們將使用上面提到的 Spring Security 的 formLogin() 功能。這將生成一個簡單的登入頁面。
- 然後,我們使用 Spring Security 的 rememberMe() 功能。這將執行兩項操作。
- 首先,它將一個“記住我”複選框新增到我們使用 formLogin() 生成的預設登入表單中。
- 其次,選中複選框會生成“記住我”cookie。“記住我”cookie 儲存使用者的身份,並由瀏覽器儲存。Spring Security 在將來的會話中檢測到此 cookie 以自動登入。
- 最後,我們有 logout() 功能。為此,Spring Security 也提供了一個預設功能。在這裡,它執行兩個重要功能:
- 使 Http 會話無效,並取消繫結繫結到會話的物件。
- 它會清除“記住我”cookie。
- 從 Spring 的安全上下文移除身份驗證。
結果,使用者可以再次訪問應用程式,而無需再次登入。
我們還提供了 logoutSuccessUrl(),以便應用程式在登出後返回到登入頁面。這完成了我們的應用程式配置。
受保護的內容(可選)
現在,我們將建立一個虛擬的索引頁面,供使用者登入後檢視。頁面中還將包含一個登出按鈕。
在我們的`/src/main/resources/templates`目錄下,我們新增一個名為`index.html`的檔案,然後向其中新增一些HTML內容。
<!doctype html>
<html lang="en">
   <head>
      <!-- Required meta tags -->
      <meta charset="utf-8">
      <meta name="viewport" content="width=device-width, initial-scale=1, shrink-to-fit=no">
      <!-- Bootstrap CSS -->
      <link rel="stylesheet" href="https://stackpath.bootstrapcdn.com/bootstrap/4.5.0/css/bootstrap.min.css" crossorigin="anonymous">
      <title>Hello, world!</title>
   </head>
   <body>
      <h1>Hello, world!</h1> <a href="logout">logout</a>
      <!-- Optional JavaScript -->
      <!-- jQuery first, then Popper.js, then Bootstrap JS -->
      <script src="https://code.jquery.com/jquery-3.5.1.slim.min.js" crossorigin="anonymous"></script>
      <script src="https://cdn.jsdelivr.net/npm/popper.js@1.16.0/dist/umd/popper.min.js" crossorigin="anonymous"></script>
      <script src="https://stackpath.bootstrapcdn.com/bootstrap/4.5.0/js/bootstrap.min.js" crossorigin="anonymous"></script>
   </body>
</html>
此內容來自Bootstrap 4入門模板。
我們還新增
<a href="logout">logout</a>
到我們的檔案中,以便使用者可以使用此連結登出應用程式。
資源控制器
我們已經建立了受保護的資源,現在新增控制器來服務此資源。
package com.tutorial.spring.security.formlogin.controllers;
import org.springframework.stereotype.Controller;
import org.springframework.web.bind.annotation.GetMapping;
@Controller public class AuthController {
   @GetMapping("/") public String home() { return "index"; }
}
如我們所見,這是一個非常簡單的控制器。它只有一個GET端點,在啟動應用程式時提供我們的`index.html`檔案。
執行應用程式
讓我們將應用程式作為Spring Boot應用程式執行。應用程式啟動後,我們可以在瀏覽器中訪問https://:8080。它應該會要求我們輸入使用者名稱和密碼。此外,我們還應該能夠看到“記住我”複選框。

登入頁面
現在,如果我們提供我們在`WebSecurity`配置檔案中配置的使用者帳戶資訊,我們就可以登入。此外,如果我們勾選“記住我”複選框,我們應該能夠在瀏覽器的開發者工具部分看到“記住我”cookie。

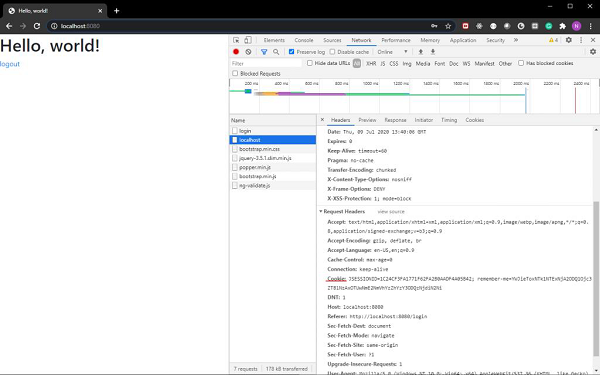
如我們所見,cookie與我們的登入請求一起傳送。
網頁中還包含一個登出連結。單擊該連結後,我們將登出應用程式並返回到登入頁面。
Spring Security - 標籤庫
目錄
- 介紹和概述
- Spring Security標籤
- authorize標籤
- authentication標籤
- csrfInput標籤
- csrfMetaTags標籤
- 入門(實用指南)
介紹和概述
在使用JSP的Spring MVC應用程式中,我們可以使用Spring Security標籤來應用安全約束以及訪問安全資訊。Spring Security標籤庫為此類操作提供基本支援。使用這些標籤,我們可以根據使用者的角色或許可權控制向用戶顯示的資訊。此外,我們可以在表單中包含CSRF保護功能。
要使用Spring Security標籤,我們必須在JSP檔案中宣告security標籤庫。
<%@ taglib prefix="sec" uri="http://www.springframework.org/security/tags" %>
現在,我們可以使用字首為“sec”的Spring Security標籤。讓我們看看這些標籤的用法。
authorize標籤
我們將討論的第一個標籤是authorize標籤。讓我們檢視一些使用示例。
<sec:authorize access="!isAuthenticated()"> Login </sec:authorize>
<sec:authorize access="isAuthenticated()"> Logout </sec:authorize>
<sec:authorize access="hasRole('ADMIN')"> Hello Admin. </sec:authorize>
如我們所見,我們可以使用此標籤根據訪問許可權或角色隱藏或顯示資訊部分。為了評估角色或訪問許可權,我們還可以使用以下Spring Security表示式:
hasRole("ADMIN") - 如果當前使用者具有admin角色,則評估結果為true。
hasAnyRole('ADMIN','USER') - 如果當前使用者具有任何列出的角色,則評估結果為true。
isAnonymous() - 如果當前使用者是匿名使用者,則評估結果為true。
isRememberMe() - 如果當前使用者是“記住我”使用者,則評估結果為true。
isFullyAuthenticated() - 如果使用者已透過身份驗證,並且既不是匿名使用者也不是“記住我”使用者,則評估結果為true。
如我們所見,access屬性是指定Web安全表示式的欄位。然後,Spring Security評估該表示式。評估通常委託給`SecurityExpressionHandler
如果我們將authorize標籤與Spring Security的許可權評估器一起使用,我們還可以檢查使用者的許可權,如下所示:
<sec:authorize access="hasPermission(#domain,'read') or hasPermission(#domain,'write')">
   This content is visible to users who have read or write permission.
</sec:authorize>
我們還可以允許或限制使用者單擊內容中的某些連結。
<sec:authorize url="/admin">
   This content will only be visible to users who are authorized to send requests to the "/admin" URL.
</sec:authorize>
authentication標籤
當我們想要訪問儲存在Spring Security上下文中的當前Authentication物件時,我們可以使用authentication標籤。然後,我們可以使用它直接在JSP頁面中呈現物件的屬性。例如,如果我們想在頁面中呈現Authentication物件的principal屬性,我們可以這樣做:
<sec:authentication property="principal.username" />
csrfInput標籤
當啟用CSRF保護時,我們可以使用csrfInput標籤插入一個包含CSRF保護令牌正確值的隱藏表單欄位。如果未啟用CSRF保護,則此標籤不會輸出任何內容。
我們可以將該標籤與其他輸入欄位一起放在HTML`
`塊內。但是,我們不能將其放在`<form method="post" action="/do/something"> <sec:csrfInput /> Username:<br /> <input type="text" username="username" /> ... </form>
csrfMetaTags標籤
我們可以使用此標籤插入包含CSRF保護令牌表單欄位和標題名稱以及CSRF保護令牌值的元標記。這些元標記可用於在我們的應用程式中使用Javascript實現CSRF保護。但是,此標籤僅在我們啟用應用程式中的CSRF保護時才有效,否則此標籤不會輸出任何內容。
<html>
   <head>
      <title>CSRF Protection in Javascript</title>
      <sec:csrfMetaTags />
      <script type="text/javascript" language="javascript">
         var csrfParam = $("meta[name='_csrf_param']").attr("content");
         var csrfToken = $("meta[name='_csrf']").attr("content");
      </script>
   </head>
   <body>
      ...
   </body>
</html>
入門(實用指南)
現在我們已經討論了這些標籤,讓我們構建一個應用程式來演示這些標籤的用法。我們將使用Spring Tool Suite 4作為我們的IDE。此外,我們將使用Apache Tomcat伺服器來提供我們的應用程式。因此,讓我們開始吧。
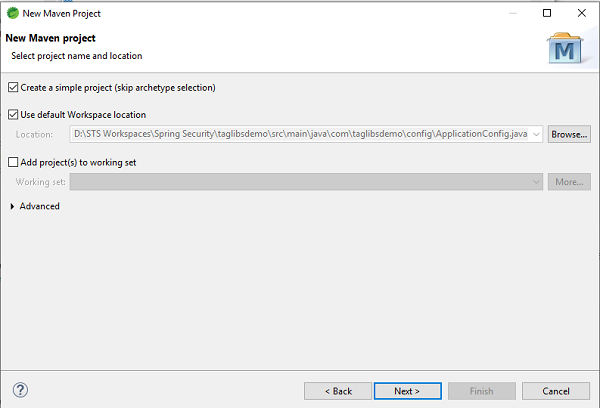
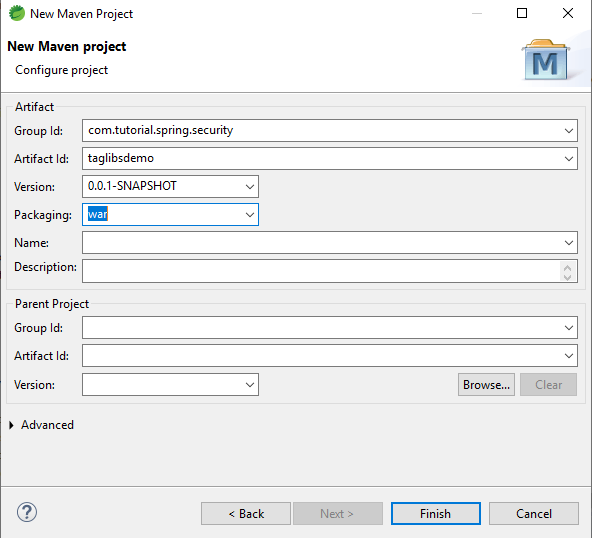
設定應用程式
讓我們在STS中建立一個簡單的Maven專案。我們可以將我們的應用程式命名為taglibsdemo,並將其打包為.war檔案。
完成應用程式設定後,其結構應類似於此。
pom.xml檔案
我們將向我們的應用程式新增以下依賴項:
- Spring Web MVC
- Spring-Security-Web
- Spring-Security-Core
- Spring-Security-Taglibs
- Spring-Security-Config
- Javax Servlet Api
- JSTL
新增這些依賴項後,我們的pom.xml應該看起來類似於此:
<project xmlns="http://maven.apache.org/POM/4.0.0"
   xmlns:xsi="http://www.w3.org/2001/XMLSchema-instance"
   xsi:schemaLocation="http://maven.apache.org/POM/4.0.0
   https://maven.apache.org/xsd/maven-4.0.0.xsd">
   <modelVersion>4.0.0</modelVersion>
   <groupId>com.tutorial.spring.security</groupId>
   <artifactId>taglibsdemo</artifactId>
   <version>0.0.1-SNAPSHOT</version>
   <packaging>war</packaging>
   <properties>
      <maven.compiler.target>1.8</maven.compiler.target>
      <maven.compiler.source>1.8</maven.compiler.source>
   </properties>
   <dependencies>
      <dependency>
         <groupId>org.springframework</groupId>
         <artifactId>spring-webmvc</artifactId>
         <version>5.0.2.RELEASE</version>
      </dependency>
      <dependency>
         <groupId>org.springframework.security</groupId>
         <artifactId>spring-security-web</artifactId>
         <version>5.0.0.RELEASE</version>
      </dependency>
      <dependency>
         <groupId>org.springframework.security</groupId>
         <artifactId>spring-security-core</artifactId>
         <version>5.0.4.RELEASE</version>
      </dependency>
      <dependency>
         <groupId>org.springframework.security</groupId>
         <artifactId>spring-security-taglibs</artifactId>
         <version>5.0.4.RELEASE</version>
      </dependency>
      <dependency>
         <groupId>org.springframework.security</groupId>
         <artifactId>spring-security-config</artifactId>
         <version>5.0.4.RELEASE</version>
      </dependency>
      <dependency>
         <groupId>javax.servlet</groupId>
         <artifactId>javax.servlet-api</artifactId>
         <version>3.1.0</version>
         <scope>provided</scope>
         </dependency> <dependency>
         <groupId>javax.servlet</groupId>
         <artifactId>jstl</artifactId>
         <version>1.2</version>
      </dependency>
   </dependencies>
   <build>
      <plugins>
         <plugin>
            <groupId>org.apache.maven.plugins</groupId>
            <artifactId>maven-war-plugin</artifactId>
            <version>2.6</version>
            <configuration>
            <failOnMissingWebXml>false</failOnMissingWebXml>
            </configuration>
         </plugin>
      </plugins>
   </build>
</project>
讓我們為應用程式建立基本包。我們可以將其命名為com.taglibsdemo。在這個包中,讓我們為我們的配置檔案建立另一個包。由於它將儲存配置檔案,因此我們可以將其命名為config。
ApplicationConfig.java
讓我們建立我們的第一個配置類ApplicationConfig.java。
package com.taglibsdemo.config;

import org.springframework.context.annotation.Bean;
import org.springframework.context.annotation.ComponentScan;
import org.springframework.context.annotation.Configuration;
import org.springframework.web.servlet.config.annotation.EnableWebMvc;
import org.springframework.web.servlet.view.InternalResourceViewResolver;
import org.springframework.web.servlet.view.JstlView;

@EnableWebMvc
@Configuration @ComponentScan({ "com.taglibsdemo.controller"} )
public class ApplicationConfig {
   @Bean
   public InternalResourceViewResolver viewResolver() {
      InternalResourceViewResolver
      viewResolver = new InternalResourceViewResolver();
      viewResolver.setViewClass(JstlView.class);
      viewResolver.setPrefix("/WEB-INF/views/");
      viewResolver.setSuffix(".jsp"); return viewResolver;
   }
}
讓我們分解一下這段程式碼:
- @EnableWebMvc - 我們使用@EnableWebMvc來啟用Spring MVC。因此,我們將此註解新增到@Configuration類中,以從WebMvcConfigurationSupport匯入Spring MVC配置。WebMvcConfigurationSupport是提供MVC Java配置的主要類。不使用此註解可能會導致content-type和accept header等問題,通常內容協商不起作用。@EnableWebMvc註冊RequestMappingHandlerMapping、RequestMappingHandlerAdapter和ExceptionHandlerExceptionResolver等,以支援使用@RequestMapping、@ExceptionHandler等註解處理帶有註解的控制器方法的請求。
- @Configuration - 此註解表明該類聲明瞭一個或多個@Bean方法,並且可以由Spring IoC容器處理,以在執行時生成bean定義併為這些bean服務請求。@Configuration類通常使用AnnotationConfigApplicationContext或其支援Web的變體AnnotationConfigWebApplicationContext來引導。
- @ComponentScan - @ComponentScan註解用於告訴Spring掃描哪些包以查詢帶註解的元件。@ComponentScan還用於使用@ComponentScan的basePackageClasses或basePackages屬性指定基本包和基本包類。
- InternalResourceViewResolver - 將提供的URI解析為格式為prefix + viewname + suffix的實際URI。
- setViewClass() - 設定用於建立檢視的檢視類。
- setPrefix() - 設定在構建URL時新增到檢視名稱之前的字首。
- setSuffix() - 設定在構建URL時新增到檢視名稱之後的字尾。
WebSecurityConfig.java
接下來,我們將建立我們的WebSecurityConfig類,它將擴充套件Spring Security熟悉的WebSecurityConfigurerAdapter類。
package com.taglibsdemo.config;

import org.springframework.context.annotation.Bean;
import org.springframework.context.annotation.ComponentScan;
import org.springframework.security.config.annotation.web.builders.HttpSecurity;
import org.springframework.security.config.annotation.web.configuration.EnableWebSecurity;
import org.springframework.security.config.annotation.web.configuration.WebSecurityConfigurerAdapter;
import org.springframework.security.core.userdetails.UserDetailsService;
import org.springframework.security.provisioning.InMemoryUserDetailsManager;
import org.springframework.security.web.util.matcher.AntPathRequestMatcher;
import org.springframework.security.core.userdetails.User;
import org.springframework.security.core.userdetails.User.UserBuilder;
@EnableWebSecurity @ComponentScan("com.taglibsdemo")
public class WebSecurityConfig extends WebSecurityConfigurerAdapter {
   @SuppressWarnings("deprecation") @Bean
   public UserDetailsService userdetailsService() {
      UserBuilder users = User.withDefaultPasswordEncoder();
      InMemoryUserDetailsManager manager = new InMemoryUserDetailsManager();
      manager.createUser(users.username("rony").password("rony123").roles("USER").build());
      manager.createUser(users.username("admin").password("admin123").roles("ADMIN").build());
      return manager;
   }
   @Override protected void configure(HttpSecurity http) throws Exception {
      http.authorizeRequests() .antMatchers("/index", "/").permitAll()
      .antMatchers("/admin", "/user").authenticated() .and() .formLogin()
      .and() .logout() .logoutRequestMatcher(
         new AntPathRequestMatcher("/logout")
      );
   }
}
讓我們分解一下這段程式碼:
- WebSecurityConfigurerAdapter - 實現WebSecurityConfigurer和WebSecurityConfigurerAdapter,並允許我們重寫安全配置方法的抽象類。
- @EnableWebSecurity - 它使Spring能夠自動查詢並將@Configuration類應用於全域性WebSecurity。
- 然後,我們使用該方法使用InMemoryUserDetailsManager例項建立使用者來建立一個UserDetailsService Bean。我們建立兩個使用者——一個具有“USER”角色,另一個具有“ADMIN”角色,並將它們新增到Spring Security。
- 之後,我們使用HttpSecurity作為引數重寫configure方法。我們使我們的主頁或索引頁面對所有人可見,管理員頁面僅在使用者已透過身份驗證時可見。接下來,我們新增Spring Security表單登入和登出。
因此,透過這些步驟,我們的安全配置就完成了。現在,我們可以繼續下一步了。
SpringSecurityApplicationInitializer.java
接下來,我們將建立SpringSecurityApplicationInitializer.java類,它擴充套件Spring Security的AbstractSecurityWebApplicationInitializer類。
package com.taglibsdemo.config;
import org.springframework.security.web.context.AbstractSecurityWebApplicationInitializer;
public class SpringSecurityApplicationInitializer extends
AbstractSecurityWebApplicationInitializer { }
AbstractSecurityWebApplicationInitializer是一個實現Spring的WebApplicationInitializer的抽象類。因此,如果類路徑包含spring-web模組,SpringServletContainerInitializer將初始化此類的具體實現。
MvcWebApplicationInitializer.java
package com.taglibsdemo.config;
import org.springframework.web.servlet.support.AbstractAnnotationConfigDispatcherServletInitializer;
public class MvcWebApplicationInitializer extends
AbstractAnnotationConfigDispatcherServletInitializer {
   @Override protected Class</?>[] getRootConfigClasses() {
      return new Class[] {WebSecurityConfig.class};
   }
   @Override protected Class</?>[] getServletConfigClasses() {
      return null;
   }
   @Override protected String[] getServletMappings() {
      return new String[] {"/"};
   }
}
- AbstractAnnotationConfigDispatcherServletInitializer - 此類擴充套件了WebApplicationInitializer。我們需要此類作為在Servlet容器環境中初始化Spring應用程式的基類。因此,AbstractAnnotationConfigDispatcherServletInitializer的子類將提供用@Configuration註解的類、Servlet配置類和DispatcherServlet對映模式。
- getRootConfigClasses() - 此方法必須由擴充套件AbstractAnnotationConfigDispatcherServletInitializer的類實現。它提供“根”應用程式上下文配置。
- getServletConfigClasses() - 此方法也必須實現,以提供DispatcherServlet應用程式上下文配置。
- getServletMappings() - 此方法用於指定DispatcherServlet的servlet對映。
我們已經設定好了配置類。現在,我們將建立我們的控制器來服務JSP頁面。
HelloController.java
package com.taglibsdemo.controller;
import org.springframework.stereotype.Controller;
import org.springframework.web.bind.annotation.GetMapping;
@Controller public class HelloController {
@GetMapping("/")
   public String index() { return "index"; }
   @GetMapping("/user")
   public String user() { return "admin"; }
   @GetMapping("/admin")
   public String admin() { return "admin"; }
}
在這裡,我們建立了三個端點——“/”、“/user”和“/admin”。正如我們之前在配置中指定的,我們將允許對索引頁面進行未授權訪問
“/”。另一方面,“/user”和“/admin”端點將僅允許授權訪問。
安全內容服務
接下來,我們將建立要在點選特定端點時服務的JSP頁面。
為此,在我們的src/main資料夾內,我們建立一個名為webapp的資料夾。在這個資料夾裡,我們建立我們的WEB-INF資料夾,並在ApplicationConfig.java類中新增views資料夾。在這裡,在這個資料夾中,我們將新增檢視。
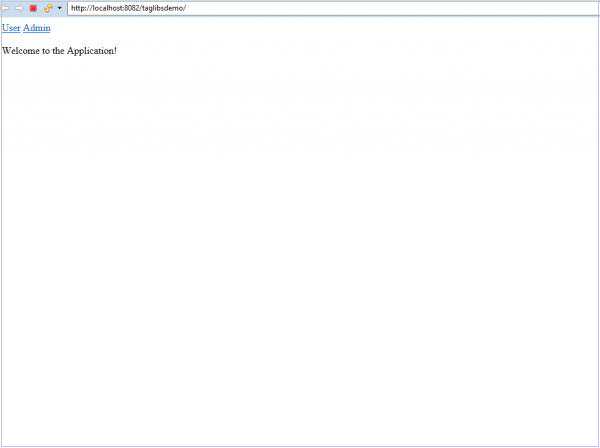
讓我們先新增我們的主頁,即index.jsp。
<%@ page language="java" contentType="text/html;
   charset=ISO-8859-1" pageEncoding="ISO-8859-1"%>
<!DOCTYPE html>
<html>
   <head>
      <meta charset="ISO-8859-1">
      <title>Home Page</title>
   </head>
   <body>
      <a href="user">User</a>
      <a href="admin">Admin</a>
      <br>
      <br> Welcome to the Application!
   </body>
</html>
然後我們將建立我們的admin.jsp檔案。讓我們新增它。
<%@ page language="java" contentType="text/html;
charset=ISO-8859-1" pageEncoding="ISO-8859-1"%>
<%@ taglib uri="http://www.springframework.org/security/tags" prefix="security"%>
<!DOCTYPE html>
<html>
<head>
<meta charset="ISO-8859-1">
<meta http-equiv="Content-Type" content="text/html; charset=UTF-8">
<title>Insert title here</title>
</head>
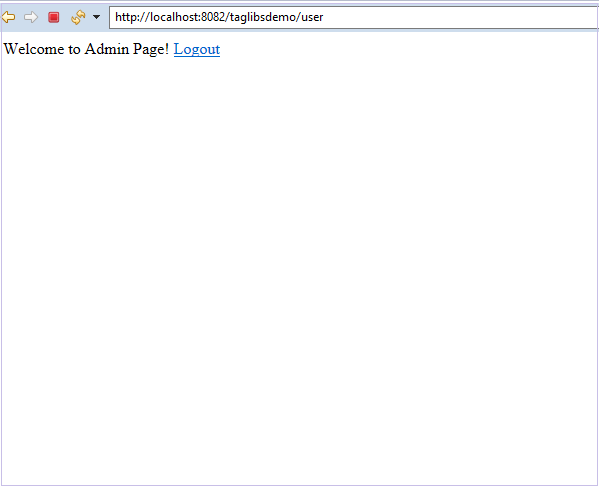
<body> Welcome to Admin Page! <a href="logout"> Logout </a>
<br>
<br>
<security:authorize access="hasRole('ADMIN')"> Hello Admin!
</security:authorize>
</body>
</html>
這裡,我們添加了<%@ taglib uri="http://www.springframework.org/security/tags" prefix="security"%>。這將讓我們使用Spring安全標籤庫,正如之前所討論的。正如我們所看到的,我們在內容周圍添加了“authorize”標籤。此內容只能由我們的管理員訪問。任何其他訪問此頁面的使用者都無法檢視此內容。
執行應用程式
現在我們右鍵單擊專案並選擇“在伺服器上執行”。當伺服器啟動並且我們的應用程式正在執行時,我們可以訪問瀏覽器上的localhost:8080/taglibsdemo/來檢視頁面。
登入頁面
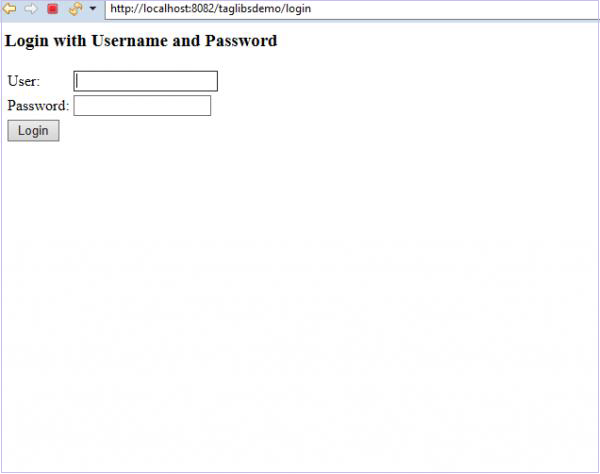
現在,如果我們點選應用程式中的“使用者”連結,系統將要求我們登入。
在這裡,正如我們在控制器中看到的,我們為使用者和管理員連結都提供了管理員頁面。但是我們的使用者,如果他不是管理員,則無法檢視受我們的“authorize”標籤保護的內容。
讓我們先以使用者身份登入。
我們可以看到“Hello Admin!”內容對我們不可見。這是因為當前使用者沒有管理員角色。
讓我們登出並以管理員身份登入。
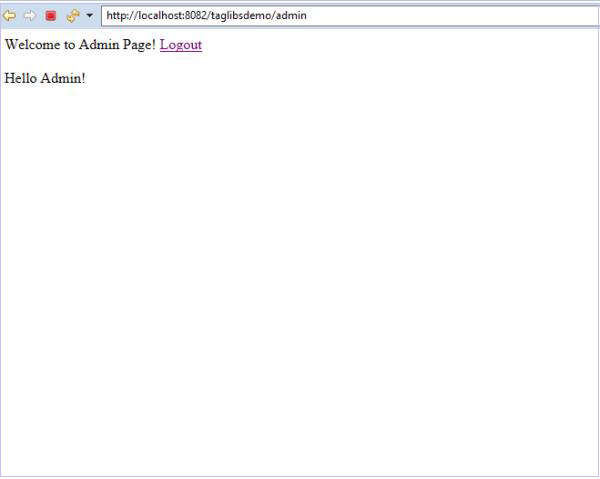
現在我們可以看到受保護的內容“Hello Admin!”,因為當前使用者具有管理員角色。
從今天的文章中,我們學習瞭如何使用基於註解的配置使用資料庫為登入使用自定義表單。我們還學習瞭如何防止多次登入失敗嘗試。在此過程中,我們瞭解瞭如何實現我們自己的 **AuthenticationProvider** 和 **UserDetailsService** 來使用我們的自定義身份驗證過程來驗證使用者。
我們學習瞭如何使用Spring Security標籤庫來保護我們的內容並訪問Spring Security上下文中的當前Authentication物件。
Spring Security - XML 配置
目錄
- 基礎知識
- 入門(實踐指南)
基礎知識
在本指南中,我們將討論如何使用XML配置配置Spring Security。我們將開發一個使用Spring Security的簡單的Spring應用程式。在此過程中,我們將詳細討論我們正在使用的每個元件。
身份驗證和授權
- 身份驗證 - 身份驗證是確保使用者或客戶端是他們聲稱的那個人。Spring Security有很多方法可以讓我們執行身份驗證。Spring Security支援基本身份驗證、LDAP身份驗證、JDBC身份驗證等。
- 授權 - 確保使用者是否具有操作許可權。如果我們的應用程式是一個複雜的應用程式,具有不同型別的使用者,例如管理員、普通使用者、其他許可權較低的使用者,我們需要維護應用程式中的訪問控制。例如,訪客使用者不應該能夠訪問管理員內容。因此,為了控制對應用程式中各種資源的訪問,我們需要檢查使用者是否有權訪問該資源。
上述主題是Spring Security的兩個主要元件。Spring Security為我們在應用程式中實現身份驗證和授權提供了各種內建功能。我們可以使用這些功能以及我們自己的更改來快速保護應用程式。除此之外,Spring Security還允許對之前提到的功能進行大量自定義,以便實現我們自己的複雜身份驗證和授權。
入門(實用指南)
讓我們來看一個使用內建Spring Security功能的基本示例。在這個示例中,我們將使用Spring Security提供的開箱即用選項來保護我們的應用程式。這將使我們瞭解Spring Security的各個元件以及如何將它們用於我們的應用程式。我們將使用XML來配置應用程式的安全功能。
我們將用於應用程式的工具是Spring Tool Suite 4和Apache Tomcat伺服器9.0。它們都可以免費下載和使用。
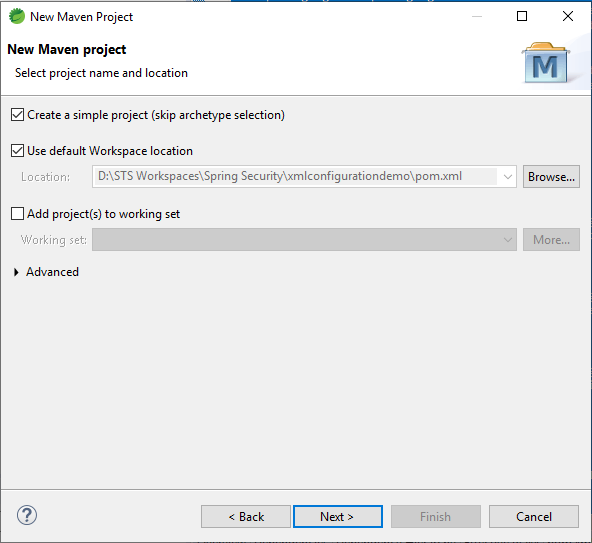
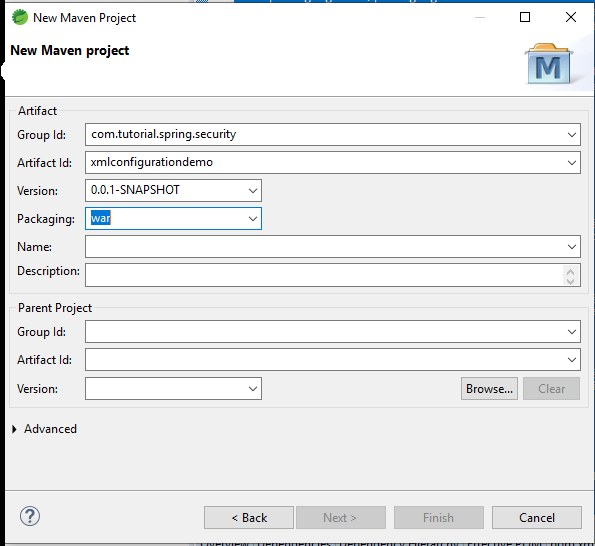
首先,讓我們在STS中啟動一個新的簡單Maven專案。我們可以根據自己的選擇選擇group id和artifact id。之後,我們點選“完成”。結果,我們將專案新增到我們的工作區。讓我們給STS一些時間來構建和驗證我們的專案。
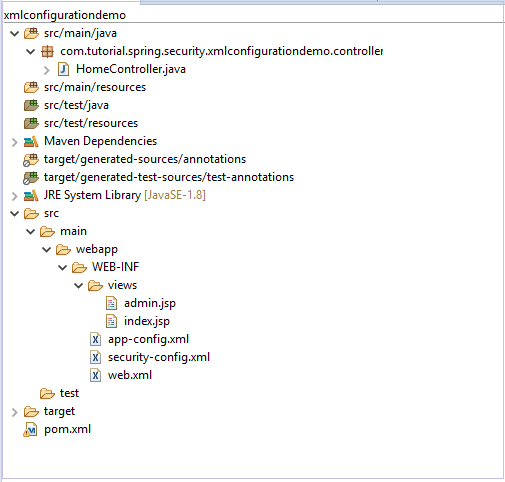
我們的專案結構最終將類似於此。
接下來,讓我們新增依賴項。我們將選擇以下依賴項。
- Spring Web MVC
- Spring-Security-Web
- Spring-Security-Core
- Spring-Security-Config
- Javax Servlet API
pom.xml
新增這些依賴項後,我們就可以配置我們的專案了。讓我們看一下我們的pom.xml檔案。
<project xmlns="http://maven.apache.org/POM/4.0.0"
   xmlns:xsi="http://www.w3.org/2001/XMLSchema-instance"
   xsi:schemaLocation="http://maven.apache.org/POM/4.0.0
   https://maven.apache.org/xsd/maven-4.0.0.xsd>
   <modelVersion>4.0.0</modelVersion>
   <groupId>com.tutorial.spring.security</groupId>
      <artifactId>xmlconfigurationdemo</artifactId>
      <version>0.0.1-SNAPSHOT</version>
      <packaging>war</packaging>
      <name>Spring Security with XML configuration</name> <description>Spring Security with XML configuration</description>
      <properties>
      <maven.compiler.target>1.8</maven.compiler.target> <maven.compiler.source>1.8</maven.compiler.source> </properties>
      <dependencies>
      <dependency>
         <groupId>org.springframework</groupId>
         <artifactId>spring-webmvc</artifactId>
         <version>5.0.2.RELEASE<version>
         </dependency> <dependency>
         <groupId>org.springframework.security</groupId>
         <artifactId>spring-security-web</artifactId>
         <version>5.0.0.RELEASE</version>
      </dependency>
      <dependency>
         <groupId>org.springframework.security</groupId>
         <artifactId>spring-security-core</artifactId>
         <version>5.0.0.RELEASE</version>
      </dependency>
      <dependency>
         <groupId>org.springframework.security</groupId>
         <artifactId>spring-security-config</artifactId>
         <version>5.0.0.RELEASE</version>
      </dependency>
      <dependency>
         <groupId>javax.servlet</groupId>
         <artifactId>javax.servlet-api</artifactId>
         <version>3.1.0</version>
         <scope>provided</scope>
      </dependency>
      </dependencies>
      <build>
         <plugins>
            <plugin>
            <groupId>org.apache.maven.plugins</groupId>
            <artifactId>maven-war-plugin</artifactId>
            <version>2.6</version>
            <configuration>
               <failOnMissingWebXml>false</failOnMissingWebXml>
            </configuration>
         </plugin>
      </plugins>
   </build>
</project>
控制器和檢視
首先,我們將建立我們的控制器。因此,讓我們建立一個名為controller的包並將我們的HomeController類新增到包中。
package com.tutorial.spring.security.xmlconfigurationdemo.controller;
import org.springframework.stereotype.Controller;
import org.springframework.web.bind.annotation.RequestMapping;
import org.springframework.web.bind.annotation.RequestMethod;
@Controller public class HomeController { @GetMapping("/")
public String index() { return "index"; }
@GetMapping("/admin")
public String admin() { return "admin"; } }
在這裡,我們有兩個端點——“index”和“admin”。雖然index頁面對所有人都是可訪問的,但我們將保護我們的“admin”頁面。
由於我們已經建立了路由,讓我們也新增頁面。
在我們的/src/main/webapp資料夾中,讓我們建立一個名為WEB-INF的資料夾。然後在其中,我們將建立一個名為views的資料夾,我們將在其中建立我們的檢視。
讓我們建立我們的第一個檢視-
<%@ page language="java" contentType="text/html;
charset=ISO-8859-1" pageEncoding="ISO-8859-1"%>
<!DOCTYPE html>
<html>
   <head>
      <meta charset="ISO-8859-1"> <title>Insert title here</title>
   </head>
   <body>
      <h2>Welcome to Spring Security!</h2>
   </body>
</html>
然後我們建立我們的管理員檢視。
<%@ page language="java" contentType="text/html; charset=ISO-8859-1" pageEncoding="ISO-8859-1"%>
<DOCTYPE html>
<html>
<head>
<meta charset="ISO-8859-1"> <title>Insert title here</title>
</head>
<body>
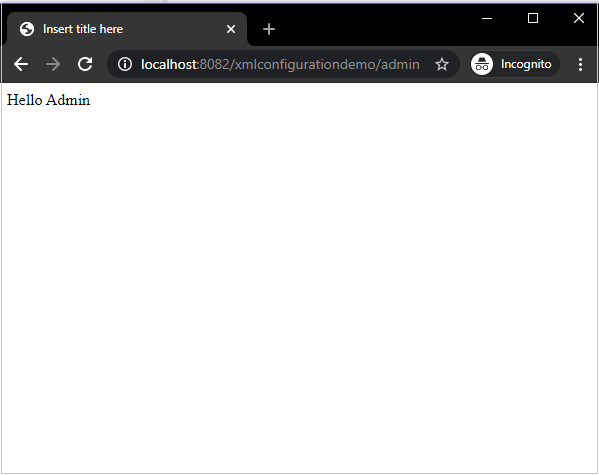
Hello Admin
</body>
</html>
接下來,讓我們配置我們的應用程式。
配置。
web.xml
現在,讓我們新增我們的第一個xml檔案——web.xml檔案。
<?xml version="1.0" encoding="UTF-8"?>
<!DOCTYPE xml>
<web-app xmlns="http://xmlns.jcp.org/xml/ns/javaee"
   xmlns:xsi="http://www.w3.org/2001/XMLSchema-instance"
   xsi:schemaLocation="http://xmlns.jcp.org/xml/ns/javaee
   http://xmlns.jcp.org/xml/ns/javaee/web-app_3_1.xsd" version="3.1"> <servlet>
   <servlet-name>spring</servlet-name>
   <servlet-class>org.springframework.web.servlet.DispatcherServlet</servlet-class>
   <init-param>
      <param-name>contextConfigLocation</param-name>
      <param-value>/WEB-INF/app-config.xml</param-value>
   </init-param>
   <load-on-startup>1</load-on-startup>
   </servlet>
   <servlet-mapping>
   <servlet-name>spring</servlet-name>
   <url-pattern>/</url-pattern>
   </servlet-mapping>
   <listener>
      <listener-class>org.springframework.web.context.ContextLoaderListener</listener-class>
   </listener>
   <context-param>
      <param-name>contextConfigLocation</param-name>
      <param-value> /WEB-INF/security-config.xml </param-value>
   </context-param>
   <filter>
      <filter-name>springSecurityFilterChain</filter-name>
      <filter-class>org.springframework.web.filter.DelegatingFilterProxy</filter-class>
   </filter>
   <filter-mapping>
      <filter-name>springSecurityFilterChain</filter-name>
      <url-pattern>/*</url-pattern>
   </filter-mapping>
</web-app>
程式碼分解
- 排程程式Servlet - 我們在這裡宣告的第一個servlet是Dispatcher servlet。排程程式servlet是任何Spring MVC應用程式的入口點,並且是整個Spring MVC框架設計的核心。它攔截所有HTTP請求並將它們分派給註冊的處理程式以處理web請求。它還提供方便的對映和異常處理功能。“load-on-startup”值決定了servlet載入的順序。“load-on-startup”值越低的servlet越先載入。
- contextConfigLocation - 它是一個字串,指示可以在哪裡找到上下文。此字串表示指向檔案的路徑,我們的配置可以從此處載入。
- servlet-mapping - 我們使用Servlet Mapping來告訴Spring容器將哪個請求路由到哪個servlet。在我們的例子中,我們將所有請求路由到我們的“spring”Dispatcher servlet。
- 監聽器 - 監聽某些型別事件並在此類事件發生時觸發相應功能的類。每個監聽器都繫結到一個事件。在我們的例子中,我們將使用ContextLoaderListener為web應用程式建立一個根web應用程式上下文。然後將其放入ServletContext中,該上下文可用於載入和解除安裝spring管理的bean。
- 過濾器 - Spring使用過濾器在將請求交給Dispatcher Servlet之前處理請求,還用於在請求分派後處理響應。DelegatingFilterProxy將應用程式上下文連結到web.xml檔案。到達此應用程式的請求將在到達其控制器之前透過我們命名的“spring SecurityFilterChain”過濾器。這是Spring Security可以在將請求傳遞到下一組過濾器或處理程式之前接管請求並在其上執行操作的地方。
security-config.xml
接下來,我們將建立security-config.xml檔案。
<?xml version="1.0" encoding="UTF-8"?>
<beans:beans xmlns="http://www.springframework.org/schema/security"
xmlns:beans="http://www.springframework.org/schema/beans"
xmlns:xsi="http://www.w3.org/2001/XMLSchema-instance"
xsi:schemaLocation="http://www.springframework.org/schema/beans
http://www.springframework.org/schema/beans/spring-beans.xsd
http://www.springframework.org/schema/security
http://www.springframework.org/schema/security/spring-security.xsd">
<http auto-config="true">
<intercept-url pattern="/admin"
access="hasRole('ROLE_ADMIN')" /> </http>
<authentication-manager>
<authentication-provider>
   <user-service>
   <user name="admin" password="{noop}1234" authorities="ROLE_ADMIN" />
   </user-service>
   </authentication-provider> </authentication-manager>
   <beans:bean id ="passwordEncoder"
      class = "org.springframework.security.crypto.password.NoOpPasswordEncoder"
      factory-method = "getInstance">
   </beans:bean>
</beans:beans>
程式碼分解
- http元素 - 所有與web相關的名稱空間功能的父級。在這裡,我們可以配置要攔截哪些URL、需要哪些許可權、使用哪種型別的登入以及所有此類配置。
- auto-config - 將此屬性設定為true會自動設定表單登入、基本登入和登出功能。Spring Security使用標準值和啟用的功能生成它們。
- intercept-url - 它使用access屬性設定我們要保護的URL的模式。
- access - 它指定哪些使用者可以訪問模式屬性指定的URL。這是根據使用者的角色和許可權進行的。我們可以使用SPEL與這個屬性一起使用。
- authentication-manager - <authentication-manager>用於在應用程式中配置使用者、其密碼和角色。這些使用者將是能夠訪問應用程式的受保護部分的使用者,前提是他們擁有適當的角色。<authentication-provider<將建立一個DaoAuthenticationProvider bean,而<user-service<元素將建立一個InMemoryDaoImpl。所有authentication-provider元素都將允許使用者透過向authentication-manager提供使用者資訊來進行身份驗證。
- password-encoder - 這將註冊一個密碼編碼器bean。為了簡單起見,我們在這裡使用了NoOpPasswordEncoder。
接下來,我們建立最後一個配置檔案——app-config檔案。在這裡,我們將新增我們的檢視解析器程式碼並定義我們的基本包。
app-config.xml
<?xml version="1.0" encoding="UTF-8"?>
<beans xmlns="http://www.springframework.org/schema/beans"
   xmlns:xsi="http://www.w3.org/2001/XMLSchema-instance"
   xmlns:mvc="http://www.springframework.org/schema/mvc"
   xmlns:context="http://www.springframework.org/schema/context" xsi:schemaLocation="
   http://www.springframework.org/schema/mvc
   http://www.springframework.org/schema/mvc/spring-mvc.xsd
   http://www.springframework.org/schema/beans
   http://www.springframework.org/schema/beans/spring-beans.xsd
   http://www.springframework.org/schema/context
   http://www.springframework.org/schema/context/spring-context.xsd">
   <mvc:annotation-driven />
   <context:component-scan
      base-package="com.tutorial.spring.security.xmlconfigurationdemo.controller">
   </context:component-scan>
   <context:annotation-config>
   </context:annotation-config>
   <bean class="org.springframework.web.servlet.view.InternalResourceViewResolver">
      <property name="prefix" value="/WEB-INF/views/"></property>
      <property name="suffix" value=".jsp"></property>
   </bean>
</beans>
在這裡,正如我們所看到的,我們正在註冊我們之前建立的檢視。為此,我們使用InternalResourceViewResolver類,它將提供的URI對映到實際的URI。
例如,使用上述配置,如果我們請求URI“/admin”,DispatcherServlet將請求轉發到
prefix + viewname + suffix = /WEB-INF/views/admin.jsp檢視。
執行應用程式
透過這個簡單的配置,我們的應用程式就可以準備服務了。我們可以右鍵單擊專案並選擇“在伺服器上執行”。我們可以選擇我們的Tomcat伺服器。伺服器啟動後,我們可以訪問localhost:8080/xmlconfigurationdemo與我們的應用程式進行互動。
如果我們輸入正確的憑據,我們將能夠登入並看到我們想要的內容。
Spring Security - OAuth2
目錄
- OAuth2.0 基礎知識
- OAuth2.0 入門(實踐指南)
OAuth 2.0 基礎知識
OAuth 2.0由IETF OAuth工作組開發,並於2012年10月釋出。它作為一種開放的授權協議,允許第三方應用程式代表資源所有者獲取對HTTP服務的有限訪問許可權。它可以在不透露使用者的身份或長期憑據的情況下做到這一點。第三方應用程式本身也可以代表自身使用它。OAuth的工作原理包括將使用者身份驗證委託給託管使用者帳戶並授權第三方應用程式訪問使用者帳戶的服務。
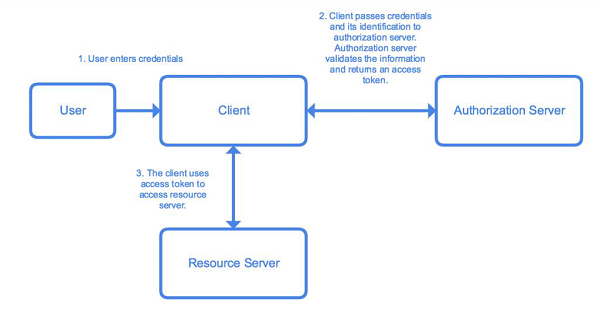
讓我們來看一個例子。假設我們想要登入網站“clientsite.com”。我們可以透過Facebook、Github、Google或Microsoft登入。我們選擇以上任一選項,就會被重定向到相應的網站進行登入。如果登入成功,系統會詢問我們是否要授予clientsite.com訪問其請求的特定資料的許可權。我們選擇所需的選項,然後就會被重定向到clientsite.com,並獲得一個授權碼或錯誤碼,我們的登入成功與否取決於我們在第三方資源中的操作。這就是OAuth 2的基本工作原理。
OAuth系統涉及五個關鍵參與者。讓我們列舉一下:
使用者/資源所有者 − 終端使用者,負責身份驗證並同意與客戶端共享資源。
使用者代理 − 使用者使用的瀏覽器。
客戶端 − 請求訪問令牌的應用程式。
授權伺服器 − 用於對使用者/客戶端進行身份驗證的伺服器。它頒發訪問令牌並在其整個生命週期內跟蹤它們。
資源伺服器 − 提供對請求資源訪問的API。它驗證訪問令牌並提供授權。
入門
我們將使用Spring Boot、Spring Security和OAuth 2.0開發一個應用程式來進行演示。我們將開發一個使用記憶體資料庫儲存使用者憑據的基本應用程式。該應用程式將使我們更容易理解Spring Security與OAuth 2.0的協同工作方式。
讓我們使用Spring Initializr在Java 8中建立一個Maven專案。首先訪問start.spring.io。我們使用以下依賴項生成一個應用程式:
- Spring Web
- Spring Security
- Cloud OAuth2
- Spring Boot Devtools

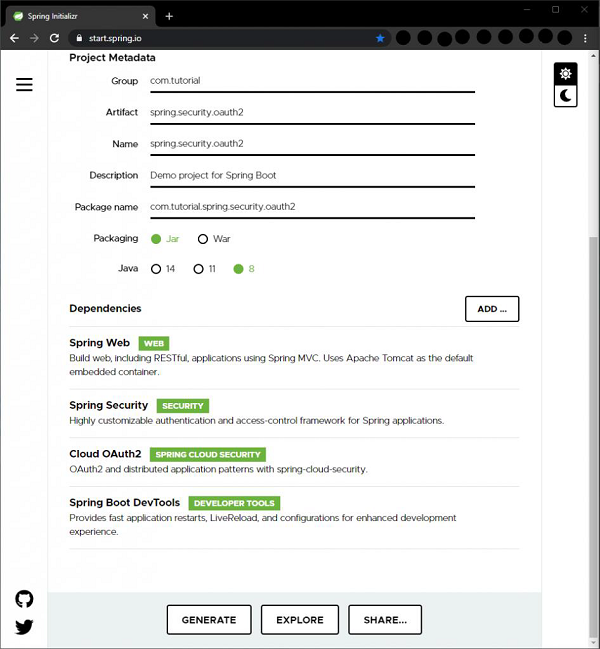
完成上述配置後,點選“Generate”按鈕生成專案。專案將下載為zip檔案。我們將zip檔案解壓到一個資料夾中。然後,我們可以在選擇的IDE中開啟專案。我在這裡使用Spring Tools Suite,因為它針對Spring應用程式進行了最佳化。我們也可以根據需要使用Eclipse或IntelliJ Idea。
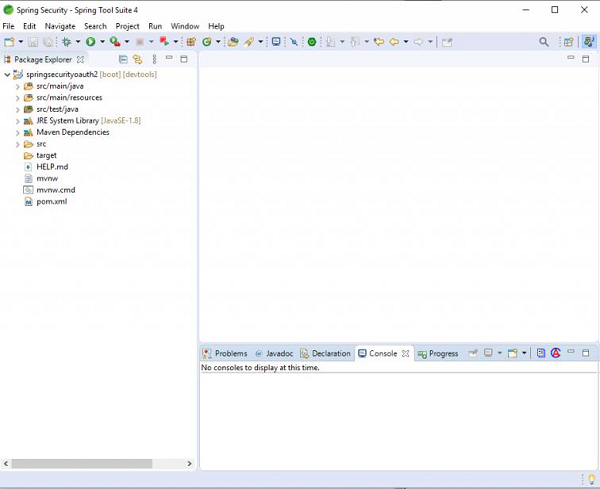
因此,我們在STS中開啟專案,等待依賴項下載完成。然後,我們可以在包資源管理器視窗中看到專案結構。它應該類似於下面的螢幕截圖。
如果我們開啟pom.xml檔案,可以檢視專案相關的依賴項和其他詳細資訊。它應該看起來像這樣。
<?xml version="1.0" encoding="UTF-8"?>
<project xmlns="http://maven.apache.org/POM/4.0.0"
   xmlns:xsi="http://www.w3.org/2001/XMLSchema-instance"
   xsi:schemaLocation="http://maven.apache.org/POM/4.0.0
   https://maven.apache.org/xsd/maven-4.0.0.xsd">
   <modelVersion>4.0.0</modelVersion>
   <parent>
      <groupId>org.springframework.boot</groupId>
      <artifactId>spring-boot-starter-parent</artifactId>
      <version>2.3.1.RELEASE</version>
      <relativePath/> <!-- lookup parent from repository -->
   </parent>
   <groupId>com.tutorial</groupId>
   <artifactId>spring.security.oauth2</artifactId>
   <version>0.0.1-SNAPSHOT</version>
   <name>spring.security.oauth2</name>
   <description>Demo project for Spring Boot</description>
   <properties>
      <java.version>1.8</java.version>
      <spring-cloud.version>Hoxton.SR6</spring-cloud.version>
   </properties>
   <dependencies>
      <dependency>
         <groupId>org.springframework.boot<groupId>
         <artifactId>spring-boot-starter-security</artifactId>
      </dependency>
      <dependency>
         <groupId>org.springframework.boot</groupId>
         <artifactId>spring-boot-starter-web</artifactId>
      </dependency>
      <dependency>
         <groupId>org.springframework.cloud</groupId>
         <artifactId>spring-cloud-starter-oauth2</artifactId>
      </dependency>
      <dependency>
         <groupId>org.springframework.boot<groupId>
         <artifactId>spring-boot-devtools</artifactId>
         <scope>runtime</scope>
         <optional>true</optional>
      </dependency>
      <dependency>
         <groupId>org.springframework.boot</groupId>
         <artifactId>spring-boot-starter-test</artifactId>
         <scope>test</scope> <exclusions>    <exclusion>
            <groupId>org.junit.vintage</groupId>
            <artifactId>junit-vintage-engine</artifactId>
            </exclusion>
         </exclusions>
      <dependency>
      <dependency>
         <groupId>org.springframework.security</groupId>
         <artifactId>spring-security-test</artifactId>
         <scope>test</scope>
      </dependency>
   </dependencies>
      <dependencyManagement>
   <dependencies>
      <dependency>
         <groupId>org.springframework.cloud</groupId>
         <artifactId>spring-cloud-dependencies</artifactId>
         <version>${spring-cloud.version}</version>
         <type>pom</type>
         <scope>import</scope>
      </dependency>
   </dependencies>
   </dependencyManagement><build>
   <plugins>
      <plugin>
         <groupId>org.springframework.boot</groupId>
         <artifactId>spring-boot-maven-plugin</artifactId>
      </plugin>
   </plugins>
   </build>
</project>
現在,在我們的應用程式的基本包中,即com.tutorial.spring.security.oauth2,讓我們新增一個名為config的新包,我們將在其中新增我們的配置類。
讓我們建立第一個配置類UserConfig,它擴充套件了Spring Security的WebSecurityConfigurerAdapter類來管理客戶端應用程式的使用者。我們使用@Configuration註解來告訴Spring這是一個配置類。
package com.tutorial.spring.security.oauth2.config;
import org.springframework.context.annotation.Bean;
import org.springframework.context.annotation.Configuration;
import org.springframework.security.authentication.AuthenticationManager;
import org.springframework.security.config.annotation.web.builders.HttpSecurity;
import org.springframework.security.config.annotation.web.configuration.WebSecurityConfigurerAdapter;
import org.springframework.security.core.userdetails.User;
import org.springframework.security.core.userdetails.UserDetails;
import org.springframework.security.core.userdetails.UserDetailsService;
import org.springframework.security.crypto.password.NoOpPasswordEncoder;
import org.springframework.security.crypto.password.PasswordEncoder;
import org.springframework.security.provisioning.InMemoryUserDetailsManager;
import org.springframework.security.provisioning.UserDetailsManager;
@Configuration public class UserConfig extends WebSecurityConfigurerAdapter {
   @Bean
   public UserDetailsService userDetailsService() {
      UserDetailsManager userDetailsManager = new InMemoryUserDetailsManager();
      UserDetails user = User.withUsername("john")
         .password("12345") .authorities("read")
      .build(); userDetailsManager.createUser(user); return userDetailsManager;
   }
   @Bean
   public PasswordEncoder passwordEncoder() {
      return NoOpPasswordEncoder.getInstance();
   }
   @Override
   @Bean
   public AuthenticationManager authenticationManagerBean() throws Exception {
      return super.authenticationManagerBean();
   }
}
然後,我們新增一個UserDetailsService的bean來檢索用於身份驗證和授權的使用者詳細資訊。為了將其放入Spring上下文,我們用@Bean對其進行註解。為了使本教程簡單易懂,我們使用InMemoryUserDetailsManager例項。對於實際應用程式,我們可以使用其他實現,例如JdbcUserDetailsManager來連線資料庫等等。為了方便本例中建立使用者,我們使用UserDetailsManager介面,它擴充套件了UserDetailsService,並具有createUser()、updateUser()等方法。然後,我們使用構建器類建立一個使用者。我們現在給他一個使用者名稱、密碼和“read”許可權。然後,使用createUser()方法,我們新增新建立的使用者並返回UserDetailsManager的例項,從而將其放入Spring上下文。
為了能夠使用我們定義的UserDetailsService,需要在Spring上下文中提供PasswordEncoder bean。同樣,為了簡化起見,我們現在使用NoOpPasswordEncoder。對於實際的生產應用,不應使用NoOpPasswordEncoder,因為它不安全。NoOpPasswordEncoder不編碼密碼,僅適用於開發或測試場景或概念驗證。我們應該始終使用Spring Security提供的其他高度安全的選項,其中最流行的是BCryptPasswordEncoder,我們將在本系列教程的後續部分使用它。為了將其放入Spring上下文,我們用@Bean註解該方法。
然後,我們覆蓋WebSecurityConfigurerAdapter的AuthenticationManager bean方法,該方法返回authenticationManagerBean以將身份驗證管理器放入Spring上下文。
現在,為了新增客戶端配置,我們新增一個名為AuthorizationServerConfig的新配置類,它擴充套件了Spring Security的AuthorizationServerConfigurerAdapter類。AuthorizationServerConfigurerAdapter類用於使用spring security oauth2模組配置授權伺服器。我們也用@Configuration註解這個類。為了向這個類新增授權伺服器功能,我們需要新增@EnableAuthorizationServer註解,以便應用程式可以充當授權伺服器。
package com.tutorial.spring.security.oauth2.config;
import org.springframework.beans.factory.annotation.Autowired;
import org.springframework.context.annotation.Configuration;
import org.springframework.security.authentication.AuthenticationManager;
import org.springframework.security.oauth2.config.annotation.configurers.ClientDetailsServiceConfigurer;
import org.springframework.security.oauth2.config.annotation.web.configuration.AuthorizationServerConfigurerAdapter;
import org.springframework.security.oauth2.config.annotation.web.configuration.EnableAuthorizationServer;
import org.springframework.security.oauth2.config.annotation.web.configurers.AuthorizationServerEndpointsConfigurer; @Configuration @EnableAuthorizationServer
public class AuthorizationServerConfig extends AuthorizationServerConfigurerAdapter {
   @Autowired private AuthenticationManager authenticationManager;
   @Override
   public void configure(ClientDetailsServiceConfigurer clients) throws Exception {
      clients.inMemory() .withClient("oauthclient1") .secret("oauthsecret1") .scopes("read") .authorizedGrantTypes("password") }
   @Override
   public void configure(AuthorizationServerEndpointsConfigurer endpoints) throws Exception {
      endpoints.authenticationManager(authenticationManager);
   }
}
對於檢查oauth令牌,Spring Security oauth公開了兩個端點 – /oauth/check_token 和 /oauth/token_key。預設情況下,這些端點受denyAll()保護。tokenKeyAccess()和checkTokenAccess()方法開啟這些端點以供使用。
我們將我們在UserConfig類中配置的AuthenticationManager bean作為依賴項自動裝配到這裡,稍後我們將使用它。
然後,我們覆蓋AuthorizationServerConfigurerAdapter的兩個configure()方法,以提供客戶端詳細資訊服務的記憶體實現。第一個方法使用ClientDetailsServiceConfigurer作為引數,顧名思義,它允許我們為授權伺服器配置客戶端。這些客戶端表示能夠使用此授權伺服器功能的應用程式。由於這是一個用於學習OAuth2實現的基本應用程式,因此我們現在將保持簡單,並使用具有以下屬性的記憶體實現:
clientId − 客戶端的ID。必需。
secret − 客戶端金鑰,受信任的客戶端需要。
scope − 客戶端的限制範圍,換句話說,就是客戶端許可權。如果留空或未定義,則客戶端不受任何範圍限制。
authorizedGrantTypes − 客戶端被授權使用的授權型別。授權型別表示客戶端從授權伺服器獲取令牌的方式。我們將使用“password”授權型別,因為它最簡單。稍後,我們將為另一個用例使用另一種授權型別。
在“password”授權型別中,使用者需要向我們的客戶端應用程式提供其使用者名稱、密碼和範圍,然後客戶端應用程式將這些憑據與其憑據一起用於我們想要從中獲取令牌的授權伺服器。
我們覆蓋的另一個configure()方法使用AuthorizationServerEndpointsConfigurer作為引數,用於將AuthenticationManager附加到授權伺服器配置。
透過這些基本配置,我們的授權伺服器就可以使用了。讓我們啟動它並使用它。我們將使用Postman ( https://www.postman.com/downloads/ ) 來發出請求。
使用STS時,我們可以啟動我們的應用程式並開始檢視控制檯中的日誌。應用程式啟動後,我們可以在控制檯中找到應用程式公開的oauth2端點。在這些端點中,我們現在將使用以下令牌:
/oauth/token – 用於獲取令牌。
如果我們檢視這裡的Postman快照,我們可以注意到一些事情。讓我們列在下面。
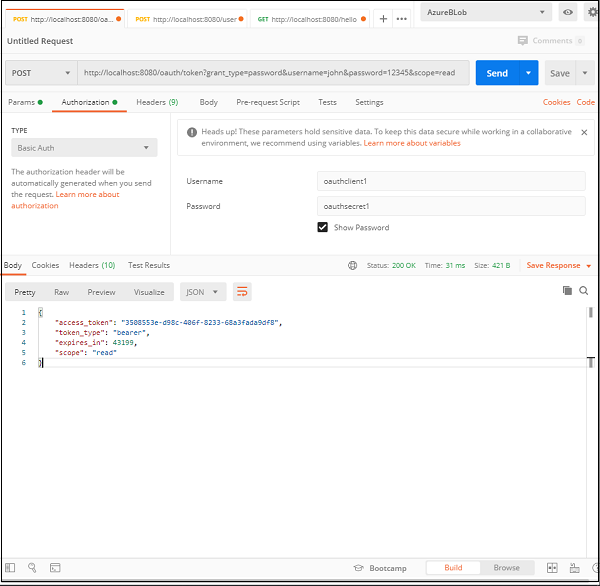
- URL − 我們的Spring Boot應用程式正在本地機器的8080埠執行,因此請求指向https://:8080。下一部分是/oauth/token,我們知道這是OAuth公開用於生成令牌的端點。
- 查詢引數− 由於這是一個“password”授權型別,使用者需要向我們的客戶端應用程式提供其使用者名稱、密碼和範圍,然後客戶端應用程式將這些憑據與其憑據一起用於我們想要從中獲取令牌的授權伺服器。
- 客戶端授權 − Oauth系統要求客戶端獲得授權才能提供令牌。因此,在Authorization標頭下,我們提供客戶端身份驗證資訊,即我們在應用程式中配置的使用者名稱和密碼。
讓我們更仔細地看看查詢引數和授權標頭:
查詢引數

客戶端憑據
如果一切正確,我們應該能夠在響應中看到生成的令牌以及200 ok狀態。

響應
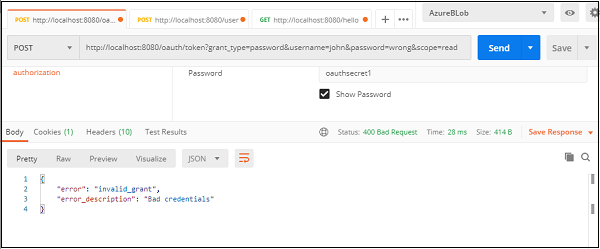
我們可以透過輸入錯誤的憑據或沒有憑據來測試我們的伺服器,我們會得到一個錯誤,提示請求未授權或憑據錯誤。
這是一個基本oauth授權伺服器,它使用密碼授權型別來生成和提供密碼。
接下來,讓我們實現一個更安全、更常見的oauth2身份驗證應用程式,即使用授權碼授權型別。我們將為此目的更新我們當前的應用程式。
授權碼授權型別與密碼授權型別的不同之處在於,使用者不必與客戶端應用程式共享其憑據。他們只與授權伺服器共享憑據,作為回報,授權碼將傳送給客戶端,客戶端使用它來驗證客戶端。它比密碼授權型別更安全,因為使用者憑據不會與客戶端應用程式共享,因此使用者資訊保持安全。除非使用者批准,否則客戶端應用程式無法訪問任何重要的使用者資訊。
通過幾個簡單的步驟,我們可以在應用程式中設定一個使用授權碼授權型別的基本oauth伺服器。讓我們看看如何操作。
package com.tutorial.spring.security.oauth2.config;
import org.springframework.beans.factory.annotation.Autowired;
import org.springframework.context.annotation.Configuration;
import org.springframework.security.authentication.AuthenticationManager;
import org.springframework.security.oauth2.config.annotation.configurers.ClientDetailsServiceConfigurer;
import org.springframework.security.oauth2.config.annotation.web.configuration.AuthorizationServerConfigurerAdapter;
import org.springframework.security.oauth2.config.annotation.web.configuration.EnableAuthorizationServer;
import org.springframework.security.oauth2.config.annotation.web.configurers.AuthorizationServerEndpointsConfigurer;
@Configuration
@EnableAuthorizationServer
public class AuthorizationServerConfig extends AuthorizationServerConfigurerAdapter {
   @Autowired private AuthenticationManager authenticationManager;
   @Override
   public void configure(ClientDetailsServiceConfigurer clients) throws Exception {
      clients.inMemory()
      .withClient("oauthclient1")
      .secret("oauthsecret1")
      .scopes("read") .authorizedGrantTypes("password")
      .and() .withClient("oauthclient2") .secret("oauthsecret2")
      .scopes("read") .authorizedGrantTypes("authorization_code")
      .redirectUris("http://locahost:9090");
   }
   @Override public void configure(AuthorizationServerEndpointsConfigurer endpoints) throws Exception {
      endpoints.authenticationManager(authenticationManager);
   }
}
讓我們為此操作新增第二個客戶端oauthclient2,使用新的金鑰和read範圍。在這裡,我們將此客戶端的授權型別更改為授權碼。我們還添加了一個重定向URI,以便授權伺服器可以回撥客戶端。因此,重定向URI基本上是客戶端的URI。
現在,我們必須在使用者和授權伺服器之間建立連線。我們必須為授權伺服器設定一個介面,使用者可以在其中提供憑據。我們使用Spring Security的formLogin()實現來實現該功能,同時保持簡單。我們還確保所有請求都經過身份驗證。
package com.tutorial.spring.security.oauth2.config;
import org.springframework.context.annotation.Bean;
import org.springframework.context.annotation.Configuration;
import org.springframework.security.authentication.AuthenticationManager;
import org.springframework.security.config.annotation.web.builders.HttpSecurity;
import org.springframework.security.config.annotation.web.configuration.WebSecurityConfigurerAdapter;
import org.springframework.security.core.userdetails.User;
import org.springframework.security.core.userdetails.UserDetails;
import org.springframework.security.core.userdetails.UserDetailsService;
import org.springframework.security.crypto.password.NoOpPasswordEncoder;
import org.springframework.security.crypto.password.PasswordEncoder;
import org.springframework.security.provisioning.InMemoryUserDetailsManager;
import org.springframework.security.provisioning.UserDetailsManager;
@SuppressWarnings("deprecation") @Configuration
public class UserConfig extends WebSecurityConfigurerAdapter {
   @Bean
   public UserDetailsService userDetailsService() {
      UserDetailsManager userDetailsManager = new InMemoryUserDetailsManager();
         UserDetails user = User.withUsername("john")
      .password("12345") .authorities("read") .build();
      userDetailsManager.createUser(user); return userDetailsManager;
   }
   @Bean public PasswordEncoder passwordEncoder() {
      return NoOpPasswordEncoder.getInstance();
    }
   @Override
   @Bean
   public AuthenticationManager authenticationManagerBean() throws Exception {
      return super.authenticationManagerBean();
   }
   @Override protected void configure(HttpSecurity http) throws Exception {
      http.formLogin(); http.authorizeRequests().anyRequest().authenticated();
   }
}
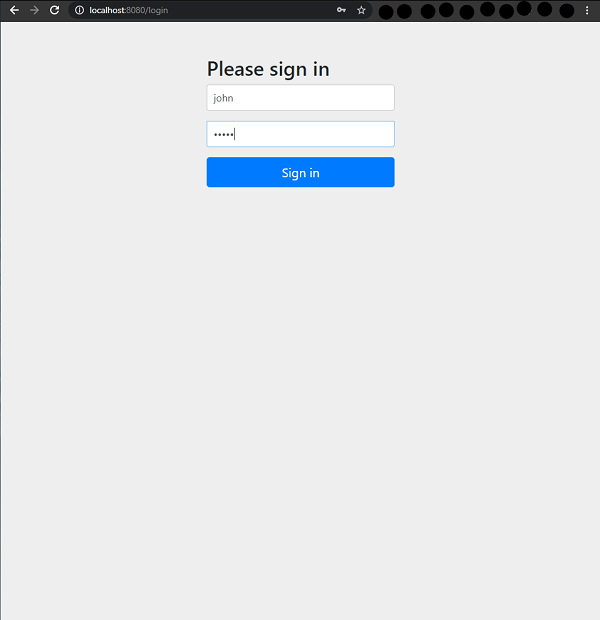
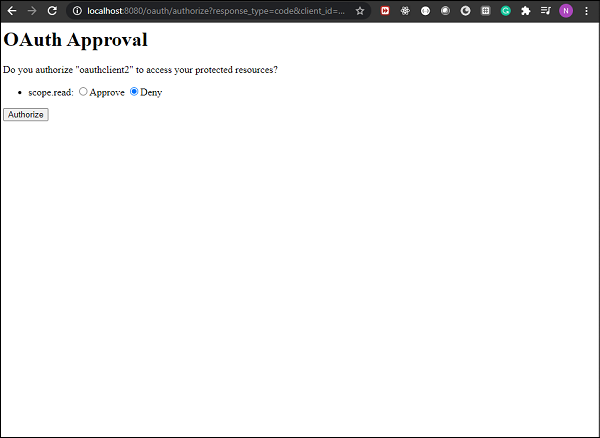
這完成了我們對授權碼授權型別的設定。現在測試我們的設定並啟動我們的應用程式。我們在https://:8080/oauth/authorize?response_type=code&client_id=oauthclient2&scope=read處啟動我們的瀏覽器。我們將被重定向到Spring Security的預設表單登入頁面。
這裡,響應型別程式碼意味著授權伺服器將返回一個訪問程式碼,客戶端將使用該程式碼登入。當我們使用使用者憑據時,系統會詢問我們是否要授予客戶端請求的許可權,類似於下面顯示的螢幕。
如果我們批准並點選“Authorize”,我們將看到我們被重定向到我們指定的重定向URL以及訪問程式碼。在我們的例子中,我們被重定向到http://locahost:9090/?code=7Hibnw,正如我們在應用程式中指定的。我們現在可以在Postman中使用此程式碼作為客戶端登入到授權伺服器。
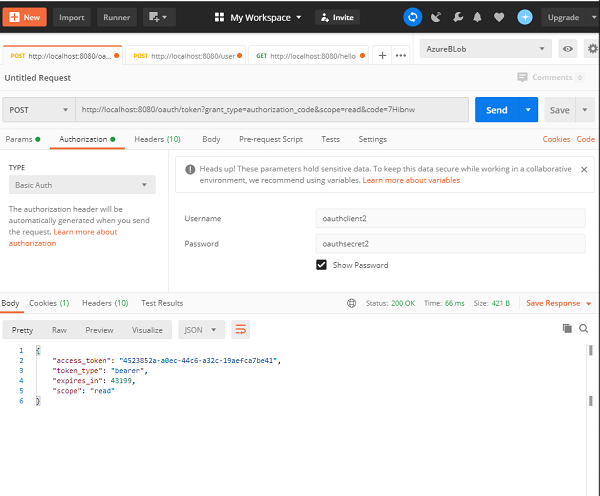
正如我們在這裡看到的,我們在URL中使用了從授權伺服器收到的程式碼,並將grant_type設定為authorization_code,範圍設定為read。我們充當客戶端並提供了我們在應用程式中配置的客戶端憑據。當我們發出此請求時,我們會收到我們的access_token,我們可以進一步使用它。
因此,我們已經看到了如何使用OAuth 2.0配置Spring Security。該應用程式非常簡單易懂,可以幫助我們很容易地理解這個過程。我們使用了兩種授權型別,並瞭解瞭如何使用它們為我們的客戶端應用程式獲取訪問令牌。
Spring Security - JWT
目錄
- JWT 介紹和概述
- 使用 JWT 的 Spring Security 入門(實用指南)
JWT 介紹和概述
JSON Web Token 或 JWT,通常簡稱為 JWT,是一種開放的網際網路標準 (RFC 7519),用於以緊湊的方式在各方之間安全地傳輸可信資訊。令牌包含編碼為 JSON 物件的宣告,並使用私鑰或公鑰/私鑰對進行數字簽名。它們是自包含的並且可驗證的,因為它們是數字簽名的。JWT 可以被簽名和/或加密。簽名的令牌驗證令牌中包含的宣告的完整性,而加密的令牌則向其他方隱藏宣告。
JWT 也可用於資訊交換,但它們更常用於授權,因為它們比使用記憶體中隨機令牌的會話管理提供了許多優勢。其中最大的是能夠將身份驗證邏輯委託給第三方伺服器,例如AuthO 等。
JWT 令牌分為三個部分:頭部、有效負載和簽名,格式如下:
[Header].[Payload].[Signature]
頭部 - JWT 頭部包含應用於 JWT 的加密操作列表。這可以是簽名技術、關於內容型別的元資料資訊等等。頭部以 JSON 物件的形式呈現,並編碼為 base64URL。有效 JWT 頭部的示例如下:
{ "alg": "HS256", "typ": "JWT" }
這裡,“alg” 提供了有關所用演算法型別的資訊,“typ” 提供了資訊型別。
有效負載 - JWT 的有效負載部分包含使用令牌傳輸的實際資料。這部分也稱為 JWT 令牌的“宣告”部分。宣告可以分為三種類型:註冊宣告、公共宣告和私有宣告。
註冊宣告是推薦但並非強制的宣告,例如 iss(發行者)、sub(主題)、aud(受眾)等。
公共宣告是由使用 JWT 的那些人定義的宣告。
私有宣告或自定義宣告是為在相關方之間共享資訊而建立的使用者定義宣告。
有效負載物件的示例可能如下所示:
{ "sub": "12345", "name": "Johnny Hill", "admin": false }
有效負載物件與頭部物件一樣,也進行了 base64Url 編碼,此字串構成 JWT 的第二部分。
簽名 - JWT 的簽名部分用於驗證訊息在傳輸過程中是否被更改。如果令牌使用私鑰簽名,它還驗證傳送方是否是它聲稱的傳送方。它是使用編碼的頭部、編碼的有效負載、一個金鑰和頭部中指定的演算法建立的。簽名的示例如下:
HMACSHA256( base64UrlEncode(header) + "." + base64UrlEncode(payload), secret)
如果我們將頭部、有效負載和簽名放在一起,我們將得到如下所示的令牌:
eyJhbGciOiJSUzI1NiIsInR5cCI6IkpXVCJ9.eyJzdWIiOiIxMjM0NTY3ODkwIiwibmFtZSI6I
kpvaG4gRG9lIiwiYWRtaW4iOmZhbHNlfQ.gWDlJdpCTIHVYKkJSfAVNUn0ZkAjMxskDDm-5Fhe
WJ7xXgW8k5CllcGk4C9qPrfa1GdqfBrbX_1x1E39JY8BYLobAfAg1fs_Ky8Z7U1oCl6HL63yJq_
wVNBHp49hWzg3-ERxkqiuTv0tIuDOasIdZ5FtBdtIP5LM9Oc1tsuMXQXCGR8GqGf1Hl2qv8MCyn
NZJuVdJKO_L3WGBJouaTpK1u2SEleVFGI2HFvrX_jS2ySzDxoO9KjbydK0LNv_zOI7kWv-gAmA
j-v0mHdJrLbxD7LcZJEGRScCSyITzo6Z59_jG_97oNLFgBKJbh12nvvPibHpUYWmZuHkoGvuy5RLUA
現在,此令牌可用於使用 Bearer 模式在 Authorization 頭部中,如下所示:
Authorization - Bearer <token>
JWT 令牌用於授權是最常見的應用。令牌通常在伺服器中生成併發送到客戶端,並在會話儲存或本地儲存中儲存。為了訪問受保護的資源,客戶端會在標頭中傳送 JWT,如上所示。我們將在下面的部分中看到 Spring Security 中的 JWT 實現。
使用 JWT 的 Spring Security 入門
我們將開發的應用程式將使用 JWT 處理基本的使用者身份驗證和授權。讓我們從訪問 start.spring.io 開始,在那裡我們將建立一個具有以下依賴項的 Maven 應用程式。
- Spring Web
- Spring Security
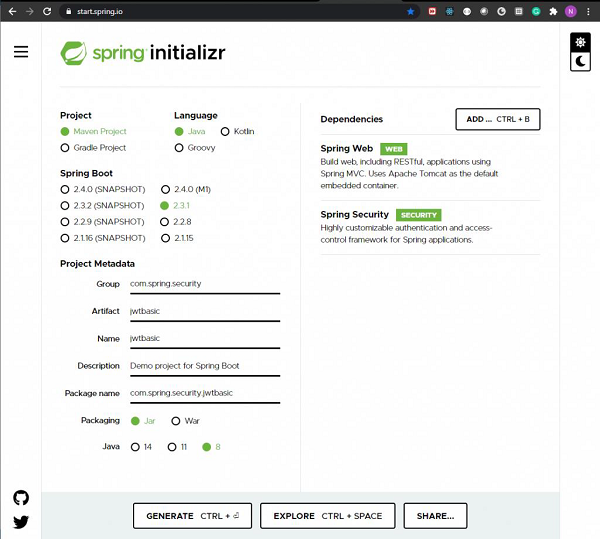
我們生成專案,下載後,將其解壓到我們選擇的資料夾中。然後我們可以使用我們選擇的任何 IDE。我將使用 Spring Tools Suite 4,因為它針對 Spring 應用程式進行了最佳最佳化。
除了上述依賴項之外,我們還將從 Maven 中心儲存庫中包含來自 io.jsonwebtoken 的 jwt 依賴項,因為它沒有包含在 Spring 初始化器中。此依賴項負責所有涉及 JWT 的操作,包括構建令牌、解析其宣告等等。
<dependency>
   <artifactId>jjwt</artifactId>
   <version>0.9.1</version>
</dependency>
我們的pom.xml 檔案現在應該類似於此。
<?xml version="1.0" encoding="UTF-8"?>
<project xmlns="http://maven.apache.org/POM/4.0.0"
   xmlns:xsi="http://www.w3.org/2001/XMLSchema-instance"
   xsi:schemaLocation="http://maven.apache.org/POM/4.0.0
   https://maven.apache.org/xsd/maven-4.0.0.xsd">
   <modelVersion>4.0.0</modelVersion>
   <parent>
      <groupId>org.springframework.boot</groupId>
      <artifactId>spring-boot-starter-parent</artifactId>
      <version>2.3.1.RELEASE<version>
      <relativePath />
      <!-- lookup parent from repository -->
   </parent>
   <groupId>com.spring.security</groupId>
   <artifactId>jwtbasic</artifactId>
   <version>0.0.1-SNAPSHOT</version>
   <name>jwtbasic</name>
   <description>Demo project for Spring Boot</description>
   <properties>
      <java.version>1.8</java.version>
   </properties>
   <dependencies>
      <dependency>
         <groupId>org.springframework.boot</groupId>
         <artifactId>spring-boot-starter-security</artifactId>
      </dependency>
      <dependency>
         <groupId>org.springframework.boot</groupId>
         <artifactId>spring-boot-starter-web</artifactId>
      </dependency>
      <dependency>
         <groupId>io.jsonwebtoken</groupId>
         <artifactId>jjwt</artifactId>
         <version>0.9.1</version>
      </dependency>
      <dependency>
         <groupId>javax.xml.bind</groupId>
         <artifactId>jaxb-api</artifactId>
      </dependency>
      <dependency>
         <groupId>org.springframework.boot</groupId>
         <artifactId>spring-boot-starter-test</artifactId>
         <scope>test</scope>
         <exclusions>
      <exclusion>
         <groupId>org.junit.vintage</groupId>
         <artifactId>junit-vintage-engine</artifactId>
         </exclusion>
      </exclusions>
      </dependency>
      <dependency>
      <groupId>org.springframework.security</groupId>
      <artifactId>spring-security-test</artifactId>
      <scope>test<scope>
      <dependency>
   </dependencies>
      <build>
      <plugins>
         <plugin>
         <groupId>org.springframework.boot</groupId>
         <artifactId>spring-boot-maven-plugin</artifactId>
         </plugin>
      </plugins>
   </build>
</project>
現在我們的專案已設定完畢,我們將建立我們的控制器類 HelloController,它公開了一個 Get 端點。
package com.spring.security.jwtbasic.controllers;
import org.springframework.web.bind.annotation.GetMapping;
import org.springframework.web.bind.annotation.RestController;
@RestController
public class HelloController {
   @GetMapping("/hello")
   public String hello() {
      return "hello";
   }
}
現在我們將建立一個名為 config 的包,在其中新增擴充套件 Spring Security 的WebSecurityConfigurerAdapter 類的配置類。這將為我們提供專案配置和應用程式安全所需的所有功能和定義。現在,我們透過實現生成相同例項的方法來提供BcryptPasswordEncoder 例項。我們使用 @Bean 註解該方法以新增到我們的 Spring 上下文中。
package com.spring.security.jwtbasic.config;
import org.springframework.beans.factory.annotation.Autowired;
import org.springframework.context.annotation.Bean;
import org.springframework.context.annotation.Configuration;
import org.springframework.security.authentication.AuthenticationManager;
import org.springframework.security.config.annotation.authentication.builders.AuthenticationManagerBuilder;
import org.springframework.security.config.annotation.web.builders.HttpSecurity;
import org.springframework.security.config.annotation.web.configuration.WebSecurityConfigurerAdapter;
import org.springframework.security.config.http.SessionCreationPolicy;
import org.springframework.security.core.userdetails.UserDetailsService;
import org.springframework.security.crypto.bcrypt.BCryptPasswordEncoder;
import org.springframework.security.crypto.password.PasswordEncoder;
import org.springframework.security.web.authentication.UsernamePasswordAuthenticationFilter;
import com.spring.security.jwtbasic.jwtutils.JwtAuthenticationEntryPoint;
import com.spring.security.jwtbasic.jwtutils.JwtFilter;
@Configuration
public class WebSecurityConfig extends WebSecurityConfigurerAdapter {
   @Bean
   public PasswordEncoder passwordEncoder() {
      return new BCryptPasswordEncoder();
   }
}
JWT 包含一個金鑰,我們將在我們的 application.properties 檔案中定義,如下所示。
secret=somerandomsecret
現在讓我們建立一個名為 jwtutils 的包。此包將包含與 JWT 操作相關的所有類和介面,包括:
- 生成令牌
- 驗證令牌
- 檢查簽名
- 驗證宣告和許可權
在此包中,我們建立我們的第一個類,名為 TokenManager。此類將負責使用 io.jsonwebtoken.Jwts 建立和驗證令牌。
package com.spring.security.jwtbasic.jwtutils;
import java.io.Serializable;
import java.util.Base64;
import java.util.Date;
import java.util.HashMap;
import java.util.Map;
import org.springframework.beans.factory.annotation.Value;
import org.springframework.security.core.userdetails.UserDetails;
import org.springframework.stereotype.Component;
import io.jsonwebtoken.Claims; import io.jsonwebtoken.Jwts;
import io.jsonwebtoken.SignatureAlgorithm;
@Component
public class TokenManager implements Serializable {
   /**
   *
   */
   private static final long serialVersionUID = 7008375124389347049L; public static final long TOKEN_VALIDITY = 10 * 60 * 60; @Value("${secret}")
   private String jwtSecret;
   public String generateJwtToken(UserDetails userDetails) {
      Map<String, Object> claims = new HashMap<>();
      return Jwts.builder().setClaims(claims).setSubject(userDetails.getUsername())
         .setIssuedAt(new Date(System.currentTimeMillis()))
         .setExpiration(new Date(System.currentTimeMillis() + TOKEN_VALIDITY * 1000))
         .signWith(SignatureAlgorithm.HS512, jwtSecret).compact();
   }
   public Boolean validateJwtToken(String token, UserDetails userDetails) {
      String username = getUsernameFromToken(token);
      Claims claims = Jwts.parser().setSigningKey(jwtSecret).parseClaimsJws(token).getBody();
      Boolean isTokenExpired = claims.getExpiration().before(new Date());
      return (username.equals(userDetails.getUsername()) && !isTokenExpired);
   }
   public String getUsernameFromToken(String token) {
      final Claims claims = Jwts.parser().setSigningKey(jwtSecret).parseClaimsJws(token).getBody();
      return claims.getSubject();
   }
}
在這裡,由於所有令牌都應該有過期日期,因此我們從令牌有效性常量開始。在這裡,我們希望我們的令牌在生成後 10 分鐘內有效。我們將在生成令牌時使用此值。然後,我們使用 @Value 註解將我們的簽名金鑰的值從 application.properties 檔案提取到我們的 jwtSecret 欄位中。
我們這裡有兩個方法:
- generateJwtToken() - 此方法用於在使用者成功身份驗證後生成令牌。為了在此處建立令牌,我們使用使用者名稱、令牌的發行日期和令牌的過期日期。這將構成令牌的有效負載部分或宣告,正如我們之前討論的那樣。為了生成令牌,我們使用 Jwts 的 builder() 方法。此方法返回一個新的 JwtBuilder 例項,可用於建立緊湊的 JWT 序列化字串。
為了設定宣告,我們使用 setClaims() 方法,然後設定每個宣告。對於此令牌,我們設定了setSubject(username)、發行日期和過期日期。我們還可以新增我們之前討論過的自定義宣告。這可以是我們想要的任何值,其中可能包括使用者角色、使用者許可權等等。
然後我們設定令牌的簽名部分。這是使用 signWith() 方法完成的,我們設定我們首選使用的雜湊演算法和金鑰。然後我們使用 compact() 方法構建 JWT 並根據 JWT 緊湊序列化規則將其序列化為緊湊的、URL 安全的字串。
validateJwtToken() - 現在令牌的生成已經處理完畢,我們應該關注在令牌作為請求的一部分出現時驗證令牌的過程。驗證令牌意味著驗證請求是經過身份驗證的請求,並且令牌是生成併發送給使用者的令牌。在這裡,我們需要解析令牌的宣告,例如使用者名稱、角色、許可權、有效期等。
要驗證令牌,我們需要先解析它。這是使用 Jwts 的 parser() 方法完成的。然後我們需要設定用於生成令牌的簽名金鑰,然後在令牌上使用 parseClaimsJws() 方法來根據構建器的當前配置狀態解析緊湊的序列化 JWS 字串,並返回生成的 Claims JWS 例項。然後使用 getBody() 方法返回在生成令牌時使用的宣告例項。
從獲得的宣告例項中,我們提取主題和過期日期以驗證令牌的有效性。使用者名稱應該是使用者的使用者名稱,並且令牌不應過期。如果這兩個條件都滿足,我們將返回 true,這表示令牌有效。
我們將要建立的下一個類是JwtUserDetailsService。此類將擴充套件 Spring Security 的UserDetailsService,我們將實現loadUserByUsername() 方法,如下所示:
package com.spring.security.jwtbasic.jwtutils;
import java.util.ArrayList;
import org.springframework.security.core.userdetails.User;
import org.springframework.security.core.userdetails.UserDetails;
import org.springframework.security.core.userdetails.UserDetailsService;
import org.springframework.security.core.userdetails.UsernameNotFoundException;
import org.springframework.stereotype.Service;
@Service
public class JwtUserDetailsService implements UserDetailsService {
   @Override
   public UserDetails loadUserByUsername(String username) throws UsernameNotFoundException {
      if ("randomuser123".equals(username)) {
         return new User("randomuser123",
            "$2a$10$slYQmyNdGzTn7ZLBXBChFOC9f6kFjAqPhccnP6DxlWXx2lPk1C3G6",
            new ArrayList<>());
      } else {
         throw new UsernameNotFoundException("User not found with username: " + username);
      }
   }
}
在這裡,由於這是一個僅用於演示 JWT 身份驗證的基本應用程式,因此我們使用了我們的使用者詳細資訊集,而不是使用資料庫。為了方便起見,我們給使用者名稱設定為“randomuser123”,並將密碼“password”編碼為“$2a$10$slYQmyNdGzTn7ZLBXBChFOC9f6kFjAqPhccnP6DxlWXx2lPk1C3G6”。
接下來,我們為我們的請求和響應模型建立類。這些模型確定我們身份驗證的請求和響應格式。下面給出的第一個快照是請求模型。如我們所見,我們將在請求中接受兩個屬性:使用者名稱和密碼。
package com.spring.security.jwtbasic.jwtutils.models;
import java.io.Serializable;
public class JwtRequestModel implements Serializable {
   /**
   *
   */
   private static final long serialVersionUID = 2636936156391265891L;
   private String username;
   private String password;
   public JwtRequestModel() {
   }
   public JwtRequestModel(String username, String password) {
      super();
      this.username = username; this.password = password;
   }
   public String getUsername() {
      return username;
   }
   public void setUsername(String username) {
      this.username = username;
   }
   public String getPassword() {
      return password;
   }
   public void setPassword(String password) {
      this.password = password;
   }
}
以下是成功身份驗證後的響應模型程式碼。如我們所見,在成功身份驗證後,我們將令牌傳送回用戶。
package com.spring.security.jwtbasic.jwtutils.models;
import java.io.Serializable;
public class JwtResponseModel implements Serializable {
   /**
   *
   */
   private static final long serialVersionUID = 1L;
   private final String token;
   public JwtResponseModel(String token) {
      this.token = token;
   }
   public String getToken() {
      return token;
   }
}
現在,對於身份驗證,讓我們建立一個如下所示的控制器。
package com.spring.security.jwtbasic.jwtutils;
import org.springframework.beans.factory.annotation.Autowired;
import org.springframework.http.ResponseEntity;
import org.springframework.security.authentication.AuthenticationManager;
import org.springframework.security.authentication.BadCredentialsException;
import org.springframework.security.authentication.DisabledException;
import org.springframework.security.authentication.UsernamePasswordAuthenticationToken;
import org.springframework.security.core.userdetails.UserDetails;
import org.springframework.web.bind.annotation.CrossOrigin;
import org.springframework.web.bind.annotation.PostMapping;
import org.springframework.web.bind.annotation.RequestBody;
import org.springframework.web.bind.annotation.RestController;
import com.spring.security.jwtbasic.jwtutils.models.JwtRequestModel;
import com.spring.security.jwtbasic.jwtutils.models.JwtResponseModel;
@RestController
@CrossOrigin
public class JwtController {
   @Autowired
   private JwtUserDetailsService userDetailsService;
   @Autowired
   private AuthenticationManager authenticationManager;
   @Autowired
   private TokenManager tokenManager;
   @PostMapping("/login")
   public ResponseEntity<> createToken(@RequestBody JwtRequestModel
   request) throws Exception {
      try {
         authenticationManager.authenticate(
            new
            UsernamePasswordAuthenticationToken(request.getUsername(),
            request.getPassword())
         );
      } catch (DisabledException e) {
         throw new Exception("USER_DISABLED", e);
      } catch (BadCredentialsException e) {
         throw new Exception("INVALID_CREDENTIALS", e);
      }
      final UserDetails userDetails = userDetailsService.loadUserByUsername(request.getUsername());
      final String jwtToken = tokenManager.generateJwtToken(userDetails);
      return ResponseEntity.ok(new JwtResponseModel(jwtToken));
   }
}
如果我們檢視程式碼,我們可以看到,我們自動裝配了三個依賴項,即JwtUserDetailsService、AuthenticationManager 和TokenManager。雖然我們已經在上面看到了JwtUserDetailsService 和TokenManager 類的實現,但 AuthenticationManager bean 是我們將在WebSecurityConfig 類中建立的 bean。
AuthenticationManager 類將負責我們的身份驗證。我們將使用UsernamePasswordAuthenticationToken 模型來對請求進行身份驗證。如果身份驗證成功,我們將為使用者生成一個 JWT,該 JWT 可在後續請求的 Authorization 標頭中傳送以獲取任何資源。
如我們所見,我們正在使用JwtUserDetailsService 類的loadUserByUsername() 方法和TokenManager 類的generateJwtToken() 方法。
如上所述,此生成的 JWT 在成功身份驗證後作為響應傳送給使用者。
現在是時候建立我們的過濾器了。過濾器類將用於跟蹤我們的請求並檢測它們是否在標頭中包含有效令牌。如果令牌有效,則我們允許請求繼續進行,否則我們傳送 401 錯誤(未授權)。
package com.spring.security.jwtbasic.jwtutils;
import java.io.IOException;
import javax.servlet.FilterChain;
import javax.servlet.ServletException;
import javax.servlet.http.HttpServletRequest;
import javax.servlet.http.HttpServletResponse;
import org.springframework.beans.factory.annotation.Autowired;
import org.springframework.security.authentication.UsernamePasswordAuthenticationToken;
import org.springframework.security.core.context.SecurityContextHolder;
import org.springframework.security.core.userdetails.UserDetails;
import org.springframework.security.web.authentication.WebAuthenticationDetailsSource;
import org.springframework.stereotype.Component;
import org.springframework.web.filter.OncePerRequestFilter;
import io.jsonwebtoken.ExpiredJwtException;
@Component
public class JwtFilter extends OncePerRequestFilter {
   @Autowired
   private JwtUserDetailsService userDetailsService;
   @Autowired
   private TokenManager tokenManager;
   @Override
   protected void doFilterInternal(HttpServletRequest request,
      HttpServletResponse response, FilterChain filterChain)
      throws ServletException, IOException {

      String tokenHeader = request.getHeader("Authorization");
      String username = null;
      String token = null;
      if (tokenHeader != null && tokenHeader.startsWith("Bearer ")) {
         token = tokenHeader.substring(7);
         try {
            username = tokenManager.getUsernameFromToken(token);
         } catch (IllegalArgumentException e) {
            System.out.println("Unable to get JWT Token");
         } catch (ExpiredJwtException e) {
            System.out.println("JWT Token has expired");
         }
      } else {
         System.out.println("Bearer String not found in token");
      }
      if (null != username &&SecurityContextHolder.getContext().getAuthentication() == null) {
         UserDetails userDetails = userDetailsService.loadUserByUsername(username);
         if (tokenManager.validateJwtToken(token, userDetails)) {
            UsernamePasswordAuthenticationToken
            authenticationToken = new UsernamePasswordAuthenticationToken(
            userDetails, null,
            userDetails.getAuthorities());
            authenticationToken.setDetails(new
            WebAuthenticationDetailsSource().buildDetails(request));
            SecurityContextHolder.getContext().setAuthentication(authenticationToken);
         }
      }
      filterChain.doFilter(request, response);
   }
}
如上所示,我們在此處也自動裝配了JwtUserDetailsService 和TokenManager 類。我們擴充套件了 Spring Security 的OncePerRequestFilter,它確保為每個請求執行過濾器。我們已將我們的實現提供給OncePerRequestFilter 類的重寫方法 doFilterInternal()。
此方法從頭部提取令牌,並藉助我們的TokenManager類的validateJwtToken()方法對其進行驗證。在驗證過程中,它會檢查使用者名稱和過期日期。如果這兩個值都有效,我們就會將身份驗證儲存到Spring Security上下文,並讓程式碼繼續執行過濾器鏈中的下一個過濾器。如果任何驗證失敗,或者令牌存在問題,或者找不到令牌,我們將丟擲相應的異常,併發送相應的響應,同時阻止請求繼續執行。
建立了請求過濾器後,我們現在建立JwtAutheticationEntryPoint類。此類擴充套件了Spring的AuthenticationEntryPoint類,並拒絕所有未經身份驗證的請求,並向客戶端返回401錯誤程式碼。我們已重寫AuthenticationEntryPoint類的commence()方法來實現此功能。
package com.spring.security.jwtbasic.jwtutils;
import java.io.IOException;
import java.io.Serializable;
import javax.servlet.ServletException;
import javax.servlet.http.HttpServletRequest;
import javax.servlet.http.HttpServletResponse;
import org.springframework.security.core.AuthenticationException;
import org.springframework.security.web.AuthenticationEntryPoint;
import org.springframework.stereotype.Component;
@Component
public class JwtAuthenticationEntryPoint implements AuthenticationEntryPoint,
Serializable {
   @Override
   public void commence(HttpServletRequest request, HttpServletResponse
   response,
   AuthenticationException authException) throws
   IOException, ServletException {
      response.sendError(HttpServletResponse.SC_UNAUTHORIZED,
   "Unauthorized");
      }
}
現在,讓我們回到我們的WebSecurityConfig類,完成其餘配置。如果我們記得,我們將需要我們的AuthenticationManager bean用於我們的Jwt控制器類,並將我們剛剛建立的過濾器新增到我們的配置中。我們還將配置哪些請求需要身份驗證,哪些請求不需要身份驗證。我們還將向我們的請求新增AuthenticationEntryPoint,以返回401錯誤響應。由於在使用jwt時我們也不需要維護會話變數,因此我們可以使我們的會話STATELESS(無狀態)。
package com.spring.security.jwtbasic.config;
import org.springframework.beans.factory.annotation.Autowired;
import org.springframework.context.annotation.Bean;
import org.springframework.context.annotation.Configuration;
import org.springframework.security.authentication.AuthenticationManager;
import org.springframework.security.config.annotation.authentication.builders.AuthenticationManagerBuilder;
import org.springframework.security.config.annotation.web.builders.HttpSecurity;
import org.springframework.security.config.annotation.web.configuration.WebSecurityConfigurerAdapter;
import org.springframework.security.config.http.SessionCreationPolicy;
import org.springframework.security.core.userdetails.UserDetailsService;
import org.springframework.security.crypto.bcrypt.BCryptPasswordEncoder;
import org.springframework.security.crypto.password.PasswordEncoder;
import org.springframework.security.web.authentication.UsernamePasswordAuthenticationFilter;
import com.spring.security.jwtbasic.jwtutils.JwtAuthenticationEntryPoint;
import com.spring.security.jwtbasic.jwtutils.JwtFilter;
@Configuration
public class WebSecurityConfig extends WebSecurityConfigurerAdapter {
   @Autowired
   private JwtAuthenticationEntryPoint authenticationEntryPoint;
   @Autowired
   private UserDetailsService userDetailsService;
   @Autowired
   private JwtFilter filter;
   @Bean
   public PasswordEncoder passwordEncoder() {
      return new BCryptPasswordEncoder();
   }
   @Override
   protected void configure(AuthenticationManagerBuilder auth) throws Exception {
      auth.userDetailsService(userDetailsService).passwordEncoder(passwordEncoder());
   }
   @Bean
   @Override
   public AuthenticationManager authenticationManagerBean() throws
   Exception {
      return super.authenticationManagerBean();
   }
   @Override
   protected void configure(HttpSecurity http) throws Exception {
      http.csrf().disable()
      .authorizeRequests().antMatchers("/login").permitAll()
      .anyRequest().authenticated()
      .and()
      .exceptionHandling().authenticationEntryPoint(authenticationEntryPoint)
      .and()
      .sessionManagement().sessionCreationPolicy(SessionCreationPolicy.STATELESS);
      http.addFilterBefore(filter, UsernamePasswordAuthenticationFilter.class);
   }
}
如我們所見,我們已經完成了所有這些工作,現在我們的應用程式已準備好執行。讓我們啟動應用程式並使用Postman發出請求。
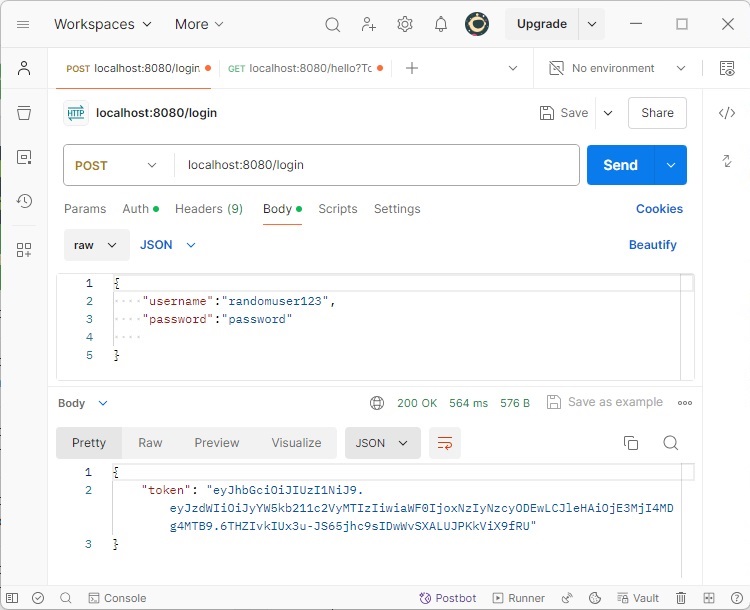
在這裡,我們發出了第一個獲取令牌的請求,正如我們所看到的,在提供正確的使用者名稱/密碼組合後,我們得到了我們的令牌。
現在,在我們的頭部使用該令牌,讓我們呼叫/hello端點。
如我們所見,由於請求已透過身份驗證,我們得到了所需的響應。現在,如果我們篡改令牌或不傳送Authorization頭部,我們將收到應用程式中配置的401錯誤。這確保了使用JWT保護我們的請求。