- Spring Security 教程
- Sprint Security - 首頁
- Spring Security - 簡介
- Spring Security - 架構
- Spring Security - 專案模組
- Spring Security - 環境設定
- Spring Security - 表單登入
- Spring Security - 自定義表單登入
- Spring Security - 登出
- Spring Security - 記住我
- Spring Security - 重定向
- Spring Security - 標籤庫
- Spring Security - XML 配置
- Spring Security - 認證提供程式
- Spring Security - 基本認證
- Spring Security - AuthenticationFailureHandler
- Spring Security - JWT
- Spring Security - 檢索使用者資訊
- Spring Security - Maven
- Spring Security - 預設密碼編碼器
- Spring Security – 密碼編碼
- Spring Security - 方法級別
- Spring Security 有用資源
- Spring Security - 快速指南
- Spring Security - 有用資源
- Spring Security - 討論
Spring Security - 認證提供程式
Spring Security 允許我們根據需要自定義身份驗證過程。從自定義登入頁面到我們自己的自定義身份驗證提供程式和身份驗證過濾器,我們幾乎可以自定義身份驗證過程的每個方面。我們可以定義我們自己的身份驗證過程,該過程可以從使用使用者名稱和密碼的基本身份驗證到使用令牌和 OTP 的複雜身份驗證(例如雙因素身份驗證)。此外,我們可以使用各種資料庫——關係型和非關係型,使用各種密碼編碼器,將惡意使用者鎖定在他們的帳戶之外,等等。
Spring Security 架構

如上圖所示,Spring Security 的基本元件如下所示。在接下來的過程中,我們將簡要討論它們。我們還將討論它們在身份驗證和授權過程中的作用。
AuthenticationFilter
這是攔截請求並嘗試對其進行身份驗證的過濾器。在 Spring Security 中,它將請求轉換為 Authentication 物件並將身份驗證委託給 AuthenticationManager。
AuthenticationManager
它是身份驗證的主要策略介面。它使用唯一的 authenticate() 方法來對請求進行身份驗證。authenticate() 方法執行身份驗證,並在身份驗證成功時返回 Authentication 物件,或在身份驗證失敗時丟擲 AuthenticationException。如果該方法無法決定,它將返回 null。在此過程中,身份驗證過程被委託給 AuthenticationProvider,我們將在接下來討論。
AuthenticationProvider
AuthenticationManager 由 ProviderManager 實現,後者將流程委託給一個或多個 AuthenticationProvider 例項。任何實現 AuthenticationProvider 介面的類都必須實現兩種方法——authenticate() 和 supports()。首先,讓我們談談 supports() 方法。它用於檢查我們的 AuthenticationProvider 實現類是否支援特定的身份驗證型別。如果支援,則返回 true,否則返回 false。接下來,是 authenticate() 方法。這是發生身份驗證的地方。如果支援身份驗證型別,則啟動身份驗證過程。在此類中,可以使用UserDetailsService實現的 loadUserByUsername() 方法。如果找不到使用者,它可能會丟擲 UsernameNotFoundException。
另一方面,如果找到使用者,則使用使用者的身份驗證詳細資訊來對使用者進行身份驗證。例如,在基本身份驗證場景中,使用者提供的密碼可能會與資料庫中的密碼進行檢查。如果發現它們彼此匹配,則表示成功。然後,我們可以從此方法返回一個 Authentication 物件,該物件將儲存在 Security Context 中,我們將在後面討論。
Spring Security 提供了以下主要的 AuthenticationProvider 實現。
DaoAuthenticationProvider − 此提供程式用於提供基於資料庫的身份驗證。
LdapAuthenticationProvider − 此提供程式專門用於基於 LDAP(輕量級目錄訪問協議)的身份驗證。
OpenIDAuthenticationProvider − 此提供程式用於基於 OpenID 的身份驗證,可與 Google/Facebook 等 OpenID 身份驗證提供程式一起使用。
JwtAuthenticationProvider − 對於基於 JWT(Java Web Token)的身份驗證,我們可以使用 JwtAuthenticationProvider 類。
RememberMeAuthenticationProvider − 此類用於基於使用者“記住我”令牌的使用者身份驗證。
我們將在接下來的部分建立自己的 AuthenticationProvider。
UserDetailsService
它是 Spring Security 的核心介面之一。任何請求的身份驗證大多取決於 UserDetailsService 介面的實現。它最常用於資料庫支援的身份驗證以檢索使用者資料。資料透過實現唯一的 loadUserByUsername() 方法來檢索,在該方法中,我們可以提供我們的邏輯來獲取使用者的使用者詳細資訊。如果找不到使用者,該方法將丟擲 UsernameNotFoundException。
PasswordEncoder
在 Spring Security 4 之前,PasswordEncoder 的使用是可選的。使用者可以使用記憶體中身份驗證儲存純文字密碼。但 Spring Security 5 已強制使用 PasswordEncoder 來儲存密碼。這使用其眾多實現之一對使用者的密碼進行編碼。其最常見的實現是 BCryptPasswordEncoder。此外,我們可以為我們的開發目的使用 NoOpPasswordEncoder 的例項。它將允許密碼以純文字形式儲存。但它不應該用於生產或實際應用。
Spring Security 上下文
這是在身份驗證成功後儲存當前已認證使用者詳細資訊的地方。然後,身份驗證物件在整個應用程式中對會話可用。因此,如果我們需要使用者名稱或任何其他使用者詳細資訊,我們需要先獲取 SecurityContext。這是透過 SecurityContextHolder 完成的,SecurityContextHolder 是一個輔助類,它提供了對安全上下文的訪問。我們可以分別使用 setAuthentication() 和 getAuthentication() 方法來儲存和檢索使用者詳細資訊。
自定義身份驗證器
我們可以透過實現 AuthenticationProvider 介面來建立一個自定義身份驗證器。AuthenticatorProvider 介面有兩種方法authenticate() 和supports()。
authenticate() 方法
@Override
public Authentication authenticate(Authentication authentication) throws AuthenticationException {
   String username = authentication.getName();
   String password = authentication.getCredentials().toString();

   UserDetails user = userDetailsService.loadUserByUsername(username);

   if (user == null || !password.equals(user.getPassword())) {
      throw new BadCredentialsException("Invalid username or password");
   }

   List<GrantedAuthority> authorities = new ArrayList();
   authorities.add(new SimpleGrantedAuthority("ROLE_USER"));
   return new UsernamePasswordAuthenticationToken(username, password, authorities);
}
在這裡,在 authenticate() 方法中,我們使用身份驗證物件獲取使用者名稱和密碼,並將使用者名稱/密碼與使用者憑據進行比較。如果使用者詳細資訊無效,我們將丟擲 BadCredentialsException 異常。否則,將準備一個新的角色,並使用所需的角色返回 UsernamePasswordAuthenticationToken。
supports() 方法
@Override
public boolean supports(Class<?> authentication) {
   return authentication.equals(UsernamePasswordAuthenticationToken.class);
}
Spring Security 配置
在 AuthenticationManager 中使用在 AuthenticationProvider 中建立的,並將其標記為託管 Bean。
@Bean
public AuthenticationManager authManager(HttpSecurity http) throws Exception {
   AuthenticationManagerBuilder authenticationManagerBuilder =
      http.getSharedObject(AuthenticationManagerBuilder.class);
   WebAuthenticationProvider authProvider = new WebAuthenticationProvider(userDetailsService());
   authenticationManagerBuilder.authenticationProvider(authProvider);
   return authenticationManagerBuilder.build();
}
這就是我們需要做的。現在讓我們看看完整的程式碼。
在開始使用 Spring 框架編寫第一個示例之前,您必須確保已正確設定 Spring 環境,如Spring Security - 環境設定章節中所述。我們還假設您對 Spring Tool Suite IDE 有些瞭解。
現在讓我們繼續編寫一個由 Maven 管理的基於 Spring MVC 的應用程式,該應用程式將要求使用者登入,對使用者進行身份驗證,然後提供使用 Spring Security 表單登入功能登出的選項。
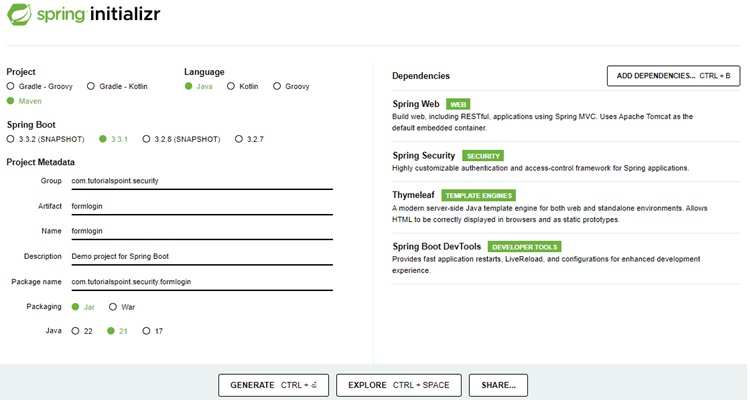
使用 Spring Initializr 建立專案
Spring Initializr 是開始 Spring Boot 專案的好方法。它提供了一個易於使用的使用者介面來建立專案,新增依賴項,選擇 Java 執行時等。它生成一個骨架專案結構,一旦下載,就可以匯入到 Spring Tool Suite 中,然後我們可以繼續使用我們的現成專案結構。
我們選擇一個 Maven 專案,將專案命名為 formlogin,Java 版本為 21。新增以下依賴項
Spring Web
Spring Security
Spring Boot DevTools
Thymeleaf 是 Java 的模板引擎。它允許我們快速開發靜態或動態網頁以在瀏覽器中呈現。它具有極強的擴充套件性,允許我們詳細定義和自定義模板的處理。除此之外,我們可以透過點選此連結瞭解更多關於 Thymeleaf 的資訊。
讓我們繼續生成我們的專案並下載它。然後,我們將其解壓縮到我們選擇的資料夾中,並使用任何 IDE 開啟它。我將使用Spring Tools Suite 4。它可以從https://springframework.tw/tools網站免費下載,並且針對 Spring 應用程式進行了最佳化。
包含所有相關依賴項的 pom.xml
讓我們看一下我們的 pom.xml 檔案。它應該看起來與此類似 -
pom.xml
<?xml version="1.0" encoding="UTF-8"?>
<project xmlns="http://maven.apache.org/POM/4.0.0" xmlns:xsi="http://www.w3.org/2001/XMLSchema-instance"
xsi:schemaLocation="http://maven.apache.org/POM/4.0.0 https://maven.apache.org/xsd/maven-4.0.0.xsd">
   <modelVersion>4.0.0</modelVersion>
   <parent>
      <groupId>org.springframework.boot</groupId>
      <artifactId>spring-boot-starter-parent</artifactId>
      <version>3.3.1</version>
      <relativePath/> <!-- lookup parent from repository -->
   </parent>
   <groupId>com.tutorialspoint.security</groupId>
   <artifactId>formlogin</artifactId>
   <version>0.0.1-SNAPSHOT</version>
   <name>formlogin</name>
   <description>Demo project for Spring Boot</description>
   <url/>
   <licenses>
      <license/>
   </licenses>
   <developers>
      <developer/>
   </developers>
   <scm>
      <connection/>
      <developerConnection/>
      <tag/>
      <url/>
   </scm>
   <properties>
      <java.version>21</java.version>
   </properties>
   <dependencies>
      <dependency>
         <groupId>org.springframework.boot</groupId>
         <artifactId>spring-boot-starter-security</artifactId>
      </dependency>
      <dependency>
         <groupId>org.springframework.boot</groupId>
         <artifactId>spring-boot-starter-thymeleaf</artifactId>
      </dependency>
      <dependency>
         <groupId>org.springframework.boot</groupId>
         <artifactId>spring-boot-starter-web</artifactId>
      </dependency>
      <dependency>
         <groupId>org.thymeleaf.extras</groupId>
         <artifactId>thymeleaf-extras-springsecurity6</artifactId>
      </dependency>
      <dependency>
         <groupId>org.springframework.boot</groupId>
         <artifactId>spring-boot-devtools</artifactId>
         <scope>runtime</scope>
         <optional>true</optional>
      </dependency>
      <dependency>
         <groupId>org.springframework.boot</groupId>
         <artifactId>spring-boot-starter-test</artifactId>
         <scope>test</scope>
      </dependency>
      <dependency>
         <groupId>org.springframework.security</groupId>
         <artifactId>spring-security-test</artifactId>
         <scope>test</scope>
      </dependency>
   </dependencies>
   <build>
      <plugins>
         <plugin>
            <groupId>org.springframework.boot</groupId>
            <artifactId>spring-boot-maven-plugin</artifactId>
         </plugin>
      </plugins>
   </build>
</project>
身份驗證提供程式
在我們的 config 包內,我們透過實現 AuthenticationProvider 介面建立了 WebAuthenticationProvider 類。就像在 authenticate() 方法中一樣,我們必須比較使用者名稱和密碼,我們使用了 UserDetailsService 例項來獲取使用者詳細資訊。
package com.tutorialspoint.security.formlogin.config;

import java.util.ArrayList;
import java.util.List;

import org.springframework.security.authentication.AuthenticationProvider;
import org.springframework.security.authentication.BadCredentialsException;
import org.springframework.security.authentication.UsernamePasswordAuthenticationToken;
import org.springframework.security.core.Authentication;
import org.springframework.security.core.AuthenticationException;
import org.springframework.security.core.GrantedAuthority;
import org.springframework.security.core.authority.SimpleGrantedAuthority;
import org.springframework.security.core.userdetails.UserDetails;
import org.springframework.security.core.userdetails.UserDetailsService;
import org.springframework.stereotype.Component;

@Component
public class WebAuthenticationProvider implements AuthenticationProvider {

   private final UserDetailsService userDetailsService;
   public WebAuthenticationProvider(UserDetailsService userDetailsService) {
      this.userDetailsService = userDetailsService;
   }

   @Override
   public boolean supports(Class<?> authentication) {
      return authentication.equals(UsernamePasswordAuthenticationToken.class);
   }

   @Override
   public Authentication authenticate(Authentication authentication) throws AuthenticationException {
      String username = authentication.getName();
      String password = authentication.getCredentials().toString();

      UserDetails user = userDetailsService.loadUserByUsername(username);

      if (user == null || !password.equals(user.getPassword())) {
         throw new BadCredentialsException("Invalid username or password");
      }

      List<GrantedAuthority> authorities = new ArrayList();
      authorities.add(new SimpleGrantedAuthority("ROLE_USER"));
      return new UsernamePasswordAuthenticationToken(username, password, authorities);

   }
}
Spring Security 配置類
在我們的 config 包內,我們建立了 WebSecurityConfig 類。我們將使用此類進行我們的安全配置,因此讓我們使用 @Configuration 註解和 @EnableWebSecurity 對其進行註釋。因此,Spring Security 知道將此類視為配置類。如我們所見,Spring 使配置應用程式變得非常容易。
WebSecurityConfig
package com.tutorialspoint.security.formlogin.config;

import org.springframework.context.annotation.Bean;
import org.springframework.context.annotation.Configuration;
import org.springframework.security.authentication.AuthenticationManager;
import org.springframework.security.config.Customizer;
import org.springframework.security.config.annotation.authentication.builders.AuthenticationManagerBuilder;
import org.springframework.security.config.annotation.web.builders.HttpSecurity;
import org.springframework.security.config.annotation.web.configuration.EnableWebSecurity;
import org.springframework.security.config.annotation.web.configurers.AbstractHttpConfigurer;
import org.springframework.security.core.userdetails.User;
import org.springframework.security.core.userdetails.UserDetails;
import org.springframework.security.core.userdetails.UserDetailsService;
import org.springframework.security.provisioning.InMemoryUserDetailsManager;
import org.springframework.security.web.SecurityFilterChain;

@Configuration
@EnableWebSecurity
public class WebSecurityConfig {

   @Bean
   public AuthenticationManager authManager(HttpSecurity http) throws Exception {
      AuthenticationManagerBuilder authenticationManagerBuilder =
         http.getSharedObject(AuthenticationManagerBuilder.class);
      WebAuthenticationProvider authProvider = new WebAuthenticationProvider(userDetailsService());
      authenticationManagerBuilder.authenticationProvider(authProvider);
      return authenticationManagerBuilder.build();
   }

   @Bean
   protected UserDetailsService userDetailsService() {
      UserDetails user = User.builder()
         .username("user")
         .password("user123")
         .roles("USER")
         .build();
      UserDetails admin = User.builder()
         .username("admin")
         .password("admin123")
         .roles("USER", "ADMIN")
         .build();
      return new InMemoryUserDetailsManager(user, admin);
   }

   @Bean
   protected SecurityFilterChain filterChain(HttpSecurity http) throws Exception {
      return http
         .csrf(AbstractHttpConfigurer::disable)
         .authorizeHttpRequests(
            request -> request.requestMatchers("/login").permitAll()
            .requestMatchers("/**").authenticated()
         )
         .formLogin(Customizer.withDefaults())
         .logout(config -> config
         .logoutUrl("/logout")
         .logoutSuccessUrl("/login"))
         .build();
   }
}
配置類詳細資訊
讓我們看一下我們的配置類。
首先,我們將使用 userDetailsService() 方法建立 UserDetailsService 類的 Bean。我們將使用此 Bean 來管理此應用程式的使用者。在這裡,為了簡單起見,我們將使用 InMemoryUserDetailsManager 例項來建立使用者。這些使用者以及我們給定的使用者名稱和密碼分別對映到 User 和 Admin 角色。
Http 安全配置
完成以上步驟後,我們繼續進行下一個配置。在這裡,我們定義了 filterChain 方法。此方法將 HttpSecurity 作為引數。我們將對其進行配置以使用我們的表單登入和登出功能。
我們可以觀察到所有這些功能都可以在 Spring Security 中使用。讓我們詳細研究以下部分 -
return http
   .csrf(AbstractHttpConfigurer::disable)
   .authorizeHttpRequests(
      request -> request.requestMatchers("/login").permitAll()
         .requestMatchers("/**").authenticated()
    )
    .formLogin(Customizer.withDefaults())
    .logout(config -> config
    .logoutUrl("/logout")
    .logoutSuccessUrl("/login"))
    .build();
這裡需要注意幾點 -
然後我們新增需要所有請求都經過身份驗證的配置。
之後,我們使用上面提到的 Spring Security 的 formLogin() 功能。這使得瀏覽器會要求輸入預設的使用者名稱/密碼登入表單,並使用 logout() 提供登出功能。
身份驗證管理器配置
讓我們看看我們自定義的 AuthenticationProvider 配置。
AuthenticationManagerBuilder authenticationManagerBuilder =
   http.getSharedObject(AuthenticationManagerBuilder.class);
WebAuthenticationProvider authProvider = new WebAuthenticationProvider(userDetailsService());
authenticationManagerBuilder.authenticationProvider(authProvider);
return authenticationManagerBuilder.build();
我們首先構建了一個 AuthenticationManagerBuilder 例項並向其傳遞一個 authenticationProvider。WebAuthenticationProvider 例項作為自定義身份驗證提供程式建立,並帶有一個 userDetailsService 物件。
控制器類
在這個類中,為了簡單起見,我們為應用程式的首頁建立了一個對映到單個 "/" 端點的對映。這將重定向到 index.html。
AuthController
package com.tutorialspoint.security.formlogin.controllers;

import org.springframework.stereotype.Controller;
import org.springframework.web.bind.annotation.GetMapping;

@Controller
public class AuthController {
   @GetMapping("/")
   public String home() {
      return "index";
   }
}
檢視
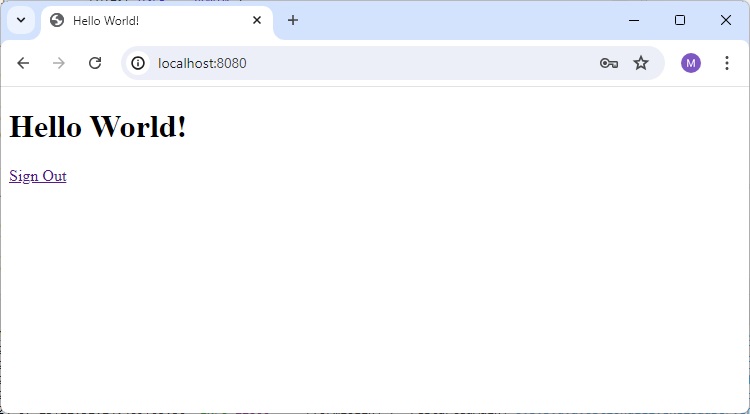
在/src/main/resources/templates資料夾中建立 index.html,並使用以下內容作為主頁。
index.html
<!DOCTYPE html>
<html xmlns="http://www.w3.org/1999/xhtml"
   xmlns:th="https://www.thymeleaf.org"
   xmlns:sec="https://www.thymeleaf.org/thymeleaf-extras-springsecurity6">
   <head>
      <title>
         Hello World!
      </title>
   </head>
   <body>
      <h1 th:inline="text">Hello World!</h1>
      <a href="/logout" alt="logout">Sign Out</a>
   </body>
<html>
執行應用程式
由於我們已經準備好所有元件,讓我們執行應用程式。右鍵單擊專案,選擇以...執行,然後選擇Spring Boot 應用。
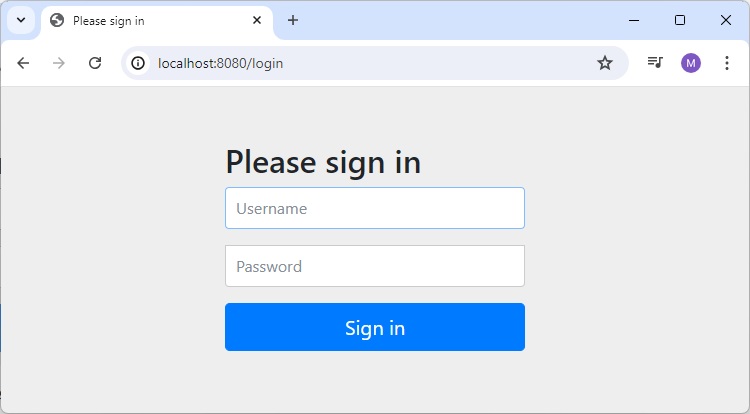
它將啟動應用程式,並且應用程式啟動後,我們可以執行 localhost:8080 以檢查更改。
輸出
現在開啟 localhost:8080,您可以看到瀏覽器正在透過系統對話方塊要求輸入使用者名稱/密碼。
瀏覽器使用者名稱/密碼對話方塊
輸入無效憑據
如果我們輸入無效憑據,則相同的對話方塊將再次彈出。

使用者主頁
如果我們為使用者輸入有效的憑據,它將載入使用者的主頁。