- 檔案系統模組
- PhantomJS - 屬性
- PhantomJS - 方法
- 系統模組
- PhantomJS - 屬性
- Web 伺服器模組
- PhantomJS - 屬性
- PhantomJS - 方法
- 其他
- 命令列介面
- PhantomJS - 螢幕截圖
- PhantomJS - 頁面自動化
- PhantomJS - 網路監控
- PhantomJS - 測試
- PhantomJS - REPL
- PhantomJS - 示例
- PhantomJS 有用資源
- PhantomJS - 快速指南
- PhantomJS - 有用資源
- PhantomJS - 討論
PhantomJS - 快速指南
PhantomJS - 概述
PhantomJS 被稱為無頭瀏覽器,因為在執行 JavaScript 程式碼時沒有瀏覽器參與。執行不會在瀏覽器顯示中看到,而是在命令列提示符下。CSS 處理、DOM 操作、JSON、Ajax、Canvas、SVG等功能都將在命令提示符下處理。PhantomJS 沒有 GUI,因此所有執行都在命令列中進行。
使用 PhantomJS,我們可以寫入檔案、讀取檔案內容或上傳檔案、擷取螢幕截圖、將網頁轉換為 pdf 等等。使用無頭瀏覽器,您可以獲得所有瀏覽器行為,即Cookie、Http 請求方法,即GET/POST、清除 Cookie、刪除 Cookie等,頁面重新載入、導航到不同的頁面。
PhantomJS 使用 WebKit,它具有與著名瀏覽器(例如 Google Chrome、Mozilla Firefox、Safari 等)類似的瀏覽環境。它還提供了許多 JavaScript API,有助於擷取螢幕截圖、上傳檔案、寫入檔案、讀取檔案、與網頁互動等。
PhantomJS 不支援 Flash 或影片,因為它需要外掛,並且在命令列上很難支援相同的功能。
PhantomJS 的特點
現在讓我們瞭解 PhantomJS 提供的功能。
頁面自動化
PhantomJS 允許您在 API 的幫助下讀取頁面內容。它可以幫助操作 DOM,使用外部庫來執行所需的任務。
螢幕截圖
PhantomJS 有助於擷取指定頁面的螢幕截圖,並將其儲存為各種格式的影像,例如 PNG、JPEG、PDF 和 GIF。在螢幕截圖的幫助下,它可以輕鬆確保網頁內容正常。
PhantomJS 提供屬性和方法,開發人員可以使用它們來調整螢幕截圖的大小並指定他們想要捕獲的區域。
無頭測試
PhantomJS 有助於在命令列中測試 UI。同時,在螢幕截圖的幫助下,它可以輕鬆幫助查詢 UI 中的錯誤。PhantomJS 有時無法單獨幫助進行測試。但是,它可以與其他測試庫(如 Mocha、Yoeman 等)一起包裝。您可以藉助 PhantomJS 上傳檔案並提交表單。
PhantomJS 可用於測試跨站點的登入,並確保安全性不會受到損害。PhantomJS 可以與其他工具(如CasperJS、Mocha、Qunit)一起使用,以使測試更強大。
網路監控
PhantomJS 的重要功能之一是使用可用的 API 監控網路連線。PhantomJS 允許檢查網路流量;它適合構建關於網路行為和效能的各種分析。
PhantomJS 可用於收集有關網頁在即時環境中的效能資料。PhantomJS 可以與Yslow等工具一起使用來收集任何網站的效能指標。
PhantomJS - 環境設定
PhantomJS 是一個免費軟體,根據BSD 許可證分發。它易於安裝,並提供多種功能來執行指令碼。PhantomJS 可以輕鬆地在多個平臺上執行,例如 Windows、Linux 和 Mac。
要下載 PhantomJS,您可以訪問 – http://phantomjs.org/,然後點選下載選項。
對於 Windows
下載頁面顯示了不同作業系統的下載選項。下載 zip 檔案,解壓縮它,您將獲得一個可執行檔案phantom.exe。將 PATH 環境變數設定為 phantom.exe 檔案的路徑。開啟一個新的命令提示符並鍵入phantomjs –v。它應該會顯示您正在執行的 PhantomJS 的當前版本。
對於 MAC OS X
下載適用於 MAC OS 的 PhantomJS zip 檔案並提取內容。下載內容後,將 PhantomJS 移動到 – /usr/local/bin/。在終端執行 PhantomJS 命令,即 phantomjs –v,它應該會顯示 PhantomJS 的版本說明。
Linux 64 位
下載適用於 Linux 64 位的 PhantomJS zip 檔案並提取內容。下載內容後,將 PhantomJS 資料夾移動到/usr/local/share/並建立符號連結:
sudo mv $PHANTOM_JS /usr/local/share
sudo ln -sf /usr/local/share/$PHANTOM_JS/bin/phantomjs /usr/local/bin.
在終端執行 phantomjs –v,它應該會顯示 PhantomJS 的版本。
Linux 32 位
下載適用於 Linux 32 位的 PhantomJS zip 檔案並提取內容。下載內容後,將 PhantomJS 資料夾移動到/usr/local/share/並建立符號連結:
sudo mv $PHANTOM_JS /usr/local/share
sudo ln -sf /usr/local/share/$PHANTOM_JS/bin/phantomjs /usr/local/bin.
在終端執行 phantomjs –v,它應該會顯示 PhantomJS 的版本。
還可以透過點選以下連結從 git 儲存庫獲取 PhantomJS 原始碼 – https://github.com/ariya/phantomjs/
要在 PhantomJS 中執行指令碼,命令如下:
phantomjs jsfile arg1 arg2…
PhantomJS - 物件
在本章中,我們將瞭解 PhantomJS 的四個重要物件。它們如下:
- CookiesEnabled
- Cookies
- LibraryPath
- Version
現在讓我們詳細討論每個物件。
cookiesEnabled
它指示 Cookie 是否已啟用。如果是,則返回true;否則返回false。
語法
其語法如下:
phantom.cookiesEnabled
示例
cookieenabled.js
phantom.addCookie ({
   //adding cookie with addcookie property
   name: 'c1',
   value: '1',
   domain: 'localhost'
});

console.log("Cookie Enabled value is : "+phantom.cookiesEnabled);
phantom.exit();
輸出
命令 - phantomjs cookieenabled.js
Cookie Enabled value is : true
Cookies
它有助於將 Cookie 新增和設定到域。它返回一個包含該域所有可用 Cookie 的物件。
語法
其語法如下:
phantom.cookies;
示例
檔名:phantomcookie.js
phantom.addCookie ({
   name: 'c1',
   value: '1',
   domain: 'localhost'
});
phantom.addCookie ({
   name: 'c2',
   value: '2',
   domain: 'localhost'
});
phantom.addCookie ({
   name: 'c3',
   value: '3',
   domain: 'localhost'
});
console.log(JSON.stringify(phantom.cookies));
phantom.exit();
輸出
命令 - phantomjs phantomcookie.js
[{"domain":".localhost","httponly":false,"name":"c3","path":"/","secure":false, "
value":"3"},{"domain":".localhost","httponly":false,"name":"c2","path":"/","sec u
re":false,"value":"2"},{"domain":".localhost","httponly":false,"name":"c1","pat h
":"/","secure":false,"value":"1"}]
在上面的示例中,我們向 localhost 域添加了一些 Cookie。然後我們使用phantom.cookies獲取它。它使用JSON stringify方法將 JavaScript 物件轉換為字串,返回包含所有 Cookie 的物件。您還可以使用foreach訪問 Cookie 的名稱/值。
LibraryPath
PhantomJS libraryPath 儲存要由injectJS方法使用的指令碼路徑。
語法
其語法如下:
phantom.libraryPath
示例
這是一個查詢版本的示例。
var webPage = require('webpage');
var page = webPage.create();

page.open('https://tutorialspoint.tw/jquery', function(status) {
   if (status === "success") {
      page.includeJs('http://ajax.googleapis.com/ajax/libs/jquery/1.7.2/jquery.min.js ', function() {
         if (page.injectJs('do.js')) {
            // returnTitle is a function loaded from our do.js file - see below
            return returnTitle();
         });

         console.log(title);
         phantom.exit();
      }
   }
});

window.returnTitle = function() {
   return document.title;
};
以上程式生成以下輸出。
Jquery Tutorial
Version
它給出正在執行的 PhantomJS 的版本,並以物件的形式返回詳細資訊。例如:{"major":2,"minor":1,"patch":1}
語法
其語法如下:
phantom.version
示例
這是一個查詢版本的示例。
var a = phantom.version;
console.log(JSON.stringify(a));
console.log(a.major);
console.log(a.minor);
console.log(a.patch);
phantom.exit();
以上程式生成以下輸出。
{"major":2,"minor":1,"patch":1}
2
1
1
在上面的示例中,我們使用了console.log來列印版本。目前,我們正在執行版本 2。它返回包含上述程式碼塊中顯示的詳細資訊的物件。
PhantomJS - 方法
PhantomJS 是一個平臺,可以幫助在沒有瀏覽器的情況下執行 JavaScript。為此,使用以下方法,這些方法有助於新增 Cookie、刪除、清除、退出指令碼、注入 JS 等。
我們將在本章中進一步討論這些 PhantomJS 方法及其語法。類似的方法,即addcookie、injectjs存在於網頁模組中,將在後續章節中討論。
PhantomJS 公開了以下方法,可以幫助我們在沒有瀏覽器的情況下執行 JavaScript:
- addCookie
- clearCookie
- deleteCookie
- Exit
- InjectJS
現在讓我們詳細瞭解這些方法並舉例說明。
addCookie
addcookie 方法用於新增 Cookie 並將其儲存在資料中。它類似於瀏覽器如何儲存它。它接受一個引數,該引數是一個包含所有 Cookie 屬性的物件,其語法如下所示:
語法
其語法如下:
phantom.addCookie ({
   "name" : "cookie_name",
   "value" : "cookie_value",
   "domain" : "localhost"
});
name、value、domain 是必須新增到 addcookie 函式的屬性。如果 Cookie 物件中缺少任何這些屬性,則此方法將失敗。
name - 指定 Cookie 的名稱。
value - 指定要使用的 Cookie 的值。
domain - 將應用 Cookie 的域。
示例
這是一個addcookie方法的示例。
var page = require('webpage').create(),url = 'https:///tasks/a.html';
page.open(url, function(status) {
   if (status === 'success') {
      phantom.addCookie({   //add name cookie1 with value = 1
         name: 'cookie1',
         value: '1',
         domain: 'localhost'
      });
      phantom.addCookie({   // add cookie2 with value 2
         name: 'cookie2',
         value: '2',
         domain: 'localhost'
      });
      phantom.addCookie({   // add cookie3 with value 3
         name: 'cookie3',
         value: '3',
         domain: 'localhost'
      });
      console.log('Added 3 cookies');
      console.log('Total cookies :'+phantom.cookies.length);

      // will output the total cookies added to the url.
   } else {
      console.error('Cannot open file');
      phantom.exit(1);
   }
});
示例
a.html
<html>
   <head>
      <title>Welcome to phantomjs test page</title>
   </head>

   <body>
      <h1>This is a test page</h1>
      <h1>This is a test page</h1>
      <h1>This is a test page</h1>
      <h1>This is a test page</h1>
      <h1>This is a test page</h1>
      <h1>This is a test page</h1>
      <h1>This is a test page</h1>
      <h1>This is a test page</h1>
      <h1>This is a test page</h1>
   </body>
</html>
以上程式生成以下輸出。
Added 3 cookies
Total cookies :3
程式碼註釋不言自明。
clearCookies
此方法允許刪除所有 Cookie。
語法
其語法如下:
phantom.clearCookies();
此概念的工作原理類似於透過在瀏覽器選單中選擇來刪除瀏覽器 Cookie。
示例
這是一個clearCookies方法的示例。
var page = require('webpage').create(),url = 'https:///tasks/a.html';
page.open(url, function(status) {
   if (status === 'success') {
      phantom.addCookie({   //add name cookie1 with value = 1
         name: 'cookie1',
         value: '1',
         domain: 'localhost'
      });
      phantom.addCookie({   // add cookie2 with value 2
         name: 'cookie2',
         value: '2',
         domain: 'localhost'
      });
      phantom.addCookie({   // add cookie3 with value 3
         name: 'cookie3',
         value: '3',
         domain: 'localhost'
      });
      console.log('Added 3 cookies');
      console.log('Total cookies :'+phantom.cookies.length);
      phantom.clearCookies();
      console.log(
         'After clearcookies method total cookies :' +phantom.cookies.length);

      phantom.exit();
   } else {
      console.error('Cannot open file');
      phantom.exit(1);
   }
});
a.html
<html>
   <head>
      <title>Welcome to phantomjs test page</title>
   </head>

   <body>
      <h1>This is a test page</h1>
      <h1>This is a test page</h1>
      <h1>This is a test page</h1>
      <h1>This is a test page</h1>
      <h1>This is a test page</h1>
      <h1>This is a test page</h1>
      <h1>This is a test page</h1>
      <h1>This is a test page</h1>
      <h1>This is a test page</h1>
   </body>
</html>
以上程式生成以下輸出。
Added 3 cookies
Total cookies :3
After clearcookies method total cookies :0
deleteCookie
刪除CookieJar中任何具有與 cookieName 匹配的“name”屬性的 Cookie。如果成功刪除,則返回true;否則返回false。
語法
其語法如下:
phantom.deleteCookie(cookiename);
讓我們在示例的幫助下了解addcookie、clearcookies和deletecookie。
示例
這是一個演示 deleteCookie 方法用法的示例:
檔案:cookie.js
var page = require('webpage').create(),url = 'https:///tasks/a.html';
page.open(url, function(status) {
   if (status === 'success') {
      phantom.addCookie({   //add name cookie1 with value = 1
         name: 'cookie1',
         value: '1',
         domain: 'localhost'
      });
      phantom.addCookie({   // add cookie2 with value 2
         name: 'cookie2',
         value: '2',
         domain: 'localhost'
      });
      phantom.addCookie({   // add cookie3 with value 3
         name: 'cookie3',
         value: '3',
         domain: 'localhost'
      });
      console.log('Added 3 cookies');
      console.log('Total cookies :'+phantom.cookies.length);

      //will output the total cookies added to the url.
      console.log("Deleting cookie2");
      phantom.deleteCookie('cookie2');

      console.log('Total cookies :'+phantom.cookies.length);
      phantom.clearCookies();

      console.log(
         'After clearcookies method total cookies :' +phantom.cookies.length);
      phantom.exit();
   } else {
      console.error('Cannot open file');
      phantom.exit(1);
   }
});
以上程式生成以下輸出。
phantomjs cookie.js
Added 3 cookies
Total cookies :3
Deleting cookie2
Total cookies :2
After clearcookies method total cookies :0
Exit
phantom.exit 方法將退出它啟動的指令碼。它以提到的返回值退出程式。如果沒有傳遞值,則返回“0”。
語法
其語法如下:
phantom.exit(value);
如果您不新增phantom.exit,則命令列假定執行仍在繼續,並且不會完成。
示例
讓我們看一個示例來了解exit方法的使用。
console.log('Welcome to phantomJs');  // outputs Welcome to phantomJS
var a = 1;
if (a === 1) {
   console.log('Exit 1'); //outputs Exit 1
   phantom.exit(); // Code exits.
} else {
   console.log('Exit 2');
   phantom.exit(1);
}
以上程式生成以下輸出。
phantomjs exit.js
Welcome to phantomJs
Exit 1
phantom.exit 之後的所有程式碼都不會執行,因為 phantom.exit 是一個結束指令碼的方法。
injectJs
InjectJs 用於在 phantom 中新增addtionaljs檔案。如果在當前目錄 librarypath中找不到該檔案,則 phantom 屬性 (phantom.libraryPath) 將用作跟蹤路徑的其他位置。如果檔案新增成功,則返回true;否則如果無法找到檔案,則返回false表示失敗。
語法
其語法如下:
phantom.injectJs(filename);
示例
讓我們看下面的例子來了解injectJs的使用。
檔名:inject.js
console.log(“Added file”);
檔名:addfile.js
var addfile =  injectJs(inject.js);
console.log(addfile);
phantom.exit();
輸出
命令 - C:\phantomjs\bin>phantomjs addfile.js
Added file // coming from inject.js
true
在上面的示例中,addfile.js使用 injectJs 呼叫檔案inject.js。當您執行 addfile.js 時,inject.js 中的 console.log 會顯示在輸出中。它還為 addfile 變數顯示 true,因為檔案 inject.js 已成功新增。
PhantomJS - Webpage 模組屬性
PhantomJS 提供了大量屬性和方法來幫助我們與網頁內的內容進行互動。
require("webpage").create() 命令建立一個網頁物件。我們將使用此物件,藉助下面列出的屬性和方法來操作網頁。
var wpage = require("webpage").create();
下表列出了我們將要討論的所有網頁屬性。
| 序號 | 屬性及描述 |
|---|---|
| 1 | canGoBack
如果導航歷史記錄中有上一頁,此屬性返回true;否則返回false。 |
| 2 | canGoForward
如果導航歷史記錄中有下一頁,此屬性返回 true;否則返回false。 |
| 3 | clipRect
clipRect 是一個包含 top、left、width 和 height 值的物件,在 render() 方法中使用時用於擷取網頁的影像。 |
| 4 | Content
此屬性包含網頁的內容。 |
| 5 | cookies
使用 cookies,您可以設定/獲取 URL 上可用的 cookie。它還會提供 URL 上可用的 cookie 以及頁面上設定的新 cookie。 |
| 6 | customHeaders
customHeaders 指定頁面發出的每個請求將傳送到伺服器的其他 HTTP 請求頭。 |
| 7 | Event
它提供事件的冗長列表,即修飾符、鍵詳細資訊。 |
| 8 | focusedFrameName
返回當前聚焦框架的名稱。 |
| 9 | frameContent
此屬性提供活動框架的內容。 |
| 10 | frameName
返回當前聚焦框架的名稱。 |
| 11 | framePlainText
此屬性也提供當前活動框架的內容,但僅提供不包含任何 html 標籤的內容。 |
| 12 | frameTitle
提供活動框架的標題。 |
| 13 | frameUrl
此屬性將提供當前聚焦框架的 URL。 |
| 14 | framesCount
提供頁面上存在的框架數量。 |
| 15 | framesName
提供框架名稱陣列。 |
| 16 | libraryPath
此屬性具有 page.inectJs 方法使用的路徑。 |
| 17 | navigationLocked
此屬性定義是否允許頁面導航。如果為 true,它將位於當前頁面 URL,並且不允許點選頁面以轉到下一頁。 |
| 18 | offlineStoragePath
此屬性提供使用 window.localStorage 儲存資料的路徑。可以使用命令列中的 --local-storage-path 更改路徑。 |
| 19 | offlineStorageQuota
此屬性定義您可以在 window.localStorage 中儲存的最大資料量。值為 5242880 位元組,即 5MB。此值可以使用以下命令在命令列中覆蓋:--localstorage-quota = size。 |
| 20 | ownsPages
如果網頁開啟的頁面是網頁的子頁面,則 ownsPages 返回 true 或 false。 |
| 21 | pagesWindowName
PagesWindowName 將提供使用 window.open 開啟的視窗的名稱。 |
| 22 | pages
pages 屬性將提供使用 window.open 在頁面中開啟的頁面的陣列。如果頁面在您引用的 URL 中關閉,則不會考慮該頁面。 |
| 23 | paperSize
此屬性提供網頁的大小,即尺寸,當需要將其轉換為 pdf 格式時使用。paperSize 包含物件中所需尺寸。 |
| 24 | plaintext
此屬性也提供當前活動框架的內容,但僅提供不包含任何 html 標籤的內容。 |
| 25 | scrollPosition
它包含指示滾動位置的物件。它提供 left 和 top。 |
| 26 | settings
當使用 page.open 方法時,此屬性將提供網頁的設定。頁面載入後,設定屬性的更改不會產生任何影響。 |
| 27 | title
此屬性將提供您正在讀取頁面的標題。 |
| 28 | url
此屬性將提供頁面 URL。 |
| 29 | viewportSize
此屬性允許更改視窗顯示的大小。它包含寬度和高度,您可以根據需要讀取或更改它。 |
| 30 | windowName
提供視窗的名稱。 |
| 31 | zoomFactor
此屬性指定 render 和 renderBase64 方法的縮放因子。它有助於縮放頁面並在需要時擷取螢幕截圖。 |
PhantomJS - Webpage 模組方法
Web Page 模組具有用於Cookie、框架、頁面導航、重新載入、渲染和檔案上傳的方法。
以下是網頁上可用的方法。
| 序號 | 方法及描述 |
|---|---|
| 1 | addCookie()
addCookie 方法將 cookie 新增到指定的頁面。 |
| 2 | childFramesCount()
此方法已根據http://phantomjs.org棄用。 |
| 3 | childFramesName()
此方法已根據http://phantomjs.org棄用。 |
| 4 | clearCookies()
將刪除指定頁面的所有 cookie。 |
| 5 | close()
此方法用於關閉頁面並釋放使用的記憶體。一旦呼叫 close,任何網頁方法或屬性都將無法工作。 |
| 6 | currentFrameName()
此方法已根據http://phantomjs.org棄用。 |
| 7 | deleteCookie()
這將刪除與給定頁面 URL 上存在的 cookie 列表匹配的名稱的 cookie。 |
| 8 | evaluateAsync()
在頁面內非同步評估給定函式,而不會阻塞當前執行。此函式有助於非同步執行某些指令碼。 |
| 9 | evaluateJavascript()
EvaluateJavaScript 幫助執行作為字串傳遞給它的函式。請注意,傳遞的字串必須僅為函式。 |
| 10 | evaluate()
Evaluate 將執行傳遞給它的函式。如果函式包含控制檯訊息,則不會直接在終端中顯示。要顯示任何控制檯訊息,您需要使用 onConsoleMessage 幻像回撥。 |
| 11 | getPage()
這將為您提供與 getpage 中傳遞的 windowname 匹配的子頁面。 |
| 12 | goBack()
它提供導航歷史記錄中的上一頁,僅當導航未鎖定時。 |
| 13 | goForward()
它提供導航歷史記錄中的下一頁,僅當導航未鎖定時。 |
| 14 | go()
此方法允許您使用頁面進行導航。 |
| 15 | includeJs()
Includejs 在頁面上執行外部 JS 檔案並在完成後執行回撥函式。 |
| 16 | injectJs()
InjectJs 從指定檔案包含外部指令碼到頁面中。如果當前目錄中沒有該檔案,則它使用 libraryPath 進一步搜尋該檔案。如果注入檔案,則返回 true,否則返回 false。 |
| 17 | openUrl()
OpenUrl 開啟一個網頁。它類似於 PhantomJS 的 open 方法。OpenUrl 有一些額外的引數,即 httpConf、設定和回撥函式。 |
| 18 | open()
Open 用於開啟一個網頁。 |
| 19 | release()
Release 將釋放頁面的記憶體堆使用量。在呼叫 release 後不要使用頁面例項方法。此方法類似於 close 方法,並且其用法已棄用。請改用 wpage.close()。 |
| 20 | reload()
Reload 用於重新載入當前使用的頁面。 |
| 21 | renderBase64()
此方法擷取螢幕截圖並將影像作為 base46 中的字串提供。Renderbase64 支援 PNG、JPEG 和 JPG 等格式。目前不支援 gif。您可以使用 clipRect 屬性定義影像捕獲的部分。 |
| 22 | renderBuffer()
RenderBuffer 將網頁的捕獲儲存到影像緩衝區,該緩衝區可以直接傳送到伺服器。支援的格式為 PNG、GIF 和 JPEG。 |
| 23 | render()
Render 幫助獲取影像緩衝區並根據指定的格式儲存它。 |
| 24 | sendEvent()
它用於向網頁傳送事件。它們不是 DOM 事件。這些事件中的每一個都根據使用者交互發送到網頁。 |
| 25 | setContent()
setcontent 將使用指定的內容更改指定 URL 的頁面內容。 |
| 26 | stop()
它有助於停止頁面的載入。 |
| 27 | switchToChildFrame()
已棄用,請使用 switchToFrame();。 |
| 28 | switchToFocusedFrame()
它選擇處於焦點的框架。 |
| 29 | switchToFrame()
選擇指定名稱且是當前框架子級的框架。 |
| 30 | switchToMainFrame()
選擇主框架,即根視窗。 |
| 31 | switchToParentFrame()
它獲取當前子框架的父框架。 |
| 32 | uploadFile()
此方法用於處理使用 html 中的表單完成的檔案上傳。PhantomJS 沒有使用表單直接執行此操作的方法,可以使用 uploadFile 方法實現相同的功能。它獲取檔案位置的 html 標籤選擇器以及必須複製到的目標位置。 |
Webpage 模組事件/回撥
下表描述了網頁模組可用的回撥。
| 序號 | 回撥及描述 |
|---|---|
| 1 | onAlert()
當頁面上出現警報時,會呼叫此回撥;回撥接受一個字串並且不返回任何內容。 |
| 2 | onCallback()
OnCallback 用於將值從網頁傳遞到網頁物件,並且它是使用 window.callPhantom() 方法完成的,該方法在內部呼叫 onCallback 函式。 |
| 3 | onClosing()
當使用 page.close() 方法或 window.close() 方法關閉視窗時,會呼叫此方法。 |
| 4 | onConfirm()
當頁面呼叫確認訊息並使用確定/取消時,會呼叫此回撥。 |
| 5 | onConsoleMessage()
當網頁使用控制檯訊息時,會使用此回撥。onConsoleMessage 方法接受 3 個引數。 |
| 6 | onError()
當出現 JavaScript 錯誤時,會呼叫它。onError 的引數是 msg 和堆疊跟蹤,它是一個數組。 |
| 7 | onFilePicker()
此方法用於上傳檔案,當用戶想要上傳檔案時會呼叫此回撥。 |
| 8 | onInitialized()
在載入頁面之前呼叫此回撥。 |
| 9 | onLoadFinished()
當開啟的頁面完全載入時,會呼叫此函式。它有一個引數,指示載入是否成功。 |
| 10 | onLoadStarted()
當頁面開始載入時,會呼叫此回撥。 |
| 11 | onNavigationRequested()
此回撥指示導航事件何時發生。 |
| 12 | onPageCreated()
當頁面開啟新的子視窗時,會呼叫此回撥。 |
| 13 | onPrompt()
當網頁呼叫提示時,會呼叫此回撥。它接受 2 個引數,訊息和答案。返回值為字串。 |
| 14 | onResourceError()
當網頁無法上傳檔案時,將呼叫此回撥函式。 |
| 15 | onResourceReceived()
當頁面請求的資源被接收時,將呼叫此回撥函式。 |
| 16 | onResourceRequested()
當頁面請求資源時,將呼叫此函式。 |
| 17 | onResourceTimeout()
當請求的資源超時時,將呼叫此回撥函式,當使用 settings.resourceTimeout 時。 |
| 18 | onUrlChanged()
當使用導航更改當前 URL 時,將呼叫此函式。它向回撥傳遞一個引數,該引數是一個新的 URL 目標字串 targetUrl。 |
網頁子程序模組
Phantomjs 子程序模組有助於與子程序互動並使用stdin/stdout/stderr與它們通訊。子程序可用於列印、傳送郵件或呼叫用其他語言編寫的程式。要建立子程序模組,您需要引用。
例如 -
var process = require("child_process");
Spawn 方法
使用 spawn 子程序,您可以訂閱其stdout和stderr流以即時獲取資料。
語法
其語法如下:
var spawn = require('child_process').spawn;
示例
讓我們來看一個 spawn 方法的例子。
var process = require("child_process")
var spawn = process.spawn
var child = spawn("cmd", ['/c', 'dir']);

child.stdout.on("data", function (data) {
   console.log("spawnSTDOUT---VALUE:", JSON.stringify(data))
})
child.stderr.on("data", function (data) {
   console.log("spawnSTDERR:", JSON.stringify(data))
})
child.on("exit", function (code) {
   console.log("spawnEXIT:", code)
})
輸出
上述程式生成以下輸出。
spawnSTDOUT---VALUE: " Volume in drive C is OS\r\n"
spawnSTDOUT---VALUE: " Volume Serial Number is 7682-9C1B\r\n\r\n Directory of C:
\\phantomjs\\bin\r\n\r\n"
spawnSTDOUT---VALUE: "20-05-2017  10:01
<DIR>          .\r\n20-05-2017  10:01
<DIR>          ..\r\n13-05-2017  20:48   12 a,txt.txt\r\n07-05-2017  08:51
63 a.js\r\n06-05-2017  16:32           120,232 a.pdf\r\n13-05-2017  20:49
spawnEXIT: 0
PhantomJS - 檔案系統模組屬性
檔案系統模組有許多用於處理檔案和目錄的 API。您可以建立/寫入和刪除檔案/目錄。要開始使用檔案系統模組,您必須要求對fs 模組的引用。
var fs = require('fs');
檔案系統模組有兩個可用的屬性:分隔符和工作目錄。讓我們詳細瞭解它們。
分隔符
它告訴您檔案路徑使用的分隔符。
- 對於 Windows:\
- 對於 Linux:/
語法
其語法如下:
fs.seperator
示例
var fs = require('fs');
console.log(fs.seperator);
phantom.exit();
以上程式生成以下輸出。
undefined
工作目錄
工作目錄是 PhantomJS 執行所在的目錄。
語法
其語法如下:
var fs = require('fs');
fs.workingDirectory;
示例
var fs = require('fs');
console.log(fs.workingDirectory);
phantom.exit();
以上程式生成以下輸出。
C:/phantomjs/bin
PhantomJS - 檔案系統模組方法
下表列出了檔案系統模組上所有方法及其描述。
| 序號 | 方法及描述 |
|---|---|
| 1 | absolute
此方法提供 PhantomJS 執行的絕對路徑。 |
| 2 | changeWorkingDirectory
這允許您更改工作目錄,如果成功則返回 true,否則返回 false。 |
| 3 | copyTree
copyTree 將目錄從一個路徑複製到另一個路徑。第一個引數是原始檔夾,第二個引數是目標資料夾。 |
| 4 | copy
此方法有助於將檔案從一個位置複製到另一個位置。它有兩個引數。第一個引數是原始檔,第二個引數是檔案路徑,檔案必須複製到該路徑。如果原始檔或目標檔案不存在,它將丟擲錯誤。 |
| 5 | exists
它檢查給定的檔案路徑是否在系統中存在。如果存在,則返回 true,否則返回 false。 |
| 6 | isAbsolute
如果檔案路徑是絕對路徑,此方法將返回 true,如果檔案路徑是相對路徑,則返回 false。 |
| 7 | isDirectory
isDirectory 用於判斷給定檔案是否為目錄。如果是目錄,則返回 true,否則返回 false。如果給定路徑不存在,則返回 false。 |
| 8 | isExecutable
此方法將判斷給定檔案是否可執行。如果可執行,則返回 true,否則返回 false。 |
| 9 | isFile
這提供了給定檔案路徑是否為檔案的資訊。如果是檔案,則返回 true,否則返回 false。 |
| 10 | isLink
如果檔案路徑是符號連結,則返回 true,否則返回 false。 |
| 11 | isReadable
它檢查給定檔案是否可讀。如果是,則返回 true,否則返回 false。 |
| 12 | isWritable
它判斷給定檔案是否可寫。如果是,則返回 true,否則返回 false。 |
| 13 | lastModified
提供對檔案進行的最後修改的詳細資訊。它顯示檔案上次修改的日期和時間。 |
| 14 | list
它提供目錄中存在的所有檔案。 |
| 15 | makeDirectory
建立一個新目錄。 |
| 16 | makeTree
makeTree 建立所有必要的資料夾以形成最終目錄。如果建立成功,則返回 true,否則返回 false。如果目錄已存在,則返回 true。 |
| 17 | move
它將檔案從一個路徑移動到另一個路徑。 |
| 18 | open
它用於開啟檔案。 |
| 19 | readLink
這將返回符號連結(或 Windows 上的快捷方式)指向的檔案或資料夾的絕對路徑。如果路徑不是符號連結或快捷方式,它將返回空字串。 |
| 20 | read
這將讀取給定的檔案。 |
| 21 | removeDirectory
這將刪除給定的目錄。 |
| 22 | removeTree
它將刪除給定資料夾中的所有檔案和資料夾,最後刪除資料夾本身。如果在此過程中出現任何錯誤,它將丟擲錯誤 - “無法刪除目錄樹 PATH”並掛起執行。 |
| 23 | remove
它刪除給定的檔案。 |
| 24 | size
它提供檔案的大小。 |
| 25 | touch
它建立給定的檔案。 |
| 26 | write
寫入給定的檔案。 |
PhantomJS - 系統模組屬性
在本章中,我們將討論 PhantomJS 的各種系統模組屬性。
args
PhantomJS 的系統模組具有不同的屬性,有助於傳遞引數、瞭解正在執行的檔案等。
args 屬性基本上返回在命令列中傳遞的引數。您還可以傳遞要讀取的頁面 URL。如果要儲存螢幕截圖 pdf 檔案或上傳檔案,則可以將詳細資訊傳遞到命令列,並可以使用args屬性讀取它們。
讓我們找到傳遞到命令列的每個引數的長度和獲取方式。
語法
其語法如下:
var system = require('system');
system.args;
示例
請檢視以下示例以瞭解此屬性的工作原理。
var system = require('system');
console.log(system.args.length);

if (system.args.length>0) {
   console.log(JSON.stringify(system.args));
}
phantom.exit();
以上程式生成以下輸出。
命令 - phantomsjs args.js https:///tasks/request.html
2
["args.js","https:///tasks/request.html"]
第一個值是檔名,下一個值是傳遞的 URL。您可以在命令列中傳遞更多引數,並使用system.args獲取它們。
env
env屬性返回系統詳細資訊。
語法
其語法如下:
var system = require('system');
system.env;
示例
var system = require('system');
console.log(JSON.stringify(system.env));
phantom.exit();
上述程式生成以下輸出。
{"=::":"::\\","=C:":"C:\\phantomjs\\bin","=ExitCode":"00000000","ALLUSERSPROFILE":
"C:\\ProgramData","APPDATA":"C:\\Users\\UserName\\AppData\\Roaming","COMPUTERNAME":
"X","ComSpec":"C:\\Windows\\system32\\cmd.exe","CommonProgramFiles":
"C:\\Program Files (x86)\\Common Files","CommonProgramFiles(x86)":
"C:\\Program Files (x86)\\Common Files","CommonProgramW6432":
"C:\\Program Files\\Common Files","FP_NO_HOST_CHECK":"NO","HOMEDRIVE":"C:",
"HOMEPATH":"\\Users\\UserName","LOCALAPPDATA":
"C:\\Users\\UserName\\AppData\\Local","LOGONSERVER":"\\\\MicrosoftAccount",
"NUMBER_OF_PROCESSORS":"2","OS":"Windows_NT","PATHEXT":".COM;.EXE;.BAT;.CMD;.VBS ;
.VBE;.JS;.JSE;.WSF;.WSH;.MSC","PROCESSOR_ARCHITECTURE":"x86","PROCESSOR_ARCHITEW64 32":
"AMD64","PROCESSOR_IDENTIFIER":"Intel64 Family 6 Model 58Stepping9,GenuineIntel",
"PROCESSOR_LEVEL":"6","PROCESSOR_REVISION":"3a09","PROMPT":
"$P$G","PSModulePath":"C:\\Windows\\system32\\WindowsPowerShell\\v1.0\\
Modules\\" ,"PUBLIC":"C:\\Users\\Public","Path":
"C:\\Program Files\\Dell\\DW WLAN Card;
c:\\Program Files (x86)\\Intel\\iCLS Client\\;c:\\Program Files\\Intel\\iCLSClient\\;
C:\\Windows\\system32;C:\\Windows;C:\\Windows\\System32\ \Wbem;
C:\\Windows\\System32\\WindowsPowerShell\\v1.0\\;
C:\\Program Files\\Intel\\Intel(R) Management Engine Components\\DAL;
C:\\Program Files\\Intel\\Intel(R) Management Engine Components\\IPT;
C:\\Program Files (x86)\\Intel\\Intel(R) Management Engine Components\\DAL;
C:\\Program Files (x86)\\Intel\\Intel(R)
ManagementEngineComponents\\IPT;c:\\ProgramFiles\\WIDCOMM\\BluetoothSoftware\\;
c:\\ProgramFiles\\WIDCOMM\\BluetoothSoftware\\syswow64;
C:\\ProgramFiles(x86)\\WindowsLive\\Shared;C:\\ProgramFiles\\nodejs\\;
C:\\ProgramFiles\\Git\\cmd;C:\\ProgramFiles\\ OpenVPN\\bin;
C:\\ProgramFiles(x86)\\Skype\\Phone\\;C:\\Users\\UserName\\AppData\\Roaming
\\npm","ProgramData":
"C:\\ProgramData","ProgramFiles":"C:\\ProgramFiles(x86)",
"ProgramFiles(x86)":"C:\\ProgramFiles(x86)","ProgramW6432":
"C:\\ProgramFiles","SESSIONNAME":"Console","SystemDrive":
"C:","SystemRoot":"C:\\Windows","TEMP":"C:\\Users\ \Username~1\\AppData\\Local\\Temp",
"TMP":"C:\\Users\\Username~1\\AppData\\Local\\Temp",
"USERDOMAIN":"USER","USERDOMAIN_ROAMINGPROFILE":"USER","USERNAME":"X Y","USERPROFILE":
"C:\\Users\\X Y","windir":"C:\\Windows"}
OS
它返回所用作業系統的詳細資訊。它返回一個包含體系結構、作業系統名稱和版本的物件。
語法
其語法如下:
var system = require('system');
system.os;
示例
var system = require('system');
console.log(JSON.stringify(system.os));
phantom.exit();
上述程式生成以下輸出。
{"architecture":"32bit","name":"windows","version":"8.1"}
pid
此屬性返回程序 ID。
語法
其語法如下:
var system = require('system');
system.pid;
示例
讓我們來看一個pid屬性的例子。
var system = require('system');
console.log(system.pid);
phantom.exit();
上述程式生成以下輸出。
2160
platform
此屬性返回我們正在使用的平臺。
語法
其語法如下:
var system = require('system');
system.platform;
示例
var system = require('system');
console.log(system.platform);
phantom.exit();
上述程式生成以下輸出。
Phantomjs
PhantomJS - Web 伺服器模組屬性
PhantomJS 使用名為mongoose的嵌入式 Web 伺服器。目前,PhantomJS 無法連線到任何其他生產 Web 伺服器。關於連線,它一次可以處理 10 個連線,超過 10 個請求將等待在佇列中。
要啟動 Web 伺服器,我們需要使用以下語法 -
var webserver = require (‘webserver’);
讓我們瞭解埠屬性,該屬性用於偵聽傳送到 Web 伺服器的請求。
port
Web 伺服器的埠屬性用於偵聽傳送到它的請求。
語法
其語法如下:
var server = require('webserver').create();
var listening = server.listen(port, function (request, response) {});
示例
讓我們舉個例子來了解port屬性是如何工作的。
var webserver = require('webserver');
var server = webserver.create();
var service = server.listen(8080,function(request,response){
});
if(service) console.log("server started - https://:" + server.port);
上述程式生成以下輸出。
server started - https://:8080
PhantomJS - Web 伺服器模組方法
在本章中,我們將討論 PhantomJS 的 Web 伺服器模組的各種方法。
close
close方法用於關閉 Web 伺服器。
語法
其語法如下:
var server = require('webserver').create();
server.close();
示例
以下示例顯示瞭如何使用close方法。
var webserver = require('webserver');
var server = webserver.create();
var service = server.listen(8080,function(request,response){
});

if(service) console.log("server started - https://:" + server.port);
console.log(server.port);
server.close();
console.log(server.port);
以上程式生成以下輸出。
server started - https://:8080
8080
在這裡,我們在關閉伺服器後控制檯輸出了server.port。因此,它不會響應,因為 Web 伺服器已關閉。
listen
server.listen方法獲取埠和回撥函式,回撥函式有兩個引數,分別是 - 請求物件和響應物件。
請求物件包含以下屬性 -
方法 - 定義方法 GET/POST。
URL - 顯示請求的 URL。
httpVersion - 顯示實際的 http 版本。
Headers - 顯示所有具有鍵值對的標頭。
Post - 僅適用於 post 方法的請求正文。
postRaw - 如果 Content-Type 標頭設定為“application/x-www-formurlencoded”,則 post 的原始內容將儲存在此額外屬性 (postRaw) 中,然後該 post 將自動更新為資料的 URL 解碼版本。
響應物件包含以下屬性 -
Headers - 包含所有 HTTP 標頭作為鍵值對。它應該在第一次呼叫 write 之前設定。
SetHeader - 設定特定的標頭。
Header (name) - 返回給定標頭的值。
StatusCode - 設定返回的 HTTP 狀態程式碼。
SetEncoding (encoding) - 用於轉換提供給 write() 的資料。預設情況下,資料將轉換為 UTF-8。如果資料是二進位制字串,則指示“binary”。如果資料是 Buffer(例如來自 page.renderBuffer),則不需要。
Write (data) - 傳送響應正文的資料。可以多次呼叫。
WriteHead (statusCode, headers) - 將響應標頭髮送到請求。狀態程式碼是 3 位 HTTP 狀態程式碼(例如 404)。最後一個引數和標頭是響應標頭。
Close - 關閉 http 連線。
CloseGracefully - 與 close() 類似,但它確保首先發送響應標頭。
語法
其語法如下:
var server = require('webserver').create();
var listening = server.listen(8080, function (request, response) {}
示例
讓我們舉個例子來了解listen方法是如何工作的。
var page = require('webpage').create();
var server = require('webserver').create();
var port = 8080;
var listening = server.listen(8080, function (request, response) {
   console.log("GOT HTTP REQUEST");
   console.log(JSON.stringify(request, null, 4));

   // we set the headers here
   response.statusCode = 200;
   response.headers = {"Cache": "no-cache", "Content-Type": "text/html"};

   // the headers above will now be sent implictly
   // now we write the body
   response.write("<html><head><title>Welcone to Phantomjs</title></head>");
   response.write("<body><p>Hello World</p></body></html>");
   response.close();
});

if (!listening) {
   console.log("could not create web server listening on port " + port);
   phantom.exit();
}

var url = "https://:" + port + "/foo/response.php";
console.log("sending request to :" +url);
page.open(url, function (status) {
   if (status !== 'success') {
      console.log('page not opening');
   } else {
      console.log("Getting response from the server:");
      console.log(page.content);
   }

   phantom.exit();
});
以上程式生成以下輸出。
sending request to :https://:8080/foo/response.php
GOT HTTP REQUEST {
   "headers": {
      "Accept": "text/html,application/xhtml+xml,application/xml;q=0.9,*/*;q=0.8",
      "Accept-Encoding": "gzip, deflate",
      "Accept-Language": "en-IN,*",
      "Connection": "Keep-Alive",
      "Host": "localhost:8080",
      "User-Agent": "Mozilla/5.0 (Windows NT 6.2; WOW64) AppleWebKit/538.1
         (KHTML, like Gecko) PhantomJS/2.1.1 Safari/538.1"
   },
   "httpVersion": "1.1",
   "method": "GET",
   "url": "/foo/response.php"
}
Getting response from the server:
<html><head><title>Welcone to Phantomjs</title></head><body><p>Hello World</p></body>
</html>
PhantomJS - 命令列介面
PhantomJS 可以使用關鍵字“phantomjs”和檔名執行。例如,“phantomjs file.js”。
您還可以將引數傳遞到“file.js”,如下所示 -
phantomjs [options] file.js arg1 arg2 ...
讓我們瀏覽一些在命令列中可用的選項。
| 序號 | 選項和描述 |
|---|---|
| 1 | --help 或 –h 將顯示所有命令列選項。立即停止,不會執行傳遞的指令碼。 |
| 2 | --version 或 –v 列印正在執行的 PhantomJS 的版本。這將停止要執行的指令碼的執行。 |
| 3 | --debug[true|false] 列印警告和除錯訊息。預設情況下,它設定為 false。您也可以使用 [yes|no]。 |
| 4 | --cookies-file = /path/to/cookies.txt 儲存持久 cookie 的檔名。 |
| 5 | --diskcache=[true|false] 啟用磁碟快取。它也接受值 [yes|no] |
| 6 | --disk-cahe-path 磁碟快取的路徑。 |
| 7 | --ignore-sslerrors=[true|false] 忽略 SSL 錯誤。例如 – 過期或自簽名證書錯誤。預設值為 false。它也接受值 [yes|no]。 |
| 8 | --loadimages=[true|false] 載入所有內聯影像。預設值為 true。它也接受 [yes|no]。 |
| 9 | --local-storagepath=/some/path 儲存 LocalStorage 內容和 WebSQL 內容的路徑。 |
| 10 | --local-storagequota=number 允許資料的最大大小。 |
| 11 | --local-url-access 允許使用“file:///" URL(預設為 true)。 |
| 12 | --local-to-remote-urlaccess=[true|false] 允許本地內容訪問遠端 URL。預設值為 false。它也接受值 [yes|no]。 |
| 13 | --max-disk-cachesize=size 限制磁碟快取的大小(以 KB 為單位)。 |
| 14 | --offline-storage-path 指定離線儲存的位置。 |
| 15 | --offline-storage-quota 設定離線儲存的最大大小(以 KB 為單位)。 |
| 16 | --outputencoding=encoding 設定用於終端輸出的編碼。預設為 utf-8。 |
| 17 | --proxy=address:port 指定要使用的代理伺服器(例如 – proxy=192.168.1.1:8080) |
| 18 | --proxytype=[http|socks5|none] 指定代理伺服器的型別(預設為 http) |
| 19 | --proxy-auth 代理的身份驗證資訊。例如 – --proxy-auth=username:password |
| 20 | --scriptencoding=encoding 設定用於指令碼的編碼。預設為 utf8。 |
| 21 | --script-language 設定指令碼語言。 |
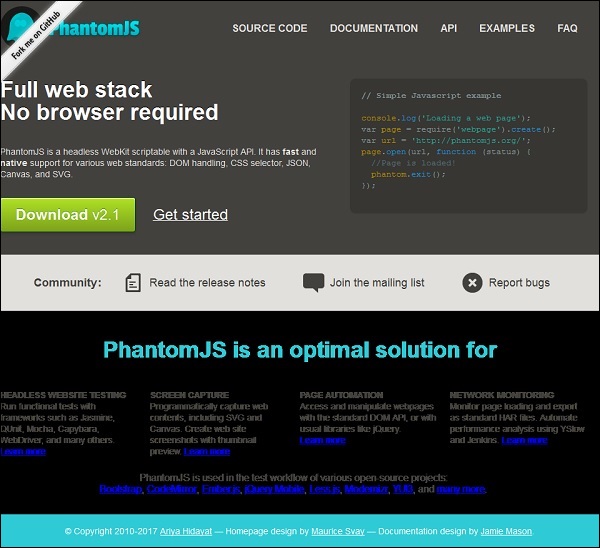
PhantomJS - 螢幕截圖
PhantomJS 在擷取網頁截圖和將網頁轉換為 PDF 方面非常有用。我們在這裡提供了一個簡單的示例來演示其工作原理。
示例
var page = require('webpage').create();
page.open('http://phantom.org/',function(status){
   page.render('phantom.png');
   phantom.exit();
});
執行上述程式,輸出將儲存為phantom.png。
將網頁轉換為 PDF
PhantomJS 還可幫助將網頁轉換為 PDF,並在其中新增頁首和頁尾。檢視以下示例以瞭解其工作原理。
var wpage = require('webpage').create();
var url = "https://en.wikipedia.org/wiki/Main_Page";
var output = "test.pdf";

wpage.paperSize = {
   width: screen.width+'px',
   height: '1500px',

   margin: {
      'top':'50px',
      'left':'50px',
      'rigtht':'50px'
   },
   orientation:'portrait',
   header: {
      height: "1cm",
      contents: phantom.callback(function(pageNumber, nPages) {
         return "<h5>Header <b>" + pageNumber + " / " + nPages + "</b></h5>";
      })
   },
   footer: {
      height: "1cm",
      contents: phantom.callback(function(pageNumber, nPages) {
         return "<h5>Footer <b>" + pageNumber + " / " + nPages + "</b></h5>";
      })
   }
}
wpage.open(url, function (status) {
   if (status !== 'success') {
      console.log('Page is not opening');
      phantom.exit();
   } else {
      wpage.render(output);
      phantom.exit();
   }
});
以上程式生成以下輸出。
The above will convert the page into pdf and will be saved in test.pdf
將畫布轉換為影像
Phantomjs 可以輕鬆地將畫布轉換為影像。檢視以下示例以瞭解其工作原理。
var page = require('webpage').create();
page.content = '<html><body><canvas id="surface" width="400" height="400"></canvas></body></html>';

page.evaluate(function() {
   var context,e1;
   el = document.getElementById('surface');

   context = el.getContext('2d');
   context.font = "30px Comic Sans MS";
   context.fillStyle = "red";
   context.textAlign = "center";
   context.fillText("Welcome to PhantomJS ", 200, 200);

   document.body.style.backgroundColor = 'white';
   document.body.style.margin = '0px';
});
page.render('canvas.png');
phantom.exit();
以上程式生成以下輸出。

PhantomJS - 頁面自動化
PhantomJS 透過其網頁模組 API 可以操作網頁並執行諸如 DOM 操作、點選按鈕等操作。
從頁面獲取影像
以下程式顯示瞭如何使用 PhantomJS 從頁面獲取影像。
var wpage = require('webpage').create();
wpage.onConsoleMessage = function(str) {
   console.log(str.length);
}
wpage.open("http://phantomjs.org", function(status) {
   console.log(status);
   var element = wpage.evaluate(function() {
      var imgdata =  document.querySelectorAll('img');
      var imgsrc = [];

      if (imgdata) {
         for (var i in imgdata) {
            imgsrc.push(imgdata[0].src);
         }
      }
      return imgsrc;
   });
   console.log(JSON.stringify(element));
});
以上程式生成以下輸出。
Success
["http://phantomjs.org/img/phantomjslogo.png","http://phantomjs.org/img/phantom
js-logo.png","http://phantomjs.org/img/phantomjslogo.png","http://phantomjs.org
/img/phantomjs-logo.png"]
可以使用injectJS 網頁方法在頁面中包含外部 JavaScript。有許多屬性和方法可以幫助頁面自動化並執行許多其他操作。您可以參考網頁模組,其中詳細解釋了屬性和方法。
PhantomJS - 網路監控
藉助 PhantomJS,我們可以監控網路並驗證特定網頁的行為和效能。PhantomJS 中有回撥,即onResourceRequested和onResourceReceived,它們有助於監控給定頁面的流量。
示例
以下示例顯示瞭如何使用 PhantomJS 監控給定頁面的流量。
function createHAR(address, title, startTime, resources) {

   // this function formats the data which is coming from
      onresourcerequest and onresourcereceived
   var entries = [];

   resources.forEach(function (resource) {
      var request = resource.request, startReply = resource.startReply,
         endReply = resource.endReply;

      if (!request || !startReply || !endReply) {
         return;
      }

      // Exclude Data URI from HAR file because
      // they aren't included in specification
      if (request.url.match(/(^data:image\/.*)/i)) {
         return;
      }
      entries.push ({
         startedDateTime: request.time.toISOString(),
         time: endReply.time - request.time,

         request: {
            method: request.method,
            url: request.url,
            httpVersion: "HTTP/1.1",
            cookies: [], headers: request.headers,
            queryString: [],
            headersSize: -1,
            bodySize: -1
         },
         response: {
            status: endReply.status,
            statusText: endReply.statusText,
            httpVersion: "HTTP/1.1",
            cookies: [],
            headers: endReply.headers,
            redirectURL: "",
            headersSize: -1,
            bodySize: startReply.bodySize,

            content: {
               size: startReply.bodySize,
               mimeType: endReply.contentType
            }
         },
         cache: {},
         timings: {
            blocked: 0,
            dns: -1,
            connect: -1,
            send: 0,
            wait: startReply.time - request.time,
            receive: endReply.time - startReply.time,
            ssl: -1
         },
         pageref: address
      });
   });
   return {
      log: {
         version: '1.2', creator: {
            name: "PhantomJS",
            version: phantom.version.major + '.' + phantom.version.minor +
               '.' + phantom.version.patch
         },
         pages: [{
            startedDateTime: startTime.toISOString(),
            id: address,
            title: title,

            pageTimings: {
               onLoad: page.endTime - page.startTime
            }
         }],
         entries: entries
      }
   };
}
var page = require('webpage').create(), system = require('system');
var fs = require('fs');

if (system.args.length === 1) {
   console.log('Usage: netsniff.js <some URL>');
   phantom.exit(1);
} else {
   page.address = system.args[1];
   page.resources = [];

   page.onLoadStarted = function () {  // called when page is loaded
      page.startTime = new Date();
   };
   page.onResourceRequested = function (req) {
      // called when any files are requested from given page url
      page.resources[req.id] = {
         request: req,
         startReply: null,
         endReply: null
      };
   };
   page.onResourceReceived = function (res) {
      //called when any files are received.
      if (res.stage === 'start') {
         page.resources[res.id].startReply = res;
      }
      if (res.stage === 'end') {
         page.resources[res.id].endReply = res;
      }
   };
   page.open(page.address, function (status) {  // open given page url
      var har;

      if (status !== 'success') {
         console.log('FAIL to load the address');
         phantom.exit(1);
      } else {
         page.endTime = new Date();

         page.title = page.evaluate(function () { // gets the page title
            return document.title;
         });
         har = createHAR(page.address, page.title, page.startTime, page.resources);

         // calls the function createHAR with page url, starttime, and page resources.
         // console.log(JSON.stringify(har, undefined, 4));
         fs.write('log.txt', JSON.stringify(har, undefined, 4), 'w');

         // logs are collected in log.txt file.
         phantom.exit();
      }
   });
}
提供給 HAR 預覽的 log.txt 示例
{
   "log": {
      "version": "1.2",
      "creator": {
         "name": "PhantomJS",
         "version": "2.1.1"
      },
      "pages": [
         {
            "startedDateTime": "2017-05-21T13:41:21.824Z",
            "id": "http://www.sample.com",
            "title": "Free Sample Products – Sample.com ≫ Free Samples,
               Free Product Samples, Product Test Marketing",
            "pageTimings": {
               "onLoad": 11081
            }
         }
      ],
      "entries": [
         {
            "startedDateTime": "2017-05-21T13:41:21.815Z",
            "time": 1999,

            "request": {
               "method": "GET",
               "url": "http://www.sample.com/",
               "httpVersion": "HTTP/1.1",
               "cookies": [],

               "headers": [
                  {
                     "name": "Accept",
                     "value": "text/html,application/xhtml+xml,
                        application/xml;q = 0.9,*/*;q = 0.8"
                  },

                  {
                     "name": "User-Agent",
                     "value": "Mozilla/5.0 (Windows NT 6.2; WOW64) AppleWebKit/538.1
                        (KHTML, like Gecko) PhantomJS/2.1.1 Safari/538.1"
                  }
               ],

               "queryString": [],
               "headersSize": -1,
               "bodySize": -1
            },
            "response": {
               "status": 301,
               "statusText": "Moved Permanently",
               "httpVersion": "HTTP/1.1",
               "cookies": [],

               "headers": [
                  {
                     "name": "Date",
                     "value": "Sun, 21 May 2017 13:41:25 GMT"
                  },

                  {
                     "name": "Server",
                     "value": "Apache/2.2.14 (Ubuntu)"
                  },

                  {
                     "name": "Location",
                     "value": "http://sample.com//"
                  },

                  {
                     "name": "Vary",
                     "value": "Accept-Encoding"
                  },

                  {
                     "name": "Content-Encoding",
                     "value": "gzip"
                  },

                  {
                     "name": "Keep-Alive",
                     "value": "timeout = 15, max = 100"
                  },

                  {
                     "name": "Connection",
                     "value": "Keep-Alive"
                  },

                  {
                     "name": "Content-Type",
                     "value": "text/html; charset = iso-8859-1"
                  }
               ],
               "redirectURL": "",
               "headersSize": -1,
               "bodySize": 307,

               "content": {
                  "size": 307,
                  "mimeType": "text/html; charset = iso-8859-1"
               }
            },

            "cache": {},
            "timings": {
               "blocked": 0,
               "dns": -1,
               "connect": -1,
               "send": 0,
               "wait": 1999,
               "receive": 0,
               "ssl": -1
            },
            "pageref": "http://www.sample.com"
         },
      ]
      {
         "startedDateTime": "2017-05-21T13:41:24.898Z",
         "time": 885,

         "request": {
            "method": "GET",
            "url": "http://sample.com/",
            "httpVersion": "HTTP/1.1",
            "cookies": [],

            "headers": [
               {
                  "name": "Accept",
                  "value": "text/html,application/xhtml+xml,
                     application/xml;q = 0.9,*/*;q = 0.8"
               },

               {
                  "name": "User-Agent",
                  "value": "Mozilla/5.0 (Windows NT 6.2; WOW64) AppleWebKit/538.1
                     (KHTML, like Gecko) PhantomJS/2.1.1 Safari/538.1"
               }
            ],
            "queryString": [],
            "headersSize": -1,
            "bodySize": -1
         },
         "response": {
            "status": 200,
            "statusText": "OK",
            "httpVersion": "HTTP/1.1",
            "cookies": [],

            "headers": [
               {
                  "name": "Date",
                  "value": "Sun, 21 May 2017 13:41:27 GMT"
               },

               {
                  "name": "Server",
                  "value": "Apache/2.2.14 (Ubuntu)"
               },

               {
                  "name": "X-Powered-By",
                  "value": "PHP/5.3.2-1ubuntu4.29"
               },

               {
                  "name": "X-Pingback",
                  "value": "http://sample.com/xmlrpc.php"
               },

               {
                  "name": "Link",
                  "value": "<http://sample.com/wp-json/>;
                     rel = \"https://api.w.org/\", <http://wp.me/P6Jj5H-4>;
                     rel = shortlink"
               },

               {
                  "name": "Vary",
                  "value": "Accept-Encoding"
               },

               {
                  "name": "Content-Encoding",
                  "value": "gzip"
               },

               {
                  "name": "Keep-Alive",
                  "value": "timeout = 15, max = 99"
               },

               {
                  "name": "Connection",
                  "value": "Keep-Alive"
               },

               {
                  "name": "Content-Type",
                  "value": "text/html; charset = UTF-8"
               }
            ],

            "redirectURL": "",
            "headersSize": -1,
            "bodySize": 1969,

            "content": {
               "size": 1969,
               "mimeType": "text/html; charset = UTF-8"
            }
         },

         "cache": {},
         "timings": {
            "blocked": 0,
            "dns": -1,
            "connect": -1,
            "send": 0,
            "wait": 869,
            "receive": 16,
            "ssl": -1
         },

         "pageref": http://www.sample.com
      },

      {
         "startedDateTime": "2017-05-21T13:41:25.767Z",
         "time": 388,

         "request": {
            "method": "GET",
            "url": "http://sample.com/wpcontent/themes/samplecom/style.css",
            "httpVersion": "HTTP/1.1",
            "cookies": [],

            "headers": [
               {
                  "name": "Accept",
                  "value": "text/css,*/*;q = 0.1"
               },

               {
                  "name": "Referer",
                  "value": "http://sample.com/"
               },

               {
                  "name": "User-Agent",
                  "value": "Mozilla/5.0 (Windows NT 6.2; WOW64) AppleWebKit/538.1
                     (KHTML, like Gecko) PhantomJS/2.1.1 Safari/538.1"
               }
            ],

            "queryString": [],
            "headersSize": -1,
            "bodySize": -1
         },

         "response": {
            "status": 200,
            "statusText": "OK",
            "httpVersion": "HTTP/1.1",
            "cookies": [],

            "headers": [
               {
                  "name": "Date",
                  "value": "Sun, 21 May 2017 13:41:27 GMT"
               },

               {
                  "name": "Server",
                  "value": "Apache/2.2.14 (Ubuntu)"
               },

               {
                  "name": "Last-Modified",
                  "value": "Fri, 22 Apr 2011 00:32:22 GMT"
               },

               {
                  "name": "ETag",
                  "value": "\"e1d7-1836-4a176fdbbd180\""
               },

               {
                  "name": "Accept-Ranges",
                  "value": "bytes"
               },

               {
                  "name": "Vary",
                  "value": "Accept-Encoding"
               },

               {
                  "name": "Content-Encoding",
                  "value": "gzip"
               },

               {
                  "name": "Keep-Alive",
                  "value": "timeout = 15, max = 98"
               },

               {
                  "name": "Connection",
                  "value": "Keep-Alive"
               },

               {
                  "name": "Content-Type",
                  "value": "text/css"
               }
            ],

            "redirectURL": "",
            "headersSize": -1,
            "bodySize": 3174,

            "content": {
               "size": 3174,
               "mimeType": "text/css"
            }
         },

         "cache": {},
         "timings": {
            "blocked": 0,
            "dns": -1,
            "connect": -1,
            "send": 0,
            "wait": 388,
            "receive": 0,
            "ssl": -1
         },

         "pageref": "http://www.sample.com"
      }
   }
}
輸出
上述程式生成以下輸出。
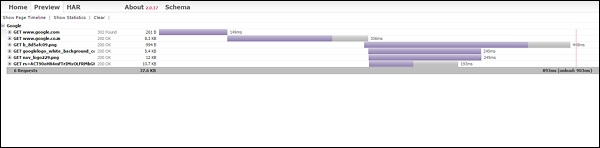
所有日誌都收集在.txt 檔案中,然後,使用 HAR 預覽將其轉換為上述內容,例如,(http://www.softwareishard.com/har/viewer/)
PhantomJS - 測試
PhantomJS 具有許多網頁 API,可以提供所有詳細資訊。PhantomJS 可用於測試,例如獲取頁面內容、擷取螢幕截圖、將頁面轉換為 pdf 等。市場上有很多流行的測試庫,可以與 PhantomJS 一起使用,並可用於測試。
一些可以與 PhantomJS 一起使用的流行框架如下:
- Mocha
- Jasmine
- Qunit
- Hiro
- Laika
- Buster.JS
- WebDriver
示例 – PhantomJS 與 Qunit
(function () {
   var url, timeout,args = require('system').args, page = require('webpage').create();
   url = args[1];
   timeout = parseInt(10, 10);

   page.onConsoleMessage = function (msg) {
      //prints all the console messages
      console.log(msg);
   };
   page.onInitialized = function () {  // called when page is initialized
      page.evaluate(callqunit);
   };
   page.onCallback = function (message) { // called from
      var result, failed;

      if (message) {
         if (message.name === 'QUnit.done') {
            result = message.data;
            failed = !result || !result.total || result.failed;

            if (!result.total) {
               console.error('No tests were executed');
            }
            pageexit(failed ? 1 : 0);
         }
      }
   };
   page.open(url, function (status) { // opening page
      if (status !== 'success') {
         console.error('Unable to access network: ' + status);
         pageexit(1);

      } else {
         var checkqunit = page.evaluate(function () {
            //evaluating page and chcking if qunit object
               is present on the given page url
            return (typeof QUnit === 'undefined' || !QUnit);
         });

         if (checkqunit) {
            console.error('Qunit scripts are not present on the page');
            pageexit(1);
         }

         //timeout of 10seconds is used otherwise message from console will get printed.
         setTimeout(function () {
            console.error('The specified timeout of ' + timeout + ' seconds has expired.
               Aborting...');
            pageexit(1);
         }, timeout * 1000);
      }
   });
   function callqunit() {
qunit.html
<!DOCTYPE html>
<html>

   <head>
      <meta charset = "utf-8">
      <meta name = "viewport" content = "width = device-width">
      <title>QUnit Example</title>
      <link rel = "stylesheet" href = "https://code.jquery.com/qunit/qunit-2.3.2.css">
   </head>

   <body>
      <div id = "qunit"></div>
      <div id = "qunit-fixture"></div>
      <script src = "https://code.jquery.com/qunit/qunit-2.3.2.js"></script>
   </body>

</html>
輸出
命令 - phantomjs qunit.js https:///tasks/qunit.html
上述程式生成以下輸出。
{"passed":3,"failed":2,"total":5,"runtime":23}
Time taken is 23ms to run 5 tests.
3 passed, 2 failed.
PhantomJS - REPL
REPL代表讀取-評估-列印迴圈。在 PhantomJS 中,REPL 是一種互動模式,用於測試 JavaScript 程式碼。您可以執行與在 Google Chrome 檢查器或 Firebug 中執行相同的操作,以直接在控制檯上執行某些程式碼段。REPL 為您提供了執行指令碼的相同平臺。
鍵入的命令傳送到直譯器以進行立即解釋 (EVAL) 並提供反饋 (PRINT)。在命令列中輸入PhantomJS,它將帶您進入互動模式,您可以在其中直接執行程式碼。
語法
其語法如下:
Phantomjs
示例
以下示例演示了 REPL 在 PhantomJS 中的工作原理。
phantomjs> console.log("Welcome to phantomjs");
Welcome to phantomjs
Undefined

phantomjs> window.navigator {
   "appCodeName": "Mozilla",
   "appName": "Netscape",
   "appVersion": "5.0 (Windows NT 6.2; WOW64) AppleWebKit/538.1 (KHTML, like Gecko)
      PhantomJS/2.1.1 Safari/538.1",
   "cookieEnabled": true,
   "language": "en-IN",

   "mimeTypes": {
      "length": 0
   },
   "onLine": false,
   "platform": "Win32",

   "plugins": {
      "length": 0
   },
   "product": "Gecko
   "productSub": "20030107",
   "userAgent": "Mozilla/5.0 (Windows NT 6.2; WOW64) AppleWebKit/538.1 (KHTML, like Gecko)
      PhantomJS/2.1.1 Safari/538.1",
   "vendor": "Apple Computer, Inc.",
   "vendorSub": ""
}

phantomjs>
To find the version
phantomjs> phantom.version {
   "major": 2,
   "minor": 1,
   "patch": 1
}
phantomjs>
每個命令都將執行,並顯示結果。使用 CTRL+C、CTRL+D 或phantom.exit()退出互動模式。
使用向上/向下箭頭鍵收聽先前鍵入的命令。
還有另一個名為自動完成的功能,它有助於記住命令。只需鍵入“phantom”並按“Tab”鍵即可獲取可執行命令的列表。
輸出
上述程式生成以下輸出。
phantomjs> phantom.→|
phantomjs> phantom.cookies→|
phantomjs> phantom.exit→|
phantomjs> phantom.version→|
PhantomJS - 示例
在本節中,我們提供了更多實用示例來了解 PhantomJS 的一些重要功能。
示例 1 - 查詢頁面速度
在本例中,我們將使用 PhantomJS 查詢任何給定頁面 URL 的頁面速度。
var page = require('webpage').create(),
   system = require('system'),
   t, address;

if (system.args.length === 1) {
   console.log('Usage: loadspeed.js <some URL>');
   phantom.exit(1);
} else {
   t = Date.now();
   address = system.args[1];

   page.open(address, function (status) {
      if (status !== 'success') {
         console.log('FAIL to load the address');
      } else {
         t = Date.now() - t;

         console.log('Page title is ' + page.evaluate(function () {
            return document.title;
         }));
         console.log('Loading time ' + t + ' msec');
      }
      phantom.exit();
   });
}
以上程式生成以下輸出。
命令 - phantomjs pagespeed.js http://www.google.com
Page title is Google
Loading time 1396 msec
示例 2 - 向頁面傳送點選事件
在以下示例中,我們將使用 PhantomJS 向頁面傳送點選事件。
var page = require('webpage').create();
page.onConsoleMessage = function(str) {
   console.log(str);
}
page.open('http://phantomjs.org/api/phantom/', function(status) {
   page.render('beforeclick.png');
   console.log(page.url);

   var element = page.evaluate(function() {
      return document.querySelector('img[src = "http://phantomjs.org/img/phantomjslogo.png"]');
   });
   page.sendEvent('click', element.offsetLeft, element.offsetTop, 'left');

   window.setTimeout(function () {
      console.log(page.url);
      page.render('afterclick.png');
      phantom.exit();
   }, 5000);
   console.log('element is ' + element);
});
以上程式生成以下輸出。
http://phantomjs.org/api/phantom/
element is [object Object]
http://phantomjs.org/
我們的程式將在bin資料夾中建立以下兩個png影像。這兩個影像顯示了程式執行前後的差異。

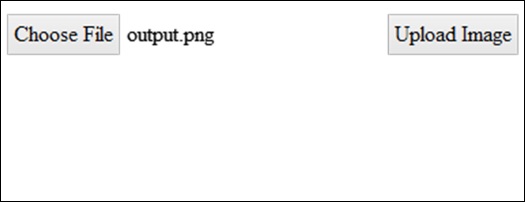
示例 3 - 提交表單
以下示例顯示瞭如何使用 PhantomJS 提交表單。
var wpage = require('webpage').create();
wpage.open("https:///tasks/submitform.html", function(status) {
   console.log(status);
   wpage.uploadFile('input[name = fileToUpload]', 'output.png');
   wpage.render("sform.png");

   var element = wpage.evaluate(function() {
      return document.querySelector('input[type = "submit"]');
      // getting details of submit button using queryselector.
   });
   wpage.sendEvent('click', element.offsetLeft, element.offsetTop, 'left');

   // sendevent is used to send click event and also giving the left and top
      position of the submit button.

   window.setTimeout(function () {
      console.log(wpage.url);
      wpage.render("submit.png");  // screenshot is saved in submit.png
      phantom.exit();
   }, 5000);
   console.log('element is ' + element);
});
submitform.html
以下程式碼顯示瞭如何使用submitform.html檔案。
<html>
   <head>
      <title>Window 2</title>
   </head>

   <body>
      <form action = "submitform.php" method = "post" enctype = "multipart/form-data"
         id = "form1">
         <input type = "file" name = "fileToUpload" id = "fileToUpload">
         <input type = "submit" value = "Upload Image" name = "submit">
      </form>
   </body>

</html>
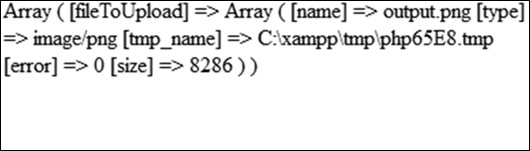
表單提交後,將轉到submitform.php。
submitform.php
submitform.php 只是列印檔案的詳細資訊。
<?php
   print_r($_FILES);
?>
以上程式生成以下輸出。
Success
element is [object Object]
https:///tasks/submitform.php
圖片
以下是檔案上傳和表單提交的圖片。