PDFBox 快速指南
PDFBox - 概述
可移植文件格式 (PDF) 是一種檔案格式,有助於以獨立於應用程式軟體、硬體和作業系統的形式呈現資料。
每個 PDF 檔案都包含固定佈局平面文件的描述,包括文字、字型、圖形以及顯示它所需的其他資訊。
有幾個庫可用於透過程式建立和操作 PDF 文件,例如:
Adobe PDF 庫 - 此庫提供 C++、.NET 和 Java 等語言的 API,使用它我們可以編輯、檢視、列印和從 PDF 文件中提取文字。
格式化物件處理器 - 由 XSL 格式化物件驅動的開源列印格式化程式和輸出獨立格式化程式。主要輸出目標是 PDF。
iText - 此庫提供 Java、C# 和其他 .NET 語言的 API,使用此庫我們可以建立和操作 PDF、RTF 和 HTML 文件。
JasperReports - 這是一款 Java 報表工具,可以生成 PDF 文件中的報表,包括 Microsoft Excel、RTF、ODT、逗號分隔值和 XML 檔案。
什麼是 PDFBox
Apache PDFBox 是一個開源的 Java 庫,支援 PDF 文件的開發和轉換。使用此庫,您可以開發建立、轉換和操作 PDF 文件的 Java 程式。
此外,PDFBox 還包括一個命令列實用程式,用於使用可用的 Jar 檔案對 PDF 執行各種操作。
PDFBox 的特性
以下是 PDFBox 的一些顯著特性:
提取文字 - 使用 PDFBox,您可以從 PDF 檔案中提取 Unicode 文字。
分割和合並 - 使用 PDFBox,您可以將單個 PDF 檔案分成多個檔案,並將它們合併回單個檔案。
填充表單 - 使用 PDFBox,您可以填充文件中的表單資料。
列印 - 使用 PDFBox,您可以使用標準 Java 列印 API 列印 PDF 檔案。
另存為圖片 - 使用 PDFBox,您可以將 PDF 儲存為影像檔案,例如 PNG 或 JPEG。
建立 PDF - 使用 PDFBox,您可以透過建立 Java 程式來建立新的 PDF 檔案,還可以包含影像和字型。
簽名 - 使用 PDFBox,您可以向 PDF 檔案新增數字簽名。
PDFBox 的應用
以下是 PDFBox 的一些應用:
Apache Nutch - Apache Nutch 是一款開源的網路搜尋軟體。它建立在 Apache Lucene 的基礎上,添加了網路特定的功能,例如爬蟲、連結圖資料庫、HTML 和其他文件格式的解析器等。
Apache Tika - Apache Tika 是一款用於檢測和提取各種文件的元資料和結構化文字內容的工具包,它利用現有的解析器庫。
PDFBox 的元件
以下是 PDFBox 的四個主要元件:
PDFBox - 這是 PDFBox 的主要部分。它包含與內容提取和操作相關的類和介面。
FontBox - 它包含與字型相關的類和介面,使用這些類我們可以修改 PDF 文件文字的字型。
XmpBox - 它包含處理 XMP 元資料的類和介面。
Preflight - 此元件用於根據 PDF/A-1b 標準驗證 PDF 檔案。
PDFBox - 環境
安裝 PDFBox
以下是下載 Apache PDFBox 的步驟:
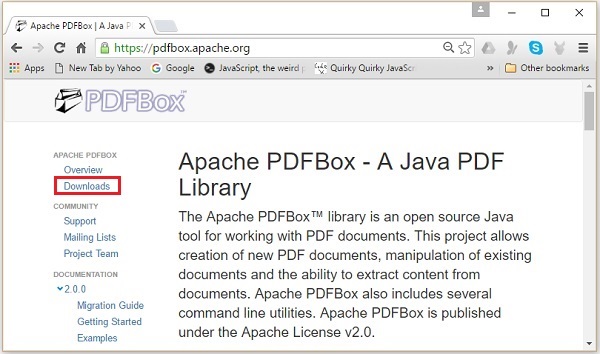
步驟 1 - 透過點選以下連結開啟Apache PDFBox的主頁:https://pdfbox.apache.org/
步驟 2 - 上述連結將帶您到如下所示的主頁:
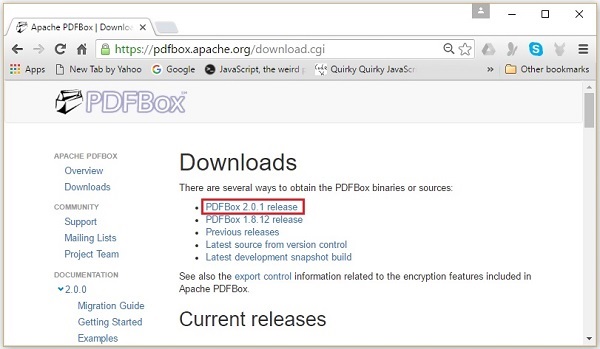
步驟 3 - 現在,點選上面截圖中突出顯示的下載連結。點選後,您將被引導到 PDFBox 的下載頁面,如下面的截圖所示。
步驟 4 - 在下載頁面,您將擁有 PDFBox 的連結。點選最新版本的相應連結。例如,我們選擇PDFBox 2.0.1,點選後,您將被引導到所需的 jar 檔案,如下面的截圖所示。
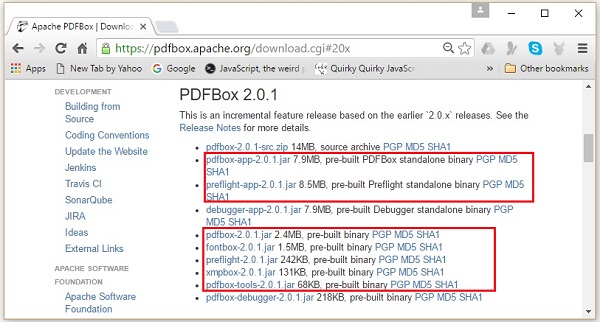
步驟 5 - 下載 jar 檔案 pdfbox-2.0.1.jar、fontbox-2.0.1.jar、preflight-2.0.1.jar、xmpbox-2.0.1.jar 和 pdfbox-tools-2.0.1.jar。
Eclipse 安裝
下載所需的 jar 檔案後,您必須將這些 JAR 檔案嵌入到您的 Eclipse 環境中。您可以透過將這些 JAR 檔案的構建路徑設定為這些 JAR 檔案,並透過使用pom.xml來實現。
設定構建路徑
以下是將 PDFBox 安裝到 Eclipse 中的步驟:
步驟 1 - 確保您已在系統中安裝了 Eclipse。如果沒有,請在您的系統中下載並安裝 Eclipse。
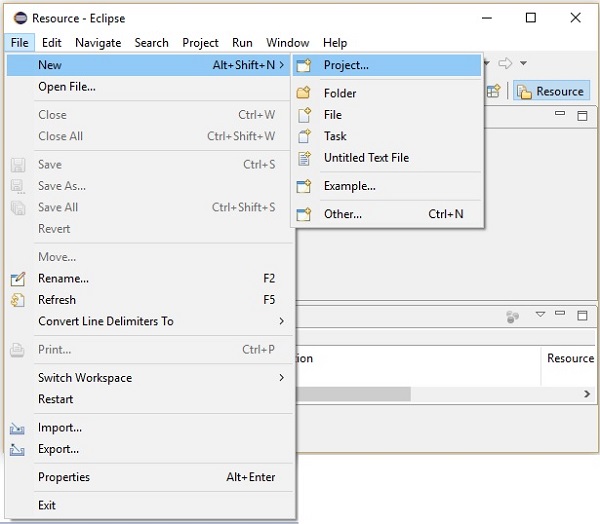
步驟 2 - 開啟 Eclipse,點選檔案,新建,並開啟一個新的專案,如下面的截圖所示。
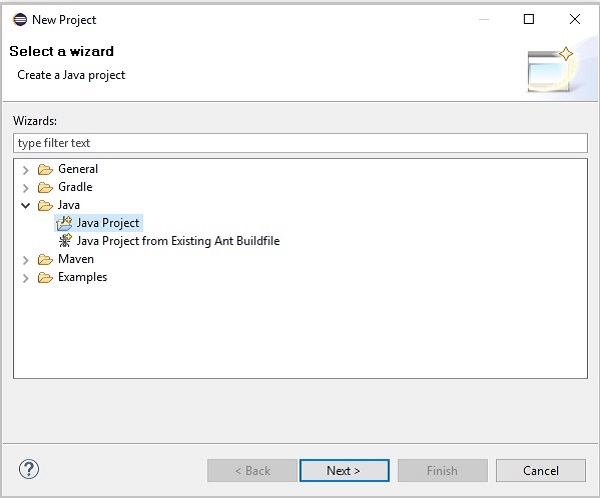
步驟 3 - 選擇專案後,您將獲得新建專案嚮導。在此嚮導中,選擇 Java 專案,然後點選下一步按鈕繼續,如下面的截圖所示。
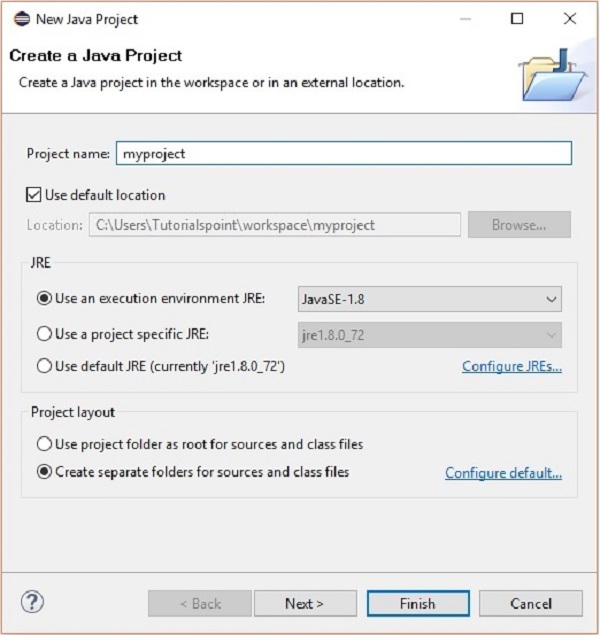
步驟 4 - 繼續前進,您將被引導到新建 Java 專案嚮導。建立一個新專案,然後點選下一步,如下面的截圖所示。
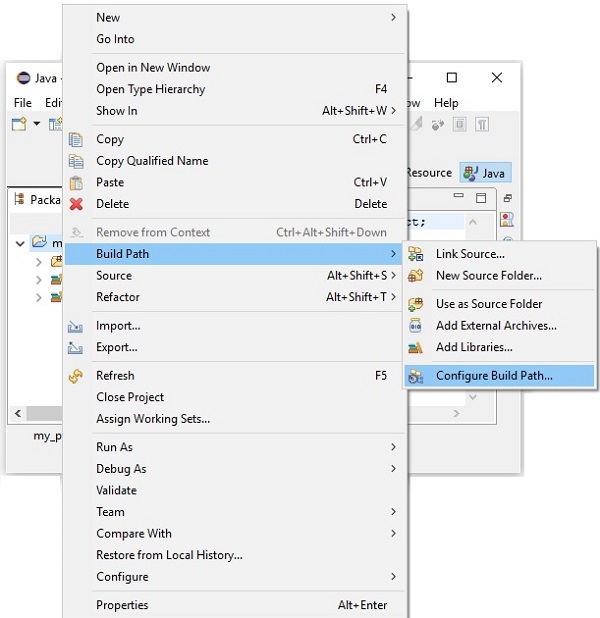
步驟 5 - 建立新專案後,右鍵單擊它;選擇構建路徑,然後點選配置構建路徑…,如下面的截圖所示。
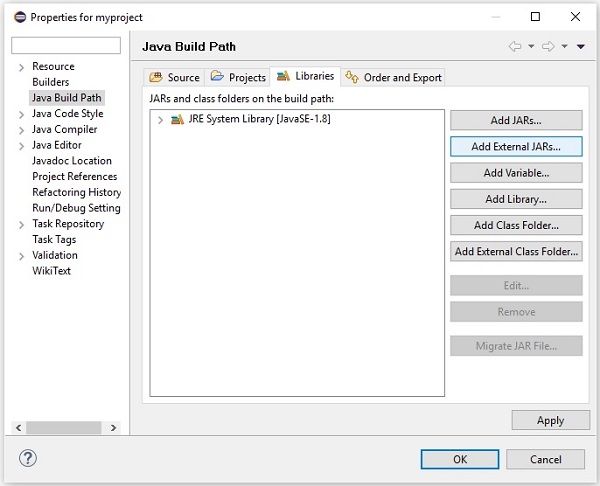
步驟 6 - 點選構建路徑選項後,您將被引導到Java 構建路徑向導。選擇新增外部 JARs,如下面的截圖所示。
步驟 7 - 選擇 jar 檔案fontbox-2.0.1.jar、pdfbox-2.0.1.jar、pdfbox-tools-2.0.1.jar、preflight-2.0.1.jar、xmpbox-2.0.1.jar,如下面的截圖所示。

步驟 8 - 點選上面截圖中的開啟按鈕,這些檔案將被新增到您的庫中,如下面的截圖所示。
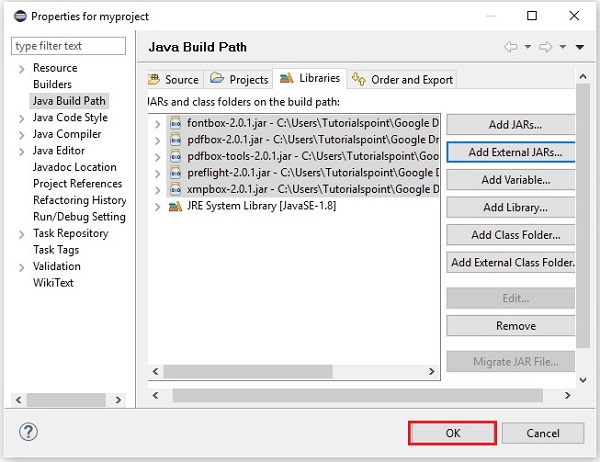
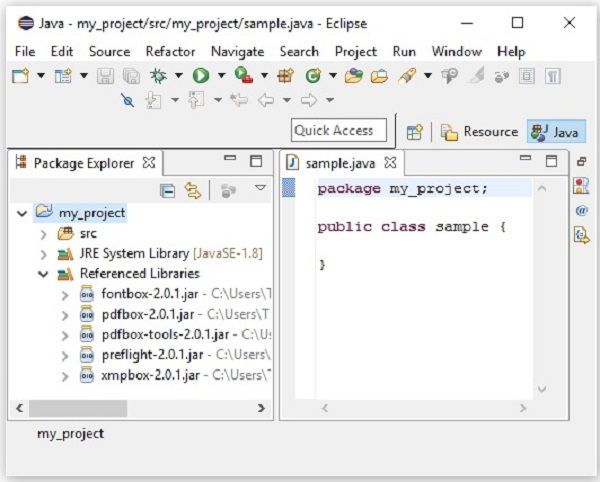
步驟 9 - 點選確定,您將成功地將所需的 JAR 檔案新增到當前專案中,您可以透過展開引用庫來驗證這些新增的庫,如下面的截圖所示。
使用 pom.xml
將專案轉換為 Maven 專案,並將以下內容新增到其pom.xml中。
<project xmlns="https://maven.apache.org/POM/4.0.0"
   xmlns:xsi="https://www.w3.org/2001/XMLSchema-instance"
   xsi:schemaLocation="https://maven.apache.org/POM/4.0.0
   https://maven.apache.org/xsd/maven-4.0.0.xsd">
   <modelVersion>4.0.0</modelVersion>
   <groupId>my_project</groupId>
   <artifactId>my_project</artifactId>
   <version>0.0.1-SNAPSHOT</version>

   <build>
      <sourceDirectory>src</sourceDirectory>
      <plugins>
         <plugin>
            <artifactId>maven-compiler-plugin</artifactId>
            <version>3.3</version>
            <configuration>
               <source>1.8</source>
               <target>1.8</target>
            </configuration>
         </plugin>
      </plugins>
   </build>

   <dependencies>
      <dependency>
         <groupId>org.apache.pdfbox</groupId>
         <artifactId>pdfbox</artifactId>
         <version>2.0.1</version>
      </dependency>

      <dependency>
         <groupId>org.apache.pdfbox</groupId>
         <artifactId>fontbox</artifactId>
         <version>2.0.0</version>
      </dependency>

      <dependency>
         <groupId>org.apache.pdfbox</groupId>
         <artifactId>jempbox</artifactId>
         <version>1.8.11</version>
      </dependency>

      <dependency>
         <groupId>org.apache.pdfbox</groupId>
         <artifactId>xmpbox</artifactId>
         <version>2.0.0</version>
      </dependency>

      <dependency>
         <groupId>org.apache.pdfbox</groupId>
         <artifactId>preflight</artifactId>
         <version>2.0.0</version>
      </dependency>

      <dependency>
         <groupId>org.apache.pdfbox</groupId>
         <artifactId>pdfbox-tools</artifactId>
         <version>2.0.0</version>
      </dependency>

   </dependencies>

</project>
PDFBox - 建立 PDF 文件
現在讓我們瞭解如何使用 PDFBox 庫建立 PDF 文件。
建立空 PDF 文件
您可以透過例項化PDDocument類來建立一個空的 PDF 文件。您可以使用Save()方法將文件儲存到您想要的路徑。
以下是建立空 PDF 文件的步驟。
步驟 1:建立空文件
屬於包org.apache.pdfbox.pdmodel的PDDocument類是 PDFDocument 的記憶體表示。因此,透過例項化此類,您可以建立一個空的 PDFDocument,如下面的程式碼塊所示。
PDDocument document = new PDDocument();
步驟 2:儲存文件
建立文件後,您需要將此文件儲存到所需的路徑中,您可以使用PDDocument類的Save()方法來做到這一點。此方法接受一個字串值作為引數,該字串值表示您要儲存文件的路徑。以下是PDDocument類的 save() 方法的原型。
document.save("Path");
步驟 3:關閉文件
當您的任務完成後,最後,您需要使用close ()方法關閉PDDocument物件。以下是PDDocument類的 close() 方法的原型。
document.close();
示例
此示例演示了 PDF 文件的建立。在這裡,我們將建立一個 Java 程式來生成一個名為my_doc.pdf的 PDF 文件並將其儲存到路徑C:/PdfBox_Examples/中。將此程式碼儲存在名為Document_Creation.java的檔案中。
import java.io.IOException;
import org.apache.pdfbox.pdmodel.PDDocument;

public class Document_Creation {

   public static void main (String args[]) throws IOException {

      //Creating PDF document object
      PDDocument document = new PDDocument();

      //Saving the document
      document.save("C:/PdfBox_Examples/my_doc.pdf");

      System.out.println("PDF created");

      //Closing the document
      document.close();

   }
}
使用以下命令從命令提示符編譯並執行儲存的 Java 檔案。
javac Document_Creation.java
java Document_Creation
執行後,上述程式建立一個 PDF 文件,顯示以下訊息。
PDF created
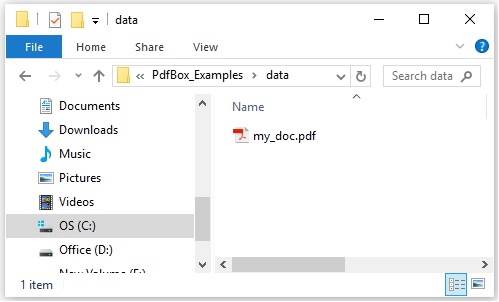
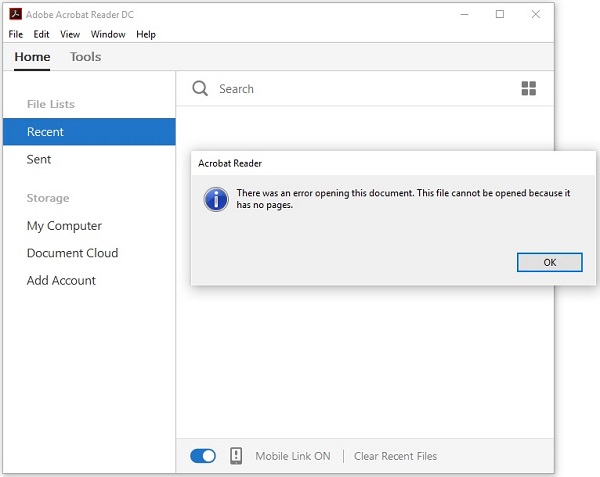
如果您驗證指定的路徑,您可以在下面看到建立的 PDF 文件。
由於這是一個空文件,如果您嘗試開啟此文件,它會提示您顯示一條錯誤訊息,如下面的截圖所示。
PDFBox - 新增頁面
在上一章中,我們瞭解瞭如何建立 PDF 文件。建立 PDF 文件後,您需要向其中新增頁面。現在讓我們瞭解如何在 PDF 文件中新增頁面。
向 PDF 文件新增頁面
您可以透過例項化PDPage類來建立一個空頁面,並使用PDDocument類的addPage()方法將其新增到 PDF 文件中。
以下是建立空文件並向其中新增頁面的步驟。
步驟 1:建立空文件
透過例項化PDDocument類來建立一個空的 PDF 文件,如下所示。
PDDocument document = new PDDocument();
步驟 2:建立空白頁面
PDPage類表示PDF文件中的一個頁面,因此,您可以透過例項化此類來建立一個空頁面,如下面的程式碼塊所示。
PDPage my_page = new PDPage();
步驟 3:將頁面新增到文件
您可以使用PDDocument類的addPage()方法將頁面新增到 PDF 文件中。為此方法,您需要將 PDPage 物件作為引數傳遞。
因此,將上一步中建立的空白頁面新增到 PDDocument 物件中,如下面的程式碼塊所示。
document.addPage(my_page);
這樣,您可以向 PDF 文件新增任意數量的頁面。
步驟 4:儲存文件
新增所有頁面後,使用PDDocument類的save()方法儲存 PDF 文件,如下面的程式碼塊所示。
document.save("Path");
步驟 5:關閉文件
最後,使用PDDocument類的close()方法關閉文件,如下所示。
document.close();
示例
此示例演示瞭如何建立 PDF 文件並向其中新增頁面。在這裡,我們將建立一個名為my_doc.pdf的 PDF 文件,並進一步向其中新增 10 個空白頁面,並將其儲存到路徑C:/PdfBox_Examples/中。將此程式碼儲存在名為Adding_pages.java的檔案中。
package document;

import java.io.IOException;

import org.apache.pdfbox.pdmodel.PDDocument;
import org.apache.pdfbox.pdmodel.PDPage;

public class Adding_Pages {

   public static void main(String args[]) throws IOException {

      //Creating PDF document object
      PDDocument document = new PDDocument();

      for (int i=0; i<10; i++) {
         //Creating a blank page
         PDPage blankPage = new PDPage();

         //Adding the blank page to the document
         document.addPage( blankPage );
      }

      //Saving the document
      document.save("C:/PdfBox_Examples/my_doc.pdf");
      System.out.println("PDF created");

      //Closing the document
      document.close();

   }
}
使用以下命令從命令提示符編譯並執行儲存的 Java 檔案:
javac Adding_pages.java
java Adding_pages
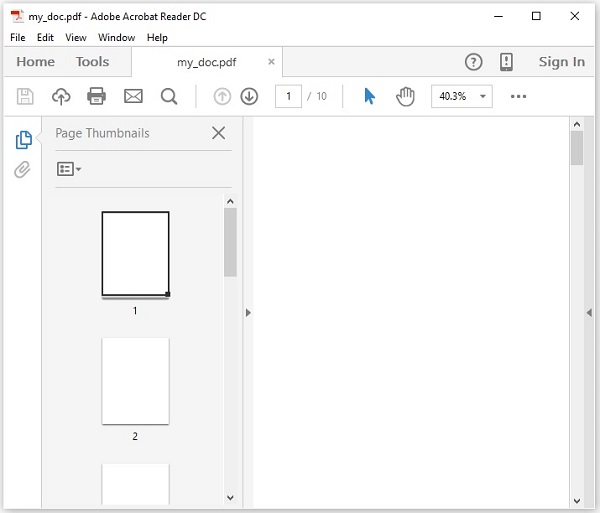
執行後,上述程式建立一個包含空白頁面的 PDF 文件,顯示以下訊息:
PDF created
如果您驗證指定的路徑,您可以在下面的截圖中找到建立的 PDF 文件。
PDFBox - 載入文件
在前面的示例中,您已經瞭解瞭如何建立新文件並向其中新增頁面。本章將教您如何載入系統中已存在的 PDF 文件,並在其上執行一些操作。
載入現有的 PDF 文件
PDDocument 類的 load() 方法用於載入現有的 PDF 文件。請按照以下步驟載入現有的 PDF 文件。
步驟 1:載入現有的 PDF 文件
使用 PDDocument 類的靜態方法 load() 載入現有的 PDF 文件。此方法接受檔案物件作為引數,由於這是一個靜態方法,因此您可以使用類名來呼叫它,如下所示。
File file = new File("path of the document")
PDDocument.load(file);
步驟 2:執行所需的操作
執行所需的操作,例如向載入的文件新增頁面、新增文字、新增影像。
步驟 3:儲存文件
新增所有頁面後,使用PDDocument類的save()方法儲存 PDF 文件,如下面的程式碼塊所示。
document.save("Path");
步驟 4:關閉文件
最後,使用PDDocument類的close()方法關閉文件,如下所示。
document.close();
示例
假設我們有一個 PDF 文件,它包含一個頁面,路徑為 C:/PdfBox_Examples/,如下面的螢幕截圖所示。
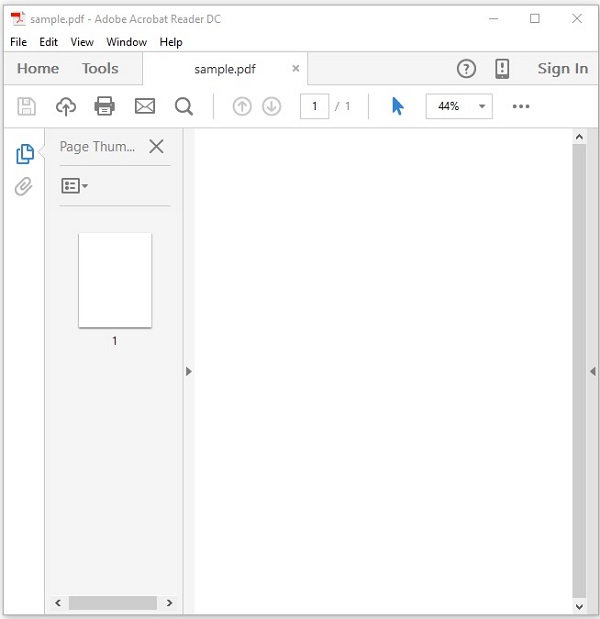
此示例演示如何載入現有的 PDF 文件。在這裡,我們將載入上面顯示的 PDF 文件 sample.pdf,向其中新增一個頁面,並將其儲存在同一路徑下,使用相同的名稱。
步驟 1 - 將此程式碼儲存在名為 LoadingExistingDocument.java 的檔案中。
import java.io.File;
import java.io.IOException;

import org.apache.pdfbox.pdmodel.PDDocument;
import org.apache.pdfbox.pdmodel.PDPage;
public class LoadingExistingDocument {

   public static void main(String args[]) throws IOException {

      //Loading an existing document
      File file = new File("C:/PdfBox_Examples/sample.pdf");
      PDDocument document = PDDocument.load(file);

      System.out.println("PDF loaded");

      //Adding a blank page to the document
      document.addPage(new PDPage());

      //Saving the document
      document.save("C:/PdfBox_Examples/sample.pdf");

      //Closing the document
      document.close();

   }
}
使用以下命令從命令提示符編譯並執行儲存的 Java 檔案
javac LoadingExistingDocument.java
java LoadingExistingDocument
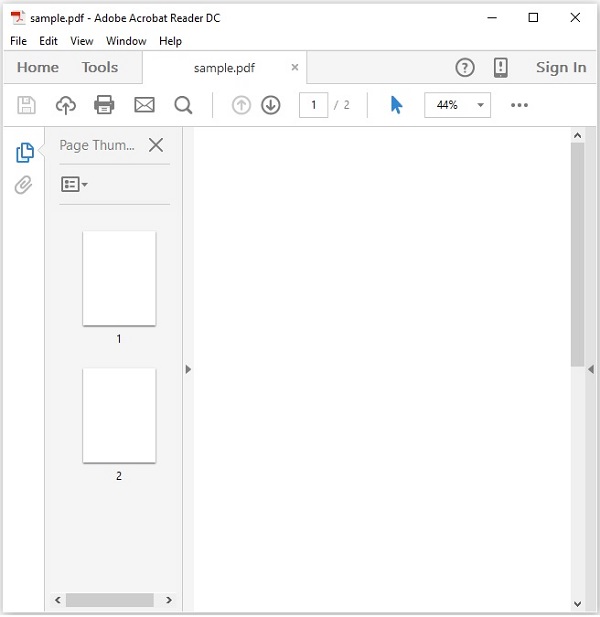
執行後,上述程式載入指定的 PDF 文件並向其新增一個空白頁面,顯示以下訊息。
PDF loaded
如果驗證指定的路徑,您可以找到新增到指定 PDF 文件中的一個額外頁面,如下所示。
PDFBox - 刪除頁面
現在讓我們學習如何從 PDF 文件中刪除頁面。
從現有文件中刪除頁面
您可以使用 PDDocument 類的 removePage() 方法從現有的 PDF 文件中刪除頁面。
步驟 1:載入現有的 PDF 文件
使用 PDDocument 類的靜態方法 load() 載入現有的 PDF 文件。此方法接受檔案物件作為引數,由於這是一個靜態方法,因此您可以使用類名來呼叫它,如下所示。
File file = new File("path of the document")
PDDocument.load(file);
步驟 2:列出頁面數量
您可以使用 getNumberOfPages() 方法列出 PDF 文件中存在的頁面數量,如下所示。
int noOfPages= document.getNumberOfPages();
System.out.print(noOfPages);
步驟 3:刪除頁面
您可以使用 PDDocument 類的 removePage() 方法從 PDF 文件中刪除頁面。對於此方法,您需要傳遞要刪除的頁面的索引。
在為 PDF 文件中的頁面指定索引時,請記住這些頁面的索引從零開始,即,如果要刪除第 1 頁,則索引值需要為 0。
document.removePage(2);
步驟 4:儲存文件
刪除頁面後,使用 PDDocument 類的 save() 方法儲存 PDF 文件,如下面的程式碼塊所示。
document.save("Path");
步驟 5:關閉文件
最後,使用 PDDocument 類的 close() 方法關閉文件,如下所示。
document.close();
示例
假設我們有一個名為 sample.pdf 的 PDF 文件,它包含三個空白頁面,如下所示。
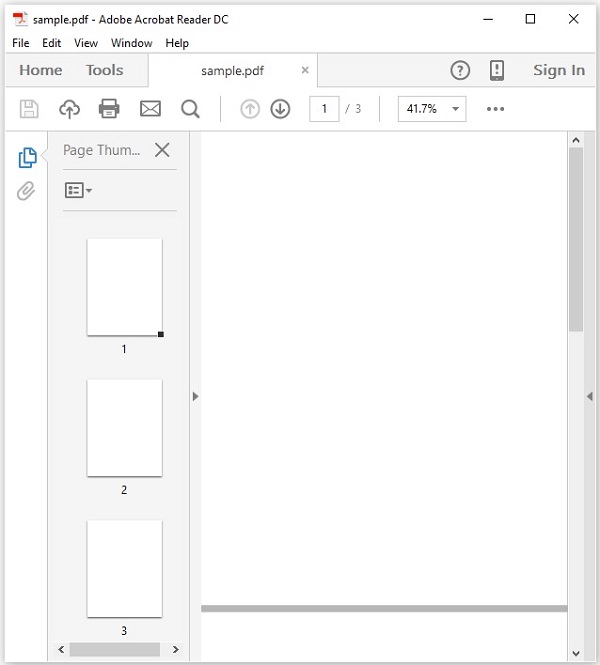
此示例演示如何從現有的 PDF 文件中刪除頁面。在這裡,我們將載入上面指定的名為 sample.pdf 的 PDF 文件,從中刪除一個頁面,並將其儲存在 C:/PdfBox_Examples/ 路徑中。將此程式碼儲存在名為 Removing_pages.java 的檔案中。
import java.io.File;
import java.io.IOException;

import org.apache.pdfbox.pdmodel.PDDocument;

public class RemovingPages {

   public static void main(String args[]) throws IOException {

      //Loading an existing document
      File file = new File("C:/PdfBox_Examples/sample.pdf");
      PDDocument document = PDDocument.load(file);

      //Listing the number of existing pages
      int noOfPages= document.getNumberOfPages();
      System.out.print(noOfPages);

      //Removing the pages
      document.removePage(2);

      System.out.println("page removed");

      //Saving the document
      document.save("C:/PdfBox_Examples/sample.pdf");

      //Closing the document
      document.close();

   }
}
使用以下命令從命令提示符編譯並執行儲存的 Java 檔案。
javac RemovingPages.java
java RemovingPages
執行後,上述程式建立一個包含空白頁面的 PDF 文件,顯示以下訊息。
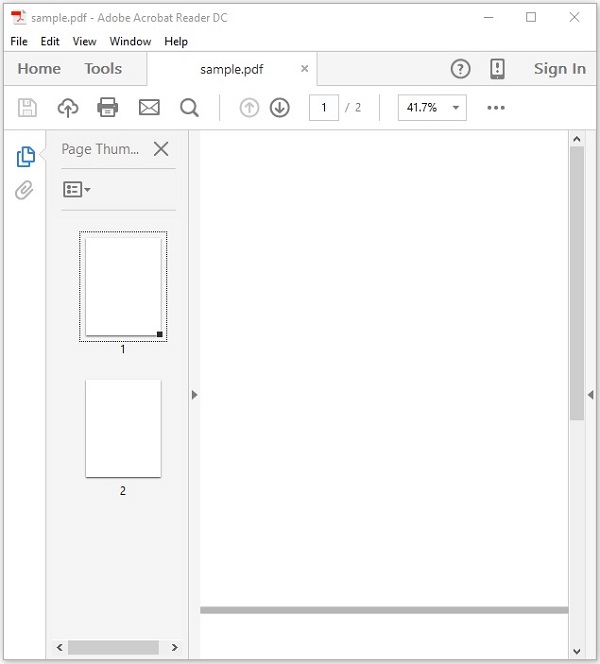
3
page removed
如果驗證指定的路徑,您可以發現所需的頁面已被刪除,並且文件中只剩下兩頁,如下所示。
PDFBox - 文件屬性
與其他檔案一樣,PDF 文件也具有文件屬性。這些屬性是鍵值對。每個屬性都提供有關文件的特定資訊。
以下是 PDF 文件的屬性:
| 序號 | 屬性及描述 |
|---|---|
| 1 | 檔案 此屬性儲存檔名稱。 |
| 2 | 標題 使用此屬性,您可以為文件設定標題。 |
| 3 | 作者 使用此屬性,您可以為文件設定作者姓名。 |
| 4 | 主題 使用此屬性,您可以指定 PDF 文件的主題。 |
| 5 | 關鍵詞 使用此屬性,您可以列出我們可以搜尋文件的關鍵詞。 |
| 6 | 建立日期 使用此屬性,您可以設定文件的建立日期。 |
| 7 | 修改日期 使用此屬性,您可以設定文件的修改日期。 |
| 8 | 應用程式 使用此屬性,您可以設定文件的應用程式。 |
以下是 PDF 文件的文件屬性表的螢幕截圖。
設定文件屬性
PDFBox 為您提供了一個名為 PDDocumentInformation 的類。此類具有一組 setter 和 getter 方法。
此類的 setter 方法用於為文件的各種屬性設定值,getter 方法用於檢索這些值。
以下是 PDDocumentInformation 類的 setter 方法。
| 序號 | 方法及描述 |
|---|---|
| 1 | setAuthor(String author) 此方法用於設定名為 Author 的 PDF 文件屬性的值。 |
| 2 | setTitle(String title) 此方法用於設定名為 Title 的 PDF 文件屬性的值。 |
| 3 | setCreator(String creator) 此方法用於設定名為 Creator 的 PDF 文件屬性的值。 |
| 4 | setSubject(String subject) 此方法用於設定名為 Subject 的 PDF 文件屬性的值。 |
| 5 | setCreationDate(Calendar date) 此方法用於設定名為 CreationDate 的 PDF 文件屬性的值。 |
| 6 | setModificationDate(Calendar date) 此方法用於設定名為 ModificationDate 的 PDF 文件屬性的值。 |
| 7 | setKeywords(String keywords list) 此方法用於設定名為 Keywords 的 PDF 文件屬性的值。 |
示例
PDFBox 提供了一個名為 PDDocumentInformation 的類,此類提供了各種方法。這些方法可以為文件設定各種屬性並檢索它們。
此示例演示如何向 PDF 文件新增屬性,例如 Author、Title、Date 和 Subject。在這裡,我們將建立一個名為 doc_attributes.pdf 的 PDF 文件,向其中新增各種屬性,並將其儲存在 C:/PdfBox_Examples/ 路徑中。將此程式碼儲存在名為 AddingAttributes.java 的檔案中。
import java.io.IOException;
import java.util.Calendar;
import java.util.GregorianCalendar;

import org.apache.pdfbox.pdmodel.PDDocument;
import org.apache.pdfbox.pdmodel.PDDocumentInformation;
import org.apache.pdfbox.pdmodel.PDPage;

public class AddingDocumentAttributes {
   public static void main(String args[]) throws IOException {

      //Creating PDF document object
      PDDocument document = new PDDocument();

      //Creating a blank page
      PDPage blankPage = new PDPage();

      //Adding the blank page to the document
      document.addPage( blankPage );

      //Creating the PDDocumentInformation object
      PDDocumentInformation pdd = document.getDocumentInformation();

      //Setting the author of the document
      pdd.setAuthor("Tutorialspoint");

      // Setting the title of the document
      pdd.setTitle("Sample document");

      //Setting the creator of the document
      pdd.setCreator("PDF Examples");

      //Setting the subject of the document
      pdd.setSubject("Example document");

      //Setting the created date of the document
      Calendar date = new GregorianCalendar();
      date.set(2015, 11, 5);
      pdd.setCreationDate(date);
      //Setting the modified date of the document
      date.set(2016, 6, 5);
      pdd.setModificationDate(date);

      //Setting keywords for the document
      pdd.setKeywords("sample, first example, my pdf");

      //Saving the document
      document.save("C:/PdfBox_Examples/doc_attributes.pdf");

      System.out.println("Properties added successfully ");

      //Closing the document
      document.close();

   }
}
使用以下命令從命令提示符編譯並執行儲存的 Java 檔案。
javac AddingAttributes.java
java AddingAttributes
執行後,上述程式將所有指定的屬性新增到文件中,顯示以下訊息。
Properties added successfully
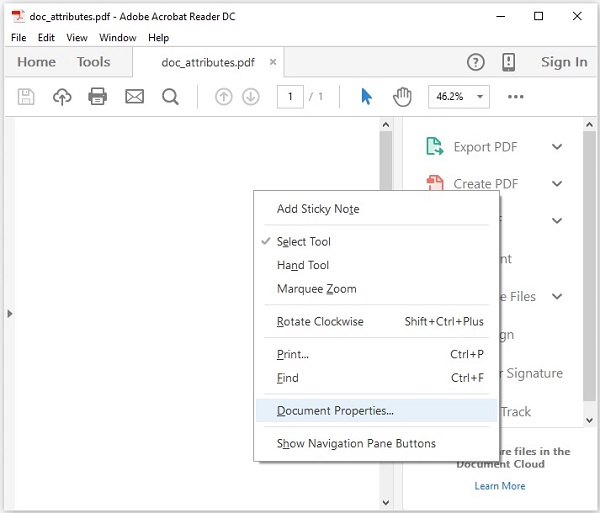
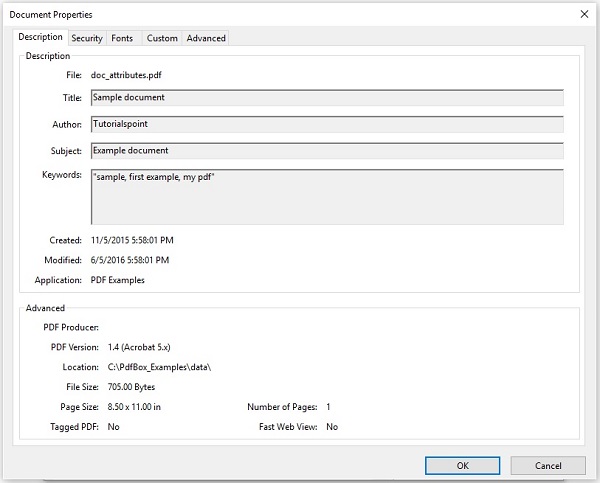
現在,如果您訪問給定的路徑,您可以在其中找到建立的 PDF。右鍵單擊文件並選擇文件屬性選項,如下所示。
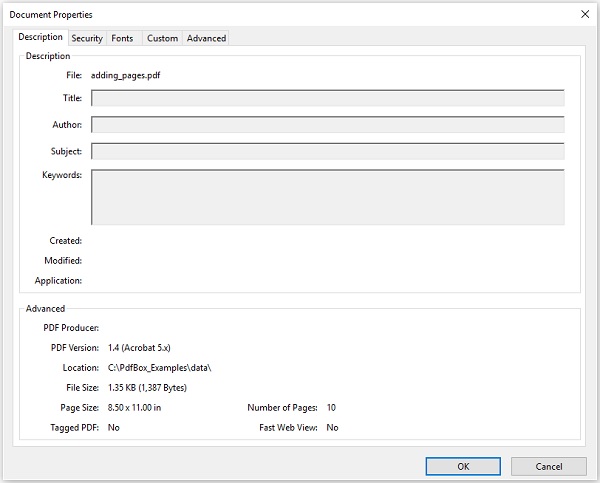
這將為您提供文件屬性視窗,在這裡您可以觀察到文件的所有屬性都已設定為指定的值。
檢索文件屬性
您可以使用 PDDocumentInformation 類提供的 getter 方法檢索文件的屬性。
以下是 PDDocumentInformation 類的 getter 方法。
| 序號 | 方法及描述 |
|---|---|
| 1 | getAuthor() 此方法用於檢索名為 Author 的 PDF 文件屬性的值。 |
| 2 | getTitle() 此方法用於檢索名為 Title 的 PDF 文件屬性的值。 |
| 3 | getCreator() 此方法用於檢索名為 Creator 的 PDF 文件屬性的值。 |
| 4 | getSubject() 此方法用於檢索名為 Subject 的 PDF 文件屬性的值。 |
| 5 | getCreationDate() 此方法用於檢索名為 CreationDate 的 PDF 文件屬性的值。 |
| 6 | getModificationDate() 此方法用於檢索名為 ModificationDate 的 PDF 文件屬性的值。 |
| 7 | getKeywords() 此方法用於檢索名為 Keywords 的 PDF 文件屬性的值。 |
示例
此示例演示如何檢索現有 PDF 文件的屬性。在這裡,我們將建立一個 Java 程式並載入名為 doc_attributes.pdf 的 PDF 文件(儲存在 C:/PdfBox_Examples/ 路徑中),並檢索其屬性。將此程式碼儲存在名為 RetrivingDocumentAttributes.java 的檔案中。
import java.io.File;
import java.io.IOException;

import org.apache.pdfbox.pdmodel.PDDocument;
import org.apache.pdfbox.pdmodel.PDDocumentInformation;

public class RetrivingDocumentAttributes {
   public static void main(String args[]) throws IOException {

      //Loading an existing document
      File file = new File("C:/PdfBox_Examples/doc_attributes.pdf")
      PDDocument document = PDDocument.load(file);
      //Getting the PDDocumentInformation object
      PDDocumentInformation pdd = document.getDocumentInformation();

      //Retrieving the info of a PDF document
      System.out.println("Author of the document is :"+ pdd.getAuthor());
      System.out.println("Title of the document is :"+ pdd.getTitle());
      System.out.println("Subject of the document is :"+ pdd.getSubject());

      System.out.println("Creator of the document is :"+ pdd.getCreator());
      System.out.println("Creation date of the document is :"+ pdd.getCreationDate());
      System.out.println("Modification date of the document is :"+
         pdd.getModificationDate());
      System.out.println("Keywords of the document are :"+ pdd.getKeywords());

      //Closing the document
      document.close();
   }
}
使用以下命令從命令提示符編譯並執行儲存的 Java 檔案。
javac RetrivingDocumentAttributes.java
java RetrivingDocumentAttributes
執行後,上述程式檢索文件的所有屬性並顯示它們,如下所示。
Author of the document is :Tutorialspoint
Title of the document is :Sample document
Subject of the document is :Example document
Creator of the document is :PDF Examples
Creation date of the document is :11/5/2015
Modification date of the document is :6/5/2016
Keywords of the document are :sample, first example, my pdf
PDFBox - 新增文字
在上一章中,我們討論瞭如何向 PDF 文件新增頁面。在本章中,我們將討論如何向現有的 PDF 文件新增文字。
向現有 PDF 文件新增文字
您可以使用 PDFBox 庫向文件新增內容,它為您提供了一個名為 PDPageContentStream 的類,該類包含在 PDFDocument 的頁面中插入文字、影像和其他型別內容所需的方法。
以下是建立空文件並在其中向頁面新增內容的步驟。
步驟 1:載入現有文件
您可以使用 PDDocument 類的 load() 方法載入現有文件。因此,例項化此類並載入所需的文件,如下所示。
File file = new File("Path of the document");
PDDocument doc = document.load(file);
步驟 2:獲取所需的頁面
您可以使用 getPage() 方法獲取文件中所需的頁面。透過將頁面的索引傳遞給此方法來檢索所需頁面的物件,如下所示。
PDPage page = doc.getPage(1);
步驟 3:準備內容流
您可以使用 PDPageContentStream 類的物件插入各種型別的資料元素。您需要將文件物件和頁面物件傳遞給此類的建構函式,因此,透過傳遞在先前步驟中建立的這兩個物件來例項化此類,如下所示。
PDPageContentStream contentStream = new PDPageContentStream(doc, page);
步驟 4:開始文字
在 PDF 文件中插入文字時,您可以使用 PDPageContentStream 類的 beginText() 和 endText() 方法指定文字的起始和結束點,如下所示。
contentStream.beginText();
………………………..
code to add text content
………………………..
contentStream.endText();
因此,使用 beginText() 方法開始文字,如下所示。
contentStream.beginText();
步驟 5:設定文字的位置
使用 newLineAtOffset() 方法,您可以在頁面上的內容流中設定位置。
//Setting the position for the line
contentStream.newLineAtOffset(25, 700);
步驟 6:設定字型
您可以使用 PDPageContentStream 類的 setFont() 方法將文字的字型設定為所需的樣式,如下所示。對於此方法,您需要傳遞字型的型別和大小。
contentStream.setFont( font_type, font_size );
步驟 7:插入文字
您可以使用 PDPageContentStream 類的 ShowText() 方法將文字插入頁面,如下所示。此方法接受字串形式的所需文字。
contentStream.showText(text);
步驟 8:結束文字
插入文字後,您需要使用 PDPageContentStream 類的 endText() 方法結束文字,如下所示。
contentStream.endText();
步驟 9:關閉 PDPageContentStream
使用 close() 方法關閉 PDPageContentStream 物件,如下所示。
contentstream.close();
步驟 10:儲存文件
新增所需內容後,使用 PDDocument 類的 save() 方法儲存 PDF 文件,如下面的程式碼塊所示。
doc.save("Path");
步驟 11:關閉文件
最後,使用 PDDocument 類的 close() 方法關閉文件,如下所示。
doc.close();
示例
此示例演示如何向文件中的頁面新增內容。在這裡,我們將建立一個 Java 程式來載入名為 my_doc.pdf 的 PDF 文件(儲存在 C:/PdfBox_Examples/ 路徑中),並向其中新增一些文字。將此程式碼儲存在名為 AddingContent.java 的檔案中。
import java.io.File;
import java.io.IOException;

import org.apache.pdfbox.pdmodel.PDDocument;
import org.apache.pdfbox.pdmodel.PDPage;
import org.apache.pdfbox.pdmodel.PDPageContentStream;
import org.apache.pdfbox.pdmodel.font.PDType1Font;

public class AddingContent {
   public static void main (String args[]) throws IOException {

      //Loading an existing document
      File file = new File("C:/PdfBox_Examples/my_doc.pdf");
      PDDocument document = PDDocument.load(file);

      //Retrieving the pages of the document
      PDPage page = document.getPage(1);
      PDPageContentStream contentStream = new PDPageContentStream(document, page);

      //Begin the Content stream
      contentStream.beginText();

      //Setting the font to the Content stream
      contentStream.setFont(PDType1Font.TIMES_ROMAN, 12);

      //Setting the position for the line
      contentStream.newLineAtOffset(25, 500);

      String text = "This is the sample document and we are adding content to it.";

      //Adding text in the form of string
      contentStream.showText(text);

      //Ending the content stream
      contentStream.endText();

      System.out.println("Content added");

      //Closing the content stream
      contentStream.close();

      //Saving the document
      document.save(new File("C:/PdfBox_Examples/new.pdf"));

      //Closing the document
      document.close();
   }
}
使用以下命令從命令提示符編譯並執行儲存的 Java 檔案。
javac AddingContent.java
java AddingContent
執行後,上述程式將給定的文字新增到文件中並顯示以下訊息。
Content added
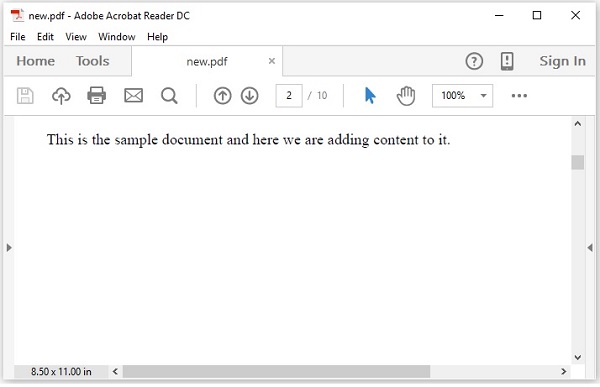
如果驗證指定路徑中的 PDF 文件 new.pdf,您可以觀察到給定的內容已新增到文件中,如下所示。
PDFBox - 新增多行文字
在上一章提供的示例中,我們討論瞭如何向 PDF 中的頁面新增文字,但透過此程式,您只能新增適合單行的文字。如果您嘗試新增更多內容,所有超出行空間的文字將不會顯示。
例如,如果您透過傳遞以下字串來執行上一章中的上述程式,則只會顯示其中的一部分。
String text = "This is an example of adding text to a page in the pdf document. we can
   add as many lines as we want like this using the showText() method of the
   ContentStream class";
將上一章示例中的 字串文字替換為上述提到的字串並執行它。執行後,您將收到以下輸出。
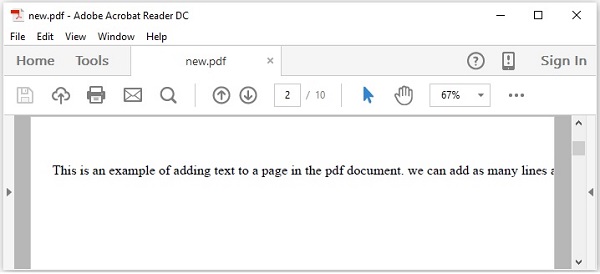
如果你仔細觀察輸出,你會注意到只顯示了字串的一部分。
為了在 PDF 中新增多行,你需要使用setLeading()方法設定行距,並在完成每一行後使用newline()方法換行。
步驟
以下是建立空文件並在其中向頁面新增內容的步驟。
步驟 1:載入現有文件
您可以使用 PDDocument 類的 load() 方法載入現有文件。因此,例項化此類並載入所需的文件,如下所示。
File file = new File("Path of the document");
PDDocument doc = PDDocument.load(file);
步驟 2:獲取所需的頁面
您可以使用 getPage() 方法獲取文件中所需的頁面。透過將頁面的索引傳遞給此方法來檢索所需頁面的物件,如下所示。
PDPage page = doc.getPage(1);
步驟 3:準備內容流
您可以使用名為PDPageContentStream類的物件插入各種資料元素。你需要將文件物件和頁面物件傳遞給此類的建構函式,因此,透過傳遞在前面步驟中建立的這兩個物件來例項化此類,如下所示。
PDPageContentStream contentStream = new PDPageContentStream(doc, page);
步驟 4:開始文字
在 PDF 文件中插入文字時,您可以使用PDPageContentStream類的beginText()和endText()方法指定文字的起始和結束點,如下所示。
contentStream.beginText();
………………………..
code to add text content
………………………..
contentStream.endText();
因此,使用 beginText() 方法開始文字,如下所示。
contentStream.beginText();
步驟 5:設定文字的位置
使用 newLineAtOffset() 方法,您可以在頁面上的內容流中設定位置。
//Setting the position for the line
contentStream.newLineAtOffset(25, 700);
步驟 6:設定字型
您可以使用PDPageContentStream類的setFont()方法將文字的字型設定為所需的樣式,如下所示,你需要將字型的型別和大小傳遞給此方法。
contentStream.setFont( font_type, font_size );
步驟 7:設定文字行距
您可以使用setLeading()方法設定文字行距,如下所示。
contentStream.setLeading(14.5f);
步驟 8:使用 newline() 插入多個字串
您可以使用PDPageContentStream類的ShowText()方法插入多個字串,透過使用newline()方法將它們分割,如下所示。
contentStream. ShowText(text1);
contentStream.newLine();
contentStream. ShowText(text2);
步驟 9:結束文字
插入文字後,您需要使用 PDPageContentStream 類的 endText() 方法結束文字,如下所示。
contentStream.endText();
步驟 10:關閉 PDPageContentStream
使用 close() 方法關閉 PDPageContentStream 物件,如下所示。
contentstream.close();
步驟 11:儲存文件
新增所需內容後,使用 PDDocument 類的 save() 方法儲存 PDF 文件,如下面的程式碼塊所示。
doc.save("Path");
步驟 12:關閉文件
最後,使用 PDDocument 類的 close() 方法關閉文件,如下所示。
doc.close();
示例
此示例演示瞭如何使用 PDFBox 在 PDF 中新增多行。將此程式儲存在名為AddMultipleLines.java的檔案中。
import java.io.File;
import java.io.IOException;

import org.apache.pdfbox.pdmodel.PDDocument;
import org.apache.pdfbox.pdmodel.PDPage;
import org.apache.pdfbox.pdmodel.PDPageContentStream;
import org.apache.pdfbox.pdmodel.font.PDType1Font;

public class AddMultipleLines {
   public static void main(String args[]) throws IOException {

      //Loading an existing document
      File file = new File("C:/PdfBox_Examples/my_pdf.pdf");
      PDDocument doc = document.load(file);

      //Creating a PDF Document
      PDPage page = doc.getPage(1);

      PDPageContentStream contentStream = new PDPageContentStream(doc, page);

      //Begin the Content stream
      contentStream.beginText();

      //Setting the font to the Content stream
      contentStream.setFont( PDType1Font.TIMES_ROMAN, 16 );

      //Setting the leading
      contentStream.setLeading(14.5f);

      //Setting the position for the line
      contentStream.newLineAtOffset(25, 725);

      String text1 = "This is an example of adding text to a page in the pdf document.
         we can add as many lines";
      String text2 = "as we want like this using the ShowText()  method of the
         ContentStream class";

      //Adding text in the form of string
      contentStream. ShowText(text1);
      contentStream.newLine();
      contentStream. ShowText(text2);
      //Ending the content stream
      contentStream.endText();

      System.out.println("Content added");

      //Closing the content stream
      contentStream.close();

      //Saving the document
      doc.save(new File("C:/PdfBox_Examples/new.pdf"));

      //Closing the document
      doc.close();
   }
}
使用以下命令從命令提示符編譯並執行儲存的 Java 檔案。
javac AddMultipleLines.java
java AddMultipleLines
執行後,上述程式將給定的文字新增到文件中並顯示以下訊息。
Content added
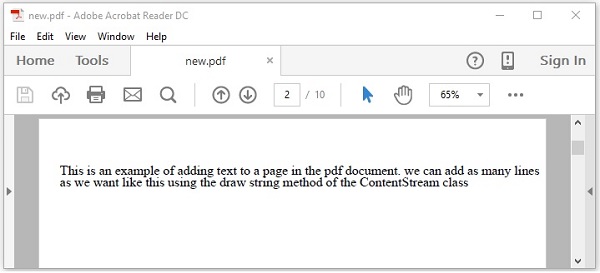
如果您在指定路徑中驗證 PDF 文件new.pdf,您可以觀察到給定的內容已按多行新增到文件中,如下所示。
PDFBox - 讀取文字
在上一章中,我們已經瞭解瞭如何將文字新增到現有的 PDF 文件中。在本章中,我們將討論如何從現有的 PDF 文件中讀取文字。
從現有 PDF 文件中提取文字
提取文字是 PDF box 庫的主要功能之一。您可以使用PDFTextStripper類的getText()方法提取文字。此類從給定的 PDF 文件中提取所有文字。
以下是從現有 PDF 文件中提取文字的步驟。
步驟 1:載入現有的 PDF 文件
使用 PDDocument 類的靜態方法 load() 載入現有的 PDF 文件。此方法接受檔案物件作為引數,由於這是一個靜態方法,因此您可以使用類名來呼叫它,如下所示。
File file = new File("path of the document")
PDDocument document = PDDocument.load(file);
步驟 2:例項化 PDFTextStripper 類
PDFTextStripper類提供從 PDF 文件檢索文字的方法,因此,例項化此類,如下所示。
PDFTextStripper pdfStripper = new PDFTextStripper();
步驟 3:檢索文字
您可以使用PDFTextStripper類的getText()方法讀取/檢索 PDF 文件中頁面的內容。對於此方法,您需要將文件物件作為引數傳遞。此方法檢索給定文件中的文字,並以 String 物件的形式返回它。
String text = pdfStripper.getText(document);
步驟 4:關閉文件
最後,使用PDDocument類的close()方法關閉文件,如下所示。
document.close();
示例
假設我們有一個 PDF 文件,其中包含一些文字,如下所示。

此示例演示瞭如何從上述 PDF 文件中讀取文字。在這裡,我們將建立一個 Java 程式並載入一個名為new.pdf的 PDF 文件,該文件儲存在路徑C:/PdfBox_Examples/中。將此程式碼儲存在名為ReadingText.java的檔案中。
import java.io.File;
import java.io.IOException;

import org.apache.pdfbox.pdmodel.PDDocument;
import org.apache.pdfbox.text.PDFTextStripper;
public class ReadingText {

   public static void main(String args[]) throws IOException {

      //Loading an existing document
      File file = new File("C:/PdfBox_Examples/new.pdf");
      PDDocument document = PDDocument.load(file);

      //Instantiate PDFTextStripper class
      PDFTextStripper pdfStripper = new PDFTextStripper();

      //Retrieving text from PDF document
      String text = pdfStripper.getText(document);
      System.out.println(text);

      //Closing the document
      document.close();

   }
}
使用以下命令從命令提示符編譯並執行儲存的 Java 檔案。
javac ReadingText.java
java ReadingText
執行後,上述程式從給定的 PDF 文件中檢索文字並顯示它,如下所示。
This is an example of adding text to a page in the pdf document. we can add as many lines
as we want like this using the ShowText() method of the ContentStream class.
PDFBox - 插入圖片
在上一章中,我們已經瞭解瞭如何從現有的 PDF 文件中提取文字。在本章中,我們將討論如何將影像插入 PDF 文件。
將影像插入 PDF 文件
您可以使用PDImageXObject和PDPageContentStream類的createFromFile()和drawImage()方法將影像插入 PDF 文件。
以下是從現有 PDF 文件中提取文字的步驟。
步驟 1:載入現有的 PDF 文件
使用 PDDocument 類的靜態方法 load() 載入現有的 PDF 文件。此方法接受檔案物件作為引數,由於這是一個靜態方法,因此您可以使用類名來呼叫它,如下所示。
File file = new File("path of the document")
PDDocument doc = PDDocument.load(file);
步驟 2:檢索頁面
在 PDF 文件中選擇一個頁面,並使用getPage()方法檢索其頁面物件,如下所示。
PDPage page = doc.getPage(0);
步驟 3:建立 PDImageXObject 物件
PDFBox 庫中的PDImageXObject類表示一個影像。它提供執行與影像相關的操作所需的所有方法,例如,插入影像、設定其高度、設定其寬度等。
我們可以使用createFromFile()方法建立此類的物件。對於此方法,我們需要傳遞要新增的影像的路徑(以字串形式)以及需要將影像新增到其中的文件物件。
PDImageXObject pdImage = PDImageXObject.createFromFile("C:/logo.png", doc);
步驟 4:準備內容流
您可以使用名為PDPageContentStream類的物件插入各種資料元素。你需要將文件物件和頁面物件傳遞給此類的建構函式,因此,透過傳遞在前面步驟中建立的這兩個物件來例項化此類,如下所示。
PDPageContentStream contentStream = new PDPageContentStream(doc, page);
步驟 5:在 PDF 文件中繪製圖像
您可以使用drawImage()方法在 PDF 文件中插入影像。對於此方法,您需要新增上面步驟中建立的影像物件以及影像所需的尺寸(寬度和高度),如下所示。
contentstream.drawImage(pdImage, 70, 250);
步驟 6:關閉 PDPageContentStream
使用 close() 方法關閉 PDPageContentStream 物件,如下所示。
contentstream.close();
步驟 7:儲存文件
新增所需內容後,使用 PDDocument 類的 save() 方法儲存 PDF 文件,如下面的程式碼塊所示。
doc.save("Path");
步驟 8:關閉文件
最後,使用 PDDocument 類的 close() 方法關閉文件,如下所示。
doc.close();
示例
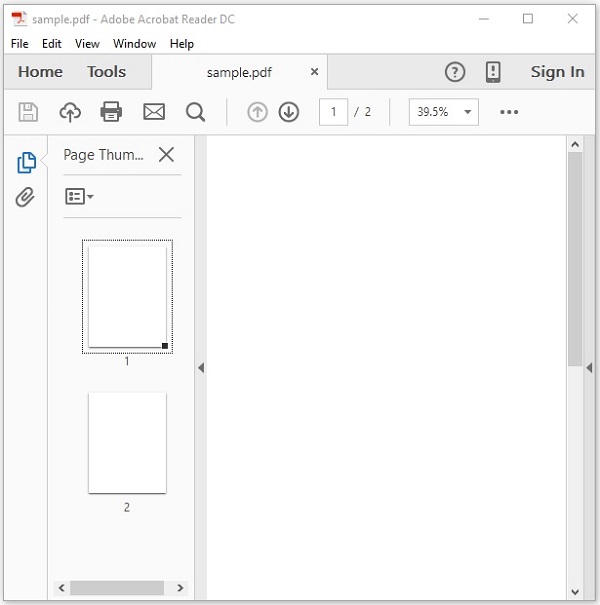
假設我們在路徑C:/PdfBox_Examples/中有一個名為sample.pdf的 PDF 文件,其中包含空白頁面,如下所示。
此示例演示瞭如何將影像新增到上述 PDF 文件的空白頁面中。在這裡,我們將載入名為sample.pdf的 PDF 文件並向其中新增影像。將此程式碼儲存在名為InsertingImage.java的檔案中。
import java.io.File;

import org.apache.pdfbox.pdmodel.PDDocument;
import org.apache.pdfbox.pdmodel.PDPage;
import org.apache.pdfbox.pdmodel.PDPageContentStream;
import org.apache.pdfbox.pdmodel.graphics.image.PDImageXObject;

public class InsertingImage {

   public static void main(String args[]) throws Exception {
      //Loading an existing document
      File file = new File("C:/PdfBox_Examples/sample.pdf");
      PDDocument doc = PDDocument.load(file);

      //Retrieving the page
      PDPage page = doc.getPage(0);

      //Creating PDImageXObject object
      PDImageXObject pdImage = PDImageXObject.createFromFile("C:/PdfBox_Examples/logo.png",doc);

      //creating the PDPageContentStream object
      PDPageContentStream contents = new PDPageContentStream(doc, page);

      //Drawing the image in the PDF document
      contents.drawImage(pdImage, 70, 250);

      System.out.println("Image inserted");

      //Closing the PDPageContentStream object
      contents.close();

      //Saving the document
      doc.save("C:/PdfBox_Examples/sample.pdf");

      //Closing the document
      doc.close();

   }
}
使用以下命令從命令提示符編譯並執行儲存的 Java 檔案。
javac InsertingImage.java
java InsertingImage
執行後,上述程式將影像插入給定 PDF 文件的指定頁面中,並顯示以下訊息。
Image inserted
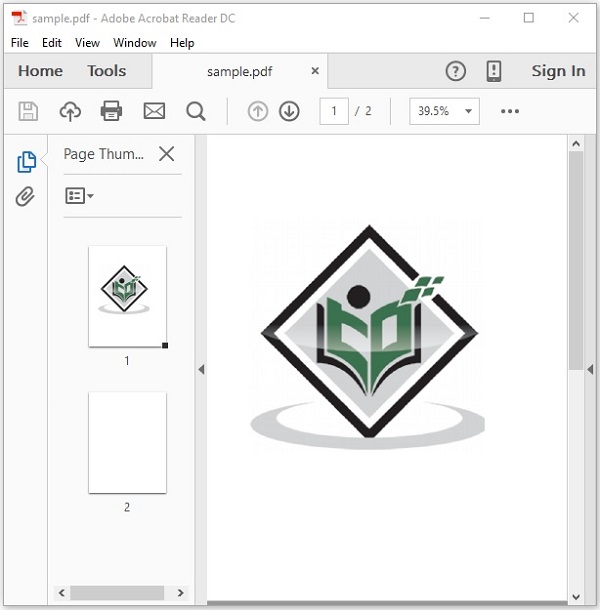
如果您驗證文件sample.pdf,您可以觀察到其中插入了一個影像,如下所示。
PDFBox - 加密 PDF 文件
在上一章中,我們已經瞭解瞭如何在 PDF 文件中插入影像。在本章中,我們將討論如何加密 PDF 文件。
加密 PDF 文件
您可以使用StandardProtectionPolicy和AccessPermission 類提供的方法加密 PDF 文件。
AccessPermission類用於透過為 PDF 文件分配訪問許可權來保護它。使用此類,您可以限制使用者執行以下操作。
- 列印文件
- 修改文件內容
- 複製或提取文件內容
- 新增或修改註釋
- 填寫互動式表單欄位
- 提取文字和圖形以供視力障礙人士訪問
- 組裝文件
- 以降級質量列印
StandardProtectionPolicy類用於為文件新增基於密碼的保護。
以下是加密現有 PDF 文件的步驟。
步驟 1:載入現有的 PDF 文件
使用 PDDocument 類的靜態方法 load() 載入現有的 PDF 文件。此方法接受檔案物件作為引數,由於這是一個靜態方法,因此您可以使用類名來呼叫它,如下所示。
File file = new File("path of the document")
PDDocument document = PDDocument.load(file);
步驟 2:建立 Access Permission 物件
例項化AccessPermission類,如下所示。
AccessPermission accessPermission = new AccessPermission();
步驟 3:建立 StandardProtectionPolicy 物件
透過傳遞所有者密碼、使用者密碼和AccessPermission物件來例項化StandardProtectionPolicy類,如下所示。
StandardProtectionPolicy spp = new StandardProtectionPolicy("1234","1234",accessPermission);
步驟 4:設定加密金鑰的長度
使用setEncryptionKeyLength()方法設定加密金鑰長度,如下所示。
spp.setEncryptionKeyLength(128);
步驟 5:設定許可權
使用StandardProtectionPolicy類的setPermissions()方法設定許可權。此方法接受AccessPermission物件作為引數。
spp.setPermissions(accessPermission);
步驟 6:保護文件
您可以使用PDDocument類的protect()方法保護您的文件,如下所示。將StandardProtectionPolicy物件作為引數傳遞給此方法。
document.protect(spp);
步驟 7:儲存文件
新增所需內容後,使用PDDocument類的save()方法儲存 PDF 文件,如下面的程式碼塊所示。
document.save("Path");
步驟 8:關閉文件
最後,使用PDDocument類的close()方法關閉文件,如下所示。
document.close();
示例
假設我們在路徑C:/PdfBox_Examples/中有一個名為sample.pdf的 PDF 文件,其中包含空白頁面,如下所示。
此示例演示瞭如何加密上述 PDF 文件。在這裡,我們將載入名為sample.pdf的 PDF 文件並對其進行加密。將此程式碼儲存在名為EncriptingPDF.java的檔案中。
import java.io.File;

import org.apache.pdfbox.pdmodel.PDDocument;
import org.apache.pdfbox.pdmodel.encryption.AccessPermission;
import org.apache.pdfbox.pdmodel.encryption.StandardProtectionPolicy;
public class EncriptingPDF {

   public static void main(String args[]) throws Exception {
      //Loading an existing document
      File file = new File("C:/PdfBox_Examples/sample.pdf");
      PDDocument document = PDDocument.load(file);

      //Creating access permission object
      AccessPermission ap = new AccessPermission();

      //Creating StandardProtectionPolicy object
      StandardProtectionPolicy spp = new StandardProtectionPolicy("1234", "1234", ap);

      //Setting the length of the encryption key
      spp.setEncryptionKeyLength(128);

      //Setting the access permissions
      spp.setPermissions(ap);

      //Protecting the document
      document.protect(spp);

      System.out.println("Document encrypted");

      //Saving the document
      document.save("C:/PdfBox_Examples/sample.pdf");
      //Closing the document
      document.close();

   }
}
使用以下命令從命令提示符編譯並執行儲存的 Java 檔案。
javac EncriptingPDF.java
java EncriptingPDF
執行後,上述程式會加密給定的 PDF 文件並顯示以下訊息。
Document encrypted
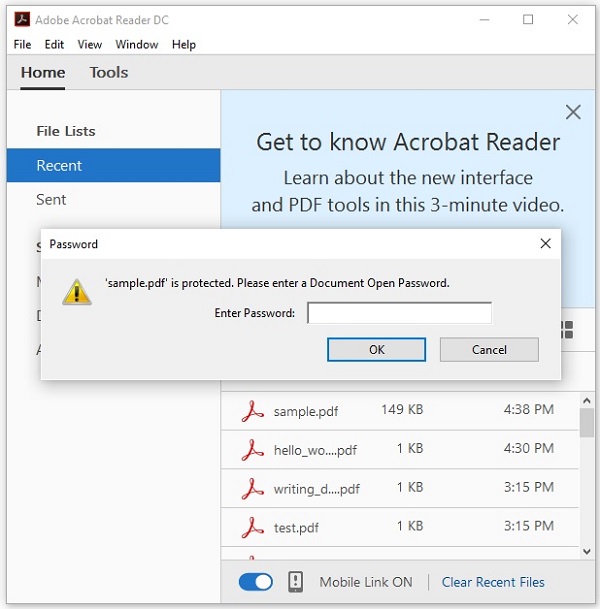
如果您嘗試開啟文件sample.pdf,則無法開啟,因為它已加密。相反,它會提示您輸入密碼以開啟文件,如下所示。
PDFBox - PDF 文件中的 JavaScript
在上一章中,我們學習瞭如何將影像插入 PDF 文件。在本章中,我們將討論如何向 PDF 文件新增 JavaScript。
向 PDF 文件新增 JavaScript
您可以使用PDActionJavaScript類向 PDF 文件新增 JavaScript 操作。這表示一個 JavaScript 操作。
以下是向現有 PDF 文件新增 JavaScript 操作的步驟。
步驟 1:載入現有的 PDF 文件
使用 PDDocument 類的靜態方法 load() 載入現有的 PDF 文件。此方法接受檔案物件作為引數,由於這是一個靜態方法,因此您可以使用類名來呼叫它,如下所示。
File file = new File("path of the document")
PDDocument document = PDDocument.load(file);
步驟 2:建立 PDActionJavaScript 物件
例項化PDActionJavaScript物件,如下所示。對於此類的建構函式,請以字串形式傳遞所需的 JavaScript,如下所示。
String javaScript = "app.alert( {cMsg: 'this is an example', nIcon: 3,"
   + " nType: 0,cTitle: 'PDFBox Javascript example' } );";
PDActionJavaScript PDAjavascript = new PDActionJavaScript(javaScript);
步驟 3:將 Java 指令碼嵌入文件
將所需的字串嵌入到 PDF 文件中,如下所示。
document.getDocumentCatalog().setOpenAction(PDAjavascript);
步驟 4:儲存文件
新增所需內容後,使用PDDocument類的save()方法儲存 PDF 文件,如下面的程式碼塊所示。
document.save("Path");
步驟 5:關閉文件
最後,使用PDDocument類的close()方法關閉文件,如下所示。
document.close();
示例
假設我們在路徑C:/PdfBox_Examples/中有一個名為sample.pdf的 PDF 文件,其中包含空白頁面,如下所示。
此示例演示瞭如何將 JavaScript 嵌入到上述 PDF 文件中。在這裡,我們將載入名為sample.pdf的 PDF 文件並將 JavaScript 嵌入到其中。將此程式碼儲存在名為AddJavaScript.java的檔案中。
import java.io.File;

import org.apache.pdfbox.pdmodel.PDDocument;
import org.apache.pdfbox.pdmodel.interactive.action.PDActionJavaScript;

public class AddJavaScript {

   public static void main(String args[]) throws Exception {

      //Loading an existing file
      File file = new File("C:/PdfBox_Examples/new.pdf");
      PDDocument document = PDDocument.load(file);

      String javaScript = "app.alert( {cMsg: 'this is an example', nIcon: 3,"
         + " nType: 0, cTitle: 'PDFBox Javascript example’} );";

      //Creating PDActionJavaScript object
      PDActionJavaScript PDAjavascript = new PDActionJavaScript(javaScript);

      //Embedding java script
      document.getDocumentCatalog().setOpenAction(PDAjavascript);

      //Saving the document
      document.save( new File("C:/PdfBox_Examples/new.pdf") );
      System.out.println("Data added to the given PDF");

      //Closing the document
      document.close();

   }
}
使用以下命令從命令提示符編譯並執行儲存的 Java 檔案。
javac AddJavaScript.java
java AddJavaScript
執行後,上述程式將 JavaScript 嵌入到給定的 PDF 文件中並顯示以下訊息。
Data added to the given PDF
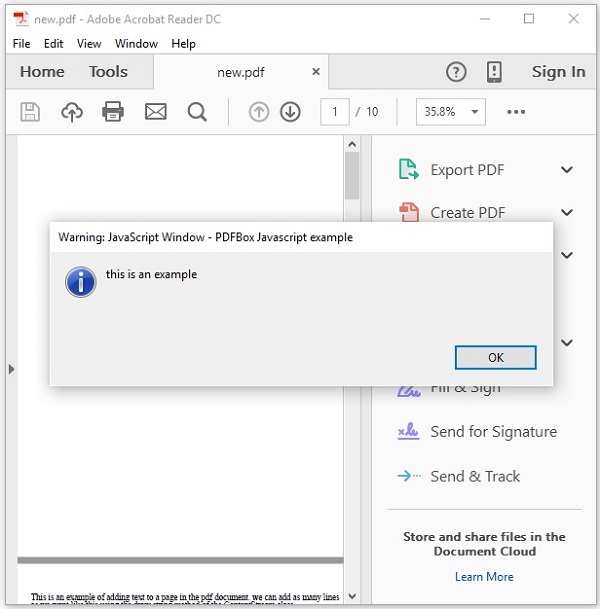
如果您嘗試開啟文件new.pdf,它將顯示一個警報訊息,如下所示。
PDFBox - 分割 PDF 文件
在上一章中,我們已經瞭解瞭如何向 PDF 文件新增 JavaScript。現在讓我們學習如何將給定的 PDF 文件拆分為多個文件。
拆分 PDF 文件中的頁面
您可以使用名為 Splitter 的類將給定的 PDF 文件拆分為多個 PDF 文件。此類用於將給定的 PDF 文件拆分為幾個其他文件。
以下是拆分現有 PDF 文件的步驟
步驟 1:載入現有的 PDF 文件
使用 PDDocument 類的靜態方法 load() 載入現有的 PDF 文件。此方法接受檔案物件作為引數,由於這是一個靜態方法,因此您可以使用類名來呼叫它,如下所示。
File file = new File("path of the document")
PDDocument document = PDDocument.load(file);
步驟 2:例項化 Splitter 類
名為Splitter的類包含用於拆分給定 PDF 文件的方法,因此,例項化此類,如下所示。
Splitter splitter = new Splitter();
步驟 3:拆分 PDF 文件
您可以使用Splitter類的Split()方法拆分給定文件。此方法接受PDDocument類的物件作為引數。
List<PDDocument> Pages = splitter.split(document);
split()方法將給定文件的每一頁拆分為一個單獨的文件,並將所有這些文件以列表的形式返回。
步驟 4:建立 Iterator 物件
為了遍歷文件列表,您需要獲取上面步驟中獲取的列表的迭代器物件,可以使用listIterator()方法獲取列表的迭代器物件,如下所示。
Iterator<PDDocument> iterator = Pages.listIterator();
步驟 5:關閉文件
最後,使用PDDocument類的close()方法關閉文件,如下所示。
document.close();
示例
假設在路徑C:\PdfBox_Examples\中有一個名為sample.pdf的PDF文件,該文件包含兩頁——一頁包含影像,另一頁包含文字,如下所示。
此示例演示如何拆分上述PDF文件。在這裡,我們將名為sample.pdf的PDF文件拆分為兩個不同的文件sample1.pdf和sample2.pdf。將此程式碼儲存在名為SplitPages.java的檔案中。
import org.apache.pdfbox.multipdf.Splitter;
import org.apache.pdfbox.pdmodel.PDDocument;

import java.io.File;
import java.io.IOException;
import java.util.List;
import java.util.Iterator;

public class SplitPages {
   public static void main(String[] args) throws IOException {

      //Loading an existing PDF document
      File file = new File("C:/PdfBox_Examples/sample.pdf");
      PDDocument document = PDDocument.load(file);

      //Instantiating Splitter class
      Splitter splitter = new Splitter();

      //splitting the pages of a PDF document
      List<PDDocument> Pages = splitter.split(document);

      //Creating an iterator
      Iterator<PDDocument> iterator = Pages.listIterator();

      //Saving each page as an individual document
      int i = 1;
      while(iterator.hasNext()) {
         PDDocument pd = iterator.next();
         pd.save("C:/PdfBox_Examples/sample"+ i++ +".pdf");
      }
      System.out.println("Multiple PDF’s created");
      document.close();
   }
}
使用以下命令從命令提示符編譯並執行儲存的 Java 檔案
javac SplitPages.java
java SplitPages
執行後,上述程式會加密給定的 PDF 文件並顯示以下訊息。
Multiple PDF’s created
如果您驗證給定的路徑,您可以觀察到建立了多個名為sample1和sample2的PDF,如下所示。


PDFBox - 合併多個PDF文件
在上一章中,我們已經瞭解瞭如何將給定的PDF文件拆分為多個文件。現在讓我們學習如何將多個PDF文件合併為一個文件。
合併多個 PDF 文件
您可以使用名為PDFMergerUtility類的類將多個PDF文件合併為單個PDF文件,此類提供方法將兩個或多個PDF文件合併為單個PDF文件。
以下是合併多個PDF文件的步驟。
步驟1:例項化PDFMergerUtility類
如下所示例項化合並實用程式類。
PDFMergerUtility PDFmerger = new PDFMergerUtility();
步驟2:設定目標檔案
如下所示,使用setDestinationFileName()方法設定目標檔案。
PDFmerger.setDestinationFileName("C:/PdfBox_Examples/data1/merged.pdf");
步驟3:設定原始檔
如下所示,使用addSource()方法設定原始檔。
File file = new File("path of the document")
PDFmerger.addSource(file);
步驟4:合併文件
如下所示,使用PDFmerger類的mergeDocuments()方法合併文件。
PDFmerger.mergeDocuments();
示例
假設我們在路徑C:\PdfBox_Examples\中有兩個PDF文件——sample1.pdf和sample2.pdf,如下所示。
此示例演示如何合併上述PDF文件。在這裡,我們將名為sample1.pdf和sample2.pdf的PDF文件合併為單個PDF文件merged.pdf。將此程式碼儲存在名為MergePDFs.java的檔案中。
import org.apache.pdfbox.multipdf.PDFMergerUtility;
import java.io.File;
import java.io.IOException;
public class MergePDFs {
   public static void main(String[] args) throws IOException {
      File file1 = new File("C:\\EXAMPLES\\Demo1.pdf");
      File file2 = new File("C:\\EXAMPLES\\Demo2.pdf");

      //Instantiating PDFMergerUtility class
      PDFMergerUtility PDFmerger = new PDFMergerUtility();

      //Setting the destination file
      PDFmerger.setDestinationFileName("C:\\Examples\\merged.pdf");

      //adding the source files
      PDFmerger.addSource(file1);
      PDFmerger.addSource(file2);

      //Merging the two documents
      PDFmerger.mergeDocuments();
      System.out.println("Documents merged");
   }
}
使用以下命令從命令提示符編譯並執行儲存的 Java 檔案。
javac MergePDFs.java
java MergePDFs
執行後,上述程式會加密給定的 PDF 文件並顯示以下訊息。
Documents merged
如果您驗證給定的路徑,您可以觀察到建立了一個名為merged.pdf的PDF文件,並且其中包含兩個源文件的頁面,如下所示。
PDFBox - 將 PDF 轉換為圖片
在上一章中,我們已經瞭解瞭如何合併多個PDF文件。在本章中,我們將瞭解如何從PDF文件的頁面中提取影像。
從PDF文件生成影像
PDFBox庫為您提供了一個名為PDFRenderer的類,該類將PDF文件渲染為AWT BufferedImage。
以下是從PDF文件生成影像的步驟。
步驟 1:載入現有的 PDF 文件
使用 PDDocument 類的靜態方法 load() 載入現有的 PDF 文件。此方法接受檔案物件作為引數,由於這是一個靜態方法,因此您可以使用類名來呼叫它,如下所示。
File file = new File("path of the document")
PDDocument document = PDDocument.load(file);
步驟2:例項化PDFRenderer類
名為PDFRenderer的類將PDF文件渲染為AWT BufferedImage。因此,您需要如下所示例項化此類。此類的建構函式接受一個文件物件;將上一步驟中建立的文件物件傳遞給它,如下所示。
PDFRenderer renderer = new PDFRenderer(document);
步驟3:從PDF文件渲染影像
您可以使用Renderer類的renderImage()方法渲染特定頁面中的影像,為此方法,您需要傳遞要渲染影像所在的頁面的索引。
BufferedImage image = renderer.renderImage(0);
步驟4:將影像寫入檔案
您可以使用write()方法將上一步中渲染的影像寫入檔案。為此方法,您需要傳遞三個引數:
- 渲染的影像物件。
- 表示影像型別(jpg或png)的字串。
- 您需要將提取的影像儲存到的檔案物件。
ImageIO.write(image, "JPEG", new File("C:/PdfBox_Examples/myimage.jpg"));
步驟 5:關閉文件
最後,使用PDDocument類的close()方法關閉文件,如下所示。
document.close();
示例
假設我們在路徑C:\PdfBox_Examples\中有一個PDF文件——sample.pdf,並且其第一頁包含一個影像,如下所示。

此示例演示如何將上述PDF文件轉換為影像檔案。在這裡,我們將檢索PDF文件第1頁中的影像並將其儲存為myimage.jpg。將此程式碼儲存為PdfToImage.java
import java.awt.image.BufferedImage;
import java.io.File;

import javax.imageio.ImageIO;
import org.apache.pdfbox.pdmodel.PDDocument;
import org.apache.pdfbox.rendering.PDFRenderer;
public class PdfToImage {

   public static void main(String args[]) throws Exception {

      //Loading an existing PDF document
      File file = new File("C:/PdfBox_Examples/sample.pdf");
      PDDocument document = PDDocument.load(file);

      //Instantiating the PDFRenderer class
      PDFRenderer renderer = new PDFRenderer(document);

      //Rendering an image from the PDF document
      BufferedImage image = renderer.renderImage(0);

      //Writing the image to a file
      ImageIO.write(image, "JPEG", new File("C:/PdfBox_Examples/myimage.jpg"));

      System.out.println("Image created");

      //Closing the document
      document.close();

   }
}
使用以下命令從命令提示符編譯並執行儲存的 Java 檔案。
javac PdfToImage.java
java PdfToImage
執行後,上述程式檢索給定PDF文件中的影像,並顯示以下訊息。
Image created
如果您驗證給定的路徑,您可以觀察到影像已生成並儲存為myimage.jpg,如下所示。

PDFBox - 新增矩形
本章將教您如何在PDF文件的頁面中建立彩色框。
在PDF文件中建立框
您可以使用PDPageContentStream類的addRect()方法在PDF頁面中新增矩形框。
以下是如何在PDF文件的頁面中建立矩形形狀的步驟。
步驟 1:載入現有的 PDF 文件
使用 PDDocument 類的靜態方法 load() 載入現有的 PDF 文件。此方法接受檔案物件作為引數,由於這是一個靜態方法,因此您可以使用類名來呼叫它,如下所示。
File file = new File("path of the document")
PDDocument document = PDDocument.load(file);
步驟2:獲取頁面物件
您需要使用PDDocument類的getPage()方法檢索要在其中新增矩形的所需頁面的PDPage物件。為此方法,您需要傳遞要在其中新增矩形的頁面的索引。
PDPage page = document.getPage(0);
步驟 3:準備內容流
您可以使用名為PDPageContentStream類的物件插入各種資料元素。你需要將文件物件和頁面物件傳遞給此類的建構函式,因此,透過傳遞在前面步驟中建立的這兩個物件來例項化此類,如下所示。
PDPageContentStream contentStream = new PDPageContentStream(document, page);
步驟4:設定非描邊顏色
您可以使用PDPageContentStream類的setNonStrokingColor()方法將非描邊顏色設定為矩形。為此方法,您需要將所需顏色作為引數傳遞,如下所示。
contentStream.setNonStrokingColor(Color.DARK_GRAY);
步驟5:繪製矩形
使用addRect()方法繪製具有所需尺寸的矩形。為此方法,您需要傳遞要新增的矩形的尺寸,如下所示。
contentStream.addRect(200, 650, 100, 100);
步驟6:填充矩形
PDPageContentStream類的fill()方法使用所需顏色填充指定尺寸之間的路徑,如下所示。
contentStream.fill();
步驟7:關閉文件
最後,使用PDDocument類的close()方法關閉文件,如下所示。
document.close();
示例
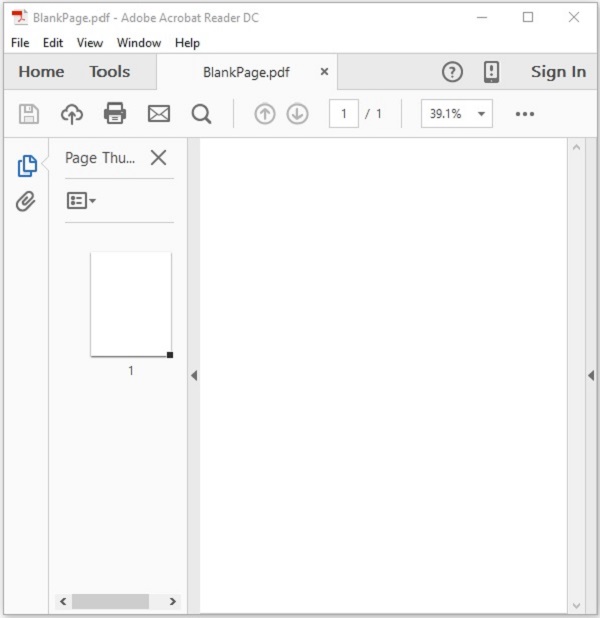
假設我們在路徑C:\PdfBox_Examples\中有一個名為blankpage.pdf的PDF文件,並且它包含一個空白頁面,如下所示。
此示例演示如何在PDF文件中建立/插入矩形。在這裡,我們將在空白PDF中建立一個框。將此程式碼儲存為AddRectangles.java。
import java.awt.Color;
import java.io.File;

import org.apache.pdfbox.pdmodel.PDDocument;
import org.apache.pdfbox.pdmodel.PDPage;
import org.apache.pdfbox.pdmodel.PDPageContentStream;
public class ShowColorBoxes {

   public static void main(String args[]) throws Exception {

      //Loading an existing document
      File file = new File("C:/PdfBox_Examples/BlankPage.pdf");
      PDDocument document = PDDocument.load(file);

      //Retrieving a page of the PDF Document
      PDPage page = document.getPage(0);

      //Instantiating the PDPageContentStream class
      PDPageContentStream contentStream = new PDPageContentStream(document, page);

      //Setting the non stroking color
      contentStream.setNonStrokingColor(Color.DARK_GRAY);

      //Drawing a rectangle
      contentStream.addRect(200, 650, 100, 100);

      //Drawing a rectangle
      contentStream.fill();

      System.out.println("rectangle added");

      //Closing the ContentStream object
      contentStream.close();

      //Saving the document
      File file1 = new File("C:/PdfBox_Examples/colorbox.pdf");
      document.save(file1);

      //Closing the document
      document.close();
   }
}
使用以下命令從命令提示符編譯並執行儲存的 Java 檔案。
javac AddRectangles.java
java AddRectangles
執行後,上述程式在PDF文件中建立一個矩形,並顯示以下影像。
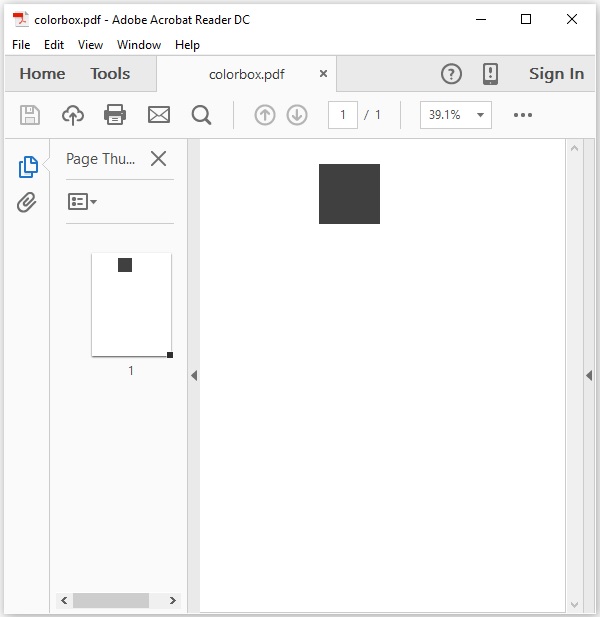
Rectangle created
如果您驗證給定的路徑並開啟儲存的文件——colorbox.pdf,您可以觀察到其中插入了一個框,如下所示。