- Laravel 教程
- Laravel - 首頁
- Laravel - 概述
- Laravel - 安裝
- Laravel - 應用結構
- Laravel - 配置
- Laravel - 路由
- Laravel - 中介軟體
- Laravel - 名稱空間
- Laravel - 控制器
- Laravel - 請求
- Laravel - Cookie
- Laravel - 響應
- Laravel - 檢視
- Laravel - Blade 模板
- Laravel - 重定向
- Laravel - 資料庫操作
- Laravel - 錯誤與日誌
- Laravel - 表單
- Laravel - 本地化
- Laravel - Session
- Laravel - 驗證
- Laravel - 檔案上傳
- Laravel - 傳送郵件
- Laravel - Ajax
- Laravel - 錯誤處理
- Laravel - 事件處理
- Laravel - Facades
- Laravel - Contracts
- Laravel - CSRF 保護
- Laravel - 身份驗證
- Laravel - 授權
- Laravel - Artisan 控制檯
- Laravel - 加密
- Laravel - 雜湊
- 理解發布流程
- Laravel - 遊客使用者許可權
- Laravel - Artisan 命令
- Laravel - 分頁自定義
- Laravel - Dump Server
- Laravel - Action URL
- Laravel 有用資源
- Laravel - 快速指南
- Laravel - 有用資源
- Laravel - 討論
Laravel - 更新記錄
我們可以使用 **DB** facade 和 **update** 方法來更新記錄。update 方法的語法如下表所示。
| 語法 | int update(string $query, array $bindings = array()) |
| 引數 |
|
| 返回值 | int |
| 描述 | 對資料庫執行更新語句。 |
示例
觀察以下示例以瞭解更多關於更新記錄的資訊:
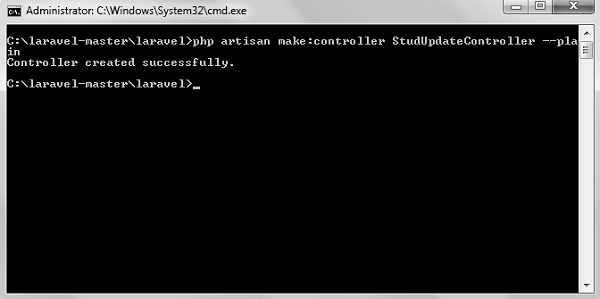
**步驟 1** − 執行以下命令建立一個名為 **StudViewController** 的控制器。
php artisan make:controller StudUpdateController --plain
**步驟 2** − 成功執行後,您將收到以下輸出:
**步驟 3** − 將以下程式碼複製到檔案 **app/Http/Controllers/ StudUpdateController.php**
app/Http/Controllers/StudUpdateController.php
<?php

namespace App\Http\Controllers;

use Illuminate\Http\Request;
use DB;
use App\Http\Requests;
use App\Http\Controllers\Controller;

class StudUpdateController extends Controller {
   public function index() {
      $users = DB::select('select * from student');
      return view('stud_edit_view',['users'=>$users]);
   }
   public function show($id) {
      $users = DB::select('select * from student where id = ?',[$id]);
      return view('stud_update',['users'=>$users]);
   }
   public function edit(Request $request,$id) {
      $name = $request->input('stud_name');
      DB::update('update student set name = ? where id = ?',[$name,$id]);
      echo "Record updated successfully.<br/>";
      echo '<a href = "/edit-records">Click Here</a> to go back.';
   }
}
**步驟 4** − 建立一個名為
**resources/views/stud_edit_view.blade.php** 的檢視檔案,並將以下程式碼複製到該檔案。
resources/views/stud_edit_view.blade.php
<html>
   <head>
      <title>View Student Records</title>
   </head>

   <body>

      <table border = "1">
         <tr>
            <td>ID</td>
            <td>Name</td>
            <td>Edit</td>
         </tr>
         @foreach ($users as $user)
         <tr>
            <td>{{ $user->id }}</td>
            <td>{{ $user->name }}</td>
            <td><a href = 'edit/{{ $user->id }}'>Edit</a></td>
         </tr>
         @endforeach
      </table>
   </body>
</html>
**步驟 5** − 建立另一個名為
**resources/views/stud_update.php** 的檢視檔案,並將以下程式碼複製到該檔案。
resources/views/stud_update.php
<html>

   <head>
      <title>Student Management | Edit</title>
   </head>

   <body>
      <form action = "/edit/<?php echo $users[0]->id; ?>" method = "post">
         <input type = "hidden" name = "_token" value = "<?php echo csrf_token(); ?>">

         <table>
            <tr>
               <td>Name</td>
               <td>
                  <input type = 'text' name = 'stud_name'
                     value = '<?php echo$users[0]->name; ?>'/>
               </td>
            </tr>
            <tr>
               <td colspan = '2'>
                  <input type = 'submit' value = "Update student" />
               </td>
            </tr>
         </table>
      </form>
   </body>
</html>
**步驟 6** − **新增**以下行到 **app/Http/routes.php** 中。
app/Http/routes.php。
Route::get('edit-records','StudUpdateController@index');
Route::get('edit/{id}','StudUpdateController@show');
Route::post('edit/{id}','StudUpdateController@edit');
**步驟 7** − 訪問以下 URL 以更新資料庫中的記錄。
https://:8000/edit-records
**步驟 8** − 輸出將顯示在以下影像中。
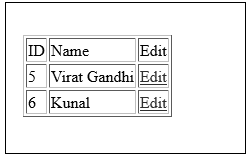
**步驟 9** − 點選任何記錄上的編輯連結,您將被重定向到一個頁面,您可以在該頁面編輯該特定記錄。
**步驟 10** − 輸出將顯示在以下影像中。

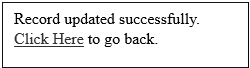
**步驟 11** − 編輯該記錄後,您將看到一個提示,如下面的影像所示。
laravel_working_with_database.htm
廣告