
 資料結構
資料結構 網路
網路 關係型資料庫管理系統
 作業系統
作業系統 Java
Java iOS
iOS HTML
HTML CSS
CSS Android
 Python
 C 程式設計
 C++
C++ C#
C# MongoDB
 MySQL
MySQL Javascript
 PHP
PHP如何使用 JavaFX 建立錨窗格?
一旦你為應用程式建立所有必需的節點,就可以使用佈局對其進行排列。其中佈局是計算給定空間中的物件位置的過程。JavaFX 在 javafx.scene.layout 包中提供了各種佈局。
錨窗格
在此佈局中,節點被附加/錨定到窗格邊緣的點(偏移量)。
可以透過例項化 javafx.scene.layout.AnchorPane 類來建立錨窗格。有四個錨約束來指定從窗格邊緣到節點邊緣的距離,即 topAnchor、leftAnchor、bottomAnchor、rightAnchor。
可以使用 setPrefSize() 方法設定錨窗格的大小。要向此窗格新增節點,可以將它們作為建構函式的引數傳遞,或將它們新增到窗格的可觀察列表中,如下所示 −
getChildren().addAll();
示例
import javafx.application.Application;
import javafx.collections.ObservableList;
import javafx.geometry.HPos;
import javafx.geometry.Insets;
import javafx.scene.Scene;
import javafx.scene.control.Button;
import javafx.scene.control.CheckBox;
import javafx.scene.control.Label;
import javafx.scene.control.Separator;
import javafx.scene.layout.AnchorPane;
import javafx.scene.layout.VBox;
import javafx.scene.paint.Color;
import javafx.scene.text.Font;
import javafx.scene.text.FontPosture;
import javafx.scene.text.FontWeight;
import javafx.stage.Stage;
public class AnchorPaneExample extends Application {
public void start(Stage stage) {
//Creating the check boxes
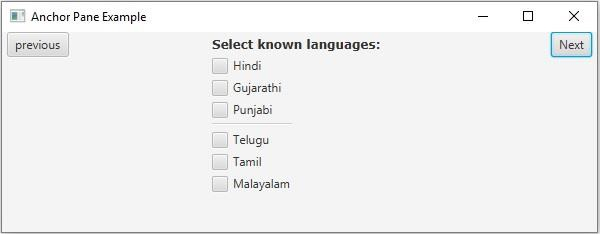
CheckBox checkBox1 = new CheckBox("Hindi");
CheckBox checkBox2 = new CheckBox("Gujarathi");
CheckBox checkBox3 = new CheckBox("Punjabi");
CheckBox checkBox4 = new CheckBox("Telugu");
CheckBox checkBox5 = new CheckBox("Tamil");
CheckBox checkBox6= new CheckBox("Malayalam");
//Creating a label
Label label = new Label("Select known languages:");
Font font = Font.font("verdana", FontWeight.BOLD, FontPosture.REGULAR, 12);
label.setFont(font);
//Creating a separator
Separator sep = new Separator();
sep.setMaxWidth(80);
sep.setHalignment(HPos.CENTER);
//Adding the check boxes and separator to the pane
VBox vBox = new VBox(5);
vBox.setPadding(new Insets(5, 5, 5, 210));
vBox.getChildren().addAll(label, checkBox1, checkBox2, checkBox3, checkBox4, checkBox5, checkBox6);
//Adding the separator after the 3rd check box
vBox.getChildren().add(4, sep);
//Creating the buttons
Button next = new Button("Next");
Button previous = new Button("previous");
//Creating an Anchor Pane
AnchorPane anchorPane = new AnchorPane();
//Setting the anchor to the next and previous buttons
AnchorPane.setRightAnchor(next, 5.0);
AnchorPane.setLeftAnchor(previous, 5.0);
//Retrieving the observable list of the Anchor Pane
ObservableList list = anchorPane.getChildren();
//Adding vBox and buttons to the anchor pane
list.addAll(vBox, next, previous);
//Setting the stage
Scene scene = new Scene(anchorPane, 595, 200, Color.BEIGE);
stage.setTitle("Anchor Pane Example");
stage.setScene(scene);
stage.show();
}
public static void main(String args[]){
launch(args);
}
}輸出

更新於: 2020-05-19
415 次觀看

廣告