
 資料結構
資料結構 網路
網路 關係資料庫管理系統
 作業系統
作業系統 Java
Java iOS
iOS HTML
HTML CSS
CSS Android
 Python
 C 語言程式設計
 C++
C++ C#
C# MongoDB
 MySQL
MySQL Javascript
 PHP
PHP如何使用 OpenCV Python 訪問和修改影像中的畫素值?
要訪問影像中的單個畫素值,我們可以使用與 NumPy 陣列索引相同的索引方式。我們可以使用切片來訪問一系列畫素值。要修改畫素值,我們使用簡單的 Python 賦值運算子(“=”)。
步驟
要訪問和修改影像中的畫素值,我們可以按照以下步驟操作:
匯入所需的庫。在以下所有示例中,所需的 Python 庫為 **OpenCV**。確保您已安裝它。
使用 **cv2.imread()** 讀取輸入 **RGB** 影像。使用此方法讀取的 RGB 影像為 BGR 格式。可以選擇將讀取的 BGR 影像分配給 img。
要訪問單個畫素,請使用索引;要修改單個畫素值,請對索引進行賦值。例如,要將 [200,150] 處的畫素值修改為紅色,我們應用
img[200,150] = (0, 0, 255)
要訪問一系列畫素,請使用切片;要修改這些畫素值,請對切片進行賦值。例如,要將 [100:300,150:350] 處的畫素值修改為紅色,我們應用
img[100:300,150:350] = (0, 0, 255)
我們將在以下示例中使用此影像作為 **輸入檔案**。

示例
在這個 Python 程式中,我們訪問輸入影像中某個點的畫素值。我們還查詢三個不同顏色通道的畫素值,並修改該點紅色通道的畫素值。
# program to access and modify a pixel value

# import required libraries
import cv2

# read the input image
img = cv2.imread('horizon.jpg')

# access pixel values using indexing
print("pixel value at [200,150]:", img[200,150])
print("pixel value blue channel at [200,150]:", img[200,150][0])
print("pixel value green channel at [200,150]:", img[200,150][1])
print("pixel value red channel at[200,150]:", img[200,150][2])

# modify the pixel value at [200,150] for red color channel
img[200,150] = (0, 0, 255)
print("after modifying pixel value at [200,150]:", img[200,150])
輸出
執行上述程式時,將生成以下輸出:
pixel value at [200,150]: [115 192 254]
pixel value blue channel at [200,150]: 115
pixel value green channel at [200,150]: 192
pixel value red channel at [200,150]: 254
after modifying pixel value at [200,150]: [ 0 0 255]
示例
在這個 Python 程式中,我們訪問輸入影像中某個區域的畫素值。我們還將這些畫素值修改為紅色。
# program to access and modify the pixel values of a region

# import required libraries
import cv2

# read the input image
img = cv2.imread('horizon.jpg')

# access pixel values using indexing and slicing

# modify pixel color of a region to red color
img[100:300,150:350] = (0, 0, 255)

# display the modified image
cv2.imshow('Modified Image', img)
cv2.waitKey(0)
cv2.destroyAllWindows()
輸出
執行上述程式時,將生成以下輸出:
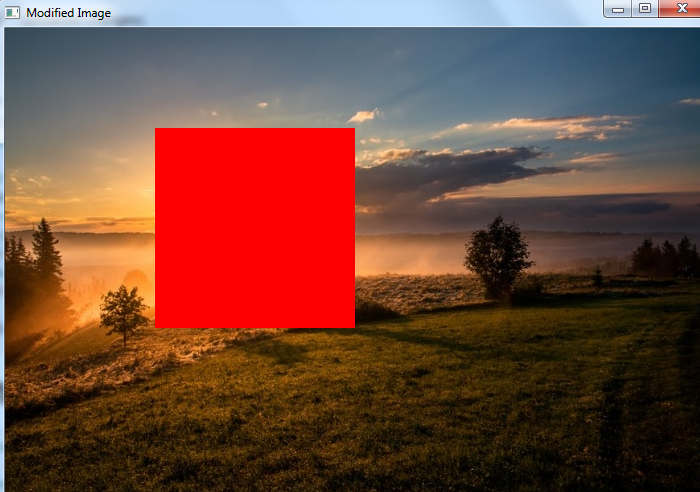
注意修改畫素值為紅色後的輸出影像。

更新於: 2022年12月2日
14K+ 瀏覽量

廣告