
 資料結構
資料結構 網路
網路 關係型資料庫管理系統
 作業系統
作業系統 Java
Java iOS
iOS HTML
HTML CSS
CSS Android
 Python
 C 程式設計
 C++
C++ C#
C# MongoDB
 MySQL
MySQL Javascript
 PHP
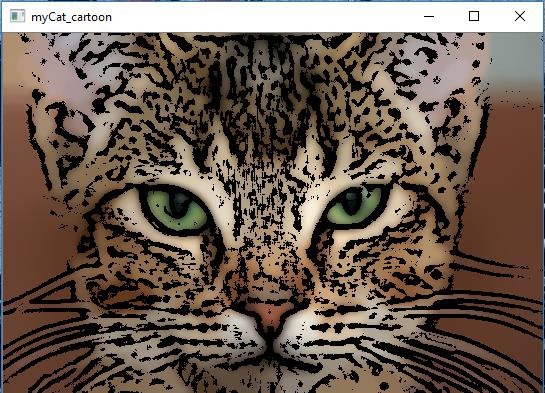
PHP使用 OpenCV 在 Python 中對影像進行漫畫化
目前市面上有很多專業漫畫化應用程式,但它們中的大多數都不是免費軟體。為了獲得基本的漫畫效果,我們只需要雙邊濾波器和一些邊緣檢測機制。雙邊濾波器會減少調色盤,這是漫畫效果所必需的,而邊緣檢測是為了生成粗體輪廓。
我們將使用 openCV python 庫將 RGB 彩色影像轉換為漫畫影像。
演算法
首先應用雙邊濾波器以減少影像的調色盤。
然後將實際影像轉換為灰度。
現在對灰度影像應用中值模糊以減少影像噪點。
使用自適應閾值從灰度影像建立邊緣蒙版。
最後將步驟 1 生成的彩色影像與步驟 4 生成的邊緣蒙版組合。
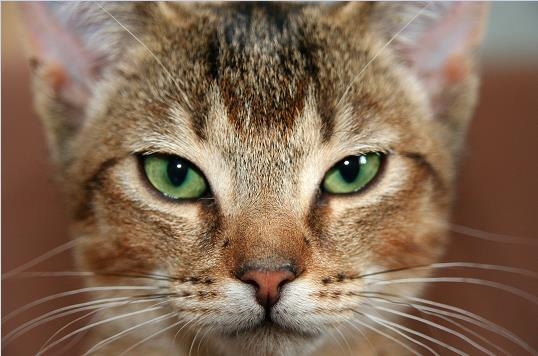
原始影像
示例
#step 1
#Use bilateral filter for edge-aware smoothing.
import cv2

num_down = 2 # number of downsampling steps
num_bilateral = 7 # number of bilateral filtering steps

img_rgb = cv2.imread("myCat.jpg")

# downsample image using Gaussian pyramid
img_color = img_rgb
for _ in range(num_down):
   img_color = cv2.pyrDown(img_color)

# repeatedly apply small bilateral filter instead of
# applying one large filter
for _ in range(num_bilateral):
img_color = cv2.bilateralFilter(img_color, d=9, sigmaColor=9, sigmaSpace=7)

# upsample image to original size
for _ in range(num_down):
   img_color = cv2.pyrUp(img_color)

#STEP 2 & 3
#Use median filter to reduce noise
# convert to grayscale and apply median blur
img_gray = cv2.cvtColor(img_rgb, cv2.COLOR_RGB2GRAY)
img_blur = cv2.medianBlur(img_gray, 7)

#STEP 4
#Use adaptive thresholding to create an edge mask
# detect and enhance edges
img_edge = cv2.adaptiveThreshold(img_blur, 255,
   cv2.ADAPTIVE_THRESH_MEAN_C,
   cv2.THRESH_BINARY,
   blockSize=9,
   C=2)

# Step 5
# Combine color image with edge mask & display picture
# convert back to color, bit-AND with color image
img_edge = cv2.cvtColor(img_edge, cv2.COLOR_GRAY2RGB)
img_cartoon = cv2.bitwise_and(img_color, img_edge)

# display
cv2.imshow("myCat_cartoon", img_cartoon)
結果

更新於: 31-Mar-2023
937 次瀏覽

廣告