
 資料結構
資料結構 網路
網路 關係型資料庫管理系統
 作業系統
作業系統 Java
Java iOS
iOS HTML
HTML CSS
CSS Android
 Python
 C 語言程式設計
 C++
C++ C#
C# MongoDB
 MySQL
MySQL Javascript
 PHP
PHP如何使用 OpenCV Python 模糊影像中的面部?
為了模糊影像中的面部,我們首先使用 Haar 級聯分類器檢測面部。OpenCV 為我們提供了用於物件檢測的不同型別的訓練好的 Haar 級聯。我們使用 **haarcascade_frontalface_alt.xml** 作為 Haar 級聯 xml 檔案。為了模糊面部區域,我們應用 **cv2.GaussianBlur()**。
如何下載 Haar 級聯?
您可以在以下 GitHub 網站地址找到不同的 Haar 級聯:
https://github.com/opencv/opencv/tree/master/data/haarcascades要下載用於人臉檢測的 **haarcascade**,請點選 **haarcascade_frontalface_alt.xml** 檔案。以原始格式開啟它,右鍵單擊並儲存。
步驟
您可以按照以下步驟模糊影像中的面部:
匯入所需的庫。在以下所有示例中,所需的 Python 庫是 **OpenCV**。確保您已安裝它。
使用 **cv2.imread()** 讀取輸入影像。指定完整的影像路徑。
初始化一個用於人臉檢測的 Haar 級聯分類器,例如 **face_cascade = cv2.CascadeClassifier()**。提供 Haar 級聯 xml 檔案的完整路徑。您可以使用 **haarcascade_frontalface_alt.xml** 來檢測影像中的人臉。
使用 **face_cascade.detectMultiScale()** 檢測輸入影像中的人臉。它以 **(x,y,w,h)** 格式返回檢測到的人臉的座標。
對於檢測到的人臉,定義 **roi** 為 **image[y:y+h, x:x+w]**,並對 roi 應用高斯模糊。將模糊後的面部新增到原始影像以獲得最終影像。
列印帶有模糊面部的影像。
讓我們看一些示例,以便更好地理解。
**注意**:您必須將“Haar 級聯 XML 檔案”放在正確的資料夾中。在這裡,我們將 XML 檔案放在名為“haarcascades”的資料夾中。
示例
在此示例中,我們將模糊輸入影像中檢測到的人臉。
# import required libraries
import cv2

# Read the input image
image = cv2.imread('man3.jpg')

# define haar cascade for face detection
face_cascade =
cv2.CascadeClassifier('haarcascades/haarcascade_frontalface_alt.xml')
faces = face_cascade.detectMultiScale(image, 1.3, 5)
print("Face detected in the image:", len(faces))

# Loop over all the detected faces in the image
for (x, y, w, h) in faces:
   roi = image[y:y+h, x:x+w]

   # apply gaussian blur to face rectangle
   roi = cv2.GaussianBlur(roi, (17, 17), 30)

   # add blurred face on original image to get final image
   image[y:y+roi.shape[0], x:x+roi.shape[1]] = roi

# Display the output
cv2.imshow('Blur Face', image)
cv2.waitKey(0)
cv2.destroyAllWindows()
輸入影像
將以下影像視為上述示例中使用的輸入影像“**man3.jpg**”。

輸出
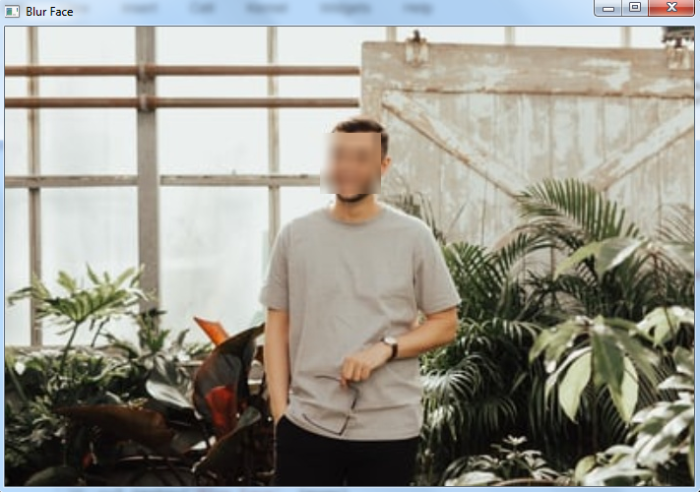
執行後,它將產生以下 **輸出**:
Face detected in the image: 1
並且我們將獲得以下視窗,顯示影像中模糊的面部:
示例
下面的 Python 程式演示瞭如何在輸入影像中模糊面部。
# import required libraries
import cv2

# Read the input image
image = cv2.imread('faces.jpg')

# define haar cascade for face detection
face_cascade =
cv2.CascadeClassifier('haarcascades/haarcascade_frontalface_alt.xml')
faces = face_cascade.detectMultiScale(image, 1.1, 2)
print("Face detected in the image:", len(faces))

# Loop over all the detected faces in the image
for (x, y, w, h) in faces:
   roi = image[y:y+h, x:x+w]

   # apply gaussian blur to face rectangle
   roi = cv2.GaussianBlur(roi, (15, 15), 30)

   # add blurred face on original image to get final image
   image[y:y+roi.shape[0], x:x+roi.shape[1]] = roi

# Display the output
cv2.imshow('Blur Face', image)
cv2.waitKey(0)
cv2.destroyAllWindows()
輸入影像
我們將使用以下影像作為此程式的輸入檔案:

執行後,它將產生以下 **輸出**
Face detected in the image: 15
並且我們將獲得以下視窗,顯示輸入影像中模糊的面部。請注意,所有 15 張面部大小都不同。所有不同的面部都已模糊。

並且我們將獲得以下視窗,顯示輸入影像中模糊的面部。請注意,所有 15 張面部大小都不同。所有不同的面部都已模糊。
**注意** - 為了獲得更好的面部檢測效果,請調整 **detectMultiScale()** 函式中使用的第二個和第三個引數。

2K+ 閱讀量
