- AWT 教程
- AWT - 首頁
- AWT - 概述
- AWT - 環境
- AWT - 控制元件
- AWT - 事件處理
- AWT - 事件類
- AWT - 事件監聽器
- AWT - 事件介面卡
- AWT - 佈局
- AWT - 容器
- AWT - 選單
- AWT - 圖形
- AWT 有用資源
- AWT - 快速指南
- AWT - 有用資源
- AWT - 討論
AWT GridLayout 類
簡介
GridLayout 類將元件排列在矩形網格中。
類宣告
以下是java.awt.GridLayout類的宣告
public class GridLayout
   extends Object
      implements LayoutManager, Serializable
類建構函式
| 序號 | 建構函式 & 描述 |
|---|---|
| 1 | GridLayout() 建立一個網格佈局,預設為每行一個元件,只有一行。 |
| 2 | GridLayout(int rows, int cols) 建立一個具有指定行數和列數的網格佈局。 |
| 3 | GridLayout(int rows, int cols, int hgap, int vgap) 建立一個具有指定行數和列數的網格佈局。 |
類方法
| 序號 | 方法 & 描述 |
|---|---|
| 1 | void addLayoutComponent(String name, Component comp) 將指定名稱的指定元件新增到佈局中。 |
| 2 | int getColumns() 獲取此佈局中的列數。 |
| 3 | int getHgap() 獲取元件之間的水平間距。 |
| 4 | int getRows() 獲取此佈局中的行數。 |
| 5 | int getVgap() 獲取元件之間的垂直間距。 |
| 6 | void layoutContainer(Container parent) 使用此佈局來佈置指定的容器。 |
| 7 | Dimension minimumLayoutSize(Container parent) 使用此網格佈局確定容器引數的最小大小。 |
| 8 | Dimension preferredLayoutSize(Container parent) 使用此網格佈局確定容器引數的首選大小。 |
| 9 | void removeLayoutComponent(Component comp) 從佈局中移除指定的元件。 |
| 10 | void setColumns(int cols) 將此佈局中的列數設定為指定值。 |
| 11 | void setHgap(int hgap) 將元件之間的水平間距設定為指定值。 |
| 12 | void setRows(int rows) 將此佈局中的行數設定為指定值。 |
| 13 | void setVgap(int vgap) 將元件之間的垂直間距設定為指定值。 |
| 14 | String toString() 返回此網格佈局值的字串表示形式。 |
繼承的方法
此類繼承自以下類的方法
java.lang.Object
GridLayout 示例
使用您選擇的任何編輯器建立以下 Java 程式,例如在D:/ > AWT > com > tutorialspoint > gui >
AwtLayoutDemo.javapackage com.tutorialspoint.gui;
import java.awt.*;
import java.awt.event.*;
public class AwtLayoutDemo {
private Frame mainFrame;
private Label headerLabel;
private Label statusLabel;
private Panel controlPanel;
private Label msglabel;
public AwtLayoutDemo(){
prepareGUI();
}
public static void main(String[] args){
AwtLayoutDemo awtLayoutDemo = new AwtLayoutDemo();
awtLayoutDemo.showGridLayoutDemo();
}
private void prepareGUI(){
mainFrame = new Frame("Java AWT Examples");
mainFrame.setSize(400,400);
mainFrame.setLayout(new GridLayout(3, 1));
mainFrame.addWindowListener(new WindowAdapter() {
public void windowClosing(WindowEvent windowEvent){
System.exit(0);
}
});
headerLabel = new Label();
headerLabel.setAlignment(Label.CENTER);
statusLabel = new Label();
statusLabel.setAlignment(Label.CENTER);
statusLabel.setSize(350,100);
msglabel = new Label();
msglabel.setAlignment(Label.CENTER);
msglabel.setText("Welcome to TutorialsPoint AWT Tutorial.");
controlPanel = new Panel();
controlPanel.setLayout(new FlowLayout());
mainFrame.add(headerLabel);
mainFrame.add(controlPanel);
mainFrame.add(statusLabel);
mainFrame.setVisible(true);
}
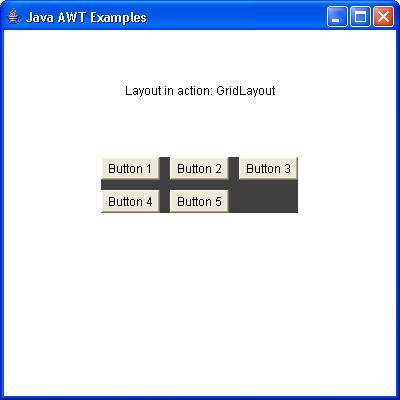
private void showGridLayoutDemo(){
headerLabel.setText("Layout in action: GridLayout");
Panel panel = new Panel();
panel.setBackground(Color.darkGray);
panel.setSize(300,300);
GridLayout layout = new GridLayout(0,3);
layout.setHgap(10);
layout.setVgap(10);
panel.setLayout(layout);
panel.add(new Button("Button 1"));
panel.add(new Button("Button 2"));
panel.add(new Button("Button 3"));
panel.add(new Button("Button 4"));
panel.add(new Button("Button 5"));
controlPanel.add(panel);
mainFrame.setVisible(true);
}
}
使用命令提示符編譯程式。轉到D:/ > AWT 並輸入以下命令。
D:\AWT>javac com\tutorialspoint\gui\AwtlayoutDemo.java
如果沒有錯誤,則表示編譯成功。使用以下命令執行程式。
D:\AWT>java com.tutorialspoint.gui.AwtlayoutDemo
驗證以下輸出