- AWS Lambda 教程
- AWS Lambda - 首頁
- AWS Lambda - 概述
- AWS Lambda - 環境設定
- AWS Lambda - 簡介
- 構建 Lambda 函式
- Node.js 函式
- Java 函式
- Python 函式
- Go 函式
- C# 函式
- 配置 Lambda 函式
- 使用 AWS 控制檯建立和部署
- 使用 AWS CLI 建立和部署
- 使用 Serverless Framework 建立和部署
- AWS 執行和呼叫 Lambda 函式
- 刪除 Lambda 函式
- 使用 Amazon API Gateway
- 帶有 Amazon S3 的 Lambda 函式
- 帶有 Amazon DynamoDB 的 Lambda 函式
- 帶有計劃事件的 Lambda 函式
- 帶有 Amazon SNS 的 Lambda 函式
- 帶有 CloudTrail 的 Lambda 函式
- 帶有 Amazon Kinesis 的 Lambda 函式
- 帶有自定義使用者應用程式的 Lambda 函式
- AWS Lambda@Edge 與 CloudFront
- 使用 CloudWatch 進行監控和故障排除
- AWS Lambda - 附加示例
- AWS Lambda 有用資源
- AWS Lambda - 快速指南
- AWS Lambda - 有用資源
- AWS Lambda - 討論
使用 Serverless Framework 建立和部署
AWS Lambda 可以使用 Serverless Framework 建立和部署。它允許您建立 AWS Lambda 觸發器,並透過建立所需的角色來部署它們。Serverless Framework 能夠更輕鬆地處理大型專案。所需的事件和資源都編寫在一個地方,只需幾個命令即可將完整的功能部署到 AWS 控制檯。
在本節中,您將詳細瞭解如何開始使用 AWS Serverless Framework。
使用 npm install 安裝 Serverless Framework
首先,您需要先安裝 **Node.js**。您可以按照以下步驟檢查 Node.js 是否已安裝:

您需要使用以下命令使用 npm 包安裝 Serverless:
npm install -g serverless

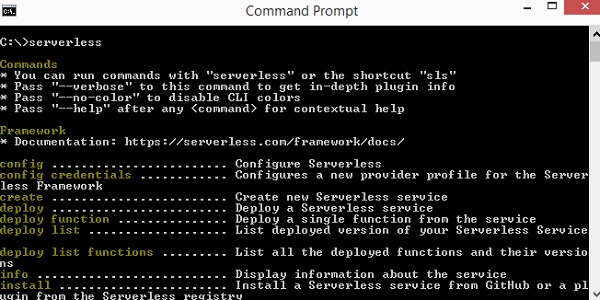
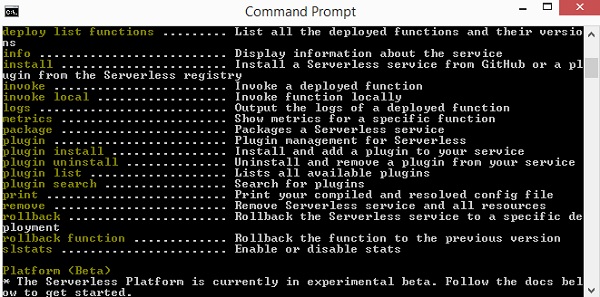
npm 安裝完成後,執行 serverless 命令,該命令將顯示用於建立和部署 AWS Lambda 函式的命令列表。請觀察下面的螢幕截圖:
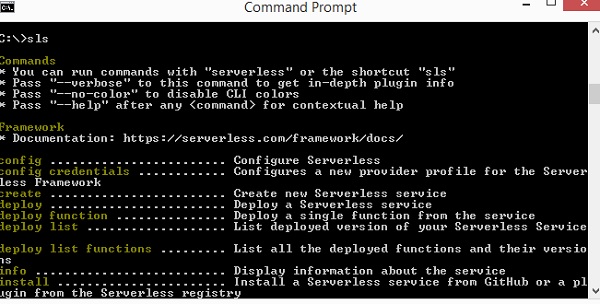
您也可以使用 sls 代替 serverless。**sls** 是 serverless 的簡寫命令。
如果您需要關於 **sls** 命令的幫助,可以使用以下命令:
sls create --help

要建立 Serverless Framework,您需要按照以下步驟操作:
步驟 1
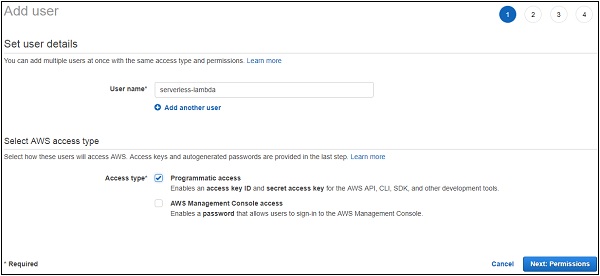
要開始使用 Serverless Framework,我們需要新增憑據。為此,您需要首先在 AWS 控制檯中建立使用者,如下所示:
步驟 2
單擊 **下一步:許可權** 按鈕以新增許可權。您需要為此使用者附加現有策略或管理員訪問許可權。
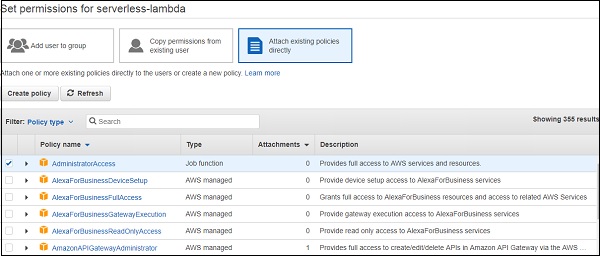

步驟 3
單擊 **建立使用者** 以新增使用者。它將顯示訪問金鑰和金鑰,我們需要使用它們來配置 Serverless Framework:

配置 AWS Serverless Framework
讓我們看看如何配置 AWS Serverless Framework。您可以為此使用以下命令:
sls config credentials --provider aws --key accesskey --secret secretkey

請注意,輸入的憑據詳細資訊(即 **訪問金鑰** 和 **金鑰**)儲存在 **~/aws/credentials** 檔案中。
首先,建立一個資料夾來儲存您的專案檔案。
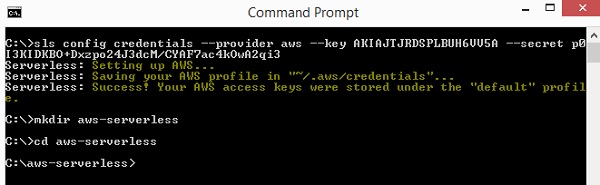
接下來,我們將在 **aws-serverless** 資料夾中開始工作。
使用 Serverless Framework 建立 AWS Lambda
現在,讓我們使用以下步驟使用 Serverless Framework 建立一個 Lambda 函式:
步驟 1
以下是 Serverless **create** 命令的詳細資訊:

步驟 2
現在,我們需要分配模板,如下所示:
AWS-nodejs、aws-nodejs-typescript、aws-nodejs-ecma-script、aws-python、aws-python3、aws-groovy-gradle 等。
步驟 3
我們將使用 **aws-nodejs** 模板使用 Serverless Framework 建立我們的第一個專案。該命令如下所示:
sls create --template aws-nodejs

請注意,此命令會為 aws-nodejs 模板建立一個樣板。
步驟 4
現在,在 IDE 中開啟建立的資料夾。這裡我們使用 Visual Studio Code,資料夾結構如下所示:

步驟 5
建立了 2 個檔案:**handler.js** 和 **serverless.yml**
AWS Lambda 基本函式詳細資訊如下所示在 **handler.js** 中:
'use strict';

module.exports.hello = (event, context, callback) => {
   const response = {
      statusCode: 200,
      body: JSON.stringify({
         message: 'Go Serverless v1.0! Your function executed successfully!',
         input: event,
      }),
   };
   callback(null, response);

   // Use this code if you don't use the http event with the LAMBDA-PROXY integration
   // callback(null, { message: 'Go Serverless v1.0! Your function executed successfully!', event });
};
此檔案 **serverless.yml** 包含 Serverless Framework 的配置詳細資訊,如下所示:
# Welcome to Serverless!
#
# This file is the main config file for your service.
# It's very minimal at this point and uses default values.
# You can always add more config options for more control.
# We've included some commented out config Examples here.
# Just uncomment any of them to get that config option.
#
# For full config options, check the docs:
#    docs.serverless.com
#
# Happy Coding!
service: aws-nodejs # NOTE: update this with your service name

# You can pin your service to only deploy with a specific Serverless version
# Check out our docs for more details
# frameworkVersion: "=X.X.X"

provider:
 name: aws
 runtime: nodejs6.10

# you can overwrite defaults here
#  stage: dev
#  region: us-east-1

# you can add statements to the Lambda function's IAM Role here
#  iamRoleStatements:
#    - Effect: "Allow"
#      Action:
#        - "s3:ListBucket"
#      Resource: { "Fn::Join" : ["", ["arn:aws:s3:::", { "Ref" : "ServerlessDeploymentBucket" } ] ]  }
#    - Effect: "Allow"
#      Action:
#        - "s3:PutObject"
#      Resource:
#        Fn::Join:
#          - ""
#          - - "arn:aws:s3:::"
#            - "Ref" : "ServerlessDeploymentBucket"
#            - "/*"

# you can define service wide environment variables here
#  environment:
#    variable1: value1

# you can add packaging information here
#package:
#  include:
#    - include-me.js
#    - include-me-dir/**
#  exclude:
#    - exclude-me.js
#    - exclude-me-dir/**

functions:
 hello:
   handler: handler.hello

#    The following are a few example events you can configure
#    NOTE: Please make sure to change your handler code to work with those events
#    Check the event documentation for details
#    events:
#      - http:
#          path: users/create
#          method: get
#      - s3: ${env:BUCKET}
#      - schedule: rate(10 minutes)
#      - sns: greeter-topic
#      - stream: arn:aws:dynamodb:region:XXXXXX:table/foo/stream/1970-01-01T00:00:00.000
#      - alexaSkill: amzn1.ask.skill.xx-xx-xx-xx
#      - alexaSmartHome: amzn1.ask.skill.xx-xx-xx-xx
#      - iot:
#          sql: "SELECT * FROM 'some_topic'"
#      - cloudwatchEvent:
#          event:
#            Example:
#              - "aws.ec2"
#            detail-type:
#              - "EC2 Instance State-change Notification"
#            detail:
#              state:
#                - pending
#      - cloudwatchLog: '/aws/lambda/hello'
#      - cognitoUserPool:
#          pool: MyUserPool
#          trigger: PreSignUp

#    Define function environment variables here
#    environment:
#      variable2: value2

# you can add CloudFormation resource templates here
#resources:
#  resources:
#    NewResource:
#      Type: AWS::S3::Bucket
#      Properties:
#        BucketName: my-new-bucket
#  Outputs:
#     NewOutput:
#       Description: "Description for the output"
#       Value: "Some output value"
現在,我們需要根據我們的需求更改 serverless.yml 檔案。您可以使用以下命令:
您可以使用以下命令指定 **服務名稱**:
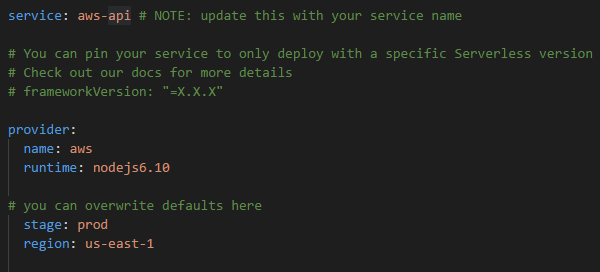
service: aws-nodejs # NOTE: update this with your service name
現在,在此處更改服務名稱,並新增我們資料夾的名稱,如下所示:
service: aws-serverless # NOTE: update this with your service name
提供程式詳細資訊如下所示:
provider:
   name: aws
   runtime: nodejs6.10
提供程式為 **aws**,執行時為 **nodejs6.10**。我們需要新增我們將要工作的 **區域** 和 **階段**,即專案的 **dev 或 prod** 環境。以下是提供程式的更新詳細資訊:
name: aws
runtime: nodejs6.10
# you can overwrite defaults here
stage: prod
region: us-east-1
IAM 角色
**iam 角色**,即與 Lambda 協同工作的許可權程式碼,在此處在 **.yml** 檔案中顯示:
#  iamRoleStatements:
#    - Effect: "Allow"
#      Action:
#        - "s3:ListBucket"
#      Resource: { "Fn::Join" : ["", ["arn:aws:s3:::", { "Ref" : "ServerlessDeploymentBucket" } ] ]  }
#    - Effect: "Allow"
#      Action:
#        - "s3:PutObject"
#      Resource:
#        Fn::Join:
#          - ""
#          - - "arn:aws:s3:::"
#            - "Ref" : "ServerlessDeploymentBucket"
#            - "/*"
請注意,我們需要在上述部分中提供角色的詳細資訊,即與其他 AWS 服務所需的許可權。
AWS Lambda 處理程式詳細資訊
**handler.js** 中匯出的函式名稱為 hello。因此,處理程式是檔名後跟匯出名稱。
functions:
   hello:
      handler: handler.hello
此處顯示新增的關於 s3 服務的資源詳細資訊:
# you can add CloudFormation resource templates here
#resources:
#  resources:
#    NewResource:
#      Type: AWS::S3::Bucket
#      Properties:
#        BucketName: my-new-bucket
#  Outputs:
#     NewOutput:
#       Description: "Description for the output"
#       Value: "Some output value"
使用 Serverless Framework 部署 AWS Lambda
讓我們將上述 Lambda 函式部署到 AWS 控制檯。您可以為此使用以下步驟:
步驟 1
首先,您需要使用以下命令:
sls deploy

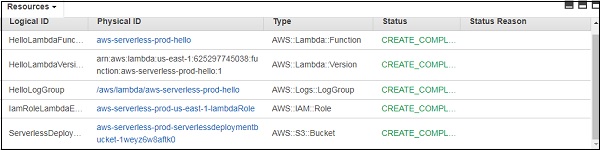
步驟 2
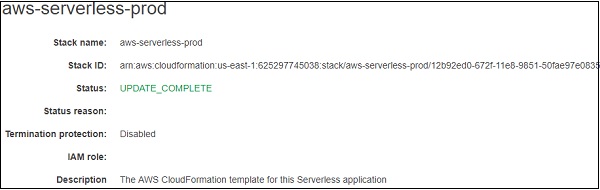
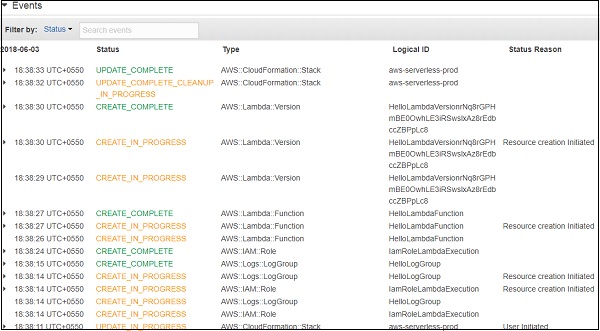
現在,您應該可以在 AWS 控制檯中看到該函式,如下圖所示。Serverless AWS 的詳細資訊記錄在 AWS CloudFormation 中。為此,請轉到 AWS 服務並選擇 **CloudFormation**。AWS Lambda 的詳細資訊如下所示:

請注意,給定的名稱是專案名稱後跟使用的階段。
步驟 3
它建立 AWS Lambda 的 iam 角色和 AWS CloudWatch 的日誌組。建立儲存程式碼詳細資訊和配置詳細資訊的 S3 儲存桶。
這是由命令 **sls deploy** 建立的。您無需指定 iam 角色,而是在 **deploy** 階段預設建立。
步驟 4
事件的詳細流程如下所示在 CloudFormation 服務中。

AWS Lambda 程式碼
AWS Lambda 程式碼及其執行設定如下面的螢幕截圖所示:

當您測試 Lambda 函式時,您可以找到以下輸出:
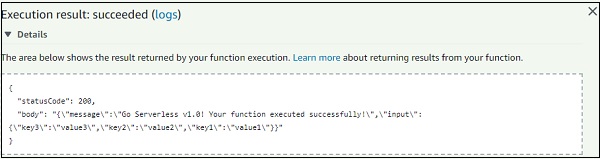

上面函式的日誌輸出如下所示:

我們也可以使用 serverless 命令測試 AWS Lambda 函式,如下所示:
sls invoke --function hello

invoke 命令的語法如下所示:
sls invoke --function hello
此 invoke 命令會觸發 AWS Lambda 函式,並在命令提示符中顯示輸出,如下所示:

您還可以在部署前測試 Lambda 函式,可以使用以下命令:
sls invoke local --function hello
請注意,並不總是可以在本地進行測試,因為 S3 和 DynamoDB 等資源無法在本地環境中模擬。只有基本的函式呼叫可以在本地測試。

使用 API Gateway 和 Serverless Framework 與 AWS Lambda 結合使用
讓我們看看如何建立一個新專案來使用 Lambda 和 API Gateway。您可以為此使用以下命令:
sls create --template aws-nodejs
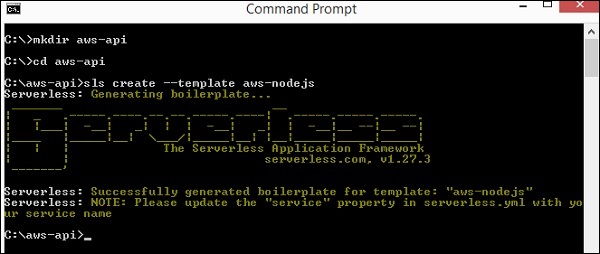
現在,在 Visual Studio Code 中開啟 **aws-api** 專案。您可以看到已建立 **handler.js** 和 **serverless.yml** 檔案。讓我們對其進行更改以新增 API Gateway。

您需要在 **serverless.yml** 中進行以下更改:
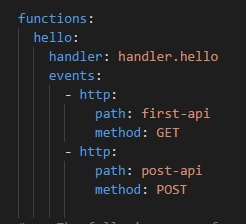
現在,為使用 AWS Lambda 啟用 API Gateway 添加了事件詳細資訊:

這裡添加了一個新內容,稱為 **events**。我們已將事件指定為 **http**,以及其路徑和方法。
路徑是我們建立 API Gateway 路徑時將使用的端點,使用的方法為 GET。
請注意,處理程式是 **handler.hello**,hello 是 handler.js 中的匯出名稱。

請注意,您無需在此處部署 API Gateway,因為 Serverless Framework 將執行此操作。
現在,我們將執行 **sls deploy** 命令來建立將 **API Gateway** 作為觸發器的 AWS Lambda 函式。
sls deploy

請注意,部署詳細資訊列在上面。它提供了帶有端點作為路徑詳細資訊的 **Get** URL。階段為 **prod**,因此在 URL 中使用相同的階段。函式的名稱為 **aws-api-prod-hello**。
讓我們訪問 URL 並檢視輸出。您可以看到我們從 API Gateway GET URL 獲取的響應如下:

{"message":"Go Serverless v1.0! Your function executed
successfully!","input":{"resource":"/first-api","path":"/first-api","httpMethod":
"GET","headers":{"Accept":"text/html,application/xhtml+xml,application/xml;q=0.9,
image/webp,image/apng,*/*;q=0.8","Accept-Encoding":"gzip, deflate, br","Accept-Language":"en-US,en;q=0.9","CloudFront-Forwarded-Proto":
"https","CloudFront-Is-Desktop-Viewer":"true","CloudFront-Is-Mobile-Viewer":
"false","CloudFront-Is-SmartTV-Viewer":"false","CloudFront-Is-Tablet-Viewer":
"false","CloudFront-Viewer-Country":"IN","Host":"nvbhfdojfg.execute-api.us-east-1.
amazonaws.com","upgrade-insecure-requests":"1","User-Agent":"Mozilla/5.0
(Windows NT 6.3; Win64; x64) AppleWebKit/537.36 (KHTML, like Gecko)
 Chrome/66.0.3359.181 Safari/537.36","Via":"2.0 707912794802dbb4825c79b7d8626a5d.cloudfront.net (CloudFront)","X-Amz-Cf-Id":"j70MMqkWFp6kmvuauzp_nvTbI-WwKIQmm2Jl5hzSoN6gkdvX11hh-g==",
 "X-Amzn-Trace-Id":"Root=1-5b13f9ef-5b012e36b7f40b5013a326fc","X-Forwarded-For":"157.33.133.217, 54.182.242.73","X-Forwarded-Port":"443","X-Forwarded-Proto":"https"},
 "queryStringParameters":null,"pathParameters":null,"stageVariables":null,
 "requestContext":{"resourceId":"pes5sy","resourcePath":"/first-api","httpMethod":
 "GET","extendedRequestId":"H6P9fE-MoAMFdIg=","requestTime":"03/Jun/2018:14:23:
 43 +0000","path":"/prod/first-api","accountId":"625297745038","protocol":"HTTP/1.1",
 "stage":"prod","requestTimeEpoch":1528035823928,"requestId":"b865dbd6-6739-11e8-b135
 -a30269a8ec58","identity":{"cognitoIdentityPoolId":null,"accountId":null,
 "cognitoIdentityId":null,"caller":null,"SourceIp":"157.33.133.217","accessKey":null,
 "cognitoAuthenticationType":null,"cognitoAuthenticationProvider":null,"userArn":null,
 "userAgent":"Mozilla/5.0 (Windows NT 6.3; Win64; x64) AppleWebKit/537.36 (KHTML, like
 Gecko) Chrome/66.0.3359.181 Safari/537.36","user":null},"apiId":"nvbhfdojfg"},"body":null,
 "isBase64Encoded":false}}
當您訪問 URL 時,事件詳細資訊也包含在輸出中。httpMethod 為 GET,queryStringParameters 為 null,因為查詢字串中沒有任何內容。事件詳細資訊提供給我們在 AWS Lambda 處理程式中指定的 **input**:

我們從 API Gateway 獲取的輸出只是 **body** 詳細資訊,例如 **message** 和 **input**。響應完全由 API Gateway 控制以及如何將其顯示為輸出。
現在,讓我們將輸入傳遞到查詢字串中的 GET URL 並檢視顯示:

然後您可以看到查詢字串的輸出,如下所示:
{"message":"Go Serverless v1.0! Your function executed
successfully!","input":{"resource":"/first-api","path":"/first-api","httpMethod":
"GET","headers":{"Accept":"text/html,application/xhtml+xml,application/xml;q=0.9,
image/webp,image/apng,*/*;q=0.8","Accept-Encoding":"gzip, deflate,
br","Accept-Language":"en-US,en;q=0.9","CloudFront-Forwarded-Proto":"https",
"CloudFront-Is-Desktop-Viewer":"true","CloudFront-Is-Mobile-Viewer":"false",
"CloudFront-Is-SmartTV-Viewer":"false","CloudFront-Is-Tablet-Viewer":"false",
"CloudFront-Viewer-Country":"IN","Host":"nvbhfdojfg.execute-api.us-east-1.amazonaws.com",
"upgrade-insecure-requests":"1","User-Agent":"Mozilla/5.0 (Windows NT 6.3; Win64; x64)
 AppleWebKit/537.36 (KHTML, like Gecko) Chrome/66.0.3359.181 Safari/537.36","Via":"2.0
 8b1d3263c2fbd0a2c270b174d7aa3d61.cloudfront.net (CloudFront)","X-Amz-Cf-Id":"JIBZw3I-blKbnpHP8LYXPVolCgdW5KmEukZS4at9mi4vrWBMI-UKNw==",
 "X-Amzn-Trace-Id":"Root=1-5b13ff90-7d6e38d4c0e4a5d4e6184f30","X-Forwarded-For":
 "157.33.133.217, 54.182.242.127","X-Forwarded-Port":"443","X-Forwarded-Proto":"https"},"queryString
 Parameters":{"displaymessage":"Hello"},"pathParameters":null,"stageVariables":null,
 "requestContext":{"resourceId":"pes5sy","resourcePath":"/first-api","httpMethod":
 "GET","extendedRequestId":"H6TeiG34oAMFguA=","requestTime":"03/Jun/2018:14:47:44 +0000","path":"/prod/first-api","accountId":"625297745038","protocol":"HTTP/1.1",
"stage":"prod","requestTimeEpoch":1528037264252,"requestId":"12e5dca3-
673d-11e8-8966-69fcf43bd4db","identity":{"cognitoIdentityPoolId":null,"accountId":null,
"cognitoIdentityId":null,"caller":null,"exmpleIp":"157.33.133.217","accessKey":null,
"cognitoAuthenticationType":null,"cognitoAuthenticationProvider":null,"userArn":null,
"userAgent":"Mozilla/5.0 (Windows NT 6.3; Win64; x64) AppleWebKit/537.36 (KHTML, like
 Gecko) Chrome/66.0.3359.181 Safari/537.36","user":null},"apiId":"nvbhfdojfg"},"body":
 null,"isBase64Encoded":false}}
讓我們更改 AWS Lambda 函式以僅顯示查詢字串詳細資訊,如下所示:
'use strict';
module.exports.hello = (event, context, callback) => {
   const response = {
      statusCode: 200,
      body: JSON.stringify({
         message:(event.queryStringParameters &&     event.queryStringParameters.displaymessage!="") ? event.queryStringParameters.displaymessage : 'Go Serverless v1.0! Your function executed successfully!'
      }),
   };
   callback(null, response);
   // Use this code if you don't use the http event with the LAMBDA-PROXY integration
   // callback(null, { message: 'Go Serverless v1.0! Your function executed successfully!', event });
};
請注意,我們已根據查詢字串 **display message** 更改了訊息。這將再次部署函式並檢查輸出。它將顯示查詢字串變數 display message 中的詳細資訊,如下所示。

現在,讓我們將 **post** 方法新增到建立的事件中,如下所示:
現在,部署所做的更改,您可以從 deploy 命令中看到以下輸出:

請注意,直接在瀏覽器中測試 post URL 將不會提供詳細資訊。您應該在 **Postman** 中測試 post URL。
要獲取 Postman,請訪問 https://www.getpostman.com/apps。根據您的作業系統下載應用程式。安裝後,您應該能夠測試您的 post URL,如下所示:
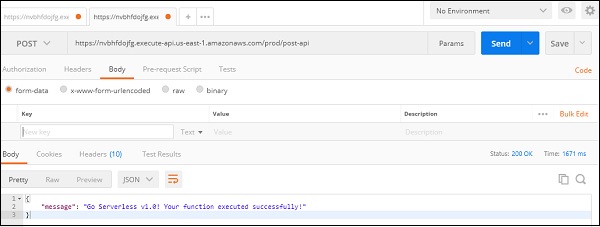
這將顯示我們在 Lambda 函式中新增的訊息。