- Apache Solr 教程
- Apache Solr - 首頁
- Apache Solr - 概述
- Apache Solr - 搜尋引擎基礎
- Apache Solr - Windows 環境
- Apache Solr - 在 Hadoop 上
- Apache Solr - 架構
- Apache Solr - 術語
- Apache Solr - 基本命令
- Apache Solr - Core
- Apache Solr - 資料索引
- Apache Solr - 新增文件 (XML)
- Apache Solr - 更新資料
- Apache Solr - 刪除文件
- Apache Solr - 檢索資料
- Apache Solr - 查詢資料
- Apache Solr - 分面搜尋
- Apache Solr 有用資源
- Apache Solr - 快速指南
- Apache Solr - 有用資源
- Apache Solr - 討論
Apache Solr - 資料索引
一般來說,索引是對文件或(其他實體)進行系統化的排列。索引使使用者能夠在文件中定位資訊。
索引收集、解析和儲存文件。
進行索引是為了提高搜尋查詢的速度和效能,以便找到所需的文件。
Apache Solr 中的索引
在 Apache Solr 中,我們可以索引(新增、刪除、修改)各種文件格式,例如 xml、csv、pdf 等。我們可以透過多種方式將資料新增到 Solr 索引中。
在本章中,我們將討論索引 -
- 使用 Solr Web 介面。
- 使用任何客戶端 API,如 Java、Python 等。
- 使用post 工具。
在本章中,我們將討論如何使用各種介面(命令列、Web 介面和 Java 客戶端 API)將資料新增到 Apache Solr 的索引中。
使用 Post 命令新增文件
Solr 在其bin/目錄中有一個post命令。使用此命令,您可以將 JSON、XML、CSV 等各種格式的檔案索引到 Apache Solr 中。
瀏覽 Apache Solr 的bin目錄並執行 post 命令的–h 選項,如下面的程式碼塊所示。
[Hadoop@localhost bin]$ cd $SOLR_HOME
[Hadoop@localhost bin]$ ./post -h
執行上述命令後,您將獲得post 命令的選項列表,如下所示。
Usage: post -c <collection> [OPTIONS] <files|directories|urls|-d [".."]>
or post –help
   collection name defaults to DEFAULT_SOLR_COLLECTION if not specified
OPTIONS
=======
Solr options:
   -url <base Solr update URL> (overrides collection, host, and port)
   -host <host> (default: localhost)
   -p or -port <port> (default: 8983)
   -commit yes|no (default: yes)

Web crawl options:
   -recursive <depth> (default: 1)
   -delay <seconds> (default: 10)

Directory crawl options:
   -delay <seconds> (default: 0)

stdin/args options:
   -type <content/type> (default: application/xml)

Other options:
   -filetypes <type>[,<type>,...] (default:
   xml,json,jsonl,csv,pdf,doc,docx,ppt,pptx,xls,xlsx,odt,odp,ods,ott,otp,ots,
   rtf,htm,html,txt,log)
   -params "<key> = <value>[&<key> = <value>...]" (values must be
   URL-encoded; these pass through to Solr update request)
   -out yes|no (default: no; yes outputs Solr response to console)
   -format Solr (sends application/json content as Solr commands
   to /update instead of /update/json/docs)

Examples:
* JSON file:./post -c wizbang events.json
* XML files: ./post -c records article*.xml
* CSV file: ./post -c signals LATEST-signals.csv
* Directory of files: ./post -c myfiles ~/Documents
* Web crawl: ./post -c gettingstarted http://lucene.apache.org/Solr -recursive 1 -delay 1
* Standard input (stdin): echo '{commit: {}}' | ./post -c my_collection -
type application/json -out yes –d
* Data as string: ./post -c signals -type text/csv -out yes -d $'id,value\n1,0.47'
示例
假設我們有一個名為sample.csv的檔案,其內容如下(在bin目錄中)。
| 學生 ID | 名字 | 姓氏 | 電話 | 城市 |
|---|---|---|---|---|
| 001 | Rajiv | Reddy | 9848022337 | Hyderabad |
| 002 | Siddharth | Bhattacharya | 9848022338 | Kolkata |
| 003 | Rajesh | Khanna | 9848022339 | Delhi |
| 004 | Preethi | Agarwal | 9848022330 | Pune |
| 005 | Trupthi | Mohanty | 9848022336 | Bhubaneshwar |
| 006 | Archana | Mishra | 9848022335 | Chennai |
以上資料集包含個人詳細資訊,如學生 ID、名字、姓氏、電話和城市。資料集的 CSV 檔案如下所示。這裡,您必須注意,您需要提及架構,並在其中記錄其第一行。
id,    first_name,   last_name,   phone_no,      location
001,   Pruthvi,      Reddy,       9848022337,    Hyderabad
002,   kasyap,       Sastry,      9848022338,    Vishakapatnam
003,   Rajesh,       Khanna,      9848022339,    Delhi
004,   Preethi,      Agarwal,     9848022330,    Pune
005,   Trupthi,      Mohanty,     9848022336,    Bhubaneshwar
006,   Archana,      Mishra,      9848022335,    Chennai
您可以使用以下post命令將此資料索引到名為sample_Solr的 Core 中:
[Hadoop@localhost bin]$ ./post -c Solr_sample sample.csv
執行上述命令後,給定的文件將被索引到指定的 Core 中,並生成以下輸出。
/home/Hadoop/java/bin/java -classpath /home/Hadoop/Solr/dist/Solr-core
6.2.0.jar -Dauto = yes -Dc = Solr_sample -Ddata = files
org.apache.Solr.util.SimplePostTool sample.csv
SimplePostTool version 5.0.0
Posting files to [base] url https://:8983/Solr/Solr_sample/update...
Entering auto mode. File endings considered are
xml,json,jsonl,csv,pdf,doc,docx,ppt,pptx,xls,xlsx,odt,odp,ods,ott,otp,ots,rtf,
htm,html,txt,log
POSTing file sample.csv (text/csv) to [base]
1 files indexed.
COMMITting Solr index changes to
https://:8983/Solr/Solr_sample/update...
Time spent: 0:00:00.228
使用以下 URL 訪問 Solr Web UI 的主頁:
https://:8983/
選擇 Core Solr_sample。預設情況下,請求處理程式為/select,查詢為“:”。無需進行任何修改,點選頁面底部的ExecuteQuery按鈕。
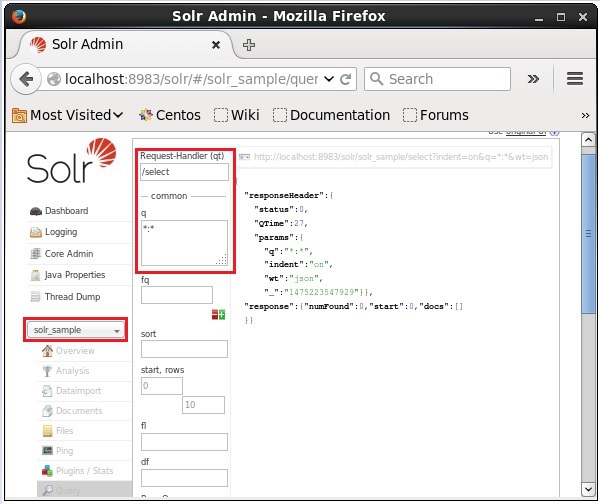
執行查詢後,您可以以 JSON 格式(預設)觀察索引的 CSV 文件的內容,如下面的螢幕截圖所示。

注意 - 同樣,您可以索引其他檔案格式,例如 JSON、XML、CSV 等。
使用 Solr Web 介面新增文件
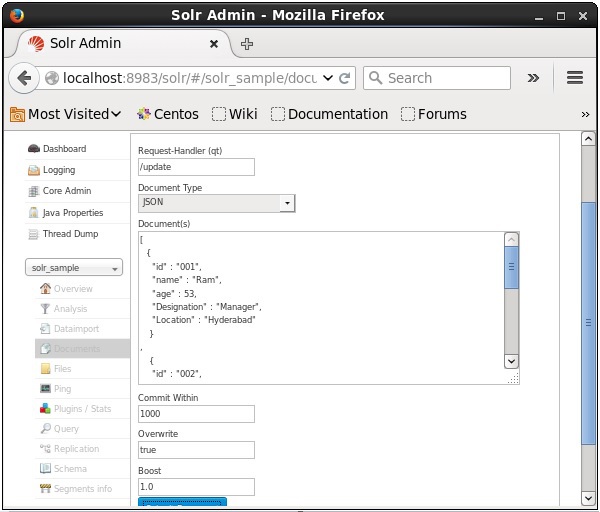
您還可以使用 Solr 提供的 Web 介面索引文件。讓我們看看如何索引以下 JSON 文件。
[
   {
      "id" : "001",
      "name" : "Ram",
      "age" : 53,
      "Designation" : "Manager",
      "Location" : "Hyderabad",
   },
   {
      "id" : "002",
      "name" : "Robert",
      "age" : 43,
      "Designation" : "SR.Programmer",
      "Location" : "Chennai",
   },
   {
      "id" : "003",
      "name" : "Rahim",
      "age" : 25,
      "Designation" : "JR.Programmer",
      "Location" : "Delhi",
   }
]
步驟 1
使用以下 URL 開啟 Solr Web 介面:
https://:8983/
步驟 2
選擇 Core Solr_sample。預設情況下,欄位“請求處理程式”、“常用範圍”、“覆蓋”和“提升”的值分別為 /update、1000、true 和 1.0,如下面的螢幕截圖所示。
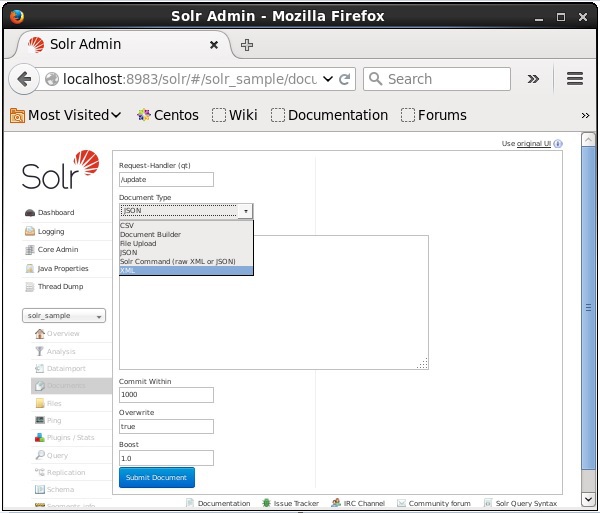
現在,從 JSON、CSV、XML 等中選擇您想要的文件格式。在文字區域中鍵入要索引的文件,然後點選提交文件按鈕,如下面的螢幕截圖所示。
使用 Java 客戶端 API 新增文件
以下是將文件新增到 Apache Solr 索引的 Java 程式。將此程式碼儲存在名為AddingDocument.java的檔案中。
import java.io.IOException;

import org.apache.Solr.client.Solrj.SolrClient;
import org.apache.Solr.client.Solrj.SolrServerException;
import org.apache.Solr.client.Solrj.impl.HttpSolrClient;
import org.apache.Solr.common.SolrInputDocument;

public class AddingDocument {
   public static void main(String args[]) throws Exception {
      //Preparing the Solr client
      String urlString = "https://:8983/Solr/my_core";
      SolrClient Solr = new HttpSolrClient.Builder(urlString).build();

      //Preparing the Solr document
      SolrInputDocument doc = new SolrInputDocument();

      //Adding fields to the document
      doc.addField("id", "003");
      doc.addField("name", "Rajaman");
      doc.addField("age","34");
      doc.addField("addr","vishakapatnam");

      //Adding the document to Solr
      Solr.add(doc);

      //Saving the changes
      Solr.commit();
      System.out.println("Documents added");
   }
}
透過在終端中執行以下命令來編譯上述程式碼:
[Hadoop@localhost bin]$ javac AddingDocument
[Hadoop@localhost bin]$ java AddingDocument
執行上述命令後,您將獲得以下輸出。
Documents added