- Apache Flink 教程
- Apache Flink - 首頁
- Apache Flink - 大資料平臺
- 批處理與即時處理
- Apache Flink - 簡介
- Apache Flink - 架構
- Apache Flink - 系統要求
- Apache Flink - 設定/安裝
- Apache Flink - API 概念
- Apache Flink - Table API 與 SQL
- 建立一個 Flink 應用程式
- Apache Flink - 執行 Flink 程式
- Apache Flink - 庫
- Apache Flink - 機器學習
- Apache Flink - 使用案例
- Apache Flink - Flink 與 Spark 與 Hadoop 對比
- Apache Flink - 結論
- Apache Flink 資源
- Apache Flink - 快速指南
- Apache Flink - 有用資源
- Apache Flink - 討論
Apache Flink - 建立 Flink 應用程式
在本章中,我們將學習如何建立 Flink 應用程式。
開啟 Eclipse IDE,單擊“新建專案”並選擇 Java 專案。

給出專案名稱,然後單擊“完成”。

現在,單擊完成,如下面的螢幕截圖所示。

現在,右鍵單擊src並選擇“新建” >> “類”。

給出類名,然後單擊“完成”。

將下面的程式碼複製並貼上到編輯器中。
import org.apache.flink.api.common.functions.FlatMapFunction;
import org.apache.flink.api.java.DataSet;
import org.apache.flink.api.java.ExecutionEnvironment;
import org.apache.flink.api.java.tuple.Tuple2;
import org.apache.flink.api.java.utils.ParameterTool;
import org.apache.flink.util.Collector;
public class WordCount {

   // *************************************************************************
   // PROGRAM
   // *************************************************************************
   public static void main(String[] args) throws Exception {
      final ParameterTool params = ParameterTool.fromArgs(args);
      // set up the execution environment
      final ExecutionEnvironment env = ExecutionEnvironment.getExecutionEnvironment();
      // make parameters available in the web interface
      env.getConfig().setGlobalJobParameters(params);
      // get input data
      DataSet<String> text = env.readTextFile(params.get("input"));
      DataSet<Tuple2<String, Integer>> counts =
      // split up the lines in pairs (2-tuples) containing: (word,1)
      text.flatMap(new Tokenizer())
      // group by the tuple field "0" and sum up tuple field "1"
      .groupBy(0)
      .sum(1);
      // emit result
      if (params.has("output")) {
         counts.writeAsCsv(params.get("output"), "\n", " ");
         // execute program
         env.execute("WordCount Example");
      } else {
         System.out.println("Printing result to stdout. Use --output to specify output path.");
         counts.print();
      }
   }

   // *************************************************************************
   // USER FUNCTIONS
   // *************************************************************************
   public static final class Tokenizer implements FlatMapFunction<String, Tuple2<String, Integer>> {
      public void flatMap(String value, Collector<Tuple2<String, Integer>> out) {
         // normalize and split the line
         String[] tokens = value.toLowerCase().split("\\W+");
         // emit the pairs
         for (String token : tokens) {
            if (token.length() > 0) {
               out.collect(new Tuple2<>(token, 1));
            }
         }
      }
   }
}
你將在編輯器中遇到很多錯誤,因為需要將 Flink 庫新增到此專案。

右鍵單擊專案 >> 構建路徑 >> 配置構建路徑。

選擇“庫”標籤,然後單擊“新增外部 JAR”。

轉到 Flink 的 lib 目錄,選擇所有 4 個庫,然後單擊“確定”。

轉到“順序和匯出”標籤,選擇所有庫,然後單擊“確定”。

你將看到,錯誤已經消失了。
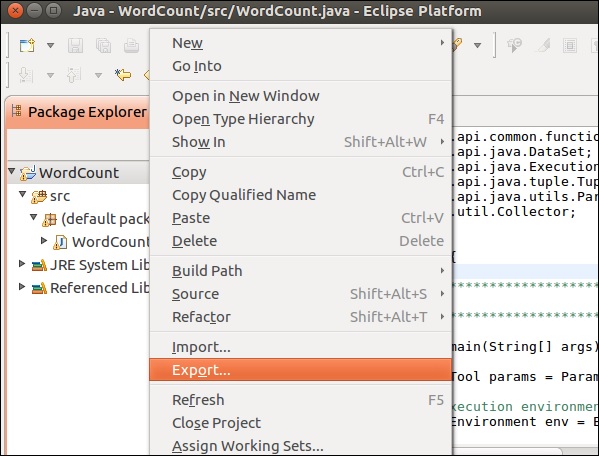
現在,讓我們匯出這個應用程式。右鍵單擊該專案,然後單擊“匯出”。
選擇 JAR 檔案並單擊“下一步”

給出目標路徑並單擊“下一步”

單擊“下一步 >”

單擊“瀏覽”,選擇主要類 (WordCount),然後單擊“完成”。

注意 - 如果出現任何警告,請單擊“確定”。
執行下面的命令。它將進一步執行你剛剛建立的 Flink 應用程式。
./bin/flink run /home/ubuntu/wordcount.jar --input README.txt --output /home/ubuntu/output

廣告