- WCF 教程
- WCF - 首頁
- WCF - 概述
- WCF - 與Web服務的比較
- WCF - 開發人員工具
- WCF - 架構
- WCF - 建立WCF服務
- WCF - 託管WCF服務
- WCF - IIS 託管
- WCF - 自託管
- WCF - WAS 託管
- WCF - Windows 服務託管
- WCF - 使用WCF服務
- WCF - 服務繫結
- WCF - 例項管理
- WCF - 事務
- WCF - RIA 服務
- WCF - 安全性
- WCF - 異常處理
- WCF 資源
- WCF - 快速指南
- WCF - 有用資源
- WCF - 討論
WCF - Windows 服務託管
Windows 服務託管的操作很簡單。以下是解釋該過程的步驟,包括必要的程式碼和螢幕截圖,以簡單易懂的方式進行說明。
步驟 1 − 現在讓我們建立一個 WCF 服務。開啟 Visual Studio 2008 並單擊“新建”→“專案”,然後從模板中選擇“類庫”。
步驟 2 − 向專案新增 System.ServiceModel 引用。這是用於建立 WCF 服務的核心程式集。
步驟 3 − 接下來,我們可以建立 ISimpleCalulator 介面。新增服務和操作契約屬性,如下所示:
using System;
using System.Collections.Generic;
using System.Linq;
using System.Text;
using System.ServiceModel;

namespace WindowsServiceHostedService{
   [ServiceContract]
   public interfaceISimpleCalculator {
      [OperationContract]
      int Add(int num1, int num2);

      [OperationContract]
      int Subtract(int num1, int num2);

      [OperationContract]
      int Multiply(int num1, int num2);

      [OperationContract]
      double Divide(int num1, int num2);
   }
}
步驟 4 − 實現 ISimpleCalculator 介面,如下所示:
using System;
using System.Collections.Generic;
using System.Linq;
using System.Text;

namespace WindowsServiceHostedService {
   Class SimpleCalulator : ISimpleCalculator {
      Public int Add(int num1, int num2) {
         return num1 + num2;
      }
      Public int Subtract(int num1, int num2) {
         return num1 - num2;
      }
      Public int Multiply(int num1, int num2) {
         return num1 * num2;
      }
      Public double Divide(int num1, int num2) {
         if (num2 != 0)
            return num1 / num2;
         else
            return 0;
      }
   }
}
步驟 5 − 構建專案並獲取 dll。現在,我們已經準備好 WCF 服務。我們將瞭解如何在 Windows 服務中託管 WCF 服務。
注意 − 在此專案中,提到我們是在同一個專案中建立契約和服務(實現)。但是,如果將兩者放在不同的專案中,始終是一個好習慣。
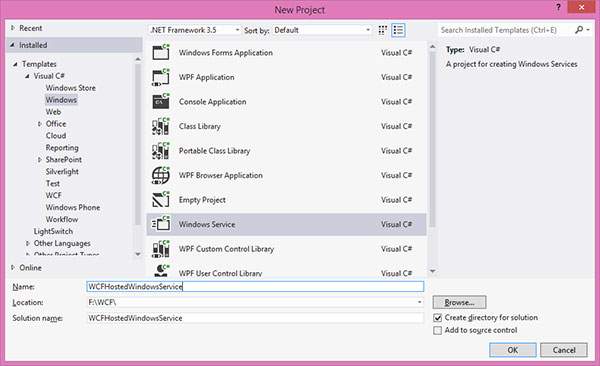
步驟 6 − 開啟 Visual Studio 2008 並單擊“新建”→“專案”,然後選擇“Windows 服務”。
步驟 7 − 將 'WindowsServiceHostedService.dll' 新增為專案的引用。此程式集將充當服務。

步驟 8 − 服務的 OnStart 方法可用於編寫 WCF 的託管程式碼。我們必須確保只使用一個服務主機物件。OnStop 方法用於關閉服務主機。以下程式碼顯示如何在 Windows 服務中託管 WCF 服務。
using System;
using System.Collections.Generic;
using System.ComponentModel;
using System.Data;
using System.Diagnostics;
using System.Linq;
using System.ServiceProcess;
using System.Text;
using System.ServiceModel;
using System.ServiceModel.Description;

namespace WCFHostedWindowsService {
   Partial class WCFHostedWindowsService : ServiceBase {
      ServiceHostm_Host;

      Public WCFHostedWindowsService() {
         InitializeComponent();
      }
      Private void InitializeComponent() {
         thrownewNotImplementedException();
      }
      protectedoverridevoidOnStart(string[] args) {
         if (m_Host != null) {
            m_Host.Close();
         }

         //Create a URI to serve as the base address
         UrihttpUrl = newUri("https://:8090/WindowsServiceHostedService/SimpleCalculator");

         //Create ServiceHost
         m_Host = newServiceHost typeof(WindowsServiceHostedService.SimpleCalulator), httpUrl);

         //Add a service endpoint
         m_Host.AddServiceEndpoint (typeof(WindowsServiceHostedService.ISimpleCalculator), newWSHttpBinding(), "");

         //Enable metadata exchange
         ServiceMetadataBehaviorsmb = newServiceMetadataBehavior();
         smb.HttpGetEnabled = true;
         m_Host.Description.Behaviors.Add(smb);

         //Start the Service
         m_Host.Open();
      }
      protectedoverridevoidOnStop() {
         if (m_Host != null) {
            m_Host.Close();
            m_Host = null;
         }
      }
      staticvoid Main() {
         ServiceBase[] ServicesToRun;
         ServicesToRun = newServiceBase[] {
            newWCFHostedWindowsService();
         }
         ServiceBase.Run(ServicesToRun);
      }
   }
}
步驟 9 − 為了安裝服務,我們需要 Windows 服務的 Installer 類。因此,向專案新增一個新的 Installer 類,該類繼承自 Installer 類。以下程式碼顯示服務的名稱、啟動型別等。
using System;
using System.Collections.Generic;
using System.Text;
using System.ServiceProcess;
using System.Configuration.Install;
using System.ComponentModel;
using System.Configuration;

namespace WCFHostedWindowsService {
   [RunInstaller(true)]
   Public class WinServiceInstaller : Installer {
      Private ServiceProcessInstaller process;
      Private ServiceInstaller service;

      Public WinServiceInstaller() {
         process = newServiceProcessInstaller();
         process.Account = ServiceAccount.NetworkService;
         service = newServiceInstaller();

         service.ServiceName = "WCFHostedWindowsService";
         service.DisplayName = "WCFHostedWindowsService";
         service.Description = "WCF Service Hosted";
         service.StartType = ServiceStartMode.Automatic;

         Installers.Add(process);
         Installers.Add(service);
      }
   }
}
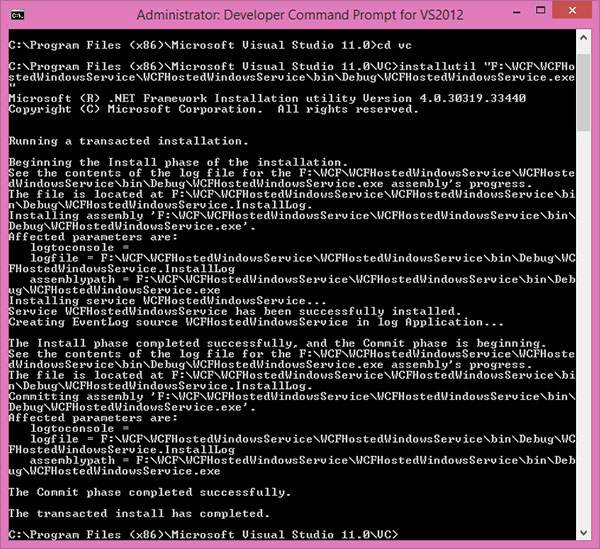
步驟 10 − 構建專案以獲取可執行檔案 WCFHostedWindowsService.exe。接下來,我們需要使用 Visual Studio 命令提示符安裝服務。因此,透過單擊“開始”→“所有程式”→“Microsoft Visual Studio 2008”→“Visual Studio 工具”→“Visual Studio 命令提示符”開啟命令提示符。使用 installutil 實用程式應用程式,您可以安裝服務,如下所示: