- WCF 教程
- WCF - 首頁
- WCF - 概述
- WCF - 與Web服務的比較
- WCF - 開發工具
- WCF - 架構
- WCF - 建立WCF服務
- WCF - 託管WCF服務
- WCS - IIS託管
- WCF - 自託管
- WCF - WAS託管
- WCF - Windows服務託管
- WCF - 使用WCF服務
- WCF - 服務繫結
- WCF - 例項管理
- WCF - 事務
- WCF - RIA服務
- WCF - 安全性
- WCF - 異常處理
- WCF 資源
- WCF 快速指南
- WCF - 有用資源
- WCF - 討論
WCF 快速指南
WCF - 概述
WCF 代表 Windows Communication Foundation(Windows 通訊基礎)。WCF 的基本特性是互操作性。它是 Microsoft 最新的技術之一,用於構建面向服務的應用程式。基於訊息通訊的概念,其中 HTTP 請求以統一的方式表示,WCF 使得無論傳輸機制如何多樣化,都可以擁有統一的 API。
WCF 最初於 2006 年作為 .NET Framework 的一部分隨 Windows Vista 釋出,之後經過多次更新。WCF 4.5 是目前廣泛使用的最新版本。
一個 WCF 應用程式包含三個元件:
- WCF 服務,
- WCF 服務主機,以及
- WCF 服務客戶端。
WCF 平臺也稱為服務模型。
WCF 的基本概念
訊息
這是通訊單元,除了正文外還包含多個部分。訊息例項在客戶端和服務之間所有型別的通訊中都會發送和接收。
端點
它定義了傳送或接收訊息的地址。它還指定通訊機制來描述訊息的傳送方式,以及定義訊息集。端點的結構包含以下部分:
地址
地址指定接收訊息的確切位置,並指定為統一資源識別符號 (URI)。它表示為 scheme://domain[:port]/[path]。請檢視下面提到的地址:
net.tcp://:9000/ServiceA
這裡,“net.tcp”是 TCP 協議的方案。域是“localhost”,可以是機器名稱或 Web 域,路徑是“ServiceA”。
繫結
它定義了端點通訊的方式。它包含一些構成通訊基礎設施的繫結元素。例如,繫結宣告用於傳輸的協議(如 TCP、HTTP 等)、訊息編碼格式以及與安全性和可靠性相關的協議。
契約
它是指定端點向客戶端公開哪些功能的操作集合。它通常包含一個介面名稱。
託管
從 WCF 的角度來看,託管是指 WCF 服務託管,可以透過多種可用選項完成,例如自託管、IIS 託管和 WAS 託管。
元資料
這是 WCF 的一個重要概念,因為它促進了客戶端應用程式和 WCF 服務之間的輕鬆互動。通常,當啟用 WCF 服務的元資料時會自動生成,這是透過檢查服務及其端點來完成的。
WCF 客戶端
為以方法的形式公開服務操作而建立的客戶端應用程式稱為 WCF 客戶端。它可以由任何應用程式託管,甚至可以託管服務的應用程式。
通道
通道是客戶端與服務通訊的媒介。不同型別的通道會堆疊起來,稱為通道堆疊。
SOAP
雖然被稱為“簡單物件訪問協議”,但 SOAP 不是傳輸協議;相反,它是一個包含標題和正文部分的 XML 文件。
WCF 的優點
它與其他服務具有互操作性。這與 .NET Remoting 形成鮮明對比,在 .NET Remoting 中,客戶端和服務都必須具有 .Net。
與 ASMX(活動伺服器方法)Web 服務相比,WCF 服務提供了更高的可靠性和安全性。
在 WCF 中實現安全模型和繫結更改不需要進行重大的程式碼更改。只需進行一些配置更改即可滿足約束條件。
WCF 具有內建的日誌記錄機制,而在其他技術中,必須編寫必要的程式碼。
WCF 集成了 AJAX 並支援 JSON(JavaScript 物件表示法)。
它提供可擴充套件性和對即將推出的 Web 服務標準的支援。
它具有極其強大的預設安全機制。
WCF - 與Web服務的比較
WCF 和 Web 服務之間存在一些主要差異,如下所示。
屬性 - WCF 服務由 ServiceContract 和 OperationContract 屬性定義,而 Web 服務由 WebService 和 WebMethod 屬性定義。
協議 - WCF 支援多種協議,即 HTTP、命名管道、TCP 和 MSMQ,而 Web 服務僅支援 HTTP 協議。
託管機制 - WCF 託管有多種啟用機制,即 IIS(Internet 資訊服務)、WAS(Windows 啟用服務)、自託管和 Windows 服務,但 Web 服務僅由 IIS 託管。
服務 - WCF 支援強大的安全、可信賴的訊息傳遞、事務和互操作性,而 Web 服務僅支援安全服務。
序列化程式 - WCF 透過使用 System.Runtime.Serialization 支援 DataContract 序列化程式,而 Web 服務透過使用 System.Xml.Serialization 支援 XML 序列化程式。
工具 - ServiceMetadata 工具 (svcutil.exe) 用於為 WCF 服務生成客戶端,而 WSDL.EXE 工具用於為 Web 服務生成客戶端。
異常處理 - 在 WCF 中,未處理的異常透過使用 FaultContract 以更好的方式處理。它們不像 Web 服務那樣作為 SOAP 錯誤返回給客戶端。
雜湊表 - 在 WCF 中可以序列化雜湊表,但在 Web 服務中則不行。
繫結 - WCF 支援多種型別的繫結,如 BasicHttpBinding、WSDualHttpBinding、WSHttpBinding 等,而 Web 服務僅支援 SOAP 或 XML。
多執行緒 - WCF 透過使用 ServiceBehavior 類支援多執行緒,而 Web 服務不支援。
雙工服務操作 - WCF 除了支援單向和請求-響應服務操作外,還支援雙工服務操作,而 Web 服務不支援雙工服務操作。
WCF - 開發工具
對於開發 WCF 服務應用程式,主要有兩個工具 - Microsoft Visual Studio 和 CodePlex。Microsoft Visual Studio 是一個完整的開發工具包,用於開發大量不同型別的應用程式,例如 ASP.NET Web 應用程式、桌面應用程式、移動應用程式等等。
Microsoft Visual Studio 使用 .NET Framework 功能。另一方面,CodePlex 是 Microsoft 的一個開源專案託管站點,它提供用於 WCF 服務應用程式開發的多種免費工具。
Microsoft Visual Studio
Microsoft Visual Studio 有很多版本,最初(Visual Studio 2005)它並不熱衷於支援 WCF 開發。目前,Visual Studio 2008 是唯一可用於開發 WCF 服務應用程式的 Microsoft IDE。
如今,最新的 Microsoft Visual Studio 2010 也是開發 WCF 服務應用程式的首選工具。Visual Studio 中還有一個現成的模板用於開發 WCF 服務應用程式。
選擇此類模板會導致新增以下用途的檔案:
- 服務契約
- 服務實現
- 服務配置
必要的屬性會自動新增,並且 Microsoft Visual Studio 甚至無需編寫任何程式碼即可建立一個簡單的“Hello World”服務。
CodePlex
CodePlex 於 2006 年 6 月由 Microsoft 推出,從那時起,它已被全球眾多開發者用於成功建立 .NET 專案。CodePlex 提供的一些用於開發 WCF 服務應用程式的工具如下:
wscf.blue - 這是一個 Microsoft Visual Studio 外掛,也是一個“契約優先”開發工具集,它有助於定義 WCF 服務操作並相應地生成程式碼框架。相應的連結為:https://wscfblue.codeplex.com
WCFProxyGenerator - 這也是一個 Microsoft Visual Studio 外掛。該工具用於擴充套件客戶端生成並提供額外的錯誤處理。有關此特定開發工具的更多資訊,請訪問 https://wcfproxygenerator.codeplex.com
WCFMock - 測試 WCF 服務可能是一項複雜的任務,而此開發工具透過其有用的類為 WCF 服務的單元測試提供了一種便捷的解決方案。有關此工具的更多資訊,請訪問 https://wcfmock.codeplex.com
另一個用於輕鬆開發 WCF 服務應用程式的免費工具是 WCFStorm。它的精簡版提供了許多引人注目的功能,用於動態呼叫和測試 WCF 服務、編輯服務繫結、修改 WCF URL 端點等。
WCF - 架構
WCF 具有分層架構,為開發各種分散式應用程式提供了充足的支援。下面詳細解釋該架構。
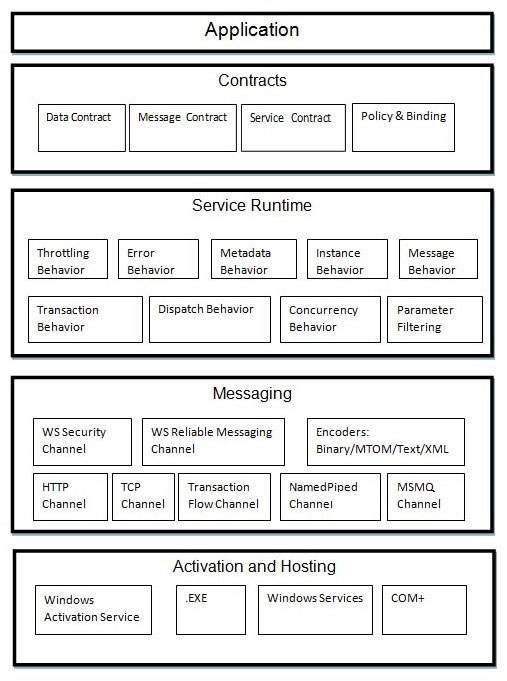
契約
契約層緊鄰應用程式層,包含類似於現實世界契約的資訊,該資訊指定服務的執行方式以及它將提供哪些可訪問的資訊。契約基本上有四種類型,下面簡要討論:
服務契約 - 此契約向客戶端以及外部世界提供有關端點提供的服務以及通訊過程中使用的協議的資訊。
資料契約 - 服務交換的資料由資料契約定義。客戶端和服務都必須與資料契約一致。
訊息契約 - 訊息契約控制資料契約。它主要自定義 SOAP 訊息引數的型別格式。這裡應該提到,WCF 使用 SOAP 格式進行通訊。SOAP 代表簡單物件訪問協議。
策略和繫結 - 與服務通訊存在某些前提條件,這些條件由策略和繫結契約定義。客戶端需要遵循此契約。
服務執行時
服務執行時層位於契約層下方。它指定執行時發生的各種服務行為。許多型別的行為都可以進行配置,並屬於服務執行時。
限流行為 - 管理處理的訊息數量。
錯誤行為 - 定義任何內部服務錯誤發生的的結果。
元資料行為 - 指定元資料對外部世界的可用性。
例項行為 - 定義需要建立多少例項才能使其可用於客戶端。
事務行為 - 在發生任何故障時啟用事務狀態的更改。
排程行為 - 控制 WCF 基礎結構如何處理訊息。
併發行為 - 控制在客戶端-伺服器通訊期間並行執行的功能。
引數過濾 - 提供在呼叫方法之前驗證方法引數的過程。
訊息傳遞
這一層由多個通道組成,主要處理兩個端點之間通訊的訊息內容。一組通道構成一個通道堆疊,構成通道堆疊的兩種主要通道型別如下:
傳輸通道 − 這些通道位於堆疊底部,負責使用 HTTP、TCP、點對點、命名管道和 MSMQ 等傳輸協議傳送和接收訊息。
協議通道 − 這些通道位於堆疊頂部,也稱為分層通道,透過修改訊息來實現線級協議。
啟用和託管
WCF 架構的最後一層是實際託管服務或可執行服務以方便客戶端訪問的地方。這可以透過下面簡要討論的各種機制來完成。
IIS − IIS 代表 Internet Information Service(網際網路資訊服務)。它透過服務使用 HTTP 協議提供多種優勢。在這裡,不需要主機程式碼來啟用服務程式碼;服務程式碼會自動啟用。
Windows 啟用服務 − 這通常稱為 WAS,隨 IIS 7.0 一起提供。這裡可以使用 TCP 或命名管道協議進行基於 HTTP 和非 HTTP 的通訊。
自託管 − 這是一種機制,WCF 服務可以作為控制檯應用程式進行自託管。這種機制在選擇所需的協議和設定自己的定址方案方面提供了驚人的靈活性。
Windows 服務 − 使用這種機制託管 WCF 服務是有利的,因為由於沒有執行時啟用,服務將保持啟用狀態並可供客戶端訪問。
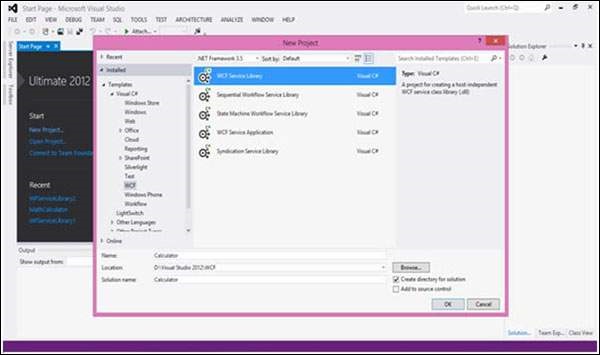
WCF - 建立WCF服務
使用 Microsoft Visual Studio 2012 建立 WCF 服務是一項簡單的任務。下面是建立 WCF 服務以及所有必要程式碼的分步方法,以便更好地理解概念。
- 啟動 Visual Studio 2012。
- 單擊“新建專案”,然後在 Visual C# 選項卡中,選擇 WCF 選項。
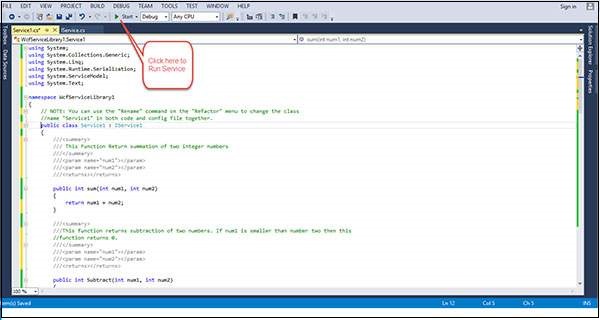
建立了一個執行基本算術運算(如加法、減法、乘法和除法)的 WCF 服務。主要程式碼位於兩個不同的檔案中——一個介面檔案和一個類檔案。
一個 WCF 包含一個或多個介面及其實現類。
using System;
using System.Collections.Generic;
using System.Linq;
using System.Runtime.Serialization;
using System.ServiceModel;
using System.Text;

namespace WcfServiceLibrary1 {
   // NOTE: You can use the "Rename" command on the "Refactor" menu to
   // change the interface name "IService1" in both code and config file
   // together.

   [ServiceContract]
   Public interface IService1 {
      [OperationContract]
      int sum(int num1, int num2);

      [OperationContract]
      int Subtract(int num1, int num2);

      [OperationContract]
      int Multiply(int num1, int num2);

      [OperationContract]
      int Divide(int num1, int num2);
   }

   // Use a data contract as illustrated in the sample below to add
   // composite types to service operations.

   [DataContract]
   Public class CompositeType {
      Bool boolValue = true;
      String stringValue = "Hello ";

      [DataMember]
      Public bool BoolValue {
         get { return boolValue; }
         set { boolValue = value; }
      }

      [DataMember]
      Public string StringValue {
         get { return stringValue; }
         set { stringValue = value; }
      }
   }
}
其類背後的程式碼如下所示。
using System;
usingSystem.Collections.Generic;
usingSystem.Linq;
usingSystem.Runtime.Serialization;
usingSystem.ServiceModel;
usingSystem.Text;

namespace WcfServiceLibrary1 {
   // NOTE: You can use the "Rename" command on the "Refactor" menu to
   // change the class name "Service1" in both code and config file
   // together.

   publicclassService1 :IService1 {
      // This Function Returns summation of two integer numbers

      publicint sum(int num1, int num2) {
         return num1 + num2;
      }

      // This function returns subtraction of two numbers.
      // If num1 is smaller than number two then this function returns 0

      publicint Subtract(int num1, int num2) {
         if (num1 > num2) {
            return num1 - num2;
         }
         else {
            return 0;
         }
      }

      // This function returns multiplication of two integer numbers.
      publicint Multiply(int num1, int num2) {
         return num1 * num2;
      }

      // This function returns integer value of two integer number.
      // If num2 is 0 then this function returns 1.
      publicint Divide(int num1, int num2) {
         if (num2 != 0) {
            return (num1 / num2);
         } else {
            return 1;
         }
      }
   }
}
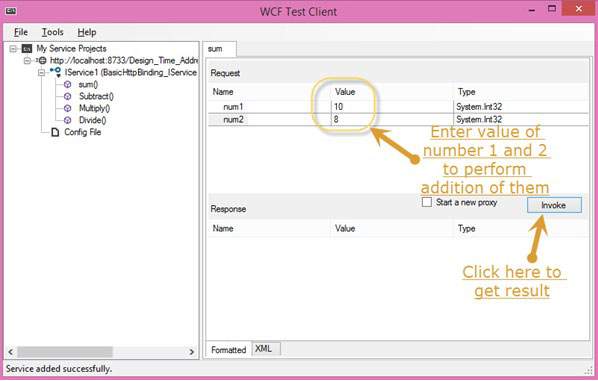
要執行此服務,請單擊 Visual Studio 中的“啟動”按鈕。
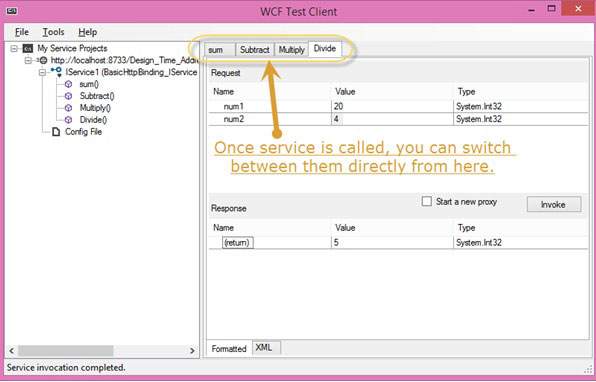
執行此服務時,將出現以下螢幕。
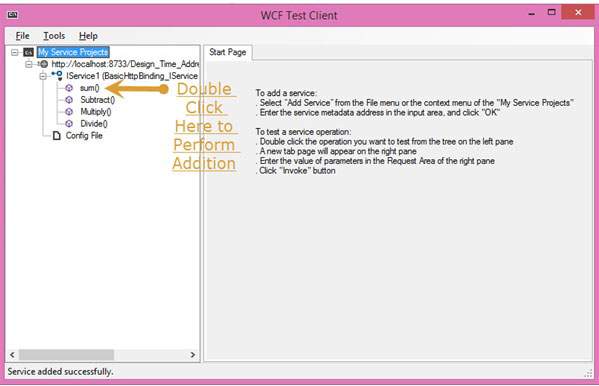
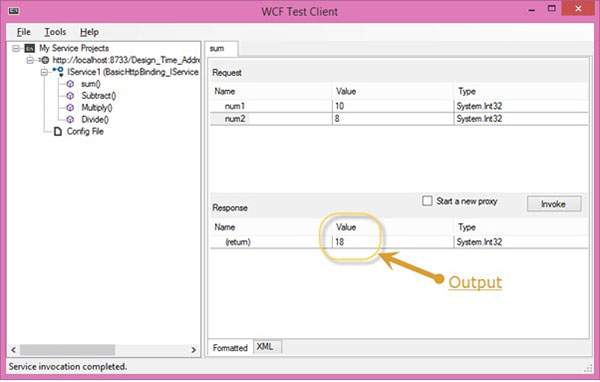
單擊求和方法後,將開啟以下頁面。在這裡,您可以輸入任意兩個整數,然後單擊“呼叫”按鈕。服務將返回這兩個數字的總和。
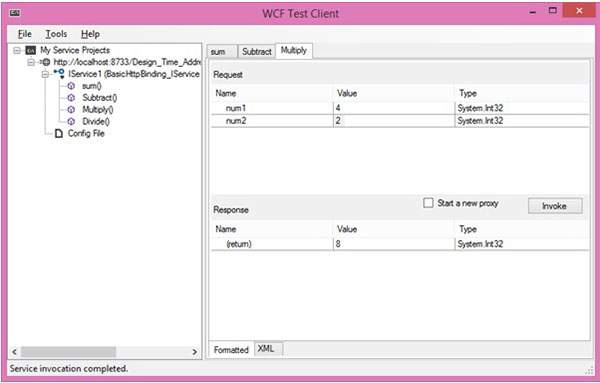
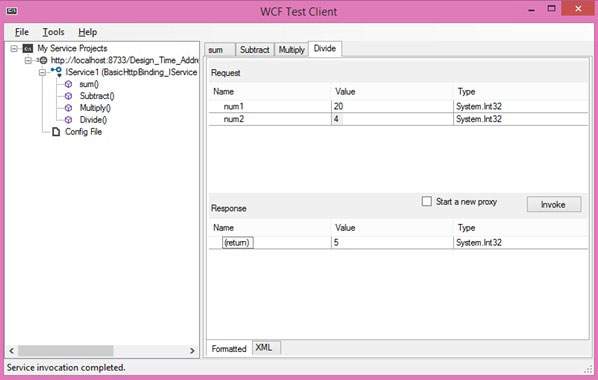
像求和一樣,我們可以執行選單中列出的所有其他算術運算。以下是它們的截圖。
單擊“減法”方法後,將出現以下頁面。輸入整數,單擊“呼叫”按鈕,然後獲取此處顯示的輸出:

單擊“乘法”方法後,將出現以下頁面。輸入整數,單擊“呼叫”按鈕,然後獲取此處顯示的輸出:
單擊“除法”方法後,將出現以下頁面。輸入整數,單擊“呼叫”按鈕,然後獲取此處顯示的輸出:
呼叫服務後,您可以直接從此處在它們之間切換。
WCF - 託管WCF服務
建立 WCF 服務後,下一步是託管它,以便客戶端應用程式可以使用它。這稱為 WCF 服務託管。可以使用以下四種方法中的任何一種來託管 WCF 服務:
IIS 託管 − IIS 代表 Internet Information Services(網際網路資訊服務)。它在託管 WCF 服務時的工作模型類似於 ASP.NET。IIS 託管的最佳功能是服務啟用會自動處理。IIS 託管還提供程序執行狀況監控、空閒關閉、程序回收以及許多其他功能,以促進 WCF 服務託管。
自託管 − 當 WCF 服務託管在託管應用程式中時,稱為自託管。它要求開發人員編寫必要的 ServiceHost 初始化程式碼。在自託管中,WCF 服務可以託管在各種應用程式中,例如控制檯應用程式、Windows 窗體等。
WAS 託管 − 在 Windows 啟用服務 (WAS) 中託管 WCF 服務最有利,因為它具有程序回收、空閒時間管理、公共配置系統以及對 HTTP、TCP 等的支援。
Windows 服務託管 − 對於本地系統客戶端,最好將 WCF 服務作為視窗服務託管,這稱為 Windows 服務託管。所有版本的 Windows 都支援這種型別的託管,並且在這裡,服務控制管理器可以控制 WCF 服務的程序生命週期。
WCF - IIS 託管
在 IIS(網際網路資訊服務)中託管 WCF 服務是一個分步過程。下面將詳細說明 IIS 託管,並提供所需的程式碼和螢幕截圖以瞭解該過程。
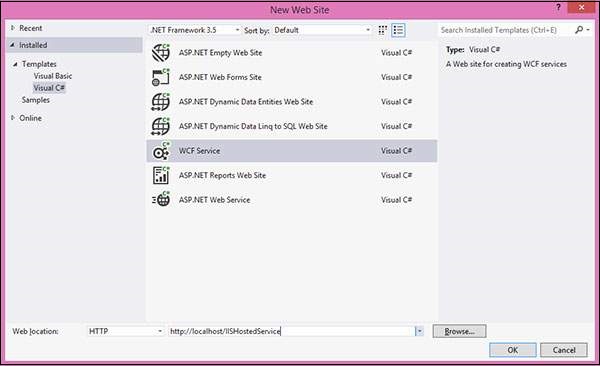
步驟 1 − 啟動 Visual Studio 2012 並單擊“檔案”→“新建”→“網站”。選擇“WCF 服務”並將位置設定為 http。這將在 IIS 中託管服務。單擊“確定”。
步驟 2 − 介面背後的程式碼如下所示。
using System;
using System.Collections.Generic;
using System.Linq;
using System.Runtime.Serialization;
using System.ServiceModel;
using System.ServiceModel.Web;
using System.Text;

// NOTE: You can use the "Rename" command on the "Refactor" menu to
// change the interface name "IService" in both code and config file
// together.

[ServiceContract]
Public interface IService {
   [OperationContract]
   String GetData(int value);

   [OperationContract]
   CompositeType GetDataUsingDataContract(CompositeType composite);

   // TODO: Add your service operations here
}

// Use a data contract as illustrated in the sample below to add
// composite types to service operations.

[DataContract]
Public class CompositeType {
   Bool boolValue = true;
   String stringValue = "Hello ";

   [DataMember]
   Public bool BoolValue {
      get { return boolValue; }
      set { boolValue = value; }
   }

   [DataMember]
   Public string StringValue {
      get { return stringValue; }
      set { stringValue = value; }
   }
}
步驟 3 − 類檔案背後的程式碼如下所示。
using System;
using System.Collections.Generic;
using System.Linq;
using System.Runtime.Serialization;
using System.ServiceModel;
using System.ServiceModel.Web;
using System.Text;

// NOTE: You can use the "Rename" command on the "Refactor" menu to
// change the class name "Service" in code, svc and config file
// together.

Public class Service : IService {
   Public string GetData(int value) {
      Return string.Format("You entered: {0}", value);
   }

   Public CompositeType GetDataUsingDataContract(CompositeType composite) {
      if(composite == null) {
         thrownewArgumentNullException("composite");
      }

      if(composite.BoolValue) {
         composite.StringValue += "Suffix";
      }
      return composite;
   }
}
步驟 4 − 服務檔案 (.svc) 包含服務名稱和檔案背後的程式碼名稱。此檔案用於瞭解服務。

<%@ ServiceHost Language = "C#" Debug = "true" Service = "Service"
   CodeBehind = "~/App_Code/Service.cs" %>
步驟 5 − 伺服器端配置在配置檔案中提及。這裡只提到了一個配置為“wsHttpBinding”的端點;我們還可以擁有具有不同繫結的多個端點。由於我們將託管在 IIS 中,因此我們只能使用 http 繫結。
<?xml version = "1.0"?>
<configuration>
   <!--
      Note: As an alternative to hand editing this file you can use the
         web admin tool to configure settings for your application. Use
         the Website->Asp.Net Configuration option in Visual Studio.
         A full list of settings and comments can be found in
         machine.config.comments usually located in
         \Windows\Microsoft.Net\Framework\vx.x\Config
   -->
   <configSections>
      <sectionGroup name = "system.web.extensions"
         ype = "System.Web.Configuration.SystemWebExtensionsSectionGroup,
         System.Web.Extensions, Version = 3.5.0.0, Culture = neutral,
         PublicKeyToken = 31BF3856AD364E35">

         <sectionGroup name = "scripting"
            type = "System.Web.Configuration.ScriptingSectionGroup,
            System.Web.Extensions, Version = 3.5.0.0, Culture = neutral,
            PublicKeyToken = 31BF3856AD364E35">

            <section name = "scriptResourceHandler"
               type = "System.Web.Configuration.ScriptingScriptResourceHandlerSection,
               System.Web.Extensions, Version = 3.5.0.0,
               Culture = neutral, PublicKeyToken = 31BF3856AD364E35"
               requirePermission = "false"
               allowDefinition = "MachineToApplication"/>

            <sectionGroup name = "webServices"
               type = "System.Web.Configuration.ScriptingWebServicesSectionGroup,
               System.Web.Extensions, Version = 3.5.0.0,
               Culture = neutral, PublicKeyToken = 31BF3856AD364E35">

               <section name = "jsonSerialization"
                  type = "System.Web.Configuration.ScriptingJsonSerializationSection,
                  System.Web.Extensions, Version = 3.5.0.0,
                  Culture = neutral, PublicKeyToken = 31BF3856AD364E35"
                  requirePermission = "false" allowDefinition = "Everywhere"/>

               <section name = "profileService"
                  type = "System.Web.Configuration.ScriptingProfileServiceSection,
                  System.Web.Extensions, Version = 3.5.0.0,
                  Culture = neutral, PublicKeyToken = 31BF3856AD364E35"
                  requirePermission = "false"
                  allowDefinition = "MachineToApplication"/>

               <section name = "authenticationService"
                  type = "System.Web.Configuration.ScriptingAuthenticationServiceSection,
                  System.Web.Extensions, Version = 3.5.0.0,
                  Culture = neutral, PublicKeyToken = 31BF3856AD364E35"
                  requirePermission = "false"
                  allowDefinition = "MachineToApplication"/>

               <section name = "roleService"
                  type = "System.Web.Configuration.ScriptingRoleServiceSection,
                  System.Web.Extensions, Version = 3.5.0.0,
                  Culture = neutral, PublicKeyToken = 31BF3856AD364E35"
                  requirePermission = "false"
                  allowDefinition = "MachineToApplication"/>

            </sectionGroup>
         </sectionGroup>
      </sectionGroup>
   </configSections>

<appSettings/>
   <connectionStrings/>
   <system.web>
      <!--
         Set compilation debug="true" to insert debugging
         symbols into the compiled page. Because this
         affects performance, set this value to true only
         during development.
      -->

      <compilation debug = "true">
         <assemblies>

            <add assembly = "System.Core, Version = 3.5.0.0, Culture = neutral,
               PublicKeyToken = B77A5C561934E089"/>

            <add assembly = "System.Web.Extensions, Version = 3.5.0.0,
               Culture = neutral, PublicKeyToken = 31BF3856AD364E35"/>

            <add assembly = "System.Data.DataSetExtensions, Version = 3.5.0.0,
               Culture = neutral, PublicKeyToken = B77A5C561934E089"/>

            <add assembly = "System.Web.Extensions, Version = 3.5.0.0,
               Culture = neutral, PublicKeyToken = 31BF3856AD364E35"/>

            <add assembly = "System.Xml.Linq, Version = 3.5.0.0, Culture = neutral,
               PublicKeyToken = B77A5C561934E089"/>

         </assemblies>
      </compilation>

         <!--
            The <authentication> section enables configuration
            of the security authentication mode used by
            ASP.NET to identify an incoming user.
         -->

      <authentication mode="Windows"/>
         <!--
            The <customErrors> section enables configuration
            of what to do if/when an unhandled error occurs
            during the execution of a request. Specifically,
            it enables developers to configure html error pages
            to be displayed in place of a error stack trace.

            <customErrors mode = "RemoteOnly" defaultRedirect = "GenericErrorPage.htm">
               <error statusCode = "403" redirect = "NoAccess.htm" />
               <error statusCode = "404" redirect = "FileNotFound.htm" />
            </customErrors>
         -->

         <pages>
            <controls>
               <add tagPrefix = "asp" namespace = "System.Web.UI"
                  assembly = "System.Web.Extensions, Version = 3.5.0.0,
                  Culture = neutral, PublicKeyToken = 31BF3856AD364E35"/>

               <add tagPrefix = "asp" namespace = "System.Web.UI.WebControls"
                  assembly = "System.Web.Extensions, Version = 3.5.0.0,
                  Culture = neutral, PublicKeyToken = 31BF3856AD364E35"/>

            </controls>
         </pages>

         <httpHandlers>
            <remove verb = "*" path = "*.asmx"/>

            <add verb = "*" path = "*.asmx" validate = "false"
               type = "System.Web.Script.Services.ScriptHandlerFactory,
               System.Web.Extensions, Version = 3.5.0.0, Culture = neutral,
               PublicKeyToken = 31BF3856AD364E35"/>

            <add verb = "*" path = "*_AppService.axd" validate = "false"
               type = "System.Web.Script.Services.ScriptHandlerFactory,
               System.Web.Extensions, Version = 3.5.0.0, Culture = neutral,
               PublicKeyToken = 31BF3856AD364E35"/>

            <add verb = "GET,HEAD" path = "ScriptResource.axd"
               type = "System.Web.Handlers.ScriptResourceHandler,
               System.Web.Extensions, Version = 3.5.0.0, Culture = neutral,
               PublicKeyToken = 31BF3856AD364E35" validate = "false"/>
         </httpHandlers>

         <httpModules>
            <add name = "ScriptModule"
               type = "System.Web.Handlers.ScriptModule,
               System.Web.Extensions, Version = 3.5.0.0, Culture = neutral,
               PublicKeyToken = 31BF3856AD364E35"/>
         </httpModules>
   </system.web>

   <system.codedom>
      <compilers>

         <compiler language = "c#;cs;csharp" extension = ".cs"
            warningLevel = "4" type = "Microsoft.CSharp.CSharpCodeProvider,
            System, Version = 2.0.0.0, Culture = neutral,
            PublicKeyToken = b77a5c561934e089">

            <providerOption name = "CompilerVersion" value = "v3.5"/>
            <providerOption name = "WarnAsError" value = "false"/>

         </compiler>

         <compiler language = "vb;vbs;visualbasic;vbscript" extension = ".vb"
            warningLevel = "4" type = "Microsoft.VisualBasic.VBCodeProvider,
            System, Version = 2.0.0.0, Culture = neutral,
            PublicKeyToken = b77a5c561934e089">

            <providerOption name = "CompilerVersion" value = "v3.5"/>
            <providerOption name = "OptionInfer" value = "true"/>
            <providerOption name = "WarnAsError" value = "false"/>

         </compiler>
      </compilers>

   </system.codedom>
   <!--
      The system.webServer section is required for running ASP.NET AJAX
      under Internet Information Services 7.0.
      It is not necessary for previous version of IIS.
   -->
   <system.webServer>
      <validation validateIntegratedModeConfiguration="false"/>

      <modules>
         <remove name = "ScriptModule"/>
         <add name = "ScriptModule" preCondition = "managedHandler"
            type = "System.Web.Handlers.ScriptModule,
            System.Web.Extensions, Version = 3.5.0.0, Culture = neutral,
            PublicKeyToken = 31BF3856AD364E35"/>
      </modules>

      <handlers>
         <remove name = "WebServiceHandlerFactory-Integrated"/>
         <remove name = "ScriptHandlerFactory"/>
         <remove name = "ScriptHandlerFactoryAppServices"/>
         <remove name = "ScriptResource"/>

         <add name = "ScriptHandlerFactory" verb = "*" path = "*.asmx"
            preCondition = "integratedMode"
            type = "System.Web.Script.Services.ScriptHandlerFactory,
            System.Web.Extensions, Version = 3.5.0.0, Culture = neutral,
            PublicKeyToken = 31BF3856AD364E35"/>

         <add name = "ScriptHandlerFactoryAppServices"
            verb = "*" path = "*_AppService.axd" preCondition = "integratedMode"
            type = "System.Web.Script.Services.ScriptHandlerFactory,
            System.Web.Extensions, Version = 3.5.0.0, Culture = neutral,
            PublicKeyToken = 31BF3856AD364E35"/>

         <add name = "ScriptResource" preCondition = "integratedMode"
            verb = "GET,HEAD" path = "ScriptResource.axd"
            type = "System.Web.Handlers.ScriptResourceHandler,
            System.Web.Extensions, Version = 3.5.0.0, Culture = neutral,
            PublicKeyToken = 31BF3856AD364E35"/>
      </handlers>

      <!--To browse web app root directory during debugging,
         set the value below to true. Set to false before deployment to
         avoid disclosing web app folder information.-->

      <directoryBrowse enabled = "true"/>
   </system.webServer>

   <runtime>
      <assemblyBinding appliesTo = "v2.0.05727" xmlns =" urn:schemas-microsoft-com:asm.v1">

         <dependentAssembly>
            <assemblyIdentity name = "System.Web.Extensions" publicKeyToken = "31bf3856ad364e35"/>
            <bindingRedirect oldVersion = "1.0.0.0-1.1.0.0" newVersion = "3.5.0.0"/>
         </dependentAssembly>

         <dependentAssembly>
            <assemblyIdentity name = "System.Web.Extensions.Design" publicKeyToken =" 31bf3856ad364e35"/>
            <bindingRedirect oldVersion = "1.0.0.0-1.1.0.0" newVersion = "3.5.0.0"/>
         </dependentAssembly>

      </assemblyBinding>
   </runtime>

   <system.serviceModel>
      <services>
         <service name = "Service" behaviorConfiguration = "ServiceBehavior">
         <!-- Service Endpoints -->
            <endpoint address = "" binding = "basicHttpBinding" contract = "IService">
               <!--
                  Upon deployment, the following identity element should be removed or replaced
                  to reflect the identity under which the deployed service runs. If removed,
                  WCF will infer an appropriate identity automatically.
               -->

               <identity>
                  <dns value="localhost"/>
               </identity>

            </endpoint>
            <endpoint address = "mex" binding = "mexHttpBinding" contract = "IMetadataExchange"/>

         </service>
      </services>

      <behaviors>
         <serviceBehaviors>
            <behavior name = "ServiceBehavior">
               <!-- To avoid disclosing metadata information, set the value below
                  to false before deployment -->

               <serviceMetadata httpGetEnabled = "true"/>

               <!-- To receive exception details in faults for debugging purposes,
                  set the value below to true.
                  Set to false before deployment to false avoid
                  disclosing exception information -->

               <serviceDebug includeExceptionDetailInFaults = "false"/>
            </behavior>
         </serviceBehaviors>
      </behaviors>

   </system.serviceModel>
</configuration>
步驟 6 − 您需要提及服務檔名以及配置檔案中提到的地址。IIS 的螢幕截圖如下所示。
單擊“開始”→“執行”→“inetmgr”,將開啟以下視窗。

步驟 7 − 執行應用程式將生成以下螢幕。

WCF - 自託管
在這裡,WCF 服務託管在控制檯應用程式中。下面是按順序說明整個過程的步驟和適當步驟的過程。
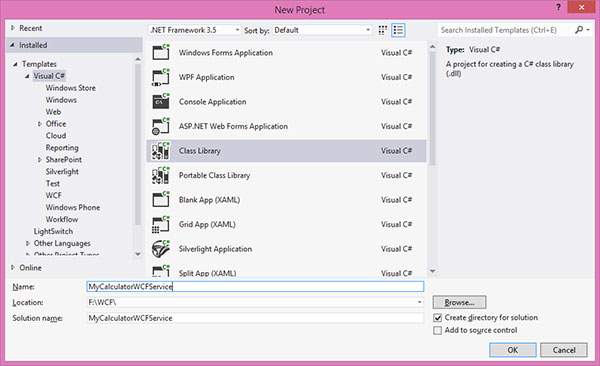
步驟 1 − 首先,讓我們建立服務契約及其實現。建立一個控制檯應用程式,並將其命名為 MyCalculatorService。這是一個簡單的服務,用於返回兩個數字的和。
步驟 2 − 現在,右鍵單擊“解決方案資源管理器”中的“引用”,然後單擊“新增引用”。將開啟以下視窗;將 System.ServiceModel 引用新增到專案。

步驟 3 − 建立 ISimpleCalculator 介面,將 ServiceContract 和 OperationContract 屬性新增到類和函式,如下所示。您將在後面的會話中瞭解有關這些契約的更多資訊。這些契約將向外界公開該方法,以便使用此服務。
步驟 4 − 此檔案背後的程式碼如下:
using System;
using System.Collections.Generic;
using System.Linq;
using System.Text;
using System.ServiceModel;

namespace MyCalculatorWCFService {
   [ServiceContract()]
   Public interface ISimpleCalculator {
      [OperationContract()]
      int Add(int num1, int num2);
   }
}
步驟 5 − MyCalculatorService 是 IMyCalculatorService 介面的實現類,如下所示。
using System;
using System.Collections.Generic;
using System.Linq;
using System.Text;

namespace MyCalculatorWCFService {
   Class SimpleCalculator : ISimpleCalculator {
      Public int Add(int num1, int num2) {
         return num1 + num2;
      }
   }
}
步驟 6 − 現在,我們已經準備好服務了。讓我們開始實現託管過程。建立一個新的控制檯應用程式,並將其命名為“MyCalculatorWCFServiceHost”。

步驟 7 − 新增 system.servicemodel 和專案 MyCalculatorWCFService 的引用。

其背後的程式碼如下所示:
using System;
using System.Collections.Generic;
using System.Linq;
using System.Text;
using MyCalculatorWCFService;
using System.ServiceModel;
using System.ServiceModel.Description;

namespace MyCalculatorWCFServiceHost {
   class Program {
      static void Main(string[] args) {
         //Create a URI to serve as the base address
         UrihttpUrl = newUri("https://:8090/MyCalculatorWCFService/SimpleCalculator");

         //Create ServiceHost
         ServiceHost host = newServiceHost(typeof(MyCalculatorWCFService.ISimpleCalculator), httpUrl);

         //Add a service endpoint
         host.AddServiceEndpoint(typeof(MyCalculatorWCFService.ISimpleCal culator), newWSHttpBinding(), "");

         //Enable metadata exchange
         ServiceMetadataBehaviorsmb = newServiceMetadataBehavior();
         smb.HttpGetEnabled = true;
         host.Description.Behaviors.Add(smb);

         //Start the Service
         host.Open();
         Console.WriteLine("Service is host at " + DateTime.Now.ToString());
         Console.WriteLine("Host is running... Press  key to stop");
         Console.ReadLine();
      }
   }
}

WCF - WAS託管
要了解 WAS 託管的概念,我們需要了解如何配置系統以及如何建立服務契約,從而為託管服務啟用不同的繫結。
首先,為非協議啟用 WCF。在開始建立服務之前,我們需要配置系統以支援 WAS。以下是配置 WAS 的步驟:
單擊“開始”選單→“控制面板”→“程式和功能”,然後單擊左窗格中的“開啟或關閉 Windows 功能”。
展開“Microsoft .Net Framework 3.0”並啟用“Windows Communication Foundation HTTP Activation”和“Windows Communication Foundation Non-HTTP Activation”。
接下來,我們需要將繫結新增到預設網站。例如,我們將預設網站繫結到 TCP 協議。轉到“開始”選單→“程式”→“附件”。右鍵單擊“命令提示符”,然後從上下文選單中選擇“以管理員身份執行”。
執行以下命令:
C:\Windows\system32\inetsrv> appcmd.exe set site "Default Web Site" -+bindings.[protocol='net.tcp',bindingInformation='808:*']
此命令透過修改位於“C:\Windows\system32\inetsrv\config”目錄中的 applicationHost.config 檔案,將 net.tcp 站點繫結新增到預設網站。同樣,我們可以將不同的協議新增到預設網站。
建立 WAS 託管服務
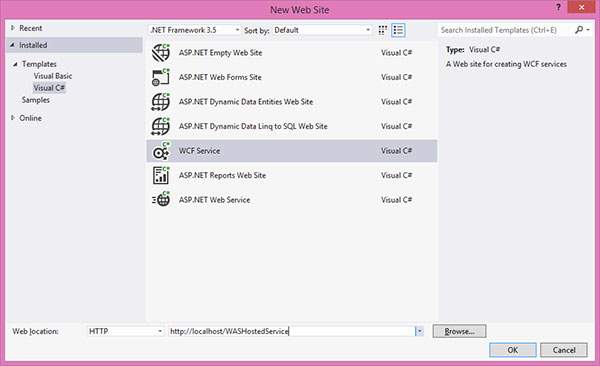
步驟 1 − 開啟 Visual Studio 2008 並單擊“新建”→“網站”,然後從模板中選擇“WCF 服務”,並將位置設定為 HTTP,如下所示:
步驟 2 − 透過建立介面 IMathService 來建立契約。將 ServiceContract 屬性新增到介面,並將 OperationContract 屬性新增到方法宣告。
using System;
using System.Collections.Generic;
using System.Linq;
using System.Runtime.Serialization;
using System.ServiceModel;
using System.Text;

// NOTE: You can use the "Rename" command on the "Refactor" menu to
// change the interface name "IService" in both code and config file
// together.

[ServiceContract]

Public interface IMathService {
   [OperationContract]
   int Add(int num1, int num2);

   [OperationContract]
   int Subtract(int num1, int num2);
}
步驟 3 − IMathService 介面的實現如下所示:
using System;
using System.Collections.Generic;
using System.Linq;
using System.Runtime.Serialization;
using System.ServiceModel;
using System.ServiceModel.Web;
using System.Text;

// NOTE: You can use the "Rename" command on the "Refactor" menu to
// change the class name "Service" in code, svc and config file
// together.

Public class MathService : IMathService {
   Public int Add(int num1, int num2) {
      return num1 + num2;
   }
   Public int Subtract(int num1, int num2) {
      return num1 - num2;
   }
}
步驟 4 − 服務檔案如下所示。

<%@ServiceHostLanguage="C#"Debug="true"Service="MathService"CodeBehind="~/App_Code/MathService.cs"%>
步驟 5 − 在 web.Config 檔案中,使用“netTcpBinding”繫結建立端點,並將使用元資料交換點發布服務元資料。因此,使用地址為“mex”和繫結為“mexTcpBinding”的元資料交換端點建立元資料交換端點。如果不釋出服務元資料,則無法使用 net.tcp 地址建立代理,例如:
svcutil.exe net.tcp:///WASHostedService/MathService.svc).
<?xml version = "1.0" ?>
<configuration>
   <!--
      Note: As an alternative to hand editing this file you can use the
         web admin tool to configure settings for your application. Use
         the Website->Asp.Net Configuration option in Visual Studio.
         A full list of settings and comments can be found in
         machine.config.comments usually located in
         \Windows\Microsoft.Net\Framework\vx.x\Config
   -->
   <configSections>
      <sectionGroup name = "system.web.extensions"
         type = "System.Web.Configuration.SystemWebExtensionsSectionGroup,
         System.Web.Extensions, Version = 3.5.0.0, Culture = neutral,
         PublicKeyToken = 31BF3856AD364E35">

         <sectionGroup name = "scripting"
            type = "System.Web.Configuration.ScriptingSectionGroup,
            System.Web.Extensions, Version = 3.5.0.0, Culture = neutral,
            PublicKeyToken =3 1BF3856AD364E35">

            <section name = "scriptResourceHandler"
               type = "System.Web.Configuration.ScriptingScriptResourceHandlerSection,
               System.Web.Extensions, Version = 3.5.0.0, Culture = neutral,
               PublicKeyToken = 31BF3856AD364E35"
               requirePermission = "false"
               allowDefinition = "MachineToApplication"/>

            <sectionGroup name = "webServices"
               type = "System.Web.Configuration.ScriptingWebServicesSectionGroup,
               System.Web.Extensions, Version = 3.5.0.0, Culture = neutral,
               PublicKeyToken = 31BF3856AD364E35">

               <section name = "jsonSerialization"
                  type = "System.Web.Configuration.ScriptingJsonSerializationSection,
                  System.Web.Extensions, Version = 3.5.0.0, Culture = neutral,
                  PublicKeyToken = 31BF3856AD364E35" requirePermission = "false"
                  allowDefinition = "Everywhere"/>

               <section name = "profileService"
                  type = "System.Web.Configuration.ScriptingProfileServiceSection,
                  System.Web.Extensions, Version = 3.5.0.0, Culture = neutral,
                  PublicKeyToken = 31BF3856AD364E35" requirePermission = "false"
                  allowDefinition = "MachineToApplication"/>

               <section name = "authenticationService"
                  type = "System.Web.Configuration.ScriptingAuthenticationServiceSection,
                  System.Web.Extensions, Version = 3.5.0.0, Culture = neutral,
                  PublicKeyToken = 31BF3856AD364E35" requirePermission = "false"
                  allowDefinition = "MachineToApplication"/>

               <section name = "roleService"
                  type = "System.Web.Configuration.ScriptingRoleServiceSection,
                  System.Web.Extensions, Version = 3.5.0.0, Culture = neutral,
                  PublicKeyToken = 31BF3856AD364E35" requirePermission = "false"
                  allowDefinition = "MachineToApplication"/>

            </sectionGroup>
         </sectionGroup>
      </sectionGroup>
   </configSections>

   <appSettings/>
   <connectionStrings/>

   <system.web>
      <!--
         Set compilation debug="true" to insert debugging
         symbols into the compiled page. Because this
         affects performance, set this value to true only
         during development.
      -->
      <compilation debug = "true">
         <assemblies>
            <add assembly = "System.Core, Version = 3.5.0.0,
               Culture = neutral, PublicKeyToken = B77A5C561934E089"/>

            <add assembly = "System.Web.Extensions, Version = 3.5.0.0,
               Culture = neutral, PublicKeyToken = 31BF3856AD364E35"/>

            <add assembly = "System.Data.DataSetExtensions,
               Version = 3.5.0.0, Culture = neutral,
               PublicKeyToken = B77A5C561934E089"/>

            <add assembly = "System.Web.Extensions, Version = 3.5.0.0,
               Culture = neutral, PublicKeyToken = 31BF3856AD364E35"/>

            <add assembly = "System.Xml.Linq,
               Version = 3.5.0.0, Culture = neutral,
               PublicKeyToken = B77A5C561934E089"/>
         </assemblies>
      </compilation>

      <!--
         The <authentication> section enables configuration
         of the security authentication mode used by
         ASP.NET to identify an incoming user.
      -->

      <authentication mode="Windows"/>

      <!--
         The <customErrors> section enables configuration
         of what to do if/when an unhandled error occurs
         during the execution of a request. Specifically,
         it enables developers to configure html error pages
         to be displayed in place of a error stack trace.
         <customErrors mode = "RemoteOnly" defaultRedirect = "GenericErrorPage.htm">
         <error statusCode = "403" redirect = "NoAccess.htm" />
         <error statusCode = "404" redirect = "FileNotFound.htm" />
         </customErrors>
      -->

      <pages>
         <controls>
            <add tagPrefix = "asp" namespace = "System.Web.UI"
               assembly = "System.Web.Extensions, Version = 3.5.0.0, Culture = neutral,
               PublicKeyToken = 31BF3856AD364E35"/>

            <add tagPrefix = "asp" namespace = "System.Web.UI.WebControls"
               assembly = "System.Web.Extensions, Version = 3.5.0.0, Culture = neutral,
               PublicKeyToken = 31BF3856AD364E35"/>
         </controls>
      </pages>

      <httpHandlers>
         <remove verb = "*" path = "*.asmx"/>

         <add verb =" *" path =" *.asmx" validate="false"
            type = "System.Web.Script.Services.ScriptHandlerFactory,
            System.Web.Extensions, Version = 3.5.0.0, Culture = neutral,
            PublicKeyToken = 31BF3856AD364E35"/>

         <add verb = "*" path = "*_AppService.axd" validate = "false"
            type = "System.Web.Script.Services.ScriptHandlerFactory,System.Web.Extensions,
            Version = 3.5.0.0, Culture = neutral,
            PublicKeyToken = 31BF3856AD364E35"/>

         <add verb = "GET,HEAD" path = "ScriptResource.axd"
            type = "System.Web.Handlers.ScriptResourceHandler, System.Web.Extensions,
            Version = 3.5.0.0, Culture = neutral,
            PublicKeyToken = 31BF3856AD364E35" validate = "false"/>
      </httpHandlers>

      <httpModules>
         <add name = "ScriptModule"
            type = "System.Web.Handlers.ScriptModule,
            System.Web.Extensions, Version = 3.5.0.0, Culture = neutral,
            PublicKeyToken = 31BF3856AD364E35"/>
      </httpModules>

   </system.web>

   <system.codedom>
      <compilers>

         <compiler language = "c#;cs;csharp" extension = ".cs" warningLevel = "4"
            type = "Microsoft.CSharp.CSharpCodeProvider, System,
            Version = 2.0.0.0, Culture = neutral,
            PublicKeyToken = b77a5c561934e089">

            <providerOption name = "CompilerVersion" value = "v3.5"/>
            <providerOption name = "WarnAsError" value = "false"/>
         </compiler>

         <compiler language = "vb;vbs;visualbasic;vbscript"
            extension = ".vb" warningLevel = "4"
            type = "Microsoft.VisualBasic.VBCodeProvider, System,
            Version = 2.0.0.0, Culture = neutral,
            PublicKeyToken = b77a5c561934e089">

            <providerOption name = "CompilerVersion" value = "v3.5"/>
            <providerOption name = "OptionInfer" value = "true"/>
            <providerOption name = "WarnAsError" value = "false"/>
         </compiler>

      </compilers>
   </system.codedom>

   <!--
      The system.webServer section is required for running ASP.NET AJAX under
      Internet Information Services 7.0. It is not necessary for previous version of IIS.
   -->

   <system.webServer>
      <validation validateIntegratedModeConfiguration = "false"/>

      <modules>
         <remove name = "ScriptModule"/>
         <add name = "ScriptModule" preCondition = "managedHandler"
            type = "System.Web.Handlers.ScriptModule, System.Web.Extensions,
            Version = 3.5.0.0, Culture = neutral,
            PublicKeyToken = 31BF3856AD364E35"/>
      </modules>

      <handlers>
         <remove name = "WebServiceHandlerFactory-Integrated"/>
         <remove name = "ScriptHandlerFactory"/>
         <remove name = "ScriptHandlerFactoryAppServices"/>
         <remove name = "ScriptResource"/>

         <add name = "ScriptHandlerFactory"
            verb = "*" path = "*.asmx" preCondition = "integratedMode"
            type = "System.Web.Script.Services.ScriptHandlerFactory,
            System.Web.Extensions, Version = 3.5.0.0, Culture = neutral,
            PublicKeyToken = 31BF3856AD364E35"/>

         <add name = "ScriptHandlerFactoryAppServices"
            verb = "*" path = "*_AppService.axd" preCondition = "integratedMode"
            type = "System.Web.Script.Services.ScriptHandlerFactory,
            System.Web.Extensions, Version = 3.5.0.0, Culture = neutral,
            PublicKeyToken = 31BF3856AD364E35"/>

         <add name = "ScriptResource" preCondition = "integratedMode"
            verb = "GET,HEAD" path = "ScriptResource.axd"
            type = "System.Web.Handlers.ScriptResourceHandler,
            System.Web.Extensions, Version = 3.5.0.0, Culture = neutral,
            PublicKeyToken = 31BF3856AD364E35"/>

      </handlers>
      <!--
         To browse web app root directory during debugging, set the value below to true.
         Set to false before deployment to avoid disclosing web app folder information.
      -->
      <directoryBrowse enabled="true"/>
   </system.webServer>

   <runtime>
      <assemblyBinding appliesTo = "v2.0.05727" xmlns = "urn:schemas-microsoft-com:asm.v1">

         <dependentAssembly>
            <assemblyIdentity name = "System.Web.Extensions" publicKeyToken = "31bf3856ad364e35"/>
            <bindingRedirect oldVersion = "1.0.0.0-1.1.0.0" newVersion = "3.5.0.0"/>
         </dependentAssembly>

         <dependentAssembly>
            <assemblyIdentity name = "System.Web.Extensions.Design" publicKeyToken = "31bf3856ad364e35"/>
            <bindingRedirect oldVersion = "1.0.0.0-1.1.0.0" newVersion = "3.5.0.0"/>
         </dependentAssembly>

      </assemblyBinding>
   </runtime>

   <system.serviceModel>
      <services>
         <service behaviorConfiguration = "ServiceBehavior" name = "Service">
            <endpoint address = "" binding = "basicHttpBinding" contract = "IMathService">

            <identity>
               <dns value = "localhost" />
            </identity>

            </endpoint>
            <endpoint address = "mex" binding = "mexHttpBinding" contract = "IMetadataExchange"/>
         </service>
      </services>

      <behaviors>
         <serviceBehaviors>
            <behavior name = "ServiceBehavior">
               <!--
                  To avoid disclosing metadata information, set the value below
                  to false before deployment.
               -->
               <serviceMetadata httpGetEnabled="true"/>

               <!--
                  To receive exception details in faults for debugging purposes,
                  set the value below to true. Set to false before deployment to avoid
                  disclosing exception information
               -->
               <serviceDebug includeExceptionDetailInFaults="false"/>
            </behavior>
         </serviceBehaviors>
      </behaviors>

   </system.serviceModel>
</configuration>
為託管服務啟用不同的繫結
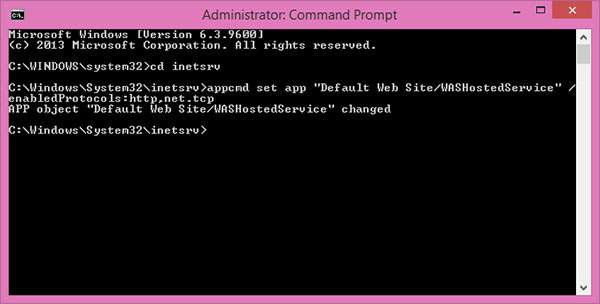
轉到“開始”選單→“程式”→“附件”。右鍵單擊“命令提示符”,然後從上下文選單中選擇“以管理員身份執行”。
執行以下命令:
C:\Windows\system32\inetsrv>appcmd set app "Default Web Site/WASHostedService" /enabledProtocols:http,net.tcp
這將產生以下輸出:
WCF - Windows服務託管
Windows 服務託管的操作很簡單。下面是說明該過程的步驟、所需程式碼和螢幕截圖。
步驟 1 − 現在讓我們建立一個 WCF 服務。開啟 Visual Studio 2008 並單擊“新建”→“專案”,然後從模板中選擇“類庫”。
步驟 2 − 將 System.ServiceModel 引用新增到專案。這是用於建立 WCF 服務的核心程式集。
步驟 3 − 接下來,我們可以建立 ISimpleCalulator 介面。新增服務和操作契約屬性,如下所示:
using System;
using System.Collections.Generic;
using System.Linq;
using System.Text;
using System.ServiceModel;

namespace WindowsServiceHostedService{
   [ServiceContract]
   public interfaceISimpleCalculator {
      [OperationContract]
      int Add(int num1, int num2);

      [OperationContract]
      int Subtract(int num1, int num2);

      [OperationContract]
      int Multiply(int num1, int num2);

      [OperationContract]
      double Divide(int num1, int num2);
   }
}
步驟 4 − 實現 ISimpleCalculator 介面,如下所示:
using System;
using System.Collections.Generic;
using System.Linq;
using System.Text;

namespace WindowsServiceHostedService {
   Class SimpleCalulator : ISimpleCalculator {
      Public int Add(int num1, int num2) {
         return num1 + num2;
      }
      Public int Subtract(int num1, int num2) {
         return num1 - num2;
      }
      Public int Multiply(int num1, int num2) {
         return num1 * num2;
      }
      Public double Divide(int num1, int num2) {
         if (num2 != 0)
            return num1 / num2;
         else
            return 0;
      }
   }
}
步驟 5 − 生成專案並獲取 dll。現在,我們已經準備好 WCF 服務了。我們將瞭解如何在 Windows 服務中託管 WCF 服務。
注意 − 在此專案中,提到我們在同一個專案中建立契約和服務(實現)。但是,如果在不同的專案中擁有兩者,這始終是一個好習慣。
步驟 6 − 開啟 Visual Studio 2008 並單擊“新建”→“專案”,然後選擇“Windows 服務”。
步驟 7 − 將“WindowsServiceHostedService.dll”作為對專案的引用新增。此程式集將充當服務。

步驟 8 − 服務的 OnStart 方法可用於編寫 WCF 的託管程式碼。我們必須確保我們只使用一個服務主機物件。OnStop 方法用於關閉服務主機。以下程式碼顯示如何在 Windows 服務中託管 WCF 服務。
using System;
using System.Collections.Generic;
using System.ComponentModel;
using System.Data;
using System.Diagnostics;
using System.Linq;
using System.ServiceProcess;
using System.Text;
using System.ServiceModel;
using System.ServiceModel.Description;

namespace WCFHostedWindowsService {
   Partial class WCFHostedWindowsService : ServiceBase {
      ServiceHostm_Host;

      Public WCFHostedWindowsService() {
         InitializeComponent();
      }
      Private void InitializeComponent() {
         thrownewNotImplementedException();
      }
      protectedoverridevoidOnStart(string[] args) {
         if (m_Host != null) {
            m_Host.Close();
         }

         //Create a URI to serve as the base address
         UrihttpUrl = newUri("https://:8090/WindowsServiceHostedService/SimpleCalculator");

         //Create ServiceHost
         m_Host = newServiceHost typeof(WindowsServiceHostedService.SimpleCalulator), httpUrl);

         //Add a service endpoint
         m_Host.AddServiceEndpoint (typeof(WindowsServiceHostedService.ISimpleCalculator), newWSHttpBinding(), "");

         //Enable metadata exchange
         ServiceMetadataBehaviorsmb = newServiceMetadataBehavior();
         smb.HttpGetEnabled = true;
         m_Host.Description.Behaviors.Add(smb);

         //Start the Service
         m_Host.Open();
      }
      protectedoverridevoidOnStop() {
         if (m_Host != null) {
            m_Host.Close();
            m_Host = null;
         }
      }
      staticvoid Main() {
         ServiceBase[] ServicesToRun;
         ServicesToRun = newServiceBase[] {
            newWCFHostedWindowsService();
         }
         ServiceBase.Run(ServicesToRun);
      }
   }
}
步驟 9 − 為了安裝服務,我們需要Windows服務的Installer類。因此,向專案中新增一個新的Installer類,該類繼承自Installer類。下面是顯示服務的服務名稱、啟動型別等的程式碼。
using System;
using System.Collections.Generic;
using System.Text;
using System.ServiceProcess;
using System.Configuration.Install;
using System.ComponentModel;
using System.Configuration;

namespace WCFHostedWindowsService {
   [RunInstaller(true)]
   Public class WinServiceInstaller : Installer {
      Private ServiceProcessInstaller process;
      Private ServiceInstaller service;

      Public WinServiceInstaller() {
         process = newServiceProcessInstaller();
         process.Account = ServiceAccount.NetworkService;
         service = newServiceInstaller();

         service.ServiceName = "WCFHostedWindowsService";
         service.DisplayName = "WCFHostedWindowsService";
         service.Description = "WCF Service Hosted";
         service.StartType = ServiceStartMode.Automatic;

         Installers.Add(process);
         Installers.Add(service);
      }
   }
}
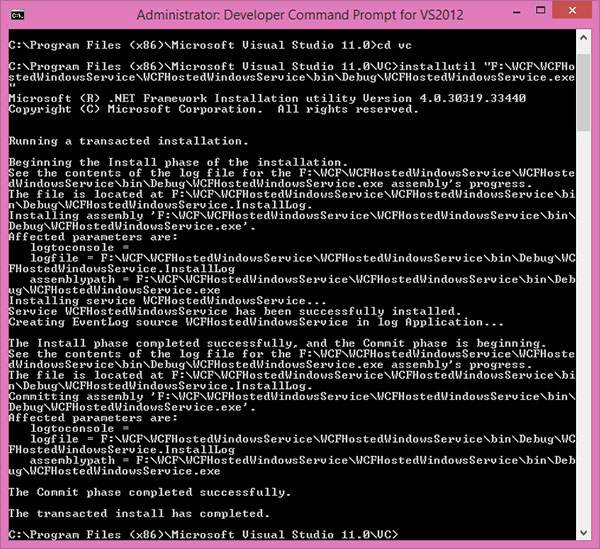
步驟 10 − 構建專案以獲取可執行檔案WCFHostedWindowsService.exe。接下來,我們需要使用Visual Studio命令提示符安裝服務。因此,透過單擊“開始”→“所有程式”→“Microsoft Visual Studio 2008”→“Visual Studio 工具”→“Visual Studio 命令提示符”開啟命令提示符。使用install util實用程式應用程式,您可以安裝如下所示的服務。
WCF - 使用WCF服務
WCF服務允許其他應用程式訪問或使用它們。WCF服務的使用者方式多種多樣,具體取決於託管型別。在這裡,我們將解釋針對以下每個流行的託管選項使用WCF服務的逐步方法:
- 使用在IIS 5/6中託管的WCF服務
- 使用自託管的WCF服務
- 使用在Windows啟用服務中託管的WCF服務
- 使用在Windows服務中託管的WCF服務
使用在IIS 5/6中託管的WCF服務
下面詳細討論了使用在IIS 5/6中託管的WCF服務的流程。此外,討論還包括如何建立代理和控制檯應用程式。
步驟 1 − 服務託管在IIS中後,我們必須在客戶端應用程式中使用它。在建立客戶端應用程式之前,我們需要為服務建立一個代理。客戶端應用程式使用此代理與服務進行互動。要建立代理,請執行Visual Studio 2008命令提示符。使用服務實用程式,我們可以建立代理類及其配置資訊。
svcutil https:///IISHostedService/Service.svc

執行此命令後,將在預設位置生成兩個檔案。
MyService.cs − WCF服務的代理類
output.config − 服務的配置資訊
步驟 2 − 現在,我們將開始使用Visual Studio 2008(客戶端應用程式)建立控制檯應用程式。
步驟 3 − 新增引用“System.ServiceModel”;這是WCF的核心dll。
步驟 4 − 建立代理類。
using System;
using System.Collections.Generic;
using System.Linq;
using System.Text;

namespace MyServiceClient {
   Class Program {
      Static void Main(string[] args) {
         // Creating Proxy for the MyService
         ServiceClient Client = newServiceClient();
         Console.WriteLine("Client calling the service...");
         Console.WriteLine("Hello Ram");
         Console.Read();
      }
   }
}
輸出如下所示:

使用自託管WCF服務
此處,逐步解釋了使用自託管WCF服務的整個過程,並在必要時提供了足夠的程式碼和螢幕截圖。
步驟 1 − 服務已託管,現在我們需要為客戶端實現代理類。建立代理的方法有很多種。
使用SvcUtil.exe,我們可以建立帶有端點的代理類及其配置檔案。
向客戶端應用程式新增服務引用。
實現ClientBase<T>類
在這三種方法中,實現ClientBase<T>是最佳實踐。如果您使用其他兩種方法,則每次在服務實現中進行任何更改時都需要建立一個代理類。但ClientBase<T>並非如此。它只在執行時建立代理,因此它會處理所有事情。
為此,建立一個包含System.ServiceModel和MyCalculatorService引用的代理類。
using System;
using System.Collections.Generic;
using System.Linq;
using System.Text;
using System.ServiceModel;
using MyCalculatorService;

namespace MyCalculatorServiceProxy {
   // WCF create proxy for ISimpleCalculator using ClientBase
   Public class MyCalculatorServiceProxy :
   ClientBase<ISimpleCalculator>,

   ISimpleCalculator {
      Public int Add(int num1, int num2) {
         //Call base to do funtion
         returnbase.Channel.Add(num1, num2);
      }
   }
}
現在,建立一個包含System.ServiceModel和MyCalculatorServiceProxy引用的控制檯應用程式。
using System;
using System.Collections.Generic;
using System.Linq;
using System.Text;
using System.ServiceModel;
using MyCalculatorServiceProxy;
namespace MyCalculatorServiceClient {
classProgram {
Static void Main(string[] args) {
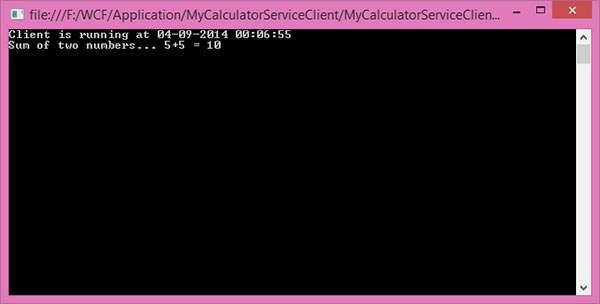
MyCalculatorServiceProxy.MyCalculatorServiceProxy proxy = newMyCalculatorServiceProxy.MyCalculatorServiceProxy();
Console.WriteLine("Client is running at " + DateTime.Now.ToString());
Console.WriteLine("Sum of two numbers. 5 + 5 =" + proxy.Add(5,5));
Console.ReadLine();
}
}
}
步驟 2 − 端點(與服務相同)資訊應新增到客戶端應用程式的配置檔案中。
<?xmlversion = "1.0"encoding = "utf-8" ?>
<configuration>
   <system.serviceModel>
      <client>
         <endpoint address
            ="https://:8090/MyCalculatorServiceProxy/ISimpleCalculator"
            binding = "wsHttpBinding" contract "MyCalculatorServiceProxy.ISimpleCalculator">
            </endpoint>
      </client>
   </system.serviceModel>
</configuration>
步驟 3 − 在執行客戶端應用程式之前,您需要執行服務。以下是客戶端應用程式的輸出。
使用在WAS中託管的WCF服務
使用在WAS中託管的WCF服務是一個簡單的過程,只需幾個步驟即可完成。步驟如下:
- 將代理類和配置檔案新增到客戶端應用程式。
- 為MathServiceClient建立物件並呼叫該方法。
using System;
using System.Collections.Generic;
using System.Linq;
using System.Text;

namespaceWASHostedClient {
   classProgram {
      staticvoid Main(string[] args) {
         MathServiceClient client = newMathServiceClient();
         Console.WriteLine("Sum of two number 5,6");
         Console.WriteLine(client.Add(5, 6));
         Console.ReadLine();
      }
   }
}
輸出如下所示。

使用在Windows服務中託管的WCF服務
下面詳細介紹瞭如何在Windows服務中使用託管的WCF服務的逐步過程,包括程式碼和說明。
成功託管後,我們可以為服務建立代理類,並在客戶端應用程式中開始使用。在這裡,它顯示了使用IIS託管型別的過程。
新增ServiceModel的引用。
using System;
using System.Collections.Generic;
using System.Linq;
using System.Text;
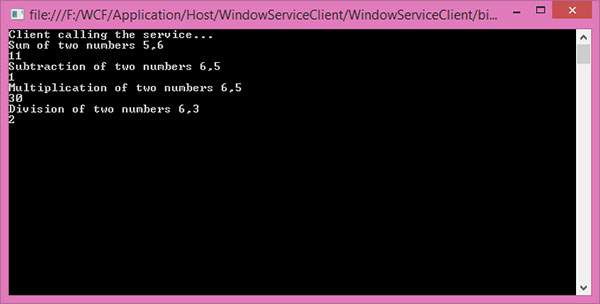
namespaceWindowServiceClient {
classProgram {
staticvoid Main(string[] args) {
//Creating Proxy for the MyService
MyServiceClient client = newMyServiceClient();
Console.WriteLine("Client calling the service...");
Console.WriteLine("Sum of two numbers 5,6");
Console.WriteLine(client.Add(5, 6));
Console.WriteLine("Subtraction of two numbers 6,5");
Console.WriteLine(client.Sub(6, 5));
Console.WriteLine("Multiplication of two numbers 6,5");
Console.WriteLine(client.Mul(6, 5));
Console.WriteLine("Division of two numbers 6,3");
Console.WriteLine(client.Div(6, 3));
Console.Read();
}
}
}
輸出如下所示:
WCF - 服務繫結
WCF服務繫結是一組多個元素,其中每個元素定義服務與客戶端通訊的方式。傳輸元素和訊息編碼元素是每個繫結的兩個最重要的組成部分。在本章中,我們將討論常用的各種WCF服務繫結。
基本繫結
基本繫結由BasicHttpBinding類提供。它使用HTTP協議傳輸並將WCF服務表示為ASP.NET Web服務(ASMX Web服務),以便可以使用ASMX Web服務的舊客戶端可以方便地使用新服務。
基本繫結在Silverlight啟用的WCF Web服務中設定為預設繫結,是Web服務樣式通訊的標準繫結。它不支援可靠訊息傳遞。
下面是一個程式碼片段,描述了基本繫結的預設設定。
<basicHttpBinding>
   <binding name = "basicHttpBindingDefaults" allowCookies = "false"
      bypassProxyOnLocal = "false" hostNameComparisonMode = "StrongWildcard"
      maxBufferPoolSize = "524288" maxBufferSize = "65536"
      maxReceivedMessageSize = "65536" messageEncoding = "Text" proxyAddress = ""
      textEncoding = "utf-8" transferMode = "Buffer" useDefaultWebProxy = "true"
      closeTimeout = "00:01:00" openTimeout = "00:01:00" receiveTimeout = "00:10:00"
      sendTimeout = "00:01:00">

      <readerQuotas maxArrayLength = "16384" maxBytesPerRead = "4096"
         maxDepth = "32"
         maxNameTableCharCount = "16384" maxStringContentLength = "8192"/>

      <security mode = "None">
         <transport clientCredentialType = "None" proxyCredentialType = "None" realm = ""/>
         <message algorithmSuite = "Basic256" clientCredentialType = "UserName" />
      </security>
   </binding>

</basicHttpBinding>
上述預設設定有其明顯的侷限性,因為訊息大小有限,並且沒有安全模式。但是,基本繫結的自定義解決了這個問題,如下所示。
<basicHttpBinding>
   <binding name = "basicHttpSecure" maxBufferSize = "100000" maxReceivedMessageSize = "100000">

      <readerQuotas maxArrayLength = "100000" maxStringContentLength = "100000"/>
      <security mode = "TransportWithMessageCredential" />

   </binding>
</basicHttpBinding>
Web服務繫結
Web服務(WS)繫結由WSHttpBinding類提供。它與基本繫結非常相似,並使用相同的協議進行傳輸,但提供了一些WS-*規範,例如WS-可靠訊息傳遞、WS-事務、WS-安全等等。簡而言之,WSHttpBinding 等於basicHttpBinding 和 WS-* 規範的總和。下面是一個程式碼片段,描述了WS繫結的預設設定:
<wsHttpBinding>
   <binding name = "wsHttpBindingDefaults" allowCookies = "false"
      bypassProxyOnLocal = "false" closeTimeout = "00:01:00"
      hostNameComparisonMode = "StrongWildcard"
      maxBufferPoolSize = "524288" maxReceivedMessageSize = "65536"
      messageEncoding = "Text" openTimeout = "00:01:00"
      receiveTimeout = "00:10:00" proxyAddress = "" sendTimeout = "00:01:00"
      textEncoding = "utf-8" transactionFlow = "false"
      useDefaultWebProxy = "true" >

      <readerQuotas maxArrayLength = "16384" maxBytesPerRead = ."4096"
         maxDepth = "32" maxNameTableCharCount = "16384"
         maxStringContentLength = "8192"/>

      <reliableSession enabled = "false" ordered = "true"
         inactivityTimeout = "oo:10:00" />

      <security mode = "Message">
         <message algorithmSuite = "Basic256" clientCredentialType = "Windows"
            esatalishSecurityContext = "true"
            negotiateServiceCredential = "true" />

         <transport clientCredentialType = "Windows"
            proxyCredentialType = "None" realm = ""/>
      </security>

   </binding>
</wsHttpBinding>
IPC繫結
IPC繫結使用命名管道,由netNamedPipeBinding類提供。這是所有可用繫結中最快的繫結,也是最安全的繫結。雖然此處不支援訊息級安全,但由於強大的傳輸安全,訊息預設情況下是安全的。下面是一個程式碼片段,描述了IPC繫結的預設設定:
<netNamedPipeBinding>

   <binding name = "netPipeDefaults" closeTimeout = "00:01:00"
      hostNameComparisonMode = "StrongWildcard" maxBufferPoolSize = "524288"
      maxBufferSize = "65536" maxConnections = "10"
      maxReceivedMessageSize = "65536" openTimeout = "00:01:00"
      receiveTimeout = "00:10:00" sendTimeout = "00:01:00" transactionFlow = "false"
      transactionProtocol = "OleTransactions" transferMode = "Buffered">

      <readerQuotas maxArrayLength = "16384" maxBytesPerRead = "4096"
         maxDepth = "32" maxNameTableCharCount = "16384"
         maxStringContentLength = "8192"/>

      <security mode = "Transport">
      </security>

   </binding>
</netNamedPipeBinding>
其他型別的服務繫結
TCP繫結 − 由NetTCPBinding類提供,此繫結使用TCP協議在同一網路內進行通訊,並以二進位制格式進行訊息編碼。與其他繫結相比,此繫結被認為是最可靠的。
WS雙向繫結 − 此型別的繫結更類似於WSHttpBinding,唯一的例外是它支援雙向通訊,即訊息可以由客戶端和服務傳送和接收。它由WSDualHttpBinding類提供。
Web繫結 − Web繫結旨在透過使用HTTP-GET、HTTP-POST等將WCF服務表示為HTTP請求的形式。它由WebHttpBinding類提供,通常與社交網路一起使用。
MSMQ繫結 − 它由NetMsmqBinding類提供,用於在服務在與客戶端傳送的時間不同的時間處理訊息的情況下提供解決方案。MSMQ繫結使用MSMQ進行傳輸,並支援分離的訊息佇列。MSMQ是Microsoft提供的訊息佇列的實現。
聯合WS繫結 − 它是WS繫結的特定形式,並支援聯合安全。它由WSFederationHttpBinding類提供。
對等網路繫結 − 由NetPeerTCPBinding類提供,主要用於檔案共享系統。它使用TCP協議,但使用對等網路作為傳輸。在此網路中,每臺機器(節點)都充當其他節點的客戶端和伺服器。對等網路繫結用於像torrent這樣的檔案共享系統。
MSMQ整合繫結 − 由MsmqIntegrationBinding類提供,它有助於與透過MSMQ(Microsoft訊息佇列)進行通訊的現有系統進行通訊。
除此之外,還可以建立自定義繫結。但是,由於可以調整每個WCF繫結的配置屬性,因此很少需要建立自定義繫結。
WCF - 例項管理
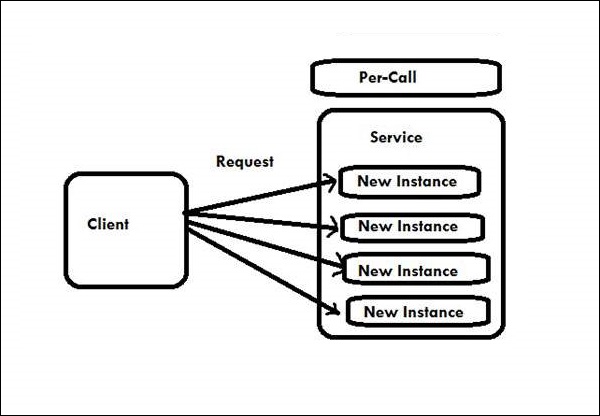
WCF用於將一組訊息(客戶端請求)繫結到服務例項的技術集合稱為例項管理。WCF支援三種類型的例項啟用,它們將在本章中討論。
每次呼叫服務
每次呼叫服務是WCF的預設例項啟用模式。當WCF服務配置為每次呼叫服務時,將為客戶端呼叫或請求正在進行的時間段建立一個CLR物件。CLR代表公共語言執行時,它包含WCF中的服務例項。
在每次呼叫服務中,每個客戶端請求都獲得一個新的專用服務例項,並且與其他型別的例項啟用相比,它的記憶體消耗更少。
為了指示WCF服務充當每次呼叫服務,需要將InstanceContextMode屬性設定為InstanceContextMode.PerCall。InstanceContextMode屬性屬於ServiceBehavior屬性。因此,可以如下配置每次呼叫服務:
[ServiceContract]
interface IMyContract
{...}
[ServiceBehavior (InstanceContextMode = InstanceContextMode.PerCall)]
class MyService : IMyContract
{...}
此處將服務表示為IMyContract。下圖顯示了每次呼叫服務例項啟用的過程。
實現每次呼叫服務
[DataContract]
class Param {....}

[ServiceContract]
interface IMyContract {
   [OperationContract]
   void MyMethod(Param objectIdentifier);
}
class MyPerCallService : IMyContract, IDisposable {
   public void MyMethod(Param objectIdentifier) {
      GetState(objectIdentifier);
      DoWork();
      SaveState(objectIdentifier);
   }

   void GetState(Param objectIdentifier) {....}
   void DoWork() {....}
   void SaveState(Param objectIdentifier) {....}
   public void Dispose() {....}
}
此處,Param是為上述示例發明的偽型別引數。
每次會話服務
在此WCF啟用模式下,在兩個實體(即客戶端和特定服務例項)之間維護一個私有或可以說是一個機密會話。每次會話服務也稱為私有會話服務,它提供一個新的服務例項,該例項專用於每個客戶端請求,並且獨立於與該會話感知服務相關的所有其他例項。
要啟動每次會話服務,需要將InstanceContextMode屬性設定為PerSession。在這裡,服務例項在整個會話持續時間內都保留在記憶體中。
此啟用模式存在可擴充套件性問題,因為配置的服務無法支援除少數(或可能最多幾百個)之外的任何其他未完成的客戶端,因為每個專用服務例項都會產生成本。
可以將每次會話服務配置為:
[ServiceBehavior (InstanceContextMode = InstanceContextMode.PerSession)]
class MyService : IMyContract
{...}
每次會話服務的過程如下圖所示:

以下程式碼顯示了配置為使用私有會話的契約和服務。輸出表明客戶端確實獲得了專用服務例項。
服務程式碼
[ServiceContract(Session = true)]
interface IMyContract {
   [OperationContract]
   void MyMethod();
}

[ServiceBehavior(InstanceContextMode = InstanceContextMode.PerSession)]
class MyService : IMyContract, IDisposable {
   int m_Counter = 0; MyService() {Console.WriteLine("MyService.MyService()"); }

   public void MyMethod() {
      m_Counter++;
      Console.WriteLine("Counter = " + m_Counter);
   }
   public void Dispose() {
      Console.WriteLine("MyService.Dispose()");
   }
}
客戶端程式碼
MyContractProxy proxy = new MyContractProxy(); proxy.MyMethod(); proxy.MyMethod();
proxy.Close();
輸出
MyService.MyService() Counter = 1 Counter = 2 MyService.Dispose()
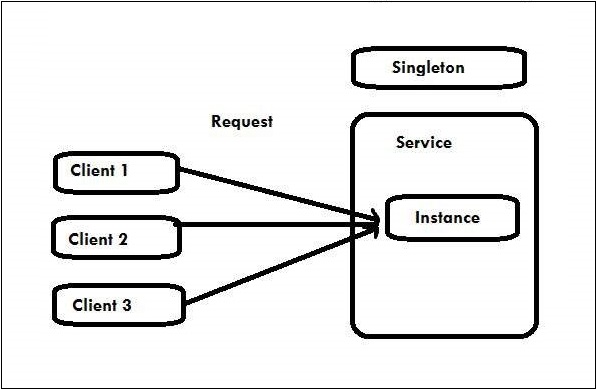
單例服務
在此WCF啟用模式下,所有相互獨立的客戶端請求都連線到相同的眾所周知的單個例項,無論它們與服務端點的連線如何。只有在主機關閉時,單例服務才會被釋放。
此服務僅在建立主機時建立一次。如果主機未提供任何單例例項,則服務返回NULL。當每個方法呼叫的工作量很小並且後臺沒有待處理的操作時,此啟用模式最佳。
需要將InstanceContextMode屬性設定為InstanceContextMode.Single才能啟動此單例服務。
因此,可以將單例服務配置為:
[ServiceBehavior(InstanceContextMode = InstanceContextMode.Single)]
class MySingleton : ...
{...}
單例服務的過程如下圖所示:
以下程式碼用於初始化和託管單例例項。
服務程式碼
[ServiceContract]
interface IMyContract {
   [OperationContract]
   void MyMethod( );
}
[ServiceBehavior(InstanceContextMode = InstanceContextMode.Single)]
class MySingleton : IMyContract {
   int m_Counter = 0;

   public int Counter {
      get {
         return m_Counter;
      }
      set {
         m_Counter = value;
      }
   }
   public void MyMethod( ) {
      m_Counter++;
      Trace.WriteLine("Counter = " + Counter);
   }
}
主機程式碼
MySingleton singleton = new MySingleton( );
singleton.Counter = 42;
ServiceHost host = new ServiceHost(singleton);
host.Open( );

//Do some blocking calls then
host.Close( );
客戶端程式碼
MyContractClient proxy = new MyContractClient( );
proxy.MyMethod( );
proxy.Close( );
輸出
Counter = 43
WCF - 事務
WCF 事務是一組遵循 ACID 屬性的操作集合。在這裡,如果單個操作失敗,則整個系統會自動失敗。線上下單時,就會發生事務。以下示例可以幫助您更簡單地理解事務過程。
示例
假設您從線上商店訂購了一臺液晶電視,並將使用信用卡支付款項。當您輸入必要的訂單資訊時,會同時發生兩個操作。
一是指定金額從您的銀行賬戶中扣除,二是供應商賬戶記入相同金額。這兩個操作都必須成功執行才能完成成功的事務。
WCF 事務屬性
WCF 事務遵循以下四個屬性:
原子性 (Atomic) − 所有操作都必須在事務完成時作為一個單一不可分割的操作。
一致性 (Consistency) − 無論操作集是什麼,系統始終處於一致狀態,即事務的結果始終符合預期。
隔離性 (Isolation) − 在事務完成之前,系統的中間狀態對外部世界任何實體都是不可見的。
永續性 (Durability) − 無論發生任何型別的故障(硬體、電源中斷等),已提交的狀態都將保持不變。
配置 WCF 事務時,需要考慮一些因素。這些是繫結和操作行為。
繫結 (Binding) − 支援 WCF 事務的繫結只有少數幾個,並且必須僅從這些繫結中進行選擇,這些繫結預設情況下處於停用狀態,應啟用它們才能獲得事務所需的支 持。這些繫結如下:
- NetTcpBinding
- NetNamedPipeBinding
- WSHttpBinding
- WSDualHttpBinding
- WSFederationHttpBinding
操作行為 (Operation behavior) − 繫結促進事務傳播的路徑,而操作負責事務處理以及操作配置。操作行為主要使用兩個屬性:TransactionFlow 和 TransactionScopeRequired。這裡需要注意的是,TransactionFlow 主要有三個值:Allowed、Mandatory 和 NotAllowed。
以下程式碼顯示更改繫結和操作契約的配置是否會促進客戶端的傳播。
<bindings>
   <wsHttpBinding>
      <binding name = "MandatoryTransBinding" transactionFlow = "true">
         <reliableSession enabled ="true"/>
      </binding>
   </wsHttpBinding>
</bindings>
事務協議
WCF 使用三種事務協議:
- 輕量級 (Lightweight)
- OLE 事務 (Ole Transaction)
- WS-Atomic Transaction (WS-AT)
在這三種協議中,WS-AT 是一種可互操作的協議,它能夠跨防火牆進行分散式事務流。但是,如果事務嚴格基於 Microsoft 技術,則不應使用此協議。
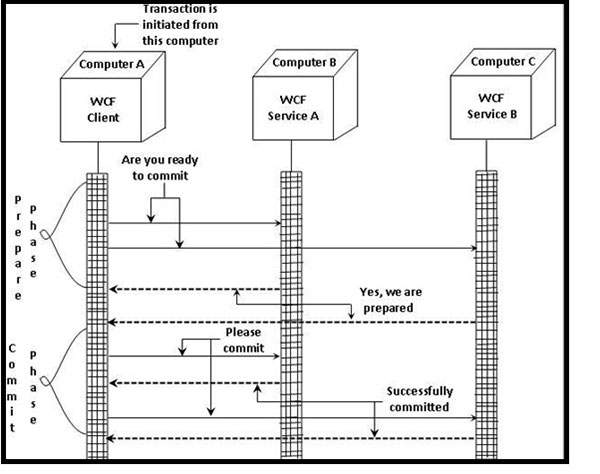
WCF 事務的階段
WCF 事務有兩個階段,如下圖所示。

準備階段 (Prepare Phase) − 在此階段,事務管理器檢查所有實體是否已準備好提交事務。
提交階段 (Commit Phase) − 在此階段,實體的提交實際上開始了。
下圖說明了 WCF 事務這兩個階段的功能。
啟用 WCF 事務
要成功啟用 WCF 事務,需要按順序執行一系列六個步驟。必要的步驟如下所述。
步驟 1 − 建立兩個 WCF 服務
這方面最重要的步驟是在 WCF 中構建兩個服務專案以參與單個事務。資料庫事務將在這兩個服務上執行,並且將瞭解 WCF 事務如何將它們統一起來。還建立了一個 WCFTransactions Web 應用程式,以在單個事務範圍內使用這兩個建立的服務。

步驟 2 − 方法建立及其與 TransactionFlow 屬性的關聯
在這裡,將為這兩個 WCF 服務建立 UpdateData 方法,以便使用 OperationContract 屬性插入資料庫。為了完成此任務,首先使用 ServiceContract 屬性建立一個介面類。為了在新建立的方法中啟用事務,它使用 TransactionFlow 屬性,並且使用 Allowed 值允許事務。
[ServiceContract]
public interface IService1 {
   [OperationContract]
   [TransactionFlow(TransactionFlowOption.Allowed)]
   void UpdateData();
}
步驟 3 − 使用 TransactionScopeRequired 屬性實現 WCF 服務
這是透過使用以下所示的程式碼完成的:
[OperationBehavior(TransactionScopeRequired = true)]
public void UpdateData() {
   try {
      SqlConnection objConnection = new SqlConnection(strConnection);
      objConnection.Open();

      using(SqlTransaction transaction = Program.dbConnection.BeginTransaction()) {
     	   Boolean doRollback = false;
     	   using(SqlCommand cmd = new SqlCommand(
            "insert into Customer (Customer name, Customer code) values ('sss', 'sss')"objConnection))

     	   try {
            cmd.ExecuteNonQuery();
     	   } catch(SqlException) {
            doRollback = true;
            break;
     	   }
      }

      if(doRollback)
         transaction.Rollback();
      else
         transaction.Commit();
   }
   finally {
      objConection.Close();
   }
}
步驟 4 − 透過 WCF 服務配置檔案啟用事務流
其編碼如下:
<bindings>
   <wsHttpBinding>
      <binding name = "TransactionalBind" transactionFlow = "true"/>
   </wsHttpBinding>
</bindings>
必須將允許事務的繫結附加到端點才能公開 WCF 服務。
<endpoint address = "" binding = "wsHttpBinding" bindingConfiguration = "TransactionalBind" contract = "WcfService1.IService1">
步驟 5 − 在單個事務中呼叫兩個服務
在這裡,上述兩個服務在一個事務中被呼叫,為此目的,使用 TransactionScope 物件對這兩個服務進行分組。呼叫上述物件的 Complete 方法以提交 WCF 事務。要回滾,需要呼叫 Dispose 方法。
using (TransactionScope ts = new TransactionScope(TransactionScopeOption.RequiresNew)) {
   try {
      // Call your webservice transactions here
      ts.Complete();
   } catch (Exception ex) {
      ts.Dispose();
   }
}
下面顯示了將 WCF 事務在一個範圍內分組的完整程式碼的小片段:
using (TransactionScope ts = new TransactionScope(TransactionScopeOption.RequiresNew)) {
   try {
      ServiceReference1.Service1Client obj = newServiceReference1.Service1Client();
      obj.UpdateData();
      ServiceReference2.Service1Client obj1 = new ServiceReference2.Service1Client();
      obj1.UpdateData();
      ts.Complete();
   } catch (Exception ex) {
      ts.Dispose();
   }
}
步驟 6 − 測試 WCF 事務
測試在第六個也是最後一步中完成,在呼叫第一個 WCF 服務後,會強制發生異常。

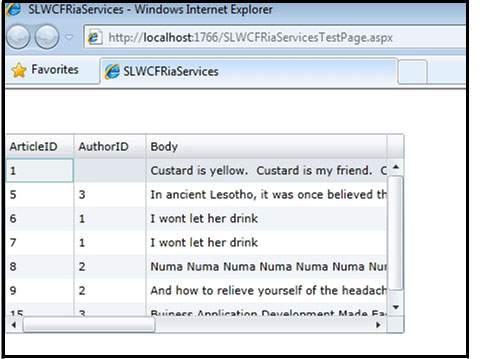
WCF - RIA 服務
WCF RIA 服務是一個更高級別的框架,也是 .NET 4 和 Silverlight 4 等框架的新元件,它透過提供客戶端驗證來簡化在 Silverlight 中構建複雜業務應用程式的過程。RIA 代表富網際網路應用程式 (Rich Internet Applications)。
這裡必須注意的是,Silverlight 是微軟提供的框架,非常適合富網際網路應用程式,並且可以像 Adobe Flash 一樣用作瀏覽器外掛。
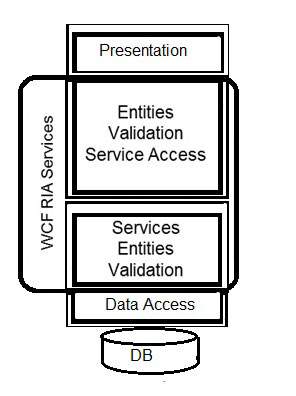
WCF RIA 服務主要基於標準版本的 WCF 服務。下圖說明了 WCF 架構的一部分,其中 WCF RIA 服務通常是其關注點。
建立 WCF RIA 服務是更好地理解該概念的下一步。分步過程如下所示。
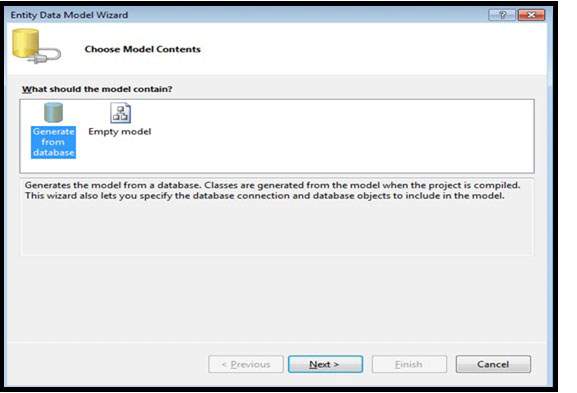
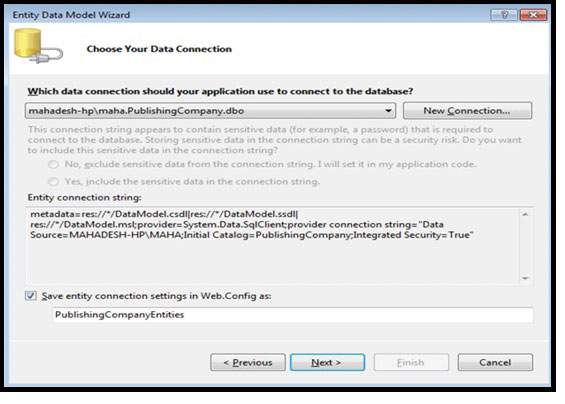
步驟 1 − 使用 Silverlight 5 建立一個名為 SLWCFRiaServices.Web 的新 Web 專案,然後透過選擇 ADO.NET 實體資料模型向其中新增一個新項。


步驟 2 − 現在從實體資料模型嚮導中選擇模型內容,透過從資料庫生成模型。
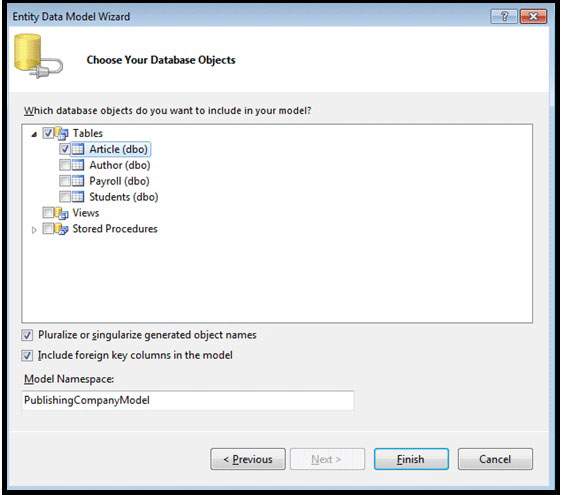
步驟 3 − 從同一個嚮導中,選擇您的資料連線和資料庫物件。
步驟 4 − 生成解決方案,以便將來識別資料模型不會成為您將要建立的域服務的問題。

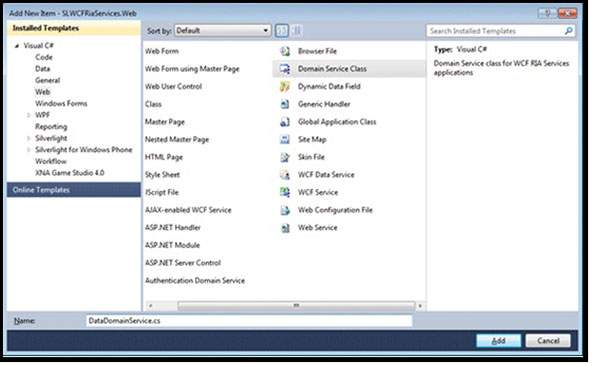
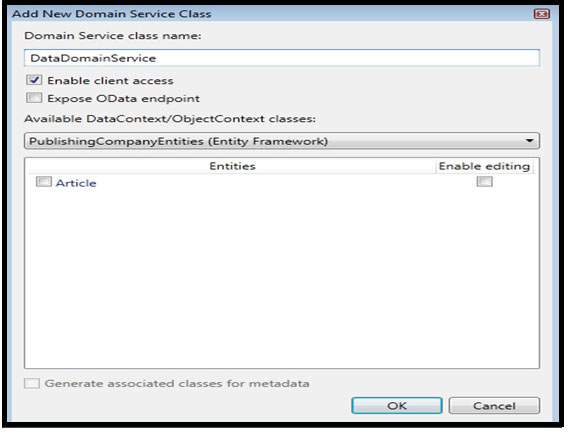
步驟 5 − 現在透過新增新項在 Web 專案中建立一個域服務,並確保啟用客戶端訪問。
步驟 6 − 在下一步中,將生成一些類,並且必須再次構建它們。
步驟 7 − 在此步驟中,資料來源面板顯示 DataDomainContext。
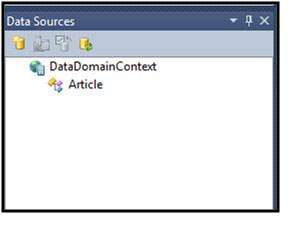
步驟 8 − 在此步驟中,應選擇並自定義 DataDomainContext 下面的文章。

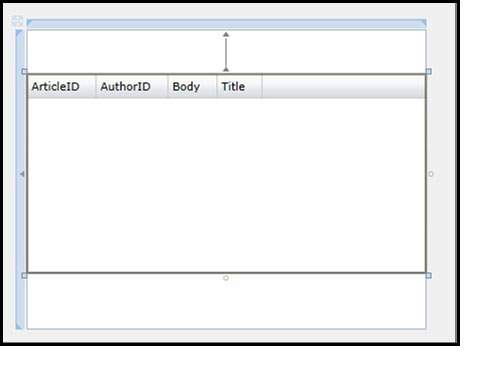
步驟 9 − 此處執行的步驟是將 DataGrid 控制元件與資料來源附加,以及主題的選擇。這裡選擇了 BureauBlue 主題。


步驟 10 − 最後一步包括轉到設計螢幕,並透過簡單的拖放操作將實體新增到 MainPage 的佈局區域。確保 AutoGenerateColumns = "True" 並執行它以檢視輸出也很重要。
先決條件
要體驗 WCF RIA 服務的全部潛力,有一些先決條件:
- Visual Studio 2010 / Visual Studio 2012
- Silverlight 開發人員執行時
- 最新版本的 RIA Services Toolkit
- SDK(軟體開發工具包)
WCF RIA 域服務
域服務包含一組與業務相關的資料庫操作。它只不過是一個公開任何 WCF RIA 服務應用程式業務邏輯的 WCF 服務。
WCF RIA 域服務內部具有託管類 DomainServiceHost,後者又使用 WCF ServiceHost 類來託管應用程式。為了使域服務可供客戶端專案訪問,它應該具有 EnableClientAccessAttribute 屬性。每當新增新的域服務類時,都會自動應用該屬性。
下圖顯示了 WCF RIA 域服務的架構:

WCF RIA 服務 – 查詢資料
下圖顯示瞭如何在客戶端建立查詢並在伺服器端執行查詢以返回可查詢結果。DAL 代表資料訪問層 (Data Access Layer)。

WCF RIA 服務 – 更新資料
下圖顯示瞭如何在伺服器端執行 CUD(建立、更新、刪除)操作來更新資料。這裡需要注意的是,WCF RIA 服務在伺服器端始終是無狀態的。

WCF - 安全性
WCF 服務擁有一個強大的安全系統,具有兩種安全模式或級別,以便只有預期的客戶端才能訪問服務。WCF 在很大程度上減輕了分散式事務中常見的安全威脅。
關鍵安全功能
WCF 服務具有四個關鍵安全功能,如下圖所示。
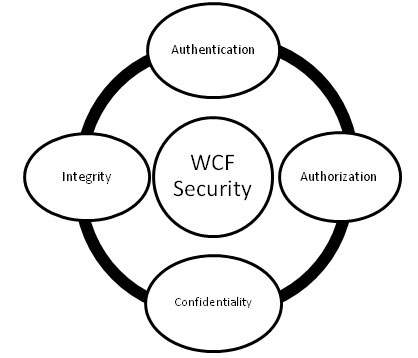
身份驗證 (Authentication) − 在這裡,身份驗證不僅限於識別訊息的傳送者,而且是相互的,即需要對訊息接收者進行身份驗證,以排除任何中間人攻擊的可能性。
授權 (Authorization) − 這是 WCF 服務採取的確保安全的下一步,在這裡確定服務是否應授權呼叫者繼續執行操作。儘管授權不依賴於身份驗證,但它通常遵循身份驗證。
機密性 (Confidentiality) − 呼叫者和服務之間資訊的交換是保密的,以限制未打算接收訊息的其他人對其進行解釋。為了實現這一點,使用了加密以及各種其他機制。
完整性 (Integrity) − 最終的關鍵概念是維護完整性,即確保訊息在從傳送者到接收者的過程中沒有被任何人篡改。
傳輸安全模式
WCF 提供以下傳輸安全模式以確保客戶端和伺服器之間安全的通訊。各種傳輸安全模式如下所述。
無 (None) − 此模式不保證任何型別的訊息安全,並且服務不會獲得有關客戶端的任何憑據。此模式風險很高,因為它可能允許篡改訊息,因此不建議使用。
<wsHttpBinding>
   <binding name = "WCFSecurityExample">
      <security mode = "None"/>
   </binding>
</wsHttpBinding>
傳輸 (Transport) − 此模式是透過使用 TCP、IPC、Https 和 MSMQ 等通訊協議實現安全的訊息傳輸的最簡單方法。當傳輸是點對點時,此模式更有效,並且主要用於受控環境,即內聯網應用程式。
<wsHttpBinding>
   <binding name = "WCFSecurityExample">
      <security mode = "Transport"/>
   </binding>
</wsHttpBinding>
訊息 (Message) − 安全模式允許相互身份驗證,並在很大程度上提供隱私,因為訊息是加密的並且可以透過 http 傳輸,http 不被認為是安全的協議。這裡的安全性是端到端提供的,而不考慮有多少中間參與者參與訊息傳輸以及是否存在安全的傳輸。該模式通常由網際網路應用程式使用。
<wsHttpBinding>
   <binding name = "WCFSecurityExample">
      <security mode = "Message"/>
   </binding>
</wsHttpBinding>
混合 (Mixed) − 此安全模式不經常使用,並且客戶端身份驗證僅在客戶端級別提供。
<wsHttpBinding>
   <binding name = "WCFSecurityExample">
      <security mode = "TransportWithMessageCredential"/>
   </binding>
</wsHttpBinding>
兩者 (Both) − 此安全模式包括傳輸安全和訊息安全,以提供強大的安全保護,但通常會導致整體效能過載。這僅受 MSMQ 支援。
<netMsmqBinding>
   <binding name = "WCFSecurityExample">
      <security mode = "Both"/>
   </binding>
</netMsmqBinding>
除 BasicHttpBinding 之外的所有 WCF 繫結預設都具有一定的傳輸安全性。
訊息安全級別
訊息級別安全性不依賴於 WCF 協議。它透過使用標準演算法加密資料來與訊息資料本身一起使用。對於訊息安全級別,多種客戶端憑據可用於不同的繫結,這些將在下面討論。
WCF 中訊息級別安全性的客戶端憑據
無 − 此處使用加密來保護訊息,但不執行客戶端身份驗證,這意味著匿名客戶端可以訪問服務。除 BasicHttpBinding 外,所有 WCF 繫結都支援此客戶端憑據。但是需要注意的是,對於 NetNamedPipeBinding,此客戶端憑據完全不可用。
Windows − 此處,針對已即時登入的使用者,會同時進行訊息加密和客戶端身份驗證。同樣,與其他所有 WCF 繫結不同,NetNamedPipeBinding 不可使用,BasicHttpBinding 也不支援。
使用者名稱 − 此處,訊息被加密並透過提供使用者名稱來保護,客戶端需要提供密碼才能進行身份驗證。與上述兩種客戶端憑據一樣,BasicHttpBinding 不支援使用者名稱,並且它對於 NetNamedPipeBinding 也不可用。
證書 − 除了訊息加密之外,客戶端和服務都會透過證書進行身份驗證。此客戶端憑據可用,並受所有 WCF 繫結支援,但 NetNamedPipeBinding 除外。
頒發的令牌 − 來自 Cardspace 等授權機構的頒發的令牌用於驗證訊息。此處也會對訊息進行加密。
以下程式碼顯示如何在 WCF 訊息安全級別/模式中配置客戶端憑據。
<netTcpBinding>
   <binding name = "WCFMessageSecurityExample">
      <security mode = "Message">
         <message clientCredentialType = "None"/>
      </security>
   </binding>
</netTcpBinding>

<netMsmqBinding>...</netMsmqBinding>
</bindings>
<behaviors>...</behaviors>
此處必須注意的是,傳輸安全模式優於訊息安全級別,因為前者速度更快。它不需要任何額外的編碼並提供互操作性支援,因此不會降低整體效能。
但是,從安全形度來看,訊息安全模式更健壯,獨立於協議,並提供端到端安全。
WCF - 異常處理
WCF 服務開發人員可能會遇到一些無法預見的錯誤,需要以合適的方式向客戶端報告。此類錯誤,稱為異常,通常使用 try/catch 塊進行處理,但這非常依賴於具體的技術。
由於客戶端關注的並非錯誤是如何發生的或導致錯誤的因素,因此在 WCF 中使用 SOAP 故障契約來將錯誤訊息從服務傳達給客戶端。
故障契約使客戶端能夠檢視服務中發生的錯誤的文件檢視。以下示例可以更好地理解。
步驟 1 − 建立一個簡單的計算器服務,其中包含除法運算,該運算會生成一般異常。
using System;
usingSystem.Collections.Generic;
usingSystem.Linq;
usingSystem.Runtime.Serialization;
usingSystem.ServiceModel;
usingSystem.Text;

namespace Calculator {
   // NOTE: You can use the "Rename" command on the "Refactor" menu to change
   // the interface name "IService1" in both code and config file together.

   [ServiceContract]

   public interface IService1 {
      [OperationContract]
      int divide(int num1, int num2);
      // TODO: Add your service operations here
   }
}
類檔案的編碼如下所示 −

現在,當我們嘗試將數字 10 除以零時,計算器服務將丟擲異常。


可以使用 try/catch 塊處理異常。

現在,當我們嘗試將任何整數除以 0 時,它將返回 10,因為我們在 catch 塊中對其進行了處理。

步驟 2 − 此步驟使用 FaultException 將異常資訊從服務傳達給客戶端。
public int Divide(int num1, int num2) {
   //Do something
   throw new FaultException("Error while dividing number");
}

步驟 3 − 也可以建立自定義型別以使用 FaultContract 傳送錯誤訊息。建立自定義型別所需的步驟如下所述 −
使用資料契約定義型別,並指定要返回的欄位。
服務操作由 FaultContract 屬性修飾。型別名稱也會被指定。
建立服務例項以引發異常並分配自定義異常屬性。