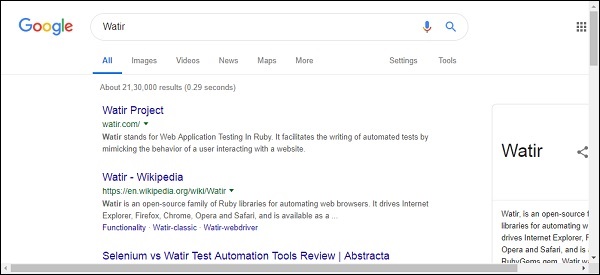
- Watir 教程
- Watir - 首頁
- Watir - 概述
- Watir - 簡介
- Watir - 環境設定
- Watir - 安裝瀏覽器驅動程式
- Watir - 使用瀏覽器
- Watir - 網頁元素
- Watir - 定位網頁元素
- Watir - 使用 Iframes
- Watir - 自動等待
- Watir - 無頭測試
- Watir - 移動測試
- Watir - 捕獲螢幕截圖
- Watir - 頁面物件
- Watir - 頁面效能
- Watir - Cookie
- Watir - 代理
- Watir - 警報
- Watir - 下載
- Watir - 瀏覽器視窗
- Watir 有用資源
- Watir 快速指南
- Watir - 有用資源
- Watir - 討論
Watir 快速指南
Watir - 概述
Watir (Web Application Testing in Ruby),發音為“Water”,是一個使用 Ruby 開發的開源工具,它有助於自動化任何程式語言開發的 Web 應用程式。Watir 支援安裝 Internet Explorer、Firefox、Chrome、Safari 和 Edge 瀏覽器。Watir 可作為 Rubygems 進行安裝。
Watir 將連線到指定的瀏覽器,並按照開啟 URL、點選按鈕、在文字框中輸入資料等指令進行操作,就像真人操作一樣。Watir 最常用於其瀏覽器支援以及與 RSpec、Cucumber 等測試框架一起使用。
Watir 的特性
Watir 功能豐富,如下所述:
定位網頁元素 - 有多種方法可以定位瀏覽器中呈現的網頁元素。最常用的方法是使用 id、class、標籤名稱、自定義屬性、標籤等。
截圖 - Watir 允許您根據需要隨時對測試進行截圖。這有助於跟蹤中間測試。
頁面效能 - 您可以使用效能物件輕鬆衡量頁面效能,該物件具有諸如 performance.navigation、performance.timing、performance.memory 和 performance.timeOrigin 等屬性。這些詳細資訊在連線到瀏覽器時獲得。
頁面物件 - Watir 中的頁面物件將幫助我們以類的形式重用程式碼。使用此功能,我們可以自動化我們的應用程式,而無需複製任何程式碼,還可以使其更易於管理。
下載 - 使用 Watir,可以輕鬆測試 UI 或網站的檔案下載。
警報 - Watir 提供易於使用的 API 來測試 UI 或網站中的警報彈出視窗。
無頭測試 - 使用無頭測試,可以在命令列中獲取詳細資訊,而無需開啟瀏覽器。這有助於在命令列中執行 UI 測試用例。
使用 Watir 的優勢
Watir 提供以下優勢:
Watir 是一個開源工具,非常易於使用。
Watir 使用 Ruby 開發,任何在瀏覽器中執行的 Web 應用程式都可以使用 Watir 輕鬆自動化。
Watir 支援所有最新的瀏覽器,使測試變得容易。
Watir 具有內建庫,用於測試頁面效能、警報、iframe 測試、瀏覽器視窗、截圖等。
Watir 的缺點
與任何其他軟體一樣,Watir 也有一些侷限性。
Watir 只支援 Ruby 測試框架,不能與任何其他測試框架一起使用。
使用 Watir 進行移動測試並未得到增強,桌面瀏覽器被模擬成移動瀏覽器,而不是充當即時裝置。
Watir - 簡介
Watir (Web Application Testing in Ruby),發音為“Water”,是一個使用 Ruby 開發的開源工具,它有助於自動化 Web 應用程式,無論應用程式是用什麼語言編寫的。Watir 帶有一套豐富的 API,可幫助我們與瀏覽器互動、定位頁面元素、截圖、處理警報、檔案下載、window.open 彈出視窗、無頭測試等。
支援的瀏覽器:
- Internet Explorer
- Firefox
- Chrome
- Safari
- Edge
注意 - Watir 可作為 Rubygems gem 進行安裝。
使用 Watir webdriver,您可以測試您的網站和 UI 應用程式。由於 Watir 完全專注於瀏覽器相關的內容,您可以將 Watir 與其他測試框架一起使用,例如:
- RSpec
- Cucumber
主要的測試程式碼將使用測試框架編寫,而與瀏覽器的互動將藉助 Watir 完成。
測試框架與 Watir 的流程如下圖所示:

RSpec 或 Cucumber 參與測試執行器和測試程式碼。有關網站或 UI 測試的詳細資訊可以分解成頁面物件,頁面物件將引用 Watir,Watir 將獲取用於測試的頁面定位器。Watir 及其 webdriver 幫助連線到瀏覽器並執行測試自動化。
Watir - 環境設定
要使用 Watir,我們需要安裝以下內容:
- 安裝 Ruby
- 安裝 Watir
- RubyMine (IDE)
由於 Watir 使用 Ruby 構建,我們需要安裝 Ruby 和 gem(Ruby 的包管理器)。
在 Windows 上安裝 Ruby
要在 Windows 上安裝 Ruby,請訪問:https://rubyinstaller.org/downloads/

根據您的 32 位或 64 位作業系統安裝 Ruby 版本。此處我們安裝了突出顯示的版本,如螢幕截圖所示。下載完成後,按照提示步驟進行安裝。
安裝完成後,在命令列中檢查 Ruby 版本,如下所示:
C:\> ruby -v
如果 Ruby 成功安裝,您將看到如下輸出:

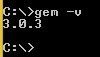
安裝的版本是 2.6.3。我們已成功在系統上安裝 Ruby。Ruby 安裝程式 gem 即 Ruby 包管理器也已安裝。您可以檢查已安裝 gem 的版本,如下所示:
我們完成了在 Windows 上安裝 Ruby 和 Gem。
在 Linux 上安裝 Ruby
要在 Linux 上安裝 Ruby,請在 Linux 終端中執行以下命令:
wget -O ruby-install-0.6.0.tar.gz https://github.com/postmodern/ruby-install/archive/v0.6.0.tar.gz
tar -xzvf ruby-install-0.6.0.tar.gz
cd ruby-install-0.6.0/
sudo make install
ruby-install ruby 2.5.3
Mac 上的 Ruby 安裝
要在 Linux 上安裝 Ruby,請在 Mac 終端中執行以下命令:
安裝 Xcode
xcode-select --install
安裝 HomeBrew
/usr/bin/ruby -e "$(curl -fsSL https://raw.githubusercontent.com/Homebrew/install/master/install)"
安裝 rbenv
brew install rbenv
rbenv init
touch ~/.bash_profile
echo 'eval "$(rbenv init -)"' >> ~/.bash_profile
source ~/.bash_profile
rbenv install 2.5.3
rbenv local 2.5.3
安裝 Watir
安裝 watir 的命令是:
gem install watir
gem install watir
然後您可以看到如下輸出螢幕:

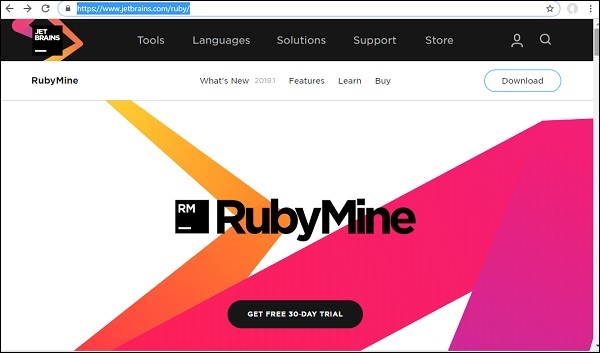
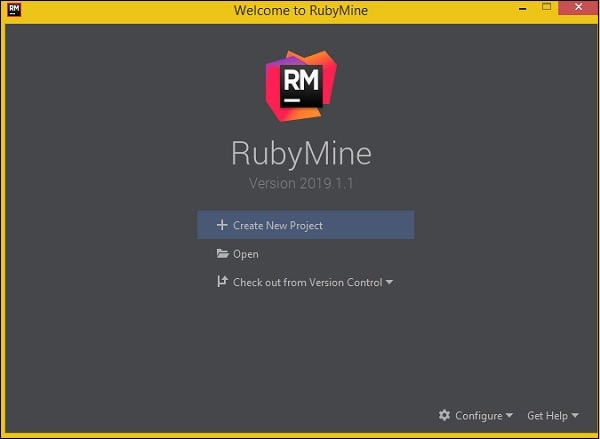
RubyMine IDE
我們將使用 RubyMine IDE 來編寫和執行測試用例。RubyMine IDE 的官方網站是 www.jetbrains.com/ruby。
RubyMine 是一個付費 IDE,提供 30 天免費試用。點選免費試用按鈕下載。您也可以使用其他您選擇的 IDE 來編寫測試用例。
點選免費試用按鈕後,將開始下載。下載完成後,將其安裝到您的系統上。
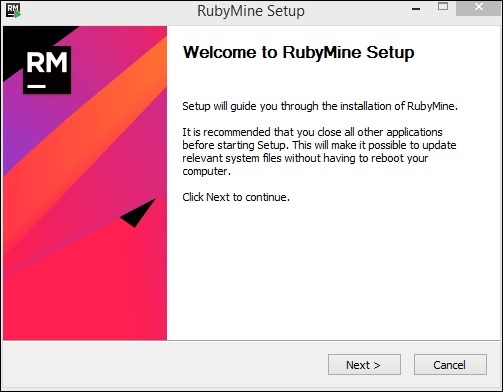
點選下一步並繼續安裝。安裝完成後,開啟 IDE,它將要求您建立專案,如下所示:
點選建立新專案,我們輸入專案的名稱為 Watir,這是 IDE 中的顯示:
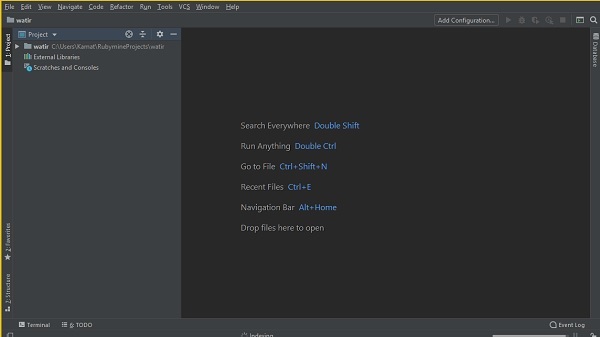
我們將在 watir/ 資料夾中編寫測試用例並執行它。
Watir - 安裝瀏覽器驅動程式
在本節中,我們將安裝使用 Watir 測試專案所需的瀏覽器驅動程式。在 Watir 6 之前,我們必須包含 watir-webdriver 來使用瀏覽器驅動程式。隨著 Watir 6 的釋出,watir-webdriver 可作為 Watir 包的一部分提供,使用者無需單獨新增 watir-webdriver。
Chrome、Firefox 和 Safari 瀏覽器預設可用,無需額外新增。如果在測試過程中遇到瀏覽器驅動程式不可用的問題,您可以按照以下說明下載它們。
我們將安裝以下瀏覽器的驅動程式:
- 瀏覽器驅動程式 - Chrome
- 瀏覽器驅動程式 - Firefox
- 瀏覽器驅動程式 - Edge
- 瀏覽器驅動程式 - Internet Explorer
- 瀏覽器驅動程式 - Safari
瀏覽器驅動程式 - Chrome
要獲取 Chrome 瀏覽器驅動程式,請訪問:https://sites.google.com/a/chromium.org/chromedriver/downloads。
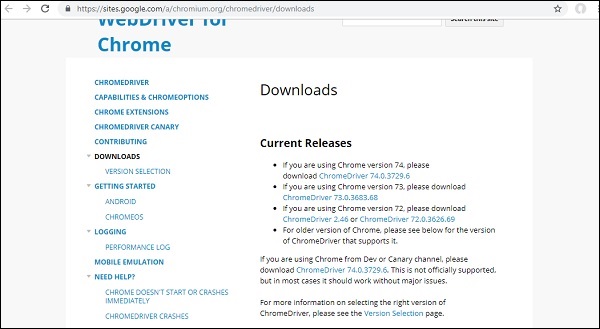
檢查您的瀏覽器版本,並相應地下載 Chrome 驅動程式。要檢查您的 Chrome 瀏覽器版本,請按照此處所示操作:
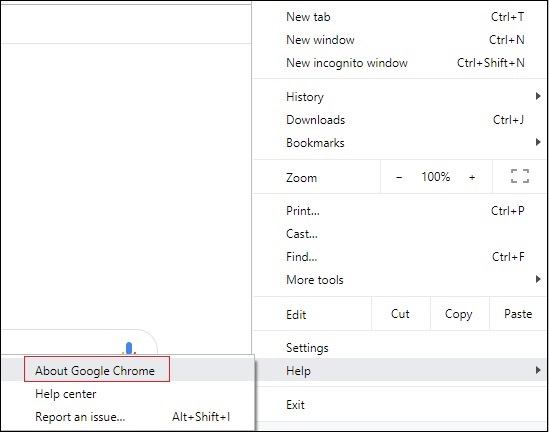
點選關於 Google Chrome,它將提供您的 Chrome 版本,如下所示:

因此我們的版本是 74。所以,下載 Chrome 驅動程式版本 74。

接下來,根據您的作業系統下載 Chrome 驅動程式。我們將下載 chromedriver_win32.zip,它適用於 32 位和 64 位機器。如果您打算使用下載的驅動程式,請將其位置新增到 PATH 變數。
瀏覽器驅動程式 - Firefox
對於 Firefox 驅動程式,請訪問:https://github.com/mozilla/geckodriver/releases,如下面的螢幕截圖所示:

根據您的作業系統,下載上面的驅動程式。如果您打算使用下載的驅動程式,請將其位置新增到 PATH 變數。
瀏覽器驅動程式 - Edge
對於 Firefox 驅動程式,請訪問:https://developer.microsoft.com/en-us/microsoft-edge/tools/webdriver/,如下面的螢幕截圖所示:
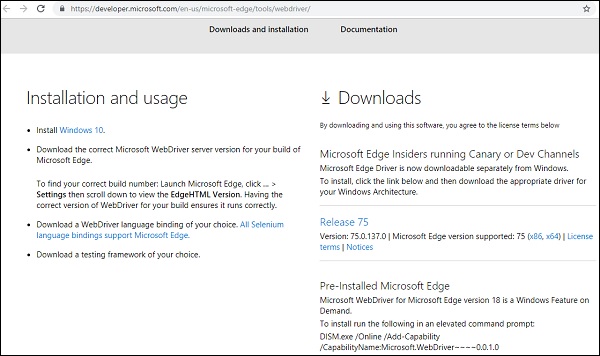
點選您擁有的 Microsoft Edge 版本,如下所示:
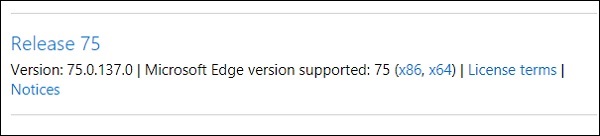
點擊發布連結,它將重定向到:
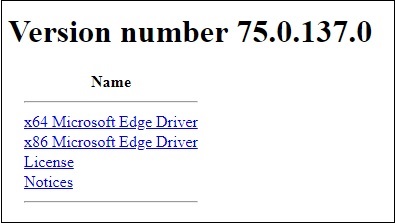
在這裡,您可以找到可用於 Windows 的下載版本。如果您打算使用下載的驅動程式,請將其位置新增到 PATH 變數。
瀏覽器驅動程式 - Internet Explorer
要安裝 Internet Explorer 的驅動程式,請訪問:https://docs.seleniumhq.org/download/,如下所示:
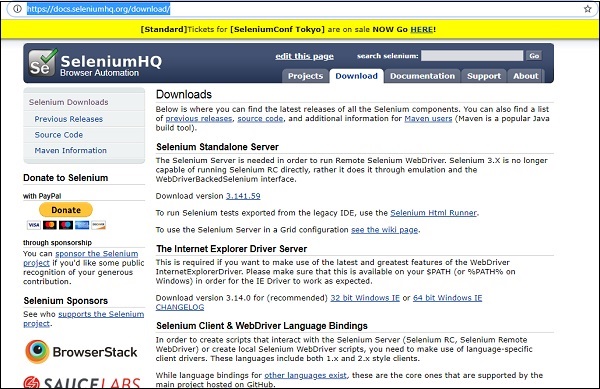
IE 下載部分的詳細資訊如下所示:
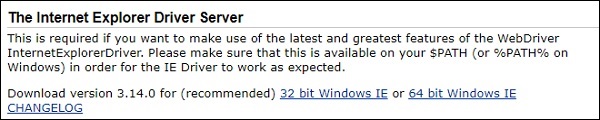
根據您的作業系統,下載 32 位或 64 位 Windows IE。還要將位置新增到 PATH 變數以使用驅動程式。
瀏覽器驅動程式 - Safari
對於 Safari 10 及更高版本,無需額外下載 Safari 驅動程式。它們在安裝 Watir 時會與 gem 包一起下載。
請注意,安裝 Watir 時也會提供 Chrome、Firefox 和 Internet Explorer 的驅動程式。但是,如果您遇到任何問題並且需要測試特定版本,您可以根據您的瀏覽器下載它們並在 PATH 中更新位置以便在測試應用程式時使用它。
Watir - 使用瀏覽器
預設情況下,如果未指定瀏覽器名稱,Watir 將開啟 Chrome 瀏覽器。所需的瀏覽器驅動程式將與 Watir 安裝一起安裝。如果您在使用瀏覽器時遇到任何問題,請安裝“瀏覽器驅動程式”一章中所示的驅動程式並在 PATH 變數中更新位置。
在本節中,我們將瞭解如何使用 Watir 開啟瀏覽器。
使用 Watir 開啟瀏覽器的步驟
開啟 IDE RubyMine 並建立一個新檔案:test1.rb


選擇確定並點選檔案模式為 ruby,如下所示:

點選確定建立檔案。
現在我們將編寫一個簡單的程式碼來開啟瀏覽器,如下所示:
test1.rb
require 'watir'
Watir::Browser.new

點選 IDE 中突出顯示的執行按鈕,如上所示。點選執行後,將開啟瀏覽器,如下所示:

瀏覽器將自動開啟和關閉。現在讓我們向 test1.rb 新增更多程式碼。
我們可以指定瀏覽器名稱,如下所示:
Chrome 示例
require 'watir'
Watir::Browser.new :chrome
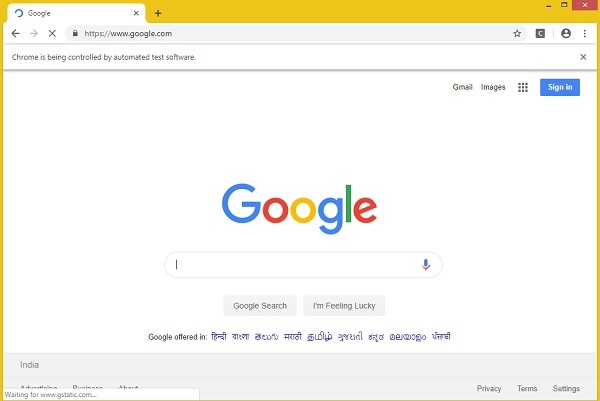
現在讓我們在測試用例中開啟一個頁面 URL。
示例
require 'watir'
browser = Watir::Browser.new
browser.goto("https://www.google.com")
單擊“執行”以檢視如下所示的輸出:
同樣,您可以開啟 Firefox、Safari、Internet Explorer 瀏覽器。
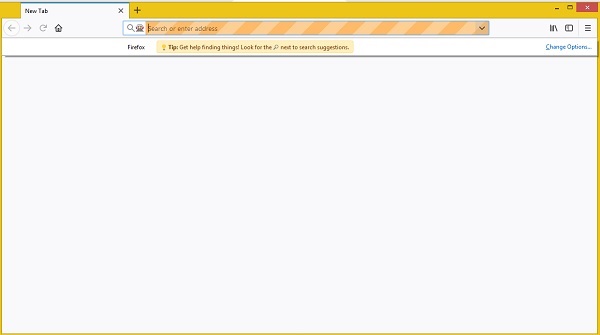
Firefox 示例
require 'watir'
Watir::Browser.new :firefox
Internet Explorer 示例
Watir 程式碼
require 'watir'
browser = Watir::Browser.new :ie
browser.goto("https://www.google.com")
執行程式碼時,顯示以下錯誤:
Unable to find IEDriverServer. Please download the server from
(Selenium::WebDriver::Error::WebDriverError)

http://selenium-release.storage.googleapis.com/index.html and place it
somewhere on your PATH.

More info at
https://github.com/SeleniumHQ/selenium/wiki/InternetExplorerDriver.
這意味著 watir 包沒有 InternetExplorer 驅動程式。我們已從此處下載了它:https://docs.seleniumhq.org/download/ 並更新了 PATH 變數。
現在再次執行它,以檢視如下所示的 Internet Explorer 瀏覽器開啟:

開啟 Safari 瀏覽器的 Watir 程式碼
require 'watir'
browser = Watir::Browser.new :safari
browser.goto("https://www.google.com")
開啟 Microsoft Edge 瀏覽器的 Watir 程式碼
require 'watir'
browser = Watir::Browser.new :edge
browser.goto("https://www.google.com")
Watir - 網頁元素
在本節中,我們將討論如何在 Watir 中使用以下內容:
- 使用文字框
- 使用組合框
- 使用單選按鈕
- 使用複選框
- 使用按鈕
- 使用連結
- 使用 Div
使用文字框
語法
browser.text_field id: 'firstname' // will get the reference of the textbox
這裡我們將嘗試瞭解如何在 UI 上使用文字框。
考慮如下所示的 page Textbox.html:
<html>
   <head>
      <title>Testing UI using Watir</title>
   </head>

   <body>
      <script type = "text/javascript">
         function wsentered() {
            console.log("inside wsentered");
            var firstname = document.getElementById("firstname");
            if (firstname.value != "") {
               document.getElementById("displayfirstname").innerHTML =
                  "The name entered is : " + firstname.value;

               document.getElementById("displayfirstname").style.display = "";
            }
         }
      </script>

      <div id = "divfirstname">
         Enter First Name :
         <input type = "text" id = "firstname" name = "firstname" onchange = "wsentered()" />
      </div>
      <br/>
      <br/>
      <div style = "display:none;" id = "displayfirstname"></div>
   </body>
</html>
相應的輸出如下所示:
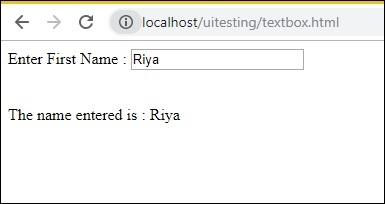
我們有一個文字框,當您輸入名稱時,onchange 事件被觸發,並且名稱顯示在下方。
現在讓我們編寫程式碼,在其中我們將找到文字框,輸入名稱並觸發 onchange 事件。
Watir 程式碼
require 'watir'
b = Watir::Browser.new :chrome
b.goto('https:///uitesting/textbox.html')
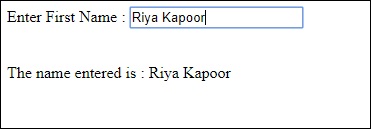
t = b.text_field id: 'firstname'
t.exists?
t.set 'Riya Kapoor'
t.value
t.fire_event('onchange')
我們使用 Chrome 瀏覽器,並將 pageurl 指定為https:///uitesting/textbox.html。
使用goto api,瀏覽器將開啟 pageurl,我們將找到 id 為 firstname 的 text_field。如果存在,我們將值設定為 Riya Kapoor,並將使用fire_event api 觸發 onchange 事件。
現在,讓我們執行程式碼以顯示如下所示的輸出:


使用組合框
語法
browser.select_list id: 'months' // will get the reference of the dropdown
我們將要測試的測試頁面顯示在此處:
<html>
   <head>
      <title>Dropdown</title>
   </head>

   <body>
      <script type = "text/javascript">
         function wsselected() {
            var months = document.getElementById("months");

            if (months.value != "") {
               document.getElementById("displayselectedmonth").innerHTML =
                  "The month selected is : " + months.value;

               document.getElementById("displayselectedmonth").style.display = "";
            }
         }
      </script>
      <form name = "myform" method = "POST">
         <div>
            Month is :
            <select name = "months" id = "months" onchange = "wsselected()">
               <option value = "">Select Month</option>
               <option value = "Jan">January</option>
               <option value = "Feb">February</option>
               <option value = "Mar">March</option>
               <option value = "Apr">April</option>
               <option value = "May">May</option>
               <option value = "Jun">June</option>
               <option value = "Jul">July</option>
               <option value = "Aug">August</option>
               <option value = "Sept">September</option>
               <option value = "Oct">October</option>
               <option value = "Nov">November</option>
               <option value = "Dec">December</option>
            </select>
         </div>
         <br/>
         <br/>

         <div style = "display:none;" id = "displayselectedmonth">
         </div>
   </body>
</html>
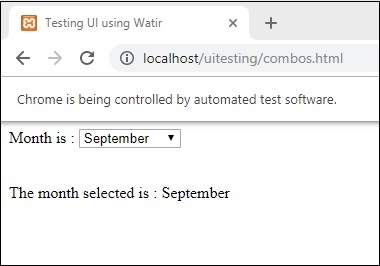
輸出

當您從下拉列表中選擇月份時,它將顯示在下方。
現在讓我們使用 Watir 來測試它。
組合框選擇的 Watir 程式碼
require 'watir'
b = Watir::Browser.new :chrome
b.goto('https:///uitesting/combos.html')
t = b.select_list id: 'months'
t.exists?
t.select 'September'
t.selected_options
t.fire_event('onchange')
要使用組合框,您需要使用 b.select_list api 和下拉列表的 id 來定位 select 元素。要從下拉列表中選擇值,您需要使用 t.select 和您想要的值。
執行後的輸出如下:
使用單選按鈕
語法
browser.radio value: 'female'
// will get the reference of the radio button with value “female”
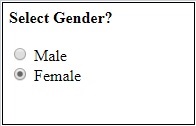
這是一個我們將用於處理單選按鈕的測試頁面:
<html>
   <head>
      <title>Testing UI using Watir</title>
   </head>

   <body>
      <form name = "myform" method = "POST">
         <b>Select Gender?</b>
         <div>
            <br/>
            <input type = "radio" name = "gender" value = "male" checked> Male
            <br/>
            <input type = "radio" name = "gender" value = "female"> Female
            <br/>
         </div>
      </form>
   </body>

</html>
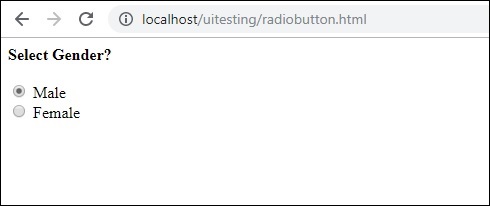
我們將選擇值為“女性”的單選按鈕,如 Watir 程式碼所示:
require 'watir'
b = Watir::Browser.new
b.goto('https:///uitesting/radiobutton.html')
t = b.radio value: 'female'
t.exists?
t.set
b.screenshot.save 'radiobutton.png'
要使用單選按鈕,我們需要告訴瀏覽器我們正在選擇的值,即b.radio value:“female”
我們還截取了螢幕截圖並將其儲存為 radiobutton.png,它顯示在下方:
使用複選框
語法
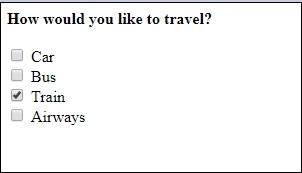
browser. checkbox value: 'Train'
// will get the reference of the checkbox with value “Train”
這是複選框的測試頁面:
<html>
   <head>
      <title>Testing UI using Watir</title>
   </head>

   <body>
      <form name = "myform" method = "POST">
         <b>How would you like to travel?</b>
         <div>
            <br>
            <input type = "checkbox" name = "option1" value = "Car"> Car<br>
            <input type = "checkbox" name = "option2" value = "Bus"> Bus<br>
            <input type = "checkbox" name = "option3" value = "Train"> Train<br>
            <input type = "checkbox" name = "option4" value = "Air"> Airways<br>
            <br>
         </div>
      </form>
   </body>

</html>
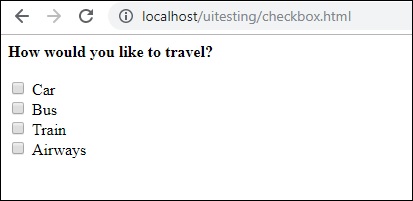
現在,讓我們使用 Watir 在瀏覽器中找到複選框,如下所示:
require 'watir'
b = Watir::Browser.new
b.goto('https:///uitesting/checkbox.html')
t = b.checkbox value: 'Train'
t.exists?
t.set
b.screenshot.save 'checkbox.png'
要在瀏覽器中找到複選框,請使用b.checkbox 和您想要選擇的值。
使用按鈕
語法
browser.button(:name => "btnsubmit").click
// will get the reference to the button element with has name “btnsubmit”
這是按鈕的測試頁面:
<html>
<head>
<title>Testing UI using Watir</title>
</head>
<body>
<script type = "text/javascript">
function wsclick() {
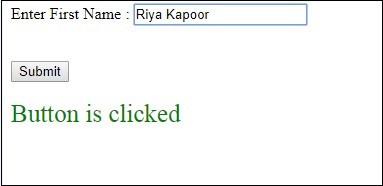
document.getElementById("buttondisplay").innerHTML = "Button is clicked";
document.getElementById("buttondisplay").style.display = "";
}
</script>
<form name = "myform" method = "POST">
<div>
<br>
<input type = "button" id = "btnsubmit" name = "btnsubmit"
value = "submit" onclick = "wsclick()"/>
<br>
</div>
</form>
<br/>
<div style = "display:none;" id = "buttondisplay"></div>
</body>
</html>
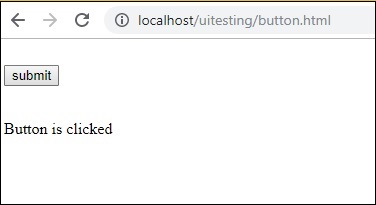
這是在給定頁面上找到按鈕的 watir 程式碼:
require 'watir'
b = Watir::Browser.new
b.goto('https:///uitesting/button.html')
b.button(:name => "btnsubmit").click
b.screenshot.save 'button.png'
這是螢幕截圖 button.png

使用連結
語法
browser.link text: 'Click Here'
// will get the reference to the a tag with text ‘Click Here’
我們將使用以下測試頁面來測試連結:
<html>
   <head>
      <title>Testing UI using Watir</title>
   </head>
   <body>
      <br/>
      <br/>
      <a href = "https://www.google.com">Click Here</a>
      <br/>
   </body>
</html>
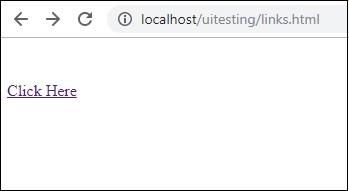
測試連結所需的 Watir 詳細資訊如下:
require 'watir'
b = Watir::Browser.new
b.goto('https:///uitesting/links.html')
l = b.link text: 'Click Here'
l.click
b.screenshot.save 'links.png'
輸出


使用 Div
語法
browser.div class: 'divtag'
// will get the reference to div with class “divtag”
我們可以測試 div 的測試頁面。
<html>
<head>
<title>Testing UI using Watir</title>
<style>
.divtag {
color: blue;
font-size: 25px;
}
</style>
</head>
<body>
<br/>
<br/>
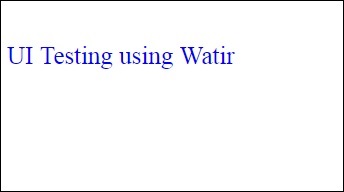
<div class = "divtag"> UI Testing using Watir </div>
<br/>
</body>
</html>
輸出
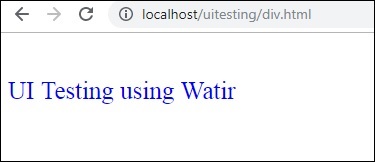
此處顯示了測試 div 的 Watir 程式碼:
require 'watir'
b = Watir::Browser.new
b.goto('https:///uitesting/div.html')
l = b.div class: 'divtag'
l.exists?
l.text
b.screenshot.save 'divtag.png'
輸出
Watir - 定位網頁元素
在 Watir 測試中,您需要找到元素,這可以透過多種方式完成——使用元素的 id、類或文字。
在本節中,我們將看到一些示例,這些示例展示了查詢元素的不同方法。
使用元素的 ID
測試頁面
<html>
   <head>
      <title>Testing UI using Watir</title>
   </head>

   <body>
      <script type = "text/javascript">
         function wsentered() {
            console.log("inside wsentered");
            var firstname = document.getElementById("firstname");

            if (firstname.value != "") {
               document.getElementById("displayfirstname").innerHTML =
                  "The name entered is : " + firstname.value;

               document.getElementById("displayfirstname").style.display = "";
            }
         }
      </script>

      <div id = "divfirstname">
         Enter First Name :
         <input type = "text" id = "firstname" name = "firstname" onchange = "wsentered()" />
      </div>
      <br/>
      <br/>
      <div style = "display:none;" id = "displayfirstname">
      </div>
   </body>
</html>
示例
require 'watir'
b = Watir::Browser.new :chrome
b.goto('https:///uitesting/textbox.html')
t = b.text_field(id: 'firstname') // using the id of the textbox to locate the textbox
t.exists?
t.set 'Riya Kapoor'
b.screenshot.save 'textboxbefore.png'
t.value
t.fire_event('onchange')
b.screenshot.save 'textboxafter.png'
在這個例子中,我們使用文字框元素的 id 來定位它並設定值。
t = b.text_field(id: 'firstname')
輸出

如果您需要定位 div、span 或任何其他 html 標籤,您可以使用 id 執行相同的操作,如下所示:
對於 div
browser.div(id: "divid")
browser.div(id: /divid/)
對於 span
browser.span(id: "spanid")
browser.span(id: /spanid/)
使用元素的 NAME
測試頁面
<html>
   <head>
      <title>Testing UI using Watir</title>
   </head>

   <body>
      <script type = "text/javascript">
         function wsentered() {
            console.log("inside wsentered");
            var firstname = document.getElementById("firstname");

            if (firstname.value != "") {
               document.getElementById("displayfirstname").innerHTML =
                  "The name entered is : " + firstname.value;

               document.getElementById("displayfirstname").style.display = "";
            }
         }
      </script>

      <div id = "divfirstname">
         Enter First Name :
         <input type = "text" id = "firstname" name = "firstname" onchange = "wsentered()" />
      </div>
      <br/>
      <br/>
      <div style = "display:none;" id = "displayfirstname">
      </div>
   </body>
</html>
示例
require 'watir'
b = Watir::Browser.new :chrome
b.goto('https:///uitesting/textbox.html')
t = b.text_field(name: 'firstname') // name is used to locate the textbox element
t.exists?
t.set 'Riya Kapoor'
b.screenshot.save 'textboxbefore.png'
t.value
t.fire_event('onchange')
b.screenshot.save 'textboxafter.png'
輸出
使用標籤名稱
您可以透過直接使用 html 標籤來定位任何您想要的 html 元素,如下所示。
對於 div
browser.div(id: "divid")
browser.div(id: /divid/)
對於 span
browser.span(id: "spanid")
browser.span(id: /spanid/)
對於 p 標籤
browser.p(id: "ptag")
browser.p(id: /ptag/)
對於按鈕
browser.button(id: "btnid")
browser.button(id: /btnid/)
使用類名
您可以使用元素的類名來定位它。這可以按如下方式完成:
對於 div
browser.div(class: "divclassname")
browser.div(class: /divclassname/)
對於 span
browser.span(class: "spanclassname”)
browser.span(class: /spanclassname/)
對於 p 標籤
browser.p(class: "pclassname")
browser.p(class: /pclassname/)
對於按鈕
browser.button(class: "btnclassname")
browser.button(class: /btnclassname/)
對於文字框
browser.text_field(class: 'txtclassname')
browser.text_field(class: /txtclassname/)
您還可以傳遞多個類,如下所示:
對於 div
browser.div(class: ["class1", "class2"])
使用文字
這是使用帶有文字的元素來定位元素的另一種方法。例如:
browser.button(text: "button text")
browser.button(text: /button text/)
使用標籤
您可以使用元素的標籤來定位它,如下所示:
browser.text_field(label: "text here"))
browser.text_field(label: /text here/))
使用資料屬性
如果您在 html 標籤中具有資料屬性,則可以使用它來定位元素,如下所示:
例如,您可以找到如下所示的標籤:
<div data-type = "test1"></div>
您可以如下定位 div:
browser.div(data-type: 'test1'))
browser.div(data-type: /test1/))
使用自定義屬性
您還可以使用自定義屬性來定位元素,如下所示:
html 元素示例
<div itemprop = ”content”>
   ….
</div>
您可以如下定位 div:
browser.div(itemprop: ‘content'))
browser.div(itemprop: /content/))
使用 Visible 屬性
可以使用 visible 屬性找到的元素如下所示:
browser.div(visible: true)
browser.div(visible: false)
Watir - 使用 Iframes
Watir 提供易於使用的語法來處理 iframe。
語法
browser.iframe(id: 'myiframe')
// will get the reference of the iframe where we want to input details.
為了瞭解如何處理 iframe 和定位 iframe 內的元素,在本節中,我們將使用一個示例。
示例
main.html
<html>
   <head>
      <title>Testing using Watir</title>
   </head>
   <body>
      <iframe src = "test1.html" id = "myiframe" width = "500" height = "100"></iframe>
   </body>
</html>
test1.html
<html>
   <head>
      <title>Testing UI using Watir</title>
   </head>

   <body>
      <script type = "text/javascript">
         function wsentered() {
            console.log("inside wsentered");
            var firstname = document.getElementById("firstname");

            if (firstname.value != "") {
               document.getElementById("displayfirstname").innerHTML =
                  "The name entered is : " + firstname.value;

               document.getElementById("displayfirstname").style.display = "";
            }
         }
      </script>

      <div id = "divfirstname">
         Enter First Name :
         <input type = "text" id = "firstname" name = "firstname" onchange = "wsentered()" />
      </div>
      <br/>
      <br/>
         <div style = "display:none;" id = "displayfirstname"></div>
   </body>
</html>
輸出

在上面的示例中,輸入表單在 iframe 內定義。將幫助我們定位並測試表單的 Watir 程式碼如下:
Watir 程式碼
require 'watir'
b = Watir::Browser.new :chrome
b.goto('https:///uitesting/main.html')
t = b.iframe(id: 'myiframe').text_field
t.set 'Riya Kapoor'
b.screenshot.save 'iframetestbefore.png'
t.fire_event('onchange')
b.screenshot.save 'iframetestafter.png'
定位此處給定的 url 中 iframe 的 Watir 程式碼:
t = b.iframe(id: 'myiframe').text_field
我們使用了 iframe 標籤名稱和 iframe 的 id,如上所示。
以上程式碼的螢幕截圖如下所示:
iframetestbefore.png
iframetestafter.png
Watir - 自動等待
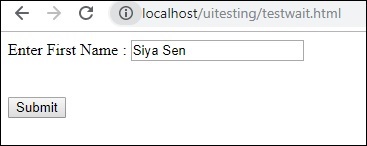
在本節中,讓我們詳細瞭解等待。為了瞭解自動等待,我們建立了一個簡單的測試頁面。當用戶在文字框中輸入文字時,onchange 事件會被觸發,3 秒後按鈕會被啟用。
Watir 有一個wait_unit api 呼叫,它等待特定事件或屬性。我們將針對如下所示的測試頁面對其進行測試:
語法
browser.button(id: 'btnsubmit').wait_until(&:enabled?)
//here the wait is on the button with id : btnsubmit to be enabled.
testwait.html
<html>
   <head>
      <title>Testing UI using Watir</title>
   </head>

   <body>
      <script type = "text/javascript">
         function wsentered() {
            setTimeout(function() {
            document.getElementById("btnsubmit").disabled = false; }, 3000);
         }
         function wsformsubmitted() {
            document.getElementById("showmessage").style.display = "";
         }
      </script>

      <div id = "divfirstname">
         Enter First Name :
         <input type = "text" id = "firstname" name = "firstname" onchange = "wsentered()" />
      </div>
      <br/>
      <br/>
      <button id = "btnsubmit" disabled onclick = "wsformsubmitted();">Submit</button>
      <br/<
      <br/<

      <div id = "showmessage" style = "display:none;color:green;font-size:25px;">l;
         Button is clicked
      </div>
   </body>
</html>
輸出

當您在文字框中輸入文字時,您必須等待 3 秒才能啟用按鈕。
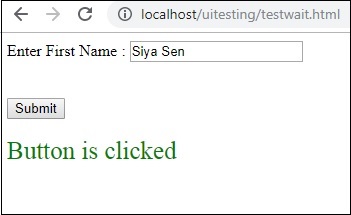
單擊“提交”按鈕時,將顯示以下文字:
現在,由於我們添加了按鈕啟用的延遲,自動化很難處理此類情況。每當我們有一些延遲或必須等待某個元素的事件或屬性被定位時,我們可以使用 wait_until,如下所示:
使用 wait_until 的 Watir 程式碼
require 'watir'
b = Watir::Browser.new :chrome
b.goto('https:///uitesting/testwait.html')
t = b.text_field(name: 'firstname')
t.exists?
t.set 'Riya Kapoor'
b.screenshot.save 'waittestbefore.png'
t.value
t.fire_event('onchange')
btn = b.button(id: 'btnsubmit').wait_until(&:enabled?)
btn.fire_event('onclick');
b.screenshot.save 'waittestafter.png'
接下來,使用以下命令
btn = b.button(id: 'btnsubmit').wait_until(&:enabled?)
Watir 將等待按鈕啟用,然後觸發單擊事件。捕獲的螢幕截圖如下所示:
Waittestbefore.png

waittestafter.png
Watir - 無頭測試
在本節中,我們將學習如何使用 Watir webdriver 的無頭選項來測試頁面 url。
語法
Browser = Watir::Browser.new :chrome, headless: true
我們將要測試的測試頁面顯示在此處:
<html>
   <head>
      <title>Testing UI using Watir</title>
   </head>

   <body>
      <script type = "text/javascript">
         function wsentered() {
            console.log("inside wsentered");
            var firstname = document.getElementById("firstname");

            if (firstname.value != "") {
               document.getElementById("displayfirstname").innerHTML =
                  "The name entered is : " + firstname.value;

               document.getElementById("displayfirstname").style.display = "";
            }
         }
      </script>

      <div id = "divfirstname">
         Enter First Name : <input type = "text" id = "firstname" name = "firstname" onchange = "wsentered()" />
      </div>
      <br/>
      <br/>
      <div style = "display:none;" id = "displayfirstname"></div>
   </body>
</html>
輸出
Watir 程式碼
require 'watir'
b = Watir::Browser.new :chrome, headless: true
b.goto('https:///uitesting/textbox.html')
t = b.text_field(name: 'firstname')
t.exists?
t.set 'Riya Kapoor'
t.value
t.fire_event('onchange')
b.screenshot.save 'headless.png'
我們已將選項headless:true 新增到 Watir Chrome 瀏覽器。當您執行 Ruby 程式時,它不會開啟瀏覽器,所有內容都將在命令列中執行:
DevTools listening on ws://127.0.0.1:53973/devtools/browser/b4127866-afb8-4c74-b967-5bacb3354b19
[0505/144843.905:INFO:CONSOLE(8)] "inside wsentered", source: https:///uitesting/textbox.html (8)
我們添加了 console.log 訊息,並在命令列中列印了相同的訊息。
headless.png 的螢幕截圖如下所示:
在 Firefox 中
此處顯示 Firefox 的 watir 程式碼:
require 'watir'
b = Watir::Browser.new :firefox, headless: true
b.goto('https:///uitesting/textbox.html')
t = b.text_field(name: 'firstname')
t.exists?
t.set 'Riya Kapoor'
t.value
t.fire_event('onchange')
b.screenshot.save 'headlessfirefox.png'
此處顯示 headlessfirefox.png 的螢幕截圖:
Watir - 移動測試
對於移動測試,我們將使用桌面瀏覽器,該瀏覽器將充當測試目的的裝置瀏覽器。讓我們在本節中瞭解其過程。
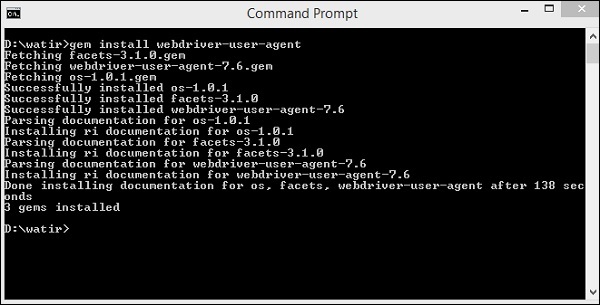
要在移動瀏覽器上測試您的應用程式,我們需要安裝 webdriver-user-agent。
安裝 webdriver-user-agent
gem install webdriver-user-agent
現在,我們將使用 Webdriver useragent,如下面的示例所示:
示例
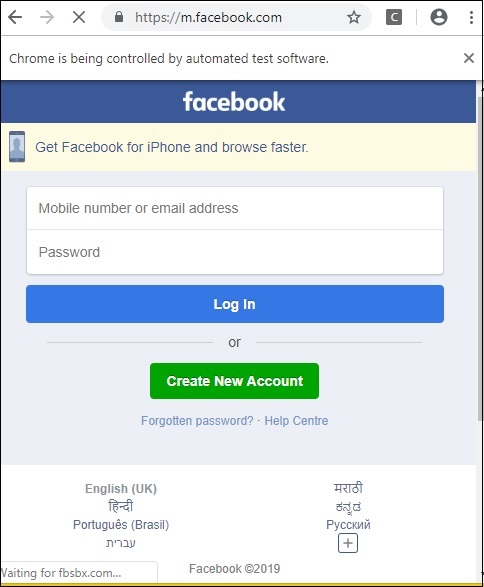
require 'watir'
require 'webdriver-user-agent'
driver = Webdriver::UserAgent.driver(browser: :chrome, agent: :iphone, orientation: :landscape)
browser = Watir::Browser.new driver
browser.goto 'https://facebook.com'
puts "#{browser.url}"
puts browser.url == 'https://m.facebook.com/'
我們給出了 facebook.com url。當您執行它時,它將根據使用者代理以移動模式開啟,如下所示:

現在讓我們嘗試縱向模式。為此,請使用以下程式碼:
require 'watir'
require 'webdriver-user-agent'
driver = Webdriver::UserAgent.driver(browser: :chrome, agent: :iphone, orientation: :portrait)
browser = Watir::Browser.new driver
browser.goto 'https://facebook.com'
puts "#{browser.url}"
puts browser.url == 'https://m.facebook.com/'
縱向模式下的輸出如下所示:
Watir - 捕獲螢幕截圖
捕獲螢幕截圖的能力是 Watir 提供的有趣功能之一。在測試自動化期間,您可以擷取螢幕截圖並儲存螢幕。如果發生任何錯誤,則可以藉助螢幕截圖對其進行記錄。
下面討論了一個簡單的示例以及我們已擷取螢幕截圖的測試頁面:
語法
browser.screenshot.save 'nameofimage.png'
測試頁面
<html>
   <head>
      <title>Testing UI using Watir</title>
   </head>

   <body>
      <script type = "text/javascript">
         function wsentered() {
            console.log("inside wsentered");
            var firstname = document.getElementById("firstname");

            if (firstname.value != "") {
               document.getElementById("displayfirstname").innerHTML =
                  "The name entered is : " + firstname.value;

               document.getElementById("displayfirstname").style.display = "";
            }
         }
      </script>
      <div id = "divfirstname">
         Enter First Name :
         <input type = "text" id = "firstname" name = "firstname" onchange = "wsentered()" />
      </div>
      <br/>
      <br/>
      <div style = "display:none;" id = "displayfirstname"></div>
   </body>
</html>
示例
require 'watir'
b = Watir::Browser.new :chrome
b.goto('https:///uitesting/textbox.html')
t = b.text_field(id: 'firstname') // using the id of the textbox to locate the textbox
t.exists?
t.set 'Riya Kapoor'
b.screenshot.save 'textboxbefore.png'
t.value
t.fire_event('onchange')
b.screenshot.save 'textboxafter.png'
我們使用 Watir 擷取的螢幕截圖顯示在此處:
textboxbefore.png
textboxafter.png
Watir - 頁面物件
Watir 中的頁面物件可以幫助我們以類的形式重用程式碼。使用頁面物件功能,我們可以自動化我們的應用程式,而無需複製任何程式碼,還可以使程式碼易於管理。
在測試時,我們可以為我們要測試的每個頁面建立頁面物件。然後,我們將使用頁面物件訪問方法和屬性。
使用頁面物件的原因:
如果稍後對頁面進行了任何更改,則無需重寫程式碼。
避免程式碼冗餘。
我們將使用 RSpec 在 Watir 中使用頁面物件。如果您不熟悉 RSpec,這裡有一個完整的教程可供您學習RSpec。
我們將對其進行測試的頁面在此處給出:
textbox.html
<html>
   <head>
      <title>Testing UI using Watir</title>
   </head>

   <body>
      <script type = "text/javascript">
         function wsentered() {
            console.log("inside wsentered");
            var firstname = document.getElementById("firstname");

            if (firstname.value != "") {
               document.getElementById("displayfirstname").innerHTML =
                  "The name entered is : " + firstname.value;

               document.getElementById("displayfirstname").style.display = "";
            }
         }
      </script>

      <div id = "divfirstname">
         Enter First Name :
         <input type = "text" id = "firstname" name = "firstname" onchange = "wsentered()" />
      </div>
      <br/>
      <br/>
      <div style = "display:none;" id = "displayfirstname"></div>
   </body>
</html>
輸出
我們現在將為上述頁面建立頁面物件,如下所示:
pageobjecttest.rb
class InitializeBrowser
   def initialize(browser)
      @browser = browser
   end
end

class TestPage lt; InitializeBrowser
   def textbox
      @textbox = TestTextbox.new(@browser)
   end
   def close
      @browser.screenshot.save 'usingpageobject.png'
      @browser.close
   end
end # TestPage

class TestTextbox < InitializeBrowser
   URL = "https:///uitesting/textbox.html"

   def open
      @browser.goto URL
      self
   end
   def enterdata_as(name)
      name_field.set name
      name_field.fire_event('onchange')
   end

private
   def name_field
      @browser.text_field(:id > "firstname")
   end
end # TestTextbox
定義了三個類 - InitializeBrowser、TestPage 和 TestTextbox:
InitializeBrowser - 這將初始化開啟的瀏覽器並將瀏覽器物件與 TestPage 和 TestTextbox 類共享。
TestPage - 此類將具有對 TestTextbox 的物件引用,幷包含捕獲螢幕截圖和關閉瀏覽器的方法。
TestTextbox - 此類將具有開啟頁面 url、引用文字欄位、設定資料和觸發 onchange 事件的方法。
執行上述程式碼後,您可以看到如下所示的輸出:
Watir - 頁面效能
Watir 頁面效能功能允許您跟蹤響應時間指標,它在 Chrome、Firefox、IE9 及更高版本中執行良好。目前,Safari 瀏覽器尚不支援。
讓我們仔細看看如何使用此功能。要使用它,我們需要使用 gem 安裝 watir-performance,如下所示:
命令
gem install watir-performance
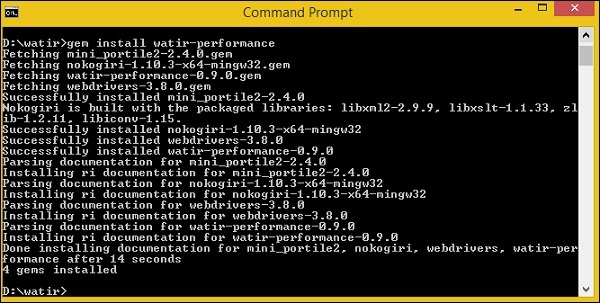
我們完成了 watir-performance 的安裝。支援的指標是:
- 摘要
- 導航
- 記憶體
- 計時
此處討論了一個使用 watir-performance 的工作示例。在這裡,我們將檢查站點的響應時間:www.tutorialspoint.com,如下所示:
require 'watir'
require 'watir-performance'
10.times do
   b = Watir::Browser.new :chrome
   b.goto 'https://tutorialspoint.tw'
   load_secs = b.performance.summary[:response_time] / 1000
   puts "Load Time: #{load_secs} seconds."
   b.close
end
輸出
Load Time: 7 seconds.
Load Time: 7 seconds.
Load Time: 5 seconds.
Load Time: 5 seconds.
Load Time: 6 seconds.
Load Time: 5 seconds.
Load Time: 5 seconds.
Load Time: 13 seconds.
Load Time: 12 seconds.
Load Time: 5 seconds.
使用 performance.timing
require 'watir'
require 'watir-performance'

b = Watir::Browser.new :chrome
b.goto 'https://tutorialspoint.tw'
load_secs = b.performance.timing[:response_end] - b.performance.timing[:response_start]
puts "Time taken to respond is #{load_secs} seconds."
b.close
輸出
Time taken to respond is 41 seconds.
使用 performance.navigation
require 'watir'
require 'watir-performance'

b = Watir::Browser.new :chrome
b.goto 'https://tutorialspoint.tw'
perf_nav = b.performance.navigation
puts "#{perf_nav}"
b.close
輸出
{:type_back_forward=>2, :type_navigate=>0, :type_reload=>1,
:type_reserved=>255, :redirect_count=>0, :to_json=>{}, :type=>0}
使用 performance.memory
require 'watir'
require 'watir-performance'

b = Watir::Browser.new :chrome
b.goto 'https://tutorialspoint.tw'
memory_used = b.performance.memory
puts "#{memory_used}"
b.close
輸出
{:js_heap_size_limit=>2, :type_navigate=>0, :type_reload=>1, :ty2136997888,
:total_js_heap_size=>2, :type_navigate=>0, :type_reload=>1, :ty12990756,
:used_js_heap_size=>2, :type_navigate=>0, :type_reload=>1, :ty7127092}
Watir - Cookie
在本節中,我們將學習如何使用 Watir 處理 Cookie。
此處討論了一個簡單的示例,該示例將為給定的 URL 獲取 Cookie。
獲取 Cookie 的語法
browser.cookies.to_a
示例
require 'watir'

b = Watir::Browser.new :chrome
b.goto 'https://tutorialspoint.tw'
puts b.cookies.to_a
輸出
{:name=>"_gat_gtag_UA_232293_6", :value=>"1", :path=>"/",
:domain=>".tutorialspoint.com", :expires=>2019-05-03 08:33:58 +0000,
:secure=>false}

{:name=>"_gid", :value=> "GA1.2.282573155.1556872379", :path=>"/",
:domain=>".tutorialspoint.com", :expires=>2019-05-04 08:32:57 +0000,
:secure=>false}

{:name=>"_ga", :value=>"GA1.2.2087825339.1556872379", :path=>"/",
:domain=>".tutorialspoint.com", :expires=>
2021-05-02 08:32:57 +0000, :secure=>false}
現在讓我們新增cookie,如下所示:
新增cookie的語法
browser.cookies.add 'cookiename', 'cookievalue', path: '/', expires:
(Time.now + 10000), secure: true
示例
require 'watir'
b = Watir::Browser.new :chrome
b.goto 'https://tutorialspoint.tw'
puts b.cookies.to_a
b.cookies.add 'cookie1', 'testing_cookie', path: '/', expires:
(Time.now + 10000), secure: true
puts b.cookies.to_a
新增cookie之前的輸出
{:name=>"_gat_gtag_UA_232293_6", :value=>"1", :path=>"/",
:domain=>".tutorialspoint.com", :expires=>2019-05-03 08:44:23 +0000,
:secure=>false}

{:name=>"_gid", :value=>"GA1.2.1541488984.1556873004",
:path=>"/", :domain=>".tutorialspoint.com",
:expires=>2019-05-04 08:43:24 +0000, :secure=>false}

{:name=>"_ga", :value=>"GA1.2.1236163943.1556873004",
:path=>"/", :domain=>".tutorialspoint.com",
:expires=>2021-05-02 08:43:24 +0000, :secure=>false}
新增cookie之後的輸出
{:name=>"_gat_gtag_UA_232293_6", :value=>"1", :path=>"/",
:domain=>".tutorialspoint.com", :expires=>2019-05-03 08:44:23 +0000,
:secure=>false}

{:name=>"_gid", :value=>"GA1.2.1541488984.1556873004",
:path=>"/", :domain=>".tutorialspoint.com",
:expires=>2019-05-04 08:43:24 +0000, :secure=>false}

{:name=>"_ga", :value=>"GA1.2.1236163943.1556873004",
:path=>"/", :domain=>".tutorialspoint.com",
:expires=>2021-05-02 08:43:24 +0000, :secure=>false}

{:name=>"cookie1", :value=>"testing_cookie", :path=>"/",
:domain=>"www.tutorialspoint.com", :expires=>2039-04-28 08:43:35 +0000,
:secure=>true}
請注意,最後一個是我們使用Watir新增的。
清除Cookie
語法
browser.cookies.clear
示例
require 'watir'

b = Watir::Browser.new :chrome
b.goto 'https://tutorialspoint.tw'
puts b.cookies.to_a
b.cookies.clear
puts b.cookies.to_a
輸出
{:name=>"_gat_gtag_UA_232293_6", :value=>"1", :path=>"/",
:domain=>".tutorialspoint.com", :expires=>2019-05-03 08:48:29 +0000,
:secure=>false}

{:name=>"_gid", :value=>"GA1.2.1264249563.1556873251",
:path=>"/", :domain=>".tutorialspoint.com",
:expires=>2019-05-04 08:47:30 +0000, :secure=>false}

{:name=>"_ga", :value=>"GA1.2.1001488637.1556873251",
:path=>"/", :domain=>".tutorialspoint.com",
:expires=>2021-05-02 08:47:30 +0000, :secure=>false

Empty response ie a blank line will get printed after cookie.clear is called.
刪除特定Cookie
語法
browser.cookies.delete 'nameofthecookie'
示例
require 'watir'
b = Watir::Browser.new :chrome
b.goto 'https://tutorialspoint.tw'
puts b.cookies.to_a
puts b.cookies.delete "_ga"
puts b.cookies.to_a
輸出
All cookies:
{:name=>"_gat_gtag_UA_232293_6", :value=>"1", :path=>"/",
:domain=>".tutorialspoint.com", :expires=>2019-05-03 08:52:38 +0000,
:secure=>false}

{:name=>"_gid", :value=>"GA1.2.1385195240.1556873499",
:path=>"/", :domain=>".tutorialspoint.com",
:expires=>2019-05-04 08:51:37 +0000, :secure=>false}

{:name=>"_ga", :value=>"GA1.2.1383421835.1556873499",
:path=>"/", :domain=>".tutorialspoint.com",
:expires=>2021-05-02 08:51:37 +0000, :secure=>false}

After delete cookie with name _ga
{:name=>"_gat_gtag_UA_232293_6",
:value=>"1", :path=>"/", :domain=>".tutorialspoint.com",
:expires=>2019-05-03 08:52:38 +0000, :secure=>false}

{:name=>"_gid", :value=>"GA1.2.1385195240.1556873499",
:path=>"/", :domain=>".tutorialspoint.com",
:expires=>2019-05-04 08:51:37 +0000, :secure=>false}
Watir - 代理
Watir允許使用代理物件來使用代理,該物件需要與瀏覽器一起使用。
語法
proxy = {
   http: '127.0.0.1:8080',
   ssl: '127.0.0.1:8080'
}
b = Watir::Browser.new :chrome, proxy: proxy
下面顯示瞭如何在Chrome瀏覽器中使用代理的示例:
示例
require "watir"
proxy = {
   http: '127.0.0.1:8080',
   ssl: '127.0.0.1:8080'
}
b = Watir::Browser.new :chrome, proxy: proxy
b.goto 'google.com'
b.screenshot.save 'proxy.png'
我們使用瞭如下所示的代理物件:
proxy = {
   http: '127.0.0.1:8080',
   ssl: '127.0.0.1:8080'
}
代理地址詳細資訊需要同時用於http和ssl。我們可以像下面這樣在Chrome瀏覽器中使用代理:
b = Watir::Browser.new :chrome, proxy: proxy
輸出proxy.png如下所示:
下面討論瞭如何在Firefox瀏覽器中使用代理的示例:
示例
require "watir"
proxy = {
   http: '127.0.0.1:8080',
   ssl: '127.0.0.1:8080'
}
b = Watir::Browser.new :firefox, proxy: proxy
b.goto 'google.com'
b.screenshot.save 'proxyfirefox.png'
您可以新增如下所示的代理詳細資訊:
proxy = {
   http: '127.0.0.1:8080',
   ssl: '127.0.0.1:8080'
}
b = Watir::Browser.new :firefox, proxy: proxy
輸出proxyfirefox.png如下所示:
Watir - 警報
本章我們將瞭解如何使用Watir處理警報。
語法
browser.alert.exists?
browser.alert.ok
browser.alert.close
測試頁面
<html>
   <head>
      <title>Testing Alerts Using Watir</title>
   </head>

   <body>
      <script type = "text/javascript">
         function wsformsubmitted() {
            alert("Button is Clicked !");
         }
      </script>
      <button id = "btnsubmit" onclick = "wsformsubmitted();">Submit</button>
   </body>
</html>
Watir 程式碼
require 'watir'
b = Watir::Browser.new :chrome
b.goto('https:///uitesting/testalert.html')
b.button(id: 'btnsubmit').click
b.alert.ok
b.screenshot.save 'alerttest.png'
輸出alerttest.png如下所示:

Watir - 下載
我們在UI或我們的網站中有一些按鈕或連結,可以下載pdf或doc檔案。我們可以透過為瀏覽器提供一些首選項來測試使用Watir進行下載。
下載語法:
prefs = {
   'download' => {
      'default_directory' => "C:/download",
      'prompt_for_download' => false,
   }
}
b = Watir::Browser.new :chrome, options: {prefs: prefs}
prefs包含download,我們需要指定下載後要儲存檔案的路徑,並且需要像上面語法中顯示的那樣將其提供給瀏覽器。
這裡顯示了一個可執行的示例。在這裡,我們建立了一個帶有按鈕的測試頁面,單擊該按鈕將下載名為file.txt的檔案,如下所示:
<html>
   <head>
      <title>Testing UI using Watir</title>
   </head>

   <body>
      <br/>
      <br/>
      <button id = "btnsubmit">
         <a href = "file.txt" download>Click to Download!</a>
      </button>
      <br/>
   </body>
</html>
file.txt
This is for testing watir download
輸出
單擊下載按鈕後,檔案將被下載。
現在讓我們使用Watir測試相同的操作:
require 'watir'
prefs = {
   'download' => {
      'default_directory' => "C:/download",
      'prompt_for_download' => false,
   }
}
b = Watir::Browser.new :chrome, options: {prefs: prefs}
b.goto('https:///uitesting/filedownload.html')
b.button(id: 'btnsubmit').click
b.screenshot.save 'testdownload.png'
我們指定的下載檔案儲存路徑為“C:/download”。當我們執行上述程式碼時,檔案將下載到指定的下載路徑,如下所示:

輸出testdownload.png如下所示:

Watir - 瀏覽器視窗
您會遇到必須使用彈出視窗或開啟新的瀏覽器視窗的情況。在本章中,我們將討論如何使用Watir測試此類情況。
語法
browser.window
我們將要測試的可執行示例如下:
<html>
   <head>
      <title>Testing UI using Watir</title>
   </head>

   <body>
      <script type = "text/javascript">
         function wsclick() {
            var myWindow = window.open(
               "https://www.google.com/", "mywindow", "width = 1000,height = 500");
         }
      </script>

      <form name = "myform" method = "POST">
         <div>
            <br>
            <input type = "button" id = "btnsubmit" name = "btnsubmit" value = "submit" onclick = "wsclick()"/>
            <br>
         </div>
      </form>
      <br/>
   </body>
</html>
輸出
單擊“開啟視窗”按鈕後,彈出視窗將開啟。這裡我們提供的網址是 www.google.com。現在讓我們使用Watir測試相同的操作。
示例
require 'watir'
b = Watir::Browser.new :chrome
b.goto('https:///uitesting/windowpopup.html')
b.button(id: 'btnsubmit').click
b.window(title: 'Google').use do
   b.screenshot.save 'popupwindow.png'
   t = b.text_field(class: 'gLFyf')
   t.set 'Watir'
   b.screenshot.save 'popupwindowbefore.png'
   b.button(name: 'btnK').click
   b.screenshot.save 'popupwindowafter.png'
end
我們擷取的螢幕截圖如下所示:
popupwindow.png
popupwindowbefore.png

popupwindowafter.png