Spring Cloud - 使用 Eureka 進行服務發現
簡介
當應用程式作為微服務部署到雲中時,服務發現是最關鍵的部分之一。這是因為對於任何使用操作,微服務架構中的應用程式可能需要訪問多個服務,並且它們之間需要進行通訊。
服務發現有助於跟蹤服務地址和可以聯絡服務例項的埠。這裡有三個元件在起作用:
服務例項 - 負責處理服務的傳入請求並響應這些請求。
服務註冊中心 - 跟蹤服務例項的地址。服務例項應該將其地址註冊到服務註冊中心。
服務客戶端 - 想要訪問或想要發出請求並從服務例項獲取響應的客戶端。服務客戶端聯絡服務註冊中心以獲取例項的地址。
Apache Zookeeper、Eureka 和 Consul 是幾個眾所周知的用於服務發現的元件。在本教程中,我們將使用 Eureka。
設定 Eureka 伺服器/註冊中心
要設定 Eureka 伺服器,我們需要更新 POM 檔案以包含以下依賴項:
<dependencies>
   <dependency>
      <groupId>org.springframework.cloud</groupId>
      <artifactId>spring-cloud-starter-netflix-eureka-server</artifactId>
   </dependency>
   <dependency>
      <groupId>org.springframework.boot</groupId>
      <artifactId>spring-boot-starter-web</artifactId>
   </dependency>
</dependencies>
然後,使用正確的註解,即 `@EnableEurekaServer`,來註解我們的 Spring 應用程式類。
package com.tutorialspoint;
import org.springframework.boot.SpringApplication;
import org.springframework.boot.autoconfigure.SpringBootApplication;
import org.springframework.cloud.netflix.eureka.server.EnableEurekaServer;
@SpringBootApplication
@EnableEurekaServer
public class RestaurantServiceRegistry{
   public static void main(String[] args) {
      SpringApplication.run(RestaurantServiceRegistry.class, args);
   }
}
如果我們想要配置註冊中心並更改其預設值,我們還需要一個屬性檔案。以下是我們將進行的更改:
將埠更新為 8900 而不是預設的 8080。
在生產環境中,為了高可用性,註冊中心將擁有多個節點。這就是我們需要註冊中心之間進行點對點通訊的地方。由於我們以獨立模式執行此操作,因此我們可以簡單地將客戶端屬性設定為false 以避免任何錯誤。
因此,我們的application.yml檔案如下所示:
server:
   port: 8900
eureka:
   client:
      register-with-eureka: false
      fetch-registry: false
就是這樣,現在讓我們使用以下命令編譯專案並執行程式:
java -jar .\target\spring-cloud-eureka-server-1.0.jar
現在,我們可以在控制檯中看到日誌:
...
2021-03-07 13:33:10.156 INFO 17660 --- [ main]
o.s.b.w.embedded.tomcat.TomcatWebServer : Tomcat initialized with port(s): 8900
(http)
2021-03-07 13:33:10.172 INFO 17660 --- [ main]
o.apache.catalina.core.StandardService : Starting service [Tomcat]
...
2021-03-07 13:33:16.483 INFO 17660 --- [ main]
DiscoveryClientOptionalArgsConfiguration : Eureka HTTP Client uses Jersey
...
2021-03-07 13:33:16.632 INFO 17660 --- [ main]
o.s.c.n.eureka.InstanceInfoFactory : Setting initial instance status as:
STARTING
2021-03-07 13:33:16.675 INFO 17660 --- [ main]
com.netflix.discovery.DiscoveryClient : Initializing Eureka in region useast-
1
2021-03-07 13:33:16.675 INFO 17660 --- [ main]
com.netflix.discovery.DiscoveryClient : Client configured to neither register
nor query for data.
2021-03-07 13:33:16.686 INFO 17660 --- [ main]
com.netflix.discovery.DiscoveryClient : Discovery Client initialized at
timestamp 1615104196685 with initial instances count: 0
...
2021-03-07 13:33:16.873 INFO 17660 --- [ Thread-10]
e.s.EurekaServerInitializerConfiguration : Started Eureka Server
2021-03-07 13:33:18.609 INFO 17660 --- [ main]
c.t.RestaurantServiceRegistry : Started RestaurantServiceRegistry in
15.219 seconds (JVM running for 16.068)
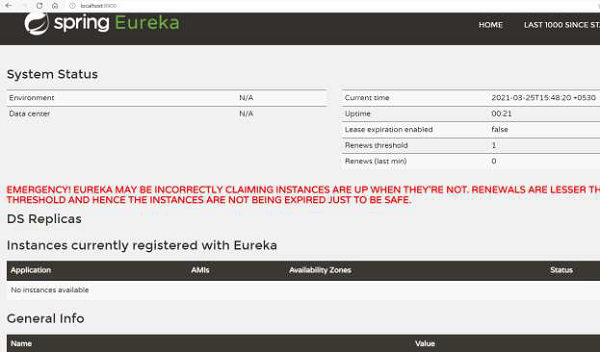
從上面的日誌中我們可以看到 Eureka 註冊中心已經設定好了。我們還獲得了 Eureka 的儀表盤(參見下圖),它託管在伺服器 URL 上。
為例項設定 Eureka 客戶端
現在,我們將設定服務例項,這些例項將註冊到 Eureka 伺服器。為了設定 Eureka 客戶端,我們將使用一個單獨的 Maven 專案,並更新 POM 檔案以包含以下依賴項:
<dependencies>
   <dependency>
      <groupId>org.springframework.cloud</groupId>
      <artifactId>spring-cloud-starter-netflix-eureka-client</artifactId>
   </dependency>
   <dependency>
      <groupId>org.springframework.boot</groupId>
      <artifactId>spring-boot-starter-web</artifactId>
   </dependency>
</dependencies>
然後,使用正確的註解,即 `@EnableDiscoveryClient`,來註解我們的 Spring 應用程式類。
package com.tutorialspoint;
import org.springframework.boot.SpringApplication;
import org.springframework.boot.autoconfigure.SpringBootApplication;
import org.springframework.cloud.client.discovery.EnableDiscoveryClient;
@SpringBootApplication
@EnableDiscoveryClient
public class RestaurantCustomerService{
   public static void main(String[] args) {
      SpringApplication.run(RestaurantCustomerService.class, args);
   }
}
如果我們想要配置客戶端並更改其預設值,我們還需要一個屬性檔案。以下是我們將進行的更改:
我們將在執行時提供 jar 執行時的埠。
我們將指定 Eureka 伺服器執行的 URL。
因此,我們的 application.yml 檔案如下所示:
spring:
   application:
      name: customer-service
server:
   port: ${app_port}
eureka:
   client:
      serviceURL:
         defaultZone: https://:8900/eureka
為了執行,我們將有兩個服務例項執行。為此,讓我們開啟兩個 shell,然後在一個 shell 上執行以下命令:
java -Dapp_port=8081 -jar .\target\spring-cloud-eureka-client-1.0.jar
並在另一個 shell 上執行以下命令:
java -Dapp_port=8082 -jar .\target\spring-cloud-eureka-client-1.0.jar
現在,我們可以在控制檯中看到日誌:
...
2021-03-07 15:22:22.474 INFO 16920 --- [ main]
com.netflix.discovery.DiscoveryClient : Starting heartbeat executor: renew
interval is: 30
2021-03-07 15:22:22.482 INFO 16920 --- [ main]
c.n.discovery.InstanceInfoReplicator : InstanceInfoReplicator onDemand
update allowed rate per min is 4
2021-03-07 15:22:22.490 INFO 16920 --- [ main]
com.netflix.discovery.DiscoveryClient : Discovery Client initialized at
timestamp 1615110742488 with initial instances count: 0
2021-03-07 15:22:22.492 INFO 16920 --- [ main]
o.s.c.n.e.s.EurekaServiceRegistry : Registering application CUSTOMERSERVICE
with eureka with status UP
2021-03-07 15:22:22.494 INFO 16920 --- [ main]
com.netflix.discovery.DiscoveryClient : Saw local status change event
StatusChangeEvent [timestamp=1615110742494, current=UP, previous=STARTING]
2021-03-07 15:22:22.500 INFO 16920 --- [nfoReplicator-0]
com.netflix.discovery.DiscoveryClient : DiscoveryClient_CUSTOMERSERVICE/
localhost:customer-service:8081: registering service...
2021-03-07 15:22:22.588 INFO 16920 --- [ main]
o.s.b.w.embedded.tomcat.TomcatWebServer : Tomcat started on port(s): 8081
(http) with context path ''
2021-03-07 15:22:22.591 INFO 16920 --- [ main]
.s.c.n.e.s.EurekaAutoServiceRegistration : Updating port to 8081
2021-03-07 15:22:22.705 INFO 16920 --- [nfoReplicator-0]
com.netflix.discovery.DiscoveryClient : DiscoveryClient_CUSTOMERSERVICE/
localhost:customer-service:8081 - registration status: 204
...
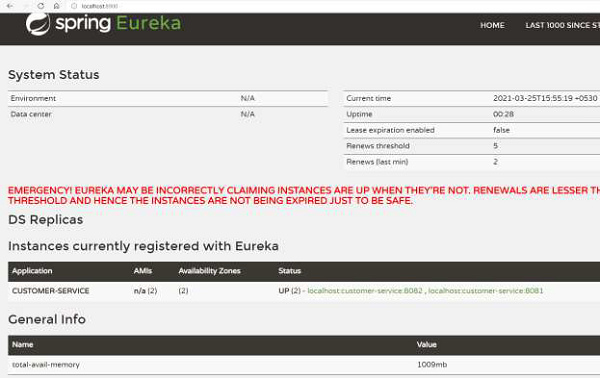
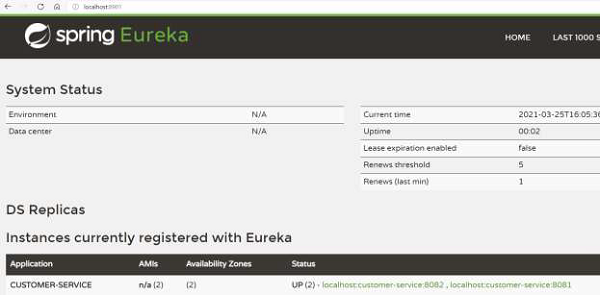
從上面的日誌中我們可以看到客戶端例項已經設定好了。我們還可以檢視我們之前看到的 Eureka 伺服器儀表盤。正如我們所看到的,Eureka 伺服器知道有兩個“CUSTOMER-SERVICE”例項正在執行:
Eureka 客戶端使用者示例
我們的 Eureka 伺服器已經獲得了已註冊的“Customer-Service”客戶端例項。現在我們可以設定使用者,它可以向 Eureka 伺服器請求“Customer-Service”節點的地址。
為此,讓我們新增一個控制器,它可以從 Eureka 註冊中心獲取資訊。這個控制器將新增到我們之前的 Eureka 客戶端本身,即“Customer Service”。讓我們為客戶端建立以下控制器。
package com.tutorialspoint;
import java.util.List;
import org.springframework.beans.factory.annotation.Autowired;
import org.springframework.cloud.client.ServiceInstance;
import org.springframework.cloud.client.discovery.DiscoveryClient;
import org.springframework.web.bind.annotation.RequestMapping;
import org.springframework.web.bind.annotation.RestController;
@RestController
class RestaurantCustomerInstancesController {
   @Autowired
   private DiscoveryClient eurekaConsumer;
   @RequestMapping("/customer_service_instances")
請注意註解 `@DiscoveryClient`,這是 Spring 框架提供的用於與註冊中心通訊的註解。
現在讓我們重新編譯我們的 Eureka 客戶端。為了執行,我們將有兩個服務例項執行。為此,讓我們開啟兩個 shell,然後在一個 shell 上執行以下命令:
java -Dapp_port=8081 -jar .\target\spring-cloud-eureka-client-1.0.jar
並在另一個 shell 上執行以下命令:
java -Dapp_port=8082 -jar .\target\spring-cloud-eureka-client-1.0.jar
一旦兩個 shell 上的客戶端啟動,讓我們訪問我們在控制器中建立的 https://:8081/customer_service_instances。此 URL 顯示有關這兩個例項的完整資訊。
[
   {
      "scheme": "http",
      "host": "localhost",
      "port": 8081,
      "metadata": {
         "management.port": "8081"
      },
      "secure": false,
      "instanceInfo": {
         "instanceId": "localhost:customer-service:8081",
         "app": "CUSTOMER-SERVICE",
         "appGroupName": null,
         "ipAddr": "10.0.75.1",
         "sid": "na",
         "homePageUrl": "https://:8081/",
         "statusPageUrl": "https://:8081/actuator/info",
         "healthCheckUrl": "https://:8081/actuator/health",
         "secureHealthCheckUrl": null,
         "vipAddress": "customer-service",
         "secureVipAddress": "customer-service",
         "countryId": 1,
         "dataCenterInfo": {
            "@class": "com.netflix.appinfo.InstanceInfo$DefaultDataCenterInfo",
            "name": "MyOwn"
         },
         "hostName": "localhost",
         "status": "UP",
         "overriddenStatus": "UNKNOWN",
         "leaseInfo": {
            "renewalIntervalInSecs": 30,
            "durationInSecs": 90,
            "registrationTimestamp": 1616667914313,
            "lastRenewalTimestamp": 1616667914313,
            "evictionTimestamp": 0,
            "serviceUpTimestamp": 1616667914313
         },
         "isCoordinatingDiscoveryServer": false,
         "metadata": {
            "management.port": "8081"
         },
         "lastUpdatedTimestamp": 1616667914313,
         "lastDirtyTimestamp": 1616667914162,
         "actionType": "ADDED",
         "asgName": null
      },
      "instanceId": "localhost:customer-service:8081",
      "serviceId": "CUSTOMER-SERVICE",
      "uri": "https://:8081"
   },
   {
      "scheme": "http",
      "host": "localhost",
      "port": 8082,
      "metadata": {
         "management.port": "8082"
      },
      "secure": false,
      "instanceInfo": {
      "instanceId": "localhost:customer-service:8082",
      "app": "CUSTOMER-SERVICE",
      "appGroupName": null,
      "ipAddr": "10.0.75.1",
      "sid": "na",
      "homePageUrl": "https://:8082/",
      "statusPageUrl": "https://:8082/actuator/info",
      "healthCheckUrl": "https://:8082/actuator/health",
      "secureHealthCheckUrl": null,
      "vipAddress": "customer-service",
      "secureVipAddress": "customer-service",
      "countryId": 1,
      "dataCenterInfo": {
         "@class": "com.netflix.appinfo.InstanceInfo$DefaultDataCenterInfo",
         "name": "MyOwn"
      },
      "hostName": "localhost",
      "status": "UP",
      "overriddenStatus": "UNKNOWN",
      "leaseInfo": {
         "renewalIntervalInSecs": 30,
         "durationInSecs": 90,
         "registrationTimestamp": 1616667913690,
         "lastRenewalTimestamp": 1616667913690,
         "evictionTimestamp": 0,
         "serviceUpTimestamp": 1616667913690
      },
      "isCoordinatingDiscoveryServer": false,
      "metadata": {
         "management.port": "8082"
      },
      "lastUpdatedTimestamp": 1616667913690,
      "lastDirtyTimestamp": 1616667913505,
      "actionType": "ADDED",
      "asgName": null
     },
     "instanceId": "localhost:customer-service:8082",
     "serviceId": "CUSTOMER-SERVICE",
     "uri": "https://:8082"
   }
]
Eureka 伺服器 API
Eureka 伺服器為客戶端例項或服務提供了各種 API 進行通訊。許多這些 API 都是抽象的,可以直接使用我們之前定義和使用的 `@DiscoveryClient`。需要注意的是,它們的 HTTP 對應項也存在,對於非 Spring 框架使用 Eureka 也很有用。
事實上,我們之前使用的 API,即獲取正在執行“Customer_Service”的客戶端的資訊,也可以透過瀏覽器使用 https://:8900/eureka/apps/customer-service 來呼叫,如下所示:
<application slick-uniqueid="3">
   <div>
      <a id="slick_uniqueid"/>
   </div>
   <name>CUSTOMER-SERVICE</name>
   <instance>
         <instanceId>localhost:customer-service:8082</instanceId>
         <hostName>localhost</hostName>
         <app>CUSTOMER-SERVICE</app>
         <ipAddr>10.0.75.1</ipAddr>
         <status>UP</status>
         <overriddenstatus>UNKNOWN</overriddenstatus>
         <port enabled="true">8082</port>
         <securePort enabled="false">443</securePort>
         <countryId>1</countryId>
         <dataCenterInfo
class="com.netflix.appinfo.InstanceInfo$DefaultDataCenterInfo">
               <name>MyOwn</name>
         </dataCenterInfo>
         <leaseInfo>
            <renewalIntervalInSecs>30</renewalIntervalInSecs>
            <durationInSecs>90</durationInSecs>
            <registrationTimestamp>1616667913690</registrationTimestamp>
            <lastRenewalTimestamp>1616668273546</lastRenewalTimestamp>
            <evictionTimestamp>0</evictionTimestamp>
            <serviceUpTimestamp>1616667913690</serviceUpTimestamp>
         </leaseInfo>
         <metadata>
            <management.port>8082</management.port>
         </metadata>
         <homePageUrl>https://:8082/</homePageUrl>
         <statusPageUrl>https://:8082/actuator/info</statusPageUrl>
   <healthCheckUrl>https://:8082/actuator/health</healthCheckUrl>
         <vipAddress>customer-service</vipAddress>
         <secureVipAddress>customer-service</secureVipAddress>
         <isCoordinatingDiscoveryServer>false</isCoordinatingDiscoveryServer>
         <lastUpdatedTimestamp>1616667913690</lastUpdatedTimestamp>
         <lastDirtyTimestamp>1616667913505</lastDirtyTimestamp>
         <actionType>ADDED</actionType>
   </instance>
   <instance>
         <instanceId>localhost:customer-service:8081</instanceId>
         <hostName>localhost</hostName>
         <app>CUSTOMER-SERVICE</app>
         <ipAddr>10.0.75.1</ipAddr>
         <status>UP</status>
         <overriddenstatus>UNKNOWN</overriddenstatus>
         <port enabled="true">8081</port>
         <securePort enabled="false">443</securePort>
         <countryId>1</countryId>
         <dataCenterInfo
class="com.netflix.appinfo.InstanceInfo$DefaultDataCenterInfo">
            <name>MyOwn</name>
         </dataCenterInfo>
         <leaseInfo>
               <renewalIntervalInSecs>30</renewalIntervalInSecs>
               <durationInSecs>90</durationInSecs>
               <registrationTimestamp>1616667914313</registrationTimestamp>
               <lastRenewalTimestamp>1616668274227</lastRenewalTimestamp>
               <evictionTimestamp>0</evictionTimestamp>
               <serviceUpTimestamp>1616667914313</serviceUpTimestamp>
         </leaseInfo>
         <metadata>
            <management.port>8081</management.port>
         </metadata>
         <homePageUrl>https://:8081/</homePageUrl>
         <statusPageUrl>https://:8081/actuator/info</statusPageUrl>
   <healthCheckUrl>https://:8081/actuator/health</healthCheckUrl>
         <vipAddress>customer-service</vipAddress>
         <secureVipAddress>customer-service</secureVipAddress>
         <isCoordinatingDiscoveryServer>false</isCoordinatingDiscoveryServer>
         <lastUpdatedTimestamp>1616667914313</lastUpdatedTimestamp>
         <lastDirtyTimestamp>1616667914162</lastDirtyTimestamp>
         <actionType>ADDED</actionType>
   </instance>
</application>
其他一些有用的 API 是:
| 操作 | API |
|---|---|
| 註冊新服務 | POST /eureka/apps/{appIdentifier} |
| 登出服務 | DELETE /eureka/apps/{appIdentifier} |
| 關於服務的資訊 | GET /eureka/apps/{appIdentifier} |
| 關於服務例項的資訊 | GET /eureka/apps/{appIdentifier}/{instanceId} |
有關程式化 API 的更多詳細資訊,請訪問 https://javadoc.io/doc/com.netflix.eureka/eureka-client/latest/index.html
Eureka – 高可用性
我們一直在獨立模式下使用 Eureka 伺服器。但是,在生產環境中,我們應該理想情況下執行多個 Eureka 伺服器例項。這樣可以確保即使一臺機器宕機,另一臺具有 Eureka 伺服器的機器也能繼續執行。
讓我們嘗試在高可用性模式下設定 Eureka 伺服器。在我們的示例中,我們將使用兩個例項。為此,我們將使用以下application-ha.yml來啟動 Eureka 伺服器。
要點:
我們已經引數化了埠,以便我們可以使用相同的配置檔案啟動多個例項。
我們添加了地址,同樣是引數化的,用於傳遞 Eureka 伺服器地址。
我們將應用程式命名為“Eureka-Server”。
spring:
   application:
      name: eureka-server
server:
   port: ${app_port}
eureka:
   client:
      serviceURL:
         defaultZone: ${eureka_other_server_url}
現在讓我們重新編譯我們的 Eureka 伺服器專案。為了執行,我們將有兩個服務例項執行。為此,讓我們開啟兩個 shell,然後在一個 shell 上執行以下命令:
java -Dapp_port=8900 '-Deureka_other_server_url=https://:8901/eureka' -
jar .\target\spring-cloud-eureka-server-1.0.jar --
spring.config.location=classpath:application-ha.yml
並在另一個 shell 上執行以下命令:
java -Dapp_port=8901 '-Deureka_other_server_url=https://:8900/eureka' -
jar .\target\spring-cloud-eureka-server-1.0.jar --
spring.config.location=classpath:application-ha.yml
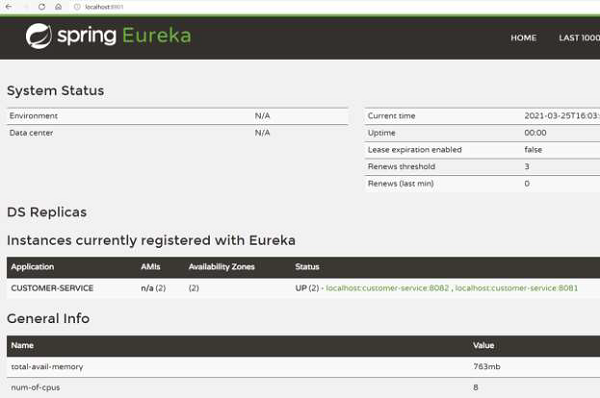
我們可以透過檢視儀表盤來驗證伺服器是否在高可用性模式下啟動並執行。例如,這是 Eureka 伺服器 1 上的儀表盤:
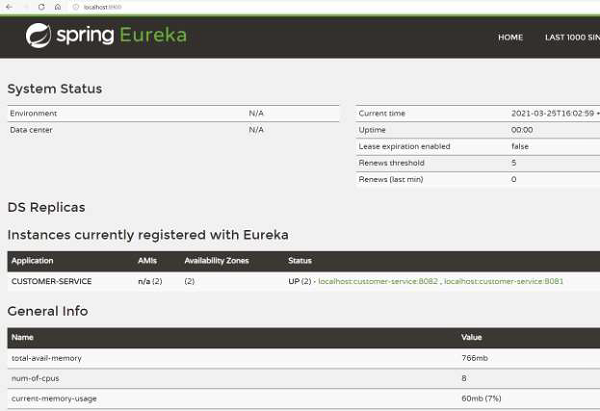
這是 Eureka 伺服器 2 的儀表盤:
因此,正如我們所看到的,我們有兩個 Eureka 伺服器正在執行並且同步。即使一個伺服器宕機,另一個伺服器也會繼續執行。
我們還可以更新服務例項應用程式,使其具有兩個 Eureka 伺服器的地址,方法是使用逗號分隔的伺服器地址。
spring:
   application:
      name: customer-service
server:
   port: ${app_port}
eureka:
   client:
      serviceURL:
         defaultZone: https://:8900/eureka,
https://:8901/eureka
Eureka – 區域感知
Eureka 還支援區域感知的概念。當我們在不同地理位置擁有叢集時,區域感知的概念非常有用。假設我們收到對服務的傳入請求,我們需要選擇應該服務該請求的伺服器。與其在位於遠處的伺服器上傳送和處理該請求,不如選擇位於同一區域的伺服器更有益。這是因為網路瓶頸在分散式應用程式中非常常見,因此我們應該避免它。
現在讓我們嘗試設定 Eureka 客戶端並使其具有區域感知能力。為此,讓我們新增application-za.yml
spring:
   application:
      name: customer-service
server:
   port: ${app_port}
eureka:
   instance:
      metadataMap:
         zone: ${zoneName}
   client:
      serviceURL:
         defaultZone: https://:8900/eureka
現在讓我們重新編譯我們的 Eureka 客戶端專案。為了執行,我們將有兩個服務例項執行。為此,讓我們開啟兩個 shell,然後在一個 shell 上執行以下命令:
java -Dapp_port=8080 -Dzone_name=USA -jar .\target\spring-cloud-eureka-client-
1.0.jar --spring.config.location=classpath:application-za.yml
並在另一個 shell 上執行以下命令:
java -Dapp_port=8081 -Dzone_name=EU -jar .\target\spring-cloud-eureka-client-
1.0.jar --spring.config.location=classpath:application-za.yml
我們可以返回儀表盤來驗證 Eureka 伺服器是否註冊了服務的區域。如下圖所示,我們有兩個可用區,而不是我們到目前為止看到的 1 個可用區。
現在,任何客戶端都可以檢視它所在的區域。假設客戶端位於美國,它會優先選擇美國的伺服器例項。它可以從 Eureka 伺服器獲取區域資訊。