Spring Cloud - 快速指南
Spring Cloud - 簡介
在深入瞭解 Spring Cloud 之前,讓我們先簡要概述一下微服務架構以及 Spring Boot 在建立微服務中的作用。
微服務架構
微服務架構是一種應用程式開發風格,其中應用程式被分解成小的服務,並且這些服務之間具有松耦合關係。以下是使用微服務架構的主要優勢:
易於維護 - 微服務規模小,並且應該只處理單個業務任務。因此,它們易於開發和維護。
獨立擴充套件和部署 - 微服務具有其獨立的部署模式和節奏。因此,每個服務可以根據其需要處理的負載進行擴充套件。每個服務都可以根據其計劃進行部署。
獨立的技術使用 - 微服務的程式碼庫與其部署環境隔離,因此可以根據用例決定微服務需要使用的語言和技術。無需在所有微服務中使用通用技術棧。
有關微服務架構的更多詳細資訊,請參閱 微服務架構
Spring Boot
Spring Boot 是一個基於 Java 的框架,用於建立微服務架構中使用的微服務。它進一步縮短了開發 Spring 應用程式所需的時間。以下是它提供的主要好處:
易於理解和開發 Spring 應用程式
提高生產力
縮短開發時間
有關 Spring Boot 的更多資訊,請參閱 - Spring Boot
Spring Cloud
Spring Cloud 提供了一系列元件,這些元件在構建雲中的分散式應用程式方面非常有用。我們可以自己開發這些元件,但這會浪費時間來開發和維護這些樣板程式碼。
這就是 Spring Cloud 發揮作用的地方。它為分散式環境中常見的難題提供了現成的雲模式。它試圖解決的一些模式包括:
分散式訊息
負載均衡
斷路器
路由
分散式日誌
服務註冊
分散式鎖
集中式配置
因此,它成為開發需要高可擴充套件性、效能和可用性的應用程式的非常有用的框架。
在本教程中,我們將介紹上面列出的 Spring Cloud 元件。
使用 Spring Cloud 的好處
開發人員專注於業務邏輯 - Spring Cloud 提供了所有樣板程式碼來實現雲的常見設計模式。因此,開發人員可以專注於業務邏輯,而無需開發和維護這些樣板程式碼。
快速開發時間 - 由於開發人員可以免費獲得樣板程式碼,因此他們可以在保持程式碼質量的同時快速交付所需的專案。
易於使用 - Spring Cloud 專案可以輕鬆地與現有的 Spring 專案整合。
活躍的專案 - Spring Cloud 由 Pivotal(Spring 背後的公司)積極維護。因此,我們只需升級 Spring Cloud 版本即可免費獲得所有新功能和錯誤修復。
微服務架構具有多種優勢;但是,它最關鍵的缺點之一是在分散式環境中的部署。並且對於分散式系統,我們有一些常見的問題經常出現,例如:
服務 A 如何知道在哪裡聯絡服務 B,即服務 B 的地址?
多個服務如何相互通訊,即使用什麼協議?
我們如何監控環境中的各種服務?
我們如何將服務的配置與服務例項一起分發?
我們如何連結跨服務的呼叫以進行除錯?
等等…
這些是 Spring Cloud 試圖解決並提供通用解決方案的一系列問題。
雖然Spring Boot 用於快速應用程式開發,但將其與 Spring Cloud 一起使用可以減少我們在開發和部署到分散式環境中的微服務整合時間。
Spring Cloud 元件
現在讓我們看一下 Spring Cloud 提供的各種元件以及這些元件解決的問題
| 問題 | 元件 |
|---|---|
| 分散式雲配置 | Spring Cloud Config,Spring Cloud Zookeeper,Spring Consul Config |
| 分散式訊息 | Spring Stream 與 Kafka,Spring Stream 與 RabbitMQ |
| 服務發現 | Spring Cloud Eureka,Spring Cloud Consul,Spring Cloud Zookeeper |
| 日誌記錄 | Spring Cloud Zipkin,Spring Cloud Sleuth |
| Spring 服務通訊 | Spring Hystrix,Spring Ribbon,Spring Feign,Spring Zuul |
我們將在接下來的章節中介紹其中一些元件。
Spring Cloud 和 Spring Boot 之間的區別
這是在開始使用 Spring Cloud 時經常出現的一個非常常見的問題。實際上,這裡沒有可比性。Spring Cloud 和 Spring Boot 用於實現不同的目標。
Spring Boot 是一個用於更快應用程式開發的 Java 框架,特別是在微服務架構中使用。
Spring Cloud 用於整合這些微服務,以便它們能夠在分散式環境中輕鬆協同工作並相互通訊
實際上,為了獲得最大的好處,例如更短的開發時間,建議將 Spring Boot 與 Spring Cloud 一起使用。
Spring Cloud - 依賴管理
在本章中,我們將使用 Spring Cloud 構建我們的第一個應用程式。讓我們回顧一下 Spring Cloud 應用程式的專案結構和依賴項設定,同時使用 Spring Boot 作為基礎框架。
核心依賴項
Spring Cloud 組列出了多個作為依賴項的包。在本教程中,我們將使用 Spring Cloud 組中的多個包。為了避免這些包之間的任何相容性問題,讓我們使用下面給出的 Spring Cloud 依賴項管理 POM:
<dependencyManagement>
   <dependencies>
      <dependency>
         <groupId>org.springframework.cloud</groupId>
         <artifactId>spring-cloud-dependencies</artifactId>
         <version>Hoxton.SR8</version>
         <type>pom</type>
         <scope>import</scope>
      </dependency>
   </dependencies>
</dependencyManagement>
Gradle 使用者可以透過使用以下方式實現相同的功能:
buildscript {
   dependencies {
      classpath "io.spring.gradle:dependency-management-plugin:1.0.10.RELEASE"
   }
}
apply plugin: "io.spring.dependency-management"
dependencyManagement {
   imports {
   mavenBom "org.springframework.cloud:spring-cloud-dependencies:
'Hoxton.SR8')"
   }
}
專案架構和結構
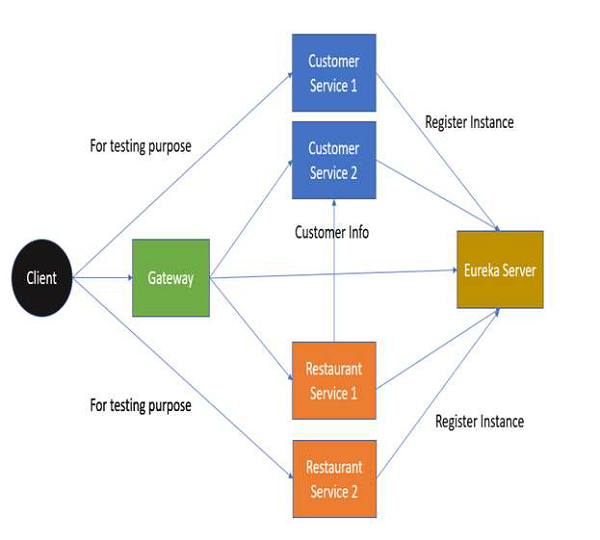
在本教程中,我們將使用餐廳的案例:
餐廳服務發現 - 用於註冊服務地址。
餐廳客戶服務 - 向客戶端和其他服務提供客戶資訊。
餐廳服務 - 向客戶端提供餐廳資訊。使用客戶服務獲取客戶的城市資訊。
餐廳閘道器 - 應用程式的入口點。但是,為了簡單起見,我們只在本教程中使用一次。
在高層次上,以下是專案架構:
我們將擁有以下專案結構。請注意,我們將在接下來的章節中檢視這些檔案。

專案 POM
為了簡單起見,我們將使用基於 Maven 的構建。以下是我們將在此教程中使用的基本 POM 檔案。
<?xml version="1.0" encoding="UTF-8"?>
<project xmlns="http://maven.apache.org/POM/4.0.0"
xmlns:xsi="http://www.w3.org/2001/XMLSchema-instance"
xsi:schemaLocation="http://maven.apache.org/POM/4.0.0
http://maven.apache.org/xsd/maven-4.0.0.xsd">
   <modelVersion>4.0.0</modelVersion>
   <groupId>com.tutorials.point</groupId>
   <artifactId>spring-cloud-eureka-client</artifactId>
   <version>1.0</version>
   <packaging>jar</packaging>
   <properties>
      <maven.compiler.source>1.8</maven.compiler.source>
      <maven.compiler.target>1.8</maven.compiler.target>
   </properties>
   <dependencyManagement>
      <dependencies>
         <dependency>
            <groupId>org.springframework.cloud</groupId>
            <artifactId>spring-cloud-dependencies</artifactId>
            <version>2020.0.1</version>
            <type>pom</type>
            <scope>import</scope>
         </dependency>
         <dependency>
            <groupId>org.springframework.boot</groupId>
            <artifactId>spring-boot-dependencies</artifactId>
            <version>2.4.0</version>
            <type>pom</type>
            <scope>import</scope>
         </dependency>
      </dependencies>
   </dependencyManagement>
   <dependencies>
      <dependency>
         <groupId>org.springframework.boot</groupId>
         <artifactId>spring-boot-starter-web</artifactId>
      </dependency>
   </dependencies>
   <build>
      <plugins>
         <plugin>
            <groupId>org.springframework.boot</groupId>
            <artifactId>spring-boot-maven-plugin</artifactId>
            <executions>
               <execution>
                  <goals>
                     <goal>repackage</goal>
                  </goals>
               </execution>
            </executions>
         </plugin>
      </plugins>
   </build>
</project>
需要注意的事項 -
POM 依賴項管理部分幾乎包含了我們所需的所有專案。我們將在需要時新增依賴項部分。
我們將使用 Spring Boot 作為應用程式開發的基礎框架,這就是為什麼您看到它被列為依賴項的原因。
Spring Cloud - 使用 Eureka 進行服務發現
簡介
當應用程式作為微服務部署到雲中時,服務發現是其中最關鍵的部分之一。這是因為對於任何使用操作,微服務架構中的應用程式可能都需要訪問多個服務,以及它們之間的通訊。
服務發現有助於跟蹤服務地址以及可以聯絡服務例項的埠。這裡有三個元件在起作用:
服務例項 - 負責處理傳入的服務請求並響應這些請求。
服務註冊中心 - 跟蹤服務例項的地址。服務例項應該向服務註冊中心註冊其地址。
服務客戶端 - 想要訪問或想要發出請求並從服務例項獲取響應的客戶端。服務客戶端聯絡服務註冊中心以獲取例項的地址。
Apache Zookeeper、Eureka 和 Consul 是幾個用於服務發現的知名元件。在本教程中,我們將使用 Eureka
設定 Eureka 伺服器/註冊中心
要設定 Eureka 伺服器,我們需要更新 POM 檔案以包含以下依賴項:
<dependencies>
   <dependency>
      <groupId>org.springframework.cloud</groupId>
      <artifactId>spring-cloud-starter-netflix-eureka-server</artifactId>
   </dependency>
   <dependency>
      <groupId>org.springframework.boot</groupId>
      <artifactId>spring-boot-starter-web</artifactId>
   </dependency>
</dependencies>
然後,使用正確的註解,即 @EnableEurekaServer,註釋我們的 Spring 應用程式類。
package com.tutorialspoint;
import org.springframework.boot.SpringApplication;
import org.springframework.boot.autoconfigure.SpringBootApplication;
import org.springframework.cloud.netflix.eureka.server.EnableEurekaServer;
@SpringBootApplication
@EnableEurekaServer
public class RestaurantServiceRegistry{
   public static void main(String[] args) {
      SpringApplication.run(RestaurantServiceRegistry.class, args);
   }
}
如果我們想要配置註冊中心並更改其預設值,我們還需要一個屬性檔案。以下是我們將進行的更改:
將埠更新為 8900 而不是預設的 8080
在生產環境中,為了實現高可用性,註冊中心將有多個節點。這就是我們需要註冊中心之間進行點對點通訊的地方。由於我們是在獨立模式下執行此操作,因此我們可以簡單地將客戶端屬性設定為false 以避免任何錯誤。
因此,我們的application.yml 檔案如下所示:
server:
   port: 8900
eureka:
   client:
      register-with-eureka: false
      fetch-registry: false
就是這樣,現在讓我們編譯專案並使用以下命令執行程式:
java -jar .\target\spring-cloud-eureka-server-1.0.jar
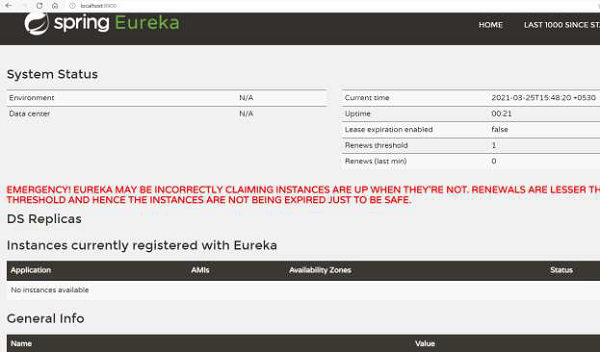
現在我們可以在控制檯中看到日誌:
...
2021-03-07 13:33:10.156 INFO 17660 --- [ main]
o.s.b.w.embedded.tomcat.TomcatWebServer : Tomcat initialized with port(s): 8900
(http)
2021-03-07 13:33:10.172 INFO 17660 --- [ main]
o.apache.catalina.core.StandardService : Starting service [Tomcat]
...
2021-03-07 13:33:16.483 INFO 17660 --- [ main]
DiscoveryClientOptionalArgsConfiguration : Eureka HTTP Client uses Jersey
...
2021-03-07 13:33:16.632 INFO 17660 --- [ main]
o.s.c.n.eureka.InstanceInfoFactory : Setting initial instance status as:
STARTING
2021-03-07 13:33:16.675 INFO 17660 --- [ main]
com.netflix.discovery.DiscoveryClient : Initializing Eureka in region useast-
1
2021-03-07 13:33:16.675 INFO 17660 --- [ main]
com.netflix.discovery.DiscoveryClient : Client configured to neither register
nor query for data.
2021-03-07 13:33:16.686 INFO 17660 --- [ main]
com.netflix.discovery.DiscoveryClient : Discovery Client initialized at
timestamp 1615104196685 with initial instances count: 0
...
2021-03-07 13:33:16.873 INFO 17660 --- [ Thread-10]
e.s.EurekaServerInitializerConfiguration : Started Eureka Server
2021-03-07 13:33:18.609 INFO 17660 --- [ main]
c.t.RestaurantServiceRegistry : Started RestaurantServiceRegistry in
15.219 seconds (JVM running for 16.068)
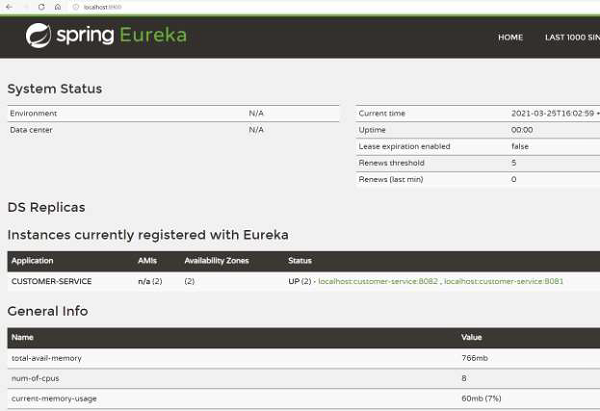
從上面的日誌中可以看到,Eureka 註冊中心已經設定好了。我們還獲得了 Eureka 的儀表盤(參見下圖),它託管在伺服器 URL 上。
為例項設定 Eureka 客戶端
現在,我們將設定服務例項,這些例項將註冊到 Eureka 伺服器。要設定 Eureka 客戶端,我們將使用一個單獨的 Maven 專案,並更新 POM 檔案以包含以下依賴項:
<dependencies>
   <dependency>
      <groupId>org.springframework.cloud</groupId>
      <artifactId>spring-cloud-starter-netflix-eureka-client</artifactId>
   </dependency>
   <dependency>
      <groupId>org.springframework.boot</groupId>
      <artifactId>spring-boot-starter-web</artifactId>
   </dependency>
</dependencies>
然後,使用正確的註解,即 @EnableDiscoveryClient,註釋我們的 Spring 應用程式類。
package com.tutorialspoint;
import org.springframework.boot.SpringApplication;
import org.springframework.boot.autoconfigure.SpringBootApplication;
import org.springframework.cloud.client.discovery.EnableDiscoveryClient;
@SpringBootApplication
@EnableDiscoveryClient
public class RestaurantCustomerService{
   public static void main(String[] args) {
      SpringApplication.run(RestaurantCustomerService.class, args);
   }
}
如果我們想要配置客戶端並更改其預設值,我們還需要一個屬性檔案。以下是我們將進行的更改:
我們將在執行時提供 jar 執行時的埠。
我們將指定 Eureka 伺服器正在執行的 URL。
因此,我們的 application.yml 檔案如下所示
spring:
   application:
      name: customer-service
server:
   port: ${app_port}
eureka:
   client:
      serviceURL:
         defaultZone: https://:8900/eureka
為了執行,我們將有兩個服務例項執行。為此,讓我們開啟兩個 shell,然後在一個 shell 上執行以下命令:
java -Dapp_port=8081 -jar .\target\spring-cloud-eureka-client-1.0.jar
並在另一個 shell 上執行以下命令:
java -Dapp_port=8082 -jar .\target\spring-cloud-eureka-client-1.0.jar
現在我們可以在控制檯中看到日誌:
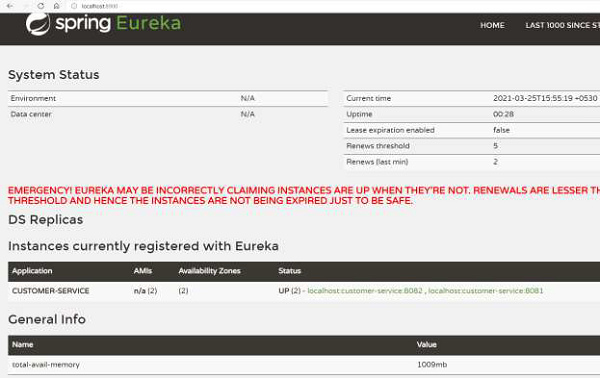
...
2021-03-07 15:22:22.474 INFO 16920 --- [ main]
com.netflix.discovery.DiscoveryClient : Starting heartbeat executor: renew
interval is: 30
2021-03-07 15:22:22.482 INFO 16920 --- [ main]
c.n.discovery.InstanceInfoReplicator : InstanceInfoReplicator onDemand
update allowed rate per min is 4
2021-03-07 15:22:22.490 INFO 16920 --- [ main]
com.netflix.discovery.DiscoveryClient : Discovery Client initialized at
timestamp 1615110742488 with initial instances count: 0
2021-03-07 15:22:22.492 INFO 16920 --- [ main]
o.s.c.n.e.s.EurekaServiceRegistry : Registering application CUSTOMERSERVICE
with eureka with status UP
2021-03-07 15:22:22.494 INFO 16920 --- [ main]
com.netflix.discovery.DiscoveryClient : Saw local status change event
StatusChangeEvent [timestamp=1615110742494, current=UP, previous=STARTING]
2021-03-07 15:22:22.500 INFO 16920 --- [nfoReplicator-0]
com.netflix.discovery.DiscoveryClient : DiscoveryClient_CUSTOMERSERVICE/
localhost:customer-service:8081: registering service...
2021-03-07 15:22:22.588 INFO 16920 --- [ main]
o.s.b.w.embedded.tomcat.TomcatWebServer : Tomcat started on port(s): 8081
(http) with context path ''
2021-03-07 15:22:22.591 INFO 16920 --- [ main]
.s.c.n.e.s.EurekaAutoServiceRegistration : Updating port to 8081
2021-03-07 15:22:22.705 INFO 16920 --- [nfoReplicator-0]
com.netflix.discovery.DiscoveryClient : DiscoveryClient_CUSTOMERSERVICE/
localhost:customer-service:8081 - registration status: 204
...
從上面的日誌可以看出,客戶端例項已經設定好了。我們還可以檢視之前看到的 Eureka Server 儀表盤。可以看到,Eureka 伺服器知道有兩個“CUSTOMER-SERVICE”例項正在執行。
Eureka 客戶端消費者示例
我們的 Eureka 伺服器已經獲得了“Customer-Service”的註冊客戶端例項。現在,我們可以設定消費者,它可以向 Eureka 伺服器請求“Customer-Service”節點的地址。
為此,讓我們新增一個控制器,它可以從 Eureka 登錄檔獲取資訊。此控制器將新增到我們之前的 Eureka 客戶端本身,即“Customer Service”。讓我們為客戶端建立以下控制器。
package com.tutorialspoint;
import java.util.List;
import org.springframework.beans.factory.annotation.Autowired;
import org.springframework.cloud.client.ServiceInstance;
import org.springframework.cloud.client.discovery.DiscoveryClient;
import org.springframework.web.bind.annotation.RequestMapping;
import org.springframework.web.bind.annotation.RestController;
@RestController
class RestaurantCustomerInstancesController {
   @Autowired
   private DiscoveryClient eurekaConsumer;
   @RequestMapping("/customer_service_instances")
請注意註釋 @DiscoveryClient,它是 Spring 框架提供的與登錄檔通訊的方式。
現在讓我們重新編譯我們的 Eureka 客戶端。為了執行,我們將執行兩個服務例項。為此,讓我們開啟兩個 shell,然後在一個 shell 上執行以下命令:
java -Dapp_port=8081 -jar .\target\spring-cloud-eureka-client-1.0.jar
並在另一個 shell 上執行以下命令:
java -Dapp_port=8082 -jar .\target\spring-cloud-eureka-client-1.0.jar
一旦兩個 shell 上的客戶端都啟動,我們就可以訪問我們在控制器中建立的 https://:8081/customer_service_instances。此 URL 顯示了有關這兩個例項的完整資訊。
[
   {
      "scheme": "http",
      "host": "localhost",
      "port": 8081,
      "metadata": {
         "management.port": "8081"
      },
      "secure": false,
      "instanceInfo": {
         "instanceId": "localhost:customer-service:8081",
         "app": "CUSTOMER-SERVICE",
         "appGroupName": null,
         "ipAddr": "10.0.75.1",
         "sid": "na",
         "homePageUrl": "https://:8081/",
         "statusPageUrl": "https://:8081/actuator/info",
         "healthCheckUrl": "https://:8081/actuator/health",
         "secureHealthCheckUrl": null,
         "vipAddress": "customer-service",
         "secureVipAddress": "customer-service",
         "countryId": 1,
         "dataCenterInfo": {
            "@class": "com.netflix.appinfo.InstanceInfo$DefaultDataCenterInfo",
            "name": "MyOwn"
         },
         "hostName": "localhost",
         "status": "UP",
         "overriddenStatus": "UNKNOWN",
         "leaseInfo": {
            "renewalIntervalInSecs": 30,
            "durationInSecs": 90,
            "registrationTimestamp": 1616667914313,
            "lastRenewalTimestamp": 1616667914313,
            "evictionTimestamp": 0,
            "serviceUpTimestamp": 1616667914313
         },
         "isCoordinatingDiscoveryServer": false,
         "metadata": {
            "management.port": "8081"
         },
         "lastUpdatedTimestamp": 1616667914313,
         "lastDirtyTimestamp": 1616667914162,
         "actionType": "ADDED",
         "asgName": null
      },
      "instanceId": "localhost:customer-service:8081",
      "serviceId": "CUSTOMER-SERVICE",
      "uri": "https://:8081"
   },
   {
      "scheme": "http",
      "host": "localhost",
      "port": 8082,
      "metadata": {
         "management.port": "8082"
      },
      "secure": false,
      "instanceInfo": {
      "instanceId": "localhost:customer-service:8082",
      "app": "CUSTOMER-SERVICE",
      "appGroupName": null,
      "ipAddr": "10.0.75.1",
      "sid": "na",
      "homePageUrl": "https://:8082/",
      "statusPageUrl": "https://:8082/actuator/info",
      "healthCheckUrl": "https://:8082/actuator/health",
      "secureHealthCheckUrl": null,
      "vipAddress": "customer-service",
      "secureVipAddress": "customer-service",
      "countryId": 1,
      "dataCenterInfo": {
         "@class": "com.netflix.appinfo.InstanceInfo$DefaultDataCenterInfo",
         "name": "MyOwn"
      },
      "hostName": "localhost",
      "status": "UP",
      "overriddenStatus": "UNKNOWN",
      "leaseInfo": {
         "renewalIntervalInSecs": 30,
         "durationInSecs": 90,
         "registrationTimestamp": 1616667913690,
         "lastRenewalTimestamp": 1616667913690,
         "evictionTimestamp": 0,
         "serviceUpTimestamp": 1616667913690
      },
      "isCoordinatingDiscoveryServer": false,
      "metadata": {
         "management.port": "8082"
      },
      "lastUpdatedTimestamp": 1616667913690,
      "lastDirtyTimestamp": 1616667913505,
      "actionType": "ADDED",
      "asgName": null
     },
     "instanceId": "localhost:customer-service:8082",
     "serviceId": "CUSTOMER-SERVICE",
     "uri": "https://:8082"
   }
]
Eureka 伺服器 API
Eureka 伺服器為客戶端例項或服務提供了各種 API 來進行通訊。許多這些 API 都是抽象的,可以直接使用我們之前定義和使用的 @DiscoveryClient。需要注意的是,它們的 HTTP 對應項也存在,對於非 Spring 框架使用 Eureka 很有用。
事實上,我們之前使用的 API,即獲取有關執行“Customer_Service”的客戶端的資訊,也可以透過瀏覽器使用 https://:8900/eureka/apps/customer-service 呼叫,如下所示:
<application slick-uniqueid="3">
   <div>
      <a id="slick_uniqueid"/>
   </div>
   <name>CUSTOMER-SERVICE</name>
   <instance>
         <instanceId>localhost:customer-service:8082</instanceId>
         <hostName>localhost</hostName>
         <app>CUSTOMER-SERVICE</app>
         <ipAddr>10.0.75.1</ipAddr>
         <status>UP</status>
         <overriddenstatus>UNKNOWN</overriddenstatus>
         <port enabled="true">8082</port>
         <securePort enabled="false">443</securePort>
         <countryId>1</countryId>
         <dataCenterInfo
class="com.netflix.appinfo.InstanceInfo$DefaultDataCenterInfo">
               <name>MyOwn</name>
         </dataCenterInfo>
         <leaseInfo>
            <renewalIntervalInSecs>30</renewalIntervalInSecs>
            <durationInSecs>90</durationInSecs>
            <registrationTimestamp>1616667913690</registrationTimestamp>
            <lastRenewalTimestamp>1616668273546</lastRenewalTimestamp>
            <evictionTimestamp>0</evictionTimestamp>
            <serviceUpTimestamp>1616667913690</serviceUpTimestamp>
         </leaseInfo>
         <metadata>
            <management.port>8082</management.port>
         </metadata>
         <homePageUrl>https://:8082/</homePageUrl>
         <statusPageUrl>https://:8082/actuator/info</statusPageUrl>
   <healthCheckUrl>https://:8082/actuator/health</healthCheckUrl>
         <vipAddress>customer-service</vipAddress>
         <secureVipAddress>customer-service</secureVipAddress>
         <isCoordinatingDiscoveryServer>false</isCoordinatingDiscoveryServer>
         <lastUpdatedTimestamp>1616667913690</lastUpdatedTimestamp>
         <lastDirtyTimestamp>1616667913505</lastDirtyTimestamp>
         <actionType>ADDED</actionType>
   </instance>
   <instance>
         <instanceId>localhost:customer-service:8081</instanceId>
         <hostName>localhost</hostName>
         <app>CUSTOMER-SERVICE</app>
         <ipAddr>10.0.75.1</ipAddr>
         <status>UP</status>
         <overriddenstatus>UNKNOWN</overriddenstatus>
         <port enabled="true">8081</port>
         <securePort enabled="false">443</securePort>
         <countryId>1</countryId>
         <dataCenterInfo
class="com.netflix.appinfo.InstanceInfo$DefaultDataCenterInfo">
            <name>MyOwn</name>
         </dataCenterInfo>
         <leaseInfo>
               <renewalIntervalInSecs>30</renewalIntervalInSecs>
               <durationInSecs>90</durationInSecs>
               <registrationTimestamp>1616667914313</registrationTimestamp>
               <lastRenewalTimestamp>1616668274227</lastRenewalTimestamp>
               <evictionTimestamp>0</evictionTimestamp>
               <serviceUpTimestamp>1616667914313</serviceUpTimestamp>
         </leaseInfo>
         <metadata>
            <management.port>8081</management.port>
         </metadata>
         <homePageUrl>https://:8081/</homePageUrl>
         <statusPageUrl>https://:8081/actuator/info</statusPageUrl>
   <healthCheckUrl>https://:8081/actuator/health</healthCheckUrl>
         <vipAddress>customer-service</vipAddress>
         <secureVipAddress>customer-service</secureVipAddress>
         <isCoordinatingDiscoveryServer>false</isCoordinatingDiscoveryServer>
         <lastUpdatedTimestamp>1616667914313</lastUpdatedTimestamp>
         <lastDirtyTimestamp>1616667914162</lastDirtyTimestamp>
         <actionType>ADDED</actionType>
   </instance>
</application>
其他一些有用的 API 是:
| 操作 | API |
|---|---|
| 註冊新服務 | POST /eureka/apps/{appIdentifier} |
| 登出服務 | DELTE /eureka/apps/{appIdentifier} |
| 有關服務的資訊 | GET /eureka/apps/{appIdentifier} |
| 有關服務例項的資訊 | GET /eureka/apps/{appIdentifier}/ {instanceId} |
有關程式化 API 的更多詳細資訊,請訪問 https://javadoc.io/doc/com.netflix.eureka/eureka-client/latest/index.html
Eureka – 高可用性
我們一直在以獨立模式使用 Eureka 伺服器。但是,在生產環境中,我們應該理想地執行多個 Eureka 伺服器例項。這樣可以確保即使一臺機器出現故障,另一臺具有 Eureka 伺服器的機器也能繼續執行。
讓我們嘗試在高可用性模式下設定 Eureka 伺服器。在我們的示例中,我們將使用兩個例項。為此,我們將使用以下application-ha.yml啟動 Eureka 伺服器。
需要注意的事項 -
我們已經將埠引數化,以便我們可以使用相同的配置檔案啟動多個例項。
我們添加了地址,同樣是引數化的,以傳遞 Eureka 伺服器地址。
我們將應用程式命名為“Eureka-Server”。
spring:
   application:
      name: eureka-server
server:
   port: ${app_port}
eureka:
   client:
      serviceURL:
         defaultZone: ${eureka_other_server_url}
現在讓我們重新編譯我們的 Eureka 伺服器專案。為了執行,我們將執行兩個服務例項。為此,讓我們開啟兩個 shell,然後在一個 shell 上執行以下命令:
java -Dapp_port=8900 '-Deureka_other_server_url=https://:8901/eureka' -
jar .\target\spring-cloud-eureka-server-1.0.jar --
spring.config.location=classpath:application-ha.yml
並在另一個 shell 上執行以下命令:
java -Dapp_port=8901 '-Deureka_other_server_url=https://:8900/eureka' -
jar .\target\spring-cloud-eureka-server-1.0.jar --
spring.config.location=classpath:application-ha.yml
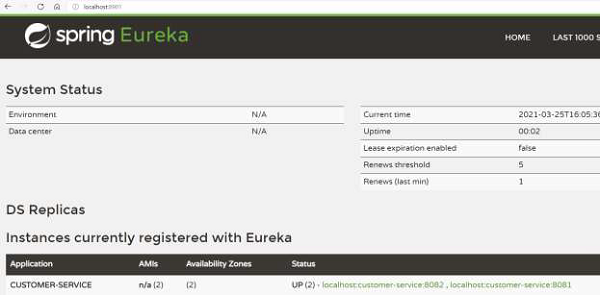
我們可以透過檢視儀表盤來驗證伺服器是否已在高可用性模式下啟動並執行。例如,這是 Eureka 伺服器 1 上的儀表盤:
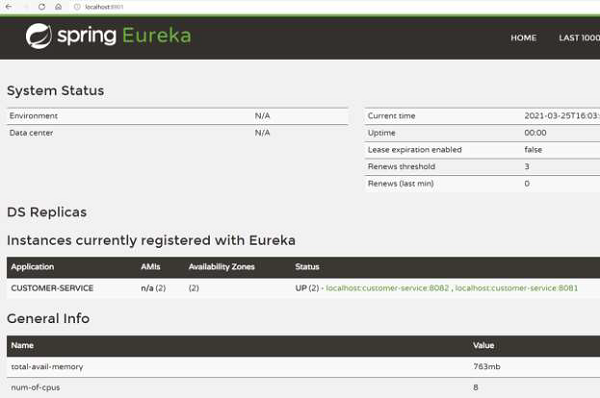
這是 Eureka 伺服器 2 的儀表盤:
因此,正如我們所看到的,我們有兩個 Eureka 伺服器正在執行並且保持同步。即使一臺伺服器宕機,另一臺伺服器也將繼續執行。
我們還可以更新服務例項應用程式,使其具有兩個 Eureka 伺服器的地址,方法是使用逗號分隔的伺服器地址。
spring:
   application:
      name: customer-service
server:
   port: ${app_port}
eureka:
   client:
      serviceURL:
         defaultZone: https://:8900/eureka,
https://:8901/eureka
Eureka – 區域感知
Eureka 還支援區域感知的概念。區域感知作為一種概念,當我們在不同地理位置擁有叢集時非常有用。例如,我們收到一個服務的傳入請求,我們需要選擇應該為該請求提供服務的伺服器。與其將該請求傳送到並處理到遠處的伺服器上,不如選擇同一區域中的伺服器更有益。這是因為網路瓶頸在分散式應用程式中非常常見,因此我們應該避免它。
現在讓我們嘗試設定 Eureka 客戶端並使其具有區域感知能力。為此,讓我們新增application-za.yml
spring:
   application:
      name: customer-service
server:
   port: ${app_port}
eureka:
   instance:
      metadataMap:
         zone: ${zoneName}
   client:
      serviceURL:
         defaultZone: https://:8900/eureka
現在讓我們重新編譯我們的 Eureka 客戶端專案。為了執行,我們將執行兩個服務例項。為此,讓我們開啟兩個 shell,然後在一個 shell 上執行以下命令:
java -Dapp_port=8080 -Dzone_name=USA -jar .\target\spring-cloud-eureka-client-
1.0.jar --spring.config.location=classpath:application-za.yml
並在另一個 shell 上執行以下命令:
java -Dapp_port=8081 -Dzone_name=EU -jar .\target\spring-cloud-eureka-client-
1.0.jar --spring.config.location=classpath:application-za.yml
我們可以返回到儀表盤以驗證 Eureka 伺服器是否註冊了服務的區域。如以下影像所示,我們有兩個可用區,而不是我們一直看到的 1 個。
現在,任何客戶端都可以檢視它所在的區域。例如,如果客戶端位於美國,它將優先選擇美國的伺服器例項。它可以從 Eureka 伺服器獲取區域資訊。
Spring Cloud - 使用 Feign 進行同步通訊
簡介
在分散式環境中,服務需要相互通訊。通訊可以同步或非同步進行。在本節中,我們將瞭解服務如何透過同步 API 呼叫進行通訊。
雖然這聽起來很簡單,但作為進行 API 呼叫的一部分,我們需要注意以下幾點:
查詢被呼叫方的地址 - 呼叫方服務需要知道它要呼叫的服務的地址。
負載均衡 - 呼叫方服務可以進行一些智慧負載均衡,以將負載分散到被呼叫方服務中。
區域感知 - 呼叫方服務最好呼叫同一區域中的服務以獲得快速響應。
Netflix Feign 和Spring RestTemplate(以及Ribbon)是用於進行同步 API 呼叫的兩個眾所周知的 HTTP 客戶端。在本教程中,我們將使用Feign Client。
Feign – 依賴項設定
讓我們使用我們在前面章節中使用過的Restaurant案例。讓我們開發一個 Restaurant 服務,其中包含有關餐廳的所有資訊。
首先,讓我們使用以下依賴項更新服務的pom.xml:
<dependencies>
      <dependency>
            <groupId>org.springframework.cloud</groupId>
            <artifactId>spring-cloud-starter-openfeign</artifactId>
      </dependency>
      <dependency>
         <groupId>org.springframework.cloud</groupId>
         <artifactId>spring-cloud-starter-netflix-eureka-client</artifactId>
      </dependency>
      <dependency>
         <groupId>org.springframework.boot</groupId>
         <artifactId>spring-boot-starter-web</artifactId>
      </dependency>
</dependencies>
然後,使用正確的註釋,即 @EnableDiscoveryClient 和 @EnableFeignCLient,對我們的 Spring 應用程式類進行註釋
package com.tutorialspoint;
import org.springframework.boot.SpringApplication;
import org.springframework.boot.autoconfigure.SpringBootApplication;
import org.springframework.cloud.client.discovery.EnableDiscoveryClient;
import org.springframework.cloud.openfeign.EnableFeignClients;
@SpringBootApplication
@EnableFeignClients
@EnableDiscoveryClient
public class RestaurantService{
   public static void main(String[] args) {
      SpringApplication.run(RestaurantService.class, args);
   }
}
以上程式碼需要注意的幾點:
@ EnableDiscoveryClient - 這是我們用於讀取/寫入 Eureka 伺服器的相同註釋。
@EnableFeignCLient - 此註釋掃描我們程式碼包中啟用的 feign 客戶端,並相應地初始化它。
完成後,現在讓我們簡要了解一下需要定義 Feign 客戶端的 Feign 介面。
使用 Feign 介面進行 API 呼叫
Feign 客戶端可以透過在介面中定義 API 呼叫來簡單地設定,該介面可以在 Feign 中用於構建呼叫 API 所需的樣板程式碼。例如,假設我們有兩個服務:
服務 A - 使用 Feign 客戶端的呼叫方服務。
服務 B - 上述 Feign 客戶端將呼叫的服務的 API。
呼叫方服務,即本例中的服務 A,需要為其打算呼叫的 API(即服務 B)建立一個介面。
package com.tutorialspoint;
import org.springframework.cloud.openfeign.FeignClient;
import org.springframework.web.bind.annotation.PathVariable;
import org.springframework.web.bind.annotation.RequestMapping;
@FeignClient(name = "service-B")
public interface ServiceBInterface {
   @RequestMapping("/objects/{id}", method=GET)
   public ObjectOfServiceB getObjectById(@PathVariable("id") Long id);
   @RequestMapping("/objects/", method=POST)
   public void postInfo(ObjectOfServiceB b);
   @RequestMapping("/objects/{id}", method=PUT)
   public void postInfo((@PathVariable("id") Long id, ObjectOfBServiceB b);
}
需要注意的事項 -
@FeignClient 註釋將由 Spring Feign 初始化的介面,並且可以被程式碼的其餘部分使用。
請注意,FeignClient 註釋需要包含服務的名稱,這用於從 Eureka 或其他發現平臺發現服務 B 的地址。
然後,我們可以定義我們計劃從服務 A 呼叫的所有 API 函式名稱。這可以是使用 GET、POST、PUT 等動詞的一般 HTTP 呼叫。
完成此操作後,服務 A 可以簡單地使用以下程式碼來呼叫服務 B 的 API:
@Autowired
ServiceBInterface serviceB
.
.
.
ObjectOfServiceB object = serviceB. getObjectById(5);
讓我們看一個示例,以瞭解其工作原理。
示例 – 帶有 Eureka 的 Feign 客戶端
假設我們想找到與客戶所在城市相同的餐廳。我們將使用以下服務:
客戶服務 - 擁有所有客戶資訊。我們在前面的 Eureka 客戶端部分中定義了它。
Eureka 發現伺服器 - 擁有上述服務的資訊。我們在前面的 Eureka 伺服器部分中定義了它。
餐廳服務 - 我們將定義的新服務,其中包含所有餐廳資訊。
讓我們首先向客戶服務新增一個基本的控制器:
@RestController
class RestaurantCustomerInstancesController {
   static HashMap<Long, Customer> mockCustomerData = new HashMap();
   static{
      mockCustomerData.put(1L, new Customer(1, "Jane", "DC"));
      mockCustomerData.put(2L, new Customer(2, "John", "SFO"));
      mockCustomerData.put(3L, new Customer(3, "Kate", "NY"));
   }
   @RequestMapping("/customer/{id}")
   public Customer getCustomerInfo(@PathVariable("id") Long id) {
      return mockCustomerData.get(id);
   }
}
我們還將為上述控制器定義一個Customer.java POJO。
package com.tutorialspoint;
public class Customer {
   private long id;
   private String name;
   private String city;
   public Customer() {}
   public Customer(long id, String name, String city) {
      super();
      this.id = id;
      this.name = name;
      this.city = city;
   }
   public long getId() {
      return id;
   }
   public void setId(long id) {
      this.id = id;
   }
   public String getName() {
      return name;
   }
   public void setName(String name) {
      this.name = name;
   }
   public String getCity() {
      return city;
   }
   public void setCity(String city) {
      this.city = city;
   }
}
因此,新增完成後,讓我們重新編譯我們的專案並執行以下查詢以啟動:
java -Dapp_port=8081 -jar .\target\spring-cloud-eureka-client-1.0.jar
注意 - 啟動 Eureka 伺服器和此服務後,我們應該能夠在 Eureka 中看到此服務的例項已註冊。
要檢視我們的 API 是否有效,讓我們訪問 https://:8081/customer/1
我們將獲得以下輸出:
{
   "id": 1,
   "name": "Jane",
   "city": "DC"
}
這證明我們的服務執行良好。
現在讓我們繼續定義餐廳服務將用於獲取客戶城市的 Feign 客戶端。
package com.tutorialspoint;
import org.springframework.cloud.openfeign.FeignClient;
import org.springframework.web.bind.annotation.PathVariable;
import org.springframework.web.bind.annotation.RequestMapping;
@FeignClient(name = "customer-service")
public interface CustomerService {
   @RequestMapping("/customer/{id}")
   public Customer getCustomerById(@PathVariable("id") Long id);
}
Feign 客戶端包含服務的名稱以及我們計劃在餐廳服務中使用的 API 呼叫。
最後,讓我們在餐廳服務中定義一個控制器,它將使用上述介面。
package com.tutorialspoint;
import java.util.HashMap;
import java.util.List;
import java.util.stream.Collectors;
import org.springframework.beans.factory.annotation.Autowired;
import org.springframework.web.bind.annotation.PathVariable;
import org.springframework.web.bind.annotation.RequestMapping;
import org.springframework.web.bind.annotation.RestController;
@RestController
class RestaurantController {
   @Autowired
   CustomerService customerService;
   static HashMap<Long, Restaurant> mockRestaurantData = new HashMap();
   static{
      mockRestaurantData.put(1L, new Restaurant(1, "Pandas", "DC"));
      mockRestaurantData.put(2L, new Restaurant(2, "Indies", "SFO"));
      mockRestaurantData.put(3L, new Restaurant(3, "Little Italy", "DC"));
}
   @RequestMapping("/restaurant/customer/{id}")
   public List<Restaurant> getRestaurantForCustomer(@PathVariable("id") Long
id) {
      String customerCity = customerService.getCustomerById(id).getCity();
      return mockRestaurantData.entrySet().stream().filter(
entry -> entry.getValue().getCity().equals(customerCity))
.map(entry -> entry.getValue())
.collect(Collectors.toList());
   }
}
這裡最重要的行是:
customerService.getCustomerById(id)
這是我們之前定義的 Feign 客戶端進行 API 呼叫的魔力發生的地方。
讓我們也定義Restaurant POJO:
package com.tutorialspoint;
public class Restaurant {
   private long id;
   private String name;
   private String city;
   public Restaurant(long id, String name, String city) {
      super();
      this.id = id;
      this.name = name;
      this.city = city;
   }
   public long getId() {
      return id;
   }
   public void setId(long id) {
      this.id = id;
   }
   public String getName() {
      return name;
   }
   public void setName(String name) {
      this.name = name;
   }
   public String getCity() {
      return city;
   }
   public void setCity(String city) {
      this.city = city;
   }
}
定義完成後,讓我們使用以下application.properties檔案建立一個簡單的 JAR 檔案:
spring:
   application:
      name: restaurant-service
server:
   port: ${app_port}
eureka:
   client:
      serviceURL:
         defaultZone: https://:8900/eureka
現在讓我們編譯我們的專案並使用以下命令執行它:
java -Dapp_port=8083 -jar .\target\spring-cloud-feign-client-1.0.jar
總共有以下專案正在執行:
獨立的 Eureka 伺服器
客戶服務
餐廳服務
我們可以從 https://:8900/ 上的儀表盤確認以上專案正在執行。

現在,讓我們嘗試查詢所有可以為位於 DC 的 Jane 提供服務的餐廳。
為此,首先讓我們訪問客戶服務:https://:8080/customer/1
{
   "id": 1,
   "name": "Jane",
   "city": "DC"
}
然後,呼叫餐廳服務:https://:8082/restaurant/customer/1
[
   {
      "id": 1,
      "name": "Pandas",
      "city": "DC"
   },
   {
      "id": 3,
      "name": "Little Italy",
      "city": "DC"
   }
]
正如我們所看到的,Jane 可以由 DC 區域的 2 家餐廳提供服務。
此外,從客戶服務的日誌中,我們可以看到:
2021-03-11 11:52:45.745 INFO 7644 --- [nio-8080-exec-1]
o.s.web.servlet.DispatcherServlet : Completed initialization in 1 ms
Querying customer for id with: 1
總之,正如我們所看到的,無需編寫任何樣板程式碼,甚至無需指定服務的地址,我們就可以對服務進行 HTTP 呼叫。
Feign 客戶端 – 區域感知
Feign 客戶端也支援區域感知。例如,我們收到一個服務的傳入請求,我們需要選擇應該為該請求提供服務的伺服器。與其將該請求傳送到並處理到遠處的伺服器上,不如選擇同一區域中的伺服器更有益。
現在讓我們嘗試設定一個區域感知的 Feign 客戶端。為此,我們將使用與前面示例相同的案例。我們將有以下內容:
一個獨立的 Eureka 伺服器
兩個區域感知的客戶服務例項(程式碼與上面相同,我們只需要使用“Eureka 區域感知”中提到的屬性檔案)
兩個區域感知的餐廳服務例項。
現在,讓我們首先啟動區域感知的客戶服務。概括地說,這是application property檔案。
spring:
   application:
      name: customer-service
server:
   port: ${app_port}
eureka:
   instance:
      metadataMap:
         zone: ${zoneName}
   client:
      serviceURL:
         defaultZone: https://:8900/eureka
為了執行,我們將執行兩個服務例項。為此,讓我們開啟兩個 shell,然後在一個 shell 上執行以下命令:
java -Dapp_port=8080 -Dzone_name=USA -jar .\target\spring-cloud-eureka-client-
1.0.jar --spring.config.location=classpath:application-za.yml
並在另一個 shell 上執行以下命令:
java -Dapp_port=8081 -Dzone_name=EU -jar .\target\spring-cloud-eureka-client-
1.0.jar --spring.config.location=classpath:application-za.yml
現在讓我們建立區域感知的餐廳服務。為此,我們將使用以下application-za.yml檔案。
spring:
   application:
      name: restaurant-service
server:
   port: ${app_port}
eureka:
   instance:
      metadataMap:
         zone: ${zoneName}
client:
   serviceURL:
      defaultZone: https://:8900/eureka
為了執行,我們將有兩個服務例項執行。為此,讓我們開啟兩個shell,然後在一個shell上執行以下命令
java -Dapp_port=8082 -Dzone_name=USA -jar .\target\spring-cloud-feign-client-
1.0.jar --spring.config.location=classpath:application-za.yml
並在另一個shell上執行以下命令:
java -Dapp_port=8083 -Dzone_name=EU -jar .\target\spring-cloud-feign-client-
1.0.jar --spring.config.location=classpath:application-za.yml
現在,我們已在區域感知模式下設定了餐廳和客戶服務的兩個例項。

現在,讓我們透過訪問https://:8082/restaurant/customer/1來測試它,其中我們訪問的是美國區域。
[
   {
      "id": 1,
      "name": "Pandas",
      "city": "DC"
   },
   {
      "id": 3,
      "name": "Little Italy",
      "city": "DC"
   }
]
但這裡更重要的一點需要注意的是,請求是由位於美國區域的客戶服務處理的,而不是位於歐盟區域的服務。例如,如果我們訪問相同的API 5次,我們會看到位於美國區域的客戶服務在日誌語句中會有以下內容:
2021-03-11 12:25:19.036 INFO 6500 --- [trap-executor-0]
c.n.d.s.r.aws.ConfigClusterResolver : Resolving eureka endpoints via
configuration
Got request for customer with id: 1
Got request for customer with id: 1
Got request for customer with id: 1
Got request for customer with id: 1
Got request for customer with id: 1
而歐盟區域的客戶服務沒有處理任何請求。
Spring Cloud - 負載均衡
簡介
在分散式環境中,服務需要相互通訊。通訊可以是同步的,也可以是非同步的。現在,當服務同步通訊時,最好讓這些服務在工作程式之間負載均衡請求,以避免單個工作程式過載。有兩種方法可以負載均衡請求
伺服器端負載均衡 - 工作程式由一個軟體作為前端,該軟體將傳入請求分發到工作程式。
客戶端負載均衡 - 呼叫服務本身將請求分發到工作程式。客戶端負載均衡的優點是我們不需要以負載均衡器的形式擁有一個單獨的元件。我們不需要擁有負載均衡器的高可用性等。此外,我們避免了從客戶端到負載均衡器到工作程式的額外跳躍來完成請求。因此,我們節省了延遲、基礎設施和維護成本。
Spring Cloud負載均衡器(SLB)和Netflix Ribbon是兩種眾所周知的客戶端負載均衡器,用於處理這種情況。在本教程中,我們將使用Spring Cloud負載均衡器。
負載均衡器依賴項設定
讓我們使用我們在前面章節中一直在使用的餐廳案例。讓我們重用Restaurant Service,其中包含有關餐廳的所有資訊。請注意,我們將與我們的負載均衡器一起使用Feign Client。
首先,讓我們使用以下依賴項更新服務的pom.xml:
<dependency>
      <groupId>org.springframework.cloud</groupId>
      <artifactId>spring-cloud-starter-openfeign</artifactId>
</dependency>
<dependency>
      <groupId>org.springframework.cloud</groupId>
      <artifactId>spring-cloud-starter-loadbalancer</artifactId>
</dependency>
<dependency>
      <groupId>org.springframework.cloud</groupId>
      <artifactId>spring-cloud-starter-netflix-eureka-client</artifactId>
</dependency>
<dependency>
      <groupId>org.springframework.boot</groupId>
      <artifactId>spring-boot-starter-web</artifactId>
</dependency>
我們的負載均衡器將使用Eureka作為發現客戶端來獲取有關工作程式例項的資訊。為此,我們將必須使用@EnableDiscoveryClient註解。
package com.tutorialspoint;
import org.springframework.boot.SpringApplication;
import org.springframework.boot.autoconfigure.SpringBootApplication;
import org.springframework.cloud.client.discovery.EnableDiscoveryClient;
import org.springframework.cloud.openfeign.EnableFeignClients;
@SpringBootApplication
@EnableFeignClients
@EnableDiscoveryClient
public class RestaurantService{
   public static void main(String[] args) {
      SpringApplication.run(RestaurantService.class, args);
   }
}
使用Spring Load Balancer與Feign
我們之前在Feign中使用的@FeignClient註解實際上包含了負載均衡器客戶端的預設設定,該設定將我們的請求輪詢。讓我們測試一下。這是我們之前Feign部分中相同的Feign客戶端。
package com.tutorialspoint;
import org.springframework.cloud.openfeign.FeignClient;
import org.springframework.web.bind.annotation.PathVariable;
import org.springframework.web.bind.annotation.RequestMapping;
@FeignClient(name = "customer-service")
public interface CustomerService {
   @RequestMapping("/customer/{id}")
   public Customer getCustomerById(@PathVariable("id") Long id);
}
這是我們將要使用的控制器。同樣,它沒有發生變化。
package com.tutorialspoint;
import java.util.HashMap;
import java.util.List;
import java.util.stream.Collectors;
import org.springframework.beans.factory.annotation.Autowired;
import org.springframework.web.bind.annotation.PathVariable;
import org.springframework.web.bind.annotation.RequestMapping;
import org.springframework.web.bind.annotation.RestController;
@RestController
class RestaurantController {
   @Autowired
   CustomerService customerService;
   static HashMap<Long, Restaurant> mockRestaurantData = new HashMap();
   static{
      mockRestaurantData.put(1L, new Restaurant(1, "Pandas", "DC"));
      mockRestaurantData.put(2L, new Restaurant(2, "Indies", "SFO"));
      mockRestaurantData.put(3L, new Restaurant(3, "Little Italy", "DC"));
      mockRestaurantData.put(4L, new Restaurant(4, "Pizeeria", "NY"));
   }
   @RequestMapping("/restaurant/customer/{id}")
   public List<Restaurant> getRestaurantForCustomer(@PathVariable("id") Long
id) {
      System.out.println("Got request for customer with id: " + id);
      String customerCity = customerService.getCustomerById(id).getCity();
      return mockRestaurantData.entrySet().stream().filter(
         entry -> entry.getValue().getCity().equals(customerCity))
         .map(entry -> entry.getValue())
         .collect(Collectors.toList());
   }
}
現在我們完成了設定,讓我們嘗試一下。這裡稍微介紹一下背景,我們將執行以下操作:
啟動Eureka Server。
啟動兩個Customer Service例項。
啟動一個Restaurant Service,它內部呼叫Customer Service並使用Spring Cloud負載均衡器
對Restaurant Service進行四次API呼叫。理想情況下,每個客戶服務將處理兩個請求。
假設我們已經啟動了Eureka伺服器和Customer Service例項,現在讓我們編譯Restaurant Service程式碼並使用以下命令執行:
java -Dapp_port=8082 -jar .\target\spring-cloud-feign-client-1.0.jar
現在,讓我們找到位於華盛頓特區的Jane的餐廳,方法是訪問以下API https://:8082/restaurant/customer/1,然後再次訪問相同的API三次。您會從Customer Service的日誌中注意到,兩個例項都處理了2個請求。每個Customer Service shell都會列印以下內容:
Querying customer for id with: 1
Querying customer for id with: 1
這有效地意味著請求被輪詢了。
配置Spring負載均衡器
我們可以配置負載均衡器以更改演算法型別,或者我們可以提供自定義演算法。讓我們看看如何調整我們的負載均衡器以優先考慮請求的相同客戶端。
為此,讓我們更新我們的Feign Client以包含負載均衡器定義。
package com.tutorialspoint;
import org.springframework.cloud.loadbalancer.annotation.LoadBalancerClient;
import org.springframework.cloud.openfeign.FeignClient;
import org.springframework.web.bind.annotation.PathVariable;
import org.springframework.web.bind.annotation.RequestMapping;
@FeignClient(name = "customer-service")
@LoadBalancerClient(name = "customer-service",
configuration=LoadBalancerConfiguration.class)
public interface CustomerService {
   @RequestMapping("/customer/{id}")
   public Customer getCustomerById(@PathVariable("id") Long id);
}
如果您注意到了,我們添加了@LoadBalancerClient註解,它指定了將用於此Feign客戶端的負載均衡器型別。我們可以為負載均衡器建立一個配置類,並將該類傳遞給註解本身。現在讓我們定義LoadBalancerConfiguratio.java
package com.tutorialspoint;
import org.springframework.cloud.loadbalancer.core.ServiceInstanceListSupplier;
import org.springframework.context.ConfigurableApplicationContext;
import org.springframework.context.annotation.Bean;
import org.springframework.context.annotation.Configuration;
@Configuration
public class LoadBalancerConfiguration {
   @Bean
   public ServiceInstanceListSupplier
discoveryClientServiceInstanceListSupplier(
         ConfigurableApplicationContext context) {
      System.out.println("Configuring Load balancer to prefer same instance");
      return ServiceInstanceListSupplier.builder()
               .withBlockingDiscoveryClient()
               .withSameInstancePreference()
               .build(context);
      }
}
現在,正如您所看到的,我們已經設定了我們的客戶端負載均衡以每次都優先考慮相同的例項。現在我們完成了設定,讓我們嘗試一下。這裡稍微介紹一下背景,我們將執行以下操作:
啟動Eureka Server。
啟動兩個Customer Service例項。
啟動一個Restaurant Service,它內部呼叫Customer Service並使用Spring Cloud負載均衡器
對Restaurant Service進行4次API呼叫。理想情況下,所有四個請求都將由同一個客戶服務處理。
假設我們已經啟動了Eureka伺服器和Customer Service例項,現在讓我們編譯Restaurant Service程式碼,然後使用以下命令執行:
java -Dapp_port=8082 -jar .\target\spring-cloud-feign-client-1.0.jar
現在,讓我們找到位於華盛頓特區的Jane的餐廳,方法是訪問以下API https://:8082/restaurant/customer/1,然後再次訪問相同的API三次。您會從Customer Service的日誌中注意到,一個例項處理了所有4個請求:
Querying customer for id with: 1
Querying customer for id with: 1
Querying customer for id with: 1
Querying customer for id with: 1
這有效地意味著請求優先選擇了同一個客戶服務代理。
類似地,我們可以使用各種其他負載均衡演算法來使用粘性會話、基於提示的負載均衡、區域優先負載均衡等。
Spring Cloud - 使用Hystrix的斷路器
簡介
在分散式環境中,服務需要相互通訊。通訊可以是同步的,也可以是非同步的。當服務同步通訊時,可能有多種原因會導致問題。例如:
被呼叫服務不可用 - 被呼叫的服務由於某種原因而停止執行,例如:bug、部署等。
被呼叫服務響應時間過長 - 被呼叫的服務可能由於高負載或資源消耗而變慢,或者它正在初始化服務。
在這兩種情況下,對於呼叫方來說,等待被呼叫方響應都是浪費時間和網路資源。更有意義的做法是讓服務退避,並在一段時間後再次呼叫被呼叫服務,或共享預設響應。
Netflix Hystrix、Resilince4j是兩種眾所周知的斷路器,用於處理此類情況。在本教程中,我們將使用Hystrix。
Hystrix – 依賴項設定
讓我們使用我們之前一直在使用的餐廳案例。讓我們將hystrix依賴項新增到我們的Restaurant Services中,該服務呼叫Customer Service。首先,讓我們使用以下依賴項更新服務的pom.xml:
<dependency>
   <groupId>org.springframework.cloud</groupId>
   <artifactId>spring-cloud-starter-netflix-hystrix</artifactId>
   <version>2.7.0.RELEASE</version>
</dependency>
然後,使用正確的註解,即@EnableHystrix,註解我們的Spring應用程式類。
package com.tutorialspoint;
import org.springframework.boot.SpringApplication;
import org.springframework.boot.autoconfigure.SpringBootApplication;
import org.springframework.cloud.client.circuitbreaker.EnableCircuitBreaker;
import org.springframework.cloud.client.discovery.EnableDiscoveryClient;
import org.springframework.cloud.netflix.hystrix.EnableHystrix;
import org.springframework.cloud.openfeign.EnableFeignClients;
@SpringBootApplication
@EnableFeignClients
@EnableDiscoveryClient
@EnableHystrix
public class RestaurantService{
   public static void main(String[] args) {
      SpringApplication.run(RestaurantService.class, args);
   }
}
注意事項
@ EnableDiscoveryClient 和 @EnableFeignCLient - 我們已經在上一章中介紹了這些註解。
@EnableHystrix - 此註解掃描我們的包,並查詢使用@HystrixCommand註解的方法。
Hystrix命令註解
完成後,我們將重用之前為Restaurant服務中的customer service類定義的Feign客戶端,這裡沒有更改:
package com.tutorialspoint;
import org.springframework.cloud.openfeign.FeignClient;
import org.springframework.web.bind.annotation.PathVariable;
import org.springframework.web.bind.annotation.RequestMapping;
@FeignClient(name = "customer-service")
public interface CustomerService {
   @RequestMapping("/customer/{id}")
   public Customer getCustomerById(@PathVariable("id") Long id);
}
現在,讓我們在此處定義服務實現類,它將使用Feign客戶端。這將是Feign客戶端的簡單包裝器。
package com.tutorialspoint;
import org.springframework.beans.factory.annotation.Autowired;
import org.springframework.stereotype.Service;
import com.netflix.hystrix.contrib.javanica.annotation.HystrixCommand;
@Service
public class CustomerServiceImpl implements CustomerService {
   @Autowired
   CustomerService customerService;
   @HystrixCommand(fallbackMethod="defaultCustomerWithNYCity")
   public Customer getCustomerById(Long id) {
      return customerService.getCustomerById(id);
   }
   // assume customer resides in NY city
   public Customer defaultCustomerWithNYCity(Long id) {
      return new Customer(id, null, "NY");
   }
}
現在,讓我們瞭解上面程式碼中的幾個要點:
HystrixCommand註解 - 它負責包裝函式呼叫getCustomerById並在其周圍提供一個代理。然後,代理提供了各種掛鉤,透過這些掛鉤我們可以控制對客戶服務的呼叫。例如,請求超時、請求池化、提供回退方法等。
回退方法 - 當Hystrix確定被呼叫方出現問題時,我們可以指定要呼叫的方法。此方法需要與使用註解的方法具有相同的簽名。在我們的例子中,我們決定將資料提供回我們的控制器以獲取紐約市的資料。
此註解提供的一些有用選項:
錯誤閾值百分比 - 在斷路器跳閘之前允許請求失敗的百分比,即呼叫回退方法。這可以透過使用cicutiBreaker.errorThresholdPercentage來控制。
在超時後放棄網路請求 - 如果被呼叫服務(在我們的例子中是Customer Service)速度緩慢,我們可以設定超時時間,在此之後我們將放棄請求並轉到回退方法。這可以透過設定execution.isolation.thread.timeoutInMilliseconds來控制。
最後,這是我們呼叫CustomerServiceImpl的控制器
package com.tutorialspoint;
import java.util.HashMap;
import java.util.List;
import java.util.stream.Collectors;
import org.springframework.beans.factory.annotation.Autowired;
import org.springframework.web.bind.annotation.PathVariable;
import org.springframework.web.bind.annotation.RequestMapping;
import org.springframework.web.bind.annotation.RestController;
@RestController
class RestaurantController {
   @Autowired
   CustomerServiceImpl customerService;
   static HashMap<Long, Restaurant> mockRestaurantData = new HashMap();
   static{
      mockRestaurantData.put(1L, new Restaurant(1, "Pandas", "DC"));
      mockRestaurantData.put(2L, new Restaurant(2, "Indies", "SFO"));
      mockRestaurantData.put(3L, new Restaurant(3, "Little Italy", "DC"));
      mockRestaurantData.put(3L, new Restaurant(4, "Pizeeria", "NY"));
   }
   @RequestMapping("/restaurant/customer/{id}")
   public List<Restaurant> getRestaurantForCustomer(@PathVariable("id") Long
id)
{
   System.out.println("Got request for customer with id: " + id);
   String customerCity = customerService.getCustomerById(id).getCity();
   return mockRestaurantData.entrySet().stream().filter(
      entry -> entry.getValue().getCity().equals(customerCity))
      .map(entry -> entry.getValue())
      .collect(Collectors.toList());
   }
}
斷路器跳閘/開啟
現在我們完成了設定,讓我們嘗試一下。這裡稍微介紹一下背景,我們將執行以下操作:
啟動Eureka Server
啟動Customer Service
啟動Restaurant Service,它將在內部呼叫Customer Service。
對Restaurant Service進行API呼叫
關閉Customer Service
對Restaurant Service進行API呼叫。鑑於Customer Service已關閉,它將導致失敗,最終將呼叫回退方法。
現在讓我們編譯Restaurant Service程式碼並使用以下命令執行:
java -Dapp_port=8082 -jar .\target\spring-cloud-feign-client-1.0.jar
此外,啟動Customer Service和Eureka伺服器。請注意,這些服務沒有任何更改,它們與前面章節中看到的一樣。
現在,讓我們嘗試查詢位於華盛頓特區的Jane的餐廳。
{
   "id": 1,
   "name": "Jane",
   "city": "DC"
}
為此,我們將訪問以下URL:https://:8082/restaurant/customer/1
[
   {
      "id": 1,
      "name": "Pandas",
      "city": "DC"
   },
   {
      "id": 3,
      "name": "Little Italy",
      "city": "DC"
   }
]
所以,這裡沒有什麼新內容,我們得到了位於華盛頓特區的餐廳。現在,讓我們進入有趣的部分,即關閉Customer Service。您可以透過按下Ctrl+C或簡單地殺死shell來執行此操作。
現在讓我們再次訪問相同的URL:https://:8082/restaurant/customer/1
{
   "id": 4,
   "name": "Pizzeria",
   "city": "NY"
}
從輸出中可以看出,我們得到了來自紐約的餐廳,儘管我們的客戶來自華盛頓特區。這是因為我們的回退方法返回了一個位於紐約的虛擬客戶。雖然沒有用,但以上示例顯示了按預期呼叫了回退。
將快取與Hystrix整合
為了使上述方法更有用,我們可以在使用Hystrix時整合快取。當底層服務不可用時,這可能是一種提供更好答案的有用模式。
首先,讓我們建立一個服務的快取版本。
package com.tutorialspoint;
import java.util.HashMap;
import java.util.Map;
import org.springframework.beans.factory.annotation.Autowired;
import org.springframework.stereotype.Service;
import com.netflix.hystrix.contrib.javanica.annotation.HystrixCommand;
@Service
public class CustomerServiceCachedFallback implements CustomerService {
   Map<Long, Customer> cachedCustomer = new HashMap<>();
   @Autowired
   CustomerService customerService;
   @HystrixCommand(fallbackMethod="defaultToCachedData")
   public Customer getCustomerById(Long id) {
      Customer customer = customerService.getCustomerById(id);
      // cache value for future reference
      cachedCustomer.put(customer.getId(), customer);
      return customer;
   }
   // get customer data from local cache
   public Customer defaultToCachedData(Long id) {
      return cachedCustomer.get(id);
   }
}
我們使用 HashMap 作為儲存來快取資料。這是為了開發目的。在生產環境中,我們可能希望使用更好的快取解決方案,例如 Redis、Hazelcast 等。
現在,我們只需要更新控制器中的一行程式碼來使用上述服務。
@RestController
class RestaurantController {
   @Autowired
   CustomerServiceCachedFallback customerService;
   static HashMap<Long, Restaurant> mockRestaurantData = new HashMap();
   …
}
我們將遵循與上述相同的步驟。
啟動Eureka Server。
啟動客戶服務。
啟動餐廳服務,該服務在內部呼叫客戶服務。
對餐廳服務進行 API 呼叫。
關閉客戶服務。
對餐廳服務進行 API 呼叫。鑑於客戶服務已關閉但資料已快取,我們將獲得一組有效的資料。
現在,讓我們按照相同的流程執行到步驟 3。
現在訪問 URL:https://:8082/restaurant/customer/1
[
   {
      "id": 1,
      "name": "Pandas",
      "city": "DC"
   },
   {
      "id": 3,
      "name": "Little Italy",
      "city": "DC"
   }
]
所以,這裡沒有什麼新東西,我們得到了位於 DC 的餐廳。現在,讓我們進入有趣的環節,即關閉客戶服務。您可以透過按下 Ctrl+C 或簡單地終止 shell 來實現。
現在讓我們再次訪問相同的URL:https://:8082/restaurant/customer/1
[
   {
      "id": 1,
      "name": "Pandas",
      "city": "DC"
   },
   {
      "id": 3,
      "name": "Little Italy",
      "city": "DC"
   }
]
從輸出中可以看出,我們得到了來自 DC 的餐廳,這正是我們期望的,因為我們的客戶來自 DC。這是因為我們的回退方法返回了快取的客戶資料。
將 Feign 與 Hystrix 整合
我們看到了如何使用 @HystrixCommand 註解來觸發斷路器並提供回退。但是我們還必須額外定義一個服務類來包裝我們的 Hystrix 客戶端。但是,我們也可以透過簡單地將正確的引數傳遞給 Feign 客戶端來實現相同的功能。讓我們嘗試這樣做。為此,首先透過新增一個**回退類**來更新我們用於 CustomerService 的 Feign 客戶端。
package com.tutorialspoint;
import org.springframework.cloud.openfeign.FeignClient;
import org.springframework.web.bind.annotation.PathVariable;
import org.springframework.web.bind.annotation.RequestMapping;
@FeignClient(name = "customer-service", fallback = FallBackHystrix.class)
public interface CustomerService {
   @RequestMapping("/customer/{id}")
   public Customer getCustomerById(@PathVariable("id") Long id);
}
現在,讓我們為 Feign 客戶端添加回退類,當 Hystrix 斷路器觸發時將呼叫該類。
package com.tutorialspoint;
import org.springframework.stereotype.Component;
@Component
public class FallBackHystrix implements CustomerService{
   @Override
   public Customer getCustomerById(Long id) {
      System.out.println("Fallback called....");
      return new Customer(0, "Temp", "NY");
   }
}
最後,我們還需要建立**application-circuit.yml**來啟用 Hystrix。
spring:
   application:
      name: restaurant-service
server:
   port: ${app_port}
eureka:
   client:
      serviceURL:
         defaultZone: https://:8900/eureka
feign:
   circuitbreaker:
      enabled: true
現在,我們已經準備好了設定,讓我們測試一下。我們將遵循以下步驟。
啟動Eureka Server。
我們不啟動客戶服務。
啟動Restaurant Service,它將在內部呼叫Customer Service。
對餐廳服務進行 API 呼叫。鑑於客戶服務已關閉,我們將注意到回退。
假設步驟 1 已經完成,讓我們轉到步驟 3。讓我們編譯程式碼並執行以下命令。
java -Dapp_port=8082 -jar .\target\spring-cloud-feign-client-1.0.jar --
spring.config.location=classpath:application-circuit.yml
現在讓我們嘗試訪問:https://:8082/restaurant/customer/1
由於我們沒有啟動客戶服務,因此將呼叫回退,並且回退將傳送 NY 作為城市,這就是為什麼我們在以下輸出中看到 NY 餐廳的原因。
{
   "id": 4,
   "name": "Pizzeria",
   "city": "NY"
}
此外,為了確認,在日誌中,我們將看到。
….
2021-03-13 16:27:02.887 WARN 21228 --- [reakerFactory-1]
.s.c.o.l.FeignBlockingLoadBalancerClient : Load balancer does not contain an
instance for the service customer-service
Fallback called....
2021-03-13 16:27:03.802 INFO 21228 --- [ main]
o.s.cloud.commons.util.InetUtils : Cannot determine local hostname
…..
Spring Cloud - 閘道器
簡介
在分散式環境中,服務需要相互通訊。但是,這是服務間通訊。我們還有用例,其中我們域外部的客戶端希望訪問我們的服務以獲取 API。因此,我們可以公開所有可以被客戶端呼叫的微服務的地址,或者我們可以建立一個服務閘道器,該閘道器將請求路由到各種微服務並響應客戶端。
在這裡,建立閘道器是更好的方法。它有兩個主要優點。
不需要維護每個單獨服務的安全性。
並且,橫切關注點(例如,新增元資訊)可以在一個地方處理。
**Netflix Zuul** 和 **Spring Cloud Gateway** 是兩種眾所周知的雲網關,用於處理此類情況。在本教程中,我們將使用 Spring Cloud Gateway。
Spring Cloud Gateway – 依賴項設定
讓我們使用我們一直在使用的餐廳案例。讓我們在兩個服務(即餐廳服務和客戶服務)前面新增一個新的服務(閘道器)。首先,讓我們使用以下依賴項更新服務的**pom.xml**。
<dependencies>
   <dependency>
         <groupId>org.springframework.cloud</groupId>
         <artifactId>spring-cloud-starter-netflix-eureka-client</artifactId>
   </dependency>
   <dependency>
         <groupId>org.springframework.cloud</groupId>
         <artifactId>spring-cloud-starter-gateway</artifactId>
   </dependency>
</dependencies>
然後,使用正確的註解(即 @EnableDiscoveryClient)註釋我們的 Spring 應用程式類。
package com.tutorialspoint;
import org.springframework.boot.SpringApplication;
import org.springframework.boot.autoconfigure.SpringBootApplication;
import org.springframework.cloud.client.discovery.EnableDiscoveryClient;
@SpringBootApplication
@EnableDiscoveryClient
public class RestaurantGatewayService{
   public static void main(String[] args) {
      SpringApplication.run(RestaurantGatewayService.class, args);
   }
}
我們使用 @EnableDiscoveryClient 進行註釋,因為我們希望使用 Eureka 服務發現來獲取正在為特定用例提供服務的宿主機列表。
使用閘道器進行動態路由
Spring Cloud Gateway 包含三個重要的部分。它們是。
**路由** – 這些是閘道器的構建塊,包含要將請求轉發到的 URL 以及應用於傳入請求的斷言和過濾器。
**斷言** – 這些是傳入請求應匹配的一組條件,以便將其轉發到內部微服務。例如,路徑斷言僅在傳入 URL 包含該路徑時才轉發請求。
**過濾器** – 這些充當可以在將請求傳送到內部微服務之前或在向客戶端響應之前修改傳入請求的位置。
讓我們為我們的餐廳和客戶服務編寫一個簡單的閘道器配置。
spring:
   application:
      name: restaurant-gateway-service
   cloud:
      gateway:
      discovery:
         locator:
            enabled: true
      routes:
         - id: customers
            uri: lb://customer-service
            predicates:
            - Path=/customer/**
         - id: restaurants
            uri: lb://restaurant-service
            predicates:
            - Path=/restaurant/**
server:
   port: ${app_port}
eureka:
   client:
      serviceURL:
         defaultZone: https://:8900/eureka
關於上述配置需要注意的幾點。
我們啟用了**discovery.locator**以確保閘道器可以從 Eureka 伺服器讀取。
我們在這裡使用了 Path 斷言來路由請求。這意味著任何以 /**customer** 開頭的請求都將路由到客戶服務,對於 /**restaurant**,我們將轉發該請求到餐廳服務。
現在讓我們在閘道器服務之前設定其他服務。
啟動Eureka Server
啟動Customer Service
啟動餐廳服務
現在,讓我們編譯並執行閘道器專案。我們將使用以下命令執行此操作。
java -Dapp_port=8084 -jar .\target\spring-cloud-gateway-1.0.jar
完成後,我們的閘道器準備好在埠 8084 上進行測試。首先讓我們訪問 https://:8084/customer/1,我們可以看到請求已正確路由到客戶服務,並且我們得到了以下輸出。
{
   "id": 1,
   "name": "Jane",
   "city": "DC"
}
現在,訪問我們的餐廳 API,即 https://:8084/restaurant/customer/1,我們得到以下輸出。
[
   {
      "id": 1,
      "name": "Pandas",
      "city": "DC"
   },
   {
      "id": 3,
      "name": "Little Italy",
      "city": "DC"
   }
]
這意味著這兩個呼叫都已正確路由到各自的服務。
斷言和過濾器請求
我們在上面的示例中使用了 Path 斷言。以下是一些其他重要的斷言。
| 斷言 | 描述 |
|---|---|
| Cookie 斷言(輸入:名稱和正則表示式) | 將 Cookie 與“名稱”與“正則表示式”進行比較 |
| 標頭斷言(輸入:名稱和正則表示式) | 將標頭與“名稱”與“正則表示式”進行比較 |
| 主機斷言(輸入:名稱和正則表示式) | 將傳入的“名稱”與“正則表示式”進行比較 |
| 權重斷言(輸入:組名稱和權重) | 權重斷言(輸入:組名稱和權重) |
**過濾器**用於在將資料傳送到下游服務之前或在將響應傳送回客戶端之前從請求中新增/刪除資料。
以下是一些用於新增元資料的重要過濾器。
| 過濾器 | 描述 |
|---|---|
| 新增請求標頭過濾器(輸入:標頭和值) | 在下游轉發請求之前新增“標頭”和“值”。 |
| 新增響應標頭過濾器(輸入:標頭和值) | 在將請求轉發到上游(即客戶端)之前新增“標頭”和“值”。 |
| 重定向過濾器(輸入:狀態和 URL) | 在傳遞到下游主機之前新增重定向標頭以及 URL。 |
| ReWritePath(輸入:正則表示式和替換) | 負責透過將匹配的“正則表示式”字串替換為輸入替換來重寫路徑。 |
過濾器和斷言的詳盡列表位於 https://cloud.spring.io/spring-cloudgateway/reference/html/#the-rewritepath-gatewayfilter-factory
監控
為了監控閘道器或訪問各種路由、斷言等,我們可以在專案中啟用執行器。為此,讓我們首先更新 pom.xml 以包含執行器作為依賴項。
<dependency>
      <groupId>org.springframework.boot</groupId>
      <artifactId>spring-boot-starter-actuator</artifactId>
</dependency>
為了進行監控,我們將使用一個單獨的應用程式屬性檔案,其中將包含啟用執行器的標誌。因此,它將如下所示。
spring:
   application:
      name: restaurant-gateway-service
   cloud:
      gateway:
         discovery:
            locator:
               enabled: true
         routes:
            - id: customers
              uri: lb://customer-service
              predicates:
              - Path=/customer/**
            - id: restaurants
              uri: lb://restaurant-service
              predicates:
              - Path=/restaurant/**
server:
   port: ${app_port}
eureka:
   client:
      serviceURL:
         defaultZone: https://:8900/eureka
management:
   endpoint:
      gateway:
         enabled: true
   endpoints:
      web:
         exposure:
            include: gateway
現在,要列出所有路由,我們可以訪問:https://:8084/actuator/gateway/routes
[
   {
      "predicate": "Paths: [/customer/**], match trailing slash: true",
      "route_id": "customers",
      "filters": [],
      "uri": "lb://customer-service",
      "order": 0
   },
   {
      "predicate": "Paths: [/restaurant/**], match trailing slash: true",
      "route_id": "restaurants",
      "filters": [],
      "uri": "lb://restaurant-service",
      "order": 0
   }
]
其他重要的監控 API。
| API | 描述 |
|---|---|
| GET /actuator/gateway/routes/{id} | 獲取有關特定路由的資訊 |
| POST /gateway/routes/{id_to_be assigned} | 向閘道器新增新路由 |
| DELETE /gateway/routes/{id} | 從閘道器刪除路由 |
| POST /gateway/refresh | 刪除所有快取條目 |
Spring Cloud - 使用 Apache Kafka 的流
簡介
在分散式環境中,服務需要相互通訊。通訊可以同步或非同步進行。在本節中,我們將瞭解服務如何透過使用**訊息代理**非同步通訊。
執行非同步通訊的兩個主要好處。
**生產者和消費者的速度可以不同** – 如果資料的消費者速度慢或快,則不會影響生產者的處理,反之亦然。兩者都可以以自己的速度工作,而不會相互影響。
**生產者無需處理來自各種消費者的請求** – 可能有多個消費者希望從生產者讀取相同的資料集。在中間使用訊息代理,生產者無需關心這些消費者產生的負載。此外,生產者級別的任何中斷都不會阻止消費者讀取舊的生產者資料,因為此資料將存在於訊息代理中。
**Apache Kafka** 和 **RabbitMQ** 是兩種眾所周知的用於進行非同步通訊的訊息代理。在本教程中,我們將使用 Apache Kafka。
Kafka – 依賴項設定
讓我們使用我們之前一直在使用的餐廳案例。因此,假設我們的客戶服務和餐廳服務透過非同步通訊進行通訊。為此,我們將使用 Apache Kafka。我們將在兩個服務中使用它,即客戶服務和餐廳服務。
要使用 Apache Kafka,我們將更新這兩個服務的 POM 並新增以下依賴項。
<dependency>
      <groupId>org.springframework.cloud</groupId>
      <artifactId>spring-cloud-starter-stream-kafka</artifactId>
</dependency>
我們還需要執行 Kafka 例項。有多種方法可以做到這一點,但我們更傾向於使用 Docker 容器啟動 Kafka。以下是一些我們可以考慮使用的映象。
無論我們使用哪個映象,這裡需要注意的重要一點是,一旦映象啟動並執行,請確保可以在**localhost:9092**訪問 Kafka 叢集。
現在我們已經讓 Kafka 叢集在我們的映象上執行,讓我們進入核心示例。
繫結和繫結器
在 Spring Cloud 流方面,有三個重要的概念。
**外部訊息系統** – 這是外部管理的元件,負責儲存應用程式產生的事件/訊息,其訂閱者/消費者可以讀取這些訊息。請注意,這不是在應用程式/Spring 中管理的。一些示例包括 Apache Kafka、RabbitMQ。
**繫結器** – 這是提供與訊息系統整合的元件,例如,包含訊息系統的 IP 地址、身份驗證等。
**繫結** – 此元件使用繫結器將訊息傳送到訊息系統或從特定主題/佇列中使用訊息。
所有上述屬性都在**應用程式屬性檔案**中定義。
示例
讓我們使用我們之前一直在使用的餐廳案例。因此,假設每當向客戶服務新增新的服務時,我們都希望通知附近的餐廳有關他/她的客戶資訊。
為此,讓我們首先更新我們的客戶服務以包含並使用 Kafka。請注意,我們將使用客戶服務作為資料的生產者。也就是說,每當我們透過 API 新增客戶時,它也將新增到 Kafka 中。
spring:
   application:
      name: customer-service
   cloud:
      stream:
         source: customerBinding-out-0
         kafka:
            binder:
            brokers: localhost:9092
            replicationFactor: 1
      bindings:
         customerBinding-out-0:
            destination: customer
            producer:
               partitionCount: 3
server:
   port: ${app_port}
eureka:
   client:
      serviceURL:
         defaultZone: https://:8900/eureka
需要注意的事項 -
我們使用我們本地 Kafka 例項的地址定義了一個繫結器。
我們還定義了繫結“customerBinding-out-0”,它使用“customer”主題輸出訊息。
我們還在stream.source中提到了我們的繫結,以便我們可以在程式碼中使用它。
完成後,我們現在透過新增一個新的方法“addCustomer”來更新我們的控制器,該方法負責處理POST請求。然後,從post請求中,我們將資料傳送到Kafka Broker。
package com.tutorialspoint;
import java.util.HashMap;
import org.springframework.beans.factory.annotation.Autowired;
import org.springframework.cloud.stream.function.StreamBridge;
import org.springframework.web.bind.annotation.PathVariable;
import org.springframework.web.bind.annotation.RequestMapping;
import org.springframework.web.bind.annotation.RequestMethod;
import org.springframework.web.bind.annotation.RestController;
@RestController
class RestaurantCustomerInstancesController {
   @Autowired
   private StreamBridge streamBridge;
   static HashMap<Long, Customer> mockCustomerData = new HashMap();
   static{
      mockCustomerData.put(1L, new Customer(1, "Jane", "DC"));
      mockCustomerData.put(2L, new Customer(2, "John", "SFO"));
      mockCustomerData.put(3L, new Customer(3, "Kate", "NY"));
   }
   @RequestMapping("/customer/{id}")
   public Customer getCustomerInfo(@PathVariable("id") Long id) {
      System.out.println("Querying customer for id with: " + id);
      return mockCustomerData.get(id);
   }
   @RequestMapping(path = "/customer/{id}", method = RequestMethod.POST)
   public Customer addCustomer(@PathVariable("id") Long id) {
      // add default name
      Customer defaultCustomer = new Customer(id, "Dwayne", "NY");
      streamBridge.send("customerBinding-out-0", defaultCustomer);
      return defaultCustomer;
   }
}
需要注意的要點
我們正在自動裝配StreamBridge,我們將使用它來發送訊息。
我們在“send”方法中使用的引數也指定了我們想要用於傳送資料的繫結。
現在讓我們更新我們的Restaurant Service以包含並訂閱“customer”主題。請注意,我們將使用Restaurant Service作為資料的消費者。也就是說,每當我們透過API新增Customer時,Restaurant Service都會透過Kafka瞭解到它。
首先,讓我們更新application properties檔案。
spring:
   application:
      name: restaurant-service
   cloud:
      function:
         definition: customerBinding
      stream:
         kafka:
            binder:
               brokers: localhost:9092
               replicationFactor: 1
            bindings:
               customerBinding-in-0:
               destination: customer
server:
   port: ${app_port}
eureka:
   client:
      serviceURL:
         defaultZone: https://:8900/eureka
完成後,我們現在透過新增一個新的方法“customerBinding”來更新我們的控制器,該方法負責獲取請求並提供一個函式,該函式將列印請求及其元資料詳細資訊。
package com.tutorialspoint;
import java.util.HashMap;
import java.util.List;
import java.util.function.Consumer;
import java.util.function.Supplier;
import java.util.stream.Collectors;
import org.springframework.beans.factory.annotation.Autowired;
import org.springframework.cloud.stream.annotation.StreamListener;
import org.springframework.cloud.stream.function.StreamBridge;
import org.springframework.context.annotation.Bean;
import org.springframework.kafka.support.Acknowledgment;
import org.springframework.kafka.support.KafkaHeaders;
import org.springframework.messaging.Message;
import org.springframework.messaging.support.MessageBuilder;
import org.springframework.web.bind.annotation.PathVariable;
import org.springframework.web.bind.annotation.RequestMapping;
import org.springframework.web.bind.annotation.RestController;
@RestController
class RestaurantController {
   @Autowired
   CustomerService customerService;
   @Autowired
   private StreamBridge streamBridge;
   static HashMap<Long, Restaurant> mockRestaurantData = new HashMap();
   static{
      mockRestaurantData.put(1L, new Restaurant(1, "Pandas", "DC"));
      mockRestaurantData.put(2L, new Restaurant(2, "Indies", "SFO"));
      mockRestaurantData.put(3L, new Restaurant(3, "Little Italy", "DC"));
      mockRestaurantData.put(4L, new Restaurant(4, "Pizeeria", "NY"));
   }
   @RequestMapping("/restaurant/customer/{id}")
   public List<Restaurant> getRestaurantForCustomer(@PathVariable("id") Long id) {
      System.out.println("Got request for customer with id: " + id);
      String customerCity = customerService.getCustomerById(id).getCity();
      return mockRestaurantData.entrySet().stream().filter(
entry -> entry.getValue().getCity().equals(customerCity))
.map(entry -> entry.getValue())
.collect(Collectors.toList());
   }
   @RequestMapping("/restaurant/cust/{id}")
   public void getRestaurantForCust(@PathVariable("id") Long id) {
      streamBridge.send("ordersBinding-out-0", id);
   }
   @Bean
   public Consumer<Message<Customer>> customerBinding() {
      return msg -> {
         System.out.println(msg);
      };
   }
}
需要注意的事項 -
我們使用“customerBinding”,它應該傳遞當此繫結收到訊息時將呼叫的函式。
我們在建立繫結並指定主題時,YAML檔案中也需要使用此函式/bean的名稱。
現在,讓我們像往常一樣執行上述程式碼,啟動Eureka Server。請注意,這不是硬性要求,這裡是為了完整性而存在。
然後,讓我們編譯並開始使用以下命令更新Customer Service:
mvn clean install ; java -Dapp_port=8083 -jar .\target\spring-cloud-eurekaclient-
1.0.jar --spring.config.location=classpath:application-kafka.yml
然後,讓我們編譯並開始使用以下命令更新Restaurant Service:
mvn clean install; java -Dapp_port=8082 -jar .\target\spring-cloud-feign-client-
1.0.jar --spring.config.location=classpath:application-kafka.yml
我們準備好了,現在讓我們透過訪問API來測試我們的程式碼片段:
curl -X POST https://:8083/customer/1
這是我們將為此API獲得的輸出:
{
   "id": 1,
   "name": "Dwayne",
   "city": "NY"
}
現在,讓我們檢查Restaurant Service的日誌:
GenericMessage [payload=Customer [id=1, name=Dwayne, city=NY],
headers={kafka_offset=1,...
因此,實際上,您可以看到,使用Kafka Broker,Restaurant Service已收到關於新新增的Customer的通知。
分割槽和消費者組
分割槽和消費者組是使用Spring Cloud Streams時應該瞭解的兩個重要概念。
分割槽 - 它們用於對資料進行分割槽,以便我們可以在多個消費者之間分配工作。
讓我們看看如何在Spring Cloud中對資料進行分割槽。假設,我們希望根據CustomerID對資料進行分割槽。因此,讓我們更新我們的Customer Service以實現相同的功能。為此,我們需要告訴
讓我們更新Customer Service應用程式屬性以指定資料的鍵。
spring:
   application:
      name: customer-service
   cloud:
      function:
         definition: ordersBinding
      stream:
         source: customerBinding-out-0
         kafka:
            binder:
               brokers: localhost:9092
               replicationFactor: 1
         bindings:
            customerBinding-out-0:
               destination: customer
               producer:
                  partitionKeyExpression: 'getPayload().getId()'
                  partitionCount: 3
server:
   port: ${app_port}
eureka:
   client:
      serviceURL:
         defaultZone: https://:8900/eureka
為了指定鍵,即“partitionKeyExpression”,我們提供了Spring表示式語言。該表示式假定型別為GenericMessage<Customer>,因為我們正在訊息中傳送Customer資料。請注意,GenericMessage是Spring框架中用於將有效負載和標頭封裝在單個物件中的類。因此,我們從此訊息中獲取有效負載,該有效負載的型別為Customer,然後我們在customer上呼叫getId()方法。
現在,讓我們也更新我們的消費者,即Restaurant Service,以便在使用請求時記錄更多資訊。
現在,讓我們像往常一樣執行上述程式碼,啟動Eureka Server。請注意,這不是硬性要求,這裡是為了完整性而存在。
然後,讓我們編譯並開始使用以下命令更新Customer Service:
mvn clean install ; java -Dapp_port=8083 -jar .\target\spring-cloud-eurekaclient-
1.0.jar --spring.config.location=classpath:application-kafka.yml
然後,讓我們編譯並開始使用以下命令更新Restaurant Service:
mvn clean install; java -Dapp_port=8082 -jar .\target\spring-cloud-feign-client-
1.0.jar --spring.config.location=classpath:application-kafka.yml
我們準備好了,現在讓我們測試我們的程式碼片段。作為測試的一部分,我們將執行以下操作:
插入ID為1的客戶:curl -X POST https://:8083/customer/1
插入ID為1的客戶:curl -X POST https://:8083/customer/1
插入ID為5的客戶:curl -X POST https://:8083/customer/5
插入ID為3的客戶:curl -X POST https://:8083/customer/3
插入ID為1的客戶:curl -X POST https://:8083/customer/1
我們不太關心API的輸出。相反,我們更關心資料傳送到的分割槽。由於我們使用CustomerID作為鍵,因此我們期望具有相同ID的客戶最終會進入同一分割槽。
現在,讓我們檢查Restaurant Service的日誌:
Consumer: org.apache.kafka.clients.consumer.KafkaConsumer@7d6d8400
Consumer Group: anonymous.9108d02a-b1ee-4a7a-8707-7760581fa323
Partition Id: 1
Customer: Customer [id=1, name=Dwayne, city=NY]
Consumer: org.apache.kafka.clients.consumer.KafkaConsumer@7d6d8400
Consumer Group: anonymous.9108d02a-b1ee-4a7a-8707-7760581fa323
Partition Id: 1
Customer: Customer [id=1, name=Dwayne, city=NY]
Consumer: org.apache.kafka.clients.consumer.KafkaConsumer@7d6d8400
Consumer Group: anonymous.9108d02a-b1ee-4a7a-8707-7760581fa323
Partition Id: 2
Customer: Customer [id=5, name=Dwayne, city=NY]
Consumer: org.apache.kafka.clients.consumer.KafkaConsumer@7d6d8400
Consumer Group: anonymous.9108d02a-b1ee-4a7a-8707-7760581fa323
Partition Id: 0
Customer: Customer [id=3, name=Dwayne, city=NY]
Consumer Group: anonymous.9108d02a-b1ee-4a7a-8707-7760581fa323
Partition Id: 1
Customer: Customer [id=1, name=Dwayne, city=NY]
因此,正如我們所看到的,ID為1的客戶每次都最終進入同一分割槽,即分割槽1。
消費者組 - 消費者組是讀取同一主題以實現相同目的的消費者的邏輯分組。主題中的資料在消費者組中的消費者之間進行分割槽,以便給定消費者組中的只有一個消費者可以讀取主題的分割槽。
要定義消費者組,我們只需在使用Kafka主題名稱的繫結中定義一個組即可。例如,讓我們在應用程式檔案中為我們的控制器定義消費者組名稱。
spring:
   application:
      name: restaurant-service
   cloud:
      function:
         definition: customerBinding
      stream:
         kafka:
            binder:
               brokers: localhost:9092
               replicationFactor: 1
            bindings:
               customerBinding-in-0:
               destination: customer
               group: restController
server:
   port: ${app_port}
eureka:
   client:
      serviceURL:
         defaultZone: https://:8900/eureka
讓我們重新編譯並啟動Restaurant Service。現在,讓我們透過訪問Customer Service上的POST API來生成事件:
插入ID為1的客戶:curl -X POST https://:8083/customer/1
現在,如果我們檢查Restaurant Service的日誌,我們將看到以下內容:
Consumer: org.apache.kafka.clients.consumer.KafkaConsumer@7d6d8400
Consumer Group: restContoller
Partition Id: 1
Customer: Customer [id=1, name=Dwayne, city=NY]
因此,正如我們從輸出中看到的,我們建立了一個名為“rest-contoller”的消費者組,其消費者負責讀取主題。在上述情況下,我們只有一個服務例項正在執行,因此“customer”主題的所有分割槽都被分配給了同一個例項。但是,如果我們有多個分割槽,我們將有多個分割槽分佈在工作程式之間。
使用 ELK 和 Sleuth 實現分散式日誌
簡介
在分散式環境或單體環境中,應用程式日誌對於除錯任何錯誤都至關重要。在本節中,我們將瞭解如何有效地記錄和改進可跟蹤性,以便我們可以輕鬆地檢視日誌。
日誌模式變得至關重要的兩個主要原因:
服務間呼叫 - 在微服務架構中,我們在服務之間進行非同步和同步呼叫。將這些請求連結起來非常關鍵,因為單個請求可能有多個巢狀級別。
服務內呼叫 - 單個服務接收多個請求,並且它們的日誌很容易混合在一起。因此,為請求關聯一些ID對於篩選請求的所有日誌變得很重要。
Sleuth是用於應用程式日誌記錄的知名工具,而ELK用於跨系統進行更簡單的觀察。
依賴項設定
讓我們以我們在每一章中一直在使用的Restaurant為例。因此,假設我們有我們的Customer服務和Restaurant服務透過API進行通訊,即同步通訊。我們希望使用Sleuth來跟蹤請求,並使用ELK堆疊進行集中視覺化。
為此,首先設定ELK堆疊。為此,首先,我們將設定ELK堆疊。我們將使用Docker容器啟動ELK堆疊。以下是我們可以考慮的映象:
完成ELK設定後,請確保它按預期工作,方法是訪問以下API:
Elasticsearch - localhost:9200
Kibana - localhost:5601
我們將在本節末尾檢視Logstash配置檔案。
然後,讓我們將以下依賴項新增到我們的Customer Service和Restaurant Service中:
<dependency>
      <groupId>org.springframework.cloud</groupId>
      <artifactId>spring-cloud-starter-sleuth</artifactId>
</dependency>
現在我們已經設定了依賴項並運行了ELK,讓我們轉到核心示例。
服務內部的請求跟蹤
在最基本的層面上,以下是Sleuth新增的元資料:
服務名稱 - 當前正在處理請求的服務。
跟蹤ID - 一個元資料ID被新增到日誌中,該日誌在服務之間傳送以處理輸入請求。這對於服務間通訊很有用,可以對處理一個輸入請求的所有內部請求進行分組。
跨度ID - 一個元資料ID被新增到日誌中,該日誌在服務為處理請求而記錄的所有日誌語句中都是相同的。它對於服務內日誌很有用。請注意,對於父服務,跨度ID = 跟蹤ID。
讓我們看看它是如何工作的。為此,讓我們更新我們的Customer Service程式碼以包含日誌行。這是我們將使用的控制器程式碼。
package com.tutorialspoint;
import java.util.HashMap;
import org.slf4j.Logger;
import org.slf4j.LoggerFactory;
import org.springframework.beans.factory.annotation.Autowired;
import org.springframework.messaging.Message;
import org.springframework.web.bind.annotation.PathVariable;
import org.springframework.web.bind.annotation.RequestMapping;
import org.springframework.web.bind.annotation.RequestMethod;
import org.springframework.web.bind.annotation.RestController;
@RestController
class RestaurantCustomerInstancesController {
   Logger logger =
LoggerFactory.getLogger(RestaurantCustomerInstancesController.class);
   static HashMap<Long, Customer> mockCustomerData = new HashMap();
   static{
      mockCustomerData.put(1L, new Customer(1, "Jane", "DC"));
      mockCustomerData.put(2L, new Customer(2, "John", "SFO"));
      mockCustomerData.put(3L, new Customer(3, "Kate", "NY"));
   }
   @RequestMapping("/customer/{id}")
   public Customer getCustomerInfo(@PathVariable("id") Long id) {
      logger.info("Querying customer with id: " + id);
      Customer customer = mockCustomerData.get(id);
      if(customer != null) {
         logger.info("Found Customer: " + customer);
      }
      return customer;
   }
}
現在讓我們像往常一樣執行程式碼,啟動Eureka Server。請注意,這不是硬性要求,這裡是為了完整性而存在。
然後,讓我們編譯並開始使用以下命令更新Customer Service:
mvn clean install ; java -Dapp_port=8083 -jar .\target\spring-cloud-eurekaclient-
1.0.jar
我們準備好了,現在讓我們透過訪問API來測試我們的程式碼片段:
curl -X GET https://:8083/customer/1
這是我們將為此API獲得的輸出:
{
   "id": 1,
   "name": "Jane",
   "city": "DC"
}
現在讓我們檢查Customer Service的日誌:
2021-03-23 13:46:59.604 INFO [customerservice,
b63d4d0c733cc675,b63d4d0c733cc675] 11860 --- [nio-8083-exec-7]
.t.RestaurantCustomerInstancesController : Querying customer with id: 1
2021-03-23 13:46:59.605 INFO [customerservice,
b63d4d0c733cc675,b63d4d0c733cc675] 11860 --- [nio-8083-exec-7]
.t.RestaurantCustomerInstancesController : Found Customer: Customer [id=1,
name=Jane, city=DC]
…..
因此,實際上,正如我們所看到的,我們在日誌語句中添加了服務名稱、跟蹤ID和跨度ID。
跨服務的請求跟蹤
讓我們看看如何在服務之間進行日誌記錄和跟蹤。例如,我們將執行的操作是使用Restaurant Service,它在內部呼叫Customer Service。
為此,讓我們更新我們的Restaurant Service程式碼以包含日誌行。這是我們將使用的控制器程式碼。
package com.tutorialspoint;
import java.util.HashMap;
import java.util.List;
import java.util.function.Consumer;
import java.util.function.Supplier;
import java.util.stream.Collectors;
import org.slf4j.Logger;
import org.slf4j.LoggerFactory;
import org.springframework.beans.factory.annotation.Autowired;
import org.springframework.context.annotation.Bean;
import org.springframework.web.bind.annotation.PathVariable;
import org.springframework.web.bind.annotation.RequestMapping;
import org.springframework.web.bind.annotation.RestController;
@RestController
class RestaurantController {
   @Autowired
   CustomerService customerService;
   Logger logger = LoggerFactory.getLogger(RestaurantController.class);
   static HashMap<Long, Restaurant> mockRestaurantData = new HashMap();
   static{
      mockRestaurantData.put(1L, new Restaurant(1, "Pandas", "DC"));
      mockRestaurantData.put(2L, new Restaurant(2, "Indies", "SFO"));
      mockRestaurantData.put(3L, new Restaurant(3, "Little Italy", "DC"));
      mockRestaurantData.put(4L, new Restaurant(4, "Pizeeria", "NY"));
   }
   @RequestMapping("/restaurant/customer/{id}")
   public List<Restaurant> getRestaurantForCustomer(@PathVariable("id") Long id) {
      logger.info("Get Customer from Customer Service with customer id: " + id);
      Customer customer = customerService.getCustomerById(id);
      logger.info("Found following customer: " + customer);
      String customerCity = customer.getCity();
      return mockRestaurantData.entrySet().stream().filter(
      entry -> entry.getValue().getCity().equals(customerCity))
      .map(entry -> entry.getValue())
      .collect(Collectors.toList());
   }
}
讓我們編譯並開始使用以下命令更新Restaurant Service:
mvn clean install; java -Dapp_port=8082 -jar .\target\spring-cloud-feign-client-1.0.jar
確保我們已執行Eureka伺服器和Customer服務。我們準備好了,現在讓我們透過訪問API來測試我們的程式碼片段:
curl -X GET https://:8082/restaurant/customer/2
這是我們將為此API獲得的輸出:
[
   {
      "id": 2,
      "name": "Indies",
      "city": "SFO"
   }
]
現在讓我們檢查Restaurant Service的日誌:
2021-03-23 14:44:29.381 INFO [restaurantservice,
6e0c5b2a4fc533f8,6e0c5b2a4fc533f8] 19600 --- [nio-8082-exec-6]
com.tutorialspoint.RestaurantController : Get Customer from Customer Service
with customer id: 2
2021-03-23 14:44:29.400 INFO [restaurantservice,
6e0c5b2a4fc533f8,6e0c5b2a4fc533f8] 19600 --- [nio-8082-exec-6]
com.tutorialspoint.RestaurantController : Found following customer: Customer
[id=2, name=John, city=SFO]
然後,讓我們檢查Customer Service的日誌:
2021-03-23 14:44:29.392 INFO [customerservice,
6e0c5b2a4fc533f8,f2806826ac76d816] 11860 --- [io-8083-exec-10]
.t.RestaurantCustomerInstancesController : Querying customer with id: 2
2021-03-23 14:44:29.392 INFO [customerservice,
6e0c5b2a4fc533f8,f2806826ac76d816] 11860 --- [io-8083-exec-10]
.t.RestaurantCustomerInstancesController : Found Customer: Customer [id=2,
name=John, city=SFO]…..
因此,實際上,正如我們所看到的,我們在日誌語句中添加了服務名稱、跟蹤ID和跨度ID。此外,我們看到跟蹤ID,即6e0c5b2a4fc533f8在Customer Service和Restaurant Service中重複出現。
使用ELK進行集中式日誌記錄
到目前為止,我們已經看到了一種透過Sleuth改進日誌記錄和跟蹤功能的方法。但是,在微服務架構中,我們有多個服務正在執行,並且每個服務有多個例項正在執行。檢視每個例項的日誌以識別請求流是不切實際的。這就是ELK對我們有幫助的地方。
讓我們使用與我們在Sleuth中相同的服務間通訊案例。讓我們更新我們的Restaurant和Customer以新增logback appender用於ELK堆疊。
在繼續之前,請確保已設定ELK堆疊並且Kibana可在localhost:5601訪問。此外,使用以下設定配置Lostash配置:
input {
   tcp {
      port => 8089
      codec => json
   }
}
output {
   elasticsearch {
      index => "restaurant"
      hosts => ["https://:9200"]
   }
}
完成後,我們需要執行兩個步驟才能在我們的Spring應用程式中使用Logstash。我們將對我們的兩個服務執行以下步驟。首先,新增logback的依賴項以使用Logstash的appender。
<dependency>
<groupId>net.logstash.logback</groupId>
   <artifactId>logstash-logback-encoder</artifactId>
   <version>6.6</version>
</dependency>
其次,為logback新增一個appender,以便logback可以使用此appender將資料傳送到Logstash
<?xml version="1.0" encoding="UTF-8"?>
<configuration>
   <appender name="logStash"
class="net.logstash.logback.appender.LogstashTcpSocketAppender">
      <destination>10.24.220.239:8089</destination>
      <encoder class="net.logstash.logback.encoder.LogstashEncoder" />
   </appender>
   <appender name="console" class="ch.qos.logback.core.ConsoleAppender">
      <encoder>
         <pattern>%d{HH:mm:ss.SSS} [%thread] %-5level %logger{36} -
%msg%n</pattern>
      </encoder>
   </appender>
   <root level="INFO">
      <appender-ref ref="logStash" />
      <appender-ref ref="console" />
   </root>
</configuration>
上述appender將記錄到控制檯,並將日誌傳送到Logstash。現在,完成此操作後,我們就可以測試它了。
現在,讓我們像往常一樣執行上述程式碼,啟動Eureka Server。
然後,讓我們編譯並開始使用以下命令更新Customer Service:
mvn clean install ; java -Dapp_port=8083 -jar .\target\spring-cloud-eurekaclient- 1.0.jar
然後,讓我們編譯並開始使用以下命令更新Restaurant Service:
mvn clean install; java -Dapp_port=8082 -jar .\target\spring-cloud-feign-client- 1.0.jar
我們準備好了,現在讓我們透過訪問API來測試我們的程式碼片段:
curl -X GET https://:8082/restaurant/customer/2
這是我們將為此API獲得的輸出:
[
   {
      "id": 2,
      "name": "Indies",
      "city": "SFO"
   }
]
但更重要的是,日誌語句也將在Kibana上可用。
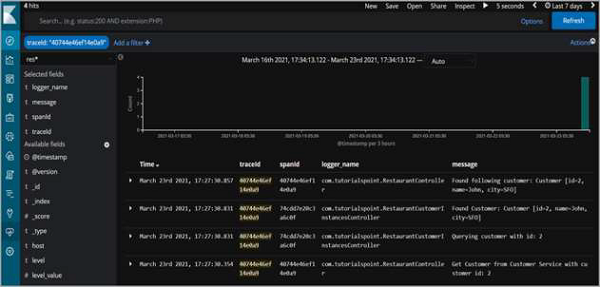
因此,正如我們所看到的,我們可以篩選traceId並檢視跨服務的所有日誌語句,這些語句已記錄以滿足請求。